
Postman을 사용하여 웹훅 시작하기
Postman은 API 작업을 쉽게 수행할 수 있도록 설계된 플랫폼입니다. 이 항목에서는 웹훅에 Postman을 사용하는 방법을 안내합니다.
Postman은 웹훅 구성, 테스트 및 수신을 포함하여 API와 관련된 대부분의 모든 것에 사용할 수 있는 API 플랫폼입니다. 이 항목에서는 웹훅 관련 작업에 대해 Postman을 설정하는 방법을 다룹니다. 웹훅을 사용하면 이벤트가 발생할 때 데이터를 수신할 수 있습니다.
우편배달부 설정
Postman을 사용하려면 Postman 웹 사이트를 사용하거나 Postman 다운로드에 설명된 대로 Postman 응용 프로그램을 다운로드할 수 있습니다.
Postman 계정이 이미 설정되어 있는 경우 Postman API 컬렉션을 사용하여 웹후크 만들기로 건너뜁니다.
- Postman 웹 사이트 또는 애플리케이션에서 Postman에 로그인(또는 계정 만들기)합니다.
- 계정이 생성되면 작업 공간에 액세스할 수 있습니다. 여기에서 API 호출을 저장하고 Mist API와 상호 작용하도록 환경을 구성할 수 있습니다.
환경 생성
postman 환경을 사용하면 여러 API 호출 및 컬렉션에서 재사용할 수 있는 프로필에 변수를 저장할 수 있습니다. Postman에서 API 호출을 시작하기 전에 환경을 만들고 변수를 정의해야 합니다.
변수를 포함하여 Postman 환경이 이미 설정된 경우 Postman API 컬렉션을 사용하여 웹후크 만들기로 건너뜁니다.
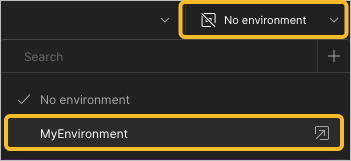
- 페이지의 오른쪽 위 모서리에 있는 환경 드롭다운 메뉴로 이동하여 Postman 작업 영역에 환경을 적용한 다음, 새로 만든 환경을 선택합니다.
Postman API 컬렉션을 사용하여 웹후크 만들기
이제 컬렉션을 Postman으로 설정했으므로 웹훅을 만들 차례입니다. Postman API 컬렉션을 사용하여 이 작업을 수행할 수 있습니다.
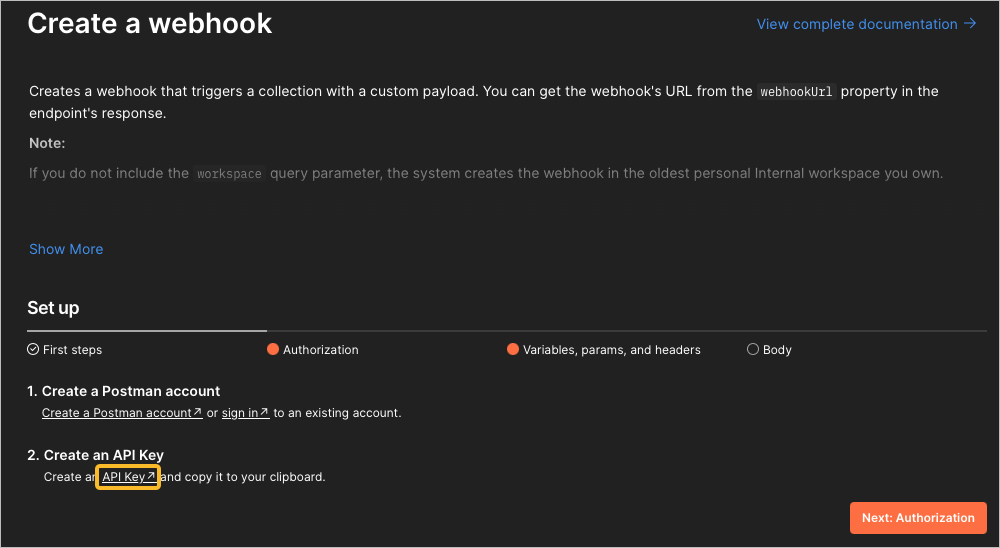
- Postman API 컬렉션을 확장하고 웹후크 > 웹후크 만들기로 이동합니다. 화면에 나타나는 프롬프트를 따릅니다.
- API 키 링크를 클릭하여 API 키를 만듭니다. 그러면 API 키 페이지로 이동합니다. 오른쪽 상단 모서리에 있는 API 키 생성 버튼을 클릭합니다. 생성 시 키를 안전한 곳에 저장합니다.
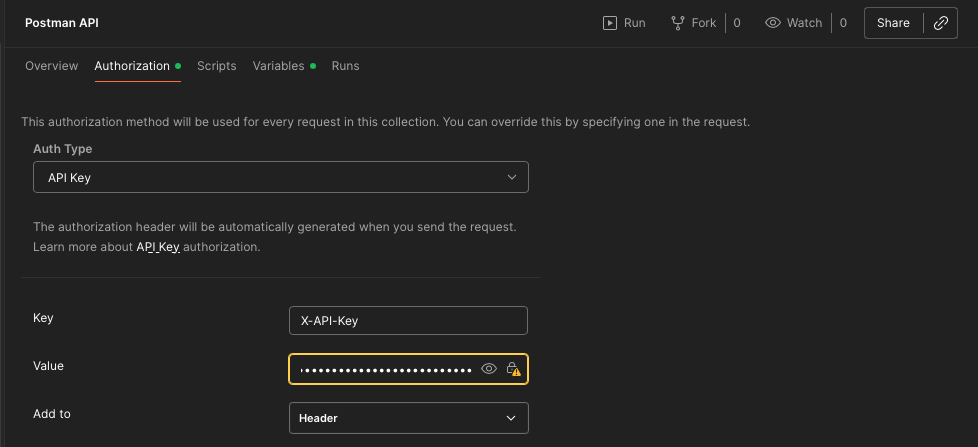
- API 키 정보를 입력하여 인증을 완료합니다. 컬렉션에서 인증 편집 버튼을 클릭합니다. 키를 값 필드에 붙여넣습니다.
- 왼쪽 메뉴에서 Webhooks > Wehook 만들기로 다시 이동합니다. 다음: 변수, 매개 변수 및 헤더를 클릭합니다. 다음 변수를 입력합니다.
workspaceId Postman의 왼쪽 상단 모서리에 있는 작업 공간 이름 위로 마우스를 가져간 다음 창에 나타나는 ID 오른쪽에 있는 복사 버튼을 클릭하여 작업 공간 ID를 얻을 수 있습니다. 웹훅 이름 웹훅에 설명이 포함된 이름을 지정합니다. collectionUid Postman API 컬렉션의 ID가 아닌 컬렉션의 ID를 입력합니다. 이렇게 하려면 개인 컬렉션을 선택한 다음 화면 오른쪽 라이딩에 있는 정보 아이콘을 클릭한 다음 ID 필드에서 ID를 복사합니다. 그렇지 않으면 웹훅을 보낼 때 오류가 발생할 400 Bad Request수 있습니다.environmentUid 환경으로 이동하여 환경 ID를 찾은 다음 화면 오른쪽에 있는 정보 아이콘을 클릭합니다. ID 필드에서 ID를 복사합니다. 베이스 URL 요청에 대한 API 엔드포인트입니다. https://api.getpostman.com는 기본적으로 기본 URL입니다.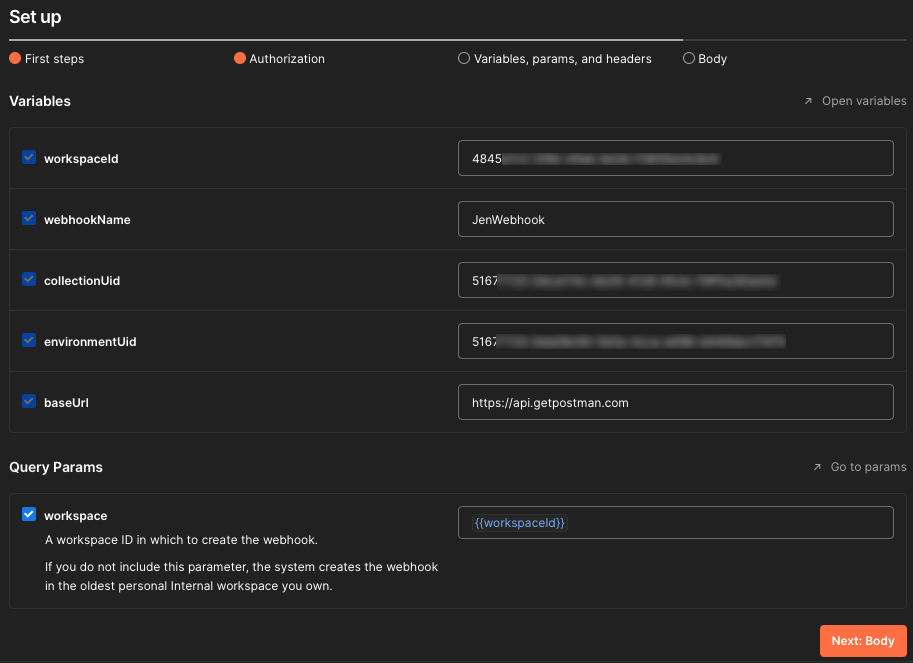
- API 키 링크를 클릭하여 API 키를 만듭니다. 그러면 API 키 페이지로 이동합니다. 오른쪽 상단 모서리에 있는 API 키 생성 버튼을 클릭합니다. 생성 시 키를 안전한 곳에 저장합니다.
- 보내기를 선택하여 웹후크를 요청합니다.
요청이 성공했음을 나타내는 응답 코드를 받아야
200 OK합니다.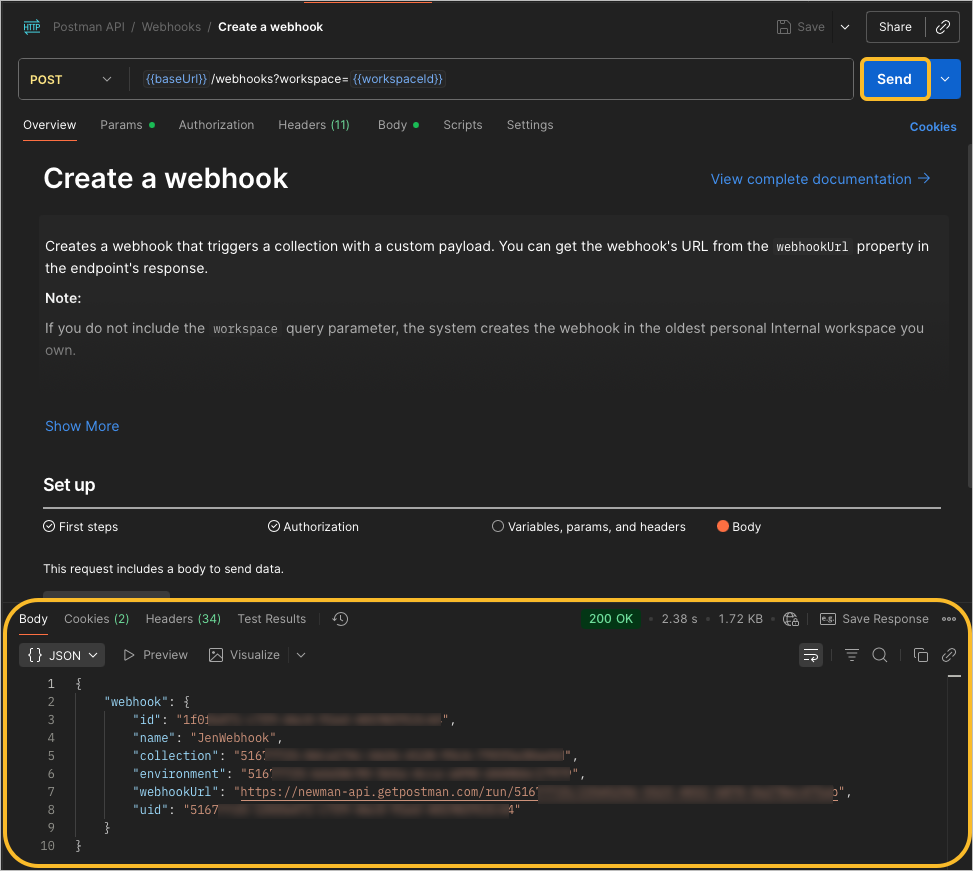
응답을 받지 못한 경우 Postman의 왼쪽 하단 모서리에 있는 콘솔 단추를 선택하여 보낸 요청과 받은 응답에 대한 자세한 정보를 수집합니다. HTML 응답 코드를 연구하여 응답을 받은 이유를 이해하십시오. 다음은 몇 가지 예제 오류 코드입니다.
-
Error 404- 이는 엔드포인트 URL이 존재하지 않음을 의미합니다. 변수가 올바르게 구성되었는지 확인합니다{{host}}. 예를 들어 URL에 추가/항목을 추가하면 응답 코드가 발생합니다Error 404. -
Error 401- 이는 API 호출을 보낼 권한이 없음을 의미합니다. Mist API의 응답을 검토하여 제대로 설정되지 않은 사항을 파악합니다. 변수가 올바르게 구성되었는지 확인합니다{{apitoken}}.
HTML 응답 코드에 대한 자세한 내용은 REST API HTTP 응답 코드를 참조하십시오.
-
선택적으로 Mist API 컬렉션 가져오기
주니퍼 Mist에는 Postman 작업 공간으로 직접 가져올 수 있는 Postman API 호출 목록이 있습니다. 이 목록은 유지 관리되며 API 문서에 나열된 것과 일치합니다.
- 주니퍼 Mist Postman 컬렉션 페이지로 이동하여 Mist Systems의 공개 작업 공간 컬렉션을 선택합니다.
- 컬렉션이 열리면 Postman의 포크 컬렉션 및 환경에 설명된 대로 포크를 클릭합니다. 이렇게 하면 사용자 고유의 작업 영역에 컬렉션의 복사본을 만들고 기본 컬렉션이 업데이트될 때 업데이트를 계속 받을 수 있습니다.
- Postman의 왼쪽 상단 모서리에 컬렉션이 이제 작업 공간으로 분기된 것을 볼 수 있습니다. 컬렉션과 해당 하위 섹션을 확장하여 API 호출이 어떻게 구성되는지 확인합니다.
Postman에서 웹훅을 사용하는 방법(비디오)
Let's learn how to create a Postman webhook. The first thing you'll need is a collection to run. I'm using this collection here called Postman API Webhook Demo.
I also have the components that I'll need to create the webhook and call it, but it's not important that these elements be in the same collection you're trying to run. Let's start by creating the webhook. This endpoint is provided by the Postman API.
There's some information that you'll need and you can read the documentation to find all those elements. But I'm going to be sending a post call with this body that includes a webhook name and a collection ID. The collection ID is for the collection I want to run, which is actually this same collection containing this request.
Let's hit send, and if we get a 200 OK, we can see that we get a webhook URL. This is the URL that you'll hit to call your webhook. When I hit send, I'm looking under the tests tab.
I actually wrote a little bit of code to set a webhook URL programmatically so that I don't have to copy that URL to my clipboard. Now we can move on to this next call, a post to call the webhook. Going to that webhook URL that we just created.
And I'm going to send a payload, which is a JSON object that says, ahoy, matey. And when I send it, I'm going to be calling the webhook, triggering this collection run. Let's hit send.
And it's 200 OK. Well, how do I know that it's really OK? A Postman webhook behind the scenes is actually a monitor. So if we go to the monitors, we can see that I created a webhook called hooky.
And here is that run. And if I select this collection run and scroll down, I can see this is the collection that ran. In fact, just one request called echo the payload.
If I want to drill down deeper, I can tab over to console, and I can see that I have some console statements where I'm saying hello from the pre-request script and hello from the test script. Let's take a look at what I actually ran by calling my webhook. Return a collections.
The thing that I was running was this request here called echo the payload. This is just Postman's echo service echoing back what I give it. And if I go under the pre-request script, you can see that I'm able to access the payload sent through that webhook using globals.previous request.
And here's that log statement from the pre-request script. And the reason why the entire collection didn't run, if you can guess, I'll go to the tests tab, is because I terminated the request using Postman set next request. So in this instance, I only ran the very first request in this collection using my webhook.