Mist Cloudへのスイッチのオンボード
新しいスイッチを申請するか、以前に導入したスイッチを組織に採用するには、以下の手順に従ってください。スイッチがすでにMistクラウドにオンボーディングされている場合は、これらの手順を無視してください。
Wired アシュアランスは、Junosフレックスイメージをサポートしていません。互換性を確保するため、スイッチが標準(非フレックス)Junosイメージを実行していることを確認してください。スイッチをアップグレードする場合は、標準のJunosイメージのみが導入されるようにするMistクラウド経由で行うことをお勧めします。
ジュニパー Mist クラウドを通じてスイッチを構成および管理するには、スイッチを組織にオンボーディングする必要があります。
グリーンフィールドまたはブラウンフィールドスイッチをMistにオンボーディングできます。
-
グリーンフィールド—新しいクラウド対応スイッチ。クラウド対応デバイスのシャーシにはQRコードまたはクレームコードが記載されており、それをスキャンしてジュニパーのMistポータルでデバイスをすばやくオンボーディングできます。
-
ブラウンフィールド—クラウド対応ではないが、Mistでサポートされている既存のインサービス(ブラウンフィールド)スイッチ。これらのスイッチにはQRコードが添付されていません。クラウド対応ではないが、Mistでまだサポートされているデバイスの場合、デバイスをオンボーディング(採用)するには、スイッチでローカルにいくつかのJunos CLIコマンドを入力する必要があります。
ジュニパースイッチは、SSH接続(TCPポート2200) を使用して、テレメトリアップデートをジュニパーMistクラウドに送信します。ジュニパー Mistポータルからは、ブラウンフィールドスイッチを採用する場合や、公共サイトメニューからスイッチへのリモートシェルを開く場合にもSSHが使用されます。さらに、スイッチ設定ページの追加の CLI コマンドセクションにカスタム CLI 設定を含めると、これらのコマンドは SSH 経由でスイッチにプッシュされます。
サービス拒否攻撃やその他の SSH の悪用の可能性を未然に防ぐために、スイッチ上の接続ごとの接続数やセッションの上限を設定できます。ジュニパー EX および QFX シリーズ スイッチの場合、 ssh max-sessions-per-connection のデフォルト値は 10 です。以下のような Junos コマンドを発行することで、これを変更できます。
[edit system services ssh] set connection-limit <number>
スイッチオンボーディングの前提条件
スイッチをオンボーディングする前に:
-
Wired アシュアランスサブスクリプションと、ジュニパー Mistポータルへのログイン資格情報があることを確認します。Mistの使用を開始するには、「クイックスタート:Mist」の手順に従ってください。
-
必要なスイッチ管理者ロールが自分に割り当てられていることを確認します。詳細については、 スイッチ管理者のロール要件を参照してください。
-
スイッチがMist Wired アシュアランスでサポートされていることを確認します。サポートされているスイッチモデルとソフトウェアバージョンについては、 有線ネットワークのハードウェアおよびソフトウェア要件を参照してください。
-
スイッチがDNSサーバー(NTPサーバーも推奨)に接続されており、インターネット経由でジュニパーMistクラウドアーキテクチャに接続できることを確認します。
-
クラウドとスイッチの間にファイアウォールがある場合は、TCPポート2200からスイッチの管理ポートへのアウトバウンドアクセスを許可します。
グリーンフィールドスイッチのオンボード
コンピューターを使用して1つ以上のグリーンフィールド、クラウド対応スイッチ、または携帯電話を使用して単一のスイッチをオンボーディングできます。単一のスイッチをMistクラウドにオンボーディングする最も簡単な方法は、Mist AIモバイルアプリを使用することです。複数のクラウド対応スイッチを一緒にオンボーディングするには、ジュニパー Mistポータルを使用し、発注書にリンクされたアクティベーションコードを入力します。
グリーンフィールドスイッチをオンボーディングするには、 クイックスタート:Mistを使用したクラウド対応EXおよびQFXスイッチの手順に従ってください。
簡単なデモについては、次のビデオをご覧ください。
Onboarding a Greenfield CloudReady EX switch is simple. In your inventory page, find the Switches tab. Click on Claim Switches.
Type in your switch's unique claim code, which can be found near the QR code at the front of the switch. Alternatively, you can also enter an activation code, which pulls all your newly purchased Juniper hardware from one order, rather than adding individual switch codes. Add and check for your desired settings, such as site assignment and configuration management.
Click Claim, and the switch has been added to the site. The EX3400 has been added. In the site view, you should see the switch appropriately assigned.
Notice that red indicates the switch is offline, but will turn green once it comes online. The switch is cloud-managed and accounted for as part of the health metrics above.
ブラウンフィールドスイッチのオンボード
スイッチ を導入 オプションを使用して、クラウド対応ではないか、QRコードを持たないブラウンフィールドスイッチをオンボーディングします。ブラウンフィールドスイッチを導入すると、Mistに管理してもらうことができます(推奨)、既存の構成はすべてMistコンソールで行った設定に置き換えられます。または、Mistにスイッチを管理 させないこと も選択できます。その場合は、既存の構成はそのままで、さらにクラウドとテレメトリに接続するための新しい設定が適用されます。アンマネージドスイッチは一意であり、Mistコンソールで行われた設定は適用されず、テンプレートやサイト変数の使用、またはマネージドデバイスで利用できるその他の便利な機能の恩恵を受けることもありません。さらに、スイッチで行われた後続の設定はMistに「認識」されないため、CLIに警告メッセージを設定して、それがMist環境の一部であることを示すか、設定変更が競合しないように設定変更できるユーザーを制限することができます。
Mistがスイッチを管理する場合、つまりオンボーディング時に Mistで設定を管理 オプションを選択した場合は、スイッチを採用する前に必ず既存のJunos OS設定をバックアップしてください。これを行うには、スイッチに接続し、CLIにログオンし、Junosで request system configuration rescue save コマンドを実行して、現在アクティブな設定とインストール固有のパラメーターを保存します。
ハードウェアでMistクレームコードが使用される前のvJunosスイッチやレガシーデバイスなどの仮想デバイスについては、クレームするのではなく、採用する必要があります。VM が以前に Global02 などの 1 つの環境で要求された場合、別の環境または組織のインベントリまたはインストール ベースからは利用できない可能性があることに注意してください (これは、MACアドレスが元の環境にまだアタッチされている可能性があるためです)。デバイスを元の環境から解放するか、仮想デバイスを再作成する必要があります。これにより、新しい仮想MACが生成されます。
以下の手順では、ジュニパー Mistポータルと、Junos OS CLIを使用してスイッチの設定を変更します。両方の環境にログインできることを確認してください。
管理対象外のスイッチは、Mist クラウドとの接続を維持するために、引き続きMistから設定を受信します。これらには、効率的な統計収集のためのシステム スクリプトと拡張機能、デバイス上の効率的なログ記録のためのシステム syslog 設定、クラウド通信用の「mist」という名前のユーザー アカウントが含まれます。
ブラウンフィールドスイッチをMistクラウドにオンボーディングするには:
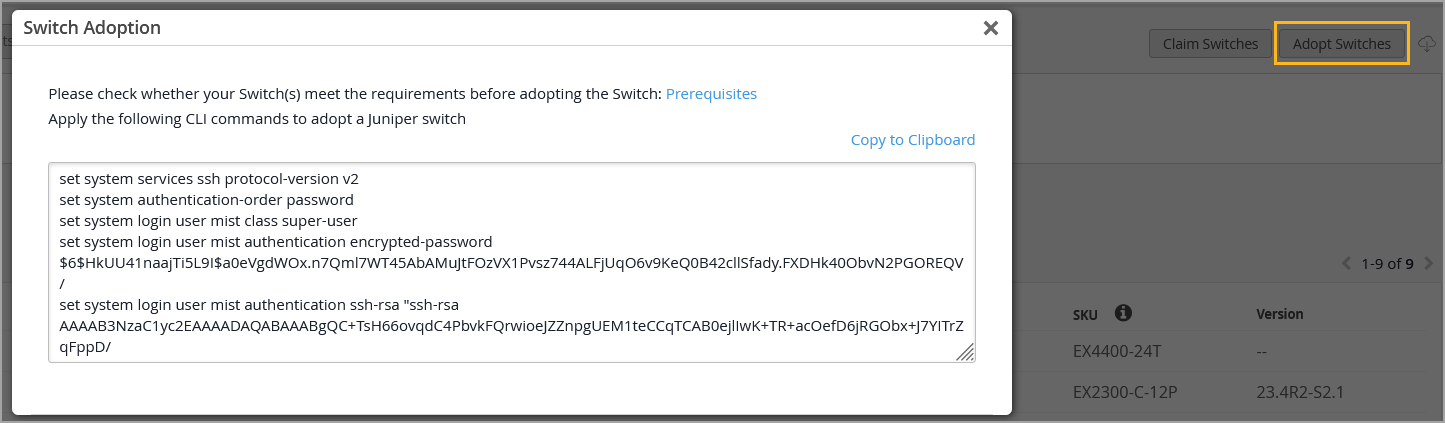
- 表示されるページの上部でスイッチを選択し、右上隅にあるスイッチを採用ボタンをクリックして、相互運用性に必要なJunos OS CLIコマンドを生成します。コマンドは、ジュニパー Mist ユーザー アカウントを作成し、TCP ポート 2200 を介してジュニパー Mist クラウドへの SSH 接続を作成します(スイッチ接続は管理インターフェイスから開始され、設定の設定とテレメトリ データの送信に使用されます)。
簡単なデモについては、次のビデオをご覧ください。
Adopting switches for brownfield environments only takes a few steps. In Organization, look for the Inventory tab and toggle to Switches. Click on Adopt Switches.
This brings up a clipboard of CLI commands to copy and paste into the console of a switch. Put in the config and commit it in the switch. Ensure that TCP port 2200 is open to the internet.
This allows for the switch to communicate with the Juniper Mist cloud. Check that it is connected properly by entering Show System Connection to see an established TCP session. Going back to the dashboard, you can see the EX switch online and fully cloud-managed.
Templates will also be inherited when you enable Configuration Management. Don't forget to save. Now you're good to go.
Adopting an EX switch to the Juniper Mist cloud from a brownfield environment is a straightforward process. Now you have the power and simplicity of a cloud-managed solution for your EX switches.