Postman を使用して Webhook の使用を開始する
Postman は、API を簡単に操作できるように設計されたプラットフォームです。このトピックでは、Webhook に Postman を使用する方法について説明します。
Postmanは、Webhookの設定、テスト、受信など、APIに関連するほとんどすべてのことに使用できるAPIプラットフォームです。このトピックでは、Webhook 関連のタスク用に Postman を設定する方法について説明します。Webhookを使用すると、イベントが発生したときにデータを受信できます。
郵便配達員の設定
Postman を使用するには、 Postman Web サイト を使用するか、「 Postman のダウンロード」の説明に従って Postman アプリケーションをダウンロードします。
Postman アカウントをすでに設定している場合は、「 Postman API コレクションを使用して Webhook を作成する」に進んでください。
- Postman の Web サイトまたはアプリケーションから Postman にサインインします (またはアカウントを作成します)。
- アカウントが作成されると、ワークスペースにアクセスできるようになります。ここでAPI呼び出しを保存し、Mist APIと対話するように環境を構成できます。
環境の作成
postman 環境では、複数の API 呼び出しとコレクションで再利用できるプロファイルに変数を格納できます。Postman で API 呼び出しを開始する前に、環境を作成し、変数を定義する必要があります。
変数を含む Postman 環境が既に設定されている場合は、「 Postman API コレクションを使用して Webhook を作成する」に進んでください。
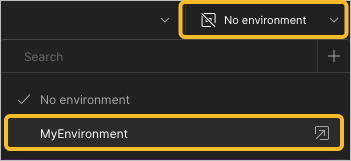
- ページの右上隅にある 環境 ドロップダウン メニューに移動して、環境を Postman ワークスペースに適用し、新しく作成した環境を選択します。
Postman API コレクションを使用した Webhook の作成
Postman コレクションを設定したので、Webhook を作成します。Postman API コレクションを使用すると、これを行うことができます。
- Postman APIコレクションを展開し、Webhooks>Webhookの作成に移動します。画面のプロンプトに従ってください。
- APIキーリンクをクリックして、APIキーを作成します。APIキーページに移動します。右上隅にあるAPIキーを生成ボタンをクリックします。キーの作成時に安全な場所に保管してください。
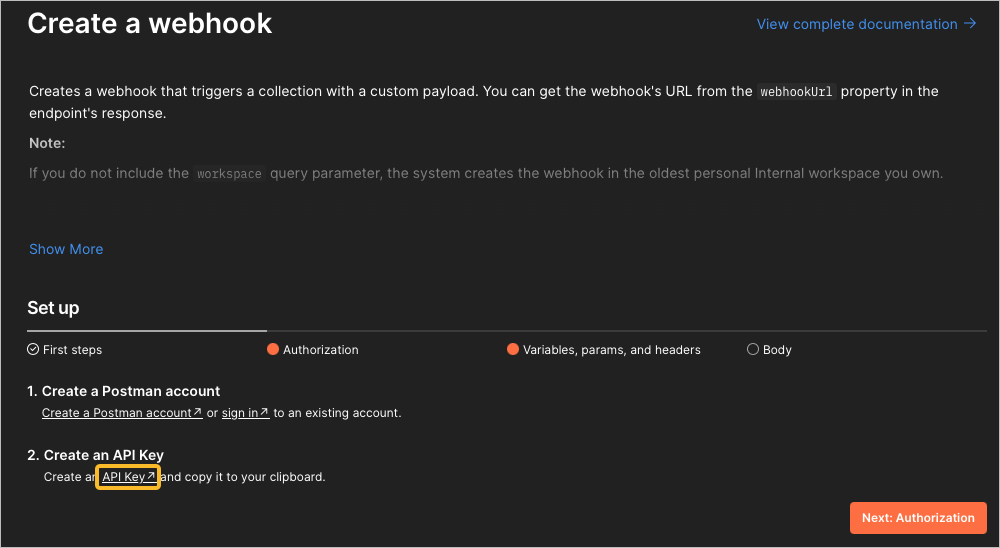
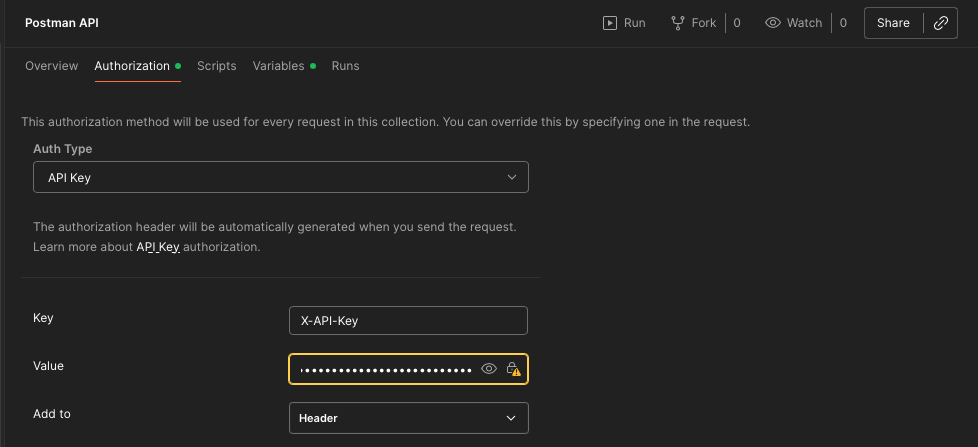
- APIキー情報を入力して認証を完了します。コレクションで認証を編集ボタンをクリックします。キーを値フィールドに貼り付けます。
- 左側のメニューから、[Webhooks] > [Create a wehook] に戻ります。[次へ: 変数、パラメーター、およびヘッダー] をクリックします。以下の変数を入力します。
workspaceId ワークスペースIDを取得するには、Postmanの左上隅にあるワークスペース名にカーソルを合わせ、ウィンドウに表示されるIDの右側にあるコピーボタンをクリックします。 webhookName Webhookにわかりやすい名前を付けます。 collectionUid コレクションの ID を入力します (Postman API コレクションの ID ではありません)。これを行うには、個人コレクションを選択し、画面の右側にある「情報」アイコンをクリックし、「ID」フィールドからIDをコピーします。そうしないと、Webhookの送信時に 400 Bad Requestエラーが発生する可能性があります。環境Uid 環境IDを確認するには、環境に移動し、画面の右側にある情報アイコンをクリックします。IDフィールドからIDをコピーします。 baseUrl リクエストのAPIエンドポイント。 https://api.getpostman.comはデフォルトでのベースURLです。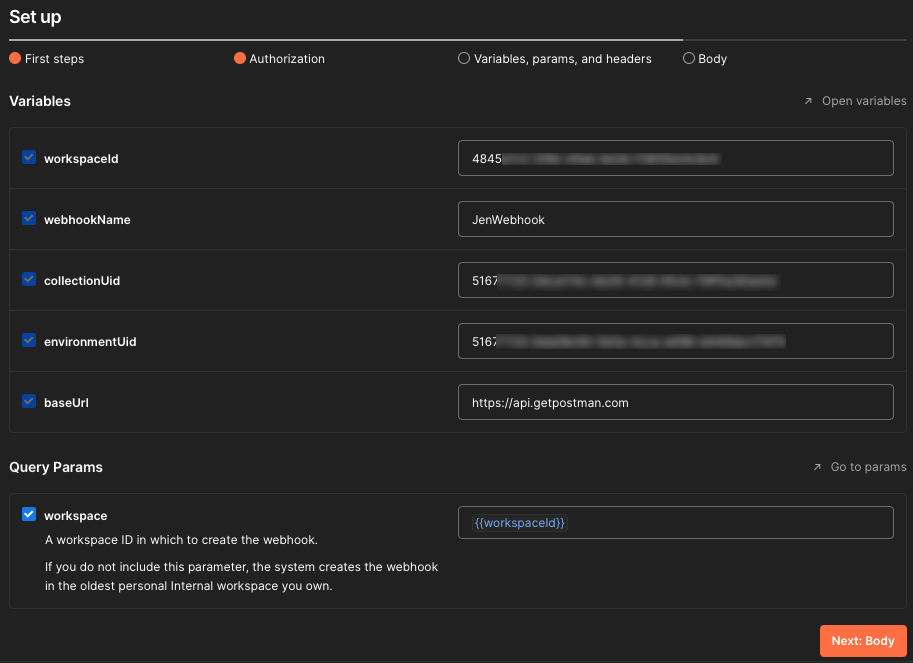
- APIキーリンクをクリックして、APIキーを作成します。APIキーページに移動します。右上隅にあるAPIキーを生成ボタンをクリックします。キーの作成時に安全な場所に保管してください。
- 送信を選択して、Webhookをリクエストします。
要求が成功したことを示す
200 OK応答コードが返されるはずです。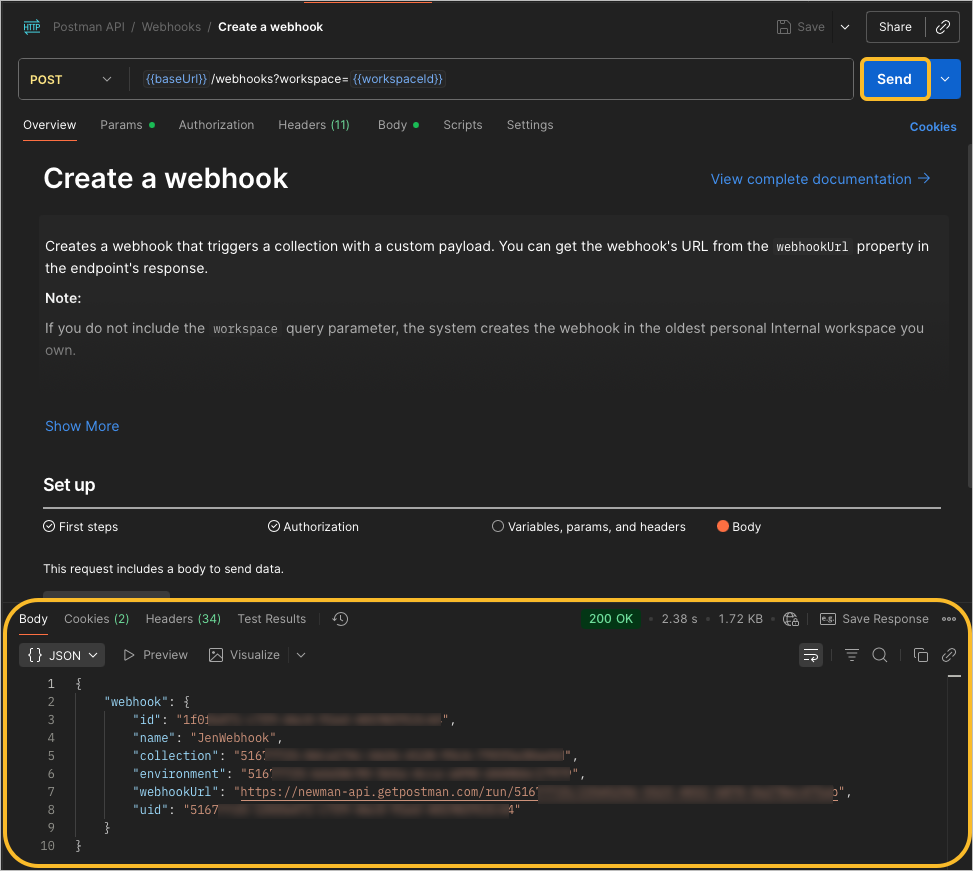
応答を受信 しなかった 場合は、Postman の左下隅にある [コンソール] ボタンを選択して、送信した要求と受信した応答に関する詳細情報を収集します。HTML 応答コードを調べて、応答を受け取った理由を理解します。エラーコードの例をいくつか示します。
-
Error 404—これは、エンドポイントURLが存在しないことを意味します。{{host}}変数が正しく設定されていることを検証します。たとえば、URLに/を追加すると、Error 404応答コードが作成されます。 -
Error 401—これは、APIコールを送信する権限がないことを意味します。Mist APIの応答を確認して、正しく設定されていないものを理解します。{{apitoken}}変数が正しく設定されていることを検証します。
HTML 応答コードの詳細については、「 REST API HTTP 応答コード」を参照してください。
-
オプションでMist APIコレクションをインポートします
ジュニパー Mist には、Postman ワークスペースに直接インポートできる Postman API 呼び出しのリストがあります。このリストは維持され、APIドキュメントに記載されているものと一致します。
- ジュニパー Mist Postman コレクション ページに移動し、Mist Systems のパブリック ワークスペース コレクションを選択します。
- コレクションが開いたら、「Postman のフォーク コレクションと環境」で説明されているように [フォーク] をクリックします。これにより、独自のワークスペースにコレクションのコピーを作成し、メイン コレクションが更新されたときに更新を受け取ることができます。
- Postman の左上隅に、コレクションがワークスペースにフォークされていることがわかります。コレクションとそのサブセクションを展開して、API 呼び出しがどのように構成されているかを確認します。
Postman で Webhook を使用する方法(ビデオ)
Let's learn how to create a Postman webhook. The first thing you'll need is a collection to run. I'm using this collection here called Postman API Webhook Demo.
I also have the components that I'll need to create the webhook and call it, but it's not important that these elements be in the same collection you're trying to run. Let's start by creating the webhook. This endpoint is provided by the Postman API.
There's some information that you'll need and you can read the documentation to find all those elements. But I'm going to be sending a post call with this body that includes a webhook name and a collection ID. The collection ID is for the collection I want to run, which is actually this same collection containing this request.
Let's hit send, and if we get a 200 OK, we can see that we get a webhook URL. This is the URL that you'll hit to call your webhook. When I hit send, I'm looking under the tests tab.
I actually wrote a little bit of code to set a webhook URL programmatically so that I don't have to copy that URL to my clipboard. Now we can move on to this next call, a post to call the webhook. Going to that webhook URL that we just created.
And I'm going to send a payload, which is a JSON object that says, ahoy, matey. And when I send it, I'm going to be calling the webhook, triggering this collection run. Let's hit send.
And it's 200 OK. Well, how do I know that it's really OK? A Postman webhook behind the scenes is actually a monitor. So if we go to the monitors, we can see that I created a webhook called hooky.
And here is that run. And if I select this collection run and scroll down, I can see this is the collection that ran. In fact, just one request called echo the payload.
If I want to drill down deeper, I can tab over to console, and I can see that I have some console statements where I'm saying hello from the pre-request script and hello from the test script. Let's take a look at what I actually ran by calling my webhook. Return a collections.
The thing that I was running was this request here called echo the payload. This is just Postman's echo service echoing back what I give it. And if I go under the pre-request script, you can see that I'm able to access the payload sent through that webhook using globals.previous request.
And here's that log statement from the pre-request script. And the reason why the entire collection didn't run, if you can guess, I'll go to the tests tab, is because I terminated the request using Postman set next request. So in this instance, I only ran the very first request in this collection using my webhook.