BGPのTCPアクセス制限
TCPを使用したBGPのセキュリティオプションについて
ルーティングプロトコルの中でも、BGPはトランスポートプロトコルとしてTCPを使用するという点でユニークです。BGPピアは、ポート179でTCPセッションを作成するために、ルーティングデバイス間の手動設定によって確立されます。BGP対応デバイスは、接続を維持するためにキープアライブメッセージを定期的に送信します。
時が経つにつれて、BGPはインターネット上で主要なドメイン間ルーティングプロトコルになりました。ただし、安定性とセキュリティの保証は限られています。BGPのセキュリティオプションを設定するには、適切なセキュリティ対策と許容可能なコストのバランスを取る必要があります。他の方法よりも優れている方法はありません。各ネットワーク管理者は、使用されているネットワークのニーズを満たすセキュリティ対策を設定する必要があります。
BGPによるトランスポートプロトコルとしてのTCPの使用に関連するセキュリティ問題の詳細については、RFC 4272、 BGPセキュリティ脆弱性分析を参照してください。
関連項目
例:指定されたBGPピア以外のポートへのTCPアクセスをブロックするフィルターの設定
この例では、指定されたBGPピアを除くすべてのリクエスターからのポート 179へのすべてのTCP接続試行をブロックする標準ステートレスファイアウォールフィルターを設定する方法を示します。
要件
この例を設定する前に、デバイスの初期化以外の特別な設定は必要ありません。
概要
この例では、指定された BGP ピアを除くすべてのリクエスターからのポート 179 へのすべての TCP 接続試行をブロックするステートレス BGP ファイアウォール フィルターを作成します。
ステートレスファイアウォールフィルター filter_bgp179 は、デバイスAとデバイスBに直接接続されたインターフェイスから宛先ポート番号 179までのすべてのパケットを照合します。
トポロジー
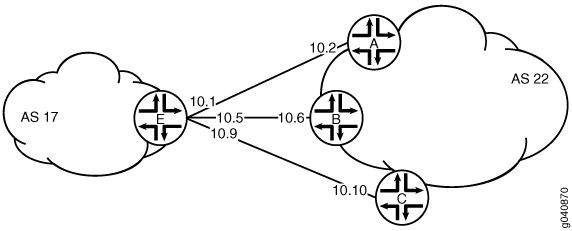
図1 は、この例で使用されているトポロジーを示しています。デバイス C はデバイス E への TCP 接続を試みますが、デバイス E は接続の試みをブロックします。この例では、デバイス E の設定を示しています。
設定
CLIクイックコンフィグレーション
この例をすばやく設定するには、以下のコマンドをコピーしてテキストファイルに貼り付け、改行を削除して、ネットワーク構成に合わせて必要な詳細を変更し、[ edit] 階層レベルのCLIにコマンドをコピー&ペーストします。
デバイスC
set interfaces ge-1/2/0 unit 10 description to-E
set interfaces ge-1/2/0 unit 10 family inet address 10.10.10.10/30
set protocols bgp group external-peers type external
set protocols bgp group external-peers peer-as 17
set protocols bgp group external-peers neighbor 10.10.10.9
set routing-options autonomous-system 22
デバイスE
set interfaces ge-1/2/0 unit 0 description to-A
set interfaces ge-1/2/0 unit 0 family inet address 10.10.10.1/30
set interfaces ge-1/2/1 unit 5 description to-B
set interfaces ge-1/2/1 unit 5 family inet address 10.10.10.5/30
set interfaces ge-1/0/0 unit 9 description to-C
set interfaces ge-1/0/0 unit 9 family inet address 10.10.10.9/30
set interfaces lo0 unit 2 family inet filter input filter_bgp179
set interfaces lo0 unit 2 family inet address 192.168.0.1/32
set protocols bgp group external-peers type external
set protocols bgp group external-peers peer-as 22
set protocols bgp group external-peers neighbor 10.10.10.2
set protocols bgp group external-peers neighbor 10.10.10.6
set protocols bgp group external-peers neighbor 10.10.10.10
set routing-options autonomous-system 17
set firewall family inet filter filter_bgp179 term 1 from source-address 10.10.10.2/32
set firewall family inet filter filter_bgp179 term 1 from source-address 10.10.10.6/32
set firewall family inet filter filter_bgp179 term 1 from destination-port bgp
set firewall family inet filter filter_bgp179 term 1 then accept
set firewall family inet filter filter_bgp179 term 2 then reject
デバイスEの設定
ステップバイステップの手順
次の例では、設定階層内のさまざまなレベルに移動する必要があります。CLIのナビゲーションについては、『Junos OS CLIユーザーガイド』の「設定モードでのCLIエディターの使用」を参照してください。
指定された BGP ピアを除くすべてのリクエスターからのポート 179 へのすべての TCP 接続試行をブロックするステートレス ファイアウォール フィルターを使用してデバイス E を設定するBGP には、以下を行います。
-
インターフェイスを設定します。
user@E# set interfaces ge-1/2/0 unit 0 description to-A
user@E# set interfaces ge-1/2/0 unit 0 family inet address 10.10.10.1/30
user@E# set interfaces ge-1/2/1 unit 5 description to-B
user@E# set interfaces ge-1/2/1 unit 5 family inet address 10.10.10.5/30
user@E# set interfaces ge-1/0/0 unit 9 description to-C
user@E# set interfaces ge-1/0/0 unit 9 family inet address 10.10.10.9/30
-
BGPを設定します。
[edit protocols bgp group external-peers]
user@E# set type external
user@E# set peer-as 22
user@E# set neighbor 10.10.10.2
user@E# set neighbor 10.10.10.6
user@E# set neighbor 10.10.10.10
-
自律システム番号を設定します。
[edit routing-options]
user@E# set autonomous-system 17
-
指定されたBGPピアからポート 179へのTCP接続試行を受け入れるフィルター条件を定義します。
[edit firewall family inet filter filter_bgp179]
user@E# set term 1 from source-address 10.10.10.2/32
user@E# set term 1 from source-address 10.10.10.6/32
user@E# set term 1 from destination-port bgp
user@E# set term 1 then accept
-
他のフィルター条件を定義して、他の送信元からのパケットを拒否します。
[edit firewall family inet filter filter_bgp179]
user@E# set term 2 then reject
-
ファイアウォールフィルターをループバックインターフェイスに適用します。
[edit interfaces lo0 unit 2 family inet]
user@E# set filter input filter_bgp179
user@E# set address 192.168.0.1/32
結果
設定モードから、 show firewall、 show interfaces、 show protocols、 show routing-options コマンドを入力して設定を確認します。出力に意図した設定が表示されない場合は、この例の手順を繰り返して設定を修正します。
user@E# show firewall
family inet {
    filter filter_bgp179 {
        term 1 {
            from {
                source-address {
                    10.10.10.2/32;
                    10.10.10.6/32;
                }
                destination-port bgp;
            }
            then accept;
        }
        term 2 {
            then {
                reject;
            }
        }
    }
}
user@E# show interfaces
lo0 {
    unit 2 {
        family inet {
            filter {
                input filter_bgp179;
            }
            address 192.168.0.1/32;
        }
    }
}
ge-1/2/0 {
    unit 0 {
        description to-A;
        family inet {
            address 10.10.10.1/30;
        }
    }
}
ge-1/2/1 {
    unit 5 {
        description to-B;
        family inet {
            address 10.10.10.5/30;
        }
    }
}
ge-1/0/0 {
    unit 9 {
        description to-C;
        family inet {
            address 10.10.10.9/30;
        }
    }
}
user@E# show protocols
bgp {
    group external-peers {
        type external;
        peer-as 22;
        neighbor 10.10.10.2;
        neighbor 10.10.10.6;
        neighbor 10.10.10.10;
    }
}
user@E# show routing-options
autonomous-system 17;
デバイスの設定が完了したら、設定モードから コミット を入力します。
検証
設定が正常に機能していることを確認します。
フィルターが設定されていることの確認
目的
show firewall filterコマンドの出力にフィルターが表示されていることを確認します。
アクション
user@E> show firewall filter filter_bgp179
Filter: filter_bgp179
TCP接続の検証
目的
TCP接続を確認します。
アクション
動作モードから、デバイス Cとデバイス Eで show system connections extensive コマンドを実行します。
デバイスCの出力は、TCP接続の確立の試みを示しています。デバイス E の出力は、デバイス A とデバイス B のみとの接続が確立されていることを示しています。
user@C> show system connections extensive | match 10.10.10

tcp4       0      0  10.10.10.9.51872     10.10.10.10.179       SYN_SENT
user@E> show system connections extensive | match 10.10.10

tcp4       0      0  10.10.10.5.179        10.10.10.6.62096     ESTABLISHED
tcp4       0      0  10.10.10.6.62096      10.10.10.5.179       ESTABLISHED
tcp4       0      0  10.10.10.1.179        10.10.10.2.61506     ESTABLISHED
tcp4       0      0  10.10.10.2.61506      10.10.10.1.179       ESTABLISHED
インターフェイス上のトラフィックの監視
目的
monitor traffic コマンドを使用して、TCP接続を確立したインターフェイス上のトラフィックと、TCP接続を確立していないインターフェイス上のトラフィックを比較します。
アクション
動作モードから、機器 E のインターフェイスから機器 B に、デバイス E のインターフェイスで機器 C に monitor traffic コマンドを実行します。次のサンプル出力は、最初の例で確認応答(ACK)メッセージを受信したことを確認します。2 番目の例では、 ack メッセージは受信されません。
user@E> monitor traffic size 1500 interface ge-1/2/1.5
19:02:49.700912 Out IP 10.10.10.5.bgp > 10.10.10.6.62096: P 3330573561:3330573580(19) ack 915601686 win 16384 <nop,nop,timestamp 1869518816 1869504850>: BGP, length: 19
19:02:49.801244  In IP 10.10.10.6.62096 > 10.10.10.5.bgp: . ack 19 win 16384 <nop,nop,timestamp 1869518916 1869518816>
19:03:03.323018  In IP 10.10.10.6.62096 > 10.10.10.5.bgp: P 1:20(19) ack 19 win 16384 <nop,nop,timestamp 1869532439 1869518816>: BGP, length: 19
19:03:03.422418 Out IP 10.10.10.5.bgp > 10.10.10.6.62096: . ack 20 win 16384 <nop,nop,timestamp 1869532539 1869532439>
19:03:17.220162 Out IP 10.10.10.5.bgp > 10.10.10.6.62096: P 19:38(19) ack 20 win 16384 <nop,nop,timestamp 1869546338 1869532439>: BGP, length: 19
19:03:17.320501  In IP 10.10.10.6.62096 > 10.10.10.5.bgp: . ack 38 win 16384 <nop,nop,timestamp 1869546438 1869546338>
user@E> monitor traffic size 1500 interface ge-1/0/0.9

18:54:20.175471 Out IP 10.10.10.9.61335 > 10.10.10.10.bgp: S 573929123:573929123(0) win 16384 <mss 1460,nop,wscale 0,nop,nop,timestamp 1869009240 0,sackOK,eol>
18:54:23.174422 Out IP 10.10.10.9.61335 > 10.10.10.10.bgp: S 573929123:573929123(0) win 16384 <mss 1460,nop,wscale 0,nop,nop,timestamp 1869012240 0,sackOK,eol>
18:54:26.374118 Out IP 10.10.10.9.61335 > 10.10.10.10.bgp: S 573929123:573929123(0) win 16384 <mss 1460,nop,wscale 0,nop,nop,timestamp 1869015440 0,sackOK,eol>
18:54:29.573799 Out IP 10.10.10.9.61335 > 10.10.10.10.bgp: S 573929123:573929123(0) win 16384 <mss 1460,sackOK,eol>
18:54:32.773493 Out IP 10.10.10.9.61335 > 10.10.10.10.bgp: S 573929123:573929123(0) win 16384 <mss 1460,sackOK,eol>
18:54:35.973185 Out IP 10.10.10.9.61335 > 10.10.10.10.bgp: S 573929123:573929123(0) win 16384 <mss 1460,sackOK,eol>
例:プレフィックスリストに基づいてポートへのTCPアクセスを制限するフィルターの設定
この例では、許可されたBGPピアを含むプレフィックスソースのリストを指定することで、ルーティングエンジンを宛先とする特定のTCPおよびインターネット制御メッセージプロトコル(ICMP)トラフィックを制限する標準的なステートレスファイアウォールフィルターを設定する方法を示しています。
要件
この例を設定する前に、デバイスの初期化以外の特別な設定を行う必要はありません。
概要
この例では、指定されたプレフィックスを持つBGPピアを除くすべてのリクエスターからのポート 179へのすべてのTCP接続試行をブロックするステートレスBGPファイアウォールフィルターを作成します。
トポロジー
許可されたBGPピアを含む送信元プレフィックスのリストを指定するソースプレフィックスリスト plist_bgp179が作成されます。
ステートレスファイアウォールフィルターは、送信元プレフィックスリストplist_bgp179から宛先ポート番号 179までのすべてのパケットをfilter_bgp179一致させます。
設定
CLIクイックコンフィグレーション
この例をすばやく設定するには、以下のコマンドをコピーしてテキストファイルに貼り付け、改行を削除して、ネットワーク構成に合わせて必要な詳細を変更し、[ edit] 階層レベルのCLIにコマンドをコピー&ペーストします。
set policy-options prefix-list plist_bgp179 apply-path "protocols bgp group <*> neighbor <*>"
set firewall family inet filter filter_bgp179 term 1 from source-address 0.0.0.0/0
set firewall family inet filter filter_bgp179 term 1 from source-prefix-list plist_bgp179 except
set firewall family inet filter filter_bgp179 term 1 from destination-port bgp
set firewall family inet filter filter_bgp179 term 1 then reject
set firewall family inet filter filter_bgp179 term 2 then accept
set interfaces lo0 unit 0 family inet filter input filter_bgp179
set interfaces lo0 unit 0 family inet address 127.0.0.1/32
フィルターを設定する
ステップバイステップの手順
次の例では、設定階層内のさまざまなレベルに移動する必要があります。CLIのナビゲーションについては、『Junos OS CLIユーザーガイド』の「構成モードでのCLIエディターの使用」を参照してください。
フィルターを設定するには:
-
プレフィックスリスト bgp179 を展開して、 プロトコルbgpグループ<*>ネイバー<*>で定義されたBGPピアグループが指すすべてのプレフィックスを含めます。
[edit policy-options prefix-list plist_bgp179]
user@host# set apply-path " protocols bgp group <*> neighbor <*>"
-
指定されたBGPピアを除くすべてのリクエスターからのポート 179へのTCP接続試行を拒否するフィルター条件を定義します。
[edit firewall family inet filter filter_bgp179]
user@host# set term term1 from source-address 0.0.0.0/0
user@host# set term term1 from source-prefix-list bgp179 except
user@host# set term term1 from destination-port bgp
user@host# set term term1 then reject
-
すべてのパケットを受け入れるようにもう一方のフィルター条件を定義します。
[edit firewall family inet filter filter_bgp179]
user@host# set term term2 then accept
-
ファイアウォールフィルターをループバックインターフェイスに適用します。
[edit interfaces lo0 unit 0 family inet]
user@host# set filter input filter_bgp179
user@host# set address 127.0.0.1/32
結果
設定モードから、 show firewall、 show interfaces、 show policy-options コマンドを入力して設定を確認します。出力に意図した設定が表示されない場合は、この例の手順を繰り返して設定を修正します。
user@host# show firewall
family inet {
    filter filter_bgp179 {
        term 1 {
            from {
                source-address {
                    0.0.0.0/0;
                }
                source-prefix-list {
                    plist_bgp179 except;
                }
                destination-port bgp;
            }
            then {
                reject;
            }
        }
        term 2 {
            then {
                accept;
            }
        }
    }
}
user@host# show interfaces
lo0 {
    unit 0 {
        family inet {
            filter {
                input filter_bgp179;
            }
            address 127.0.0.1/32;
        }
    }
}
user@host# show policy-options
prefix-list plist_bgp179 {
    apply-path "protocols bgp group <*> neighbor <*>";
}
デバイスの設定が完了したら、設定モードから コミット を入力します。
検証
設定が正常に機能していることを確認します。
ループバックインターフェイスに適用されるファイアウォールフィルターの表示
目的
ファイアウォールフィルター filter_bgp179 が、論理インターフェイス lo0.0のIPv4入力トラフィックに適用されていることを確認します。
アクション
論理インターフェイスlo0.0にはshow interfaces statistics operational modeコマンドを使用し、detailオプションを含めます。コマンド出力セクションのProtocol inetセクションの下にあるInput Filtersフィールドには、入力方向の論理インターフェイスに適用されたステートレスファイアウォールフィルターの名前が表示されます。
[edit]
user@host> show interfaces statistics lo0.0 detail
  Logical interface lo0.0 (Index 321) (SNMP ifIndex 16) (Generation 130)
    Flags: SNMP-Traps Encapsulation: Unspecified
    Traffic statistics:
     Input  bytes  :                    0
     Output bytes  :                    0
     Input  packets:                    0
     Output packets:                    0
    Local statistics:
     Input  bytes  :                    0
     Output bytes  :                    0
     Input  packets:                    0
     Output packets:                    0
    Transit statistics:
     Input  bytes  :                    0                    0 bps
     Output bytes  :                    0                    0 bps
     Input  packets:                    0                    0 pps
     Output packets:                    0                    0 pps
    Protocol inet, MTU: Unlimited, Generation: 145, Route table: 0
      Flags: Sendbcast-pkt-to-re
      Input Filters: filter_bgp179
      Addresses, Flags: Primary
        Destination: Unspecified, Local: 127.0.0.1, Broadcast: Unspecified, Generation: 138
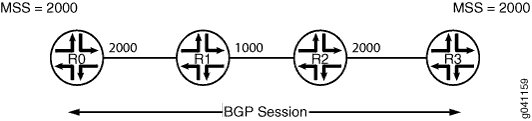
例:BGP の TCP セグメントサイズの制限
この例では、最大送信単位(MTU)検出を使用している場合にTCPセグメントサイズを制限することで、インターネット制御メッセージプロトコル(ICMP)の脆弱性の問題を回避する方法を示しています。TCPパスでMTU検出を使用することは、BGPパケットのフラグメント化を回避する方法の1つです。
要件
この例を設定する前に、デバイスの初期化以外の特別な設定は必要ありません。
概要
TCPは、2つのピア間のセッション接続確立中に最大セグメントサイズ(MSS)値をネゴシエートします。ネゴシエートされたMSS値は、主に通信ピアが直接接続されているインターフェイスの最大送信単位(MTU)に基づいています。ただし、TCPパケットが取るパスのリンクMTUにばらつきがあるため、パケットサイズがリンクのMTUを超えると、MSS値の範囲内にあるネットワーク内の一部のパケットがフラグメント化される可能性があります。
TCP MSS値を設定するには、セグメントサイズが1〜4096の tcp-mss ステートメントを含めます。
ルーターがSYNビットとMSSオプションが設定されたTCPパケットを受信し、パケットで指定されたMSSオプションが tcp-mss ステートメントで指定されたMSS値よりも大きい場合、ルーターはパケット内のMSS値を tcp-mss ステートメントで指定された小さい値に置き換えます。
設定されたMSS値は、送信者の最大セグメントサイズとして使用されます。前提として、送信者が BGP ネイバーと通信するために使用する TCP MSS 値は、送信者が BGP ネイバーから受け入れることができる TCP BGP MSS 値と同じであると仮定しています。BGPネイバーからのMSS値が設定されたMSS値よりも小さい場合、BGPネイバーからのMSS値が送信者の最大セグメントサイズとして使用されます。
mtu-discovery ステートメントのない間接ネイバーの場合、デフォルトの MSS 値は 512 です。mtu-discoveryステートメントの詳細については、https://www.juniper.net/documentation/us/en/software/junos/cli-reference/topics/ref/statement/mtu-discovery-edit-protocols-bgp.html#id-13368402__d674375e146 を参照してください。
この機能は、TCP over IPv4およびTCP over IPv6でサポートされています。
設定
CLIクイックコンフィグレーション
この例をすばやく設定するには、以下のコマンドをコピーしてテキスト ファイルに貼り付け、改行を削除して、ネットワーク構成に合わせて必要な詳細を変更し、 [edit] 階層レベルのCLIにコマンドをコピー アンド ペーストします。
R0
set interfaces fe-1/2/0 unit 1 family inet address 1.1.0.1/30
set interfaces lo0 unit 1 family inet address 10.255.14.179/32
set protocols bgp group-int tcp-mss 2020
set protocols bgp group int type internal
set protocols bgp group int local-address 10.255.14.179
set protocols bgp group int mtu-discovery
set protocols bgp group int neighbor 10.255.71.24 tcp-mss 2000
set protocols bgp group int neighbor 10.255.14.177
set protocols bgp group int neighbor 10.0.14.4 tcp-mss 4000
set protocols ospf area 0.0.0.0 interface fe-1/2/0.1
set protocols ospf area 0.0.0.0 interface 10.255.14.179
set routing-options autonomous-system 65000
手順
ステップバイステップの手順
次の例では、設定階層内のさまざまなレベルに移動する必要があります。CLIのナビゲーションについては、『Junos OS CLIユーザーガイド』の「構成モードでのCLIエディターの使用」を参照してください。
ルーターR0を設定するには:
-
インターフェイスを設定します。
[edit interfaces]
user@R0# set fe-1/2/0 unit 1 family inet address 1.1.0.1/30
user@R0# set lo0 unit 1 family inet address 10.255.14.179/32
-
この例では、内部ゲートウェイプロトコル(IGP)、OSPFを設定します。
[edit protocols ospf area 0.0.0.0]
user@R0# set interface fe-1/2/0.1
user@R0# set interface 10.255.14.179
-
1つ以上のBGPグループを設定します。
[edit protocols bgp group int]
user@R0# set type internal
user@R0# set local-address 10.255.14.179
-
パケットのフラグメント化を防止するために、MTU検出を設定します。
[edit protocols bgp group int]
user@R0# set mtu-discovery
-
BGPネイバーを設定し、TCP MSSをグループに対してグローバルに、またはさまざまなネイバーに対して設定します。
[edit protocols bgo group int]
user@R0# set tcp-mss 2020
user@R0# set neighbor 10.255.14.177
user@R0# set neighbor 10.255.71.24 tcp-mss 2000
user@R0# set neighbor 10.0.14.4 tcp-mss 4000
注:TCP MSSネイバー設定は、グループ設定よりも優先されます。
-
ローカルの自律システムを設定します。
[edit routing-options]
user@R0# set autonomous-system 65000
結果
設定モードから、 show interfaces、 show protocols、 show routing-options コマンドを入力して設定を確認します。出力に意図した設定が表示されない場合は、この例の手順を繰り返して設定を修正します。
user@R0# show interfaces
fe-1/2/0 {
    unit 1 {
        family inet {
            address 1.1.0.1/30;
        }
    }
}
lo0 {
    unit 1 {
        family inet {
            address 10.255.14.179/32;
        }
    }
}
user@R0# show protocols
bgp {
    group int {
        type internal;
        local-address 10.255.14.179;
        mtu-discovery;
        tcp-mss 2020;
        neighbor 10.255.71.24 {
            tcp-mss 2000;
        }
        neighbor 10.255.14.177;
        neighbor 10.0.14.4 {
            tcp-mss 4000;
        }
    }
}
ospf {
    area 0.0.0.0 {
        interface fe-1/2/0.1;
        interface 10.255.14.179;
    }
}
user@R0# show routing-options
autonomous-system 65000;
デバイスの設定が完了したら、設定モードから commit を入力します。
検証
設定が正常に機能していることを確認するには、以下のコマンドを実行します。
-
show system connections extensive | find <neighbor-address>をクリックして、ネゴシエートされたTCP MSS値を確認します。 -
monitor traffic interfaceは、BGPトラフィックを監視し、設定されたTCP MSS値がTCP SYNパケットのMSSオプションとして使用されていることを確認します。
トラブルシューティング
MTU検出によるMSS計算
問題点
2つのルーティングデバイス(R1およびR2)が内部BGP(IBGP)接続を持っている例を考えてみましょう。どちらのルーターでも、接続されたインターフェイスのIPv4 MTUは4034です。
user@R1# show protocols bgp | display set
[edit]
set protocols bgp group ibgp type internal
set protocols bgp group ibgp local-address 45.45.45.2
set protocols bgp group ibgp mtu-discovery
set protocols bgp group ibgp neighbor 45.45.45.1
user@R1# run show interfaces xe-0/0/3 extensive | match mtu

  Link-level type: Ethernet, MTU: 4048, LAN-PHY mode, Speed: 10Gbps,
    FIFO errors: 0, HS link CRC errors: 0, MTU errors: 0, Resource errors: 0
    Protocol inet, MTU: 4034, Generation: 180, Route table: 0
    Protocol multiservice, MTU: Unlimited, Generation: 181, Route table: 0
デバイスR1の以下のパケットキャプチャでは、ネゴシエートされたMSSは3994です。MSSの show system connections extensive 情報では、2048に設定されています。
05:50:01.575218 Out
        Juniper PCAP Flags [Ext], PCAP Extension(s) total length 16
          Device Media Type Extension TLV #3, length 1, value: Ethernet (1)
          Logical Interface Encapsulation Extension TLV #6, length 1, value: Ethernet (14)
          Device Interface Index Extension TLV #1, length 2, value: 137
          Logical Interface Index Extension TLV #4, length 4, value: 69
        -----original packet-----
        00:21:59:e1:e8:03 > 00:19:e2:20:79:01, ethertype IPv4 (0x0800), length 78: (tos 0xc0, ttl 64, id 53193, offset 0, flags [DF], proto: TCP (6), length: 64) 45.45.45.2.62840 > 45.45.45.1.bgp: S 2939345813:2939345813(0) win 16384 **mss 3994,nop,wscale 0,nop,nop,timestamp 70559970 0,sackOK,eol>
05:50:01.575875 In
        Juniper PCAP Flags [Ext, no-L2, In], PCAP Extension(s) total length 16
          Device Media Type Extension TLV #3, length 1, value: Ethernet (1)
          Logical Interface Encapsulation Extension TLV #6, length 1, value: Ethernet (14)
          Device Interface Index Extension TLV #1, length 2, value: 137
          Logical Interface Index Extension TLV #4, length 4, value: 69
        -----original packet-----
		PFE proto 2 (ipv4): (tos 0xc0, ttl 255, id 37709, offset 0, flags [DF], proto: TCP (6), length: 64) 45.45.45.1.bgp > 45.45.45.2.62840: S 2634967984:2634967984(0) ack 2939345814 win 16384 **mss 3994,nop,wscale 0,nop,nop,timestamp 174167273 70559970,sackOK,eol>
user@R1# run show system connections extensive | find 45.45

tcp4       0      0  45.45.45.2.62840                              45.45.45.1.179                                ESTABLISHED
   sndsbcc:          0 sndsbmbcnt:          0  sndsbmbmax:     131072
sndsblowat:       2048 sndsbhiwat:      16384
   rcvsbcc:          0 rcvsbmbcnt:          0  rcvsbmbmax:     131072
rcvsblowat:          1 rcvsbhiwat:      16384
   proc id:      19725  proc name:        rpd
       iss: 2939345813      sndup: 2939345972
    snduna: 2939345991     sndnxt: 2939345991      sndwnd:      16384
    sndmax: 2939345991    sndcwnd:      10240 sndssthresh: 1073725440
       irs: 2634967984      rcvup: 2634968162
    rcvnxt: 2634968162     rcvadv: 2634984546      rcvwnd:      16384
       rtt:          0       srtt:       1538        rttv:       1040
    rxtcur:       1200   rxtshift:          0       rtseq: 2939345972
    rttmin:       1000  mss:        2048
ソリューション
これはJunos OSで予期される動作です。MSS値は、MTU値からIPまたはIPv6およびTCPヘッダーを引いたものに等しくなります。これは、MSS値が通常、MTU(IPv4の場合)より40バイト小さく、MTU(IPv6の場合)より60バイト小さいことを意味します。この値はピア間でネゴシエートされます。この例では、4034 - 40 = 3994です。その後、Junos OS はこの値を 2 KB の倍数に丸めます。値は 3994 / 2048 * 2048=2048 です。したがって、 show system connections 出力でと同じMSS値を確認する必要はありません。
3994 / 2048 = 1.95
1.95は1に四捨五入されます。
1 * 2048 = 2048