为 SRX 防火墙用户配置身份验证方法
了解如何配置直通身份验证和强制门户身份验证。
示例:配置直通身份验证
此示例说明如何配置直通身份验证来对防火墙用户进行身份验证。防火墙用户是在通过防火墙发起连接时必须提供用户名和密码的网络用户。
直通身份验证允许 SRX 系列管理员限制尝试使用 FTP、Telnet、HTTP 或 HTTPS 访问其他区域中的资源的用户。如果流量与作为直通身份验证的安全策略匹配,则需要用户提供登录信息。
对于 HTTPS,为确保安全性,HTTPS 默认证书密钥大小为 2048 位。如果未指定证书大小,则假定为默认大小。
要求
开始之前,定义防火墙用户。请参阅防火墙用户身份验证概述。
此示例使用以下硬件和软件组件:
-
SRX 系列防火墙
-
防火墙用户系统
-
数据包目标系统
概述
当客户端(称为防火墙用户)尝试启动 FTP、Telnet 或 HTTP 会话以访问其他区域中的资源时,将触发直通身份验证过程。SRX 系列防火墙充当 FTP、Telnet、HTTP 或 HTTPS 服务器的代理,以便在允许用户访问防火墙后面的实际 FTP、Telnet 或 HTTP 服务器之前,对防火墙用户进行身份验证。
如果防火墙用户发送的连接请求生成的流量与某安全策略规则双向匹配,并且该规则将直通防火墙身份验证指定为其子句的作 then ,则 SRX 系列防火墙将要求防火墙用户向 Junos OS 代理服务器进行身份验证。
如果身份验证成功,则来自同一源 IP 地址的后续流量与安全策略元组匹配时,将自动允许这些流量通过 SRX 系列防火墙。
图 1 显示了此示例中使用的拓扑。
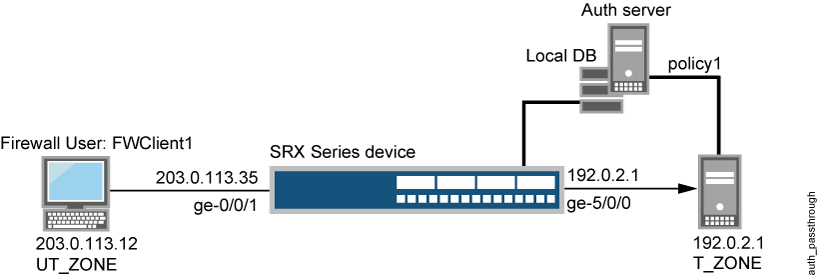
尽管拓扑显示了外部服务器的使用情况,但配置中没有涵盖它。这超出了此示例的范围。
配置
程序
CLI 快速配置
要快速配置此示例,请将以下命令复制到文本文件中,删除所有换行符,更改详细信息,以便与网络配置匹配,将命令复制并粘贴到层级的 CLI 中,然后从配置模式进入 commit 。
                  set interfaces ge-0/0/1 unit 0 family inet address 203.0.113.35/24

                  set interfaces ge-5/0/0 unit 0 family inet address 192.0.2.1/24

                  set access profile FWAUTH client FWClient1 firewall-user password password


                  set access firewall-authentication pass-through default-profile FWAUTH

                  set access firewall-authentication pass-through telnet banner success "WELCOME TO JUNIPER TELNET SESSION"

                  set security zones security-zone UT-ZONE host-inbound-traffic system-services all

                  set security zones security-zone UT-ZONE interfaces ge-0/0/1.0 host-inbound-traffic protocols all

                  set security zones security-zone T-ZONE host-inbound-traffic system-services all

                  set security zones security-zone T-ZONE interfaces ge-5/0/0.0 host-inbound-traffic protocols all

                  set security policies from-zone UT-ZONE to-zone T-ZONE policy P1 match source-address any

                  set security policies from-zone UT-ZONE to-zone T-ZONE policy P1 match destination-address any

                  set security policies from-zone UT-ZONE to-zone T-ZONE policy P1 match application junos-telnet

                  set security policies from-zone UT-ZONE to-zone T-ZONE policy P1 then permit firewall-authentication pass-through client-match FWClient1
分步过程
下面的示例要求您在各个配置层级中进行导航。有关作说明,请参阅 在配置模式下使用 CLI 编辑器。
要配置直通身份验证,请执行以下作:
-
配置两个接口并为其分配 IP 地址。
注意:在此示例中,可以选择为接口分配两个地址。
[edit] user@host# set interfaces ge-0/0/1 unit 0 family inet address 203.0.113.35/24 user@host# set interfaces ge-5/0/0 unit 0 family inet address 192.0.2.1/24 -
为 FWClient1 用户创建 FWAUTH 访问配置文件,指定用户的密码,并为 Telnet 会话定义成功横幅。
[edit access] user@host# set access profile FWAUTH client FWClient1 firewall-user password pwd user@host# set firewall-authentication pass-through default-profile FWAUTH user@host# set firewall-authentication pass-through telnet banner success "WELCOME TO JUNIPER TELNET SESSION" -
配置安全区域。
注意:在此示例中,可以选择为安全区域配置第二个接口。
[edit security zones] user@host# set security-zone UT-ZONE host-inbound-traffic system-services all user@host# set security-zone UT-ZONE interfaces ge-0/0/1.0 host-inbound-traffic protocols all user@host# set security-zone T-ZONE host-inbound-traffic system-services all user@host# set security-zone T-ZONE interfaces ge-5/0/0.0 host-inbound-traffic protocols all -
将安全策略 P1 分配给安全区域。
[edit security policies] user@host# set from-zone UT-ZONE to-zone T-ZONE policy P1 match source-address any user@host# set from-zone UT-ZONE to-zone T-ZONE policy P1 match destination-address any user@host# set from-zone UT-ZONE to-zone T-ZONE policy P1 match application junos-telnet user@host# set from-zone UT-ZONE to-zone T-ZONE policy P1 then permit firewall-authentication pass-through client-match FWClient1 -
使用 Telnet 向 host2 验证 FWClient1 防火墙用户的身份。
                        user@FWClient1# run telnet 192.0.2.1/24

                        Trying 192.0.2.1/24...

                        Connected to 192.0.2.1/24

                        Escape character is '^]'.

                        Firewall User Authentication

                        Username: FWClient1

                        Password:$ABC123

                                  WELCOME TO JUNIPER TELNET SESSION

                        Host1 (ttyp0)

                        login: user

                        Password: $ABC123

                        --- JUNOS 10.1R1.1 built 2009-10-12 13:30:18 UTC

                        %
结果
在配置模式下,输入以下命令以确认您的配置。
-
show interfaces -
show access -
show security zones -
show security policies
如果输出未显示预期的配置,请重复此示例中的配置说明,以便进行更正。
为简洁起见,输出仅包含与此示例相关的配置。系统上的任何其他配置都已替换为省略号 (...)。
user@host# show interfaces
    ge-0/0/1 {
        unit 0 {
            family inet {
                address 203.0.113.35;
            }
        }
    }
    ge-5/0/0 {
        unit 0 {
            family inet {
                address 192.0.2.1/24;
            }
        }
    }
...
user@host# show access
    profile FWAUTH {
        authentication-order password;
        client FWClient1 {
            firewall-user {
                password "$ABC123"; ## SECRET-DATA
            }
        }
    }
    firewall-authentication {
        pass-through {
            default-profile FWAUTH;
            telnet {
                banner {
                    success "WELCOME TO JUNIPER TELNET SESSION";
                }
            }
        }
    }
user@host# show security zones
    security-zone UT-ZONE {
        host-inbound-traffic {
            system-services {
                all;
            }
        }
            interfaces {
                ge-0/0/1.0 {
                    host-inbound-traffic {
                        protocols {
                            all;
                        }
                    }
                }
            }
            security-zone T-ZONE {
                host-inbound-traffic {
                    system-services {
                        all;
                    }
                }
                interfaces {
                    ge-5/0/0.0 {
                        host-inbound-traffic {
                            protocols {
                                all;
                            }
                        }
                    }
                }
            }
user@host# show security policies
...
from-zone UT-ZONE to-zone T-ZONE {
    policy P1 {
        match {
            source-address any;
            destination-address any;
            application junos-telnet;
        }
        then {
            permit {
                firewall-authentication {
                    pass-through {
                        client-match FWClient1;
                    }
                }
            }
        }
    }
}
如果完成设备配置,请从配置模式进入提交。
验证
要确认配置工作正常,请执行以下任务:
验证防火墙用户身份验证并监控身份验证表中的用户和 IP 地址
目的
显示防火墙认证用户历史记录,验证成功认证的防火墙用户数和登录失败的防火墙用户数。
行动
在作模式下,输入以下 show 命令:
user@host> show security firewall-authentication history
History of firewall authentication data:
Authentications: 2
Id Source Ip Date Time Duration Status User
1 203.0.113.12 2010-10-12 21:24:02 0:00:24 Failed FWClient1
2 203.0.113.12 2010-10-12 21:24:48 0:00:22 Success FWClient1
user@host> show security firewall-authentication history identifier 1
Username: FWClient1
Source IP: 203.0.113.12
Authentication state: Success
Authentication method: Pass-through using Telnet
Access start date: 2010-10-12
Access start time: 21:24:02
Duration of user access: 0:00:24
Source zone: UT-ZONE
Destination zone: T-ZONE
Access profile: FWAUTH
Bytes sent by this user: 0
Bytes received by this user: 2660
user@host> show security firewall-authentication users
Firewall authentication data:
Total users in table: 1
Id Source Ip Src zone Dst zone Profile Age Status User
4 203.0.113.12     UT-ZONE  T-ZONE   FWAUTH     1 Success   FWClient1
user@host> show security firewall-authentication users identifier 3
Username: FWClient1
Source IP: 203.0.113.12
Authentication state: Success
Authentication method: Pass-through using Telnet
Age: 3
Access time remaining: 9
Source zone: UT-ZONE
Destination zone: T-ZONE
Access profile: FWAUTH
Interface Name: ge-0/0/1.0
Bytes sent by this user: 0
Bytes received by this user: 1521
示例:配置 HTTPS 流量以触发直通身份验证
此示例说明如何配置 HTTPS 流量以触发直通身份验证。HTTPS比HTTP更安全,因此它变得更加流行,使用范围更广。
要求
此示例使用以下硬件和软件组件:
-
SRX 系列防火墙
-
两台运行 Linux 和 Open SSL 的 PC。一台 PC 充当客户端,另一台充当 HTTPS 服务器。这两台 PC 用于创建密钥文件和发送流量。
-
Junos OS 12.1X44-D10 或更高版本(适用于 SRX5400、SRX5600 和 SRX5800 防火墙)以及 Junos OS 版本 15.1X49-D40 或更高版本(适用于 vSRX 虚拟防火墙、SRX300、SRX320、SRX340、SRX345、SRX380、SRX550M 和 SRX1500 防火墙)。
从 Junos OS 版本 12.1X44-D10 和 Junos OS 版本 17.3R1 开始,在 SRX5400、SRX5600 和 SRX5800 防火墙上引入了基于 HTTPS 的身份验证。
从 Junos OS 15.1X49-D40 版和 Junos OS 17.3R1 版开始,可在 vSRX 虚拟防火墙、SRX300、SRX320、SRX340、SRX345、SRX380、SRX550M 和 SRX1500 防火墙上引入基于 HTTPS 的身份验证。
开始之前:
SRX 系列防火墙必须解码 HTTPS 流量才能触发直通身份验证。然后,SSL 终止代理创建并安装私钥文件和认证文件。以下列表介绍了创建和安装私钥文件和证书密钥文件的步骤。
如果您有正式 的 .crt 文件和 .key 文件,则可以直接在 SRX 系列 防火墙上上传和安装文件。如果您没有 .crt 文件和 .key 文件,请按照过程创建和安装文件。步骤 1 和步骤 2 中指定的说明必须在安装了 Linux 和 OpenSSL 的 PC 上运行。步骤 3 和步骤 4 中指定的说明必须在作模式下运行。
要创建并安装私钥文件和认证文件,请执行以下作:
-
在 PC 上创建 .key 文件。
openssl genrsa -out /tmp/server.key 1024 -
在 PC 上,创建 .crt 文件。
openssl req -new -x509 -days 365 -key /tmp/server.key -out /tmp/device.crt -subj "/C=CN/ST=BJ/L=BJ/O=JNPR/OU=CNRD/CN=203.0.113.11/emailAddress=device@mycompany.com" -
将 .key 和 .crt 文件上传到 SRX 系列 防火墙,并在作模式下使用以下命令将文件安装在设备上:
user@host> request security pki local-certificate load filename /var/tmp/device.crt key /var/tmp/device.key certificate-id device
概述
防火墙身份验证启动要在两台设备之间建立的安全连接。网络用户在通过防火墙发起连接时,必须提供用户名和密码进行身份验证。防火墙身份验证支持用于直通身份验证的 HTTPS 流量。HTTPS 可以保护用户与 SRX 系列防火墙之间的 HTTP 防火墙身份验证流量。
HTTPS 是 HTTP 的安全版本,HTTP 是在用户和用户连接的设备之间发送数据的协议。用户与所连接设备之间的所有通信均经过加密。HTTPS 通常用于保护高度机密的在线交易,如网上银行和在线购物订单。
在此示例中,HTTPS 流量用于触发直通身份验证,因为 HTTPS 比 HTTP 更安全。要使 HTTPS 流量触发直通身份验证,必须先配置 SSL 终止配置文件。
图 2 显示了使用 HTTPS 流量进行直通身份验证的示例。在此示例中,来自不信任区域的主机或用户尝试访问信任区域上的资源。SRX 系列防火墙使用 HTTPS 收集用户名和密码信息。根据此身份验证的结果,允许或拒绝来自主机或用户的后续流量。
 的直通身份验证
配置
CLI 快速配置
要快速配置此示例,请将以下命令复制到文本文件中,删除所有换行符,更改详细信息,以便与网络配置匹配,将命令复制并粘贴到层级的 CLI 中,然后从配置模式进入 commit 。
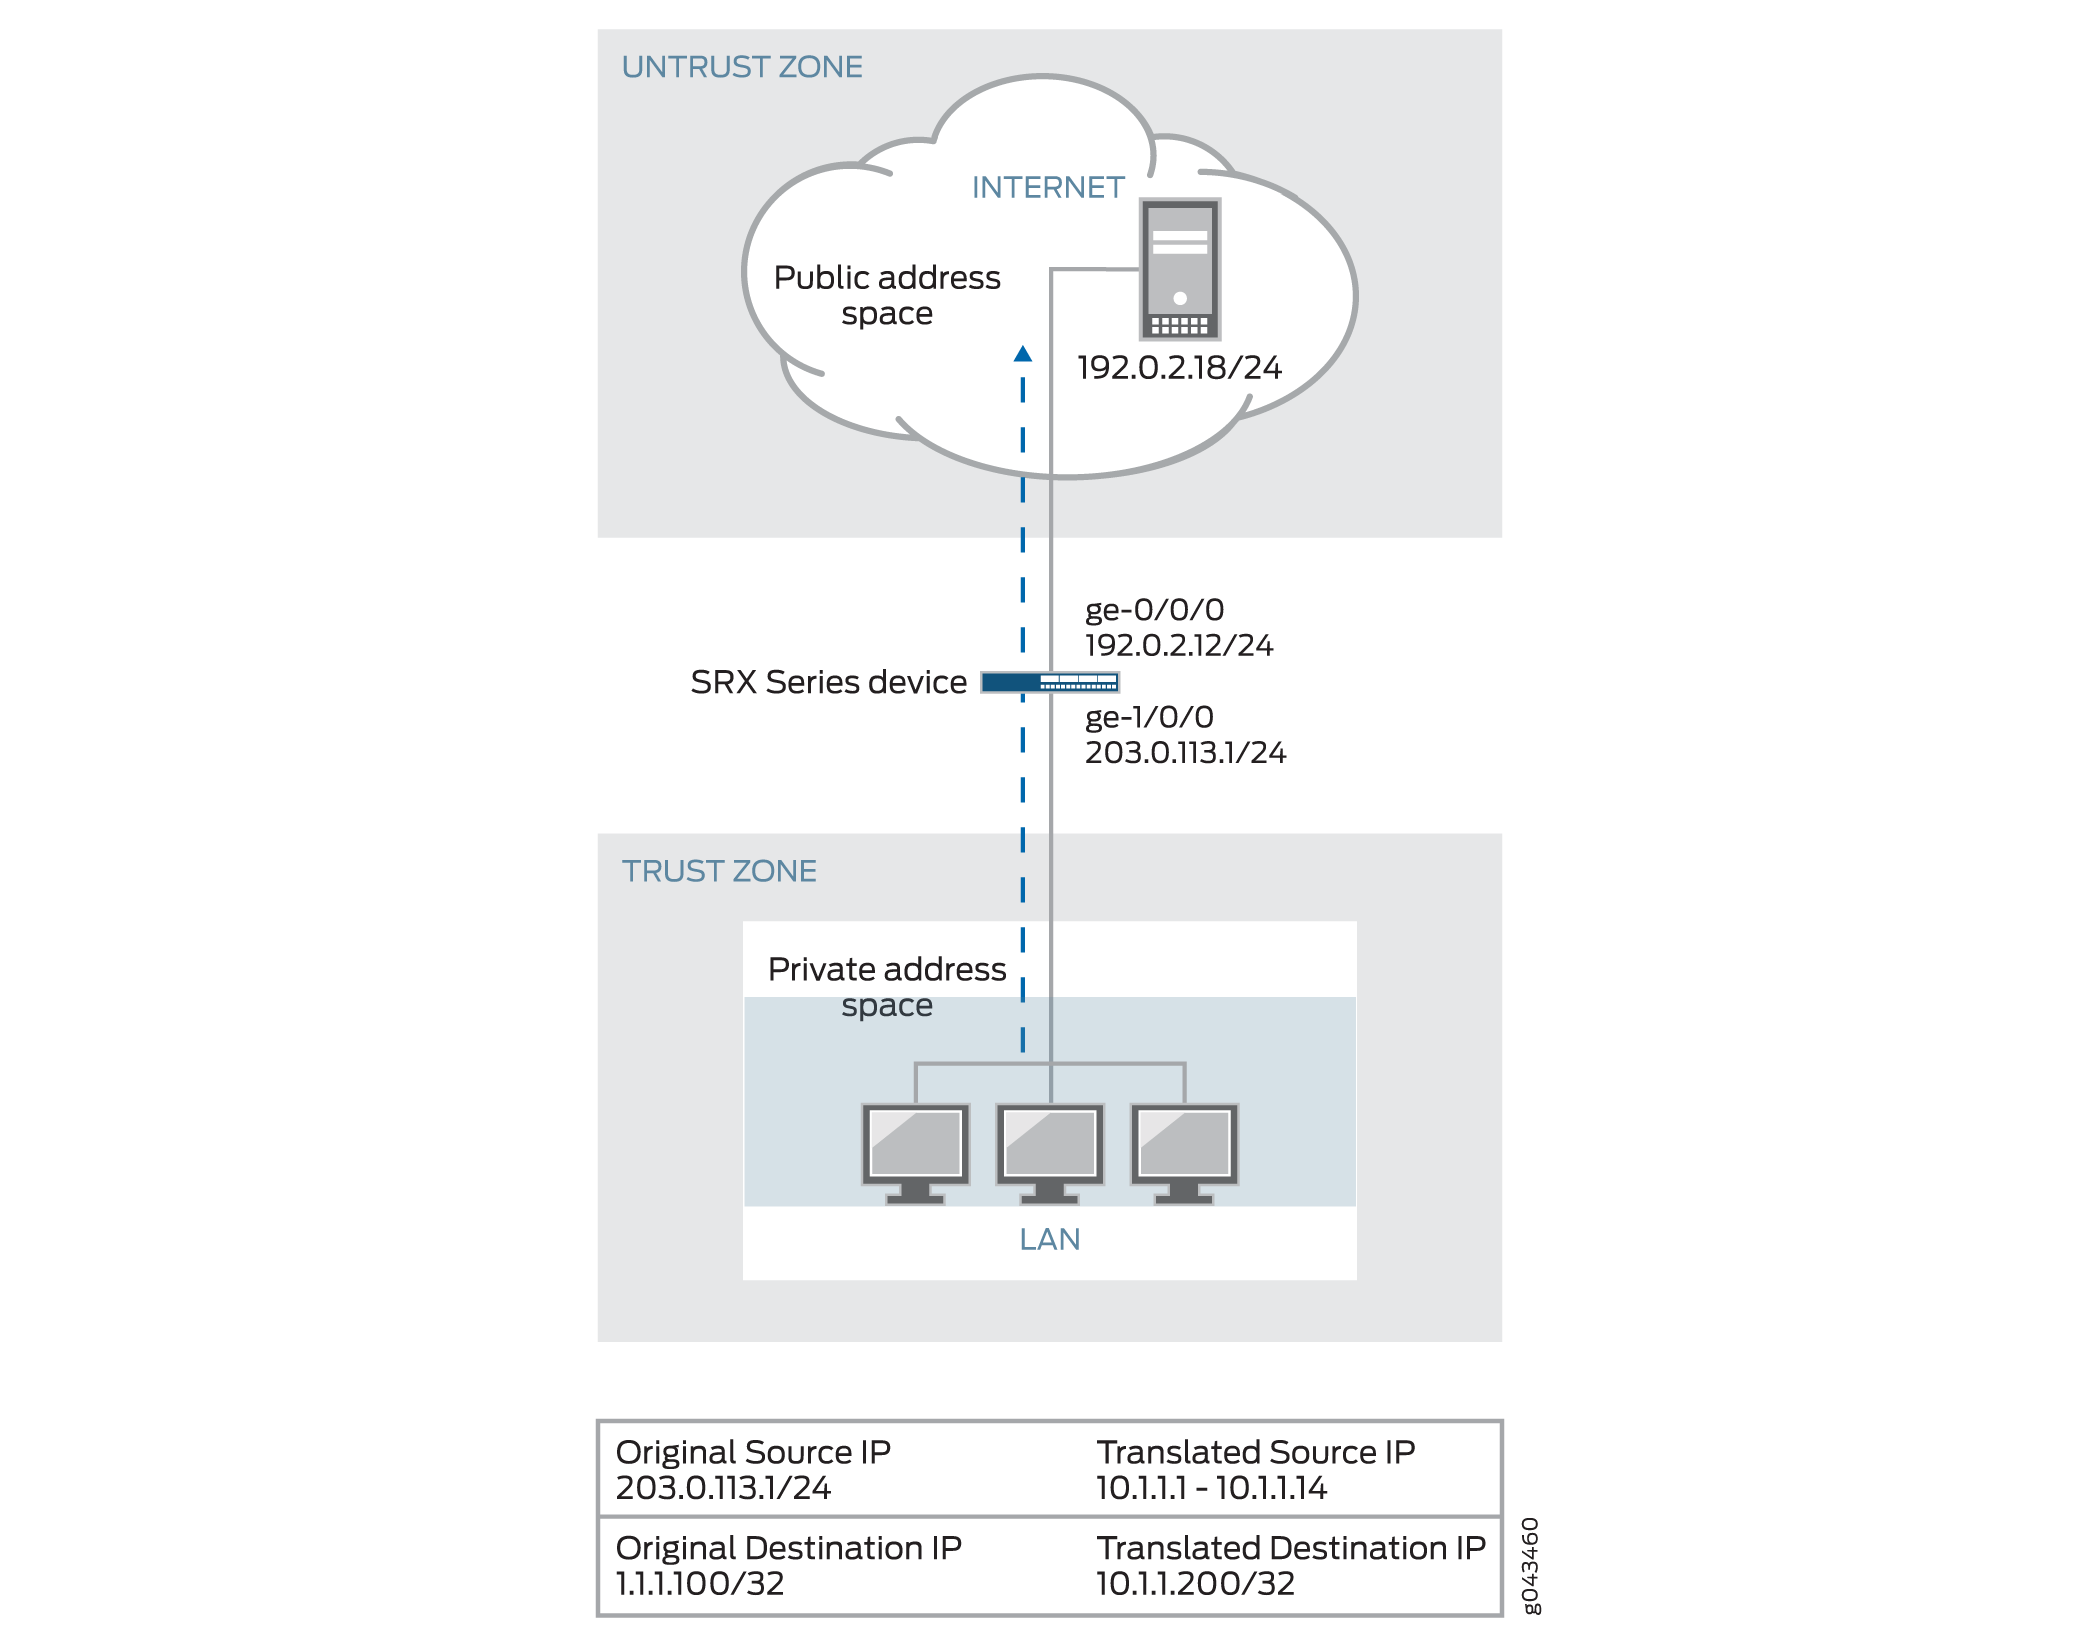
set interfaces ge-0/0/0 unit 0 family inet address 192.0.2.12/24
set interfaces ge-1/0/0 unit 0 family inet address 203.0.113.1/24
set security policies from-zone trust to-zone untrust policy p1 match source-address any
set security policies from-zone trust to-zone untrust policy p1 match destination-address any
set security policies from-zone trust to-zone untrust policy p1 match application any
set security policies from-zone trust to-zone untrust policy p1 then permit firewall-authentication pass-through access-profile local_pf
set security policies from-zone trust to-zone untrust policy p1 then permit firewall-authentication pass-through ssl-termination-profile ssl_pf
set security policies from-zone trust to-zone untrust policy p1 then log session-init
set security policies from-zone trust to-zone untrust policy p1 then log session-close
set security zones security-zone trust interfaces ge-0/0/0.0 host-inbound-traffic system-services all
set security zones security-zone trust interfaces ge-0/0/0.0 host-inbound-traffic protocols all
set security zones security-zone untrust interfaces ge-1/0/0.0 host-inbound-traffic system-services all
set security zones security-zone untrust interfaces ge-1/0/0.0 host-inbound-traffic protocols all
set access profile local_pf client user1 firewall-user password <password>
set access firewall-authentication pass-through default-profile local_pf
set services ssl termination profile ssl_pf server-certificate device
程序
分步过程
要将 HTTPS 流量配置为触发直通身份验证,请执行以下作:
-
配置接口并分配 IP 地址。
[edit interfaces] user@host# set ge-0/0/0 unit 0 family inet address 192.0.2.12/24 user@host# set ge-1/0/0 unit 0 family inet address 203.0.113.1/24 -
配置安全策略以允许从区域信任到区域不信任的防火墙身份验证流量。
[edit security policies] user@host# set from-zone trust to-zone untrust policy p1 then permit firewall-authentication pass-through access-profile local_pf user@host# set from-zone trust to-zone untrust policy p1 then permit firewall-authentication pass-through ssl-termination-profile ssl_pf -
指定当数据包符合条件时要执行的策略作。
[edit security policies] user@host# set from-zone trust to-zone untrust policy p1 match source-address any user@host# set from-zone trust to-zone untrust policy p1 match destination-address any user@host# set from-zone trust to-zone untrust policy p1 match application any user@host# set from-zone trust to-zone untrust policy p1 then log session-init user@host# set from-zone trust to-zone untrust policy p1 then log session-close -
配置安全区域并分配接口。
[edit security zones] user@host# set security-zone trust interfaces ge-0/0/0.0 host-inbound-traffic protocols all user@host# set security-zone trust interfaces ge-0/0/0.0 host-inbound-traffic system-services all -
为区域配置应用程序服务。
[edit security zones] user@host# set security-zone trust host-inbound-traffic system-services all protocols all user@host# set security-zone untrust host-inbound-traffic system-services all protocols all -
创建访问配置文件,将客户端配置为防火墙用户并设置密码。
[edit access] user@host# set profile local_pf client user1 firewall-user password <password> -
在其中定义身份验证设置,配置防火墙类型和默认配置文件名称。
[edit access] user@host# set firewall-authentication pass-through default-profile local_pf -
配置 SSL 终止配置文件并输入本地证书标识符名称。
[edit services]
user@host# set ssl termination profile ssl_pf server-certificate device
结果
在配置模式下,输入show interfaces、show accessshow security policiesshow security zones和show services ssl termination命令,以确认您的配置。如果输出未显示预期的配置,请重复此示例中的配置说明,以便进行更正。
user@host# show interfaces
...
interfaces
    ge-0/0/0 {
        unit 0 {
            family inet {
                address 192.0.2.12;
            }
        }
    }
    ge-1/0/0 {
        unit 0 {
            family inet {
                address 203.0.113.1/24;
            }
        }
    }
user@host# show security policies
...
policies
    from-zone trust to-zone untrust {
        policy p1 {
            match {
                source-address any;
                destination-address any;
                application any;
            }
            then {
                permit {
                    firewall-authentication {
                        pass-through {
                            access-profile local_pf;
                            ssl-termination-profile ssl_pf;
                        }
                    }
                }
                log {
                    session-init;
                    session-close;
                }
            }
        }
    }
}
user@host# show security zones
...
zones {
    security-zone trust {
        interfaces {
            ge-0/0/0.0 {
                host-inbound-traffic {
                    system-services {
                        all;
                    }
                    protocols {
                        all;
                    }
                }
            }
        }
    }
    security-zone untrust {
        interfaces {
            ge-1/0/0.0 {
                host-inbound-traffic {
                    system-services {
                        all;
                    }
                    protocols {
                        all;
                    }
                }
            }
        }
    }
user@host# show access
...
access {
    profile local_pf {
        client user1 {
            firewall-user {
                password password;
            }
        }
    }
    firewall-authentication {
        pass-through {
            default-profile local_pf;
        }
    }
user@host# show services ssl termination
...
services {
    ssl {
        termination {
            profile ssl_pf {
                server-certificate device;
            }
        }
    }
}
如果完成设备配置,请从配置模式输入 commit 。
验证
验证配置
目的
验证配置是否正确。
行动
在作模式下,为标识符 1 输入 show security firewall-authentication users 命令。
user@host> show security firewall-authentication users identifier 1
    Username: user1
    Source IP: 203.0.113.1/24
    Authentication state: Success
    Authentication method: Pass-through using HTTPS
    Age: 0
    Access time remaining: 10
    Lsys: root-logical-system
    Source zone: trust
    Destination zone: untrust
    Access profile: local_pf
    Interface Name: ge-0/0/0.0
    Bytes sent by this user: 946
    Bytes received by this user: 0
意义
命令 show security firewall-authentication users 显示指定标识符的防火墙身份验证用户信息。如果输出在“身份验证方法”字段中显示“使用 HTTPS 直通”,在“身份验证状态”字段中显示“成功”,则您的配置正确。
示例:配置强制门户身份验证
此示例说明如何启用强制门户身份验证并设置策略,以便在流量遇到启用了强制门户身份验证的策略时允许访问用户。
要求
开始之前:
定义防火墙用户。请参阅 防火墙用户身份验证概述。
在接口的地址层次结构下添加 Web 身份验证 HTTP 标志以启用 Web 身份验证。
概述
要启用 Web 身份验证,必须指定托管 HTTP 会话的设备的 IP 地址。如果访问受保护资源的防火墙用户希望通过直接访问 Web 服务器或通过 Web 身份验证进行身份验证,则使用这些设置。以下说明说明如何设置一个策略,以便在流量遇到启用了 Web 身份验证 (Policy-W) 的策略时,允许访问 FWClient1 用户。(请参阅 图 3。在此示例中,FWClient1 已通过 Web 身份验证登录页进行身份验证。
FWClient1 防火墙用户执行以下作来获取身份验证:
将浏览器指向 Web 身份验证 IP (198.51.100.63/24) 以首先进行身份验证
启动流量以访问 policy-W 策略指定的资源

当您按照这些说明中的说明配置设备并且用户成功进行身份验证时,将显示 如图 4 所示的屏幕。

配置
程序
CLI 快速配置
要快速配置此示例,请将以下命令复制到文本文件中,删除所有换行符,更改详细信息,以便与网络配置匹配,将命令复制并粘贴到层级的 CLI 中,然后从配置模式进入 commit 。
set interfaces ge-0/0/1 unit 0 family inet address 198.51.100.23/24set interfaces ge-0/0/1 unit 0 family inet address 198.51.100.63/24 web-authentication httpset interfaces fe-5/0/0 unit 0 family inet address 203.0.113.15/24set access profile WEBAUTH client FWClient1 firewall-user password pwdset access firewall-authentication web-authentication default-profile WEBAUTHset access firewall-authentication web-authentication banner success "WEB AUTH LOGIN SUCCESS"set security zones security-zone UT-ZONE host-inbound-traffic system-services allset security zones security-zone UT-ZONE interfaces ge-0/0/1.0 host-inbound-traffic protocols allset security zones security-zone T-ZONE host-inbound-traffic system-services allset security zones security-zone T-ZONE interfaces ge-5/0/0.0 host-inbound-traffic protocols allset security policies from-zone UT-ZONE to-zone T-ZONE policy P1 match source-address anyset security policies from-zone UT-ZONE to-zone T-ZONE policy P1 match destination-address anyset security policies from-zone UT-ZONE to-zone T-ZONE policy P1 match application anyset security policies from-zone UT-ZONE to-zone T-ZONE policy P1 then permit firewall-authentication web-authentication client-match FWClient1set system services web-management http interface ge-0/0/1.0
分步过程
下面的示例要求您在各个配置层级中进行导航。有关作说明,请参阅 在配置模式下使用 CLI 编辑器。
要配置 Web 身份验证,请执行以下作:
配置两个接口并为其分配 IP 地址。
注意:在此示例中,可以选择为接口分配两个地址。
[edit]
user@host# set interfaces ge-0/0/1 unit 0 family inet address 198.51.100.23/24
user@host# set interfaces ge-0/0/1 unit 0 family inet address 198.51.100.63/24 web-authentication http
user@host# set interfaces fe-5/0/0 unit 0 family inet address 203.0.113.15/24
为 FWClient1 用户创建 WEBAUTH 访问配置文件,指定用户的密码,并定义成功横幅。
[edit access]
user@host# set profile WEBAUTH client FWClient1 firewall-user password pwd
user@host# set firewall-authentication web-authentication default-profile WEBAUTH
user@host# set firewall-authentication web-authentication banner success "WEB AUTH LOGIN SUCCESS"
配置安全区域。
注意:在此示例中,可以选择为安全区域配置第二个接口。
[edit security zones]
user@host# set security-zone UT-ZONE host-inbound-traffic system-services all
user@host# set security-zone UT-ZONE interfaces ge-0/0/1.0 host-inbound-traffic protocols all
user@host# set security-zone T-ZONE host-inbound-traffic system-services all
user@host# set security-zone T-ZONE interfaces ge-5/0/0.0 host-inbound-traffic protocols all
将安全策略 P1 分配给安全区域。
[edit security policies]
user@host# set from-zone UT-ZONE to-zone T-ZONE policy P1 match source-address any
user@host# set from-zone UT-ZONE to-zone T-ZONE policy P1 match destination-address any
user@host# set from-zone UT-ZONE to-zone T-ZONE policy P1 match application any
user@host# set from-zone UT-ZONE to-zone T-ZONE policy P1 then permit firewall-authentication web-authentication client-match FWClient1
激活设备上的 HTTP 进程(守护程序)。
[edit]
user@host# set system services web-management http interface ge-0/0/1.0
结果
在配置模式下,输入以下命令以确认您的配置:
show interfacesshow accessshow security zonesshow security policiesshow system services
如果输出未显示预期的配置,请重复此示例中的配置说明,以便进行更正。
为简洁起见,此 show 输出仅包含与此示例相关的配置。系统上的任何其他配置都已替换为省略号 (...)。
user@host# show interfaces
...
}
ge-0/0/1{
    unit 0 {
        family inet {
            address 198.51.100.23/24 {
            address 198.51.100.63/24 {
                web-authentication http;
            }
        }
    }
}
fe-5/0/0 {
    unit 0 {
        family inet {
            address 198.51.100.14/24;
        }
    }
}
...


user@host# show access
profile WEBAUTH {
    client FWClient1 {
        firewall-user {
            password "$ABC123"; ## SECRET-DATA
        }
    }
}
firewall-authentication {
    web-authentication {
        default-profile WEBAUTH;
        banner {
            success "WEB AUTH LOGIN SUCCESS";
        }
    }
}


user@host# show security zones
...
}
security-zone UT-ZONE {
    host-inbound-traffic {
       system-services {
            all;
        }
    }
    interfaces {
        ge-0/0/1.0 {
            host-inbound-traffic {
                protocols {
                    all;
                }
            }
        }
    }
}
security-zone T-ZONE {
    host-inbound-traffic {
       system-services {
            all;
        }
    }
    interfaces {
        ge-5/0/0.0 {
            host-inbound-traffic {
                protocols {
                    all;
                }
            }
        }
    }
}


user@host# show security policies
...
from-zone UT-ZONE to-zone T-ZONE {
    policy P1 {
       match {
            source-address any;
            destination-address any;
            application any;
       }
       then {
            permit {
                firewall-authentication {
                    web-authentication {
                        client-match FWClient1;
                    }
                }
            }
       }
    }
}

user@host# show system services
...
ftp;
ssh;
telnet;
web-management {
    http {
        interface g-0/0/1.0;
    }
}
如果完成设备配置,请从配置模式输入 commit 。
验证
要确认配置工作正常,请执行以下任务:
验证防火墙用户身份验证并监控身份验证表中的用户和 IP 地址
目的
显示防火墙认证用户历史记录,验证成功认证的防火墙用户数和登录失败的防火墙用户数。
行动
在作模式下,输入以下 show 命令:
user@host> show security firewall-authentication history
user@host> show security firewall-authentication history identifier 1
user@host> show security firewall-authentication users
user@host> show security firewall-authentication users identifier 3
user@host> show security firewall-authentication history
History of firewall authentication data:
Authentications: 1
Id Source Ip Date Time Duration Status User
5 198.51.100.75      2010-04-24 01:08:57 0:10:30    Success  FWClient1
user@host> show security firewall-authentication history identifier 1
Username: FWClient1
Source IP: 198.51.100.752
Authentication state: Success
Authentication method: Web-authentication
Access start date: 2010-10-12
Access start time: 21:24:02
Duration of user access: 0:00:24
Source zone: N/A
Destination zone: N/A
Access profile: WEBAUTH
Bytes sent by this user: 0
Bytes received by this user: 2660
user@host> show security firewall-authentication users
Firewall authentication data:
Total users in table: 1
Id Source Ip Src zone Dst zone Profile Age Status User
4 198.51.100.75     N/A  N/A   WEBAUTH     1 Success   FWClient1
user@host> show security firewall-authentication users identifier 3
Username: FWClient1
Source IP: 198.51.100.75
Authentication state: Success
Authentication method: Web-authentication
Age: 3
Access time remaining: 9
Source zone: N/A
Destination zone: N/A
Access profile: WEBAUTH
Interface Name: ge-0/0/1.0
Bytes sent by this user: 0
Bytes received by this user: 1521
示例:配置 HTTPS 流量以触发强制门户身份验证
此示例说明如何配置 HTTPS 流量以触发强制门户身份验证。HTTPS 被广泛用于强制门户身份验证,因为它比 HTTP 更安全。
要求
开始之前:
此示例使用以下硬件和软件组件:
-
SRX 系列防火墙
-
两台安装了 Linux 和 Open SSL 的 PC。一台 PC 充当客户端,另一台充当 HTTPS 服务器。这两台 PC 用于创建密钥文件和发送流量。
-
Junos OS 12.1X44-D10 或更高版本(适用于 SRX5400、SRX5600 和 SRX5800 设备),Junos OS版本为 15.1X49-D40 或更高版本(适用于 vSRX 虚拟防火墙、SRX300、SRX320、SRX340、SRX345、SRX380、SRX550M 和 SRX1500 服务网关)。
SRX 系列防火墙必须解码 HTTPS 流量才能触发 Web 身份验证。以下列表介绍了创建和安装私钥文件和证书密钥文件的步骤。
如果您有正式 .crt 文件和 .key 文件,则可以直接在 SRX 系列防火墙上上传和安装文件。如果您没有 .crt 文件和 .key 文件,请按照过程创建和安装文件。步骤 1 和步骤 2 中指定的说明必须在安装了 Linux 和 OpenSSL 的 PC 上运行。步骤 3 和步骤 4 中指定的说明必须在作模式下运行。
-
在 PC 上创建
.key文件。openssl genrsa -out /tmp/server.key 1024 -
在 PC 上创建
.crt文件。openssl req -new -x509 -days 365 -key /tmp/server.key -out /tmp/device.crt -subj "/C=CN/ST=BJ/L=BJ/O=JNPR/OU=CNRD/CN=203.0.113.22/emailAddress=device@mycomany.com" -
在 SRX 系列防火墙中,上传
.key和.crt文件,然后使用以下命令将文件安装到设备上:user@host> request security pki local-certificate load filename /var/tmp/device.crt key /var/tmp/device.key certificate-id device
概述
防火墙身份验证启动要在两台设备之间建立的安全连接。网络用户在通过防火墙发起连接时,必须提供用户名和密码进行身份验证。防火墙身份验证支持用于直通身份验证的 HTTPS 流量。HTTPS 可以保护用户与 SRX 系列防火墙之间的 HTTP 防火墙身份验证流量。
HTTPS 是 HTTP 的安全版本,HTTP 是在用户和用户连接的设备之间发送数据的协议。用户与所连接设备之间的所有通信均经过加密。HTTPS 通常用于保护高度机密的在线交易,如网上银行和在线购物订单。
在此示例中,HTTPS 流量用于触发 Web 身份验证,因为 HTTPS 比 HTTP 更安全。
用户使用 HTTPS 访问已启用 Web 身份验证的设备上的 IP 地址。在此方案中,用户不使用 HTTPS 访问受保护资源的 IP 地址。系统会提示用户输入用户名和密码,并由设备进行验证。根据此 Web 身份验证的结果,允许或拒绝从用户或主机到受保护资源的后续流量。
图 5 显示了使用 HTTPS 流量进行 Web 身份验证的示例。
 的 Web 身份验证
配置
CLI 快速配置
要快速配置此示例,请将以下命令复制到文本文件中,删除所有换行符,更改详细信息,以便与网络配置匹配,将命令复制并粘贴到层级的 CLI 中,然后从配置模式进入 commit 。
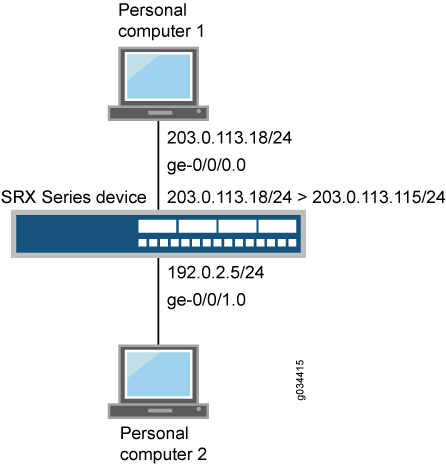
set system services web-management https pki-local-certificate device
set interfaces ge-0/0/0 unit 0 family inet address 203.0.113.18/24
set interfaces ge-0/0/0 unit 0 family inet address 203.0.113.115/24  web-authentication https
set interfaces ge-0/0/1 unit 0 family inet address 192.0.2.5/24
set security policies from-zone trust to-zone untrust policy p1 match source-address any
set security policies from-zone trust to-zone untrust policy p1 match destination-address any
set security policies from-zone trust to-zone untrust policy p1 match application any
 set security policies from-zone trust to-zone untrust policy p1 then permit
set access profile local_pf client user1 firewall-user password user1
set access firewall-authentication web-authentication default-profile local_pf
set security policies from-zone trust to-zone untrust policy p1 then permit firewall-authentication web-authentication
程序
分步过程
要配置 HTTPS 流量以触发 Web 身份验证,请执行以下作:
-
启用对 HTTPS 流量的 Web 管理支持。
[edit system services] user@host# set web-management https pki-local-certificate device -
配置接口并分配 IP 地址。在 ge-0/0/0 接口启用 Web 认证。
[edit interfaces] user@host# set ge-0/0/0 unit 0 family inet address 203.0.113.18/24 set ge-0/0/0 unit 0 family inet address 203.0.113.115/24 web-authentication https user@host# set ge-0/0/1 unit 0 family inet address 192.0.2.5/24 -
配置安全策略以允许从区域信任到区域不信任的防火墙身份验证流量。
[edit security policies] user@host# set from-zone trust to-zone untrust policy p1 match source-address any destination-address any application any user@host# set security policies from-zone trust to-zone untrust policy p1 then permit -
创建访问配置文件,将客户端配置为防火墙用户,并设置密码。
[edit access] user@host# set profile local_pf client user1 firewall-user password user1 -
配置防火墙身份验证设置的类型。
[edit access] user@host# set firewall-authentication web-authentication default-profile local_pf -
指定当数据包符合条件时要执行的策略作。
[edit security policies]
user@host# set from-zone trust to-zone untrust policy p1 then permit firewall-authentication web-authentication
结果
在配置模式下,输入show system services、show interfacesshow security policies、和show access命令,以确认您的配置。如果输出未显示预期的配置,请重复此示例中的配置说明,以便进行更正。
user@host#  show system services
    web-management {
        https {
            pki-local-certificate device;
        }
}
user@host#  show interfaces
    ge-0/0/0 {
    unit 0 {
        family inet {
            address 203.0.113.115/24  {
                web-authentication https;
            }
        }
}
    ge-0/0/1 {
        unit 0 {
            family inet {
                address 192.0.2.5/24;
            }
        }
    }
user@host# show security policies
from-zone trust to-zone untrust {
    policy p1 {
        match {
            source-address any;
            destination-address any;
            application any;
        }
        then {
            permit {
                firewall-authentication {
                    web-authentication;
                }
            }
        }
    }
}
user@host# show access
    profile local_pf {
        client user1 {
            firewall-user {
                password "user1";
            }
        }
    }
        firewall-authentication {
            web-authentication {
                default-profile local_pf;
            }
如果完成设备配置,请从配置模式输入 commit 。
验证
验证配置
目的
验证配置是否正确。
行动
在作模式下,输入 show security firewall-authentication users identifier identifier 命令。
示例输出
user@host> show security firewall-authentication users identifier 1
    Username: user1
    Source IP: 203.1.113.102
    Authentication state: Success
    Authentication method: Web-authentication
    Age: 0
    Access time remaining: 10
    Lsys: root-logical-system
    Source zone: N/A
    Destination zone: N/A
    Access profile: local_pf
    Bytes sent by this user: 0
    Bytes received by this user: 0
意义
命令 show security firewall-authentication users identifier identifier 使用用户的标识符 ID 显示防火墙身份验证用户信息。如果身份验证方法参数显示 Web 身份验证,并且身份验证状态参数在输出中显示成功,则您的配置是正确的。
为未经身份验证的浏览器配置强制门户
了解如何为未经身份验证的浏览器配置强制门户。
下面是如何配置安全策略以使用仅验证浏览器和身份验证用户代理防火墙身份验证功能的一些示例。
For Pass-Through Authentication
为使用 auth-only-browser 参数的直通身份验证配置安全策略。
user@host# set security policies from-zone trust to-zone untrust policy p1 match source-address any
user@host# set security policies from-zone trust to-zone untrust policy p1 match destination-address any
user@host# set security policies from-zone trust to-zone untrust policy p1 match application any
user@host# set security policies from-zone trust to-zone untrust policy p1 then permit firewall-authentication pass-through auth-only-browser access-profile my-access-profile1t
为使用 auth-user-agent 参数(不带 auth-only-browser)的直通身份验证配置安全策略。
user@host# set security policies from-zone trust to-zone untrust policy p2 match source-address any
user@host# set security policies from-zone trust to-zone untrust policy p2 match destination-address any
user@host# set security policies from-zone trust to-zone untrust policy p2 match application any
user@host# set security policies from-zone trust to-zone untrust policy p2 then permit firewall-authentication pass-through auth-user-agent  Opera1 access-profile my-access-profile2
配置直通身份验证的安全策略,该策略使用带有 auth-user-agent 参数的 auth-only-browser。
user@host# set security policies from-zone trust to-zone untrust policy p3 match source-address any
user@host# set security policies from-zone trust to-zone untrust policy p3 match destination-address any
user@host# set security policies from-zone trust to-zone untrust policy p3 match application any
user@host# set security policies from-zone trust to-zone untrust policy p3 then permit firewall-authentication pass-through auth-only-browser  auth-user-agent  Opera1 my-access-profile3
For User Firewall Authentication
配置使用 auth-only-browser 参数的用户防火墙身份验证安全策略。
user@host# set security policies from-zone trust to-zone untrust policy p4 match source-address any
user@host# set security policies from-zone trust to-zone untrust policy p4 match destination-address any
user@host# set security policies from-zone trust to-zone untrust policy p4 match application any
user@host# set security policies from-zone trust to-zone untrust policy p4 then permit firewall-authentication user-firewall auth-only-browser access-profile my-access-profile4t
为用户防火墙身份验证配置安全策略,该策略使用 auth-user-agent 参数,不使用 auth-only-browser。
user@host# set security policies from-zone trust to-zone untrust policy p5 match source-address any
user@host# set security policies from-zone trust to-zone untrust policy p5 match destination-address any
user@host# set security policies from-zone trust to-zone untrust policy p5 match application any
user@host# set security policies from-zone trust to-zone untrust policy p5 then permit firewall-authentication user-firewall auth-user-agent  Opera1 access-profile my-access-profile5
为用户防火墙身份验证配置安全策略,该策略使用带有 auth-user-agent 参数的 auth-only-browser。
user@host# set security policies from-zone trust to-zone untrust policy p6 match source-address any
user@host# set security policies from-zone trust to-zone untrust policy p6 match destination-address any
user@host# set security policies from-zone trust to-zone untrust policy p6 match application any
user@host# set security policies from-zone trust to-zone untrust policy p6 then permit firewall-authentication user-firewall auth-only-browser  auth-user-agent  Opera1 access-profile my-access-profile6
另见
示例:配置统一策略
阅读此示例,了解如何在统一策略中配置直通身份验证和强制门户身份验证,以限制或允许用户访问网络资源。
概述
通过防火墙用户身份验证,可以在用户访问防火墙后面的网络资源之前对用户进行身份验证。启用防火墙用户身份验证后,用户在跨防火墙启动连接时必须提供用户名和密码进行身份验证。
从 Junos OS 21.2R1 版开始,我们支持使用统一策略的防火墙用户身份验证。支持直通身份验证和强制门户身份验证。
拓扑学
图 6 显示了此示例中使用的拓扑。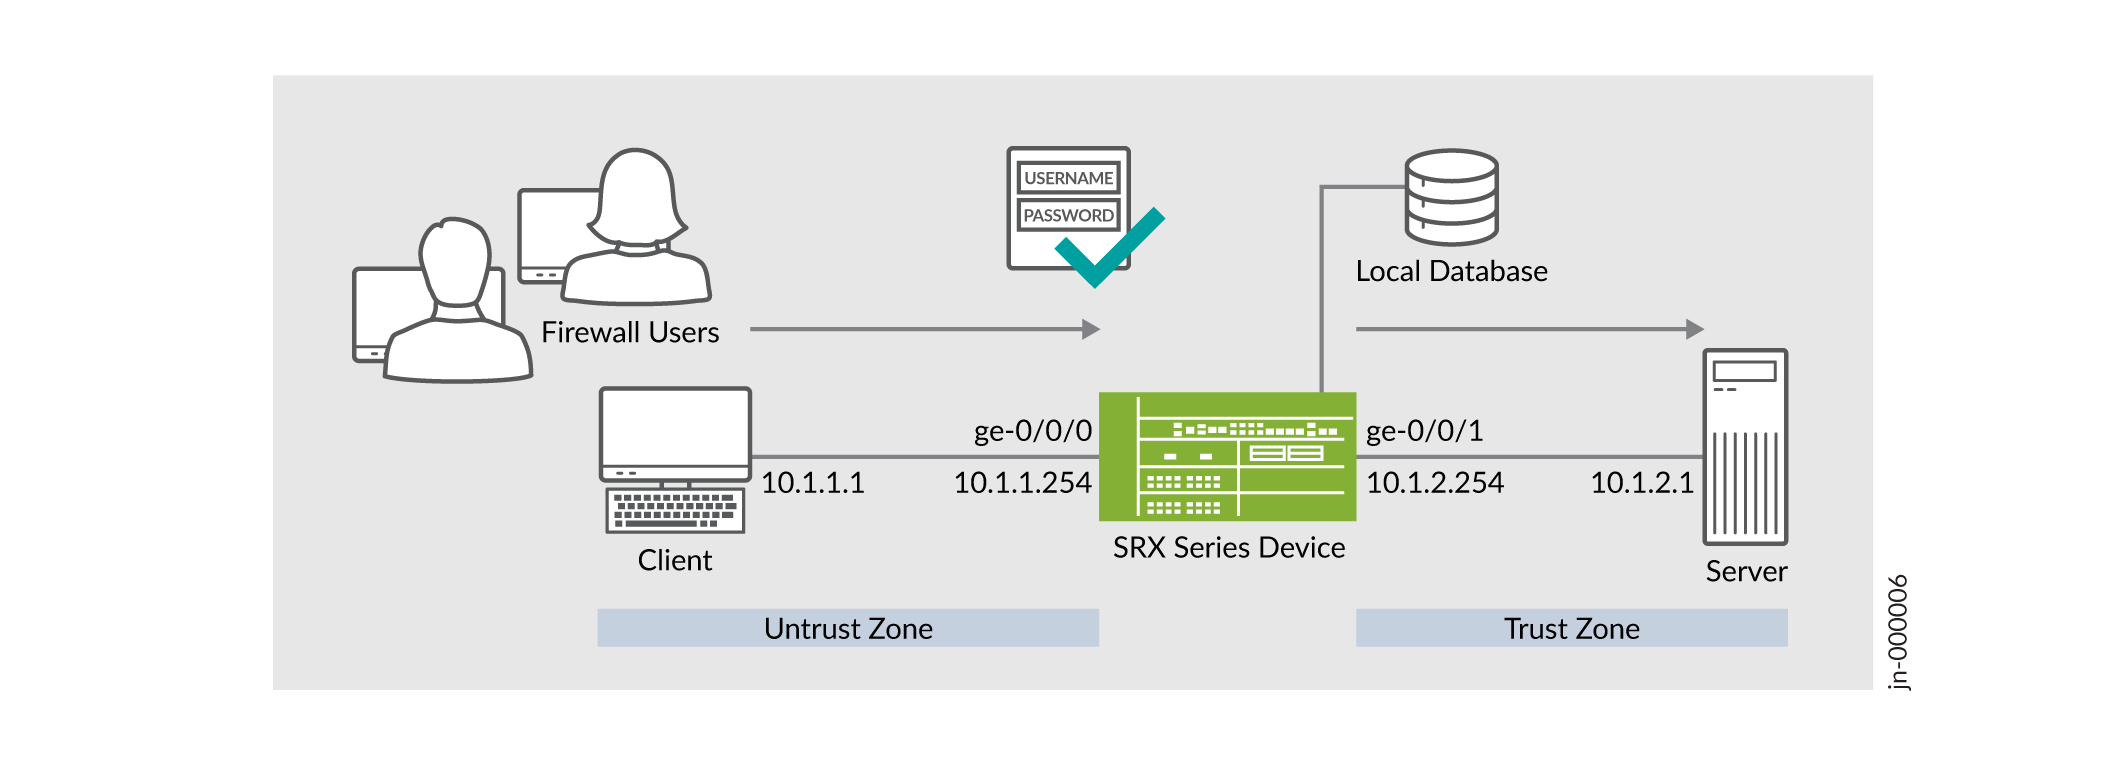 配置防火墙用户身份验证
如拓扑所示,不信任区域中的防火墙用户需要访问信任区域中的外部服务器(IP 地址 10.1.2.1)。用户在访问服务器之前使用安全设备进行身份验证。设备通过查询本地数据库确定认证结果。身份验证成功后,安全设备将允许来自同一源 IP 地址的后续流量,直至用户会话超时并关闭。
在此示例中,您将在 SRX 系列防火墙上配置以下功能:
-
在访问配置文件中配置安全设备本地的用户数据库。在配置文件中添加一个或多个客户端,代表最终用户。client-name 表示用户名。以纯文本格式输入每个用户的密码。
- 将访问配置文件与直通或 Web 防火墙身份验证方法相关联。设置自定义横幅以向最终用户显示。
- 配置安全策略以允许或限制流量,并为允许的流量应用防火墙用户身份验证。
要求
此示例使用以下硬件和软件组件:
- SRX 系列防火墙或 vSRX 虚拟防火墙
- Junos OS 21.2R1 版
开始之前:
- 在 SRX 系列防火墙上安装有效的应用识别功能许可证。请参阅 安装和验证应用程序签名包的许可证。
- 在 SRX 系列防火墙上安装应用签名数据库。请参阅 下载和安装 Junos OS 应用程序签名包。
使用传统策略和统一策略对 SRX 防火墙用户进行配置
| 方案 | 、策略 | 、用户启动会话结果时的工作流程 | |
|---|---|---|---|
| 使用传统安全策略和未知用户进行身份验证 | 策略 P1
|
|
在防火墙用户身份验证成功后允许未经过身份验证的用户。 |
| 使用统一策略和经过身份验证的用户进行身份验证 | 策略 P2
|
|
允许经过身份验证的用户无需防火墙用户身份验证。 |
| 使用统一策略进行身份验证 | 策略 P3
|
|
允许使用防火墙用户身份验证的流量。 |
要将流量从未经过身份验证的用户重定向到 UAC 强制门户进行身份验证,请参阅 示例:在 SRX 系列设备上配置用户角色防火墙。
CLI 快速配置
要在 SRX 系列防火墙上快速配置此示例,请复制以下命令并将其粘贴到文本文件中。删除所有换行符,更改所有必要的详细信息以匹配您的网络配置,然后将命令复制并粘贴到 [编辑] 层级的 CLI 中。
set services ssl termination profile ssl-a server-certificate SERVER-CERTIFICATE-1
set security policies from-zone untrust to-zone trust policy p1 match source-address any
set security policies from-zone untrust to-zone trust policy p1 match destination-address any
set security policies from-zone untrust to-zone trust policy p1 match application junos-http
set security policies from-zone untrust to-zone trust policy p1 match application junos-https
set security policies from-zone untrust to-zone trust policy p1 match source-identity unauthenticated-user
set security policies from-zone untrust to-zone trust policy p1 match source-identity unknown-user
set security policies from-zone untrust to-zone trust policy p1 then permit firewall-authentication user-firewall access-profile PROFILE-1
set security policies from-zone untrust to-zone trust policy p1 then permit firewall-authentication user-firewall ssl-termination-profile ssl-a
set security policies from-zone untrust to-zone trust policy p1 then log session-init
set security policies from-zone untrust to-zone trust policy p1 then log session-close
set security policies from-zone untrust to-zone trust policy p2 match source-address any
set security policies from-zone untrust to-zone trust policy p2 match destination-address any
set security policies from-zone untrust to-zone trust policy p2 match application any
set security policies from-zone untrust to-zone trust policy p2 match source-identity authenticated-user
set security policies from-zone untrust to-zone trust policy p2 match dynamic-application junos:GOOGLE
set security policies from-zone untrust to-zone trust policy p2 then permit
set security policies from-zone untrust to-zone trust policy p3 match source-address any
set security policies from-zone untrust to-zone trust policy p3 match destination-address any
set security policies from-zone untrust to-zone trust policy p3 match application any
set security policies from-zone untrust to-zone trust policy p3 match dynamic-application junos:YAHOO
set security policies from-zone untrust to-zone trust policy p3 then permit firewall-authentication user-firewall access-profile PROFILE-1
set security zones security-zone trust interfaces ge-0/0/1.0 host-inbound-traffic system-services all
set security zones security-zone trust interfaces ge-0/0/1.0 host-inbound-traffic protocols all
set security zones security-zone untrust interfaces ge-0/0/0.0 host-inbound-traffic system-services all
set security zones security-zone untrust interfaces ge-0/0/0.0 host-inbound-traffic protocols all
set interfaces ge-0/0/0 unit 0 family inet address 10.1.1.254/24
set interfaces ge-0/0/1 unit 0 family inet address 10.1.2.254/24
set access profile PROFILE-1 client CLIENT-1 client-group GROUP-1
set access profile PROFILE-1 client CLIENT-1 firewall-user password "$ABC123"
set access profile PROFILE-1 client CLIENT-2 client-group GROUP-1
set access profile PROFILE-1 client CLIENT-2 firewall-user password "$ABC123"
set access profile PROFILE-1 session-options client-idle-timeout 10
set access firewall-authentication pass-through default-profile PROFILE-1
set access firewall-authentication web-authentication default-profile PROFILE-1
分步过程
-
配置接口。
[edit] user@host# set interfaces ge-0/0/0 unit 0 family inet address 10.1.1.254/24 user@host# set interfaces ge-0/0/1 unit 0 family inet address 10.1.2.254/24 -
创建安全区域并分配接口。
[edit]
user@host# set security zones security-zone trust interfaces ge-0/0/1.0 host-inbound-traffic system-services all
user@host# set security zones security-zone trust interfaces ge-0/0/1.0 host-inbound-traffic protocols all
user@host# set security zones security-zone untrust interfaces ge-0/0/0.0 host-inbound-traffic system-services all
user@host# set security zones security-zone untrust interfaces ge-0/0/0.0 host-inbound-traffic protocols all
-
设置访问配置文件并添加用户详细信息。
[edit]
user@host# set access profile PROFILE-1 client CLIENT-1 client-group GROUP-1
user@host# set access profile PROFILE-1 client CLIENT-1 firewall-user password "$9$2ngZjHkPQ39.PhrvLVb.P5Tz6"
user@host# set access profile PROFILE-1 client CLIENT-2 client-group GROUP-1
user@host# set access profile PROFILE-1 client CLIENT-2 firewall-user password "$9$/Bv59pBIRSleWB17-ws4o"
user@host# set access profile PROFILE-1 session-options client-idle-timeout 10
我们添加了两个用户 CLIENT-1 和 CLIENT-2 并使用密码,并将这些用户分配到客户端组 GROUP-1。
-
配置身份验证方法并分配访问配置文件。
[edit] user@host# set access firewall-authentication pass-through default-profile PROFILE-1 user@host# set access firewall-authentication web-authentication default-profile PROFILE-1 -
配置 SSL 终止配置文件。
[edit] user@host# set services ssl termination profile ssl-a server-certificate SERVER-CERTIFICATE-1 -
配置安全策略以允许未经过身份验证的用户使用防火墙用户身份验证。
[edit] user@host# set security policies from-zone untrust to-zone trust policy p1 match source-address any user@host# set security policies from-zone untrust to-zone trust policy p1 match destination-address any user@host# set security policies from-zone untrust to-zone trust policy p1 match application junos-http user@host# set security policies from-zone untrust to-zone trust policy p1 match application junos-https user@host# set security policies from-zone untrust to-zone trust policy p1 match source-identity unauthenticated-user user@host# set security policies from-zone untrust to-zone trust policy p1 match source-identity unknown-user user@host# set security policies from-zone untrust to-zone trust policy p1 match source-identity unknown-user user@host# set security policies from-zone untrust to-zone trust policy p1 then permit firewall-authentication user-firewall access-profile PROFILE-1 user@host# set security policies from-zone untrust to-zone trust policy p1 then permit firewall-authentication user-firewall ssl-termination-profile ssl-a user@host# set security policies from-zone untrust to-zone trust policy p1 then log session-init user@host# set security policies from-zone untrust to-zone trust policy p1 then log session-close -
配置安全策略,以允许经过身份验证的用户无需防火墙用户身份验证。
[edit] user@host# set security policies from-zone untrust to-zone trust policy p2 match source-address any user@host# set security policies from-zone untrust to-zone trust policy p2 match destination-address any user@host# set security policies from-zone untrust to-zone trust policy p2 match application any user@host# set security policies from-zone untrust to-zone trust policy p2 match source-identity authenticated-user user@host# set security policies from-zone untrust to-zone trust policy p2 match dynamic-application junos:GOOGLE user@host# set security policies from-zone untrust to-zone trust policy p2 then permit -
配置安全策略以允许使用防火墙用户身份验证的流量。
[edit]
user@host# set security policies from-zone untrust to-zone trust policy p3 match source-address any
user@host# set security policies from-zone untrust to-zone trust policy p3 match destination-address any
user@host# set security policies from-zone untrust to-zone trust policy p3 match application any
user@host# set security policies from-zone untrust to-zone trust policy p3 match dynamic-application junos:YAHOO
user@host# set security policies from-zone untrust to-zone trust policy p3 then permit firewall-authentication user-firewall access-profile PROFILE-1
user@host#
- 向本地身份验证表添加条目。请注意,每个条目必须包含一个 IP 地址。
user@host> request security user-identification local-authentication-table add user-name CLIENT-1 ip-address 10.1.1.1
结果
在配置模式下,输入 show security 命令以确认您的配置。如果输出未显示预期的配置,请重复此示例中的配置说明,以便进行更正。
[edit ]
               user@host# show security policies
from-zone untrust to-zone trust {
    policy p1 {
        match {
            source-address any;
            destination-address any;
            application [ junos-http junos-https ];
            source-identity [ unauthenticated-user unknown-userset unknown-user ];
        }
        then {
            permit {
                firewall-authentication {
                    user-firewall {
                        access-profile PROFILE-1;
                        ssl-termination-profile ssl-a;
                    }
                }
            }
            log {
                session-init;
                session-close;
            }
        }
    }
     policy p2 {
        match {
            source-address any;
            destination-address any;
            application any;
            source-identity authenticated-user;
            dynamic-application junos:GOOGLE;
        }
        then {
            permit;
        }
    }

    policy p3 {
        match {
            source-address any;
            destination-address any;
            application any;
            dynamic-application junos:YAHOO;
        }
        then {
            permit {
                firewall-authentication {
                    user-firewall {
                        access-profile PROFILE-1;
                    }
                }
            }
        }
    }
}
               user@host# show  security zones
security-zone trust {
    interfaces {
        ge-0/0/1.0 {
            host-inbound-traffic {
                system-services {
                    all;
                }
                protocols {
                    all;
                }
            }
        }
    }
}
security-zone untrust {
    interfaces {
        ge-0/0/0.0 {
            host-inbound-traffic {
                system-services {
                    all;
                }
                protocols {
                    all;
                }
            }
        }
    }
}
               user@host# show interfaces
interfaces {
    ge-0/0/0 {
        unit 0 {
            family inet {
                address 10.1.1.254/24;
            }
        }
    }
    ge-0/0/1 {
        unit 0 {
            family inet {
                address 10.1.2.254/24;
            }
        }
    }
[edit]
               user@host# show access
profile PROFILE-1 {
    client CLIENT-1 {
        client-group GROUP-1;
        firewall-user {
            password "$9$2ngZjHkPQ39.PhrvLVb.P5Tz6"; ## SECRET-DATA
        }
    }
    client CLIENT-2 {
        client-group GROUP-1;
        firewall-user {
            password "$9$/Bv59pBIRSleWB17-ws4o"; ## SECRET-DATA
        }
    }

    session-options {
        client-idle-timeout 10;
    }
}
firewall-authentication {
    pass-through {
        default-profile PROFILE-1;

    web-authentication {
        default-profile PROFILE-1;
    }
}
如果完成设备上的功能配置,请从配置模式输入 commit 。
验证防火墙用户身份验证是否有效
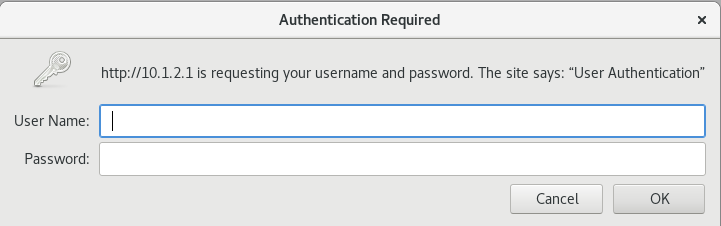
要验证防火墙用户身份验证是否有效,请在客户端计算机上打开 Web 浏览器。通过输入服务器 IP 地址 10.1.2.1 访问服务器。系统将提示您输入登录名和密码详细信息,如 图 7 所示。
成功输入凭据后,即可访问服务器。
使用统一策略配置直通身份验证
any定义为 。
CLI 快速配置
要在 SRX 系列防火墙上快速配置此示例,请复制以下命令,将其粘贴到文本文件中,删除所有换行符,更改详细信息,以便与网络配置匹配,然后将命令复制并粘贴到 [编辑] 层级的 CLI 中。
set services ssl termination profile ssl-a server-certificate SERVER-CERTIFICATE-1
set interfaces ge-0/0/0 unit 0 family inet address 10.1.1.254/24
set interfaces ge-0/0/1 unit 0 family inet address 10.1.2.254/24
set security policies from-zone untrust to-zone trust policy p1 match source-address any
set security policies from-zone untrust to-zone trust policy p1 match destination-address any
set security policies from-zone untrust to-zone trust policy p1 match application any
set security policies from-zone untrust to-zone trust policy p1 match dynamic-application any
set security policies from-zone untrust to-zone trust policy p1 then permit firewall-authentication pass-through access-profile PROFILE-1
set security policies from-zone untrust to-zone trust policy p1 then permit firewall-authentication pass-through ssl-termination-profile ssl-a
set security policies from-zone untrust to-zone trust policy p1 then log session-init
set security policies from-zone untrust to-zone trust policy p1 then log session-close
set security zones security-zone trust interfaces ge-0/0/1.0 host-inbound-traffic system-services all
set security zones security-zone trust interfaces ge-0/0/1.0 host-inbound-traffic protocols all
set security zones security-zone untrust interfaces ge-0/0/0.0 host-inbound-traffic system-services all
set security zones security-zone untrust interfaces ge-0/0/0.0 host-inbound-traffic protocols all
set access profile PROFILE-1 client CLIENT-1 client-group GROUP-1
set access profile PROFILE-1 client CLIENT-1 firewall-user password "$9$2ngZjHkPQ39.PhrvLVb.P5Tz6"
set access profile PROFILE-1 client CLIENT-2 client-group GROUP-1
set access profile PROFILE-1 client CLIENT-2 firewall-user password "$9$/Bv59pBIRSleWB17-ws4o"
set access profile PROFILE-1 session-options client-idle-timeout 10
set access firewall-authentication pass-through default-profile PROFILE-1
set access firewall-authentication web-authentication default-profile PROFILE-1
分步过程
-
配置接口。
[edit] user@host# set interfaces ge-0/0/0 unit 0 family inet address 10.1.1.254/24 user@host# set interfaces ge-0/0/1 unit 0 family inet address 10.1.2.254/24 -
定义安全区域并分配接口。
[edit] user@host# set security zones security-zone trust interfaces ge-0/0/1.0 host-inbound-traffic system-services all user@host# set security zones security-zone trust interfaces ge-0/0/1.0 host-inbound-traffic protocols all user@host# set security zones security-zone untrust interfaces ge-0/0/0.0 host-inbound-traffic system-services all user@host# set security zones security-zone untrust interfaces ge-0/0/0.0 host-inbound-traffic protocols all -
设置访问配置文件并添加用户详细信息。
[edit]
user@host# set access profile PROFILE-1 client CLIENT-1 client-group GROUP-1
user@host# set access profile PROFILE-1 client CLIENT-1 firewall-user password "$9$2ngZjHkPQ39.PhrvLVb.P5Tz6"
user@host# set access profile PROFILE-1 client CLIENT-2 client-group GROUP-1
user@host# set access profile PROFILE-1 client CLIENT-2 firewall-user password "$9$/Bv59pBIRSleWB17-ws4o"
user@host# set access profile PROFILE-1 session-options client-idle-timeout 10
我们已使用密码添加了两个用户 CLIENT-1 和 CLIENT-2,并将这些用户分配到客户端组 GROUP-1。
-
配置身份验证方法并分配访问配置文件。
[edit] user@host# set access firewall-authentication pass-through default-profile PROFILE-1 user@host# set access firewall-authentication web-authentication default-profile PROFILE-1 -
配置 SSL 终止配置文件。
[edit] user@host# set services ssl termination profile ssl-a server-certificate SERVER-CERTIFICATE-1 -
将动态应用程序配置为的安全
any策略。[edit] user@host# set security policies from-zone untrust to-zone trust policy p1 match source-address any user@host# set security policies from-zone untrust to-zone trust policy p1 match destination-address any user@host# set security policies from-zone untrust to-zone trust policy p1 match application any user@host# set security policies from-zone untrust to-zone trust policy p1 match dynamic-application any user@host# set security policies from-zone untrust to-zone trust policy p1 then permit firewall-authentication pass-through access-profile PROFILE-1 user@host# set security policies from-zone untrust to-zone trust policy p1 then permit firewall-authentication pass-through ssl-termination-profile ssl-a user@host# set security policies from-zone untrust to-zone trust policy p1 then log session-init user@host# set security policies from-zone untrust to-zone trust policy p1 then log session-close
结果
在配置模式下,输入 show security 命令以确认您的配置。如果输出未显示预期的配置,请重复此示例中的配置说明,以便进行更正。
[edit]
               user@host# show security policies]
from-zone untrust to-zone trust {
    policy p1 {
        match {
            source-address any;
            destination-address any;
            application any;
            dynamic-application any;
        }
        then {
            permit {
                firewall-authentication {
                    pass-through {
                        access-profile PROFILE-1;
                        ssl-termination-profile ssl-a;
                    }
                }
            }
            log {
                session-init;
                session-close;
            }
        }
    }
}
[edit]
               user@host# show security zones
security-zone trust {
    interfaces {
        ge-0/0/1.0 {
            host-inbound-traffic {
                system-services {
                    all;
                }
                protocols {
                    all;
                }
            }
        }
    }
}
security-zone untrust {
    interfaces {
        ge-0/0/0.0 {
            host-inbound-traffic {
                system-services {
                    all;
                }
                protocols {
                    all;
                }
            }
        }
    }
}
[edit]
               user@host# show interfaces
ge-0/0/0 {
    unit 0 {
        family inet {
            address 10.1.1.254/24;
        }
    }
}
ge-0/0/1 {
    unit 0 {
        family inet {
            address 10.1.2.254/24;
        }
    }
}
[edit]
               user@host# show access
profile PROFILE-1 {
    client CLIENT-1 {
        client-group GROUP-1;
        firewall-user {
            password "$9$2ngZjHkPQ39.PhrvLVb.P5Tz6"; ## SECRET-DATA
        }
    }
    client CLIENT-2 {
        client-group GROUP-1;
        firewall-user {
            password "$9$/Bv59pBIRSleWB17-ws4o"; ## SECRET-DATA
        }
    }
    session-options {
        client-idle-timeout 10;
    }
}
firewall-authentication {
    pass-through {
        default-profile PROFILE-1;
    }
    web-authentication {
        default-profile PROFILE-1;
    }
}
如果完成设备上的功能配置,请从配置模式输入 commit 。
验证直通身份验证是否有效
要验证防火墙用户身份验证是否有效,请在客户端计算机上打开 Web 浏览器。通过输入服务器 IP 地址 10.1.2.1 访问服务器。系统将提示您输入登录名和密码详细信息,如 图 8 所示。
成功输入凭据后,即可访问服务器。
使用统一策略配置强制门户身份验证
CLI 快速配置
要在 SRX 系列防火墙上快速配置此示例,请复制以下命令,将其粘贴到文本文件中,删除所有换行符,更改详细信息,以便与网络配置匹配,然后将命令复制并粘贴到 [编辑] 层级的 CLI 中。
               set system services web-management http interface ge-0/0/0.0
set system services web-management https system-generated-certificate
set system services web-management https interface ge-0/0/0.0
set security policies from-zone untrust to-zone trust policy p1 match source-address any
set security policies from-zone untrust to-zone trust policy p1 match destination-address any
set security policies from-zone untrust to-zone trust policy p1 match application junos-http
set security policies from-zone untrust to-zone trust policy p1 match application junos-https
set security policies from-zone untrust to-zone trust policy p1 match dynamic-application junos:HTTP
set security policies from-zone untrust to-zone trust policy p1 match dynamic-application junos:SSH
set security policies from-zone untrust to-zone trust policy p1 then permit firewall-authentication web-authentication
set security policies from-zone untrust to-zone trust policy p1 then log session-init
set security policies from-zone untrust to-zone trust policy p1 then log session-close
set security zones security-zone trust interfaces ge-0/0/1.0 host-inbound-traffic system-services all
set security zones security-zone trust interfaces ge-0/0/1.0 host-inbound-traffic protocols all
set security zones security-zone untrust interfaces ge-0/0/0.0 host-inbound-traffic system-services all
set security zones security-zone untrust interfaces ge-0/0/0.0 host-inbound-traffic protocols all
set interfaces ge-0/0/0 unit 0 family inet address 10.1.1.254/24
set interfaces ge-0/0/0 unit 0 family inet address 10.1.1.253/24 web-authentication http
set interfaces ge-0/0/0 unit 0 family inet address 10.1.1.253/24 web-authentication https
set interfaces ge-0/0/1 unit 0 family inet address 10.1.2.254/24
set access profile PROFILE-1 client CLIENT-1 client-group GROUP-1
set access profile PROFILE-1 client CLIENT-1 firewall-user password "$9$2ngZjHkPQ39.PhrvLVb.P5Tz6"
set access profile PROFILE-1 client CLIENT-2 client-group GROUP-1
set access profile PROFILE-1 client CLIENT-2 firewall-user password "$9$/Bv59pBIRSleWB17-ws4o"
set access profile PROFILE-1 session-options client-idle-timeout 10
set access firewall-authentication pass-through default-profile PROFILE-1
set access firewall-authentication web-authentication default-profile PROFILE-1
set access firewall-authentication web-authentication banner success "WELCOME to JUNIPER HTTP SESSION"
分步过程
-
创建接口。
[edit]
user@host# set interfaces ge-0/0/0 unit 0 family inet address 10.1.1.254/24
user@host# set interfaces ge-0/0/0 unit 0 family inet address 10.1.1.253/24 web-authentication http
user@host# set interfaces ge-0/0/0 unit 0 family inet address 10.1.1.253/24 web-authentication https
user@host# set interfaces ge-0/0/1 unit 0 family inet address 10.1.2.254/24
使用辅助 IP 地址进行 Web 验证。在此示例中,我们使用 10.1.1.253/24 进行 Web 身份验证。请注意,辅助 IP 地址必须使用与主 IP 地址相同的子网。
-
创建安全区域并分配接口。
[edit] user@host# set security zones security-zone trust interfaces ge-0/0/1.0 host-inbound-traffic system-services all user@host# set security zones security-zone trust interfaces ge-0/0/1.0 host-inbound-traffic protocols all user@host# set security zones security-zone untrust interfaces ge-0/0/0.0 host-inbound-traffic system-services all user@host# set security zones security-zone untrust interfaces ge-0/0/0.0 host-inbound-traffic protocols all - 启用 Web 认证接口。
[edit] user@host# set system services web-management http interface ge-0/0/0.0 user@host# set system services web-management https system-generated-certificate -
设置访问配置文件并添加用户详细信息。
[edit]
user@host# set access profile PROFILE-1 client CLIENT-1 client-group GROUP-1
user@host# set access profile PROFILE-1 client CLIENT-1 firewall-user password "$9$2ngZjHkPQ39.PhrvLVb.P5Tz6"
user@host# set access profile PROFILE-1 client CLIENT-2 client-group GROUP-1
user@host# set access profile PROFILE-1 client CLIENT-2 firewall-user password "$9$/Bv59pBIRSleWB17-ws4o"
user@host# set access profile PROFILE-1 session-options client-idle-timeout 10
我们已使用密码添加了两个用户 CLIENT-1 和 CLIENT-2,并将这些用户分配到客户端组 GROUP-1。
-
配置 Web 认证属性
[edit] user@host# set access firewall-authentication web-authentication default-profile PROFILE-1 user@host# set access firewall-authentication web-authentication banner success "WELCOME to JUNIPER HTTP SESSION" -
使用 dynamic-application 创建安全策略。
[edit]
user@host# set security policies from-zone untrust to-zone trust policy p1 match source-address any
user@host# set security policies from-zone untrust to-zone trust policy p1 match destination-address any
user@host# set security policies from-zone untrust to-zone trust policy p1 match application junos-http
user@host# set security policies from-zone untrust to-zone trust policy p1 match application junos-https
user@host# set security policies from-zone untrust to-zone trust policy p1 match dynamic-application junos:HTTP
user@host# set security policies from-zone untrust to-zone trust policy p1 then permit firewall-authentication web-authentication
user@host# set security policies from-zone untrust to-zone trust policy p1 then log session-init
user@host# set security policies from-zone untrust to-zone trust policy p1 then log session-close
结果
在配置模式下,输入 show security 命令以确认您的配置。如果输出未显示预期的配置,请重复此示例中的配置说明,以便进行更正。
[edit]
               user@host# show security policies
from-zone untrust to-zone trust {
    policy p1 {
        match {
            source-address any;
            destination-address any;
            application [ junos-http junos-https ];
            dynamic-application [ junos:HTTP junos:SSH ];
        }
        then {
            permit {
                firewall-authentication {
                    web-authentication;
                }
            }
            log {
                session-init;
                session-close;
            }
        }
    }
}
[edit]
               user@host# show security zones
security-zone trust {
    interfaces {
        ge-0/0/1.0 {
            host-inbound-traffic {
                system-services {
                    all;
                }
                protocols {
                    all;
                }
            }
        }
    }
}
security-zone untrust {
    interfaces {
        ge-0/0/0.0 {
            host-inbound-traffic {
                system-services {
                    all;
                }
                protocols {
                    all;
                }
            }
        }
    }
}
[edit]
               user@host# show interfaces
ge-0/0/0 {
    unit 0 {
        family inet {
            address 10.1.1.254/24;
            address 10.1.1.253/24 {
                web-authentication {
                    http;
                    https;
                }
            }
        }
    }
}
ge-0/0/1 {
    unit 0 {
        family inet {
            address 10.1.2.254/24;
        }
    }
}
[edit]
               user@host# show access
profile PROFILE-1 {
    client CLIENT-1 {
        client-group GROUP-1;
        firewall-user {
            password "$9$2ngZjHkPQ39.PhrvLVb.P5Tz6"; ## SECRET-DATA
        }
    }
    client CLIENT-2 {
        client-group GROUP-1;
        firewall-user {
            password "$9$/Bv59pBIRSleWB17-ws4o"; ## SECRET-DATA
        }
    }
    session-options {
        client-idle-timeout 10;
    }
}
firewall-authentication {
    pass-through {
        default-profile PROFILE-1;
        }
    }
    web-authentication {
        default-profile PROFILE-1;
        banner {
            success "WELCOME to JUNIPER HTTP SESSION";
        }
    }
}
[edit]
               user@host# show system services
ssh {
    root-login allow;
}
web-management {
    http {
        interface [ fxp0.0 ge-0/0/0.0 ];
    }
    https {
        system-generated-certificate;
        interface [ fxp0.0 ge-0/0/0.0 ];
    }
}
如果完成设备上的功能配置,请从配置模式输入 commit 。
验证 Web 身份验证是否有效
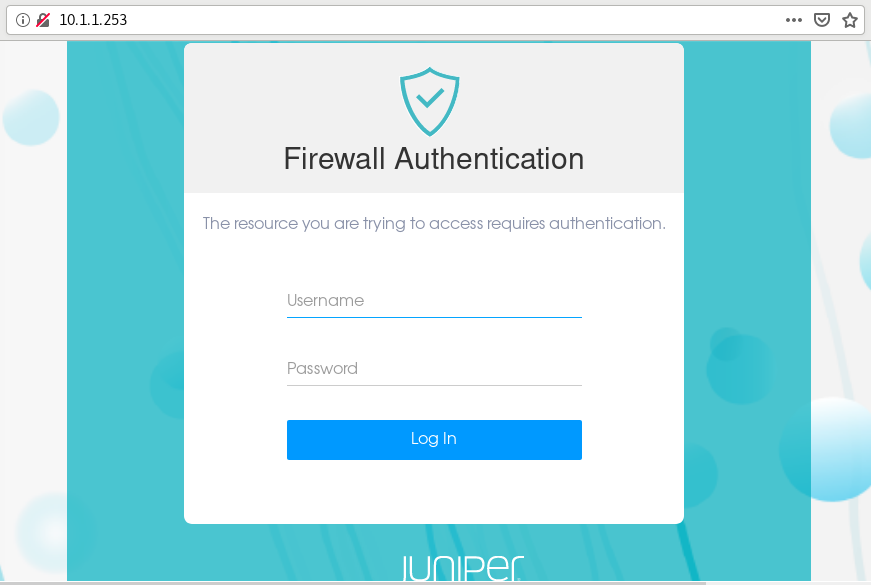
若要验证 Web 认证是否有效,请在客户端计算机上打开 Web 浏览器。首先,使用 Web 浏览器访问安全设备。使用我们为 Web 身份验证配置的 IP 地址 10.1.1.253。设备将提示输入用户名和密码,如 图 9 所示。
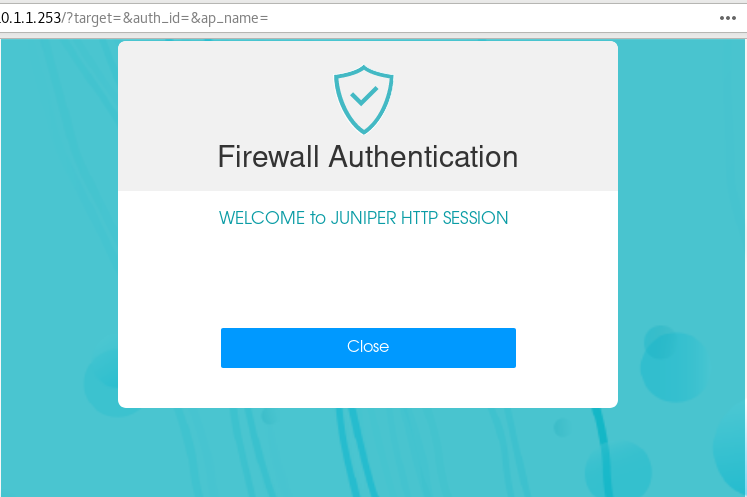
身份验证成功后,系统会显示配置的横幅,如 图 10 所示,您可以访问服务器。
验证
监控防火墙用户
目的
显示防火墙身份验证用户历史记录以验证防火墙用户详细信息。
行动
在作模式下,输入以下 show 命令:
                  user@host> show security firewall-authentication users
Firewall authentication data:
  Total users in table: 1
          Id Source Ip                         Src zone Dst zone Profile    Age Status   User
          15 10.1.1.1                          N/A      N/A      PROFILE-     1 Success  CLIENT-2
                  user@host> show security firewall-authentication users identifier 16
Username: CLIENT-2
Source IP: 10.1.1.1
Authentication state: Success
Authentication method: User-firewall using HTTP
Age: 1
Access time remaining: 9
Lsys: root-logical-system
Source zone: N/A
Destination zone: N/A
Access profile: PROFILE-1
Interface Name: ge-0/0/0.0
Bytes sent by this user: 56986
Bytes received by this user: 436401
Client-groups: GROUP-1
lab@vSRX-01> show security firewall-authentication users identifier 15
Username: CLIENT-2
Source IP: 10.1.1.1
Authentication state: Success
Authentication method: Web-authentication using HTTP
Age: 2
Access time remaining: 8
Lsys: root-logical-system
Source zone: N/A
Destination zone: N/A
Access profile: PROFILE-1
Interface Name: ge-0/0/0.0
Bytes sent by this user: 0
Bytes received by this user: 0
Client-groups: GROUP-1
                  user@host> show security firewall-authentication history
History of firewall authentication data:
  Authentications: 2
          Id Source Ip                         Date       Time     Duration   Status   User
           0 10.1.1.1                          2021-05-12 06:44:26 0:00:59    Failed
          14 10.1.1.1                          2021-05-12 07:33:43 0:10:00    Success  CLIENT-2
意义
命令输出提供详细信息,例如登录用户、使用的身份验证方法、应用的配置文件、登录尝试等。
验证安全策略利用率详细信息
目的
根据收到的点击数显示安全策略的效用率。
行动
在作模式下,输入以下 show 命令:
                  user@host> show security policies hit-count
Logical system: root-logical-system
Index   From zone        To zone           Name           Policy count  Action
1       untrust          trust             p2             2             Permit
意义
命令输出提供有关在流量上应用的安全策略的详细信息。
示例:配置外部认证服务器
此示例说明如何配置设备以进行外部身份验证。
要求
开始之前,请创建一个身份验证用户组。
概述
您可以将多个用户帐户组合在一起以形成一个用户组,该用户组可以存储在本地数据库或 RADIUS、LDAP 或 SecurID 服务器上。当您在策略中引用身份验证用户组和外部身份验证服务器时,与策略匹配的流量将引发身份验证检查。
此示例说明如何为外部身份验证配置访问配置文件 Profile-1。在访问配置文件中配置了两台 RADIUS 服务器和一台 LDAP 服务器。但是,身份验证顺序仅指定 RADIUS 服务器,因此,如果 RADIUS 服务器身份验证失败,则防火墙用户将无法进行身份验证。不会访问本地数据库。
如果防火墙客户端由 RADIUS 服务器进行身份验证,则 RADIUS 服务器返回的组成员 VSA 应在 RADIUS 服务器配置或访问配置文件 Profile-1 中包含 alpha、beta 或 gamma 客户端组。访问配置文件存储用户的用户名和密码,或指向存储此类信息的外部身份验证服务器。
配置
程序
CLI 快速配置
要快速配置此示例,请将以下命令复制到文本文件中,删除所有换行符,更改详细信息,以便与网络配置匹配,将命令复制并粘贴到层级的 CLI 中,然后从配置模式进入 commit 。
set access profile Profile-1 authentication-order radius
set access profile Profile-1 client Client-1 client-group alpha
set access profile Profile-1 client Client-1 client-group beta
set access profile Profile-1 client Client-1 client-group gamma
set access profile Profile-1 client Client-1 firewall-user password pwd
set access profile Profile-1 client Client-2 client-group alpha
set access profile Profile-1 client Client-2 client-group beta
set access profile Profile-1 client Client-2 firewall-user password pwd
set access profile Profile-1 client Client-3 firewall-user password pwd
set access profile Profile-1 client Client-4 firewall-user password pwd
set access profile Profile-1 session-options client-group alpha
set access profile Profile-1 session-options client-group beta
set access profile Profile-1 session-options client-group gamma
set access profile Profile-1 session-options client-idle-timeout 255
set access profile Profile-1 session-options client-session-timeout 4
set access profile Profile-1 ldap-options base-distinguished-name CN=users,DC=junos,DC=juniper,DC=net
set access profile Profile-1 ldap-options search search-filter sAMAccountName=
set access profile Profile-1 ldap-options search admin-search distinguished-name cn=administrator,cn=users,dc=junos,dc=juniper,dc=net
set access profile Profile-1 ldap-options search admin-search password pwd
set access profile Profile-1 ldap-server 203.0.113.39/24
set access profile Profile-1 radius-server 203.0.113.62/24  secret example-secret
set access profile Profile-1 radius-server 203.0.113.62/24  retry 10
set access profile Profile-1 radius-server 203.0.113.27/24  secret juniper
分步过程
下面的示例要求您在各个配置层级中进行导航。有关作说明,请参阅 在配置模式下使用 CLI 编辑器。
要配置设备以进行外部身份验证:
指定外部身份验证顺序的 RADIUS 服务器。
[edit]
user@host# set access profile Profile-1 authentication-order radius
配置 Client1-4 防火墙用户,并将 Client-1 防火墙用户和 Client-2 防火墙用户分配到客户端组。
[edit access profile Profile-1]
user@host# set client Client-1 client-group alpha
user@host# set client Client-1 client-group beta
user@host# set client Client-1 client-group gamma
user@host# set client Client-1 firewall-user password pwd
user@host# set client Client-2 client-group alpha
user@host# set client Client-2 client-group beta
user@host# set client Client-2 firewall-user password pwd
user@host# set client Client-3 firewall-user password pwd
user@host# set client Client-4 firewall-user password pwd
在会话选项中配置客户端组。
[edit access profile Profile-1]
user@host# set session-options client-group alpha
user@host# set session-options client-group beta
user@host# set session-options client-group gamma
user@host# set session-options client-idle-timeout 255
user@host# set session-options client-session-timeout 4
配置 LDAP 服务器和服务器选项的 IP 地址。
[edit access profile Profile-1]
user@host# set ldap-options base-distinguished-name CN=users,DC=junos,DC=mycompany,DC=net
user@host# set ldap-options search search-filter sAMAccountName=
user@host# set ldap-options search admin-search password pwd
user@host# set ldap-options search admin-search distinguished-name cn=administrator,cn=users,dc=junos,dc=mycompany,dc=net
user@host# set ldap-server 203.0.113.39/24
配置两个 RADIUS 服务器的 IP 地址。
[edit access profile Profile-1]
user@host# set radius-server 203.0.113.62/24  secret pwd
user@host# set radius-server 203.0.113.62/24  retry 10
user@host# set radius-server 203.0.113.27/24 secret pwd
结果
在配置模式下,输入 show access profile Profile-1 命令以确认您的配置。如果输出未显示预期的配置,请重复此示例中的配置说明,以便进行更正。
user@host# show access profile Profile-1
authentication-order radius;
client Client-1 {
    client-group [ alpha beta gamma ];
    firewall-user {
        password "$ABC123"; ## SECRET-DATA
    }
}
client Client-2 {
    client-group [ alpha beta ];
    firewall-user {
        password "$ABC123"; ## SECRET-DATA
    }
}
client Client-3 {
    firewall-user {
        password "$ABC123"; ## SECRET-DATA
    }
}
client Client-4 {
    firewall-user {
        password "$ABC123"; ## SECRET-DATA
    }
}
session-options {
    client-group [ alpha beta gamma ];
    client-idle-timeout 255;
    client-session-timeout 4;
}
ldap-options {
    base-distinguished-name CN=users,DC=junos,DC=juniper,DC=net;
    search {
        search-filter sAMAccountName=;
        admin-search {
            distinguished-name cn=administrator,cn=users,dc=junos,
							dc=mycompany,dc=net; password "$ABC123"; ## SECRET-DATA
        }
    }
}
ldap-server {
    203.0.113.39/24 ;
}
radius-server {
    203.0.113.62/24  {
        secret "$ABC123"; ## SECRET-DATA
        retry 10;
    }
    203.0.113.27/24  {
        secret "$ABC123"; ## SECRET-DATA
    }
}
如果完成设备配置,请从配置模式输入 commit 。
示例:配置客户端组
此示例说明如何为配置文件中的客户端组配置本地用户。
要求
开始之前,请创建访问配置文件。
概述
客户端组是客户端所属的组的列表。与客户端空闲超时一样,仅当外部认证服务器在其响应中未返回值时(例如,LDAP 服务器不返回此类信息),才使用客户端组。
此示例说明如何在名为 Managers 的配置文件中为客户端组 G1、G2 和 G3 配置名为 Client-1 的本地用户。在此示例中,为客户端配置了客户端组。如果未为客户端定义客户端组,则使用层次结构下的 access profile session-options 客户端组。
配置
程序
CLI 快速配置
要快速配置此示例,请将以下命令复制到文本文件中,删除所有换行符,更改详细信息,以便与网络配置匹配,将命令复制并粘贴到层级的 CLI 中,然后从配置模式进入 commit 。
set access profile Managers client Client-1 client-group G1set access profile Managers client Client-1 client-group G2set access profile Managers client Client-1 client-group G3set access profile Managers client Client-1 firewall-user password pwdset access profile Managers session-options client-group G1set access profile Managers session-options client-group G2set access profile Managers session-options client-group G3
分步过程
下面的示例要求您在各个配置层级中进行导航。有关作说明,请参阅 在配置模式下使用 CLI 编辑器。
要在配置文件中为客户端组配置本地用户,请执行以下作:
配置防火墙用户配置文件管理器,并为其分配客户端组。
user@host# edit access profile Managers
[edit access profile Managers]
user@host# set client Client-1 client-group G1
user@host# set client Client-1 client-group G2
user@host# set client Client-1 client-group G3
user@host# set client Client-1 firewall-user password pwd
在会话选项中配置客户端组。
[edit access profile Managers]
user@host# set session-options client-group G1
user@host# set session-options client-group G2
user@host# set session-options client-group G3
结果
从配置模式输入 show access profile Managers 命令,以确认您的配置。如果输出未显示预期的配置,请重复此示例中的配置说明,以便进行更正。
user@host# show access profile Managers

client Client-1 {
    client-group [ G1 G2 G3 ];
    firewall-user {
        password "$ABC123"; ## SECRET-DATA
    }
}
session-options {
    client-group [ G1 G2 G3 ];
}
如果完成设备配置,请从配置模式输入 commit 。
示例:自定义横幅
此示例说明如何自定义浏览器中显示的横幅文本。
要求
开始之前,请创建访问配置文件。
概述
横幅是根据登录类型在显示器上不同位置显示的消息。此示例说明如何更改浏览器中显示的横幅,以指示用户在通过 Web 身份验证成功登录后已成功进行身份验证。新消息为“Web 身份验证成功”。如果身份验证失败,则新消息为“身份验证失败”。
配置
程序
CLI 快速配置
要快速配置此示例,请将以下命令复制到文本文件中,删除所有换行符,更改详细信息,以便与网络配置匹配,将命令复制并粘贴到层级的 CLI 中,然后从配置模式进入 commit 。
set access firewall-authentication pass-through default-profile Profile-1set access firewall-authentication pass-through ftp banner fail “ Authentication failed”set access firewall-authentication web-authentication default-profile Profile-1set access firewall-authentication web-authentication banner success “ Web authentication is successful”
分步过程
下面的示例要求您在各个配置层级中进行导航。有关作说明,请参阅 在配置模式下使用 CLI 编辑器。
要自定义浏览器中显示的横幅文本:
为通过 FTP 的失败直通身份验证指定横幅文本。
[edit]
user@host# set access firewall-authentication pass-through default-profile Profile-1
user@host# set access firewall-authentication pass-through ftp banner fail “ Authentication failed”
指定成功进行 Web 身份验证的横幅文本。
[edit]
user@host# set access web-authentication default-profile Profile-1
user@host# set access web-authentication banner success “ Web authentication is successful”
结果
在配置模式下,输入 show access firewall-authentication 命令以确认您的配置。如果输出未显示预期的配置,请重复此示例中的配置说明,以便进行更正。
user@host# show access firewall-authentication
pass-through {
    default-profile Profile-1;
    ftp {
        banner {
            fail "Authentication failed";
        }
    }
}
web-authentication {
    default-profile Profile-1;
    banner {
        success "Web authentication is successful";
    }
}
如果完成设备配置,请从配置模式输入 commit 。
示例:为 SRX 强制网络门户配置双向 TLS (mTLS) 身份验证
了解如何配置双向 TLS (mTLS) 身份验证。
使用此示例可在防火墙上配置并验证相互传输层安全性 (mTLS) 身份验证。在此示例中,我们使用 防火墙 来指代瞻博网络® SRX 系列防火墙或瞻博网络® vSRX 虚拟防火墙 (vSRX3.0)。使用此配置,用户无需密码即可进行身份验证。用户身份验证是通过在公钥-私钥密钥对的帮助下验证客户端/服务器证书来实现的。
若要配置此示例中所示的 mTLS,管理员必须生成以下证书:
-
CA 证书 — 在防火墙和客户端浏览器上运行 CA 证书。
-
服务器证书 — 使用 domain1.com mTLS 服务器在防火墙上生成服务器证书。使用防火墙上配置的 CA 证书对服务器证书进行签名。
-
客户端证书 — 在客户端浏览器上生成客户端证书,并使用防火墙上配置的 CA 证书对客户端证书进行签名。
| 阅读时间 |
不到一个小时。 |
| 配置时间 |
不到一个小时。 |
先决条件示例
| 硬件要求 |
® 瞻博网络 SRX 系列防火墙或瞻博网络® vSRX 虚拟防火墙 (vSRX3.0) |
| 软件要求 |
Junos OS 23.4R1 或更高版本 |
准备工作
功能概述
本节提供此示例中配置组件的摘要。
| 使用的技术 |
要建立 mTLS 身份验证,必须配置:
|
| 主要验证任务 |
验证 mTLS 身份验证。 |
拓扑概览
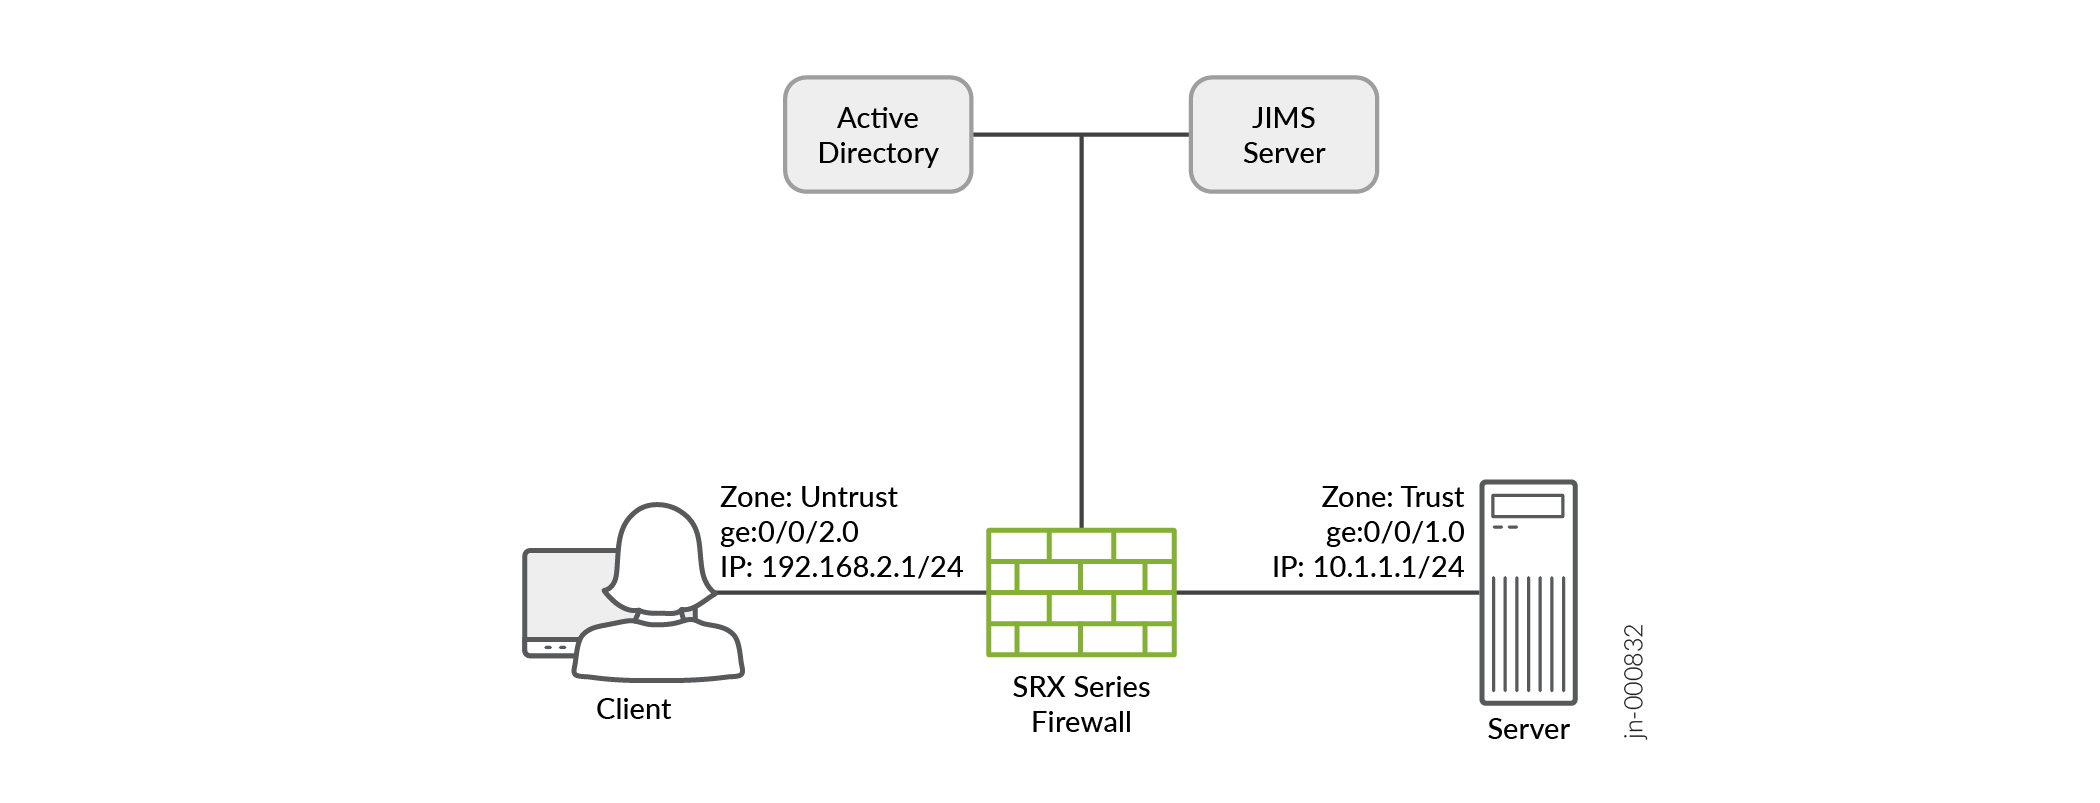
在此示例中,客户端通过防火墙连接到服务器。在 mTLS 身份验证中,客户端和服务器通过加密的 TLS 连接交换信息,从而验证彼此的证书。
连接到服务器后,防火墙会将未经身份验证的客户端重定向到 domain1.com。此过程可避免证书错误,因为防火墙上预安装了 domain1.com 的 CA 证书和服务器证书。CA 证书预安装在客户端的浏览器上。
使用 mTLS 身份验证可以绕过手动输入用户凭据以进行强制门户身份验证。确保针对轻型目录访问协议 (LDAP) 配置文件配置有效用户,以便从 Active Directory 中检索用户信息和授权。在策略中应用防火墙身份验证时,需要进行 JIMS 配置。
| 主机名 |
角色 |
功能 |
|---|---|---|
| 客户 |
服务请求者 |
通过 SRX 系列防火墙启动与服务器的会话。 |
| SRX 系列防火墙 |
防火墙 |
对客户端的数据包进行加密和解密。 |
| 服务器 |
服务器 |
响应客户端的请求。 |
| 活动目录 |
标识源 |
作为身份源的 Active Directory 定义了 SRX 系列防火墙、vSRX 虚拟防火墙、瞻博网络® cSRX 容器防火墙或瞻博网络® NFX 系列网络服务平台与 Microsoft Windows Active Directory 的集成。有关详细信息,请参阅作为标识源的 Active Directory。 |
| JIMS |
Windows 服务应用程序 |
® 瞻博网络身份管理服务 (JIMS) 是一款 Windows 服务应用,旨在收集和管理来自 Active Directory 域的用户、设备和组信息。有关详细信息,请参阅 使用 SRX 系列防火墙的 JIMS。 |
拓扑图示
在被测设备 (DUT) 上进行分步配置
-
配置所需的接口。
set interfaces ge-0/0/2 unit 0 family inet address 192.168.2.1/24 web-authentication https
set interfaces ge-0/0/1 unit 0 family inet address 10.1.1.1/24
-
配置安全区域并为这些区域分配接口。
set security zones security-zone untrust host-inbound-traffic system-services ike
set security zones security-zone untrust host-inbound-traffic system-services https
set security zones security-zone untrust host-inbound-traffic system-services tcp-encap
set security zones security-zone untrust interfaces ge-0/0/2.0
set security zones security-zone trust interfaces ge-0/0/1.0
-
配置访问配置文件。
set access profile profile1 client user1 client-group group1
set access profile profile1 client user1 client-group group2
set access profile profile1 client user1 firewall-user password "$9$dPb4ZjHmzF/k.uO"
-
配置安全策略以允许未经过身份验证的用户使用防火墙用户身份验证。
set security policies from-zone untrust to-zone trust policy p1 match source-address any
set security policies from-zone untrust to-zone trust policy p1 match destination-address any
set security policies from-zone untrust to-zone trust policy p1 match application any
set security policies from-zone untrust to-zone trust policy p1 match source-identity unauthenticated-user
set security policies from-zone untrust to-zone trust policy p1 match source-identity unknown-user
set security policies from-zone untrust to-zone trust policy p1 then permit firewall-authentication user-firewall access-profile profile1
set security policies from-zone untrust to-zone trust policy p1 then permit firewall-authentication user-firewall web-redirect-to-https
set security policies from-zone untrust to-zone trust policy p1 then permit firewall-authentication user-firewall web-authentication-server domain1.com:8443
set security policies from-zone untrust to-zone trust policy p1 then permit firewall-authentication push-to-identity-management
set security policies from-zone untrust to-zone trust policy p1 then log session-close
-
配置安全策略,以允许经过身份验证的用户无需防火墙用户身份验证。
set security policies from-zone untrust to-zone trust policy p2 match source-address any
set security policies from-zone untrust to-zone trust policy p2 match destination-address any
set security policies from-zone untrust to-zone trust policy p2 match application any
set security policies from-zone untrust to-zone trust policy p2 match source-identity authenticated-user
set security policies from-zone untrust to-zone trust policy p2 then permit
set security policies from-zone untrust to-zone trust policy p2 then log session-close
-
配置 ca-profile。
set security pki ca-profile ca_domain1
set security pki ca-profile ca_domain1 ca-identity ca_domain1_id
-
配置 mTLS 配置文件。
set security firewall-authentication mtls-profile ma2 subject CN=test1client.*
set security firewall-authentication mtls-profile-fallback-password
-
配置
web-management为在运行 domain1.com 服务器证书的防火墙上启动 mTLS。set system services web-management https interface ge-0/0/2.0 set system services web-management https pki-local-certificate srx_domain1.com set system services web-management https virtual-domain domain1.com pki-local-certificate srx_domain1.com set system services web-management https virtual-domain domain1.com mtls port 8443 set system services web-management https virtual-domain domain1.com mtls ca-profile ca_domain1 set system services web-management https virtual-domain domain1.com mtls firewall-authentication-profile ma2
-
(选答)配置证书吊销列表 (CRL) 以进行证书验证。mTLS 支持传入证书的 CRL 验证。请参阅 证书吊销。
set security pki ca-profile ca_domain1 revocation-check use-crl
set security pki ca-profile ca_domain1 revocation-check crl url http://<crl-server-ip>/ca_crl.crl
附录 1: set 所有设备上的命令
set interfaces ge-0/0/2 unit 0 family inet address 192.168.2.1/24 web-authentication https
set interfaces ge-0/0/1 unit 0 family inet address 10.1.1.1/24

set security zones security-zone untrust host-inbound-traffic system-services ike
set security zones security-zone untrust host-inbound-traffic system-services https
set security zones security-zone untrust host-inbound-traffic system-services tcp-encap
set security zones security-zone untrust interfaces ge-0/0/2.0
set security zones security-zone trust interfaces ge-0/0/1.0

set access profile profile1 client user1 client-group group1
set access profile profile1 client user1 client-group group2
set access profile profile1 client user1 firewall-user password "$9$dPb4ZjHmzF/k.uO"

set security policies from-zone untrust to-zone trust policy p1 match source-address any
set security policies from-zone untrust to-zone trust policy p1 match destination-address any
set security policies from-zone untrust to-zone trust policy p1 match application any
set security policies from-zone untrust to-zone trust policy p1 match source-identity unauthenticated-user
set security policies from-zone untrust to-zone trust policy p1 match source-identity unknown-user
set security policies from-zone untrust to-zone trust policy p1 then permit firewall-authentication user-firewall access-profile profile1
set security policies from-zone untrust to-zone trust policy p1 then permit firewall-authentication user-firewall web-redirect-to-https
set security policies from-zone untrust to-zone trust policy p1 then permit firewall-authentication user-firewall web-authentication-server domain1.com:8443
set security policies from-zone untrust to-zone trust policy p1 then permit firewall-authentication push-to-identity-management
set security policies from-zone untrust to-zone trust policy p1 then log session-close


set security policies from-zone untrust to-zone trust policy p2 match source-address any
set security policies from-zone untrust to-zone trust policy p2 match destination-address any
set security policies from-zone untrust to-zone trust policy p2 match application any
set security policies from-zone untrust to-zone trust policy p2 match source-identity authenticated-user
set security policies from-zone untrust to-zone trust policy p2 then permit
set security policies from-zone untrust to-zone trust policy p2 then log session-close

set security pki ca-profile ca_domain1
set security pki ca-profile ca_domain1 ca-identity ca_domain1_id

set security firewall-authentication mtls-profile ma2 subject CN=test1client.*
set security firewall-authentication mtls-profile-fallback-password

set system services web-management https interface ge-0/0/2.0
set system services web-management https pki-local-certificate srx_domain1.com
set system services web-management https virtual-domain domain1.com pki-local-certificate srx_domain1.com
set system services web-management https virtual-domain domain1.com mtls port 8443
set system services web-management https virtual-domain domain1.com mtls ca-profile ca_domain1
set system services web-management https virtual-domain domain1.com mtls firewall-authentication-profile ma2

set security pki ca-profile ca_domain1 revocation-check use-crl
set security pki ca-profile ca_domain1 revocation-check crl url http://<crl-server-ip>/ca_crl.crl
为客户端和服务器生成密钥证书
Goal :
1. Generate CA certificate.
2. Generate server cert for srx_domain1.com domain and sign it with CA cert and load it in SRX.
3. Generate client cert sign it with CA cert and load it in client browser.

----------------------------
1. Generate CA certificate :
----------------------------

First you need to set up CA, and then you sign server and client certificates.
Below steps will help creating the certificates in the Linux machine where openssl is installed.

To create CA certificate, create a basic configuration file:

$ touch openssl-ca.cnf,   Then, add the following to it:

## Begining of file

HOME            = .
RANDFILE        = $ENV::HOME/.rnd

####################################################################
[ ca ]
default_ca    = CA_default      # The default ca section

[ CA_default ]

default_days     = 365          # How long to certify for
default_crl_days = 30           # How long before next CRL
default_md       = sha256       # Use public key default MD
preserve         = no           # Keep passed DN ordering

x509_extensions = ca_extensions # The extensions to add to the cert

email_in_dn     = no            # Don't concat the email in the DN
copy_extensions = copy          # Required to copy SANs from CSR to cert

####################################################################
[ req ]
default_bits       = 4096
default_keyfile    = cakey.pem
distinguished_name = ca_distinguished_name
x509_extensions    = ca_extensions
string_mask        = utf8only

####################################################################
[ ca_distinguished_name ]
countryName         = Country Name (2 letter code)
countryName_default = US

stateOrProvinceName         = State or Province Name (full name)
stateOrProvinceName_default = Maryland

localityName                = Locality Name (eg, city)
localityName_default        = MyLocality

organizationName            = Organization Name (eg, company)
organizationName_default    = Test CA, Limited

organizationalUnitName         = Organizational Unit (eg, division)
organizationalUnitName_default = Server Research Department

commonName         = Common Name (e.g. server FQDN or YOUR name)
commonName_default = MYCA

emailAddress         = Email Address
emailAddress_default = test@example.com

####################################################################
[ ca_extensions ]

subjectKeyIdentifier   = hash
authorityKeyIdentifier = keyid:always, issuer
basicConstraints       = critical, CA:true
keyUsage               = keyCertSign, cRLSign

## End of file.


Then, execute the following. The -nodes omits the password or passphrase so you can examine the certificate.

$ openssl req -x509 -config openssl-ca.cnf -days 365 -newkey rsa:4096 -sha256 -nodes -out cacert.pem -outform PEM
After the command executes, cacert.pem will be your certificate for CA operations, and cakey.pem will be the private key.

You can verify the certificate with the following command :

$ openssl x509 -in cacert.pem -text -noout
Certificate:
    Data:
        Version: 3 (0x2)
        Serial Number: 11485830970703032316 (0x9f65de69ceef2ffc)
    Signature Algorithm: sha256WithRSAEncryption
        Issuer: C=US, ST=MD, L=MyLocality, CN=Test CA/emailAddress=test@example.com
        Validity
            Not Before: Jan 24 14:24:11 2014 GMT
            Not After : Feb 23 14:24:11 2014 GMT
        Subject: C=US, ST=MD, L=MyLocality, CN=Test CA/emailAddress=test@example.com
        Subject Public Key Info:
            Public Key Algorithm: rsaEncryption
                Public-Key: (4096 bit)
                Modulus:
                    00:b1:7f:29:be:78:02:b8:56:54:2d:2c:ec:ff:6d:
                    ...
                    39:f9:1e:52:cb:8e:bf:8b:9e:a6:93:e1:22:09:8b:
                    59:05:9f
                Exponent: 65537 (0x10001)
        X509v3 extensions:
            X509v3 Subject Key Identifier:
                4A:9A:F3:10:9E:D7:CF:54:79:DE:46:75:7A:B0:D0:C1:0F:CF:C1:8A
            X509v3 Authority Key Identifier:
                keyid:4A:9A:F3:10:9E:D7:CF:54:79:DE:46:75:7A:B0:D0:C1:0F:CF:C1:8A

            X509v3 Basic Constraints: critical
                CA:TRUE
            X509v3 Key Usage:
                Certificate Sign, CRL Sign
    Signature Algorithm: sha256WithRSAEncryption
         4a:6f:1f:ac:fd:fb:1e:a4:6d:08:eb:f5:af:f6:1e:48:a5:c7:
         ...
         cd:c6:ac:30:f9:15:83:41:c1:d1:20:fa:85:e7:4f:35:8f:b5:
         38:ff:fd:55:68:2c:3e:37

You can also test its purpose with following command :

$ openssl x509 -purpose -in cacert.pem -inform PEM
Certificate purposes:
SSL client : No
SSL client CA : Yes
SSL server : No
SSL server CA : Yes
Netscape SSL server : No
Netscape SSL server CA : Yes
S/MIME signing : No
S/MIME signing CA : Yes
S/MIME encryption : No
S/MIME encryption CA : Yes
CRL signing : Yes
CRL signing CA : Yes
Any Purpose : Yes
Any Purpose CA : Yes
OCSP helper : Yes
OCSP helper CA : Yes
Time Stamp signing : No
Time Stamp signing CA : Yes
-----BEGIN CERTIFICATE-----
MIIFpTCCA42gAwIBAgIJAJ9l3mnO7y/8MA0GCSqGSIb3DQEBCwUAMGExCzAJBgNV
...
aQUtFrV4hpmJUaQZ7ySr/RjCb4KYkQpTkOtKJOU1Ic3GrDD5FYNBwdEg+oXnTzWP
tTj//VVoLD43
-----END CERTIFICATE-----


Load CA cert on SRX :
router# set security pki ca-profile ca_domain1 ca-identity ca_domain1_id
router# run request security pki ca-certificate load ca-profile ca_domain1 filename /var/tmp/cacert.pem


Load CA cert on client browser :  ca_cert.pem  in 'authorities' section of client browser certificates [Can also be done after step3].

-------------------------------------------------------------------------
2. Generate server cert for srx_domain1.com domain and sign it with CA cert :
-------------------------------------------------------------------------
First, touch the openssl-server.cnf (you can make one of these for user certificates also) :

$ touch openssl-server.cnf
Then open it, and add the following.
## Begining of file.

HOME            = .
RANDFILE        = $ENV::HOME/.rnd

####################################################################
[ req ]
default_bits       = 2048
default_keyfile    = serverkey.pem
distinguished_name = server_distinguished_name
req_extensions     = server_req_extensions
string_mask        = utf8only

####################################################################
[ server_distinguished_name ]
countryName         = Country Name (2 letter code)
countryName_default = US

stateOrProvinceName         = State or Province Name (full name)
stateOrProvinceName_default = MD

localityName         = Locality Name (eg, city)
localityName_default = MyLocality

organizationName            = Organization Name (eg, company)
organizationName_default    = Test Server, Limited

commonName           = Common Name (e.g. server FQDN or YOUR name)
commonName_default   = srx_domain1

emailAddress         = Email Address
emailAddress_default = srx_domain1@srx_domain1.com

####################################################################
[ server_req_extensions ]

subjectKeyIdentifier = hash
basicConstraints     = CA:FALSE
keyUsage             = digitalSignature, keyEncipherment
subjectAltName       = @alternate_names
nsComment            = "OpenSSL Generated Certificate"

####################################################################
[ alternate_names ]

DNS.1  = srx_domain1.com
DNS.2  = www.srx_domain1.com
DNS.3  = mail.srx_domain1.com
DNS.4  = ftp.srx_domain1.com

# IPv4 localhost
IP.1     = 127.0.0.1

# IPv6 localhost
IP.2     = ::1

## End of file.

Now, create the server certificate request using below command.

$ openssl req -config openssl-server.cnf -newkey rsa:2048 -sha256 -nodes -out servercert.csr -outform PEM
After this command executes, you will have a request in servercert.csr and a private key in serverkey.pem.

Verify the created certificate with below command :

$ openssl req -text -noout -verify -in servercert.csr
Certificate:
    verify OK
    Certificate Request:
        Version: 0 (0x0)
        Subject: C=US, ST=MD, L=MyLocality, CN=srx_domain1/emailAddress=srx_domain1@srx_domain1.com
        Subject Public Key Info:
            Public Key Algorithm: rsaEncryption
                Public-Key: (2048 bit)
                Modulus:
                    00:ce:3d:58:7f:a0:59:92:aa:7c:a0:82:dc:c9:6d:
                    ...
                    f9:5e:0c:ba:84:eb:27:0d:d9:e7:22:5d:fe:e5:51:
                    86:e1
                Exponent: 65537 (0x10001)
        Attributes:
        Requested Extensions:
            X509v3 Subject Key Identifier:
                1F:09:EF:79:9A:73:36:C1:80:52:60:2D:03:53:C7:B6:BD:63:3B:61
            X509v3 Basic Constraints:
                CA:FALSE
            X509v3 Key Usage:
                Digital Signature, Key Encipherment
            X509v3 Subject Alternative Name:
                DNS:example.com, DNS:www.example.com, DNS:mail.example.com, DNS:ftp.example.com
            Netscape Comment:
                OpenSSL Generated Certificate
    Signature Algorithm: sha256WithRSAEncryption
         6d:e8:d3:85:b3:88:d4:1a:80:9e:67:0d:37:46:db:4d:9a:81:
         ...
         76:6a:22:0a:41:45:1f:e2:d6:e4:8f:a1:ca:de:e5:69:98:88:
         a9:63:d0:a7

Next, you have to sign it with your CA.

First, open openssl-ca.cnf and add the following two sections.


####################################################################
[ signing_policy ]
countryName            = optional
stateOrProvinceName    = optional
localityName           = optional
organizationName       = optional
organizationalUnitName = optional
commonName             = supplied
emailAddress           = optional

####################################################################
[ signing_req ]
subjectKeyIdentifier   = hash
authorityKeyIdentifier = keyid,issuer
basicConstraints       = CA:FALSE
keyUsage               = digitalSignature, keyEncipherment
Second, add the following to the [ CA_default ] section of openssl-ca.cnf. I left them out earlier, because they can complicate things (they were unused at the time). Now you'll see how they are used, so hopefully they will make sense.

base_dir      = .
certificate   = $base_dir/cacert.pem   # The CA certificate
private_key   = $base_dir/cakey.pem    # The CA private key
new_certs_dir = $base_dir              # Location for new certs after signing
database      = $base_dir/index.txt    # Database index file
serial        = $base_dir/serial.txt   # The current serial number

unique_subject = no  # Set to 'no' to allow creation of
                     # several certificates with same subject.
Third, touch index.txt and serial.txt:

$ touch index.txt
$ echo '01' > serial.txt

Then, perform the following:

$ openssl ca -config openssl-ca.cnf -policy signing_policy -extensions signing_req -out servercert.pem -infiles servercert.csr
You should see similar to the following:

Using configuration from openssl-ca.cnf
Check that the request matches the signature
Signature ok
The Subject's Distinguished Name is as follows
countryName           :PRINTABLE:'US'
stateOrProvinceName   :ASN.1 12:'MD'
localityName          :ASN.1 12:'MyLocality'
commonName            :ASN.1 12:'Test CA'
emailAddress          :IA5STRING:'test@example.com'
Certificate is to be certified until Oct 20 16:12:39 2016 GMT (1000 days)
Sign the certificate? [y/n]:Y

1 out of 1 certificate requests certified, commit? [y/n]Y
Write out database with 1 new entries
Data Base Updated
After the command executes, you will have a freshly minted server certificate in servercert.pem. The private key was created earlier and is available in serverkey.pem.

Finally, you can inspect your freshly minted certificate with the following:

$ openssl x509 -in servercert.pem -text -noout
Certificate:
    Data:
        Version: 3 (0x2)
        Serial Number: 9 (0x9)
    Signature Algorithm: sha256WithRSAEncryption
        Issuer: C=US, ST=MD, L=MyLocality, CN=Test CA/emailAddress=test@srx_domain1.com
        Validity
            Not Before: Jan 24 19:07:36 2014 GMT
            Not After : Oct 20 19:07:36 2016 GMT
        Subject: C=US, ST=MD, L=MyLocality, CN=Test Server
        Subject Public Key Info:
            Public Key Algorithm: rsaEncryption
                Public-Key: (2048 bit)
                Modulus:
                    00:ce:3d:58:7f:a0:59:92:aa:7c:a0:82:dc:c9:6d:
                    ...
                    f9:5e:0c:ba:84:eb:27:0d:d9:e7:22:5d:fe:e5:51:
                    86:e1
                Exponent: 65537 (0x10001)
        X509v3 extensions:
            X509v3 Subject Key Identifier:
                1F:09:EF:79:9A:73:36:C1:80:52:60:2D:03:53:C7:B6:BD:63:3B:61
            X509v3 Authority Key Identifier:
                keyid:42:15:F2:CA:9C:B1:BB:F5:4C:2C:66:27:DA:6D:2E:5F:BA:0F:C5:9E

            X509v3 Basic Constraints:
                CA:FALSE
            X509v3 Key Usage:
                Digital Signature, Key Encipherment
            X509v3 Subject Alternative Name:
                DNS:example.com, DNS:www.example.com, DNS:mail.example.com, DNS:ftp.example.com
            Netscape Comment:
                OpenSSL Generated Certificate
    Signature Algorithm: sha256WithRSAEncryption
         b1:40:f6:34:f4:38:c8:57:d4:b6:08:f7:e2:71:12:6b:0e:4a:
         ...
         45:71:06:a9:86:b6:0f:6d:8d:e1:c5:97:8d:fd:59:43:e9:3c:
         56:a5:eb:c8:7e:9f:6b:7a


Please refer to openssl documentation for copy_extension, unique_subject, policy_match etc and add those the file if needed.
This document describes only the basic key generation steps.


Load sever certificate on SRX :
router# run request security pki local-certificate load filename server_CASignedcert.pem key server_key.pem certificate-id srx_domain1


-------------------------------------------------------
3. Generate client cert and load it in client browser :
--------------------------------------------------------
Follow the steps in step-2 and generate client certificate.
In case you need to connect CN of the certificate to the username from Active-directory - where user's role can be fetched, ensure that client CN is test1client@srx_domain1.com,
where, Active-directory already has a user with name test1client in domain srx_domain1.com.

Active-directory entry :
PS C:\Users\Administrator> Get-ADUser -Filter {SamAccountName -like "*test*"}
DistinguishedName : CN=test1client N,DC=srx_domain1,DC=com
Enabled           : True
GivenName         : test1Client
Name              : test1client N
ObjectClass       : user
ObjectGUID        : a28777ef-0023-45f1-a192-147eff664cbd
SamAccountName    : test1client
UserPrincipalName : test1client@srx_domain1.com


After the client certificate is generated in pem format, convert it in pkcs format :
openssl pkcs12 -export -out client_cert.p12 -in clientcert.pem -inkey clientkey.pem -passin pass:root -passout pass:root

Now, on  client machine, on web browser, load client_cert.p12 in 'your certificates' section.
Also, load ca_cert.pem  in 'authorities' section of browser certificates.
验证
本部分提供可用于验证此示例中功能的命令 show 列表。
验证 mTLS 身份验证
目的
验证 mTLS 身份验证。
行动
在作模式下,输入 show services user-identification debug-counters | match MTLS 命令,以查看 mTLS 身份验证的状态。
user@host> show services user-identification debug-counters | match MTLS
  MTLS Authentication Successful           :          2
  MTLS Authentication failed               :          0
  MTLS profile match failed, fallback password :      0
  MTLS auth processed by userfw            :          1
  MTLS auth processed by fwauthd           :          0
  MTLS auth processed by none              :          0
  MTLS failure due to NULL domain          :          0
  MTLS PTIM failed                         :          0
意义
示例输出确认:
-
您已成功配置 mTLS 身份验证。
-
用户防火墙已成功处理 mTLS 身份验证。
另见
配置自定义徽标和横幅消息
了解防火墙管理员如何设置自定义徽标,并配置在直通和强制门户身份验证期间显示的登录和注销横幅消息。
按照以下步骤设置自定义徽标,并配置在强制门户身份验证期间显示的登录成功、登录失败和注销横幅消息。
默认情况下,强制门户会显示注销按钮,防火墙管理员无需进行任何其他配置。登录后,防火墙用户可以使用强制门户中显示的注销按钮注销。
设置在以下期间显示的自定义徽标:
强制门户身份验证。
[edit]
user@host# set access firewall-authentication web-authentication logo file path
例:
[edit]
user@host# set access firewall-authentication web-authentication logo path/var/tmp/mylogo.png
配置在以下期间显示的自定义登录成功和登录失败横幅消息
直通身份验证。
[edit]
user@host# set access firewall-authentication pass-through http banner success string
user@host# set access firewall-authentication pass-through http banner fail string
强制门户身份验证。
[edit]
user@host# set access firewall-authentication web-authentication banner success string
user@host# set access firewall-authentication web-authentication banner fail string
例:
[edit]
user@host# set access firewall-authentication web-authentication banner success Login Success
user@host# set access firewall-authentication web-authentication banner fail Login Failed
配置在直通身份验证期间显示的登录横幅消息。
[edit]
user@host# set access firewall-authentication pass-through http banner login string
例:
[edit]
user@host# set access firewall-authentication pass-through http banner login Successful Login
配置在强制门户身份验证期间显示的注销横幅消息。
[edit]
user@host# set access firewall-authentication web-authentication banner logout string
例:
[edit]
user@host# set access firewall-authentication web-authentication banner logout Successful Logout
提交配置。
[edit]
user@host# commit