Installing Nested vMX VMs
A nested virtual machine is a virtual machine contained within another VM. Read this topic to understand how to launch the nested vMX VM on KVM.
Overview of the Nested VM Model
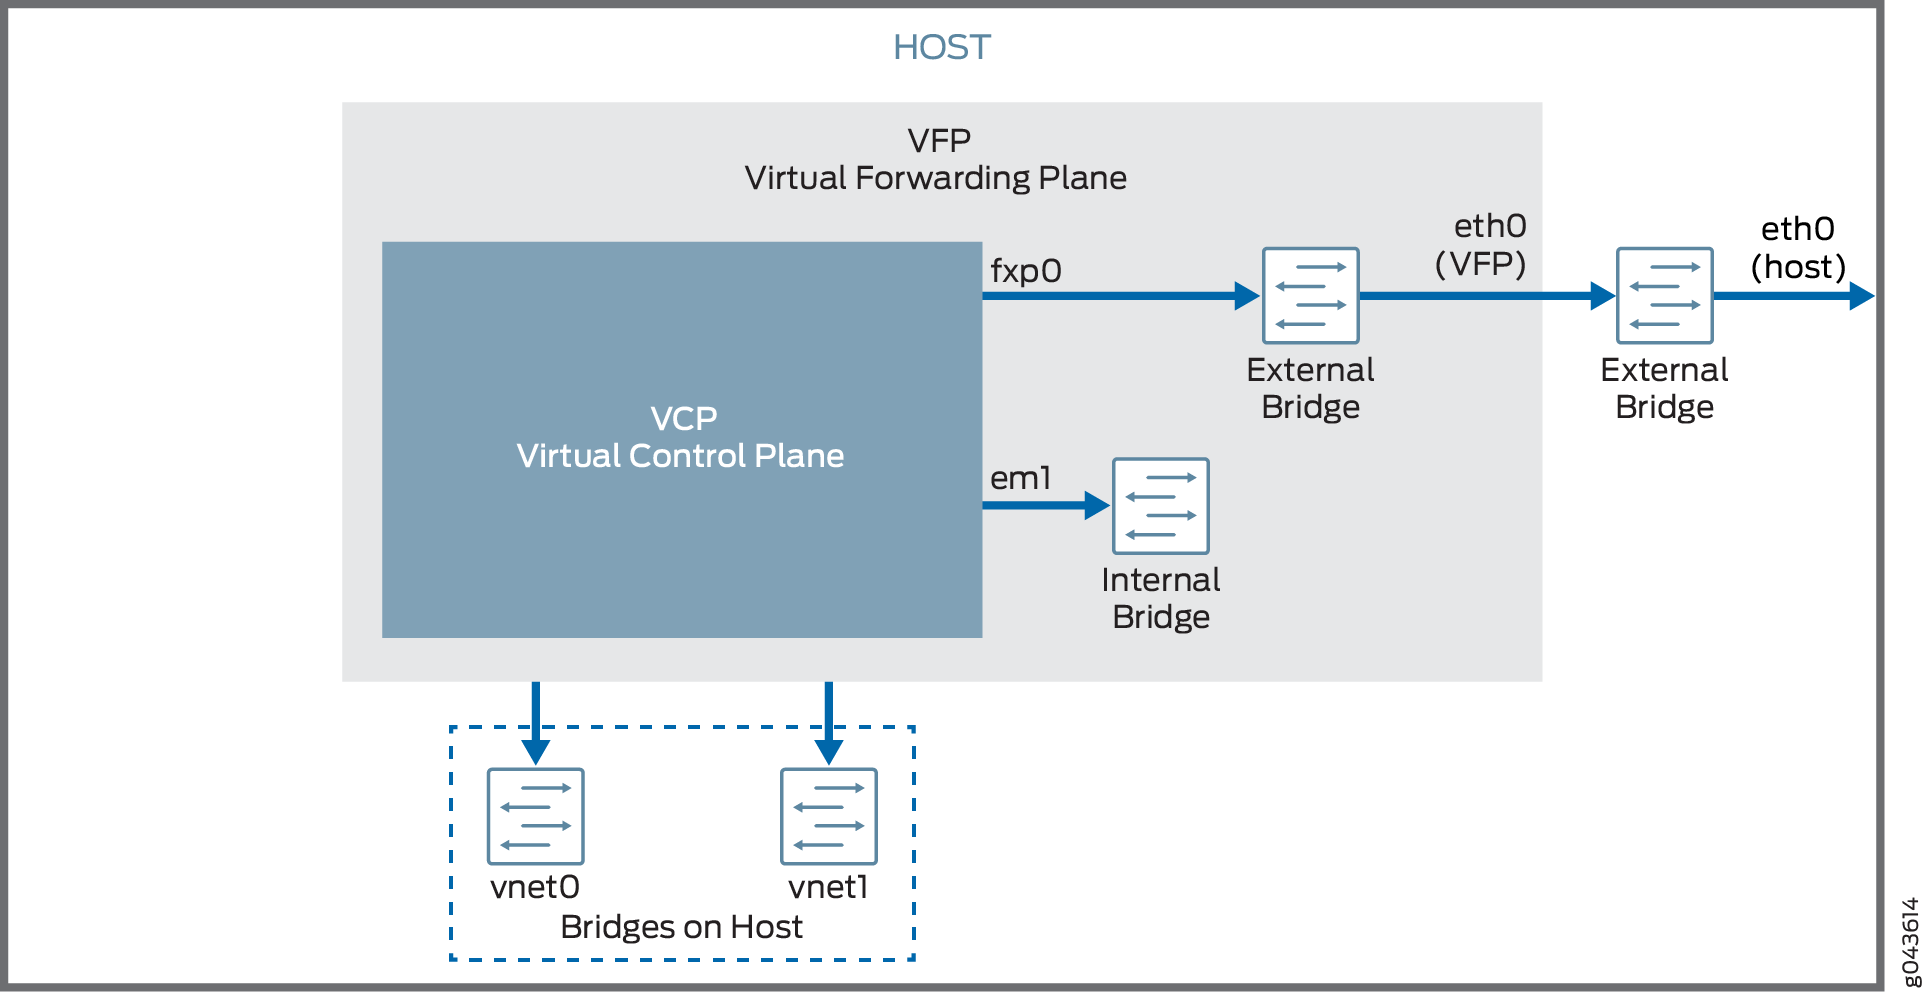
The nested vMX virtual machine (VM) model has the virtual control plane (VCP) running as a VM within the virtual forwarding plane (VFP) VM. The VFP VM runs the virtual Trio forwarding plane software and the VCP VM runs Junos OS. The VCP VM and VFP VM require Layer 2 connectivity to communicate with each other. An internal bridge that is local to the server for each vMX instance enables this communication. The VCP VM and VFP VM also require Layer 2 connectivity to communicate with the Ethernet management port on the server. You must specify virtual Ethernet interfaces with unique IP addresses and MAC addresses for both the VFP and VCP to set up an external bridge for a vMX instance. Ethernet management traffic for all vMX instances enters the server through the Ethernet management port.
The nested vMX VM supports virtio and SR-IOV interfaces for forwarding ports. The first interface is used for management and must be a virtio interface connected to the br-ext bridge (external bridge). Subsequent interfaces are WAN interfaces and can be virtio or SR-IOV interfaces. You must create the bridges for all the virtio interfaces. You must have at least one WAN interface for forwarding.
- Nested VM with Virtio Interfaces
- Nested VM with SR-IOV Interfaces
- System Requirements for Nested VM Model
- vMX Limitations with the Nested VM Model
Nested VM with Virtio Interfaces
In virtio mode, the server interfaces must not be configured
with the VFs. You can remove or reset the interfaces (eth1) using the rmmod ixgbe command and you can add the IXGBE
driver with default interface to the server interface using the modprobe ixgbe command.
Figure 1 illustrates the nested vMX VM model with virtio interfaces.
Nested VM with SR-IOV Interfaces
In SR-IOV mode, the vMX interfaces are associated with the server
interfaces. For example, the ge-0/0/0 interface is associated
with eth1 . eth1 is defined in the .conf
file- interface: ge-0/0/0 ,nic: eth1.
The VF is added to the IXGBE driver of the server interface eth1 which associated with the VF and can be checked using
the ip link show eth1 command while running in the SR-IOV
mode.
Figure 2 illustrates the nested vMX VM model with SR-IOV interfaces.
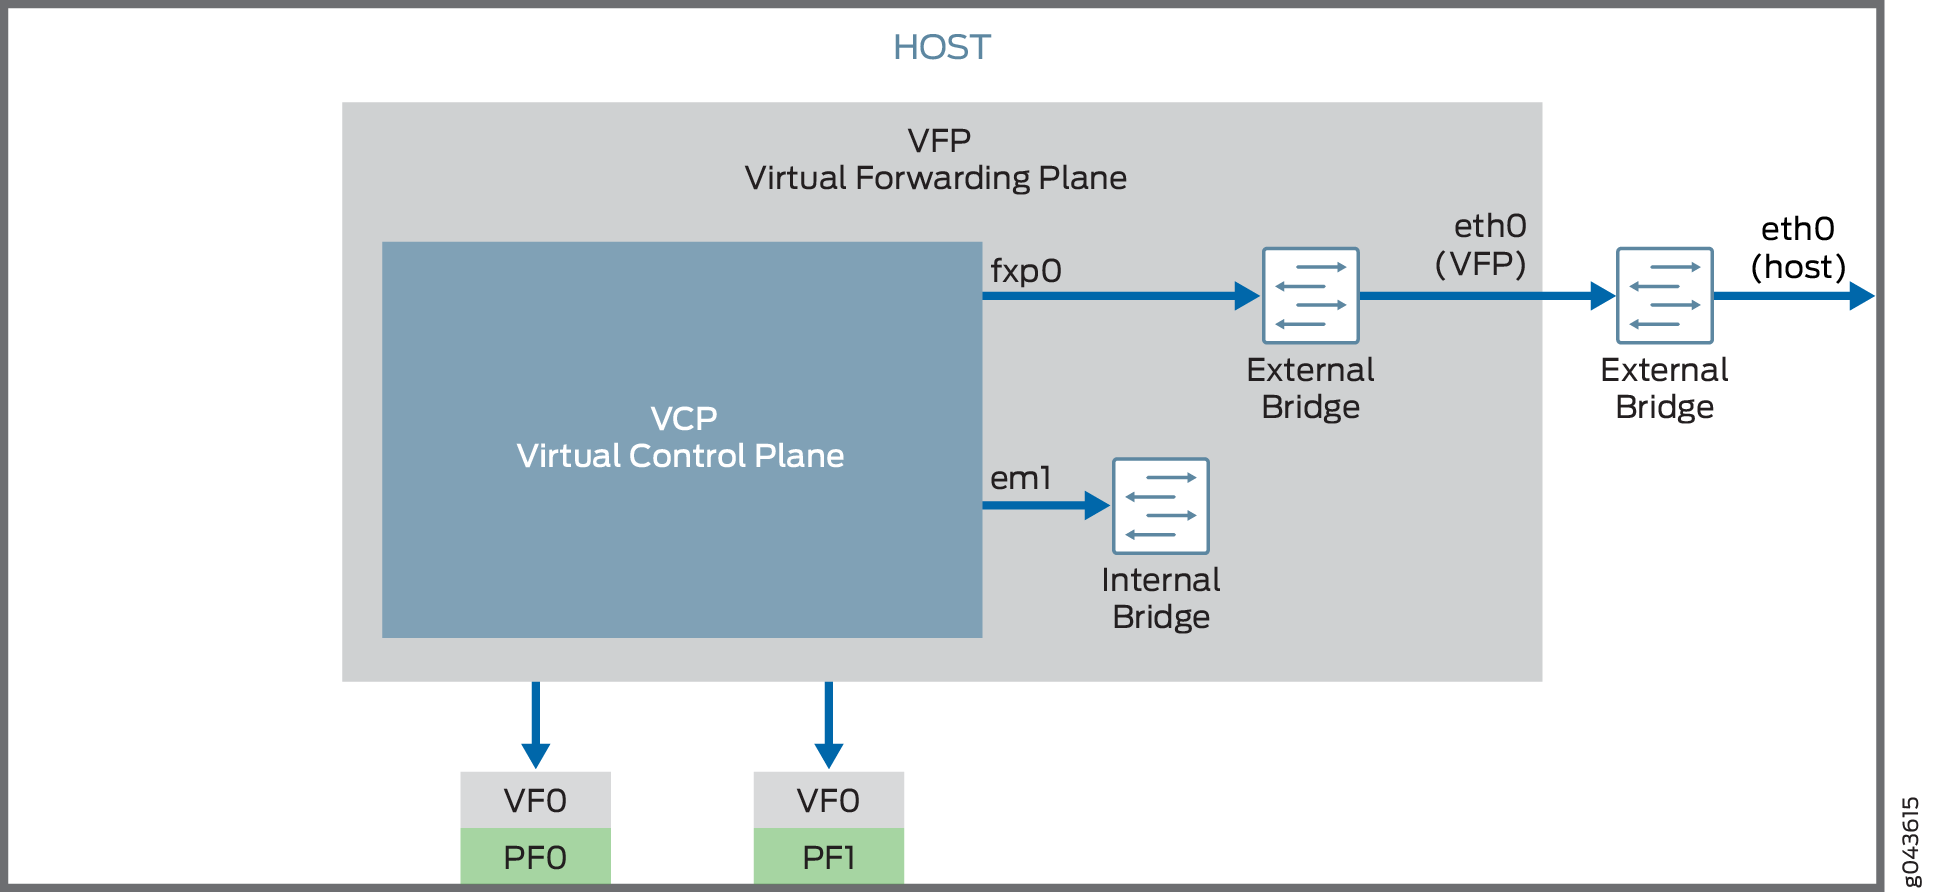
For SR-IOV interfaces, you must load the modified IXGBE driver before launching the nested vMX VM.
The way network traffic passes from the physical NIC to the virtual NIC depends on the virtualization technique that you configure.
System Requirements for Nested VM Model
vMX can be configured to run in two modes depending on the use case:
Lite mode—Needs fewer resources in terms of CPU and memory to run at lower bandwidth.
Performance mode—Needs higher resources in terms of CPU and memory to run at higher bandwidth.
Note:Performance mode is the default mode.
vMX Limitations with the Nested VM Model
vMX does not support the following features with the nested VM model:
Attachment or detachment of interfaces while a vMX instance is running
Upgrade of Junos OS release
Hardware and Software Requirements for Nested vMX VMs
Table 1 lists the hardware requirements.
Description |
Value |
|---|---|
Sample system configuration |
For virtio: Any x86 processor (Intel or AMD) with VT-d capability. For SR-IOV: Intel 82599-based PCI-Express cards (10 Gbps) and Ivy Bridge processors. |
Number of cores Note:
Performance mode is the default mode and the minimum value is based on one port. |
|
Memory |
|
Table 2 lists the software requirements.
Description |
Value |
|---|---|
Operating system |
Ubuntu 14.04.1 LTS Linux 3.19.0-80-generic |
Virtualization |
QEMU-KVM 2.0.0+dfsg-2ubuntu1.11 |
Required packages Note:
Other additional packages might be required to satisfy all dependencies. |
bridge-utils qemu-kvm libvirt-bin virtinst Note:
libvirt 1.2.19 |
Installing and Launching the Nested vMX VM on KVM
To launch the nested vMX VM on KVM, perform these tasks.
- Preparing the Ubuntu Host to Install the Nested vMX VM
- Loading the Modified IXGBE Driver
- Launching a Nested vMX Instance
- Connecting to the VFP Console Port
- Connecting to the VCP
Preparing the Ubuntu Host to Install the Nested vMX VM
To prepare the Ubuntu host system for installing vMX:
Loading the Modified IXGBE Driver
If you are using SR-IOV interfaces, you must load the modified IXGBE driver before launching the nested vMX VM. To load the modified IXGBE driver:
Launching a Nested vMX Instance
To launch the nested vMX instance:
For example, this command launches a vMX instance in performance mode with two virtio interfaces connected to the vnet0 and vnet1 bridges:
sudo virt-install --hvm --vcpus=12 -r 16384 \
    --serial tcp,host=:4001,mode=bind,protocol=telnet \
    --nographics --import --noautoconsole \
    --cpu \
SandyBridge,+erms,+smep,+fsgsbase,+pdpe1gb,+rdrand,+f16c,+osxsave,+dca,+pcid,+pdcm,+x
tpr,+tm2,+est,+smx,+vmx,+ds_cpl,+monitor,+dtes64,+pbe,+tm,+ht,+ss,+acpi,+ds,+vme \
    -w bridge=br-ext,model=virtio \
    -w bridge=vnet0,model=virtio \
    -w bridge=vnet1,model=virtio \
    -n vmx1 --disk vmx-nested-17.2R1.13-4.qcow2,format=qcow2
For example, this command launches a vMX instance in performance mode with two SR-IOV interfaces:
sudo virt-install --hvm --vcpus=12 -r 16384 \
    --serial tcp,host=:4001,mode=bind,protocol=telnet \
    --nographics --import --noautoconsole \
    --cpu \
SandyBridge,+erms,+smep,+fsgsbase,+pdpe1gb,+rdrand,+f16c,+osxsave,+dca,+pcid,+pdcm,+x
tpr,+tm2,+est,+smx,+vmx,+ds_cpl,+monitor,+dtes64,+pbe,+tm,+ht,+ss,+acpi,+ds,+vme \
    -w bridge=br-ext,model=virtio \
    --host-device=pci_0000_81_10_0 \
    --host-device=pci_0000_81_10_1 \
    -n vmx2 --disk vmx-nested-17.2R1.13-4.qcow2,format=qcow2
Connecting to the VFP Console Port
After launching the vMX instance with the virt-install command, you can connect to the console port of the VFP from the
host with the telnet localhost serial-port command, where serial-port is the port you specified as host with the -serial parameter.
For example:
$ telnet localhost 4001
Log in with the default username jnpr and password jnpr123. Become root using the sudo -i command.
The br-ext interface tries to fetch an IP address using DHCP.
Use the ifconfig br-ext command to display the assigned
IP address. If DHCP is unavailable or if you prefer a static IP address,
assign an IP address to br-ext. You can
now connect to the VFP using the SSH protocol and this assigned IP
address.
Connecting to the VCP
When the VCP VM is launched, you can connect to the VCP console port at TCP port 8601 from the VFP VM using this command:
$ telnet localhost 8601
From the console port, you can log in with
username root and no password.
At a minimum, you must perform these initial Junos OS configuration tasks after logging in to the VCP: