Deploying and Managing vMX
Read this topic to understand the procedures required to manage vMX instance after you install it.
Specifying vMX Configuration File Parameters
The parameters required to configure vMX are defined in the startup configuration file. The configuration file is in YAML format. The default file is config/vmx.conf. We recommend you to rename the configuration file to a different name so that you can use the same configuration file every time you create different instances.
You must set up these three interfaces to launch the VFP.
Management access
Bridge for internal communication between the VCP and VFP
WAN interface (minimum of one)
Starting in Junos OS Release 18.1, to configure the vMX instance, download and modify the startup configuration file (vmx.conf).
Download the vMX software package as root and uncompress the package.
tar xzvf package-nameChange directory to the location of the uncompressed vMX package.
cd package-locationEdit the config/vmx.conf text file with a text editor to configure a single vMX instance and save the file.
To customize the configuration, perform these tasks:
Configuring the Host
To configure the host environment, you must change the identifier for each vMX instance and you must provide the correct path for the images.
To configure the host, navigate to Host and specify the following parameters:
Parameter |
Description |
|---|---|
|
Name of the vMX instance, maximum of four alphanumeric characters. |
|
Name of the physical NIC on the host device that is used for management access (eth0). Note:
The interfaces for HOST:host-management-interface, CONTROL_PLANE, and FORWARDING_PLANE must be on the same subnet. |
|
Absolute path to the junos-vmx-x86-64-*.qcow2 file for launching VCP. |
|
Absolute path to the vmxhdd.img file for VCP storage. |
|
Absolute path to the vFPC-*.img file for launching VFP. |
|
(Optional) Makes a local copy of the VCP and VFP images
and uses the local copy to launch vMX. Default value is Note:
Copy the image file from its default location to ensure that the scripts do not try to use the same image file concurrently. |
|
(Optional) Makes a local copy of the VCP storage image
and uses the local copy to launch vMX. Default value is Note:
Copy the image file from its default location to ensure that the scripts do not try to use the same image file concurrently. |
Configuring the VCP VM
To configure the VCP VM, you must change the IP address and you must make sure the console port is not being used by another vMX instance or another server.
To configure the VCP VM, navigate to CONTROL_PLANE and specify the following parameters:
Parameter |
Description |
|---|---|
|
Number of vCPUs for the VCP, default is 1. Starting in Junos OS Release 18.1, If you are deploying dual VCP instances, you must double the number of vCPUs. |
|
Amount of memory for the VCP, default is 2 GB. In Junos OS Release 15.1F6, amount of memory for the VCP; minimum is 4 GB (performance mode) and 1 GB (lite mode). |
|
KVM TCP-based console port. It must be a unique number. |
|
(Optional) VCP instance to deploy on this host. Specify
the number of the instance; first instance is 0, second instance is
1, and multiple instances are separated by a comma. If you do not
specify this parameter, both instances ( Note:
When deploying on separate hosts, you must set up a connection between the hosts for the VCPs to communicate. Starting in Junos OS Release
18.1 If you are deploying across multiple servers (for example, one
server as the RE and one server as the PFE), and you want to disable
VCP for the Control Plane on the server, you have the option to specify |
|
(Optional) IP address for the interface from which the console can be accessed; default is 127.0.0.1, which only allows access from within the host. To allow access from any interfaces, specify 0.0.0.0. |
|
VCP instance. Navigate to interfaces > type (static) and include this parameter below it. (Optional) Create the second instance below the first instance
and include the interfaces :
- type : static
instance : 0
ipaddr : 10.102.144.94
macaddr : "0A:00:DD:C0:DE:0E"
- type : static
instance : 1
console_port: 8612
ipaddr : 10.102.144.95
macaddr : "0A:00:DD:C0:DE:0F" |
|
Management IP address for the VCP VM (fxp0). Navigate to interfaces > type (static) > ipaddr to modify this parameter. Note:
The interfaces for HOST:host-management-interface, CONTROL_PLANE, and FORWARDING_PLANE must be on the same subnet. |
Configuring the VFP VM
Before you configure the VFP VM, consider the following:
You must make sure the console port is not being used by another vMX instance or another server.
To disable network access to the VFP console, do not configure an IP address.
Based on your requirements, you might want to change the memory, number of vCPUs, and the device type. See Installing vMX for Different Use Cases for some sample configuration requirements.
Starting in Junos
OS Release 18.1 if you are deploying across multiple servers (for
example, one server as the RE and one server as the PFE), and you
need to disable VFP for the Forwarding Plane on the server, you have
the option to specify none.
To configure the VFP VM, navigate to FORWARDING_PLANE and specify the following parameters:
Parameter |
Description |
|---|---|
|
Amount of memory for the VFP, default is 6 GB. |
|
Number of vCPUs for the VFP, default is 3. |
|
KVM TCP-based console port. It must be a unique number. |
|
(Optional) VFP instance to deploy on this host. Specify
the number of the instance; first instance is 0, second instance is
1, and multiple instances are separated by a comma. If you do not
specify this parameter, both instances ( Note:
When deploying on separate hosts, you must set up a connection between the hosts for the VFPs to communicate. |
|
(Optional) IP address for the interface from which the console can be accessed; default is 127.0.0.1, which only allows access from within the host. To allow access from any interfaces, specify 0.0.0.0. |
|
NIC interface type, either |
|
Management IP address for the VFP VM (eth0). Navigate to interfaces > type (static) > ipaddr to modify this parameter. Note:
The interfaces for HOST:host-management-interface, CONTROL_PLANE, and FORWARDING_PLANE must be on the same subnet. |
|
Set to true to allow using the host’s driver. Note:
From Junos OS Release 18.4R1 (Ubuntu host) and Junos OS Release
19.1R1 (Red Hat host), you can set the |
To configure the VFP VM, navigate to FORWARDING_PLANE and specify the following parameters (supported in Junos OS Release 15.1F6):
Parameter |
Description |
|---|---|
|
Amount of memory for the VFP; minimum is 12 GB (performance mode) and 4 GB (lite mode). |
|
Number of vCPUs for the VFP; minimum is 7 (performance mode) and 3 (lite mode). |
|
KVM TCP-based console port. It must be a unique number. |
|
(Optional) IP address for the interface from which the console can be accessed; default is 127.0.0.1, which only allows access from within the host. To allow access from any interfaces, specify 0.0.0.0. |
|
NIC interface type, either |
|
Management IP address for the VFP VM (eth0). Navigate to interfaces > type (static) > ipaddr to modify this parameter. Note:
The interfaces for HOST:host-management-interface, CONTROL_PLANE, and FORWARDING_PLANE must be on the same subnet. |
Configuring Interfaces
The JUNOS_DEVICES interface names correspond to the Linux physical
NIC names on the host. Bring
up the Linux physical NIC ports that are defined in this section before
proceeding. For example, use the ifconfig eth9 up command
to bring up the NIC ports on the eth9 interface.
To configure interfaces for virtio device types, you must specify the interface and the MAC address. You can bind virtio devices to connect virtio NICs in the vMX to physical NICs or virtio NICs in another vMX (see Binding virtio Devices).
To configure interfaces for SR-IOV device types, you must specify the interface, the NIC, and the MAC address.
To configure the routed interfaces, navigate to JUNOS_DEVICES and specify the following parameters:
Parameter |
Description |
|---|---|
|
Name of the interface on the vMX. Note:
The interface names that are defined in the vmx.conf file must be contiguous starting from ge-0/0/0. The total number of interfaces supported is 23 for configurations running in performance mode. If you are running virtio interfaces in lite mode, you can use up to 96 interfaces. |
|
NIC interface type, either Note:
If you are configuring both interface types, you must specify the virtio interfaces before the SR-IOV interfaces. |
|
(SR-IOV only) Port speed for the physical NIC, default is 10000 Mbps. |
|
(SR-IOV only) Name of the physical NIC. Note:
Depending on the version of udev, you can rename the classic Linux standard ethXX names. See Predictable Network Interface Names for more information. |
|
(SR-IOV only) MTU value, default is 2000 and maximum is 9500. To change the MTU configuration for virtio device types, modify
the |
|
(SR-IOV only) Child unit of the physical NIC, default is 0. (SR-IOV only) Virtual function number of the physical NIC; default is 0 (supported in Junos OS Release 15.1F5 and earlier releases). |
|
Unicast MAC address for the physical NIC. |
|
Description of the mapping. |
Connecting to VMs
Perform these tasks to connect to the virtual machines for first-time configuration, to enable access by other means (like Telnet or SSH):
Logging In to VCP
You can access the serial console using the ./vmx.sh --console
vcp vmx-id command, where vmx-id is the vMX identifier specified in the startup
configuration file, and log in with the username root and
no password.
To disconnect from the console, log out of the session and press
Ctrl + ]. At the telnet> prompt, type close and
press Enter.
Logging In to VFP
You can access the serial console using the ./vmx.sh --console
vfp vmx-id command, where vmx-id is the vMX identifier
specified in the startup configuration file, and log in with the username
root and password root.
To disconnect from the console, log out of the session and press
Ctrl + ]. At the telnet> prompt, type close and
press Enter.
To SSH into the virtual forwarding plane (VFP), use the IP address defined under FORWARDING_PLANE in the vmx.conf file. For security reasons, you cannot connect to VFP using the Telnet protocol.
Also for security reasons you cannot connect to the VFP instance using the SSH protocol with the root user. You must first access the VFP with console, login as root user, and create a user that you can then use to SSH in with.
For example:
Access the VFP with the console:
root@ubuntu:~/19.2/vmx# ./vmx.sh --console vfp vmx1
root@qemux86-64:/home/pfe/riot# ./vfp_util.sh -create_user
Enter Username:pfe
Enter Password:
Re-enter Password:
Not copying any file from skel directory into it.
User pfe created, HOME:/var/pfe
Restarting OpenBSD Secure Shell server: sshd.
Now when using SSH to access the VFP as the PFE user you can login as super user to access to the root directory.
pfe@qemux86-64:~$ su
root@qemux86-64:/var/pfe# id
 uid=0(root) gid=0(root) groups=0(root)
 root@qemux86-64:/var/pfe#
Managing vMX
Only English locale is supported for using the vmx.sh script.
After you install and deploy vMX, you can use the vmx.sh script with different options to perform these tasks:
- Deploying vMX
- Managing vMX Deployments
- Specifying the Temporary File Directory
- Specifying the Environment File
- Configuring Logging Options for vMX
- Connecting to Console Port for the VMs
- Getting Help for the Script Options
Deploying vMX
You must be logged in as root to use the control options.
Using the --install option also launches the VCP
and VFP VMs.
We recommend you deploy the vMX by running the ./vmx.sh
-lv --install script to provide verbose-level logging to a file
for the deployment of the vMX instance.
Only English locale is supported for using the vmx.sh script.
If you cannot deploy vMX after upgrading libvirt, bring
down the virbr0 bridge with the ifconfig virbr0 down command
and delete the bridge with the brctl delbr virbr0 command.
Before you reboot the host server, you must shut down
the vMX instance using the request system halt command.
To deploy vMX, use these options with the vmx.sh script:
--cfg file |
Use the specified vMX startup configuration file. The default file is config/vmx.conf. |
--install |
Start vMX by setting up the environment, driver dependencies, and
memory requirements and deploying the vMX. If you do not specify a
startup configuration file with the |
If you cannot deploy vMX after upgrading libvirt, bring
down the virbr0 bridge with the ifconfig virbr0 down command
and delete the bridge with the brctl delbr virbr0 command.
This example deploys a new vMX instance specified by the my-vmx.cfg configuration file and provides verbose-level logging to a file:
./vmx.sh -lv --install --cfg config/my-vmx.cfg
Managing vMX Deployments
You must be logged in as root to use the control options.
Use these options with the vmx.sh script to stop, start, restart, verify, and clean up an existing vMX:
--cfg file |
Use the specified vMX startup configuration file. The default file is config/vmx.conf. |
--cleanup |
Stop vMX and clean up relevant information about the vMX instance.
It also tears down the Linux bridges and other dependencies. If you
do not specify a startup configuration file with the |
--restart |
Stop and start a running vMX. This option is useful for redeploying
a vMX that has parameter changes in the startup configuration file.
If you do not specify a startup configuration file with the |
--start |
Start the vMX that was running and stopped. If you do not specify
a startup configuration file with the |
--status |
Verify the status of a deployed vMX. If you do not specify a startup
configuration file with the |
--stop |
Stop
vMX without cleaning up build files so that the vMX can be started
quickly without setup performed by the |
This example tears down an existing vMX instance specified by the my-vmx.cfg configuration file:
./vmx.sh --cleanup --cfg config/my-vmx.cfg
Starting in Junos OS release 19.1 onwards, if you are deploying the vMX image with i40e driver-based NIC cards and want to redeploy the vMX that has parameter changes in the startup configuration file, we recommend not using the options such as --restart or --start/--stop. You must use the following options:
Use the
./vmx.sh --cleanupcommand to clean up an existing vMX.Run the
./vmx.sh -lv --installscript to re-deploy vMX.
The vMX instance starts with the updated configuration.
Specifying the Temporary File Directory
You must be logged in as root to use the control options.
To specify the directory used for temporary files, run the ./vmx.sh build directory script. The default
directory is build/vmx-id, where vmx-id is the vMX identifier specified in the startup configuration file.
By default, copies of the VCP and VFP images are copied to this
directory. We recommend that you do not change the make-local-copy-of-images and make-local-copy-of-vmxhdd parameters when specifying
startup configuration file parameters for the host.
Specifying the Environment File
You must be logged in as root to use the control options.
To specify the environment file (.env), run the ./vmx.sh env file script.
The default file is env/ubuntu_sriov.env.
Configuring Logging Options for vMX
You can enable logging options. It is especially useful when
used with the control options, such as --install.
Use these options to configure logging:
-l |
Enable logging to a file in the specified build directory. The default directory is build/vmx-id/logs, where vmx-id is the vMX identifier specified in the startup configuration file. By default, logging is disabled. |
-lv |
Enable logging with verbose details. |
-lvf |
Enable logging with verbose details to the foreground (standard output). |
This example deploys a new vMX instance specified by the my-vmx.cfg configuration file and provides verbose-level logging to a file:
./vmx.sh -lv --install --cfg config/my-vmx.cfg
Connecting to Console Port for the VMs
Use these options with the vmx.sh script to connect to the console of the VCP or VFP of the specified vMX:
--console vcp [vmx-id] |
Connect to the console of the VCP for the specified vMX. The vMX identifier is specified in the startup configuration file. |
--console vfp [vmx-id] |
Connect to the console of the VFP for the specified vMX. The vMX identifier is specified in the startup configuration file. |
This example connects to the console of the VCP for the vMX instance specified by the vmx1 identifier:
./vmx.sh --console vcp vmx1
Getting Help for the Script Options
To obtain on-line help for the vmx.sh script options, run the ./vmx.sh --help script.
Binding virtio Devices
For configurations using virtio device types, you can bind multiple vMX instances together on the same system if the host has enough CPU and memory to support the vMX instances. You configure each vMX instance with a different startup configuration file.
If you are deploying multiple vMX instances, make sure:
The VM identifiers are unique across all instances.
The console ports of the VCP and the VFP are unique across all instances.
The external static IP address of the VCP and the VFP are unique across all instances.
The MAC addresses of the VCP and the VFP are unique across all instances, whenever specified.
All VMs share the same management domain. The physical management interface (for example, eth0) is also part of this global external bridge.
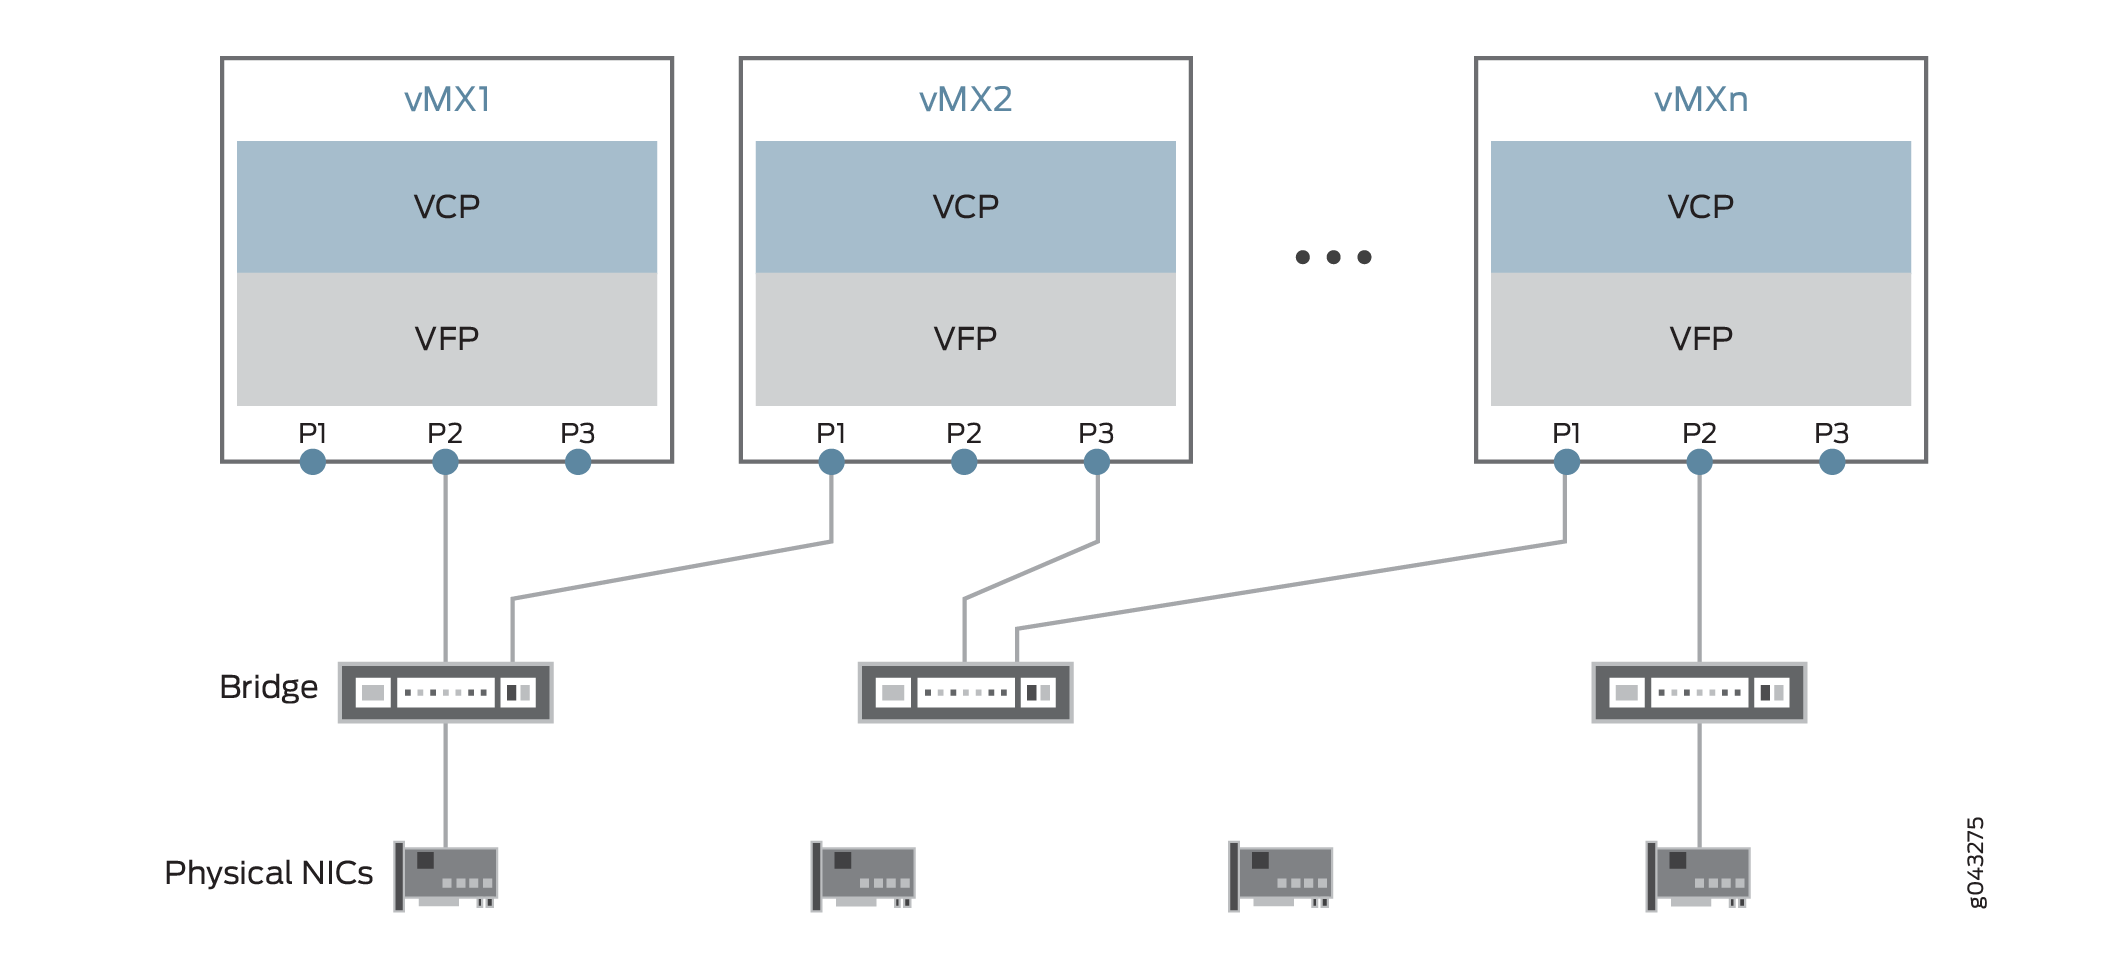
You can connect virtio NICs in the vMX to physical NICs or virtio NICs in another vMX by binding these devices as shown in Figure 1.
To manage device bindings, perform these tasks:
- Setting Up the Device Bindings
- Creating Device Bindings
- Deleting Device Bindings
- Verifying Device Bindings
Setting Up the Device Bindings
The parameters required to configure vMX to bind devices are defined in the device-binding file. The device-binding file is in YAML format. The default file is config/vmx-junosdev.conf.
The device-binding file defines the endpoints of each link originating from the VFP of a vMX. One endpoint must be a device using virtio NICs. The other endpoint can be a physical NIC, a virtio NIC in another vMX instance, or a Linux bridge.
To bind the vMX instances together:
Here is a sample vMX device-binding file:
interfaces :

     - link_name  : link_host
       mtu        : 1500
       endpoint_1 :
         - type        : junos_dev
           vm_name     : vmx1
           dev_name    : ge-0/0/0
       endpoint_2 :
         - type        : host_dev
           dev_name    : int2

     - link_name  : link_vmx_12
       mtu        : 1500
       endpoint_1 :
         - type        : junos_dev
           vm_name     : vmx1
           dev_name    : ge-0/0/1
       endpoint_2 :
         - type        : junos_dev
           vm_name     : vmx2
           dev_name    : ge-0/0/0

     - link_name  : bridge_vmx_123
       endpoint_1 :
         - type        : junos_dev
           vm_name     : vmx1
           dev_name    : ge-0/0/2
       endpoint_2 :
         - type        : bridge_dev
           dev_name    : bridge1

     - link_name  : bridge_vmx_123
       endpoint_1 :
         - type        : junos_dev
           vm_name     : vmx2
           dev_name    : ge-0/0/1
       endpoint_2 :
         - type        : bridge_dev
           dev_name    : bridge1

     - link_name  : bridge_vmx_123
       endpoint_1 :
         - type        : junos_dev
           vm_name     : vmx3
           dev_name    : ge-0/0/0
       endpoint_2 :
         - type        : bridge_dev
           dev_name    : bridge1
The link_host entry shows how to
connect the ge-0/0/0 interface on vmx1 to the physical NIC. The link_vmx_12 entry shows how to connect two interfaces
on vmx1 and vmx2 to each other. The bridge_vmx_123 entries show how to connect the interfaces on vmx1, vmx2, and vmx3
with a bridge.
Creating Device Bindings
You must be logged in as root to bind devices.
To bind devices with virtio NICs to other devices, define your
devices in the vMX device-binding file and run the ./vmx.sh --bind-dev
–-cfg device-binding-file script
to create the device binding. If you do not specify a file, the default
file is config/vmx-junosdev.conf.
This example creates device bindings with the specified device-binding file:
./vmx.sh --bind-dev –-cfg config/vmx1-junosdev.conf
Deleting Device Bindings
You must be logged in as root to unbind devices.
To unbind devices, run the ./vmx.sh --unbind-dev –-cfg device-binding-file script to delete the device
bindings created with the --bind-dev option. If you do
not specify a file, the default file is config/vmx-junosdev.conf.
This example deletes device bindings with the specified device-binding file:
./vmx.sh --unbind-dev –-cfg config/vmx1-junosdev.conf
Verifying Device Bindings
You must be logged in as root to bind devices.
To verify the status of device bindings created with the --bind-dev option, run the ./vmx.sh --bind-check –-cfg device-binding-file script. If you do not specify
a file, the default file is config/vmx-junosdev.conf.
This example verifies the status of the device bindings for the specified device-binding file:
./vmx.sh --bind-check –-cfg config/vmx1-junosdev.conf