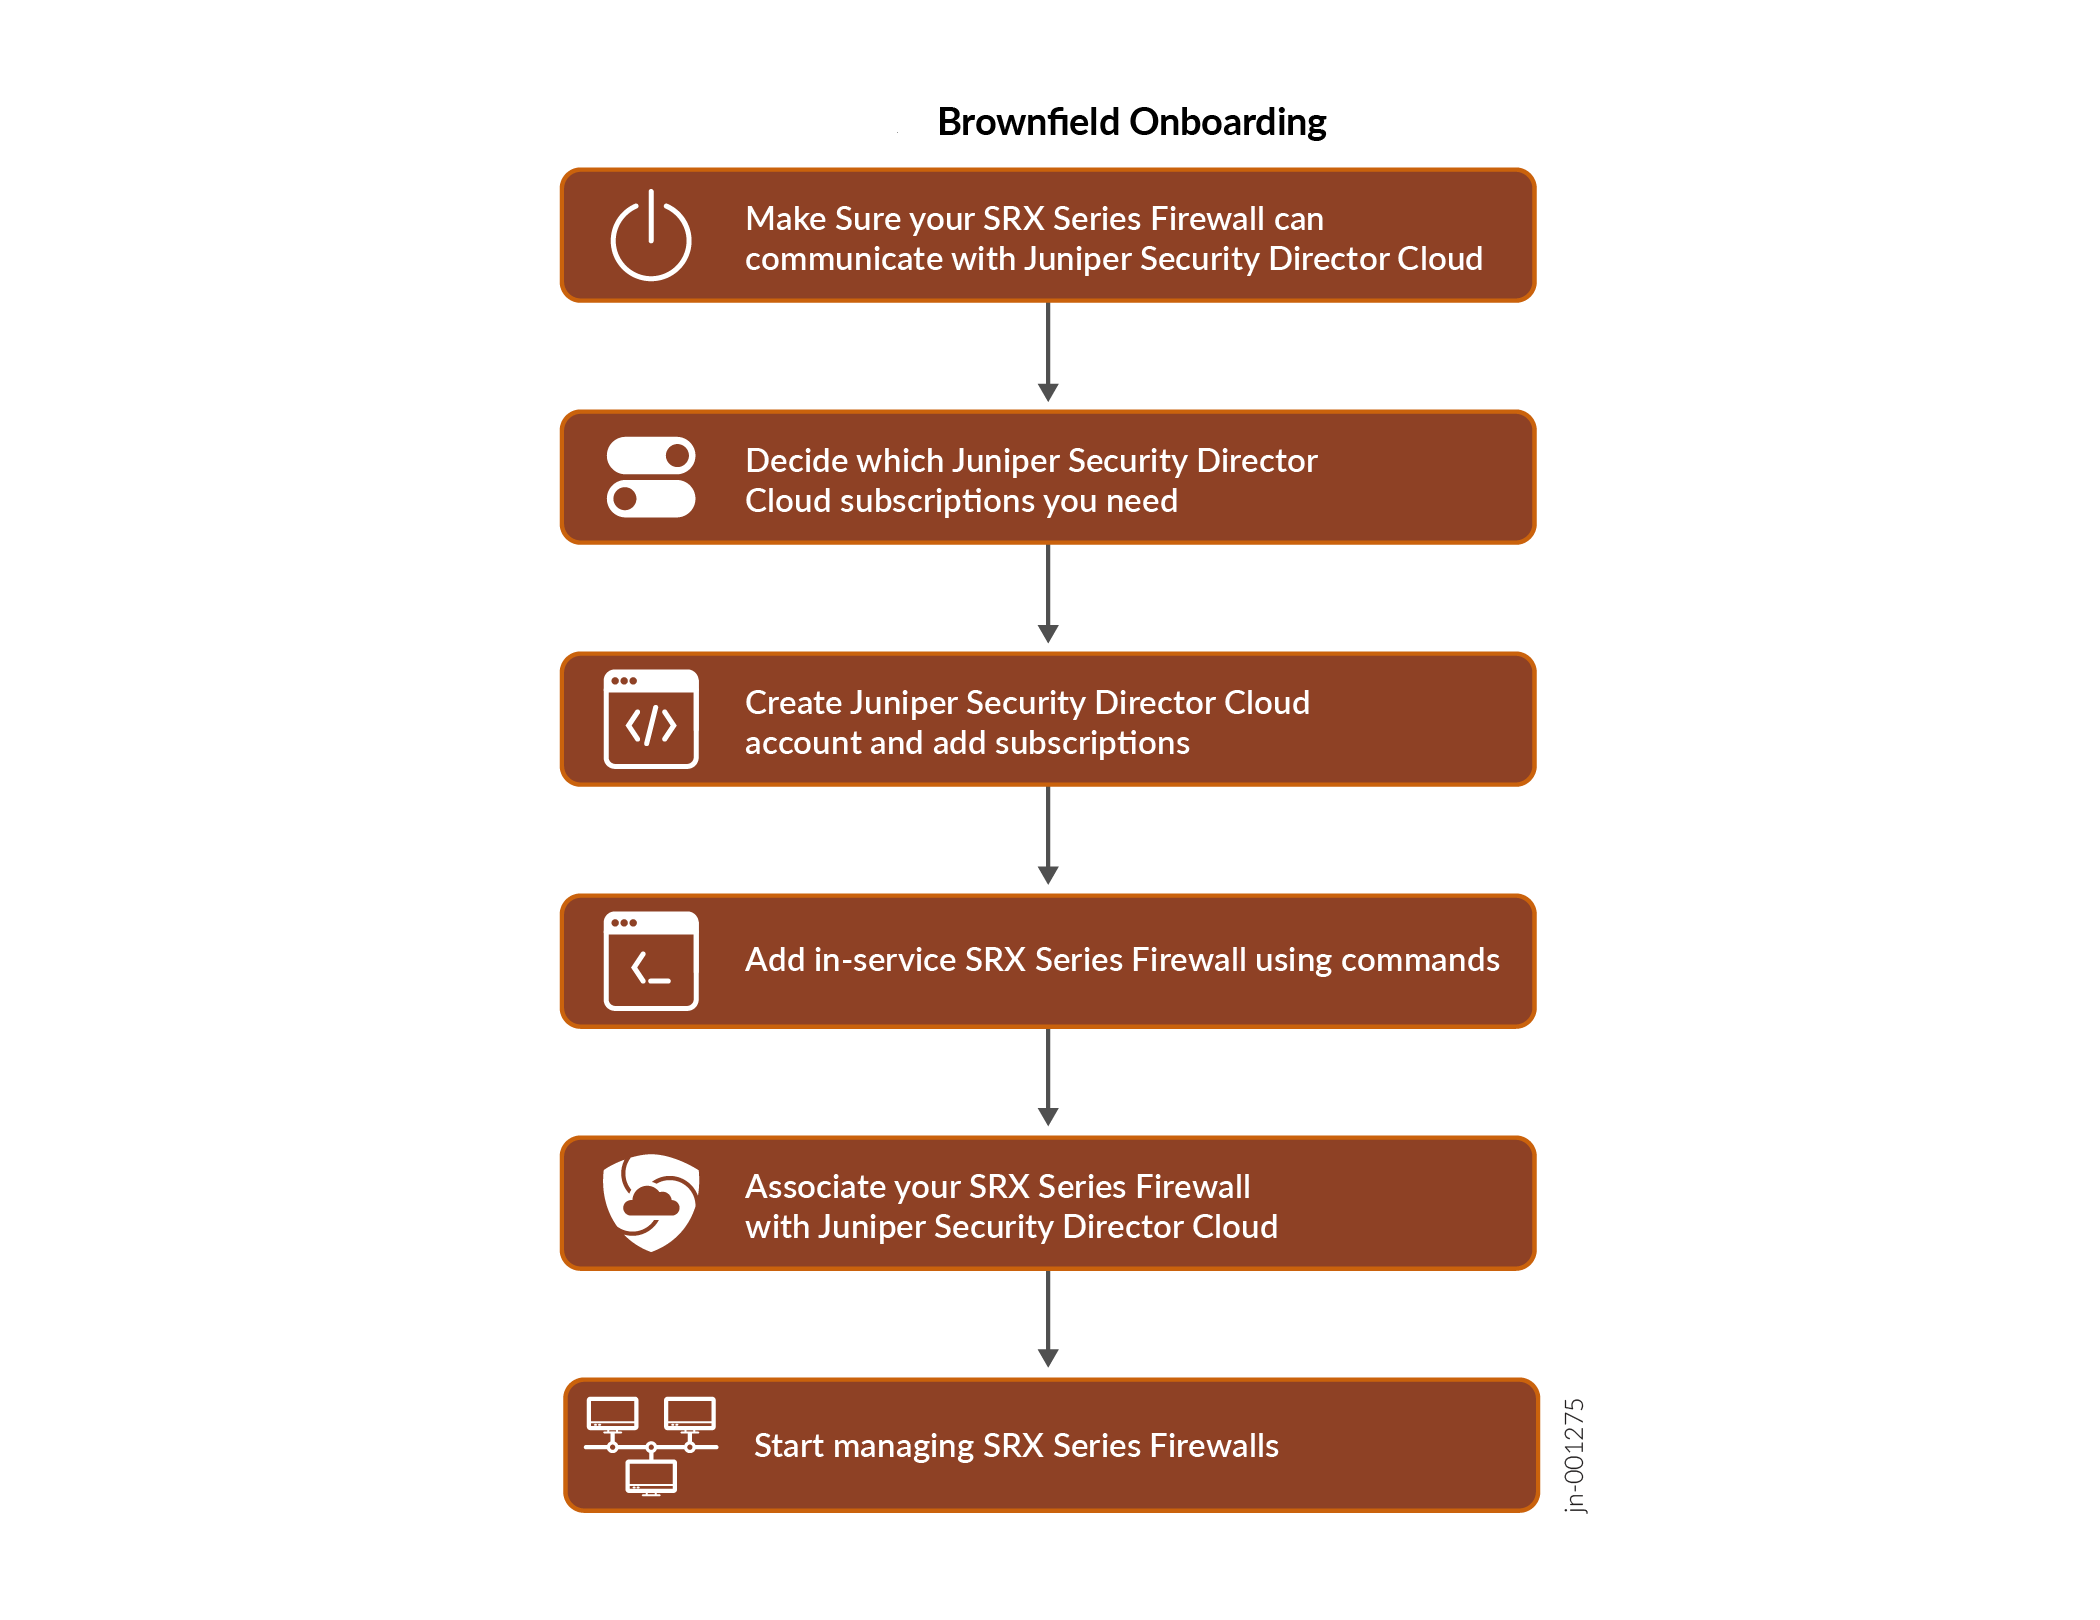
Onboard Brownfield SRX Series Firewalls to Juniper Security Director Cloud Using Commands
This topic walks you through the simple steps to onboard existing, in-service, SRX Series Firewalls to Juniper Security Director Cloud using CLI commands.
Before You Begin
-
Make sure SRX Series Firewall can communicate with Juniper Security Director Cloud fully qualified domain name (FQDN) on respective ports. The FQDN of each home region is different. See the following table for FQDN mapping details.
Table 1: Region to FQDN Mapping Region Purpose Port FQDN for IPv4/IPv6 North Virginia, US
ZTP
443
IPv4: srx.sdcloud.juniperclouds.net
IPv6: srx-v6.sdcloud.juniperclouds.net
Outbound SSH
7804
IPv4: srx.sdcloud.juniperclouds.net
IPv6: srx-v6.sdcloud.juniperclouds.net
Syslog TLS
6514
IPv4: srx.sdcloud.juniperclouds.net
IPv6: srx-v6.sdcloud.juniperclouds.net
Ohio, US
ZTP
443
IPv4: srx.jsec2-ohio.juniperclouds.net
IPv6: srx-v6.jsec2-ohio.juniperclouds.net
Outbound SSH
7804
IPv4: srx.jsec2-ohio.juniperclouds.net
IPv6: srx-v6.jsec2-ohio.juniperclouds.net
Syslog TLS
6514
IPv4: srx.jsec2-ohio.juniperclouds.net
IPv6: srx-v6.jsec2-ohio.juniperclouds.net
Montreal, Canada
ZTP
443
IPv4: srx.jsec-montreal2.juniperclouds.net
IPv6: srx-v6.jsec-montreal2.juniperclouds.net
Outbound SSH
7804
IPv4: srx.jsec-montreal2.juniperclouds.net
IPv6: srx-v6.jsec-montreal2.juniperclouds.net
Syslog TLS
6514
IPv4: srx.jsec-montreal2.juniperclouds.net
IPv6: srx-v6.jsec-montreal2.juniperclouds.net
Frankfurt, Germany
ZTP
443
IPv4: srx.jsec-frankfurt.juniperclouds.net
IPv6: srx-v6.jsec-frankfurt.juniperclouds.net
Outbound SSH
7804
IPv4: srx.jsec-frankfurt.juniperclouds.net
IPv6: srx-v6.jsec-frankfurt.juniperclouds.net
Syslog TLS
6514
IPv4: srx.jsec-frankfurt.juniperclouds.net
IPv6: srx-v6.jsec-frankfurt.juniperclouds.net
-
Use TCP port 53 and UDP port 53 to connect to Google DNS servers (IP addresses—8.8.8.8 and 8.8.4.4). The Google DNS servers are specified as the default servers in the factory settings of the SRX Series Firewalls. You must use these default DNS servers when you use ZTP to onboard the firewalls. You can use private DNS servers when you use other methods to onboard the firewalls. Note that you must make sure that the private DNS servers can resolve the Juniper Security Director Cloud FQDNs.
Workflow
You can also onboard existing, in-service (brownfield), SRX Series Firewalls using the following methods:
- To onboard (adopt) existing, in-service (brownfield), SRX Series Firewalls into Juniper Security Director Cloud using J-Web, see Add SRX Series Firewalls to Juniper Security Director Cloud Using J-Web.
- To onboard (adopt) existing, in-service (brownfield), SRX Series Firewalls into Juniper Security Director Cloud using Security Director on-prem, see Add Devices to Juniper Security Director Cloud.
Onboard your SRX Series Firewall to Juniper Security Director Cloud
- Decide which Juniper Security Director Cloud Subscriptions you need. Contact your sales representative or account manager to purchase subscriptions. You can also use a 30-day trial subscription that is available in the portal by default.
- Go to https://sdcloud.juniperclouds.net/
and click Create an
organization account.
Follow the on-screen instructions to activate your account. It takes up to 7 working days to approve your account activation request.
- Log in to the Juniper Security Director Cloud portal, click Add Subscriptions, enter details,
and click OK.
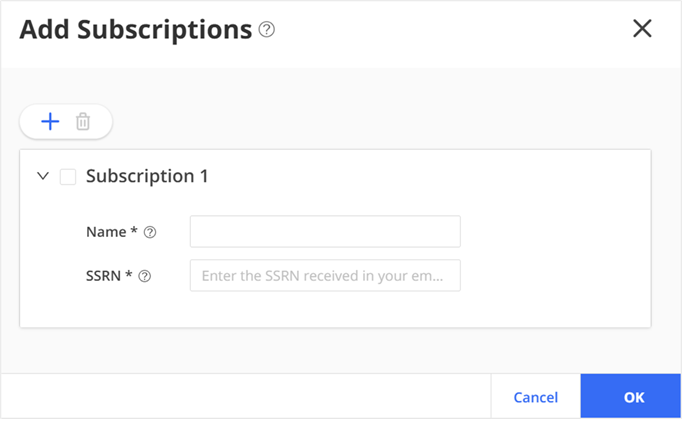
View your added subscriptions from . If you do not see your subscriptions, go to page to view the status.
- Go to Juniper Security Director Cloud, select . Click the + icon to add your devices.
- Click Adopt SRX Devices and select one of the following:
SRX Devices
SRX Clusters
SRX Multinode High Availability (MNHA) Pairs
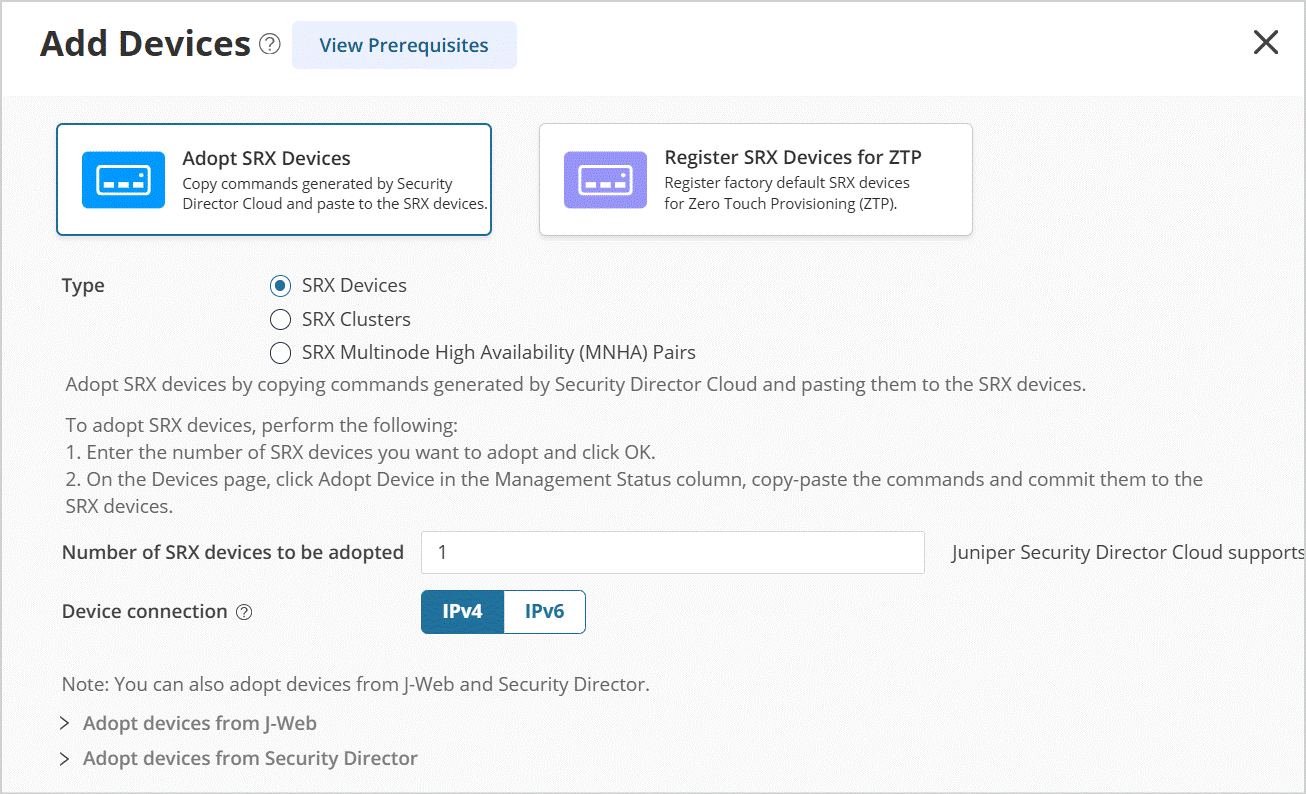 Follow the on-screen instructions to continue.
 - Copy and paste the commands from the devices page to the SRX Series Firewall. Paste the
commands for the primary cluster device console or each device in the MNHA pair. Commit
the changes.
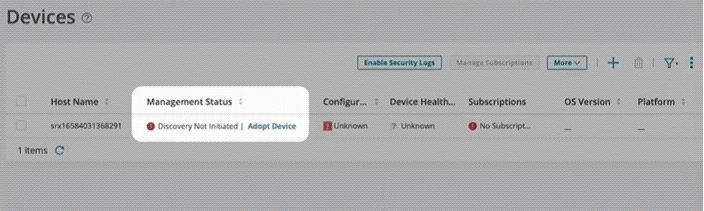
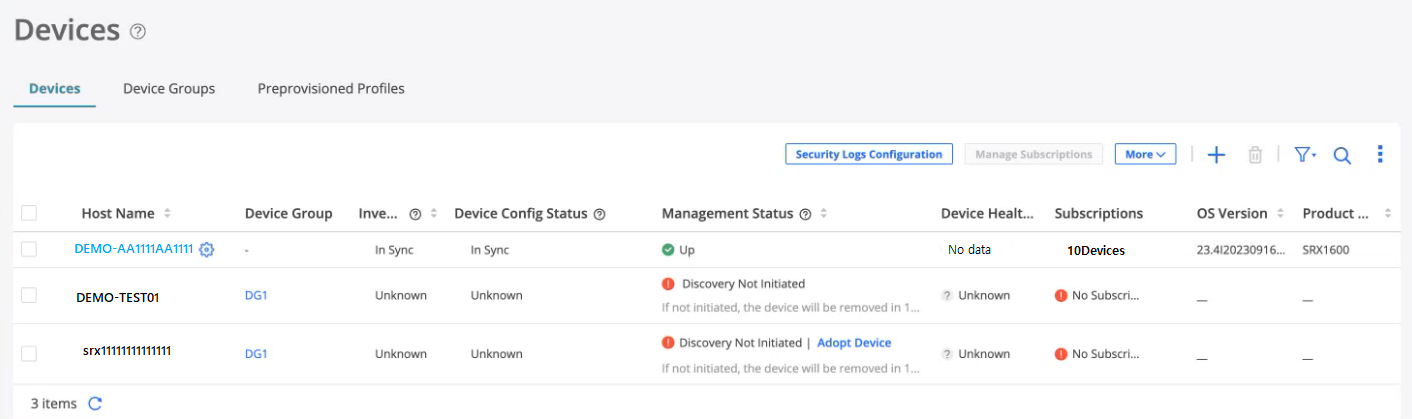
It will take few seconds for the device discovery. After device discovery is successful, verify the following fields on the Devices page:
Management Status changes from Discovery in progress to Up.
Inventory Status and Device Config Status changes from Out of Sync to In Sync.
In case of discovery failure, navigate to page to view the status.
You’re ready to associate devices to your Juniper Security Director Cloud subscription.
Associate your SRX Series Firewall with Juniper Security Director Cloud Subscription
- Go to , select the device, and click Manage
Subscriptions. Follow the on-screen instructions.
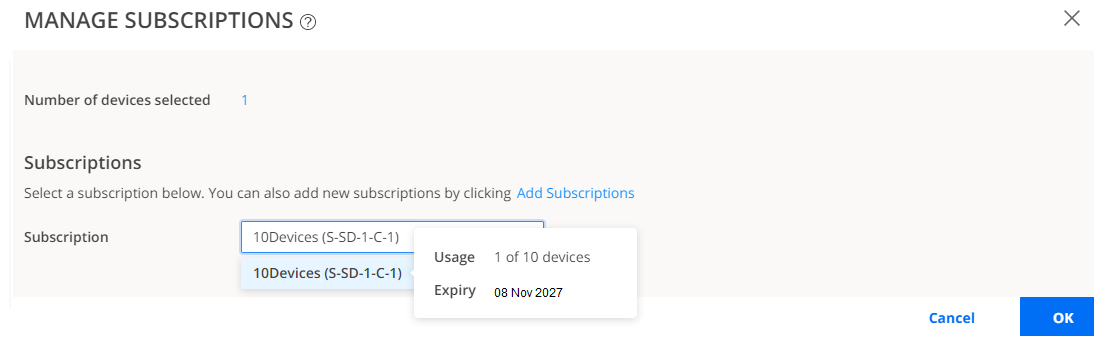
- Verify that the Subscriptions column displays the subscription
name for your device.
Congratulations! You have successfully associated your device to Juniper Security Director Cloud.
Explore Juniper Security Director Cloud Features
Now that your Juniper Security Director Cloud setup is up and running, explore other Juniper Security Director Cloud features to meet your business needs. Here are some features we think you'll find especially helpful.
| If You Want To | Then |
|---|---|
|
Create or import a security policy, add a rule to the security policy, and deploy the security policy on the devices |
See Security Policies Overview |
|
Set up the Content Security profiles to secure your network from multiple security threat types |
See Content Security Profiles Overview |
|
Configure ATP Cloud to protect all hosts in your network against evolving security threats |
See File Inspection Profiles Overview |
|
View the traffic logs and network events including viruses found, interfaces that are down, number of attacks, CPU spikes, system reboots, and sessions |
See Session Overview and All Security Events Overview |