Help us improve your experience.

Let us know what you think.

Do you have time for a two-minute survey?


Integrate Juniper Mist™ with Aruba ClearPass Guest for Enhanced Access Control

SUMMARY Follow this procedure to integrate Juniper Mist™ with Aruba ClearPass Guest™ for secure user authentication.

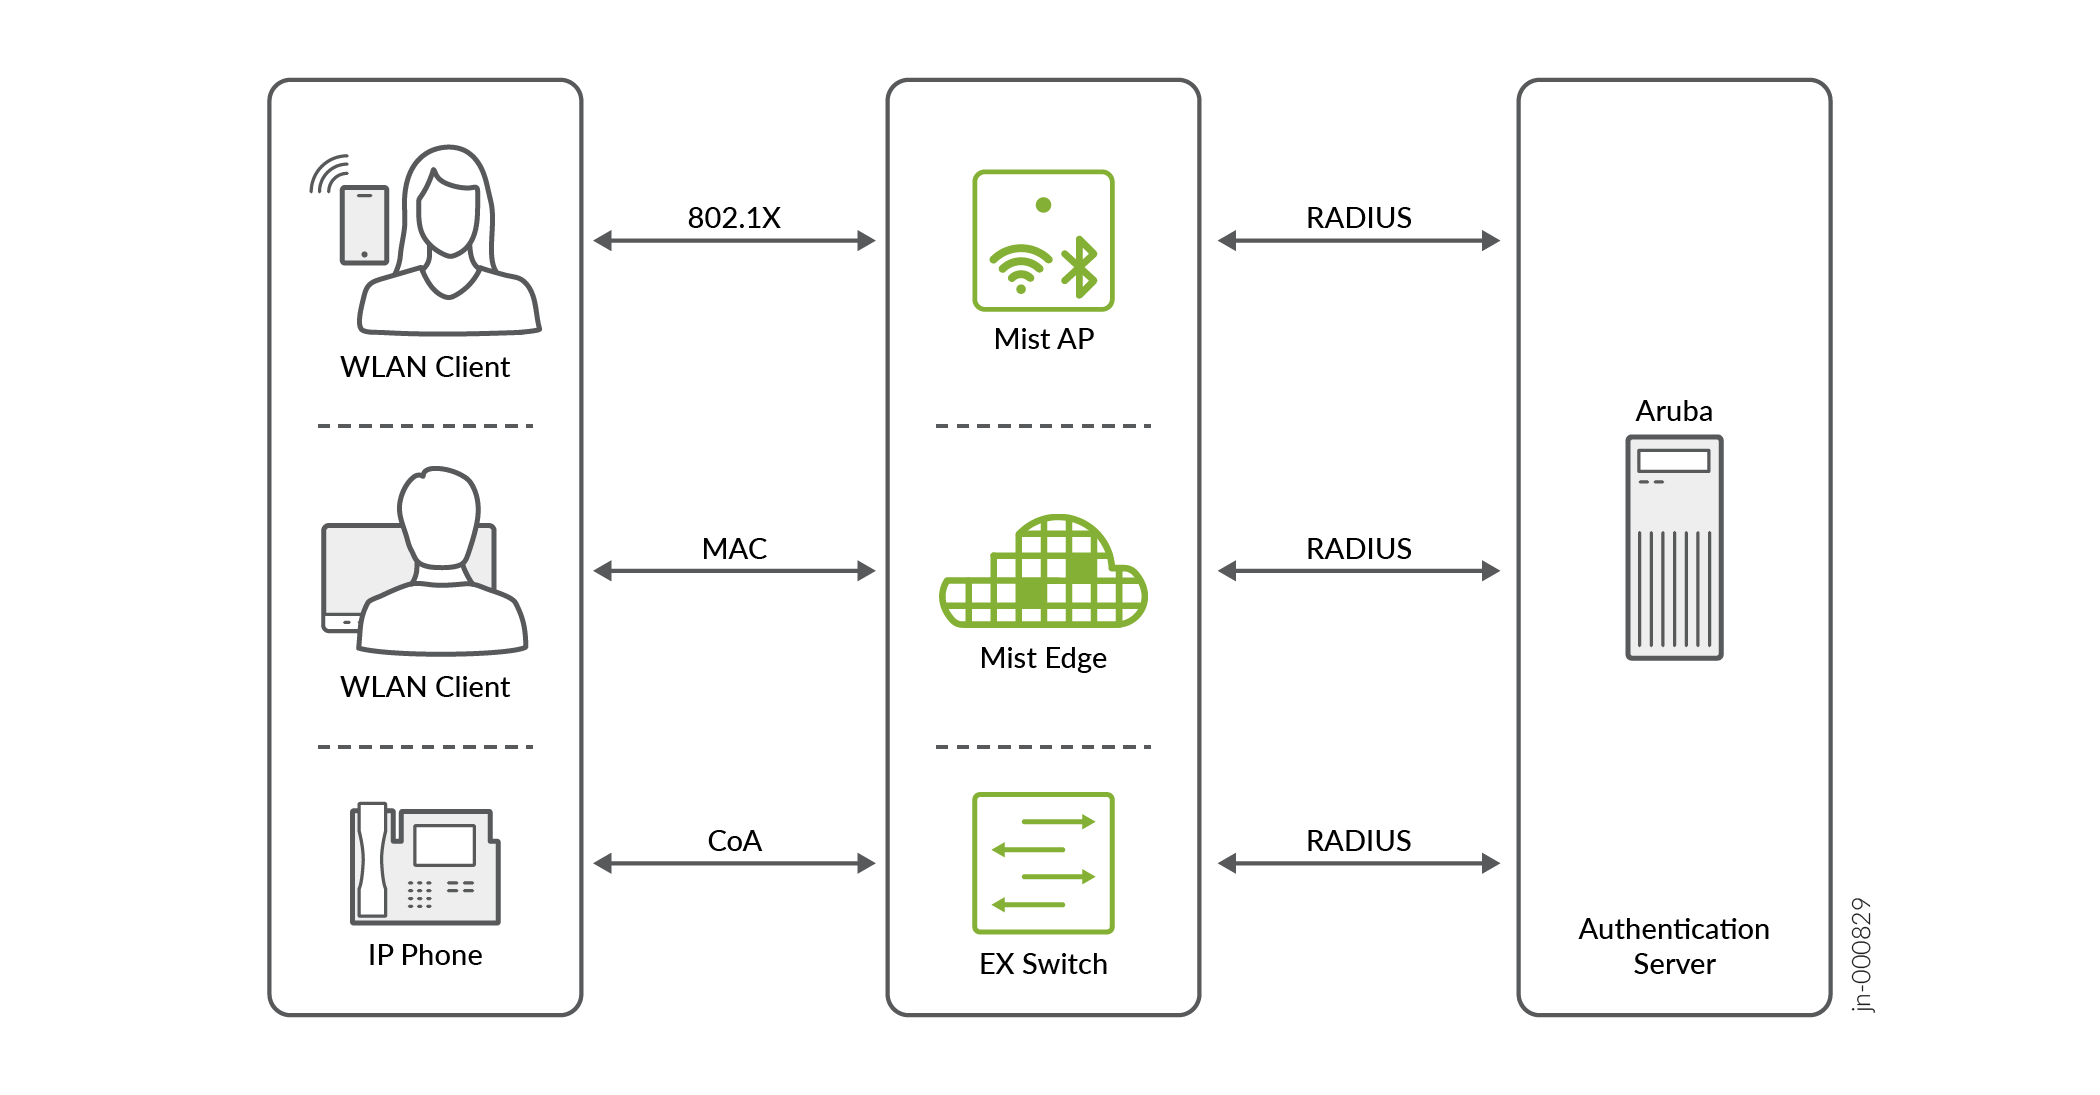
Juniper Mist™ can seamlessly integrate with network access management platforms, such as Aruba ClearPass Guest, to leverage extensive access control customization options for guest users on the network.

Standards-Based Integration with Aruba ClearPass
Note:

For information about Aruba products, go to resources on the Aruba support site, such as About ClearPass Guest.

To integrate Juniper Mist™ with Aruba ClearPass Guest:

  1. Go to the admin console for Aruba ClearPass Policy Manager, and create a Change of Authorization (CoA) Profile for the Mist Access Points (APs).
    Note:

    For help, see Configuring Enforcement Profiles on the Aruba support site.

    1. Find the [Cisco – Reauthenticate-Session] profile, select it, and then Copy it.
    2. Edit the new copy of that profile. Rename it as [Mist - Reauthenticate-Session].
    3. Configure the following attributes for the Mist CoA profile:
      Table 1: Table 1:

      Type

      Name

      Value

      Radius:IETF

      CallingStation-Id

      %{Radius:IETF:Calling-Station:Id}

      Radius:Cisco

      Cisco-AVPair

      subscriber:command=reauthenticate

      Radius:IETF

      NAS-IPAddress

      %{Radius:IETF:NAS-IP-Address}

      Radius:IETF

      Event-Timestamp

      %{Authorization:[Time Source]:Now}

  2. Create a Guest Registration page on the ClearPass Guest Manager by duplicating the default self-registration web page template. For help, go to resources on the Aruba support site, such as Accessing the Self-Registration Customization Forms.
    1. For the self registration instance, select Enable self-registration, and then save the changes.
    2. Enable Sponsor Confirmation since you're enabling a sponsored guest workflow.
    3. Configure a login delay, which will give ClearPass time to send the CoA back to the Mist AP and reauthorize a newly registered guest client. Set a login delay of 10 seconds (anything lower may cause inconsistent behavior with ClearPass). Then save the changes. For help, go to resources on the Aruba support site, such as Editing Self-Registration Pages.
    4. Configure NAS Vendor Settings as follows:
      • Enabled—Enable guest login to a Network Access Server

      • Default URL—Enter http://www.mist.com.

      • Override Destination—Select Force Default Destination for all clients.

      For help, go to resources on the Aruba support site, such as Editing and Enabling NAS Login Properties.
  3. Create Guest Access configuration with MAC Caching and move through the tabs to configure the settings as follows:
    • Name Prefix—Mist

    • Wireless SSID—Guest-Access

    • Controller IP Address—Add the management IP subnet of the Mist APs to allow them to talk to ClearPass through RADIUS.

    • Set the default expiration times for each type of guest as required.

    • Select Filter ID based enforcement and provide guest role names.

    For help, go to resources on the Aruba support site, such as Guest Authentication with MAC Caching Service Template.
  4. Select Add Service, and then you will see that new services were added.
  5. Edit existing Enforcement Profiles and Policies in order to integrate the Mist APs. For help, go to resources on the Aruba support site, such as Modifying an Existing Enforcement Profile.
    1. Edit the default mist Captive Portal Profile and from the attributes tab:
      • Delete the existing Filter-id attribute.

      • Add a new url-redirect attribute to let the AP know where a client needs to be redirected to. Follow this syntax when configuring the value:

      • Save the changes.

      Also, edit Mist Guest Device Profile and remove the last attribute that was pre-created during the wizard:

    2. Edit the Mist Guest Device Profile and remove the last attribute that was automatically created.
    3. Navigate to Enforcement Policies and Edit the Mist MAC Authentication Enforcement Policy to send a redirect URL for any unknown/unregistered clients:
      • In the Enforcement tab, select Mist Captive Portal Profile as the Default Profile.

      • Save the changes.

  6. Create a new Enforcement Policy to handle guest user authentication through the Captive Portal hosted by ClearPass. For help, go to resources on the Aruba support site, such as Configuring Enforcement Policies.
    1. Set the Enforcement Type as WEBAUTH.
    2. Set the Default Profile as [RADIUS_CoA] [Mist – Reauthenticate Session].
    3. Click Next, then create a rule to cache a client MAC once a user is authenticated as Guest. Choose the duration specified on the guest manager settings.
    4. Save the changes.
  7. Create a new WebAuth Service. For help,go to resources on the Aruba support site, such as Adding Services.
    1. In the Service tab, configure the following:
      • Type—Select Web-Authentication.

      • More Options—Select Authorization.

      • Add another condition to match on the guest page that contains “Mist” in the name.

      • Click Next.

    2. In the Authentication tab:
      • Select [Guest User Repository] as your authentication source.

      • Click Next.

    3. In the Authorization tab:
      • Add [Endpoints Repository] and [Time Source] as additional authorization sources.

      • Click Next.

    4. In the Roles tab:
      • Select the Role Mapping policy “Mist User Authentication with MAC Caching Role Mapping".

      • Click Next.

    5. In the Enforcement tab:
      • Select the enforcement policy that you created in the previous step.

      • Click Save.

  8. In the Juniper Mist portal, navigate to the WLAN or create a new one.
    Note:

    For help, see Configure a WLAN Template or Adding a WLAN.

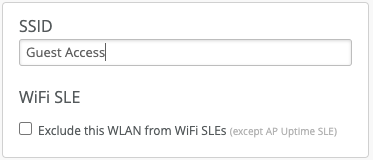
  9. Enter the same SSID that you configured in ClearPlass.

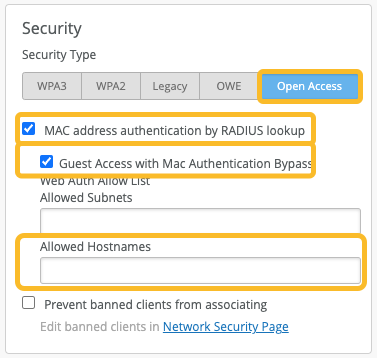
  10. In the Security section:
      • Select Open Access.

      • Select MAC address authentication by RADIUS lookup.

      • Select Guest Access with Mac Authentication Bypass.

      • In the Allowed Hostnames field, enter the FQDN of the ClearPass server where a guest user will be redirected to. Also add any additional FQDNs that need to be allowed before the user is authenticated.

  11. In the Authentication Servers section, click Add Server, enter the IP address, port, and shared secret for the ClearPass server, and then click the checkmark icon to save the changes.
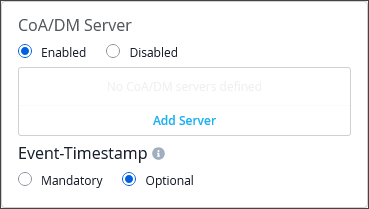
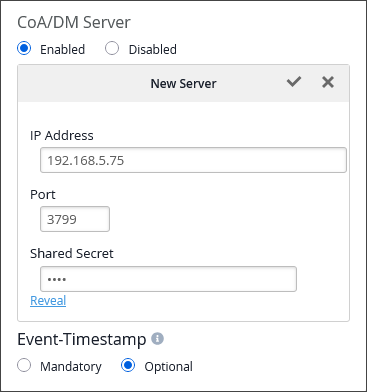
  12. In the CoA/DM Server section, select Enabled, click Add Server, enter the IP Address, Port, and Shared Secret for the ClearPass server, and then click the checkmark to save the changes.
  13. Save the WLAN settings.
    Note:

    If the WLAN is in a WLAN template, ensure that you've applied the template to the desired site(s).

  14. Verify that integration was successful by looking at the Access Tracker in the Aruba ClearPass Policy Manager. For help, go to resources on the Aruba support site, such as Live Monitoring: Access Tracker.