
Configure Secure Edge Connector with Zscaler (Auto)
Follow this workflow to configure automatic tunnel provisioning when using Zscaler as your Secure Edge provider.
Juniper Mist WAN Assurance with Mist AI enhances security, and integration with Zscaler offers a comprehensive SASE solution for secure access across locations. Zscaler provides comprehensive cyber-security and zero-trust connectivity, all integrated seamlessly with the Juniper Mist Cloud. This topic walks you through how to configure automatic tunnel provisioning when you integrate Zscaler as your Secure Edge Connector provider.
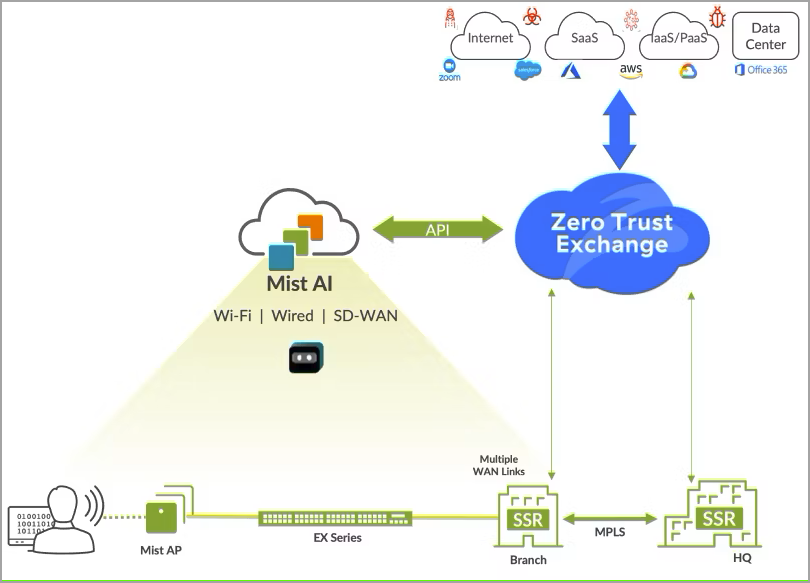
To improve cloud-to-cloud connectivity, Mist now offers automated Zscaler tunnel provisioning. This integration allows you to effortlessly establish connections from your devices to the Secure Service Edge (SSE) when you integrate Zscaler as your Secure Edge Connector provider in the Mist portal. The Mist portal allows simplified configuration and management of Zscaler Security Service Edge (SSE) connections through the Secure Edge Connector—eliminating the need for additional platform logins.
Note the following about Zscaler tunnel provisioning:
- Automatic provisioning supports only IPsec tunnels.
- The tunnel auto-provision process includes the creation of a new Zscaler location and VPN credential objects in the Zscaler cloud. These Zscaler resources will be deleted when the associated tunnel provider is removed from the Mist portal.
- Each auto-orchestration requires the creation of one primary tunnel and one secondary tunnel.
Configure Auto-Provisioning of Tunnels for Zscaler Integration
- Prerequisites
- Add Zscaler Credentials in the Juniper Mist Portal
- Set Up Auto Tunnel Provisioning
- Verify the Juniper Secure Edge Tunnels
Prerequisites
You must obtain a partner key and the partner admin login credentials in the Zscaler portal for auto-provisioning of Zscaler tunnels.
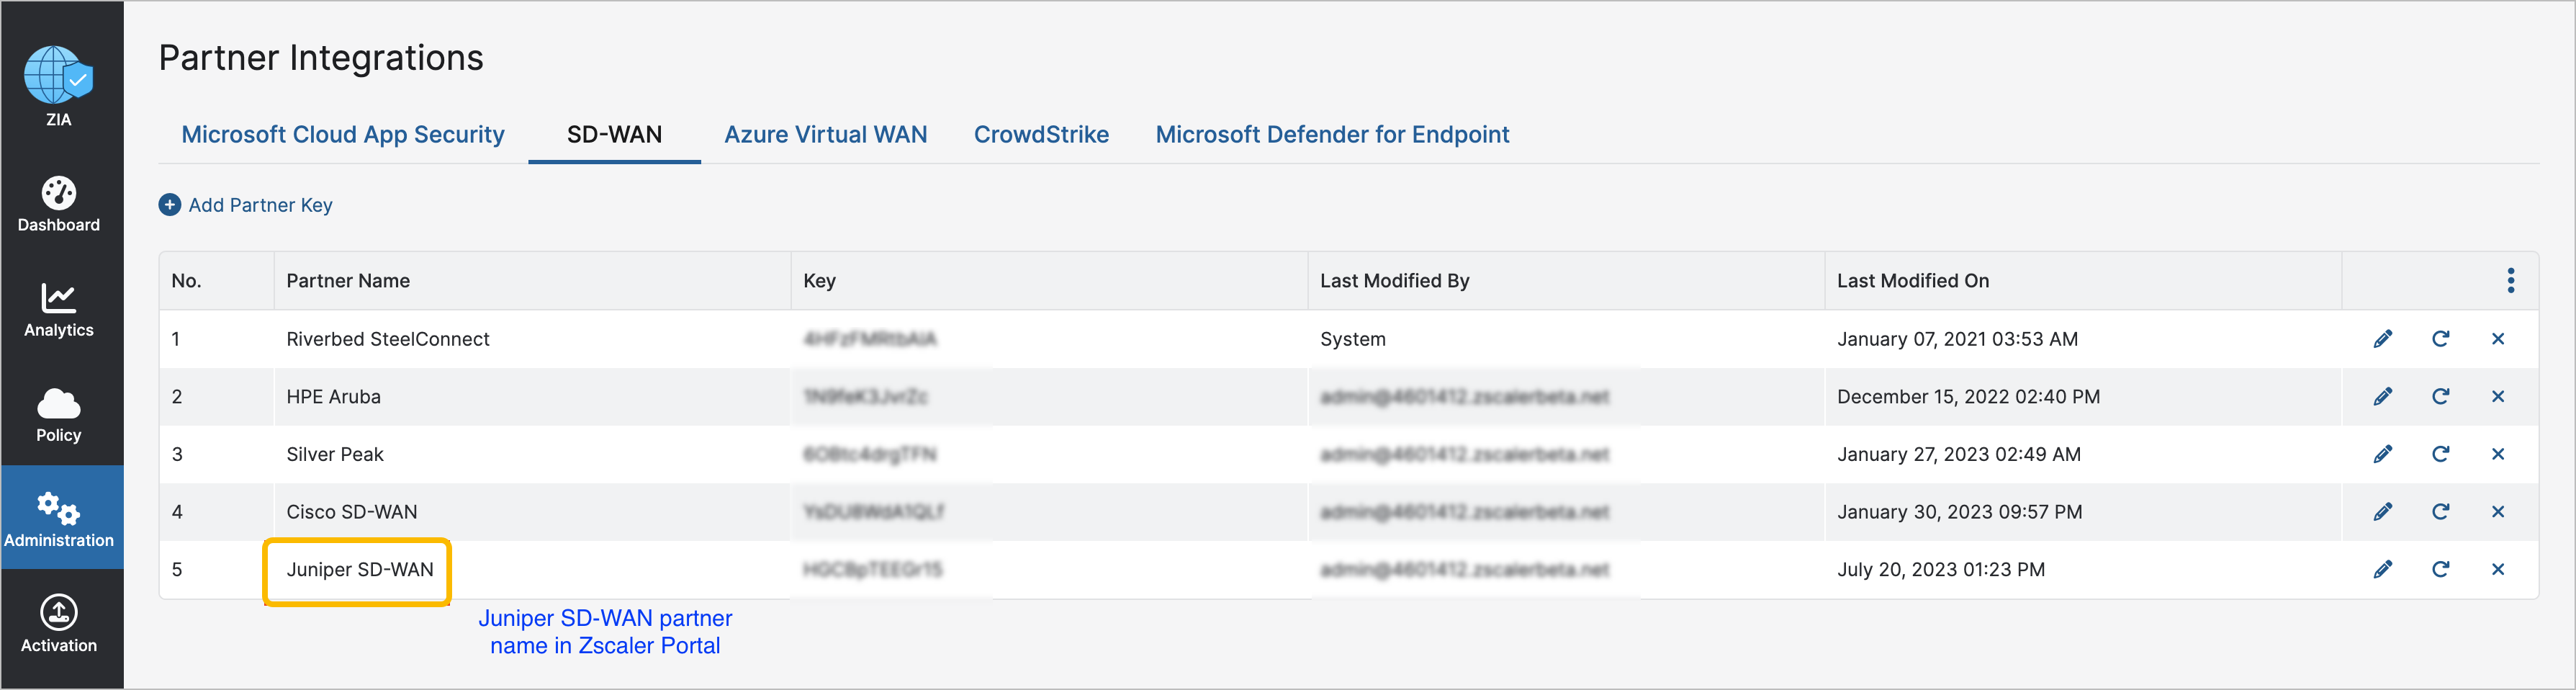
Add a partner API key.
- Log in with your Zscaler account to access the admin portal.
- Select Administration > Partner Integrations.
- Select the SD-WAN tab.
- Click Add Partner Key.
- In the Add Partner Key window, choose the partner name from
the drop-down menu and click Generate. Figure 2: Selecting SD-WAN Partner Integration
Provide credentials for the API access.
- Go to Administration > Role Management > Add SD-WAN Partner API Role.
- Configure the following options:
- Name—Name of the SD-WAN partner API role.
- Traffic Forwarding—Assign the permissions for the SD-WAN partner APIs to access the Traffic Forwarding API endpoints that the partner is managing via the cloud service API. You can choose permissions of Full, View Only, or Custom.
See Adding Partner Admin Roles for details.
Create a partner account for the SD-WAN Orchestrator. This admin user (username/password) is specifically used for SD-WAN partner authentication and it is different from the Zscaler account admin user.
- Select Administration > Administrator Management > Add SD-WAN Partner API Client.
- Enter the details such as login ID, email address, name, partner role, and password. See Adding Partner Admins for details.
- To find the name of your Zscaler Cloud, see What is My Cloud Name.
Add Zscaler Credentials in the Juniper Mist Portal
Provide Zscaler credential details in the Juniper Mist portal in order to integrate the Mist cloud with Zscaler.
- From the left menu of the Juniper Mist portal, select Organization > Settings.
- Scroll down to Secure WAN Edge Integration section and click Add Credentials.
- In the Add Credentials window, enter the details. Use
Table 1 to
guide you.
Table 1: Add Credentials Settings Field Value Provider Select Zscaler. Email Address Enter username (e-mail address). These are the SD-WAN partner user credentials. Password Enter the password for the username. Partner Key Enter the partner key you created when you configured your Zscaler account. Cloud Name This is the Zscaler cloud URL. For example, zscalerbeta.net. Figure 3: Add Credentials for Zscaler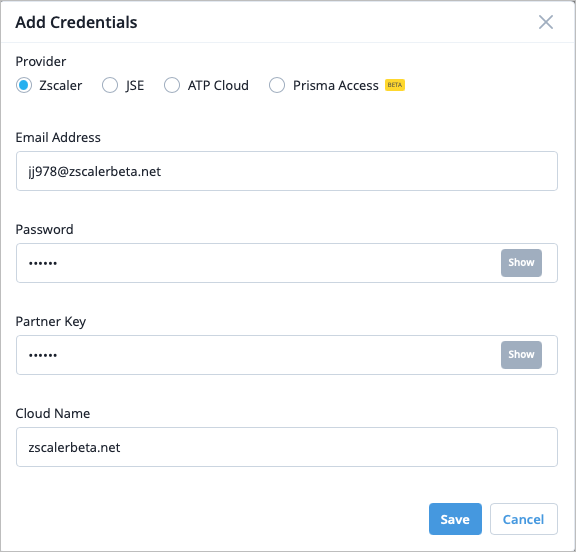
- Click Save to continue.
This procedure is a one-time configuration at the organization level. To automatically provision the Zscaler tunnels across several sites, the Mist Cloud uses the above-mentioned credentials for the given organization.
Set Up Auto Tunnel Provisioning
- From the left menu of the Mist portal, navigate to Secure Edge Connectors at the WAN Edge Template level or device level.
- Click Add Provider.
- In the Add Provider side panel, select Zscaler (Auto) in the Provider field for automatic tunnel provisioning.
- Use table 2 to
help guide you as you enter the following details for the Zscaler
provider:
Table 2: Add Provider Settings for Auto Provisioning a Tunnel Field Value Name Enter the name of the service. Provider Select Zscaler (Auto). Probe IPs Enter the probe IP address (primary and secondary). You can enter a well-known IP address as the probe IP (Example: 8.8.8.8). WAN Interface Assign WAN interfaces under the Primary and Secondary sections for provisioning of primary and secondary tunnels. Figure 4: Add Details for Auto Provisioning a Tunnel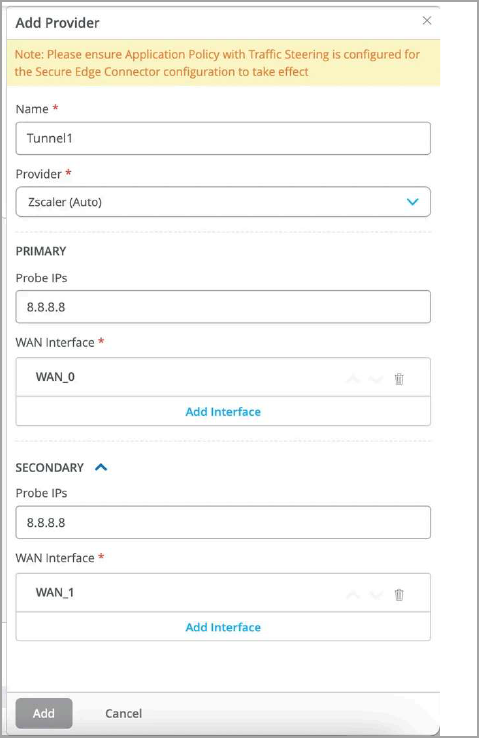
- Click Add to continue.
Add a traffic steering profile on the WAN Edge Templates page or on the WAN Edge Device page. See Traffic Steering Rules for more information.
Use Table 3 to help guide you as you enter the information.
Table 3: Traffic Steering Settings Field Value Name Enter a name for the traffic-steering profile. Strategy Select a strategy. You can configure the traffic steering profile with any strategy (Ordered, Weighted, or ECMP), based on your topology and configuration. Paths Click Add Paths and enter the following details. - Type—Select Secure Edge Connector.
- Provider—Select Zscaler (Auto).
- Name—Select the Zscaler Provider's name you created in step 3 above.
Figure 5: Traffic Steering Path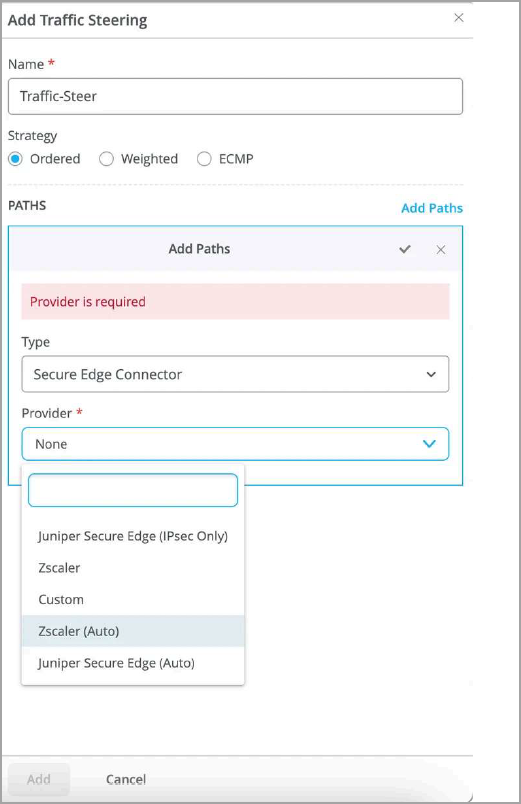
- Add an application policy that references the traffic steering profile you
created. This is required for provisioning of provider tunnels to take
effect. To create the application policy, scroll down to the
Application Policies section on the WAN Edge Template or device you are
currently on.
Enter the details as described in Table 4 for the application policy:
Table 4: Application Policy Settings Field Value Name Enter a name for the application policy. Network/User This is the network or user that needs secure access to applications through the Zscaler tunnel. Action Select an action of Allow for the traffic. Application/Destination Select the applications that you want the Network/User to have access to. Traffic Steering Select the traffic steering profile you created in step 6. This specifies the path that traffic is allowed to take to reach its destination. Figure 6: Application Policies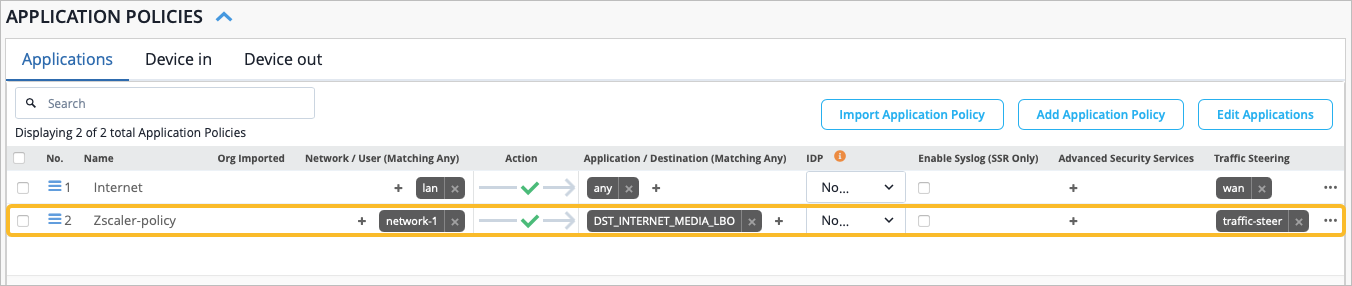
When you assign a template that is enabled with the Zscaler (Auto) option to a site, the following operations take place:
An associated Zscaler site (location object) is automatically created. You can view the location object in Administration > Location Management on the Zscaler portal.
Figure 7: Location Created in Zscaler Portal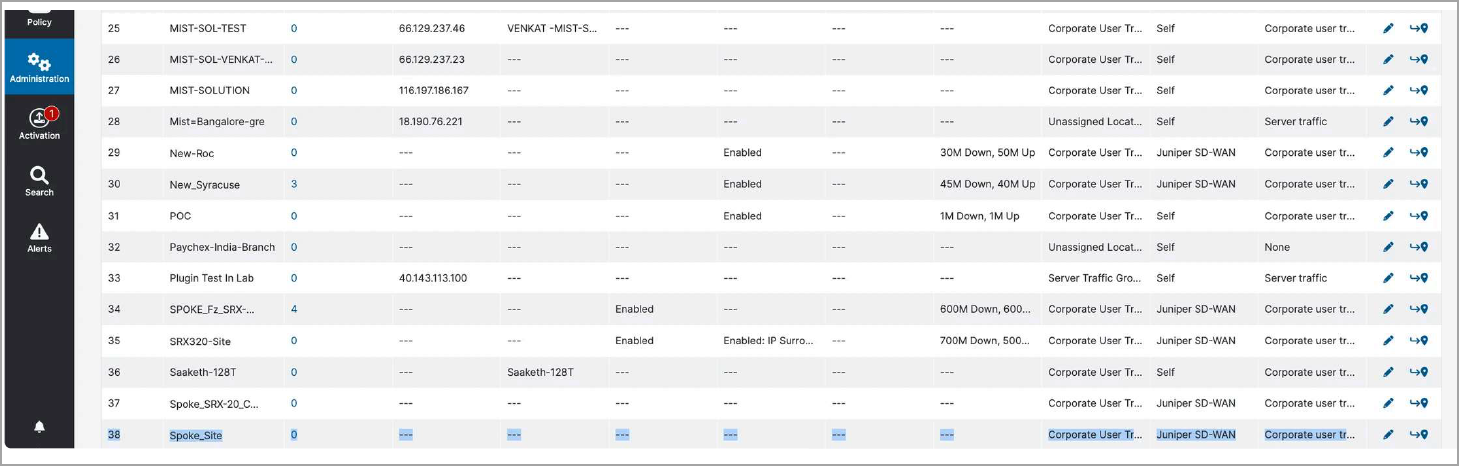
The details required for tunnel creation are exchanged between the Mist cloud and Zscaler.
Tunnels are powered up from the device to the closest network point-of-presence (POP).
Verify the Juniper Secure Edge Tunnels
On Juniper Mist portal, you can verify the established tunnels details by navigating to WAN Edges > WAN Edges > WAN Edge Insights > WAN Edge Events. You should see the WAN Edge Tunnel Auto Provision Succeeded event.
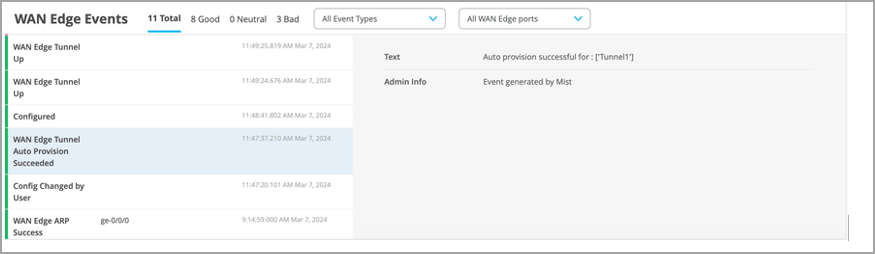
Once the Zscaler tunnel configuration has been deployed, you can see the tunnel status by navigating to WAN Edges > WAN Edges. Click on the device name, then scroll down to the Secure Edge Connector Details section.
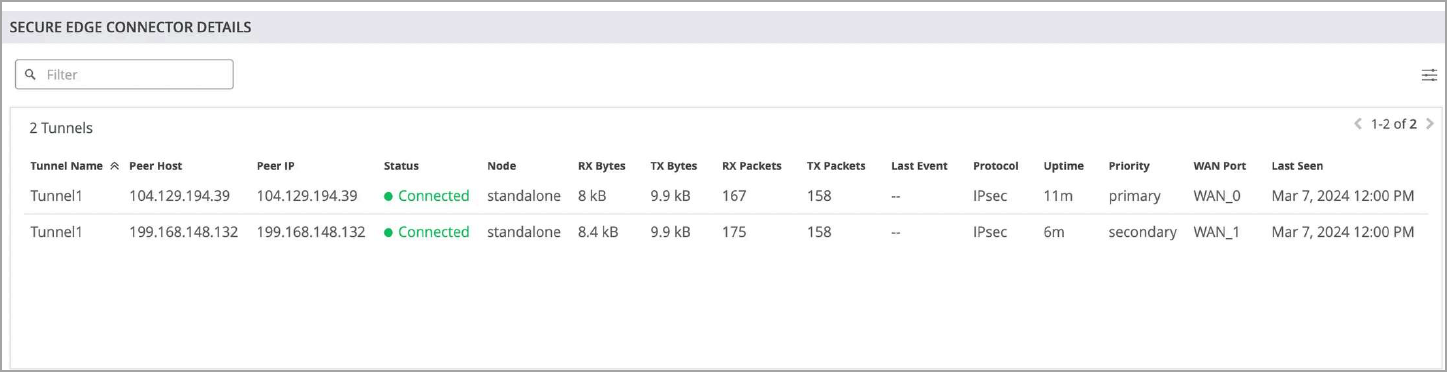
You can view the tunnel statistics under Probe Stats on the WAN Edge Insights page. To view an example of this, see Tunnel Statistics.