Integrate Palo Alto Prisma Access as Your Secure Edge Connector for SASE Health (BETA)
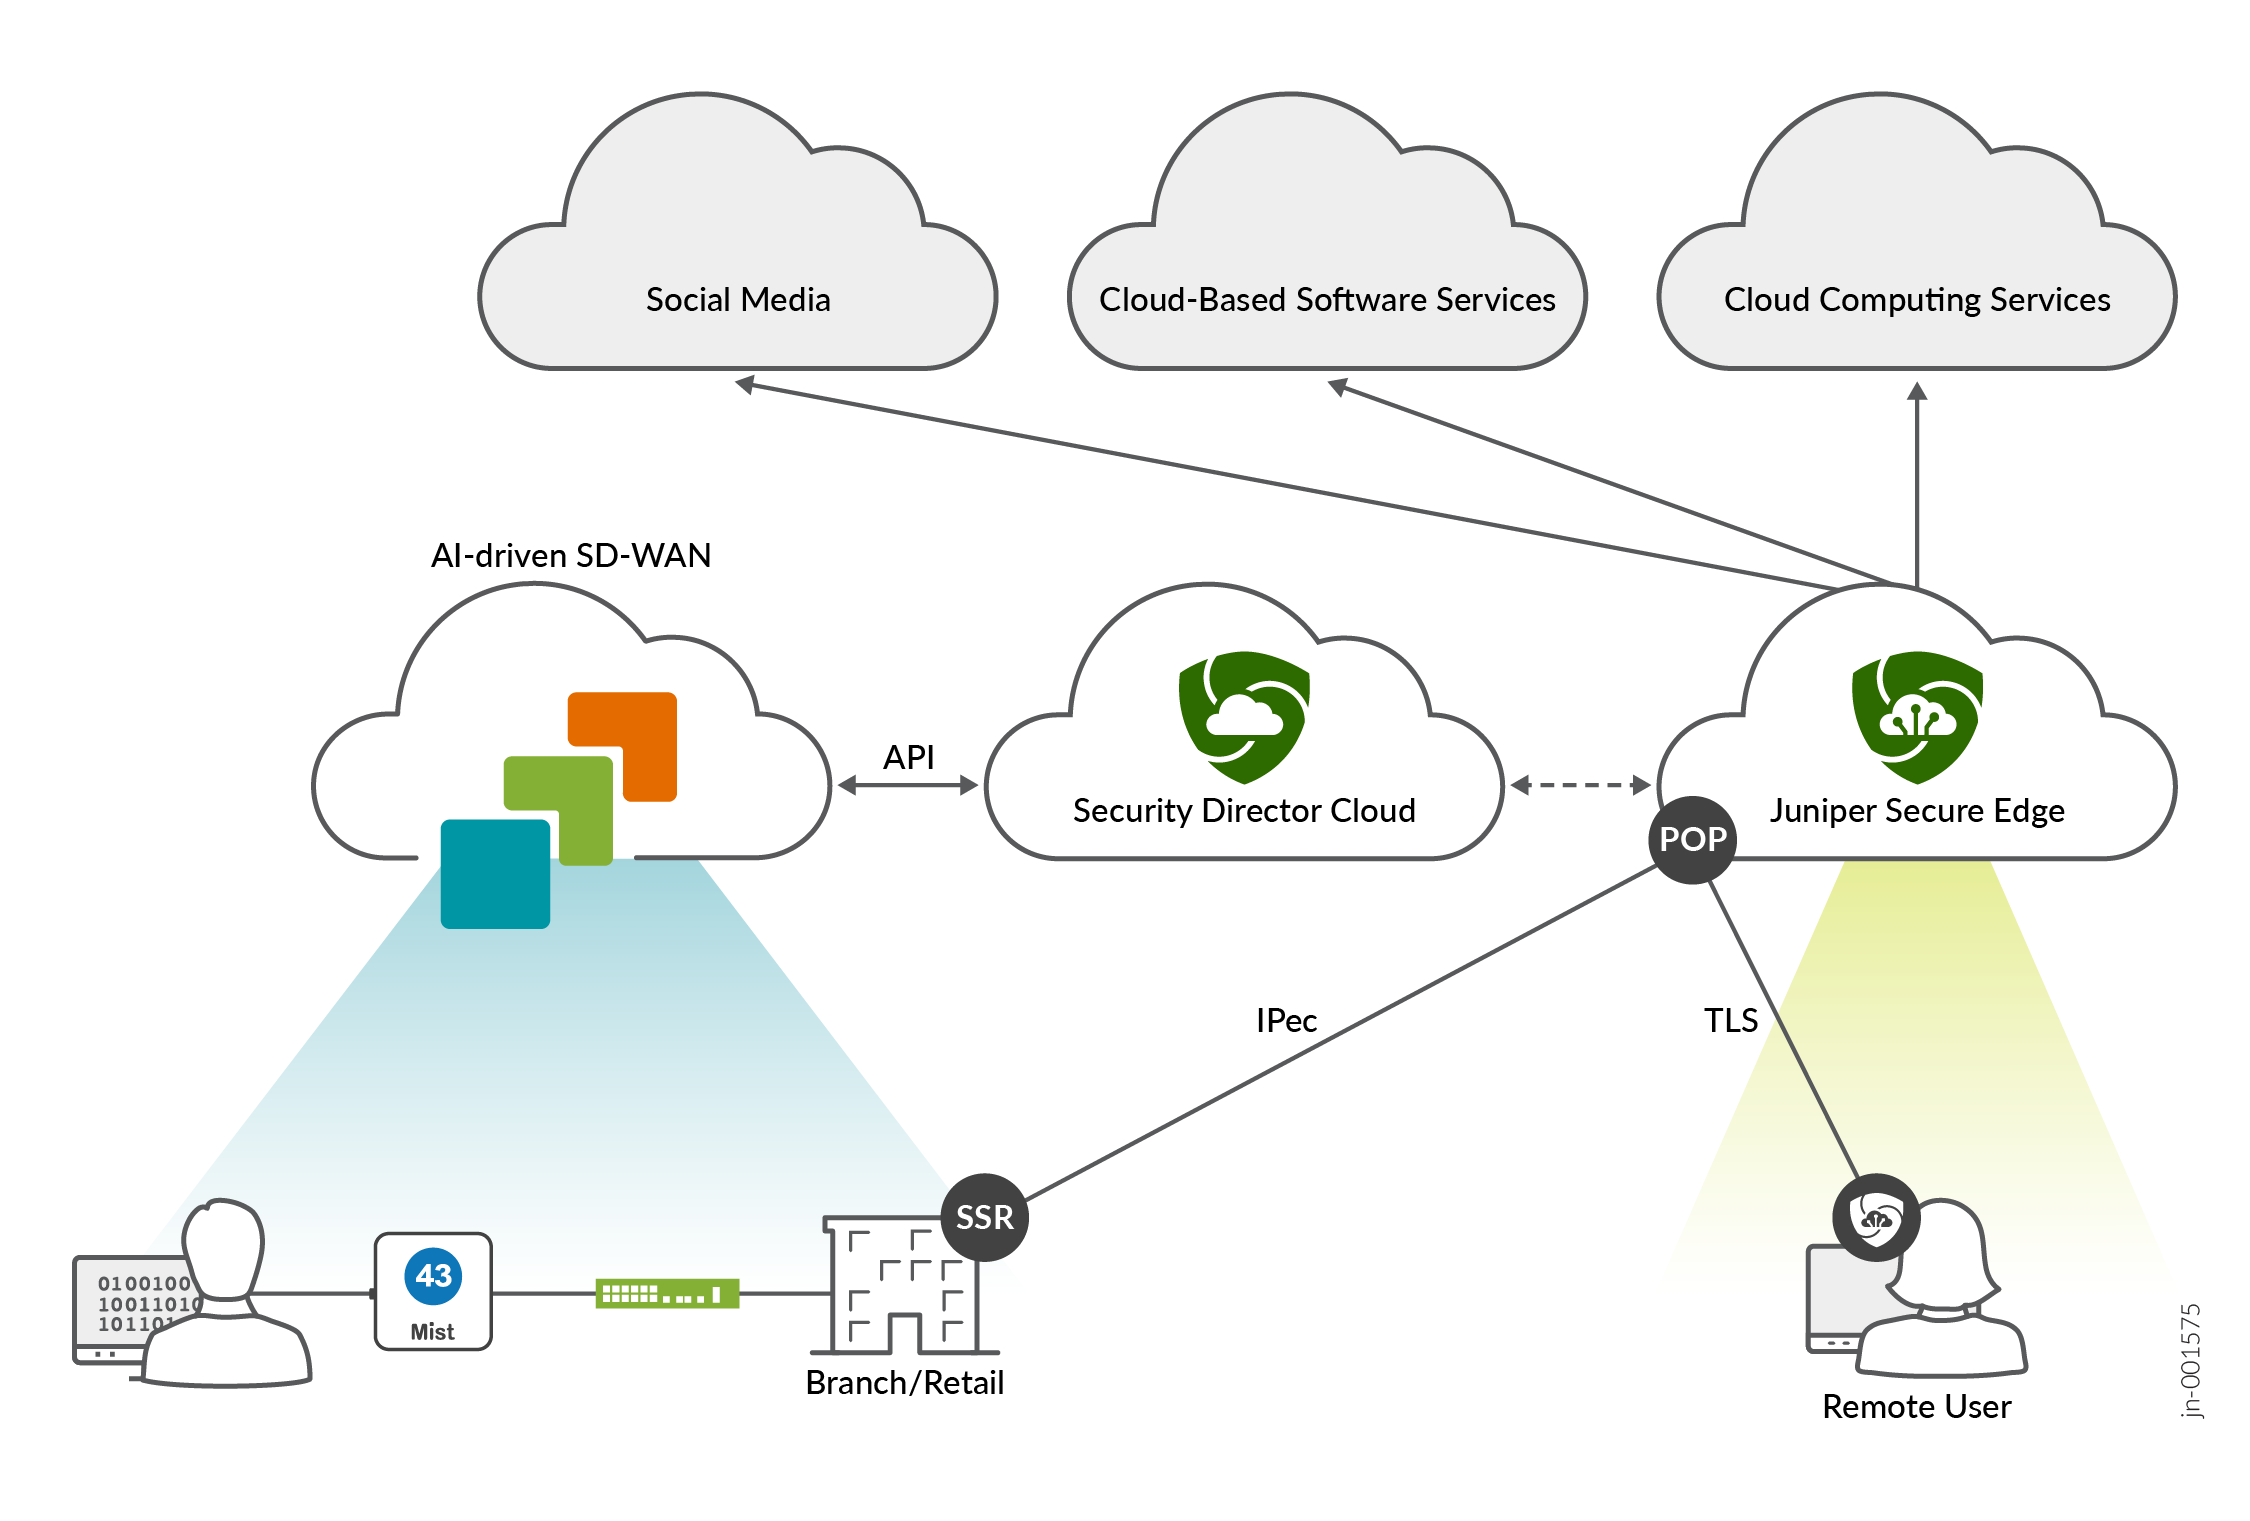
You can integrate a Palo Alto Prisma Access account with Juniper Mist™ WAN Assurance for single-pane-of-glass troubleshooting directly from the Mist portal.
You can integrate a Palo Alto Prisma Access account with Juniper Mist™ WAN Assurance to get a single-pane-of-glass view for troubleshooting and debugging. This integration enables you to view Prisma Access events and tunnel statistics in real-time directly from the Mist portal, so you don't have to navigate between platforms while troubleshooting.
Palo Alto Prisma Access is a cloud-based security platform that ensures secure and fast access to applications and data for users regardless of their location. If you use both Prisma Access and Mist WAN Assurance, an IPsec tunnel is used for end-to-end communication between the two. Standalone WAN Edge devices can use this tunnel to reach specific applications securely.
Mist automatically provisions these IPsec tunnels, which significantly reduces the amount of manual configuration required, as well as reduces the risk of human error. This automatic tunnel provisioning means that you do not need to configure on both sides, as the configuration you do in Mist is replicated in Strata Cloud Manager.
This integration delivers critical insights in real-time for your WAN Edge devices, Prisma Access, and applications. You can use these insights to quickly and efficiently diagnose and resolve site issues.
Benefits and Requirements
| Benefits |
|
| Requirements |
|
To integrate a Prisma Access account with Mist WAN Assurance, you must complete the following steps.
Configure User Access Role in the Prisma Strata Cloud Manager and Obtain Credentials for Mist
To control access to your applications and services, configure a user Access Role in Prisma. You'll set up the role through the Strata Cloud Manager. Then store the user credentials so that they can be entered into the Juniper Mist portal for account linking.
-
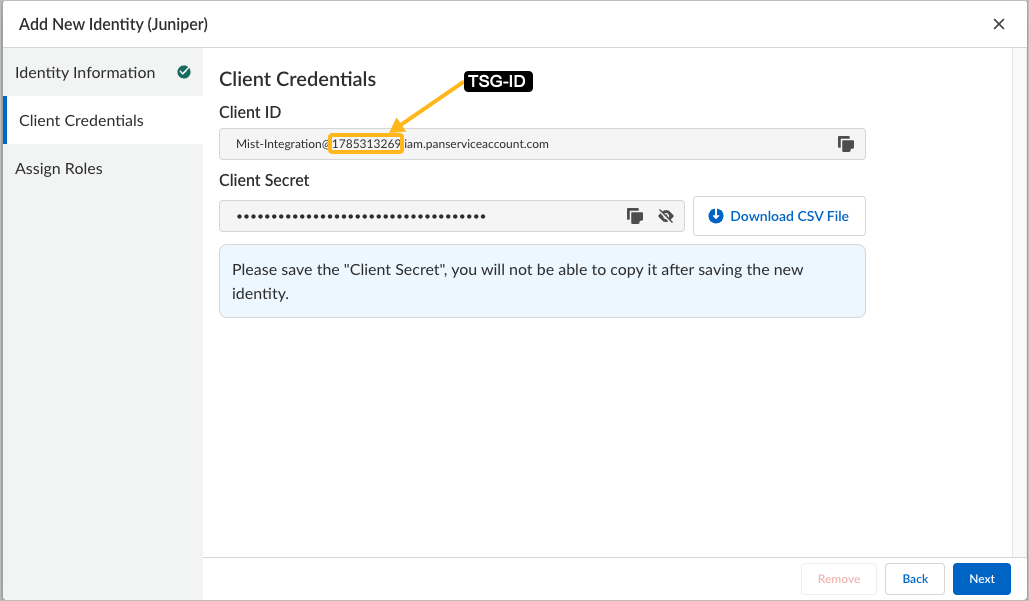
When the client credentials are displayed on the screen, copy the following
values and store this information somewhere safe:
-
Client ID
-
Client Secret
-
TSG-ID—The Tenant/Service Group ID (TSG-ID) is the series of numbers directly after the
@symbol in the Client ID. You can also view the TSG-ID from the lefthand panel of the Strata Cloud Manager.Refer to the following example, but consult your Strata Cloud documentation for the latest information.
-
-
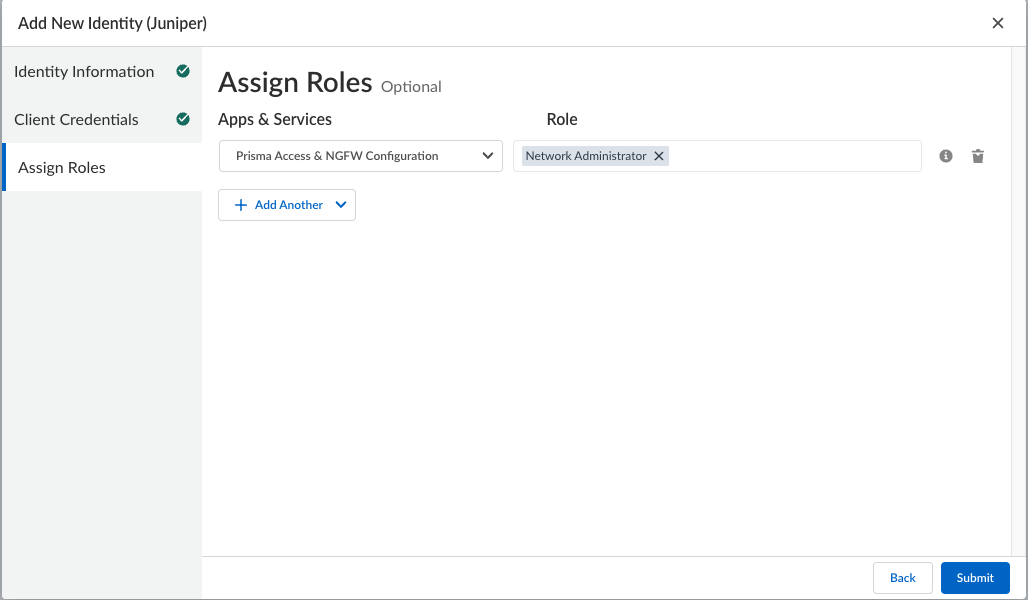
In Strata Cloud, assign a predefined role with the following
information:
-
Apps & Services—Select Prisma Access & NGFW Configuration.
-
Role—Select Network Administrator.
Note: The Network Administrator role is the minimum required access role to enable the link between Mist and Prisma APIs. With this role, Mist can access Prisma APIs for IPsec tunnel orchestration and can provide visibility into tunnel status, alerts, and incident notifications. If this role is not assigned, you must use the two separate dashboards (the Mist portal for Mist WAN Edge device troubleshooting, and the Strata Cloud Manager for Prisma tunnel troubleshooting).Refer to the following example, but consult your Strata Cloud documentation for the latest information.
-
Add the Prisma Access Account as a Secure Edge Connector
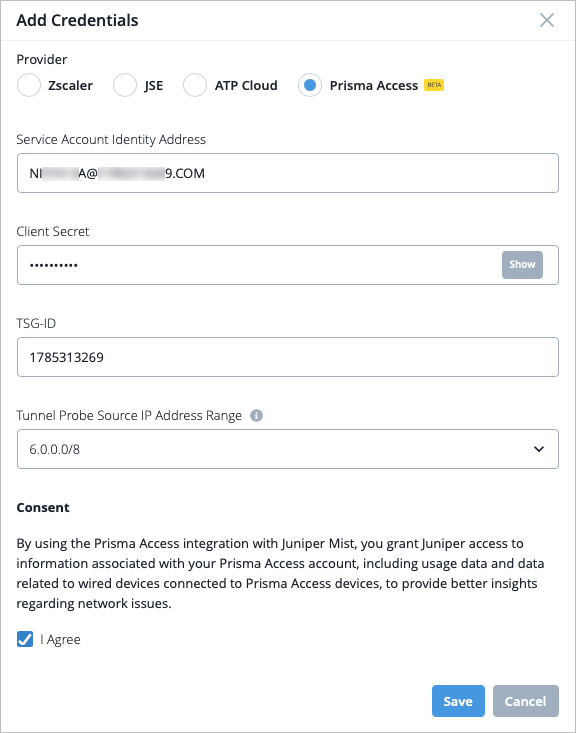
- From the left menu of the Juniper Mist portal, select Organization > Admin > Settings.
- In the Secure WAN Edge Integration section, click Add Credentials.
-
Enter the credentials you copied from the Prisma Strata Cloud
Manager.
-
Click Save.
 Note:
Note:If any of the credentials you entered are incorrect or expired, you will receive an error message and will not be able to save the settings.
The Prisma Access Provider and Username is then listed in the Secure WAN Edge Integration tile.
-
Click Save.
Auto Provision IPsec Tunnels
Mist's automatic Prisma tunnel provisioning requires very minimal configuration. You only need to configure in Mist, and that configuration will be replicated in the Strata Cloud Manager automatically.
Most aspects of the configuration are automatically set for you. All you have to do to configure your tunnel is enter a name, provider, and WAN interface. Some of the fields that are automatically configured for you include the Region, where Mist automatically finds your region for the tunnel based on your Prisma tenant information, and Data Center, where Mist automatically finds the closest geographically located Point of Presence (POP) to your service connection. However, you can configure these fields with other values if necessary.
-
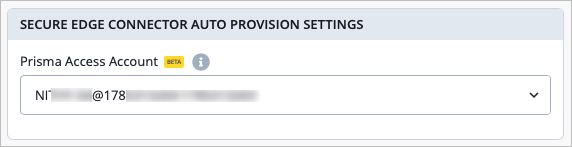
Navigate to the WAN Edge template (Organization > WAN Edge
Templates). In the SECURE EDGE CONNECTOR AUTO PROVISION SETTINGS
tile, select the Prisma Access Account you just created.
-
Configure an IPsec tunnel from the WAN Edge device to the Prisma Access
cloud. To do this, you must first add a Provider.
-
In the Add Provider window, use Table 2 to
guide you as you enter the following information for tunnel
provisioning:
Table 2: Add Provider Settings Field Value Name Enter the name of the service. Provider Select Prisma Access. Remote Networks Select an existing network or create a new one. Probe IPs Enter the destination probe IP address. You can use any well-known IP (Example: 8.8.8.8). Probes are used to send information such as jitter, latency, and roundtrip time to Prisma, and are used to construct the Probe Stats that display on the WAN Edge Insights page. WAN Interfaces Assign WAN interfaces for provisioning of primary and secondary tunnels. You can add multiple WAN interfaces, and the first interface in the list has priority. If the first interface is down, the second interface is used to establish the tunnel. In the OVERRIDE AUTO PROVISION OPTIONS section, default parameters are automatically configured for you as part of this automatic Provider configuration process. Use the fields in this section if you need to change any of the parameters that would otherwise be automatically chosen for you:
Table 3: Add Provider Settings - Override Auto Provision Options Field Description Region This indicates the geographic region for the Secure Edge instance. When the default "Auto" is selected, the nearest Prisma cloud region is automatically chosen for you. IKE v2 Proposals The encryption and authentication settings to be used for internet key exchange security association. DH Group The size of the keys to be used in the IKE negotiation to establish the tunnel. IPsec Proposals The encryption and authentication settings to be used for IPsec tunnels. Data Center This is set to "none" by default. As part of the automatic provisioning, Mist automatically selects the location of the nearest point of presence (POP) for your application. 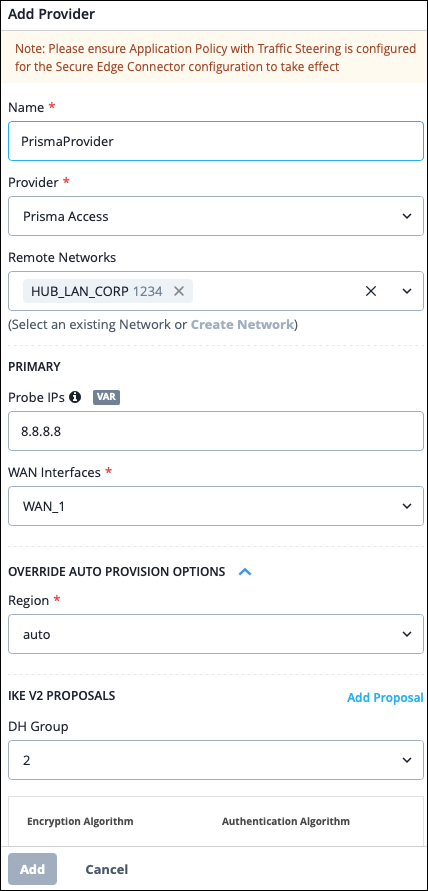
Note:The provider information you configured is automatically carried over to Prisma once the WAN Edge template is updated, so there is no need for manual configuration on the Prisma side. This is possible due to the account linking step.
In addition to configuring a provider, you must also complete the steps below to set up an IPsec tunnel. -
In the Add Provider window, use Table 2 to
guide you as you enter the following information for tunnel
provisioning:
Configure Traffic Steering and Application Policies
-
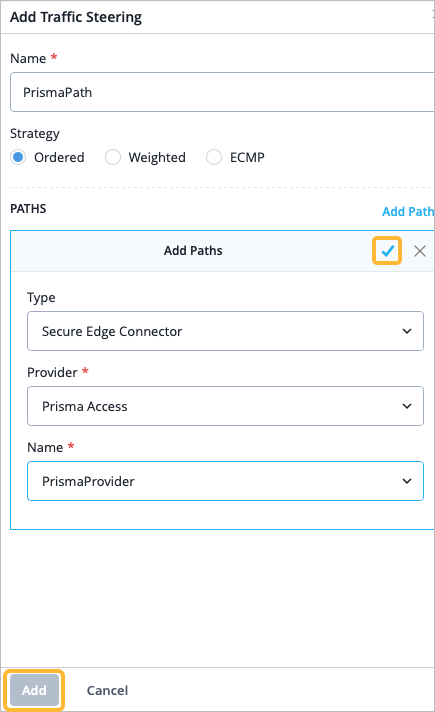
Scroll down to the Traffic Steering section and click Add
Traffic Steering.
Later, you'll add this traffic steering profile to an application policy to specify the path traffic can take to the destination.
-
Select Add.
For more information about how to create Traffic Steering rules, see Traffic Steering Rules.
-
Select Add.
-
Next, scroll down to the Application Policies section and click Add
Application Policy. An application policy defines the networks and
users that can access an application, as well as which path traffic can take
to reach its destination.
Enter the details as described in Table 5 for the application policy:
Table 5: Application Policy Settings Field Value Name Enter a name for the application policy. Network/User This is the LAN user that needs secure access to applications through the Prisma cloud. Action Select an action of Allow for the traffic. Application/Destination Select the applications that you want the Network/User to have access to. Traffic Steering Select the traffic steering profile you created in step 2. This specifies the path that traffic is allowed to take to reach its destination. 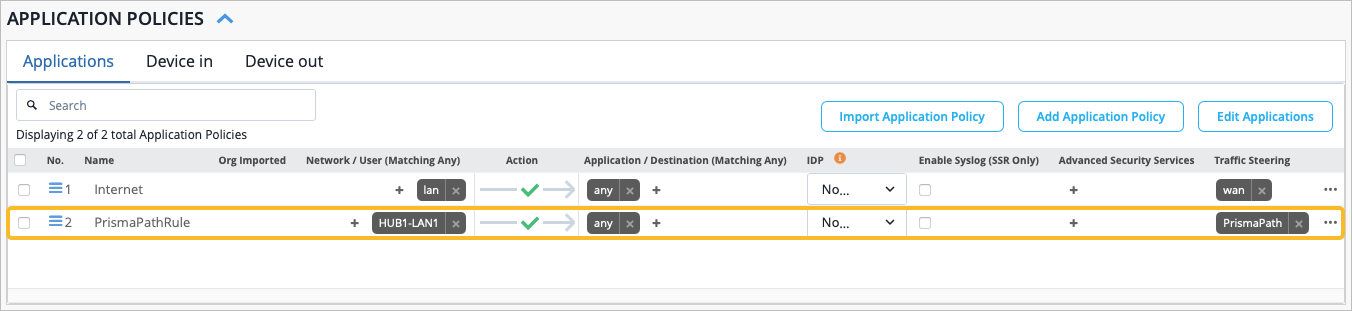
For more information about how to create Application Policies, see Configure Application Policies.
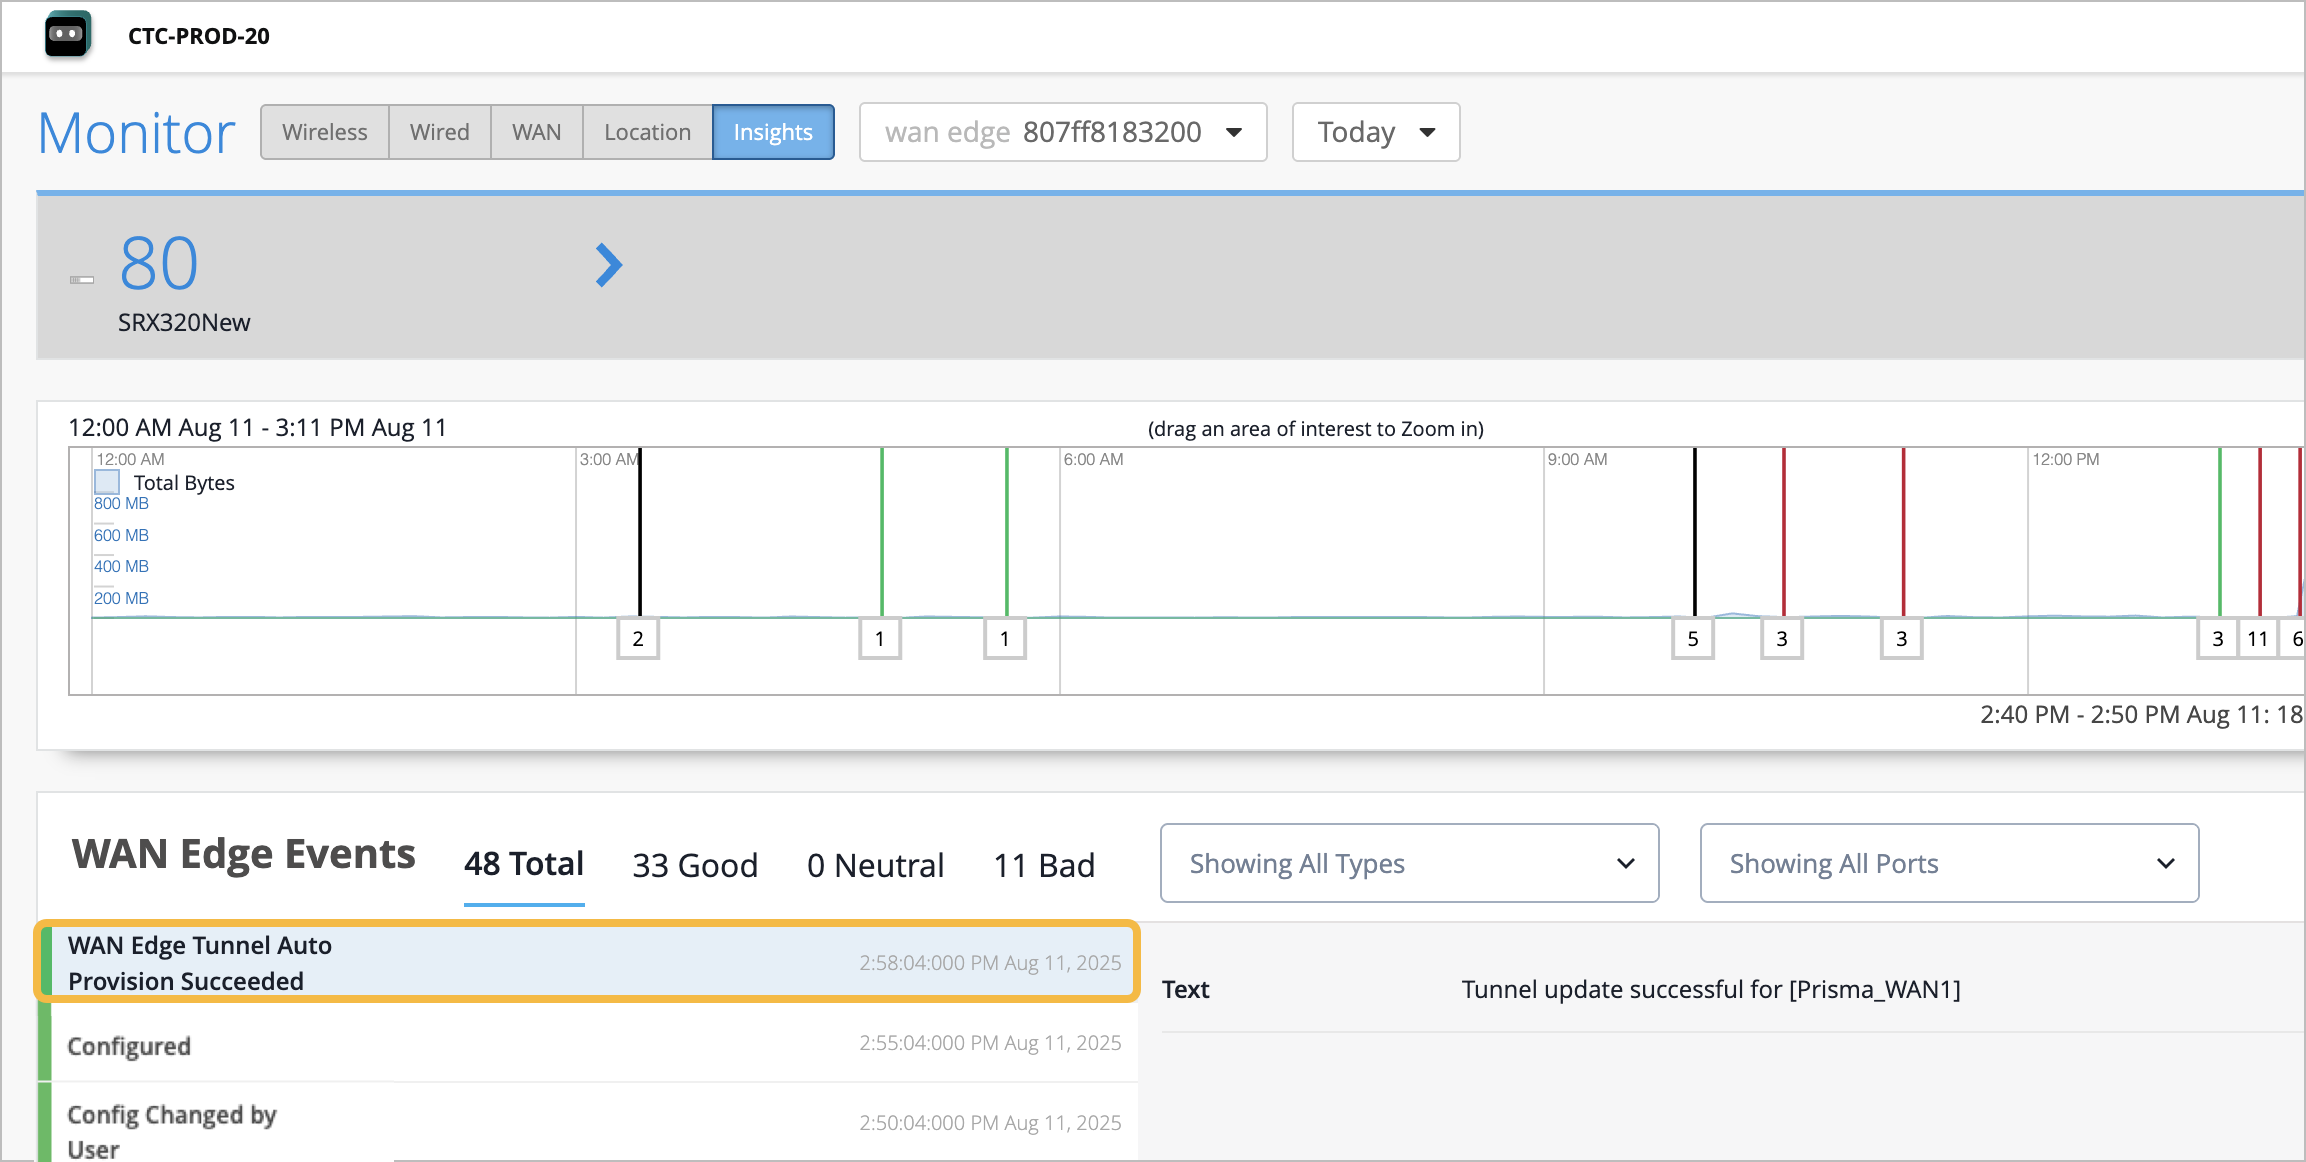
Verify the Tunnel
To see the IPsec status, select WAN Edges > WAN Edges from the left menu, then click the WAN Edge device. Finally, click WAN Edge Insights.
You can verify the established tunnel's details on the WAN Edge Insights page of the device once the WAN Edge Tunnel Auto Provision Succeeded event appears under WAN Edge Events.
Prisma Access Events on the Mist Portal
Juniper Mist supports the following Prisma Access Events:
| Event Type | Prisma Access Event |
|---|---|
| Remote Networks | Prisma RN ECMP BGP Down |
| Prisma RN ECMP BGP Flap | |
| Prisma RN ECMP Proxy Tunnel Down | |
| Prisma RN ECMP Proxy Tunnel Flap | |
| Prisma RN Primary WAN BGP Down | |
| Prisma RN Primary WAN BGP Flap | |
| Prisma RN Primary WAN BGP Up | |
| Prisma RN Primary WAN Proxy Tunnel Down | |
| Prisma RN Primary WAN Proxy Tunnel Flap | |
| Prisma RN Primary WAN Tunnel Down | |
| Prisma RN Primary WAN Tunnel Flap | |
| Prisma RN Primary WAN Tunnel Up | |
| Prisma RN Secondary WAN BGP Down | |
| Prisma RN Secondary WAN BGP Flap | |
| Prisma RN Secondary WAN BGP Up | |
| Prisma RN Secondary WAN Proxy Tunnel Down | |
| Prisma RN Secondary WAN Proxy Tunnel Flap | |
| Prisma RN Secondary WAN Tunnel Down | |
| Prisma RN Secondary WAN Tunnel Flap | |
| Prisma RN Secondary WAN Tunnel Up | |
| Service Connection | Prisma Service Connection Primary WAN BGP Down |
| Prisma Service Connection Primary WAN BGP Flap | |
| Prisma Service Connection Primary WAN Proxy Tunnel Down | |
| Prisma Service Connection Primary WAN Proxy Tunnel Flap | |
| Prisma Service Connection Primary WAN Tunnel Down | |
| Prisma Service Connection Primary WAN Tunnel Flap | |
| Prisma Service Connection Secondary WAN Proxy Tunnel Down | |
| Prisma Service Connection Secondary WAN Proxy Tunnel Flap | |
| Prisma Service Connection Secondary WAN Tunnel Down | |
| Prisma Service Connection Secondary WAN Tunnel Flap | |
| Prisma Service Connection WAN BGP Down | |
| Prisma Service Connection WAN BGP Flap |
A Prisma Access icon displays next to any Prisma Access events received from Strata Cloud Manager. The information in the Prisma Access event comes directly from Strata Cloud Manager.
When you select a Prisma Access event, you have the View Prisma SCM Incidents button available to you. Select the button if you need to see more details about the Prisma incident from Prisma SCM.
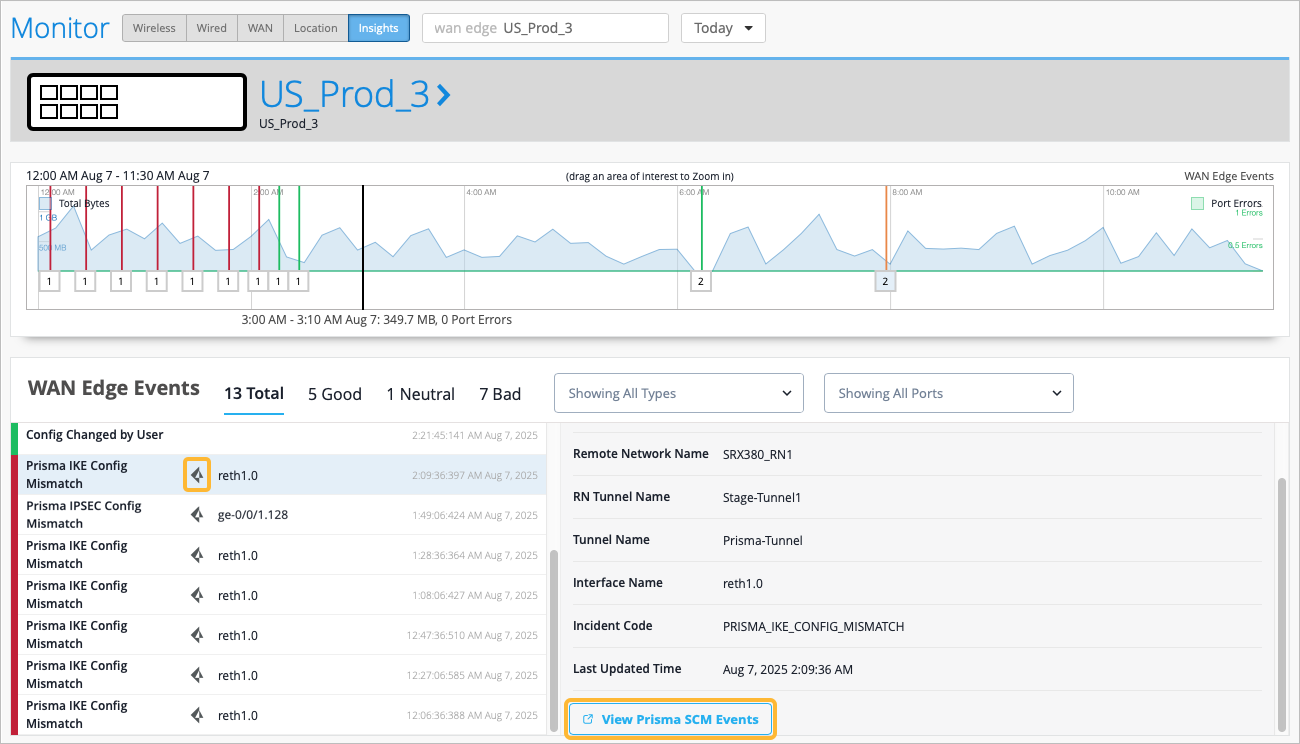
Configuration Mismatch
Marvis constantly compares the site configuration in Mist to the configuration in Prisma. If any deviations are detected, a Prisma Access event is generated and appears in the WAN Edge Events.
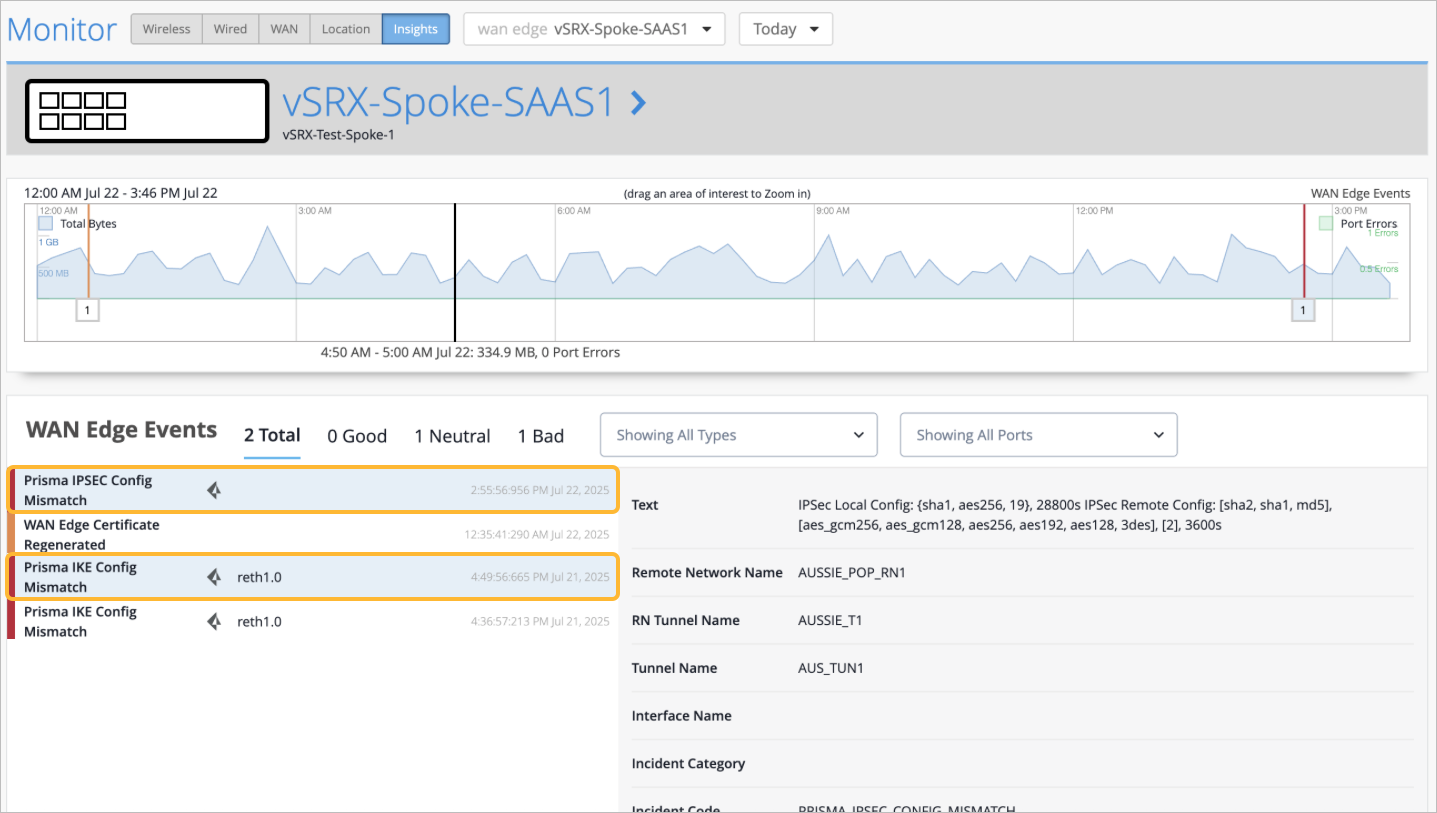
Configuration Difference Alerts:
-
Prisma IKE Config Mismatch
-
Prisma IPsec Config Mismatch
Tunnel Statistics
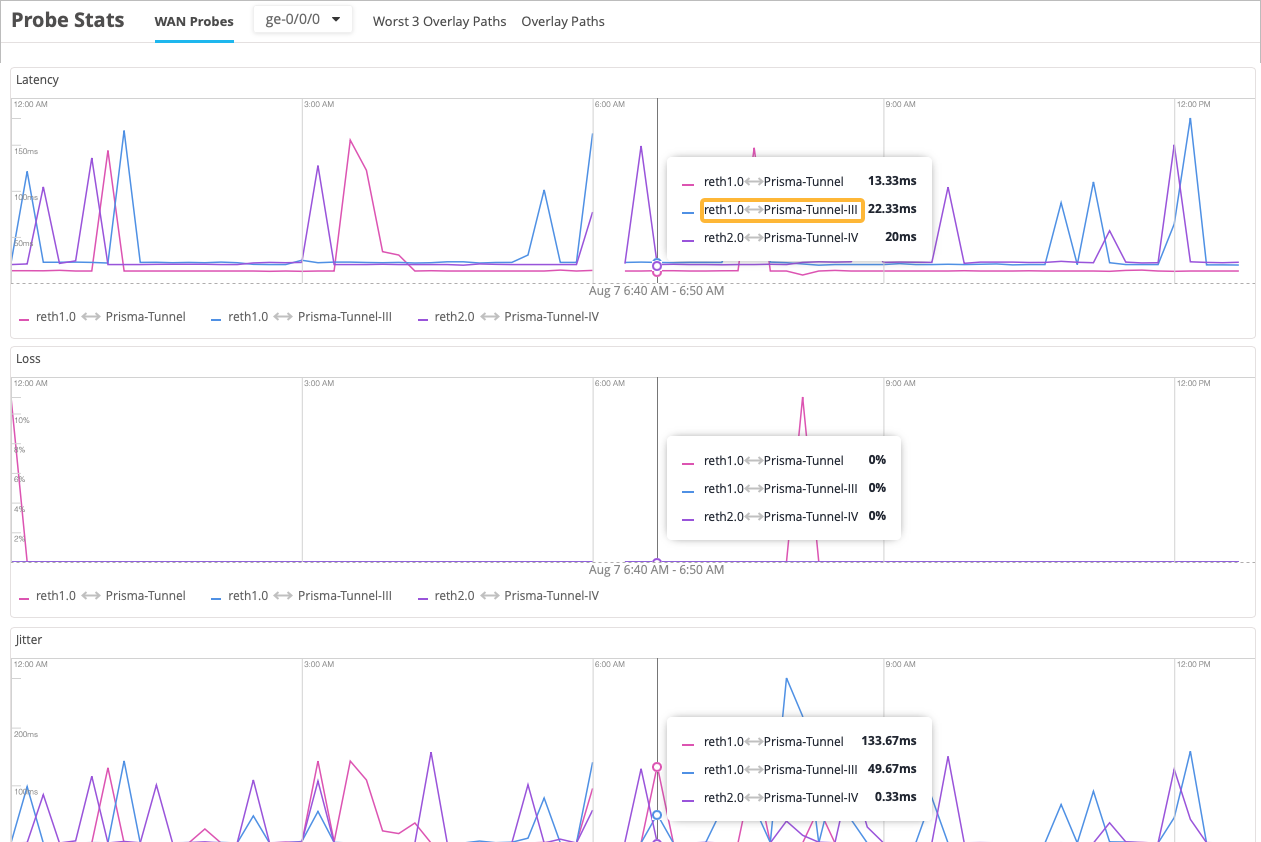
You can view the Prisma tunnel statistics for both Session Smart Router (SSRs) and SRX Series Firewalls under Probe Stats on the WAN Edge Insights page.
Tunnel statistics use intelligent probing to a northbound resource and generate the near-real time Key Performance Indicator (KPI). You can see the customer's experience as they access an application through the tunnel in near-real time.
When you hover over the Probe Stats chart, you get information about the path in the string that is displayed to you. You can decipher the string as follows:
egress device interface <--> Prisma tunnel name.