Install Juniper Mist Edge VM for Juniper Mist Authentication Proxy
Follow these steps to install a Juniper Mist™ Edge virtual machine (VM) for the Juniper Mist Authentication Proxy functionality.
System Requirements
Minimum hardware requirements for a Juniper Mist Edge VM to support the Juniper Mist Auth Proxy functionality:
- Hypervisor: VMware ESXi (Versions – 6.7.0 and 7.0)
- CPU: 2 vCPUs
- RAM: 16-GB RAM
- Hard Disk: 32 GB, thick provisioned
- Network Interface Card (NIC): Single virtual NIC
You need to provide unrestricted access to debian and mistsys repo in the environments where you create the Mist Edge VM for initial bring up. Also, ensure that the Firewall has Port-80 and Port-443 open.
Juniper Mist Edge VM as Juniper Mist Auth Proxy
Juniper Mist Edge virtual machine (VM) requires out-of-band management (OOBM) interface to act as Juniper Mist Auth Proxy.
You can specify a port on which the client contacts the RADIUS server. By default, the client uses port 1812 (as specified in RFC 2865). You can also specify an accounting port to send accounting packets. The default port is 1813 (as specified in RFC 2866).
You must configure TCP port 2083 to allow outbound connections destined to radsec.nac.mist.com.
Additionally, you must provide Juniper Mist Edge VM access to the EP terminator service [ep-terminator.mistsys.net (TCP 443)] on the Juniper Mist cloud. See Firewall Configuration: Juniper Mist Ports and IP Addresses.

Install Juniper Mist Edge VM
-
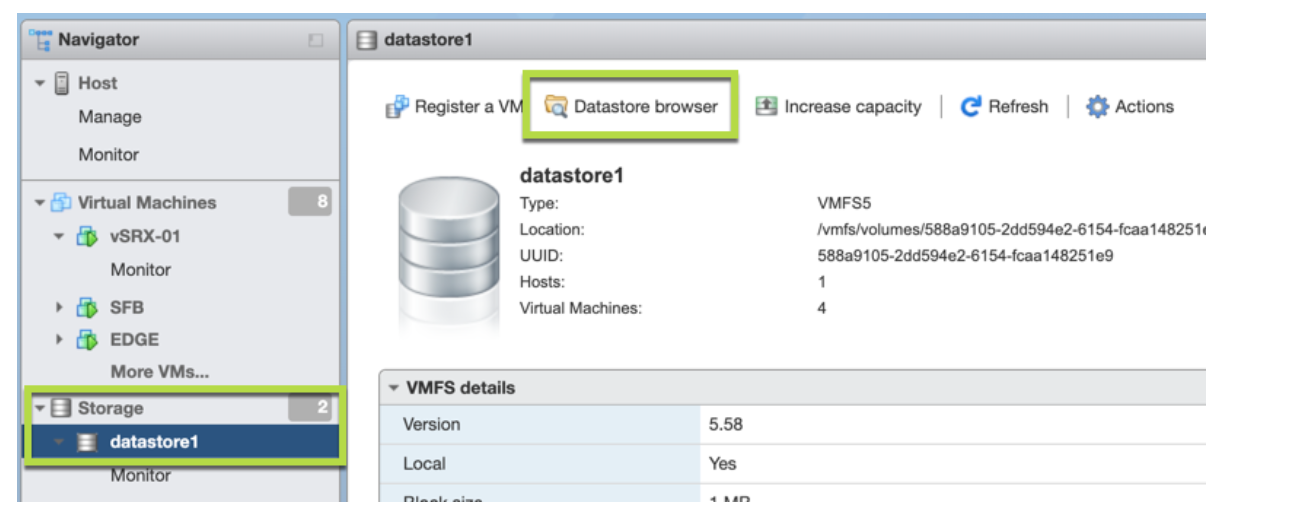
In the VMware ESXi Portal, upload the ISO to the VMware storage.
-
Click Datastore browser and select the
datastore to which you will upload the file.
Figure 2: Select Datastore to Upload File
-
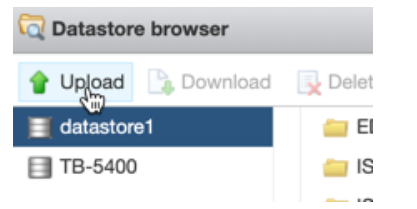
Click Upload and then select the ISO file
that you have downloaded in the previous step.
Figure 3: Upload ISO File
-
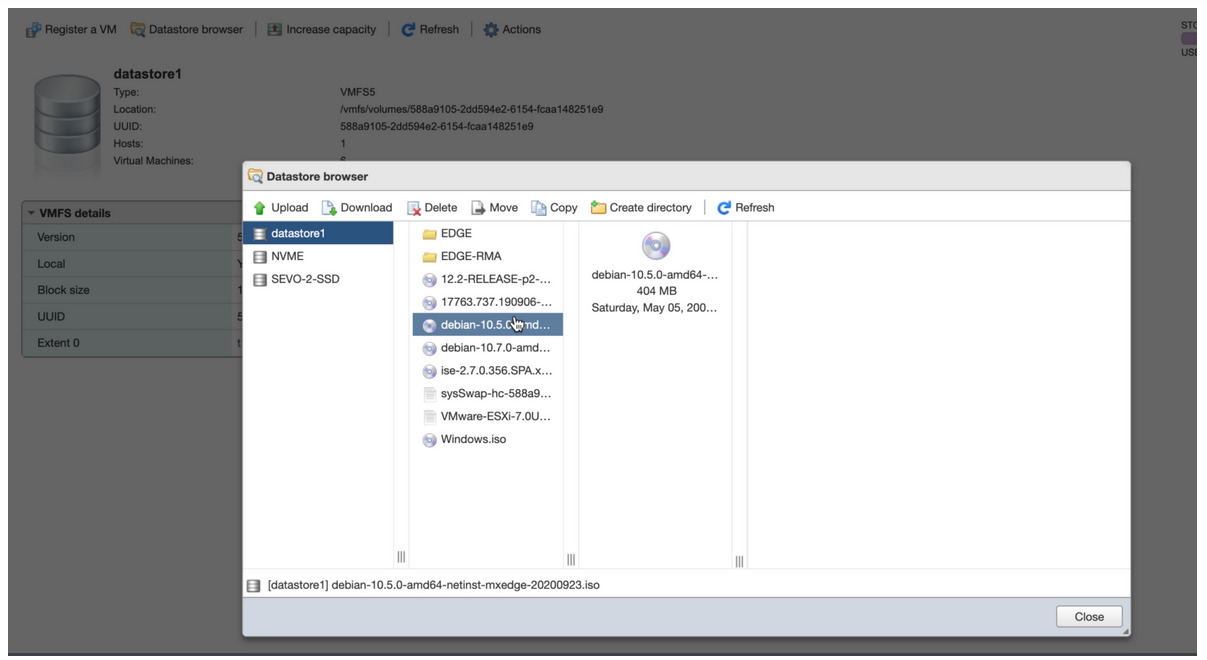
Refresh the Datastore browser to see the uploaded file in the
list.
Figure 4: Refresh Datastore Browser
-
Click Datastore browser and select the
datastore to which you will upload the file.
-
Create a VM with the following configuration.
-
On the Select a name and guest OS page, enter the required
details.
Figure 5: Enter Details of Juniper Mist Edge VM
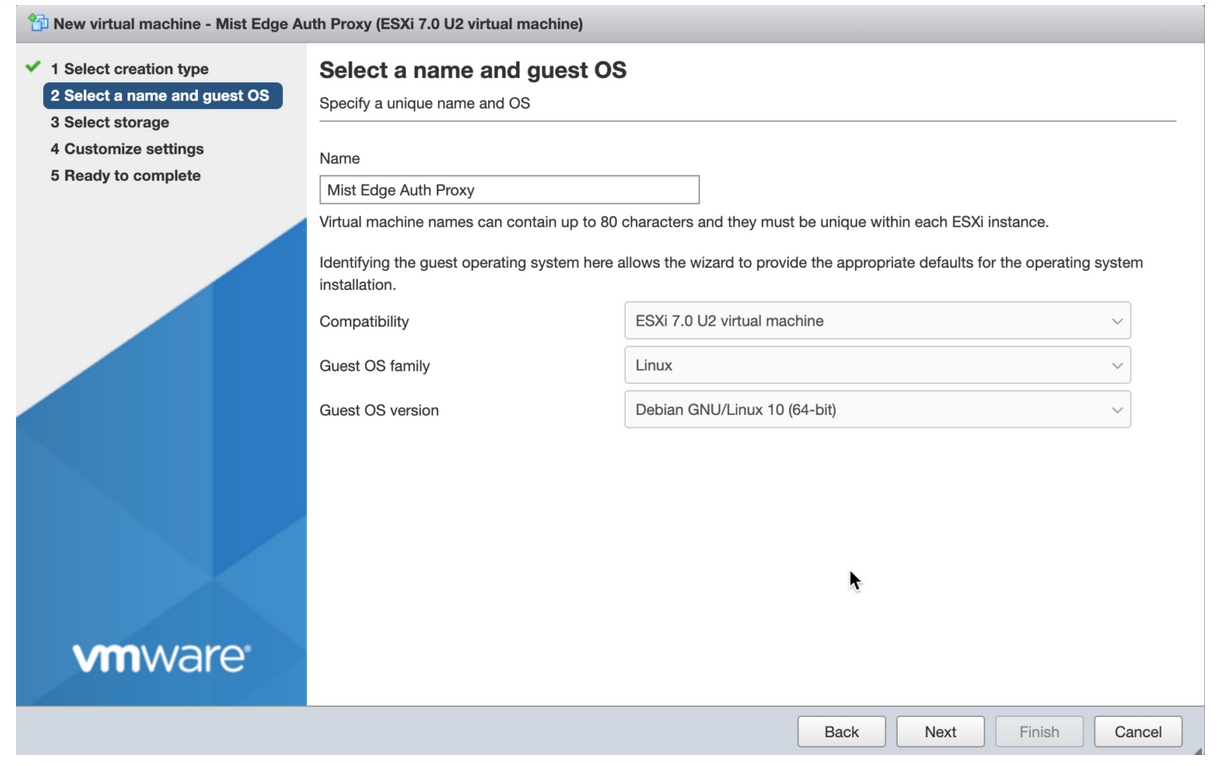
- Name—Enter a name for the VM.
- Compatibility—Select the ESXi version running on the vSphere. For example: ESXi 7.0 U2 virtual machine.
- Guest OS family—Select the guest operating system family. For example: Linux.
- Guest OS version—Select a guest operating system version. for example: Debian GNU/Linux 10 [64-bit].
-
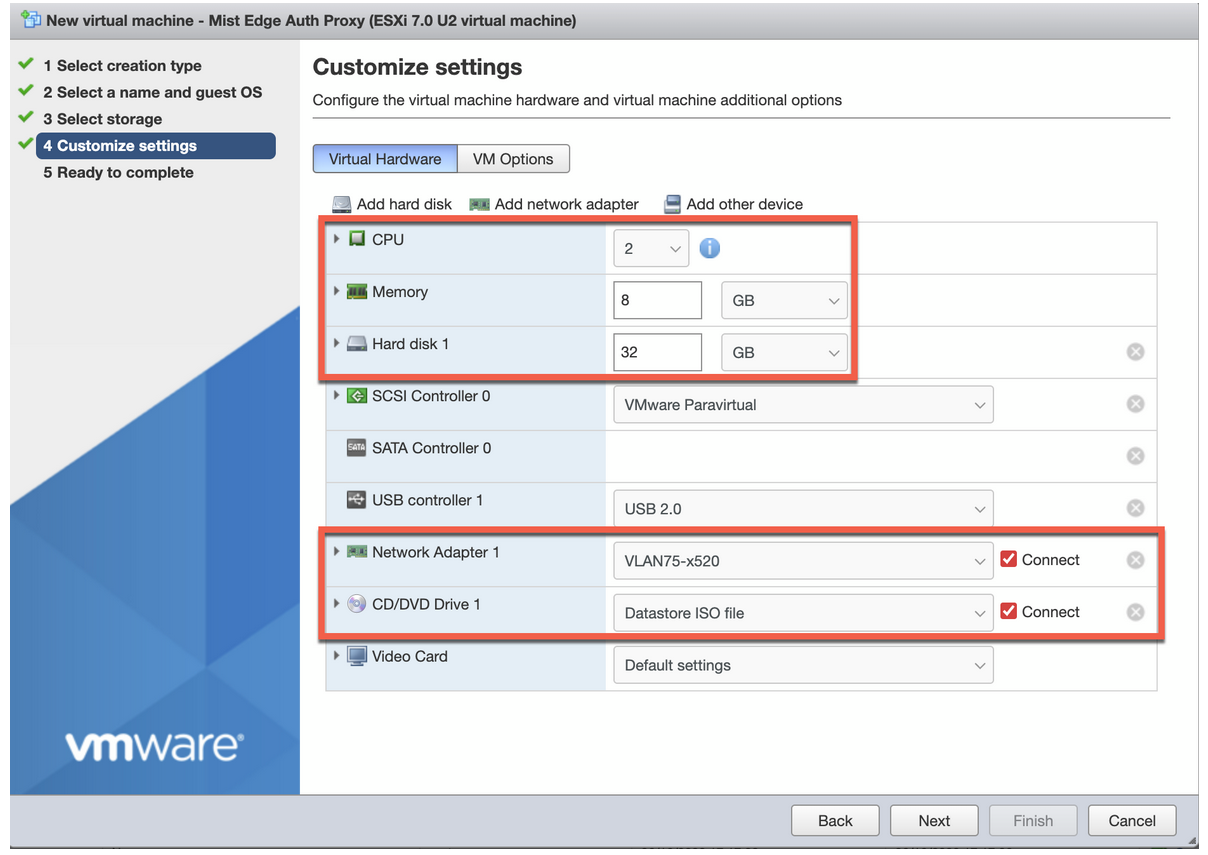
On the Customize settings page, make the required changes.
Figure 6: Customize Settings for VMSee Virtual Mist Edge for detailed instructions.
Power on the VM when it is created.
-
On the Select a name and guest OS page, enter the required
details.
-
When the Juniper Mist Edge VM powers on, install the VM.
On the Juniper Mist Edge VM install page, select Install and press Enter. The default selection is Graphical install.
Figure 7: Install Juniper Mist Edge VM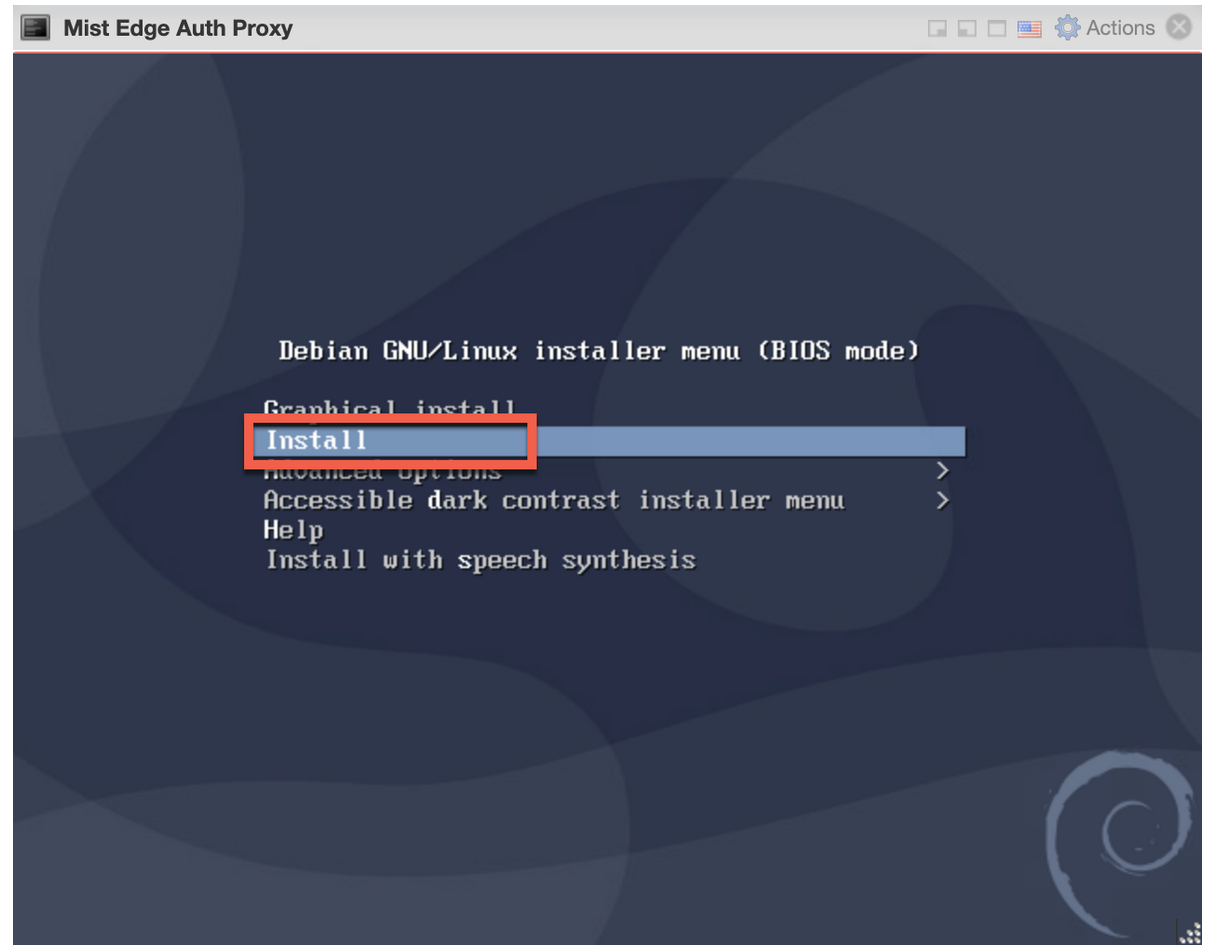
After the installation, the system displays the
‘mxedge login:’.On the installation page, you can see the progress of the installation for some time (30 seconds to a minute) and a request to wait.
After you select Install, the installation proceeds automatically without any user intervention.
Create a Juniper Mist Edge VM on the Juniper Mist Portal
-
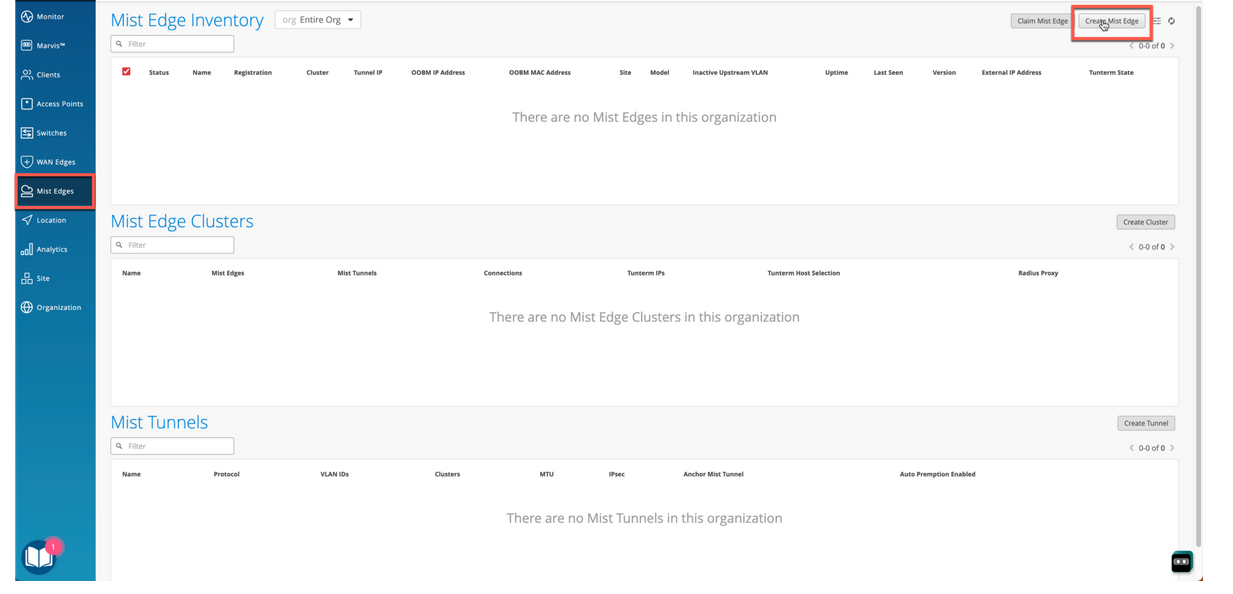
From the left menu of the Juniper Mist portal, select Mist
Edges. Then on the top right of the page, click
Create Mist Edge.
Figure 8: Create Juniper Mist Edge VM
-
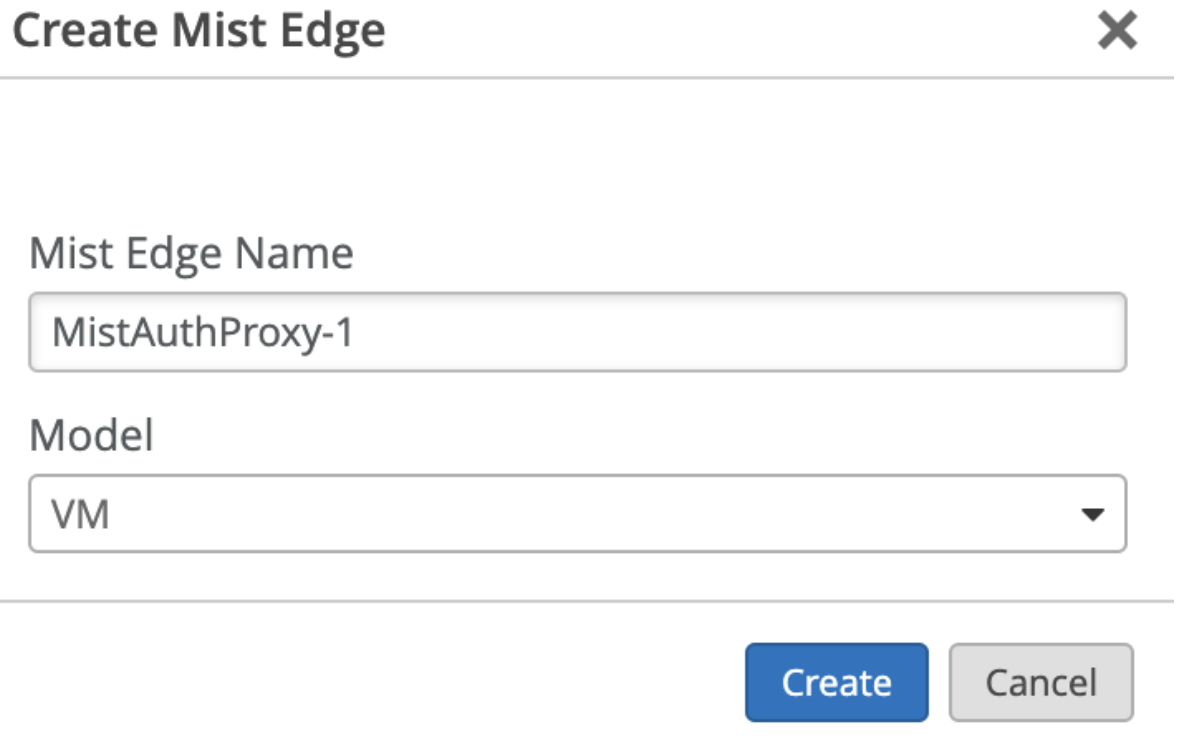
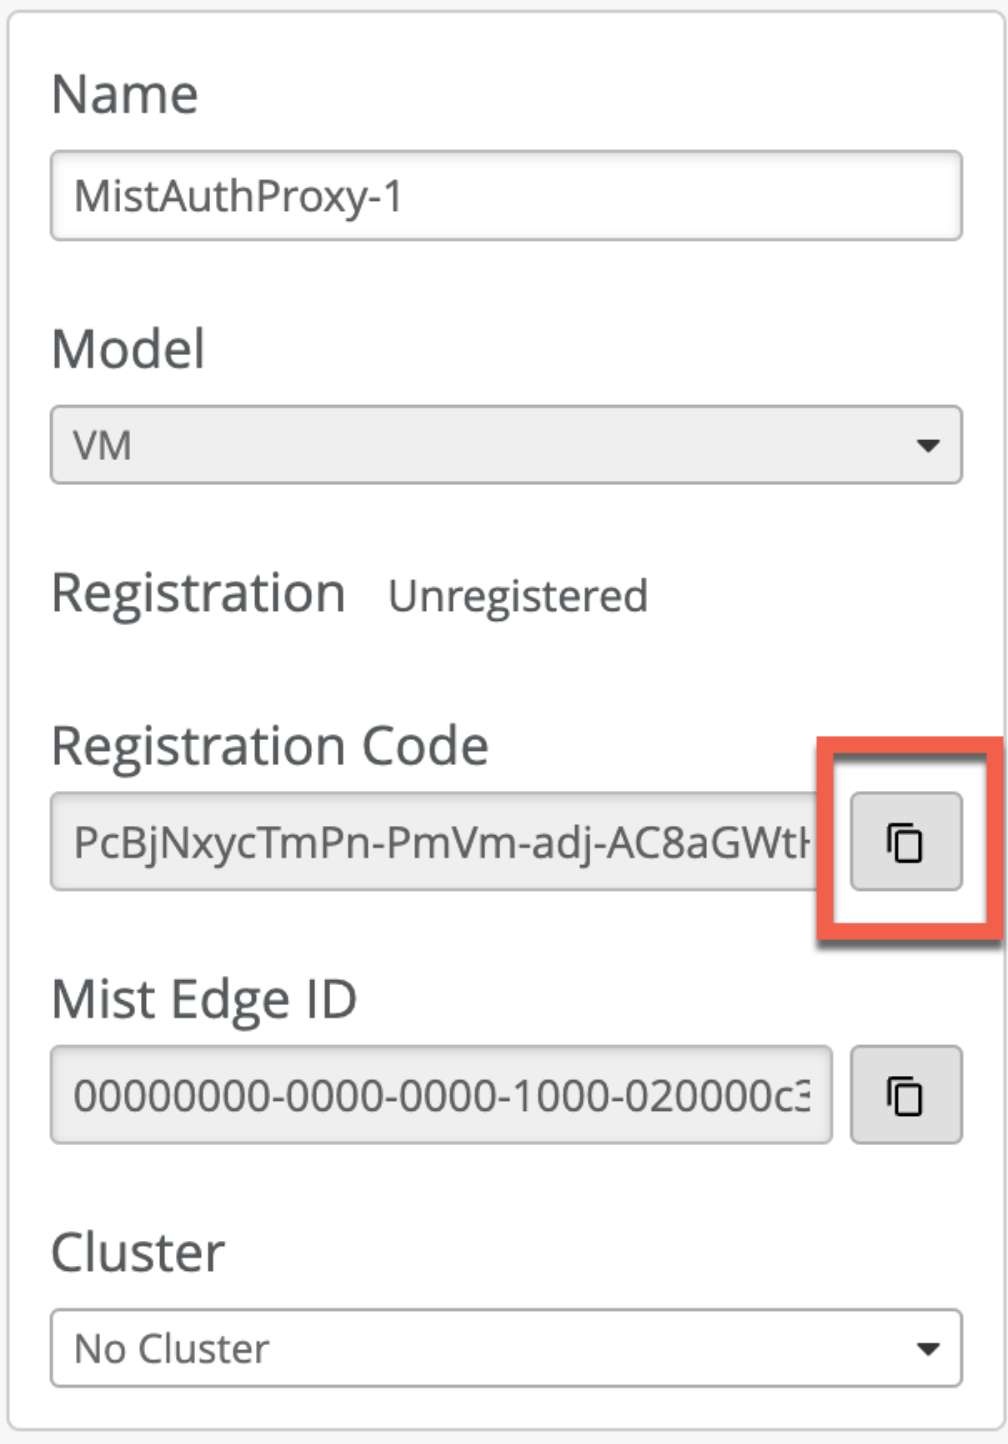
On the Create Mist Edge page, enter a name for the Juniper Mist Edge device
and select VM as the model.
Figure 9: Enter Details for Juniper Mist Edge VM
-
Copy the registration code and save the information.
Figure 10: Copy Registration Code
Note that by default Dynamic Host Configuration Protocol (DHCP) provides the out-of-band management (OOBM) IP address. On the Juniper Mist portal, you can see the assigned static OOBM IP address as shown in the following figure. We recommend that you use a static out-of-band management IP address for the Juniper Mist authentication proxy use case.
Figure 11: Juniper Mist Edge VM Out-of-Band Management IP Address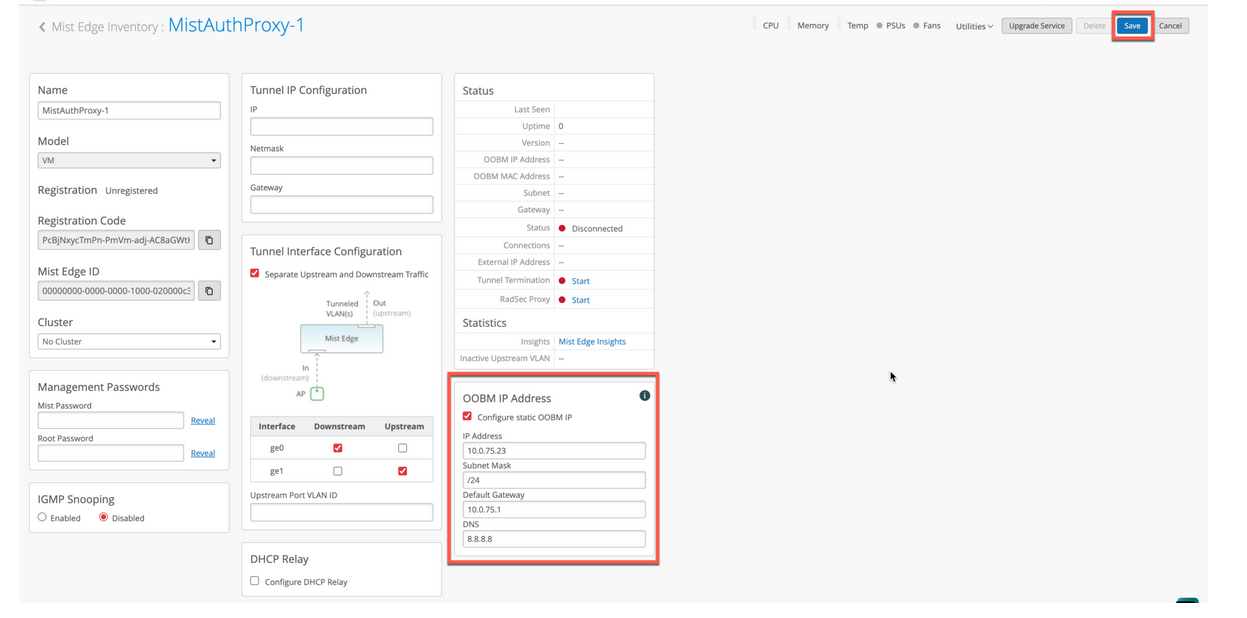
For the Juniper Mist authentication proxy use case, you do not need to configure the tunnel interface IP.
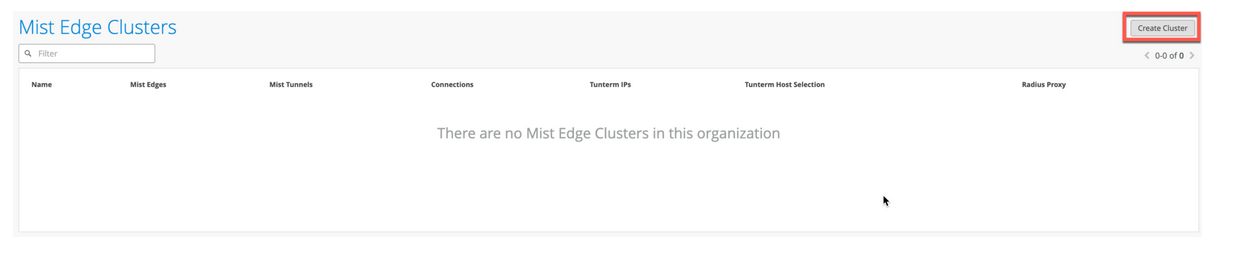
-
On the Mist Edge Inventory page, scroll down to the Mist Edge Clusters pane
and click Create Cluster.
Figure 12: Create Juniper Mist Edge Cluster
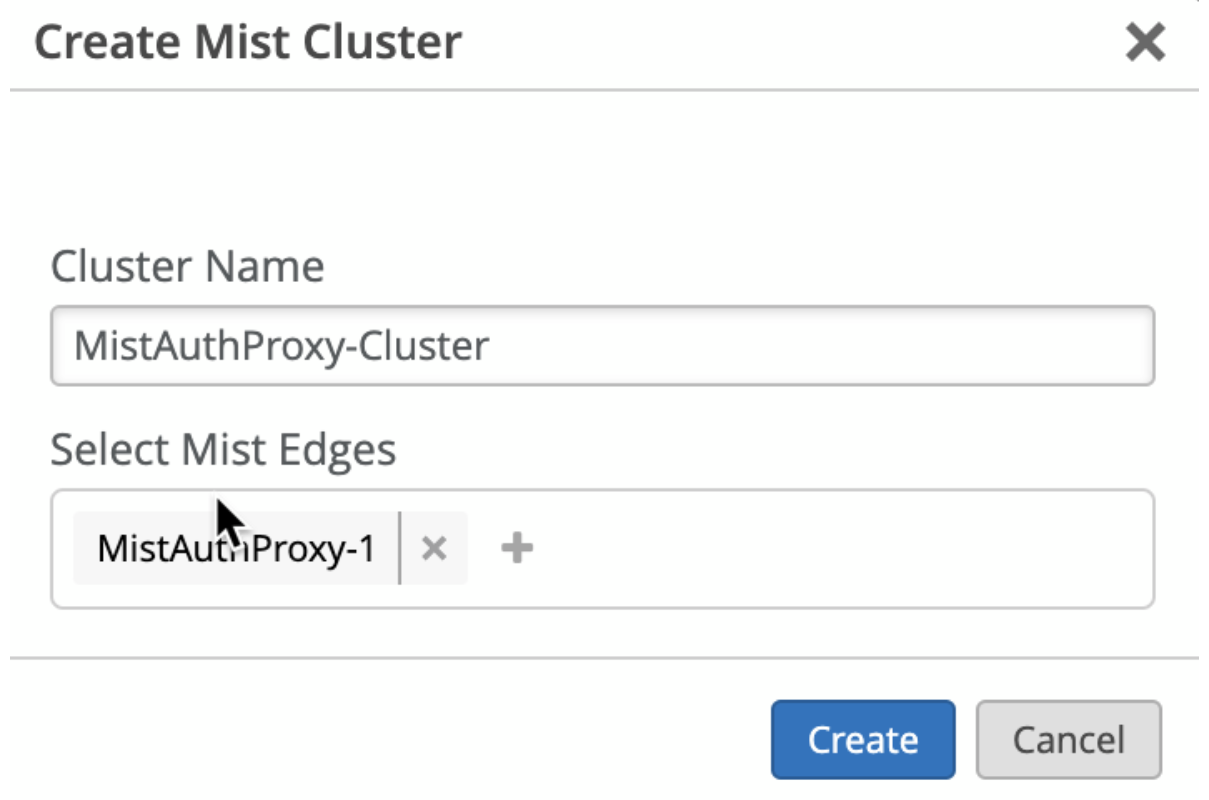
-
On the Create Mist Cluster page, enter the cluster name and select your
deployed Juniper Mist Edge VM.
Figure 13: Select Mist Edge VM for Cluster
-
Provision your Juniper Mist Edge VM.
After you configure the Juniper Mist Edge on the Juniper Mist portal, connect to the console interface.
- When your Juniper Mist Edge VM boots up for the first time, log in
to the VM using the following credentials:
- Username: mist
- Password: Mist@1234
- Root (su -) password: mist
- Get the current management IP address from DHCP by issuing the
ip acommand. In the command output, you can see that the OOBM interface is ens192..
Figure 14: Provision Juniper Mist Edge VM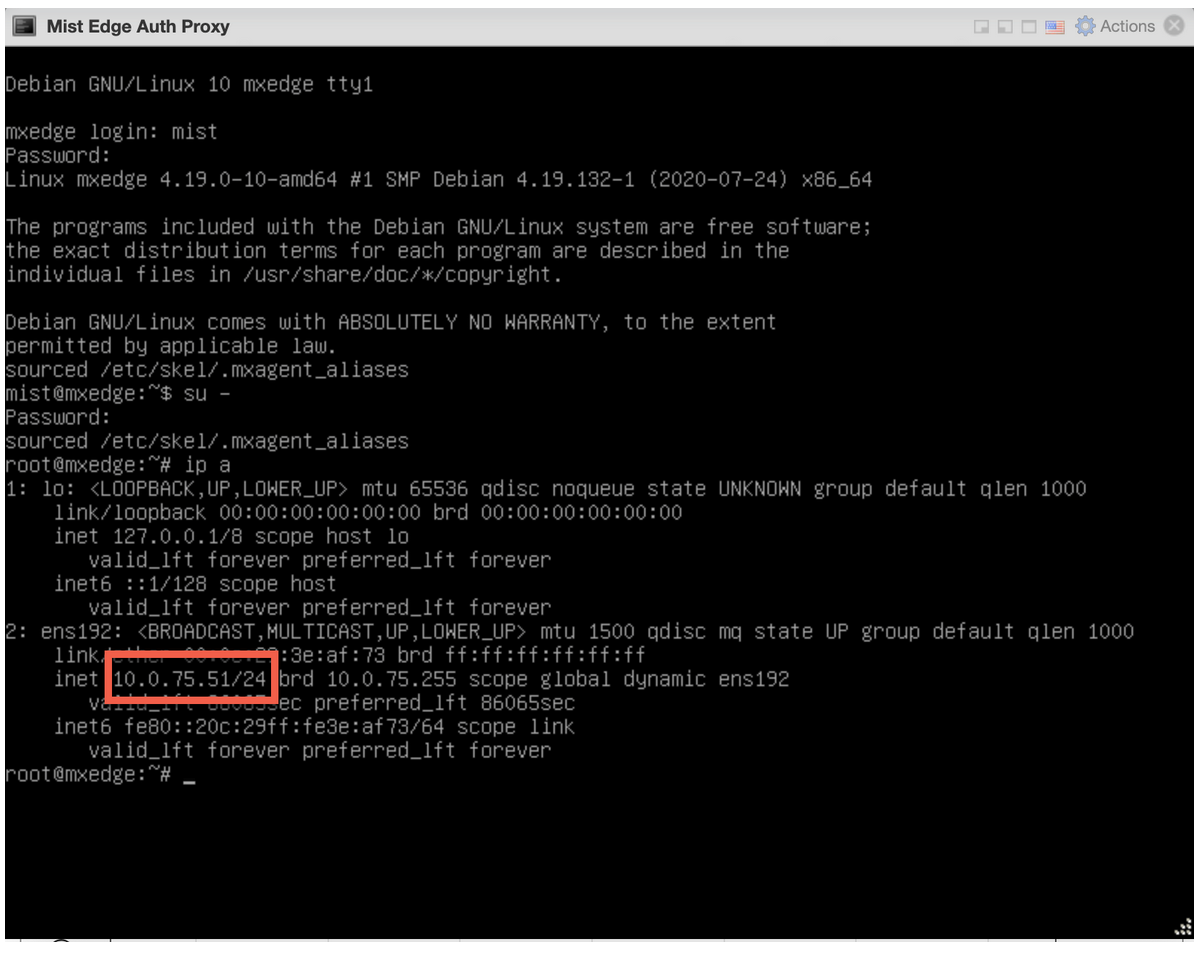 Now, you can initiate an SSH session and connect to the Juniper Mist Edge VM with the username
mist. Example:ssh mist@<OOBM-IP>, password is Mist@1234
Switch to root:
Issue thesu –command and use mist as the password. - When your Juniper Mist Edge VM boots up for the first time, log in
to the VM using the following credentials:
-
Initiate SSH from the Juniper Mist Edge VM and perform bootstrap.
To perform a bootstrap on the Juniper Mist Edge VM and onboard the device to the Juniper Mist portal, use the following CLI commands:
mist@mxedge:~$ su –
Password: abc1
root@mxedge:~# apt-get update
root@mxedge:~# mxagent register --registration-code <paste registration code from step 3>
When the process completes, the CLI displays the following message:
registration finished successfully. (regfile at /var/lib/mxagent/mxagent.reg
After successful registration, the Juniper Mist Edge VM automatically reboots and downloads the configuration from the Juniper Mist Cloud portal.
After the reboot, you can see the updated status of the Juniper Mist Edge VM on the Juniper Mist portal. The Status field on the Mist Edge Inventory page displays Connected and a corresponding orange icon.
Figure 15: Juniper Mist Edge VM in Mist Edge Inventory