Configure Client Device for EAP-TTLS Authentication
To secure your network through EAP-TTLS authentication, follow these configuration steps on the client device.
Juniper Mist Access Assurance supports EAP-TTLS authentication only with PAP as the inner method. By default, most client devices such as Apple iOS/macOS and Windows attempt to use PEAP-MSCHAPv2 or EAP-TTLS/MSCHAPv2 when a user enters credentials at the SSID login prompt. These methods rely on password hashing (such as MSCHAPv2) and are not supported with modern cloud-based Identity Providers (IdPs). To enable successful onboarding, client devices must be explicitly configured to use EAP-TTLS with PAP. In production deployments, this configuration is typically enforced through Mobile Device Management (MDM) solutions. For validation or lab testing, however, the method can also be manually configured on the device by following the steps below
Prerequisites
- Download the Juniper Mist Org CA certificate:
Client devices must trust the Mist Access Assurance server. The Mist Org CA certificate must be included in the wireless profile you configure.
- On the Juniper Mist portal, go to Organization > Access >
Certificates.. In the Certificate Authorities page, click
View Mist Certificate to display the certificate
details.Figure 1: Download Juniper Mist CA Certificate
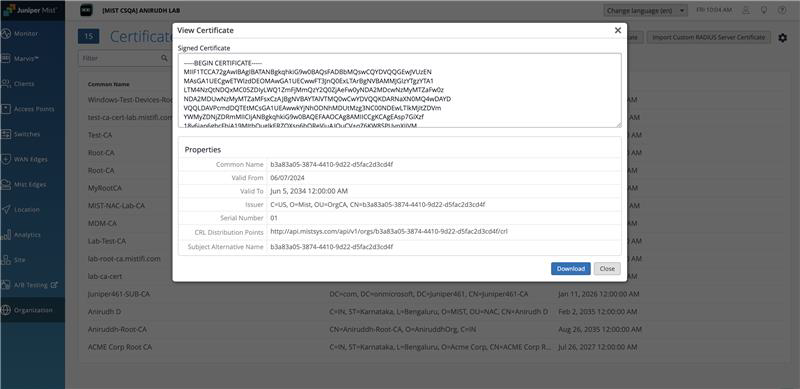
Click Download Certificate to download the certificate on your client device.
Note: If you are using a custom server certificate, use the Root CA of the server certificate instead of the Mist Org CA.
- On the Juniper Mist portal, go to Organization > Access >
Certificates.. In the Certificate Authorities page, click
View Mist Certificate to display the certificate
details.
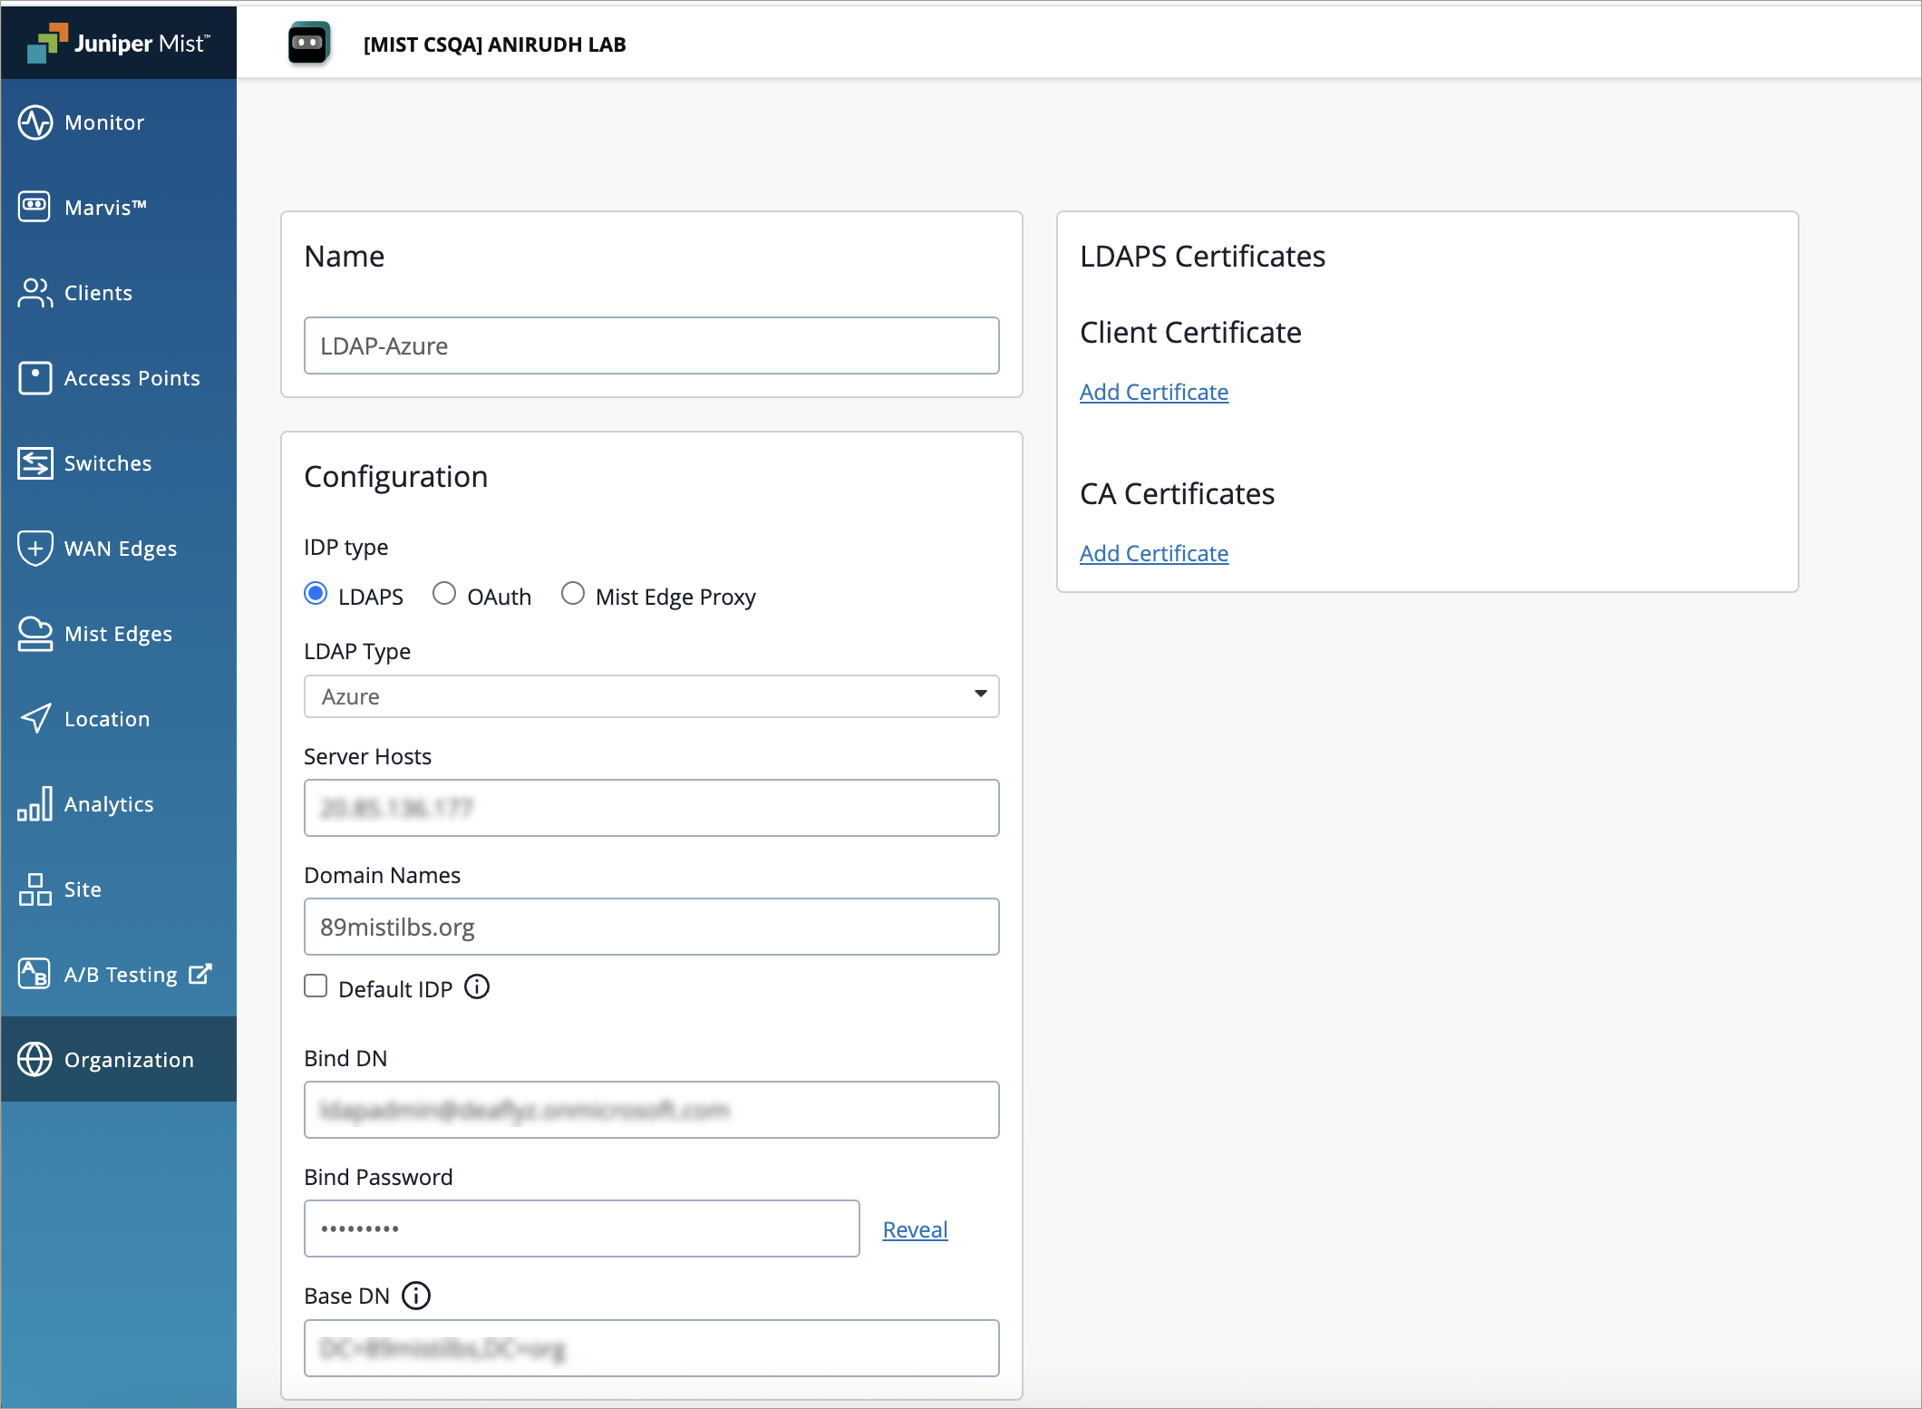
- Configure the Identity Provider (IdP): In Juniper Mist dashboard, navigate to
Organization > Access > Identity Providers > Add IDP
and configure the required IdP details. For details, see Add Identity Providers for Juniper Mist Access Assurance.Figure 2: Configure the Identity Provider
- Create an Auth Policy Rule: Under Organization> Access> Auth
Policies, define an appropriate Auth Policy Rule that allows EAP-TTLS
client devices to connect to the network. For details, see Configure Authentication Policy. Figure 3: Create an Auth Policy

Configure Apple Device for EAP-TTLS Authentication
We've described the configuration using Apple macOS device.
For this task, create an EAP-TTLS network profile using a free Apple Configurator tool.
Create a profile on your Apple client device:
- On your macOS client, open your Apple Configurator tool, and click File >
New ProfileFigure 4: Wi-Fi Profile Configuration for Apple Client
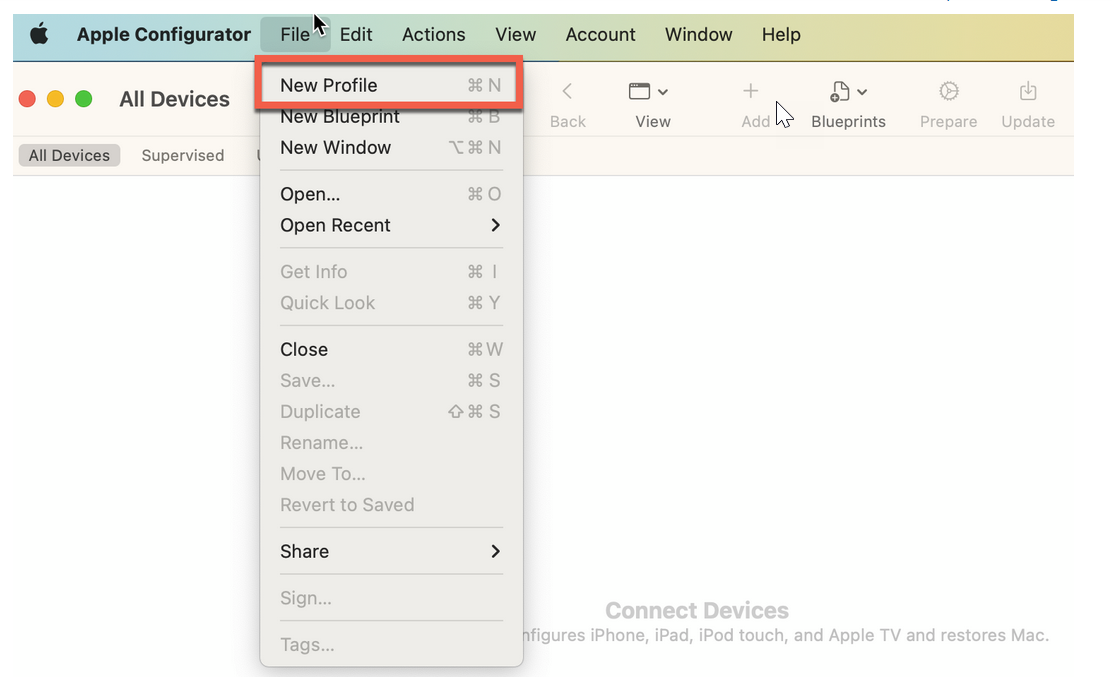
A new configuration profile document opens.
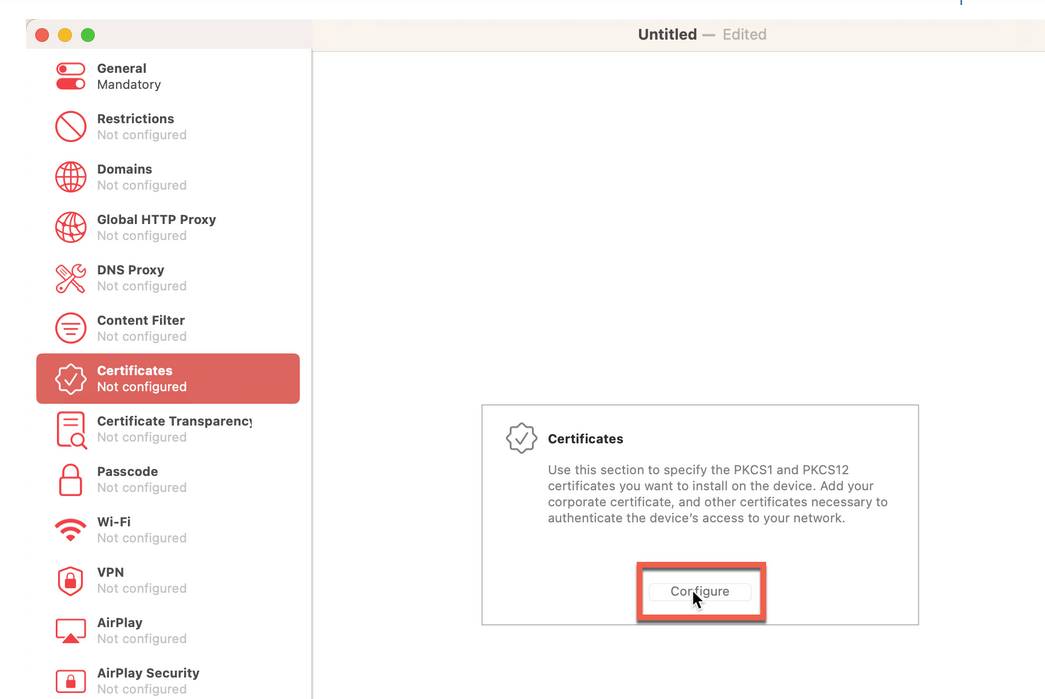
- On the left-navigation bar of the Apple Configurator page, click Certificates
> Configure. Select and upload your Mist Certificate you downloaded (as
mentioned in Prerequisites). For
the client devices to trust the Juniper Mist Access Assurance Server, you must include it
in the wireless profile.Figure 5: Upload Juniper Mist CA Certificate in Wi-Fi Profile Configuration
- From the left-navigation bar of the Apple Configurator tool, select
Wi-Fi and click Configure. Figure 6: Wi-Fi Profile Configuration
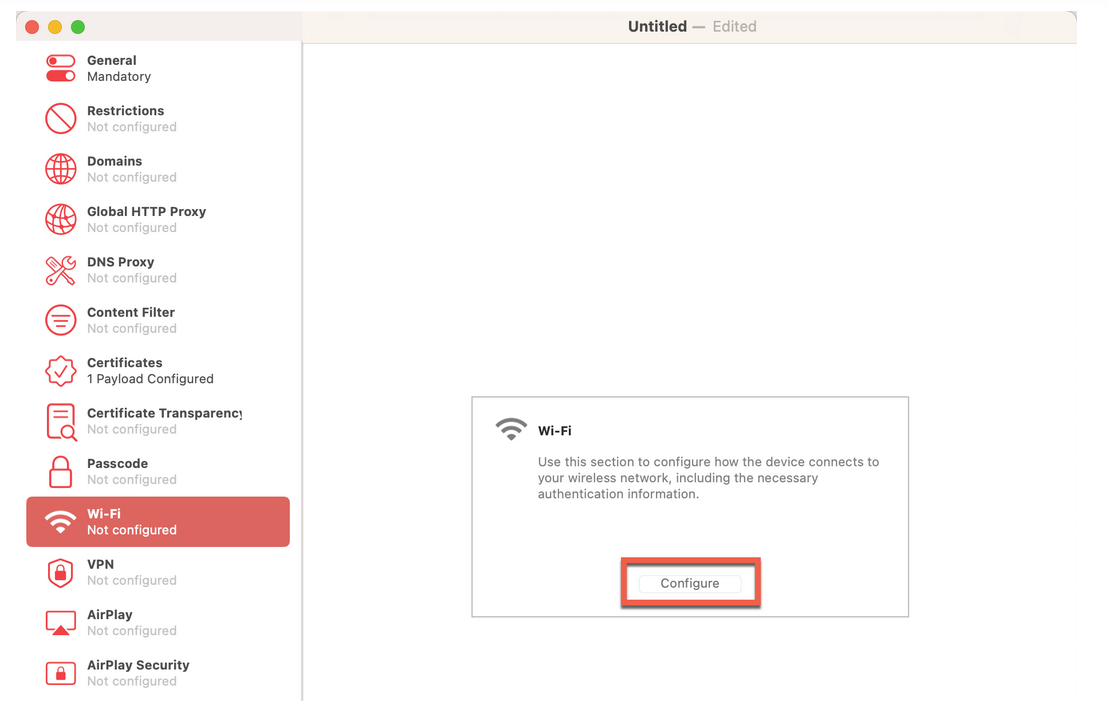
Enter the following options for the Wi-Fi settings:
- SSID—Your network's SSID. Ensure that you enter the correct SSID including capital letters.
- Security Type—WPA2/WPA 3 Enterprise
- Accepted EAP Types—TTLS and select Per-connection Password.
- Inner Authentication—PAP
Figure 7: Wi-Fi Profile Configuration Settings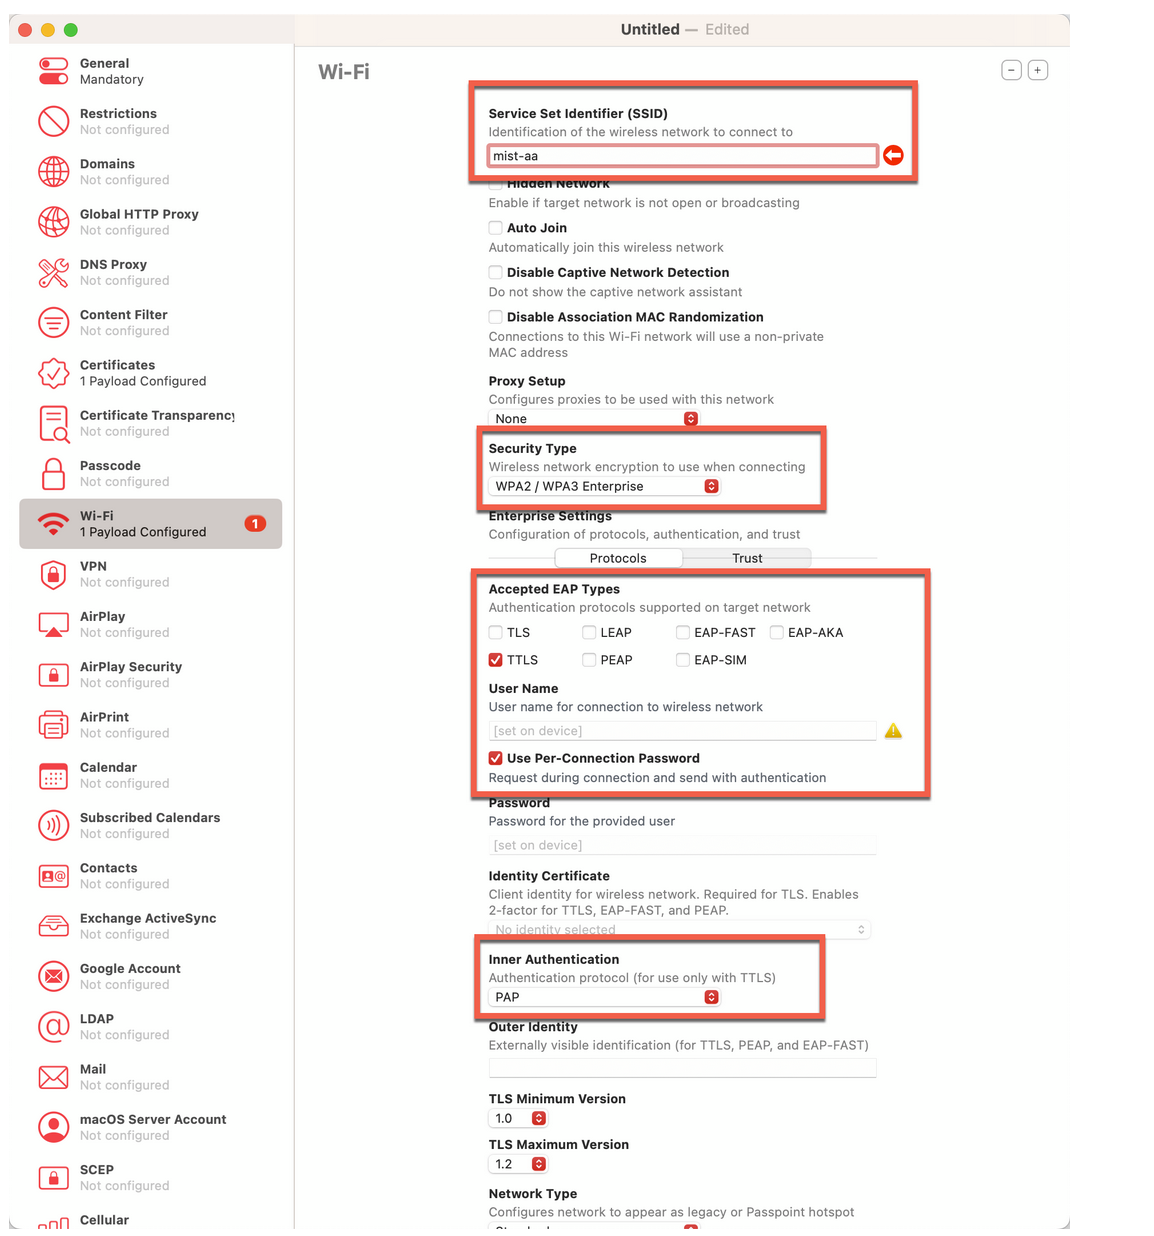
- On the same page, under Enterprise Settings next to
Protocols, click Trust. The page displays
a list of uploaded certificates.
Select the Juniper Mist CA certificate and enter auth.mist.com under Trusted Server Certificate Name. This step enables the client device to trust the Juniper Mist Access Assurance Server.
Figure 8: Trust Juniper Mist CA Certificate in Wi-Fi Profile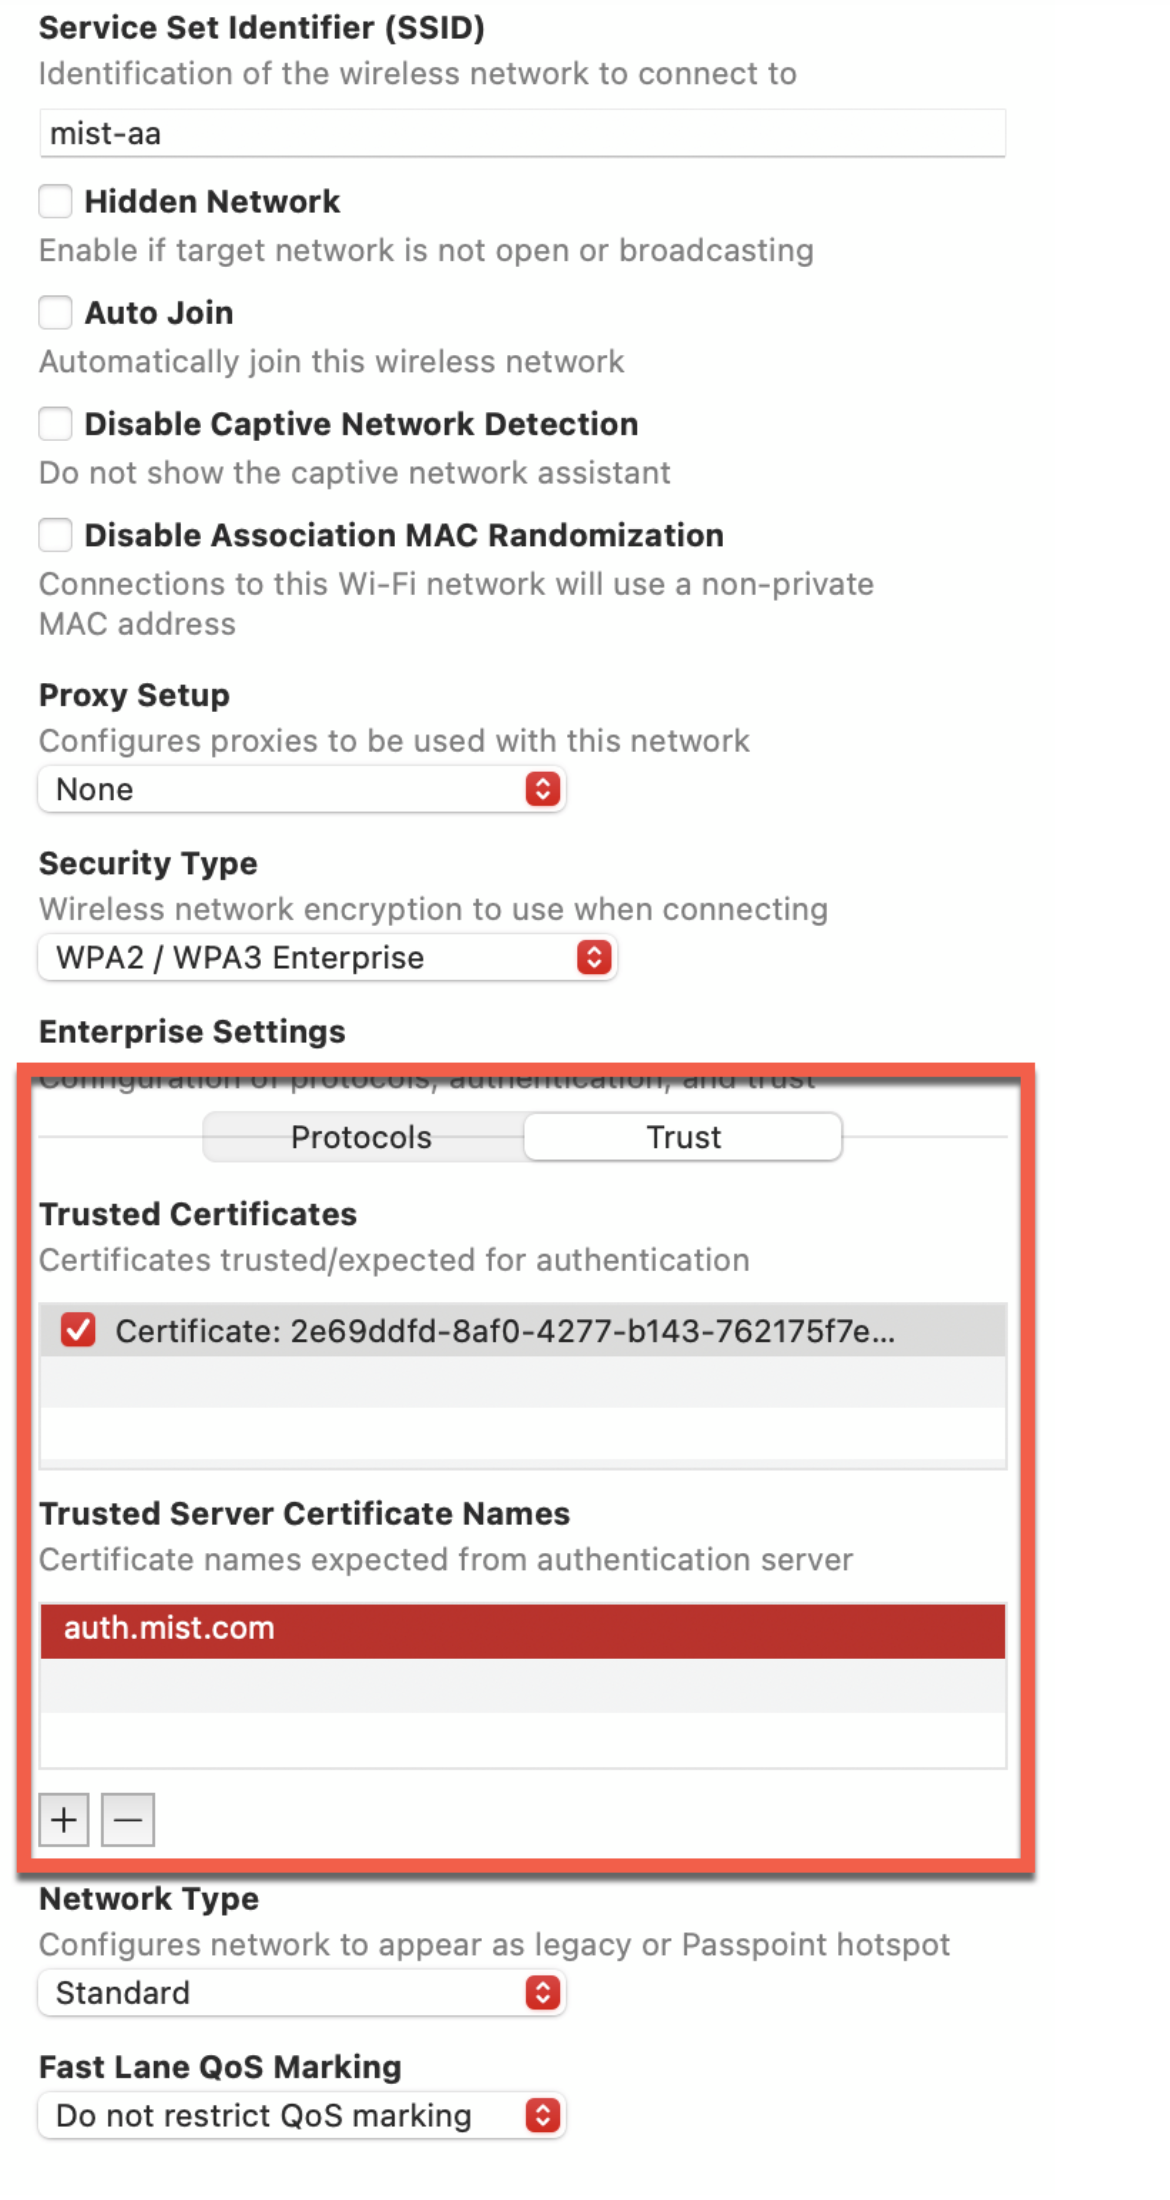
- Save the profile configuration. Figure 9: Save Wi-Fi Profile Configuration

- To sign the profile, you need an Apple trusted certificate. This step is required for production use.
Now you can install the profile on to your macOS device and connect to SSID through EAP-TTLS.
For iOS and iPadOS
To test EAP-TTLS on an iPhone or iPad, you can export the configured Wi-Fi profiles from your macOS device and share them via AirDrop. Once received, install these profiles on the iOS device to connect using EAP-TTLS with PAP authentication.
- On your iOS device, open the Settings app and tap Profile
Downloaded.Figure 10: Locate Profile
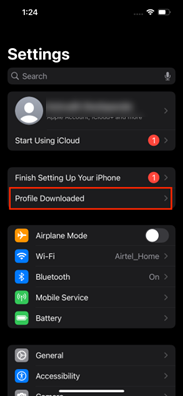
- Tap Install in the upper-right corner of the screen.Figure 11: Install Profile
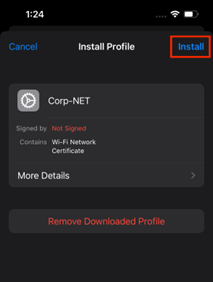
Follow the on-screen instructions to complete the installation process.
Enter username and password and click Join connect wireless network.
Figure 12: Connect Wireless Network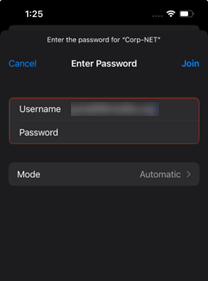
Configure Windows Device for EAP-TTLS Authentication
Use the following steps to configure a Windows device for EAP-TTLS authentication.
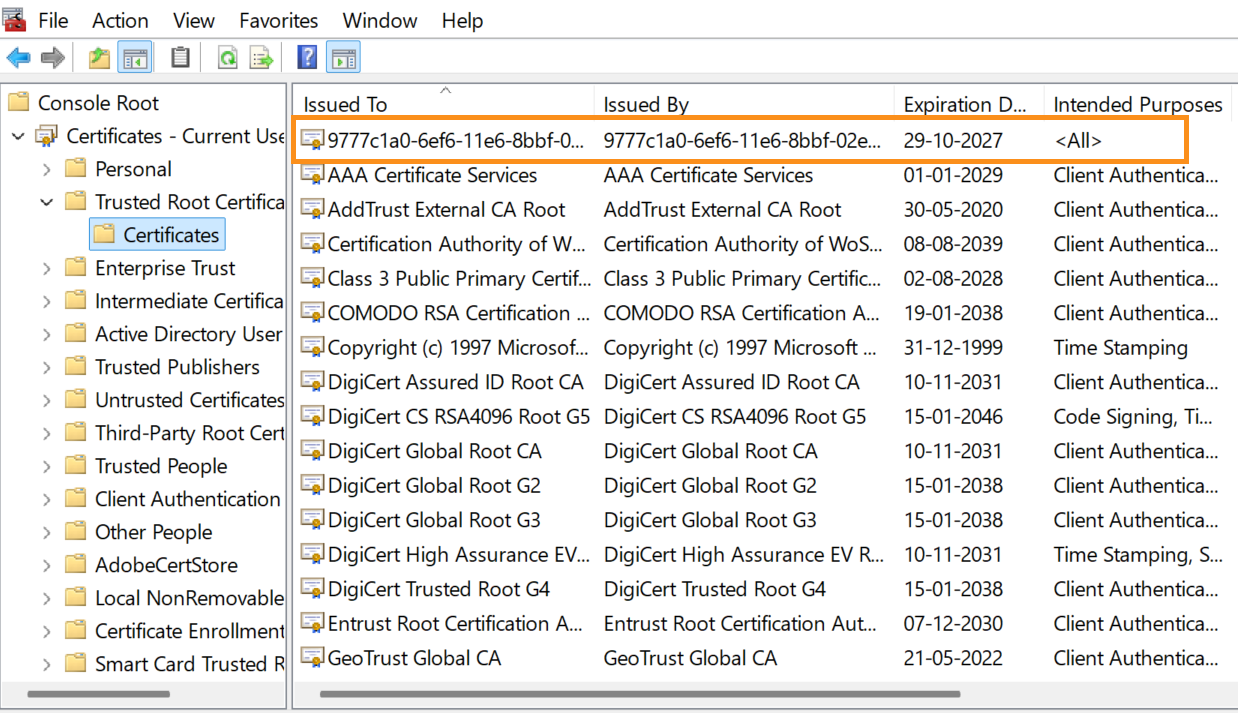
- Download the Juniper Mist Org CA certificate (as mentioned in Prerequisites) and
import the Mist Org CA Certificate on to your Windows device under Manage
Computer Certificates > Trusted Root Certification Authorities. Figure 13: Trusted Root Certificates on Windows Device
- On your Windows device, go to Control Panel > Network and Sharing Center
> Set up a new connection or network and select Manually
connect to a wireless network and Click Next.Figure 14: Setup New Connection
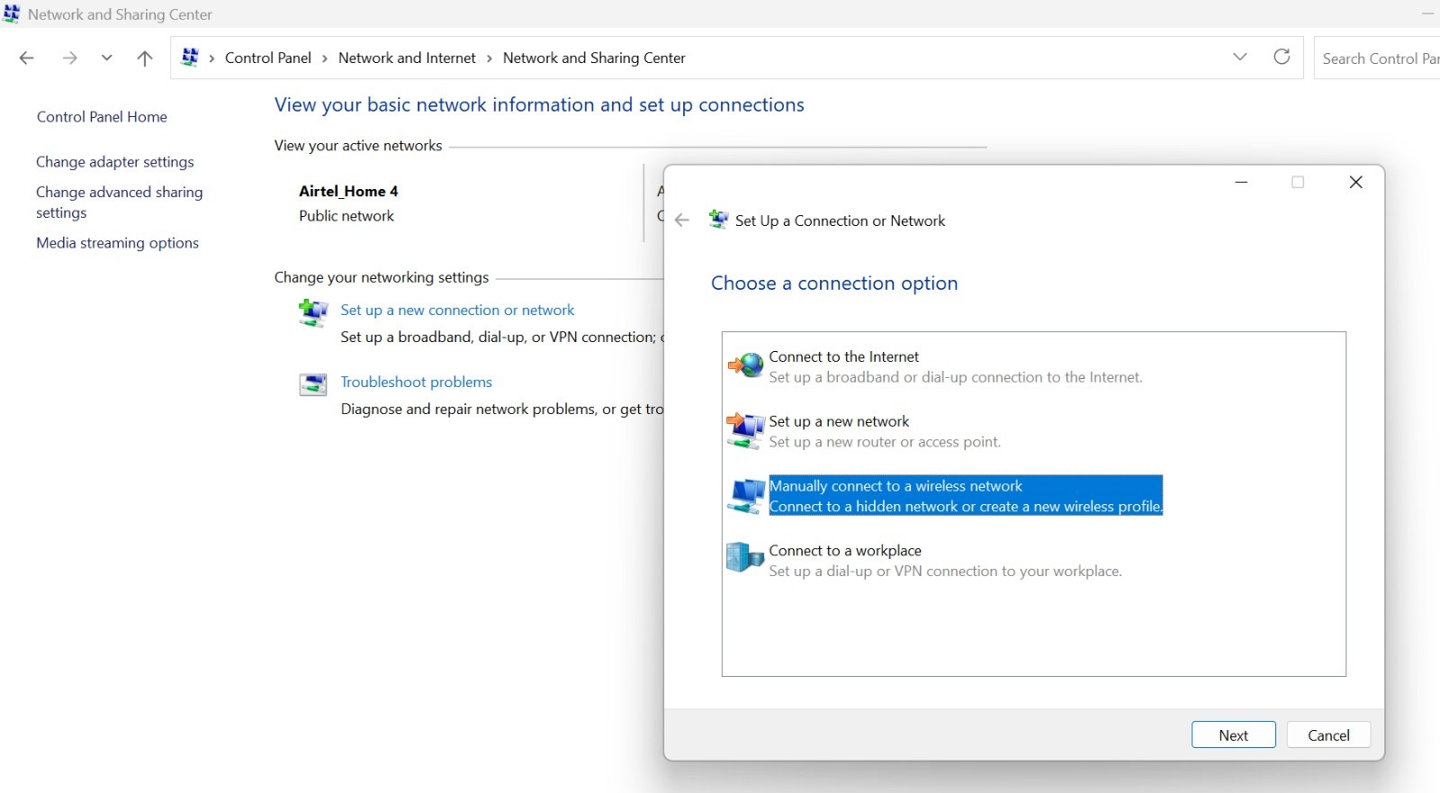
- In the Enter information for the wireless network you want to
add, provide the following details:
Network name— Provide an SSID name.
Security type—Select the WPA2-Enterprise or WPA3-Enterprise option.
Figure 15: Enter Information for Wireless Network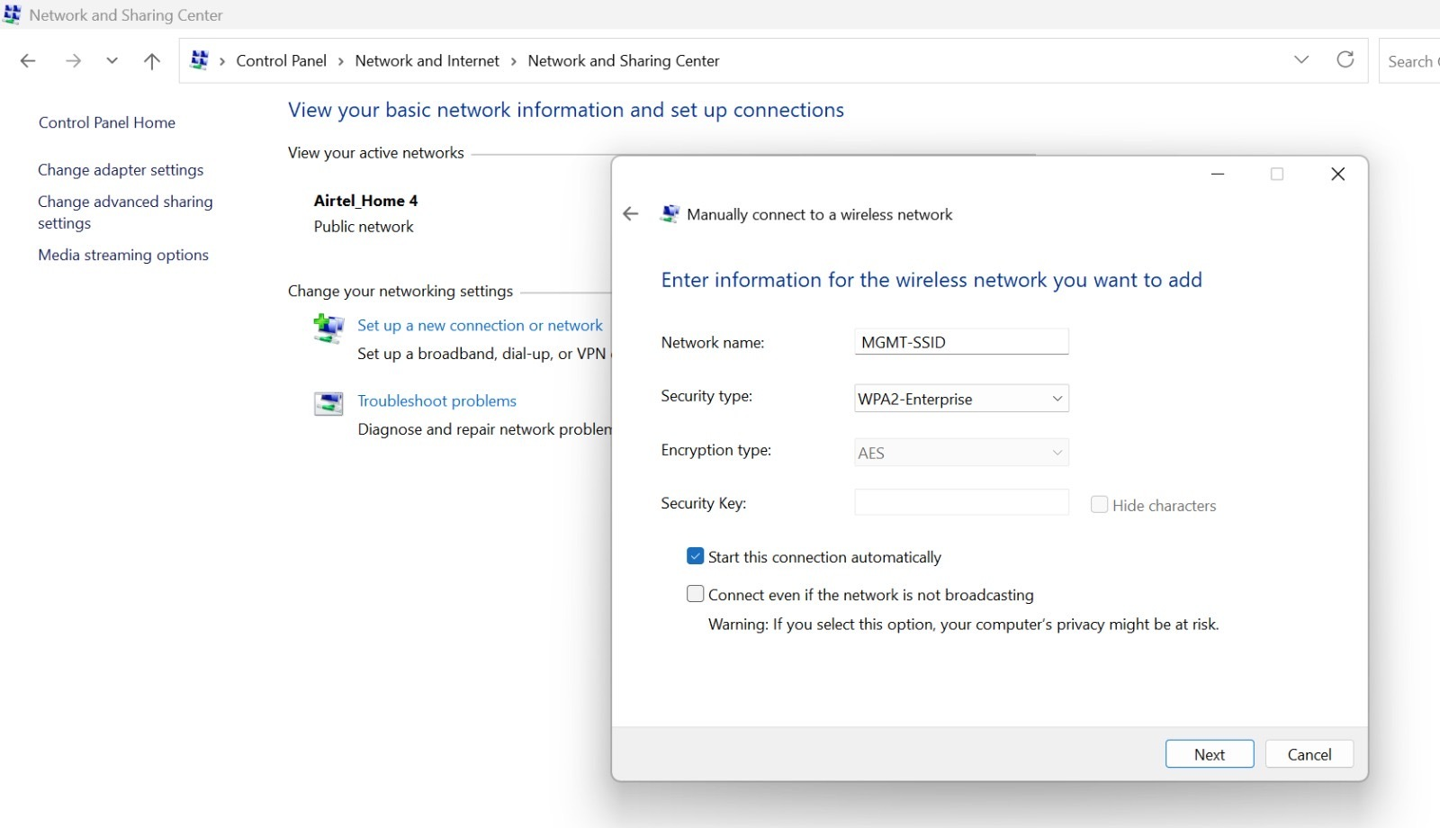
When you click Next, a confirmation message appears stating that your SSID has been successfully added.
Figure 16: Configure Wireless Network: Connection Settings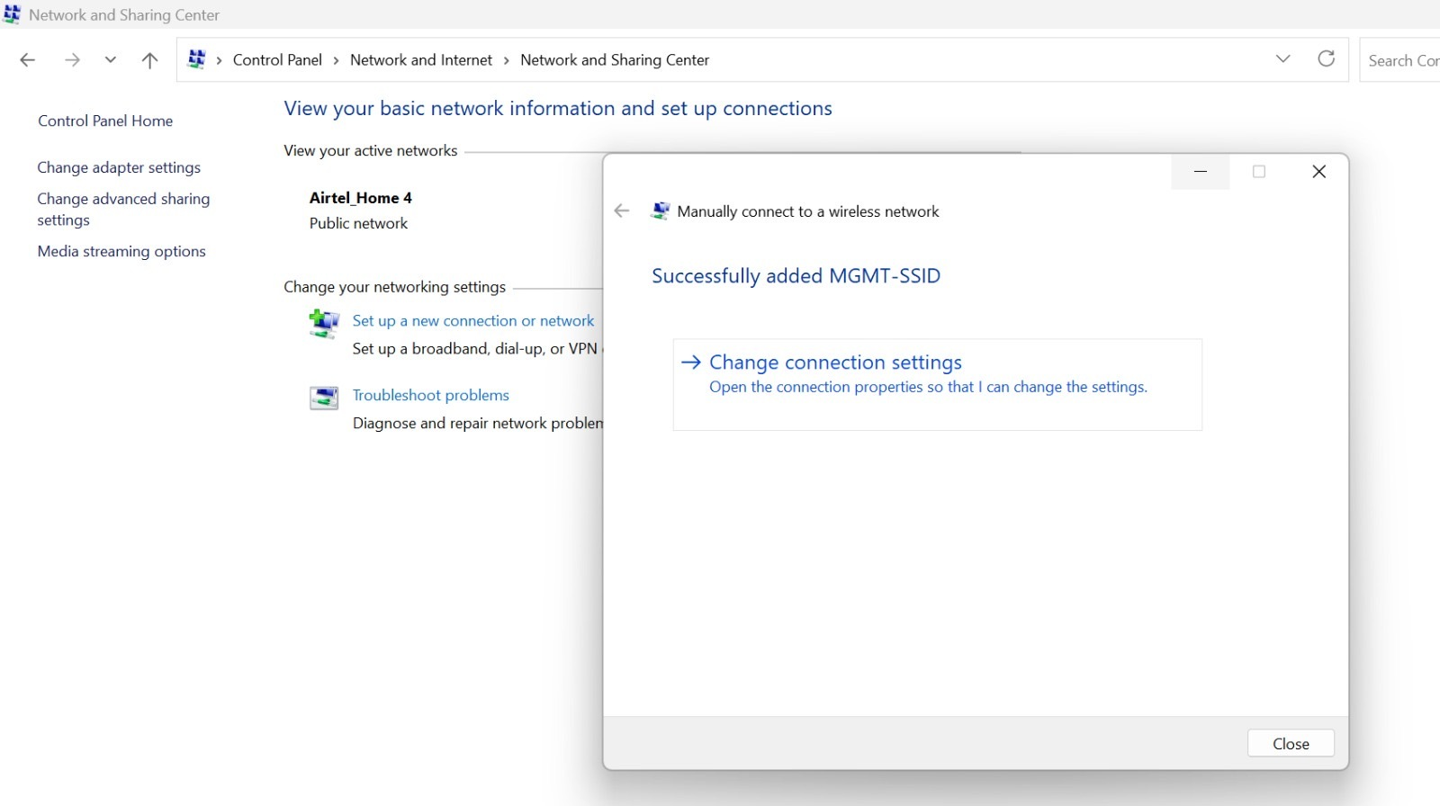
Click Change connection settings.
- Go to the Security tab, and under Choose a network authentication
method, select Microsoft: EAP-TTLS and click
Settings. Figure 17: Configure Wireless Network Properties
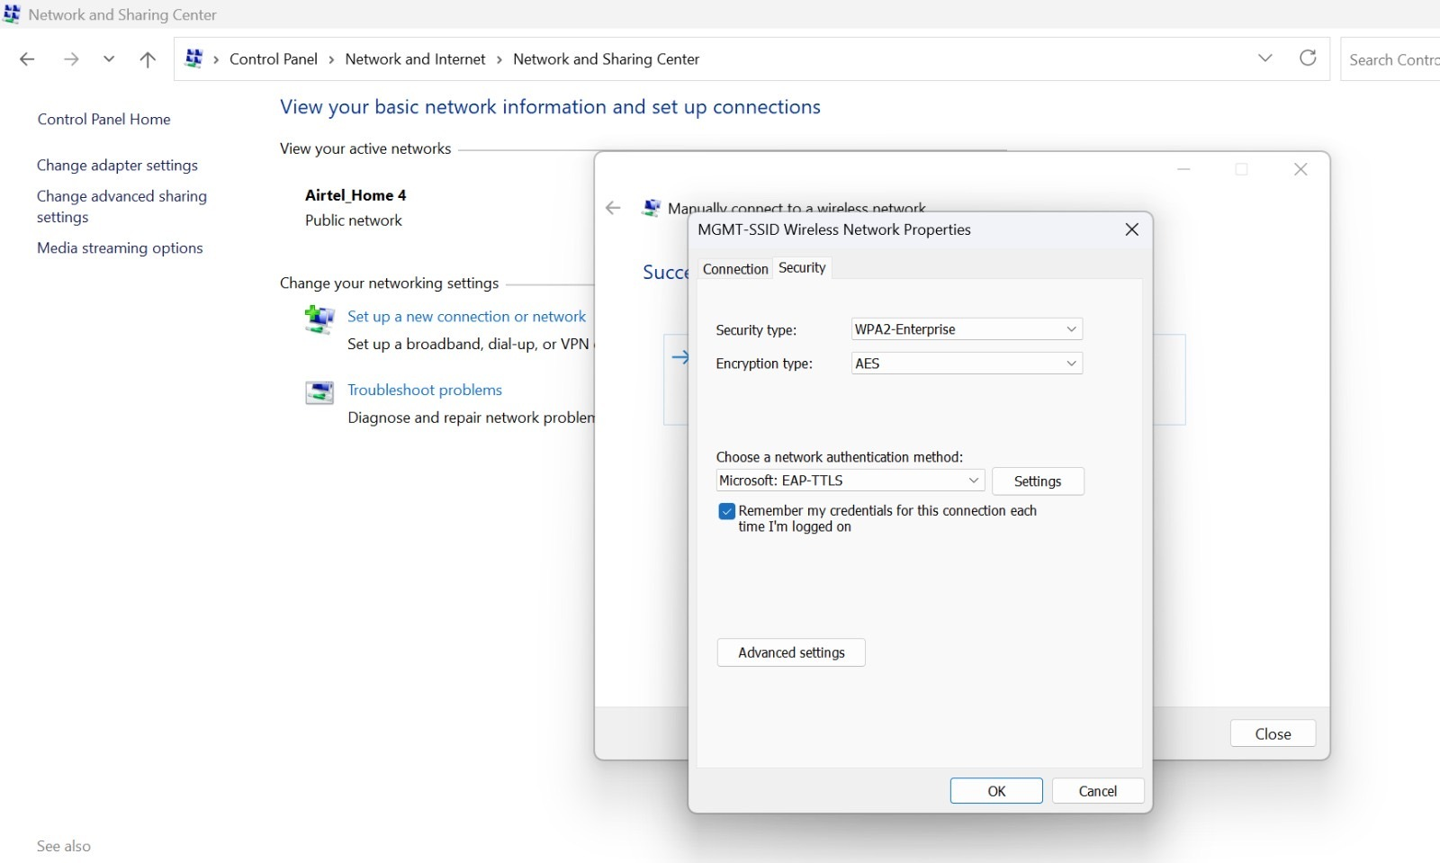
In the TTLS Properties window, perform following actions:
Disable the Enable Identity Privacy option.
For the Connect to these servers, enter
auth.mist.comUnder Trusted Root Certification Authorities, select the Mist Org CA certificate or Root CA of your custom RADIUS server certificate.
For Select a non-EAP method for authentication, select Unencrypted password (PAP)
.
Figure 18: Configure Wireless Network: TTLS Properties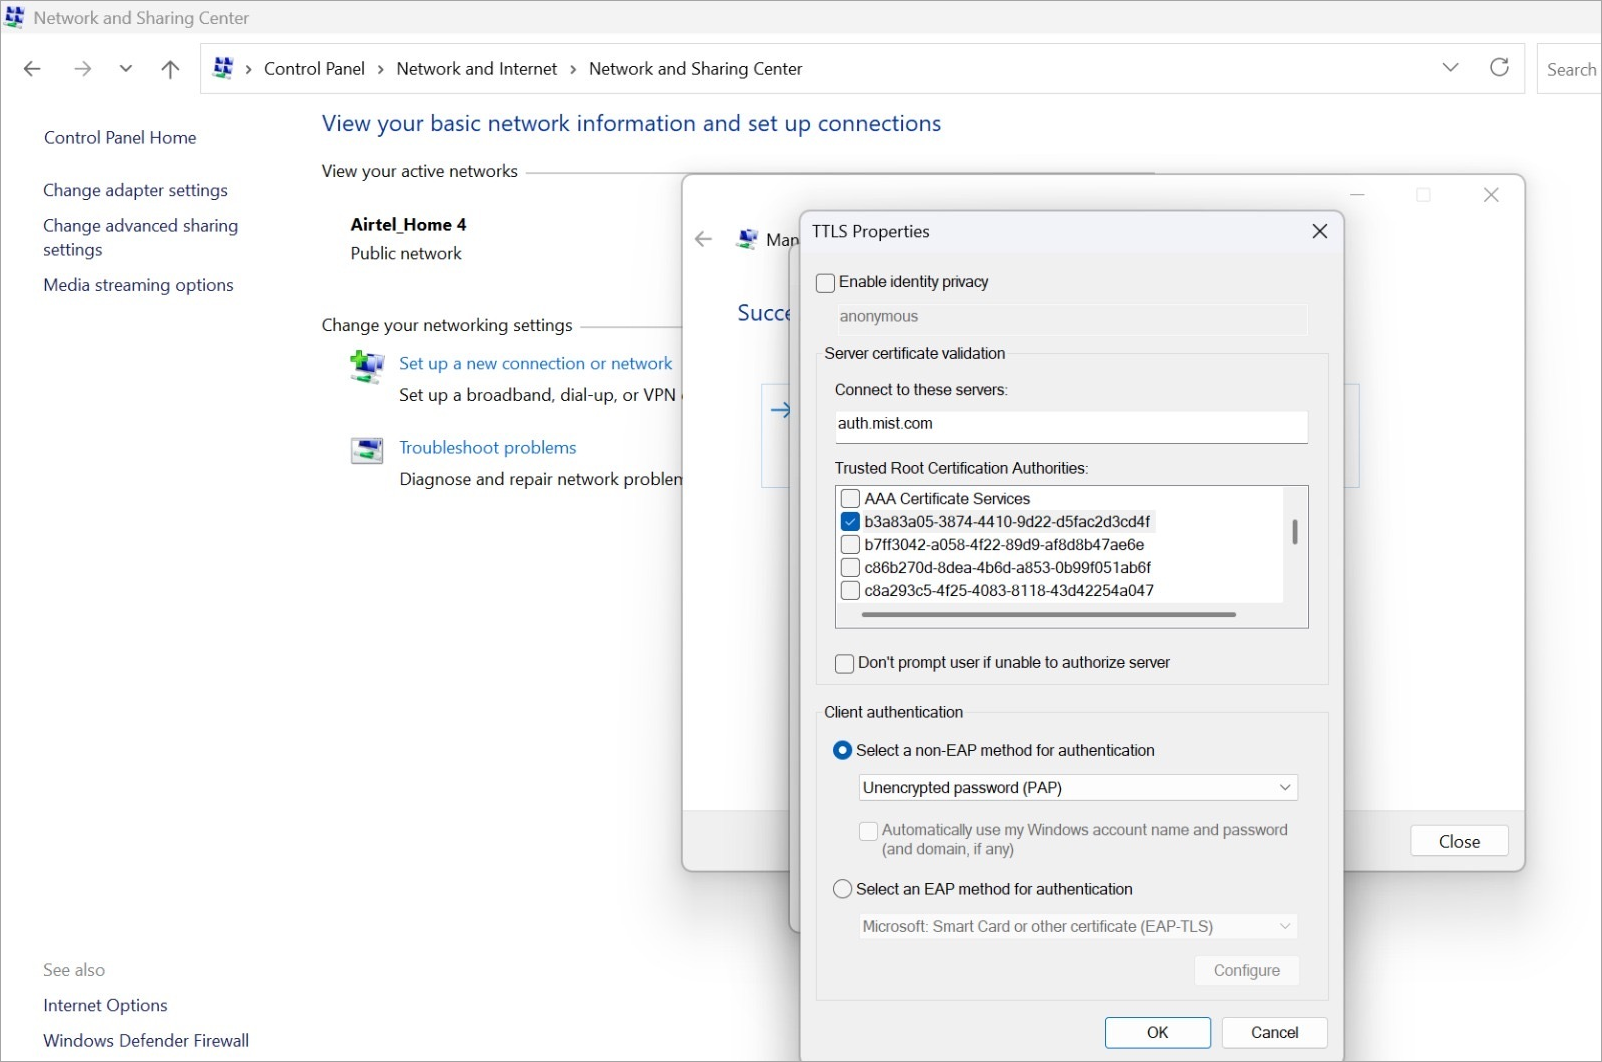
Click OK.
Back in the Security tab, click Advanced settings.
- Check Specify authentication mode and select User Authentication option.
- Click OK, then Close to complete your configuration.
Figure 19: Configure Wireless Network: Advance Settings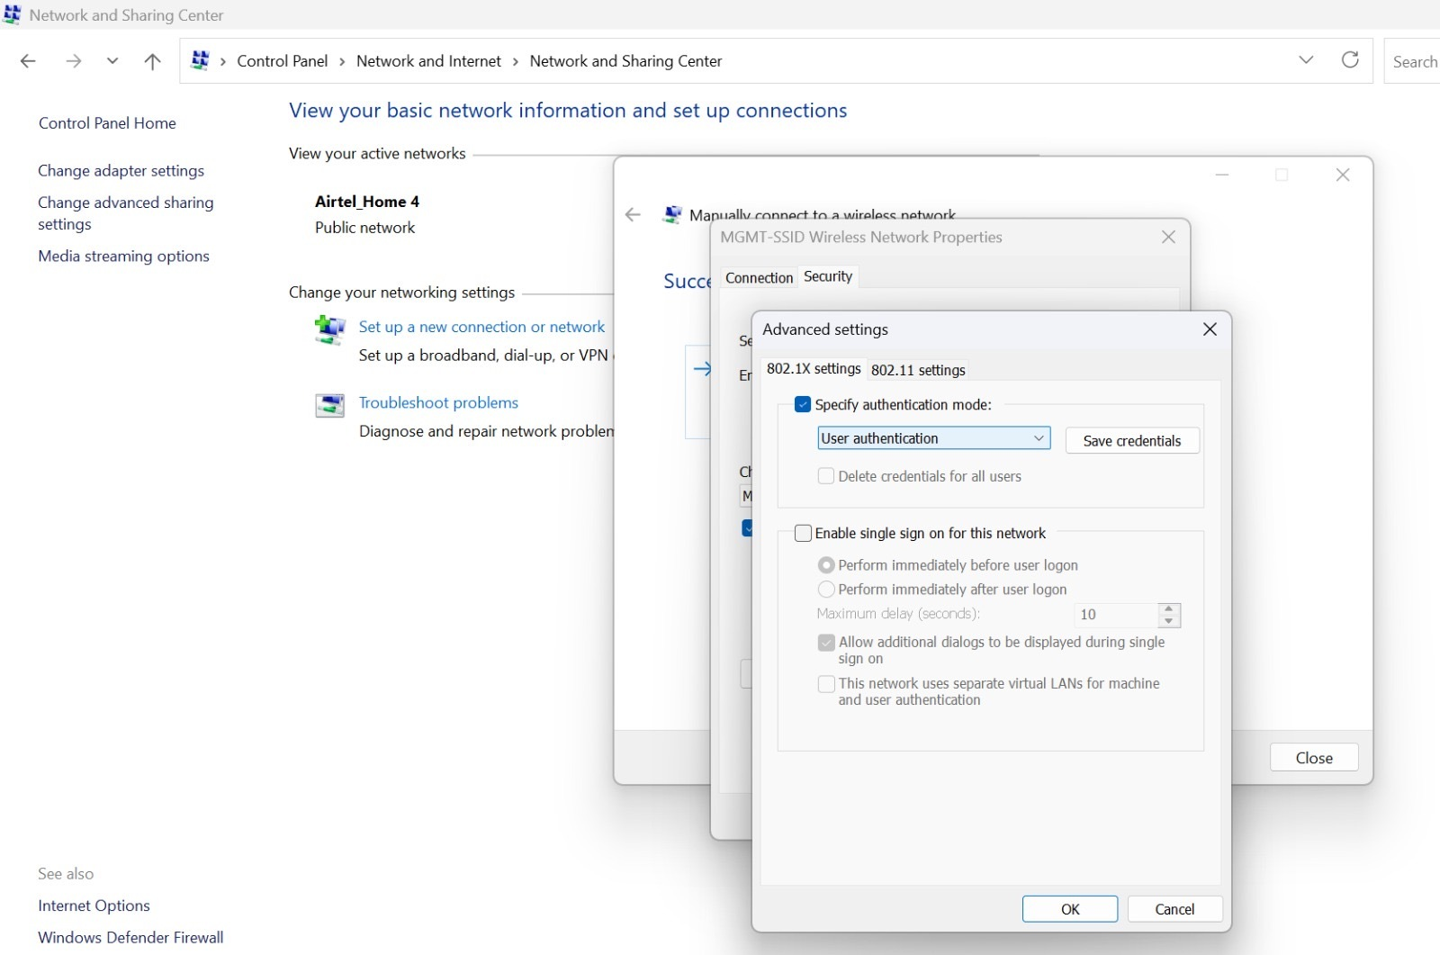
Configure Android Device for EAP-TTLS Authentication
Use the following steps to configure an Android device for EAP-TTLS authentication. Navigation steps may vary slightly depending on the device model; the example provided here is based on a Google Pixel 9.
- Download the Mist Org CA Cert and saved to your device's storage.
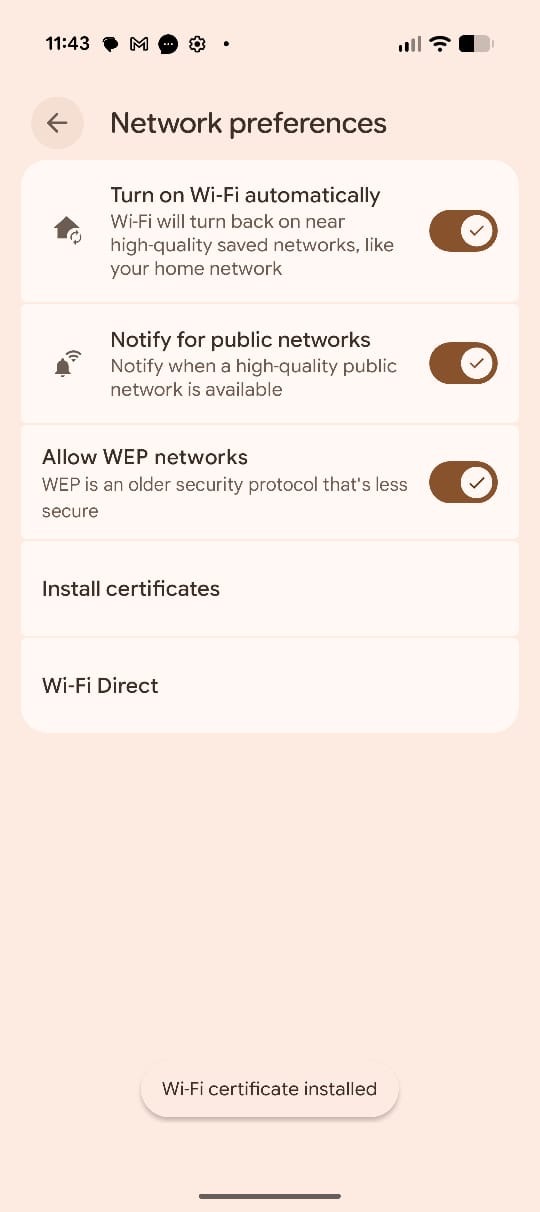
- Open the Settings app on your Android device and navigate to
Settings > Network and Internet> Internet > Network
Preferences. Click Install Certificates. Figure 20: Install Certificate
From the internal storage upload the Mist Org CA certificate and enter the name of the certificate. If you are using a custom RADIUS server certificate, choose the Root CA corresponding to that server instead of the Mist Org CA.
Figure 21: Enter Certificate Name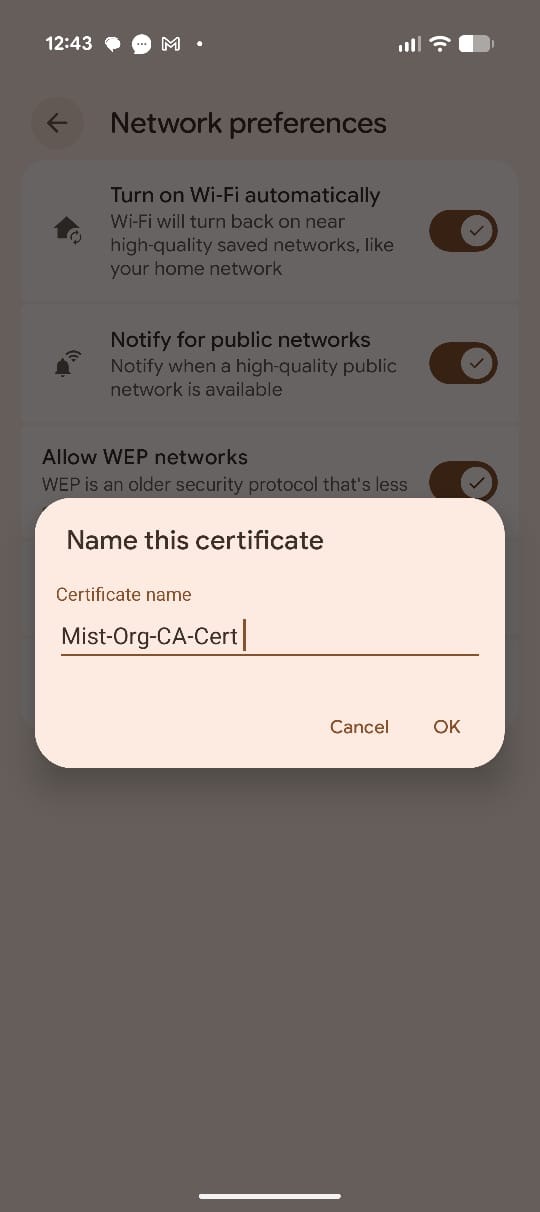
Once the CA certificate is downloaded and installed, click on the SSID and configure the connection as follows:
- EAP Method: TTLS
- Phase 2 Authentication: PAP
- CA Certificate: Select the Org CA Certificate
- Domain: Enter
auth.mist.com. - Credentials: Enter the Username and
Password.Figure 22: Configure Wireless Network
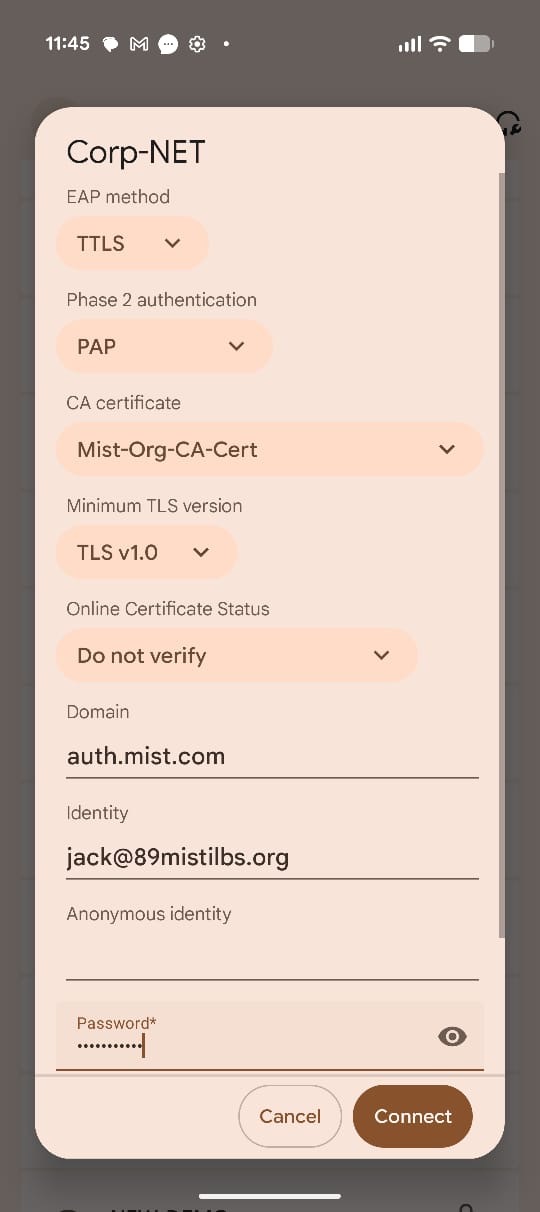
Click Connect to complete the configuration.
Configure Linux Device for EAP-TTLS Authentication
Use the following steps to configure EAP-TTLS authentication on a Linux (Ubuntu) device:
- Open the network settings and click on the SSID to be connected. Figure 23: Wireless Network Configuration
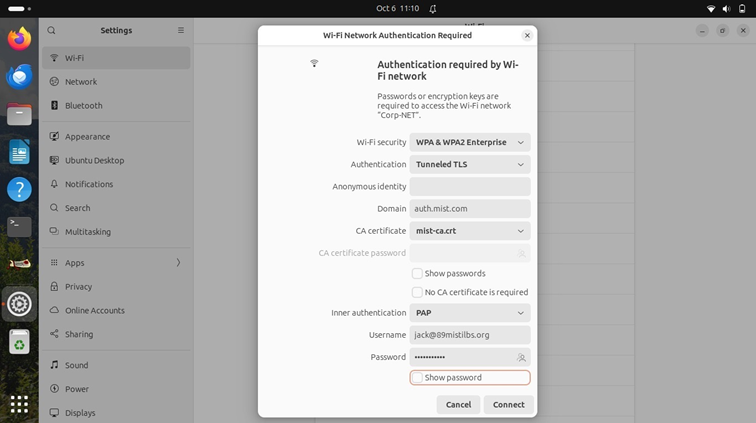
- Under Wi-Fi Security, choose WPA & WPA2 Enterprise.
- For Authentication, select Tunneled TLS (EAP-TTLS).
- Set the Domain field to: auth.mist.com
- For the CA certificate, select the Mist Org CA certificate that was previously downloaded. If you are using a custom RADIUS server certificate, choose the Root CA corresponding to that server instead of the Mist Org CA.
- Set Inner authentication (or Phase 2 Authentication) to PAP.
- Enter the Username and Password provided for authentication.
- Click Connect to complete the configuration.
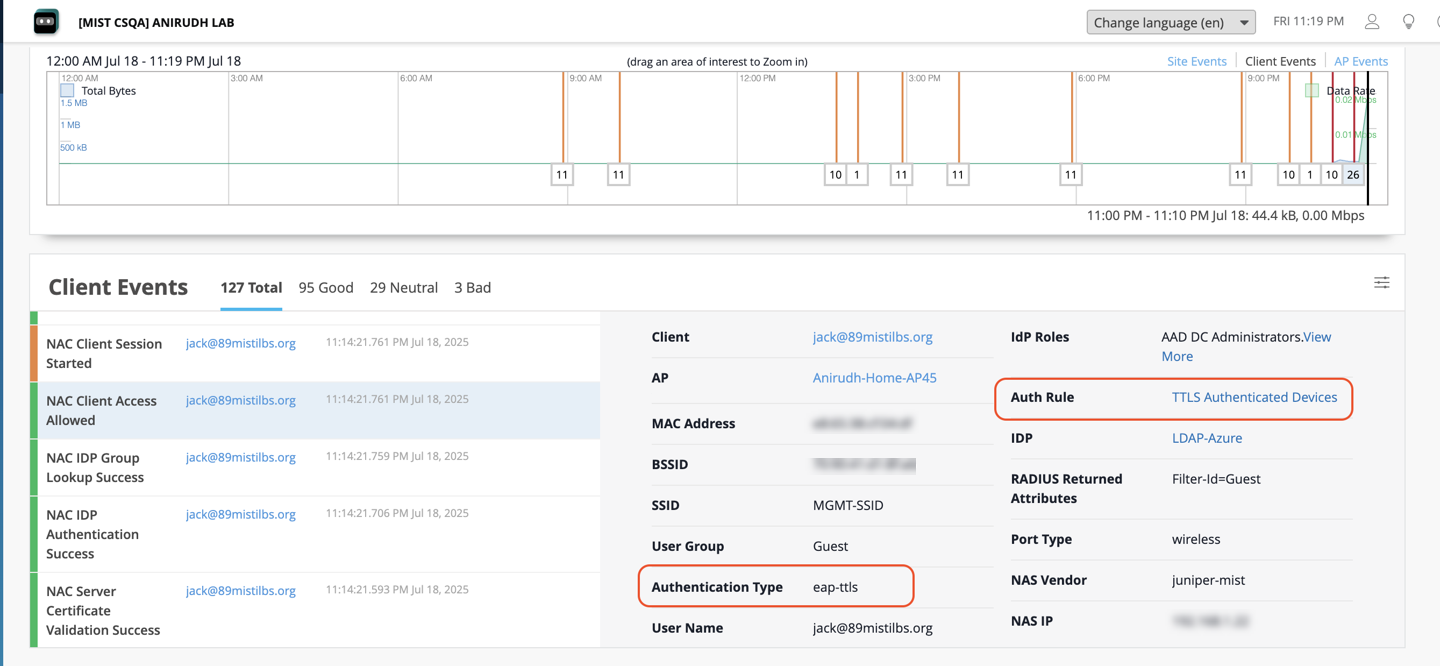
Client Connection and Verification
- Connect your client device to the network with the username and password.
- In the Juniper Mist portal, navigate to Monitor > Service Levels >
Insights. Under the Client Events section, view NAC client authentication
events. Figure 24: NAC Client Authentication Events