Access the J-Web User Interface
Prerequisites for Using J-Web
To access the J-Web interface for all SRX Series Firewalls, your management device requires the following software:
-
Supported browsers—Mozilla Firefox and Google Chrome.
Note:By default, you establish a J-Web session through an HTTPS-enabled Web browser.
Microsoft ended Internet Explorer support in June 2022. Therefore, starting with Junos OS Release 22.4R1 or later, J-Web UI is not supported in Internet Explorer.
-
Language support— English-version browsers.
Install J-Web Application Package
-
This document assumes that you are accessing the device to launch J-Web for the first time using a factory default configuration. If your SRX Series Firewall is already configured with a management IP address, you simply point your browser to the device's management address to access J-Web.
-
The Junos-FIPS devices do not support web-management statement at [edit system services] hierarchy level. For detailed list of Junos-FIPS configuration restrictions on the FIPS compliant SRX Series Firewalls, see platform specific Junos-FIPS configuration restrictions on the Juniper Tech Library. Search for the specific SRX Series Firewall and navigate to System Admin Guides > FIPS Evaluated Configuration Guide. Junos-FIPS mode does not support applications that depend on the web-management CLI such as J-Web, Firewall Authentication, and Juniper Secure Connect.
The factory default settings vary between SRX Series Firewalls. In addition, some SRX Series Firewalls have interface while others use a revenue (network interface) port for Ethernet based management. When running a factory default configuration SRX 300 and 500 Series devices typically provide DHCP services on specific network interface ports that are enabled for host management access.
On SRX Series Firewalls with a dedicated management interface, DHCP services may or may not be present in the factory default. Some devices provide DHCP server functions on the dedicated management interface (fxp0). When using a device that does not offer DHCP services, for example an SRX5400, you must ensure the management device has a compatible IP address. This address can be manually assigned or be allocated by an external DHCP server on the management network.
Table 1 provides the factory defaults relating to J-Web access for SRX Series Firewalls. If your SRX Series Firewall is not listed, refer to the corresponding hardware guide for details on the factory defaults.
|
SRX Series Firewall |
Management Interface |
DHCP Server Ports |
DHCP Subnet |
J-Web Server IP |
|---|---|---|---|---|
|
SRX300, SRX320 |
ge-0/0/1 through ge-0/0/6 |
ge-0/0/1 through ge-0/0/6 |
192.168.1.0/24 |
192.168.1.1 |
|
SRX340, SRX345 |
MGMT/fxp0 |
fxp0 |
192.168.1.0/24 |
192.168.1.1 |
|
ge-0/0/1 through ge-0/0/14 |
192.168.2.0/24 |
192.168.2.1 |
||
|
SRX380 |
MGMT/fxp0 |
fxp0 |
192.168.1.0/24 |
192.168.1.1 |
|
ge-0/0/1 through ge-0/0/18 |
192.168.2.0/24 |
192.168.2.1 |
||
|
SRX1500 |
MGMT/fxp0 |
ge-0/0/1 |
192.168.2.0/24 |
192.168.1.1 192.168.2.1, 192.168.3.1, or 192.168.4.1 |
|
SRX1600 |
MGMT/fxp0 |
ge-0/0/1 |
192.168.2.0/24 |
192.168.1.1 or 192.168.2.1 |
| SRX2300, SRX4120, SRX4300 |
MGMT/fxp0 |
mge-0/0/1 | 192.168.2.0/24 |
192.168.1.1 or 192.168.2.1 |
|
SRX4100, SRX4200 |
MGMT/fxp0 |
NA |
NA |
192.168.1.1 |
|
SRX4600 |
MGMT/fxp0 |
xe-1/1/1 |
NA (no DHCP address pool in the default configuration) |
192.168.1.1 |
|
SRX4700 |
MGMT/fxp0 |
NA |
NA |
192.168.1.1 |
|
SRX5400, SRX5600, SRX5800 |
MGMT/fxp0 |
NA |
NA |
192.168.1.1 |
|
vSRX Virtual Firewall |
fxp0 |
NA |
NA |
NA |
Starting with Junos OS Release 25.2R1, the Junos bundle for SRX Series Firewalls includes jweb-srx-app as an optional package. You must use the CLI to install the J-Web SRX Application Package.
To log into the J-Web interface on a new device:
-
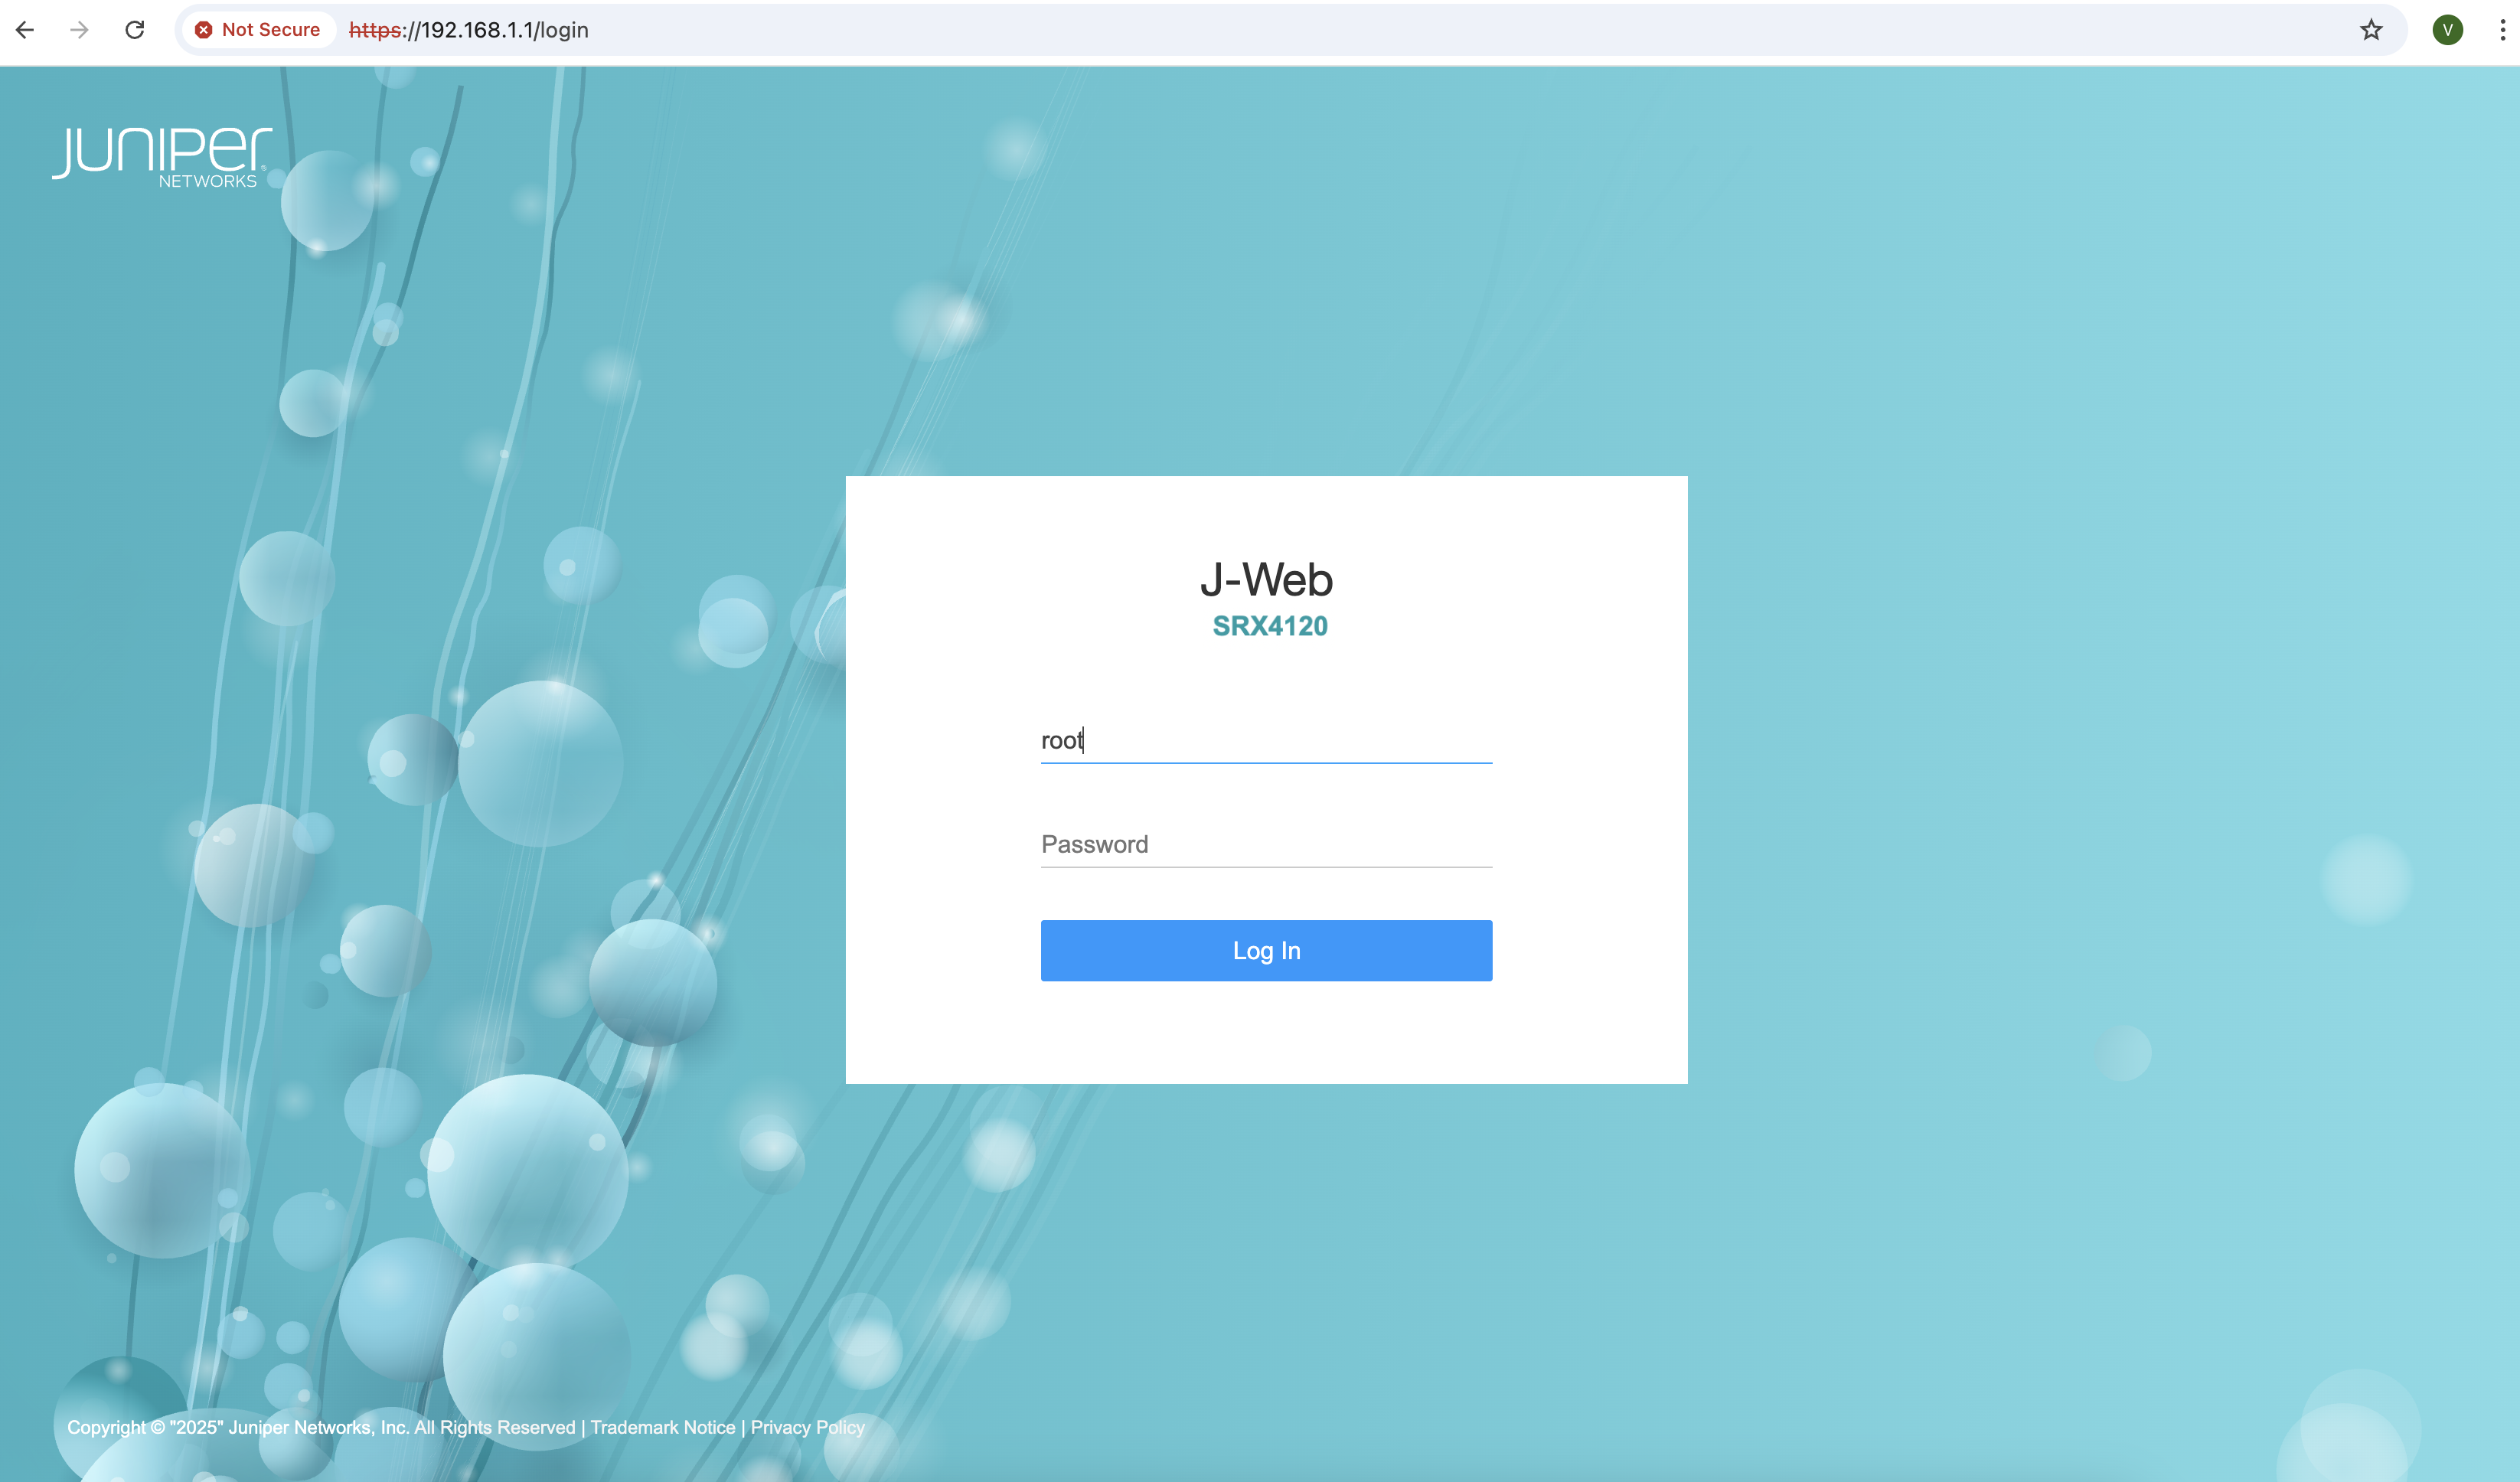
Open a browser and enter https://<IP address> in the
address bar. Where, <IP address> is the IP address of the SRX
Series Firewall. The J-Web login page appears.
Figure 1: J-Web Login Page
-
Enter the username 'root' and click Log In. Password is not
required.
The J-Web Setup Wizard screen appears. See Figure 2.Note:
In a factory default configuration, a self-signed certificate is used to support the HTTPS connection. You can safely accept the security exception to perform initial configuration.
Figure 2: J-Web Setup Wizard Page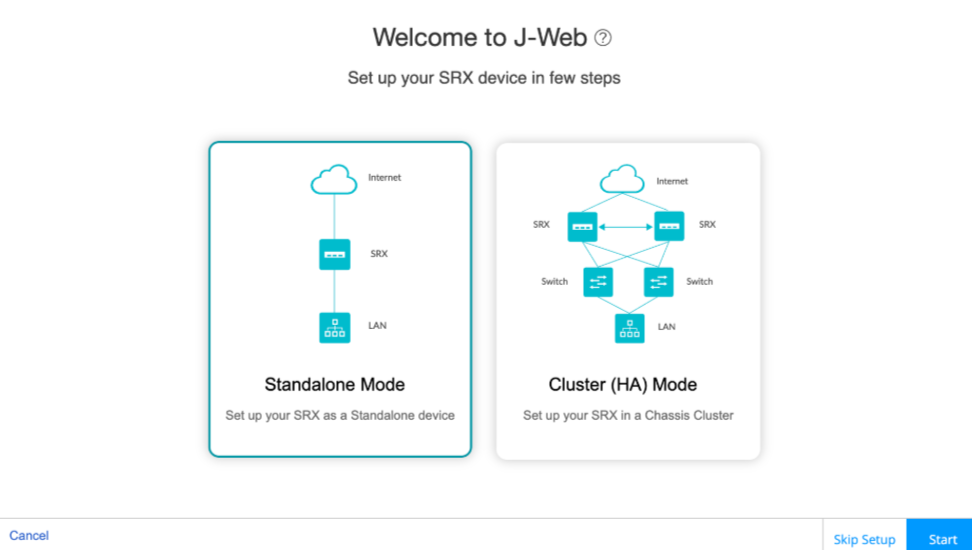
Two examples are given to better illustrate the use of the information in Table 1:
-
You have an SRX380 device:
-
You connect your management PC, which is configured for DHCP address assignment, to the fxp0 port, or to port ge-0/0/1 through ge-0/0/18.
-
If connected to the fxp0 port, you access J-Web at https://192.168.1.1.
-
If connected to ge-0/0/1 through ge-0/0/18, you access J-Web at https://192.168.2.1.
-
-
You have an SRX5400 device:
-
You connect your management PC, which is statically configured with an IP address from 192.168.1.0/24 subnet, to the fxp0 port.
Note:The static IP address assignment cannot use 192.168.1.1 for fxp0 on the management subnet as the SRX Series Firewall uses this IP address.
-
You access J-Web at https://192.168.1.1.
After a successful user login, J-Web opens the Basic settings page.
-
-
-
Optional. If you do not want to perform the initial configuration,
then:
-
Click Skip Setup.
The J-Web Device Password screen appears. See Figure 3.
Figure 3: Device Password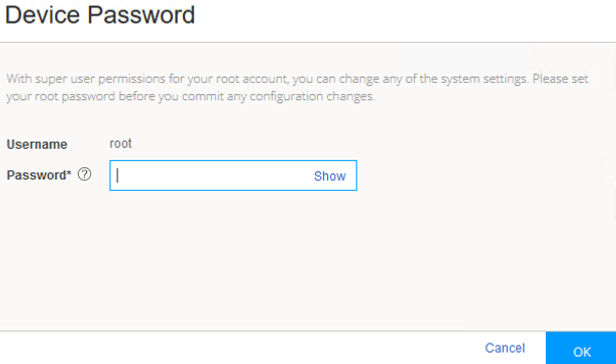
-
Enter the root password.
-
Click OK.
The password is committed to the device and the J-Web login page appears.
-
Enter the username and password again and click Log In.
The J-Web application window appears.
Note:You can choose Device Administration > Reset Configuration through the J-Web menu to reset and reconfigure the SRX Series Firewall.
-
Congratulations! Now that you have access to the J-Web interface, you are ready to use J-Web to configure, manage, and monitor your SRX device.
- Get a quick overview of the J-Web user interface: Explore J-Web
- Use the setup wizard for initial configuration: The J-Web Setup Wizard
- Access the device dashboard: Dashboard Overview
- Configure your device: Configure Basic Settings
- Watch a Learning Bytes video showing J-Web usage on a vSRX Virtual Firewall: SRX J-Web Access
Install the J-Web SRX Application Package on an Existing Device
Before upgrading the J-Web SRX Application Package to version 25.2R1 or later, ensure that the loopback interface is configured on your device. If it is not already configured, open the CLI and run the following command, then commit the configuration:
set interfaces lo0 unit 0 family inet address 127.0.0.1/32
To install the latest J-Web SRX Application Package:
Uninstall J-Web Application Package
To remove the J-Web Application Package from your device.