Sophos Antivirus Protection
The Sophos antivirus scanner uses a local internal cache to maintain query responses from the external list server to improve lookup performance. The Sophos antivirus scanning is offered as a less CPU-intensive alternative to the full file-based antivirus feature. For more information, see the following topics:
Sophos Antivirus Protection Overview
Sophos antivirus is as an in-the-cloud antivirus solution. The virus pattern and malware database is located on external servers that are maintained by Sophos (Sophos Extensible List) servers, thus there is no need to download and maintain large pattern databases on the Juniper device. Prior to Junos OS Release 23.1R1, the Sophos antivirus scanner also used a local internal cache to maintain query responses from the external list server to improve lookup performance.
Because a significant amount of traffic processed by Juniper Content Security is HTTP based, Uniform Resource Identifier (URI) checking is used to effectively prevent malicious content from reaching the endpoint client or server. The following checks are performed for HTTP traffic: URI lookup, true file type detection, and file checksum lookup. The following application layer protocols are supported: HTTP, FTP, SMTP, POP3 and IMAP.
The full file-based antivirus feature is not supported from Junos OS Release 15.1X49-D10 and Junos OS Release 17.3R1 onwards. For previous releases, Sophos antivirus scanning is offered as a less CPU-intensive alternative to the full file-based antivirus feature. Sophos supports the same protocols as full antivirus and functions in much the same manner; however, it has a smaller memory footprint and is compatible with lower end devices that have less memory.
Starting with Junos OS Release 15.1X49-D100, IPv6 pass-through traffic for HTTP, HTTPS, FTP, SMTP, POP3, IMAP protocols is supported for Sophos antivirus, Web filtering and Content filtering security features of Content Security.
Starting with Junos OS Release 12.3X48-D35 and Junos OS Release 17.3R1, the Content Security Sophos antivirus (SAV) single session throughput is increased for optimizing tcp-proxy forwarding.
Starting from Junos OS Release 19.4R1, the antivirus feature supports implicit and explicit SMTPS, IMAPS, and POP3S protocol, and supports only explicit passive mode FTPS.
Implicit mode—Connect to SSL/TLS encrypted port using secure channel.
Explicit mode—First connect to unsecured channel, then secure the communication by issuing STARTTLS command. For POP3S, use STLS command.
Starting in Junos OS Release 23.1R1, Content Security supports the new antivirus Sophos Live Protection version 2.0. The new version of Sophos antivirus uses an HTTPS connection for the device-to-server communication. For the HTTPS connection, you must create an SSL initiation profile and add the profile to the default configuration of the Sophos engine.
Starting in Junos OS Release 24.4R1, we introduce Web proxy support for Content Security Sophos 2.0 antivirus. In addition, we introduce the file reputation groups based on the file reputation value to control the traffic and provide more control over security.
See Also
Sophos Antivirus Features
Sophos antivirus has the following main features:
Sophos antivirus expanded MIME decoding support—Sophos antivirus offers decoding support for HTTP, POP3, SMTP, and IMAP. MIME decoding support includes the following for each supported protocol:
Multipart and nested header decoding
Base64 decoding, printed quote decoding, and encoded word decoding in the subject field
Sophos antivirus supports HTTPS traffic—Starting with Junos OS Release 12.3X48-D25 and Junos OS Release 17.3R1, Sophos antivirus over SSL forward proxy supports HTTPS traffic. Sophos antivirus over SSL forward proxy does so by intercepting HTTPS traffic passing through the SRX Series Firewall. The security channel from the SRX Series Firewall is divided as one SSL channel between the client and the SRX Series Firewall and another SSL channel between the SRX Series Firewall and the HTTPS server. SSL forward proxy acts as the terminal for both channels and forwards the cleartext traffic to Content Security. Content Security extracts the URL and the file checksum information from cleartext traffic. The Sophos antivirus scanner determines whether to block or permit the requests.
SSL forward proxy does not support client authentication. If client authentication is required by the server, Content Security bypasses the traffic. Content Security bypasses the HTTPS traffic under the following conditions:
If SSL proxy does not parse the first handshake packet from the client, SSL forward proxy bypasses the traffic.
If the SSL proxy handshake with the client and server is incomplete because of compatibility issues, connection drops.
If the system resource is low, SSL forward proxy cannot handle the new connection and Sophos antivirus bypasses the traffic.
If HTTPS traffic hits the allowlist of SSL forward proxy, SSL forward proxy and Sophos antivirus bypass the traffic.
Sophos antivirus scan result handling—With Sophos antivirus, the TCP, traffic is closed gracefully when a virus is found and the data content is dropped.
The following fail mode options are supported: content-size, default, engine-not-ready, out-of-resource, timeout, and too-many-requests. You can set the following actions: block, log-and-permit, and permit. Fail mode handling of supported options with Sophos is much the same as with full antivirus.
Sophos Uniform Resource Identifier checking—Sophos provides Uniform Resource Identifier (URI) checking, which is similar to antispam realt-ime null route list (RBL) lookups. URI checking is a way of analyzing URI content in HTTP traffic against the Sophos database to identify malware or malicious content. Because malware is predominantly static, a checksum mechanism is used to identify malware to improve performance. Files that are capable of using a checksum include .exe, .zip, .rar, .swf, .pdf, and .ole2 (doc and xls).
If you have a Juniper Networks device protecting an internal network that has no HTTP traffic, or has webservers that are not accessible to the outside world, you might want to turn off URI checking. If the webservers are not accessible to the outside world, it is unlikely that they contain URI information that is in the Sophos URI database. URI checking is on by default.
Starting from Junos OS Release 18.4R1 onwards, the URI checking is off by default.
See Also
Understanding Sophos Antivirus Data File Update
Sophos antivirus uses a small set of data files that need to be updated periodically. These data files only contain information on guiding scanning logic and do not contain the full pattern database. The main pattern database, which includes protection against critical viruses, URI checks, malware, worms, Trojans, and spyware, is located on remote Sophos Extensible List servers maintained by Sophos.
The Sophos data files are updated over HTTP or HTTPS and can be updated manually or scheduled to update automatically. With Sophos antivirus:
The signature database auto-update interval is once a day by default. This interval can be changed.
There is no interruption in virus scanning capability during the data file update. If the update fails, the existing data files will continue to be used.
By default, the URL for Sophos antivirus data file update is http://update.juniper-updates.net/SAV/.
The Sophos antivirus scanning feature is a separately licensed subscription service. When your antivirus license key expires, functionality will no longer work because the pattern lookup database is located on remote Sophos servers. You have a 30-day grace period in which to update your license.
See Also
Comparison of Sophos Antivirus to Kaspersky Antivirus
The Kaspersky and Express Antivirus feature is not supported from Junos OS Release 15.1x49-D10 and Junos OS Release 17.3R1 onwards. For previous releases, Sophos Antivirus is much like Juniper Express Antivirus and also has similarities to the Full Antivirus feature:
Unlike the Juniper Express and Full Antivirus solutions, the antivirus and malware database for Sophos is stored on a group of remote Sophos Extensible List servers. Queries are performed using the DNS protocol. Sophos maintains these servers, so there is no need to download and maintain large pattern databases on the Juniper device. Because the database is remote, and there is a quicker response to new virus outbreaks. The Antivirus database has no size limitation, but there is a limitation with the scan file size.
Note:Sophos antivirus uses a set of data files that need to be updated on a regular basis. These are not typical virus pattern files; they are a set of small files that help guide virus scanning logic. You can manually download the data files or set up automatic download.
Sophos does not provide the same prescreening detection as Kaspersky Antivirus. Sophos does provide a similar solution that is part of the Sophos engine and cannot be turned on and off.
The Sophos antivirus scanning feature is a separately licensed subscription service. Also, the pattern lookup database is located on remote servers maintained by Sophos, so when your antivirus license key expires, functionality will no longer work. You have a 30-day grace period in which to update your license.
See Also
Sophos Antivirus Configuration Overview
Sophos antivirus is part of the Content Security feature set, so you first configure Content Security options (custom objects), configure the Sophos Feature, then create a Content Security policy and a security policy. The security policy controls all traffic that is forwarded by the device, and the Content Security policy specifies which parameters to use to scan traffic. The Content Security policy is also used to bind a set of protocols to one or more Content Security feature profiles, including Sophos antivirus in this case.
You must complete the following tasks to configure Sophos antivirus:
- Configure Content Security custom objects and MIME lists. See Example: Configuring Sophos Antivirus Custom Objects,
- Configure the Sophos antivirus feature profile. See Example: Configuring Sophos Antivirus Feature Profile.
- Configure a Content Security policy. See Example: Configuring Sophos Antivirus Content Security Policies
- Configure a security policy. See Example: Configuring Sophos Antivirus Firewall Security Policies.
To configure Sophos antivirus live protection version 2.0, see Example: Configure Sophos Antivirus Live Protection Version 2.0.
To use the Sophos antivirus while performing an in-service software upgrade (ISSU), remove the following configuration options. This caution applies only to ISSU upgrades and not to standalone upgrades. Once you complete the ISSU, you can re-enable the configurations. The Sophos antivirus feature perform as usual when both devices come up.
-
edit security utm default-configuration anti-virus forwarding-mode holdset -
edit security utm default-configuration anti-virus forwarding-mode
                     inline-tap
To configure Sophos antivirus over SSL forward proxy to support HTTPS traffic, see Configure SSL Proxy with Content Security.
Example: Configuring Sophos Antivirus Custom Objects
This example shows you how to create Content Security global custom objects to be used with Sophos antivirus.
Requirements
Before you begin, read about Content Security custom objects. See Content Security Overview.
Overview
Configure MIME lists. This includes creating a MIME allowlist and a MIME exception list for antivirus scanning. In this example, you bypass scanning of QuickTime videos, unless if they contain the MIME type quicktime-inappropriate.
Configuration
Procedure
GUI Quick Configuration
Step-by-Step Procedure
To configure a MIME list:
Click the Configure tab from the taskbar, and then select Security>UTM>Custom Objects.
Click the MIME Pattern List tab and then click Add.
In the MIME Pattern Name box, type avmime2.
In the MIME Pattern Value box, type video/quicktime, and click Add.
In the MIME Pattern Value box, type image/x-portable-anympa, and click Add.
In the MIME Pattern Value box, type x-world/x-vrml, and click Add.
Step-by-Step Procedure
To configure a MIME exception list:
Click the Configure tab from the taskbar, and then select Security>UTM>Custom Objects.
Click the MIME Pattern List tab and then select Add.
In the MIME Pattern Name box, type exception-avmime2.
In the MIME Pattern Value box, type video/quicktime-inappropriate and click Add.
Step-by-Step Procedure
Configure a URL pattern list (allowlist) of URLs or addresses that will be bypassed by antivirus scanning. After you create the URL pattern list, you will create a custom URL category list and add the pattern list to it.
Because you use URL pattern lists to create custom URL category lists, you must configure URL pattern list custom objects before you configure custom URL category lists.
To configure a URL pattern allowlist:
Click the Configure tab from the taskbar, and then select Security>UTM>Custom Objects.
Click the URL Pattern List tab, and then click Add.
In the URL Pattern Name box, enter urlist2.
In the URL Pattern Value box, enter http://example.net. (You can also us the IP address of the server instead of the URL.)
Step-by-Step Procedure
Save your configuration:
Click OK to check your configuration and save it as a candidate configuration.
If you are done configuring the device, click Actions>Commit.
URL pattern wildcard support—The wildcard rule is as follows: \*\.[]\?* and you must precede all wildcard URLs with http://. You can use “*” only if it is at the beginning of the URL and is followed by a “.”. You can only use “?” at the end of the URL.
The following wildcard syntax is supported: http://*.example.net, http://www.example.ne?, http://www.example.n??. The following wildcard syntax is not supported: *.example.net , www.example.ne?, http://*example.net, http://*.
Step-by-Step Procedure
To configure antivirus protection using the CLI, you must create your custom objects in the following order:
-
Create the MIME allowlist.
[edit security utm]
user@host# set custom-objects mime-pattern avmime2 value [video/quicktime image/x-portable-anymap x-world/x-vrml]
Create the MIME exception list.
[edit security utm]
user@host# set custom-objects mime-pattern exception-avmime2 value [video/quicktime-inappropriate]
Configure a URL pattern list (allowlist) of URLs or addresses that you want to bypass. After you create the URL pattern list, you create a custom URL category list and add the pattern list to it. Configure a URL pattern list custom object by creating the list name and adding values to it as follows. As you use URL pattern lists to create custom URL category lists, you must configure URL pattern list custom objects before you configure custom URL category lists.
[edit security utm]
user@host# set custom-objects url-pattern urllist2 value [http://www. example.net 192.168.1.5]
Note:URL pattern wildcard support—The wildcard rule is as follows: \*\.[]\?* and you must precede all wildcard URLs with http://. You can only use “*” if it is at the beginning of the URL and is followed by a “.”. You can only use “?” at the end of the URL.
The following wildcard syntax is supported: http://*.example.net, http://www.example.ne?, http://www.example.n??. The following wildcard syntax is not supported: *.example.net , www.example.ne?, http://*example.net, http://*.
Configure a custom URL category list custom object by using the URL pattern list urllist2 that you created earlier:
[edit security utm]
user@host# set custom-objects custom-url-category custurl2 value urllist2
Verification
Verify the Sophos Antivirus Custom Objects Configuration
Purpose
To verify the Sophos Antivirus custom objects configuration.,
enter the show security utm custom-objects command.
Action
From the operational mode, enter the show security
utm custom-objects command to verify the Sophos Antivirus custom
objects configuration.
Example: Configuring Sophos Antivirus Feature Profile
This example shows you how to configure a Sophos antivirus profile that defines the parameters that will be used for virus scanning.
Requirements
Before you begin:
Install a Sophos antivirus license. See Installation and Upgrade Guide.
Configure custom objects for Content Security. See Example: Configuring Sophos Antivirus Custom Objects.
Overview
The following configuration defines Sophos as the antivirus engine and sets parameters, such as the data file update interval, notification options for administrators, fallback options, and file size limits.
The [edit security utm feature-profile] hierarchy
level is deprecated in Junos OS Release 18.2R1. For more information,
see Content Security Overview.
Configuration
Procedure
GUI Quick Configuration
Step-by-Step Procedure
The following example shows you how to create a custom Sophos profile. If you want to use the Juniper Networks preconfigured profile, use the profile named junos-sophos-av-defaults in your Content Security policy. See Example: Configuring Sophos Antivirus Content Security Policies.
Select and configure the engine type. Because you are configuring Sophos antivirus, you configure sophos-engine:
Step-by-Step Procedure
Click the Configure tab from the taskbar, and then select Security>UTM>Anti-Virus.
Click the Global Options tab and then click Sophos.
Click OK and commit your changes.
Return to the antivirus Global Options screen as you did in step 1, and set the following parameters:
Step-by-Step Procedure
In the MIME allowlist list, select exception-avmime2.
In the URL allowlist list, select custurl2.
In the Pattern update interval (sec) box, type 2880.
In the box, type the e-mail address that will receive Sophos administrator e-mail data file update notifications. For example - admin@ example.net.
In the Custom message subject box, type Sophos Data File Updated.
Click OK to check your configuration and save it as a candidate configuration.
Configure a profile for the sophos-engine and set parameters.
Step-by-Step Procedure
Click the Configure tab from the taskbar and then select Security>UTM>Anti-Virus. Click Add.
In the Add profile box, click the Main tab.
In the Profile name box, type sophos-prof1.
In the Trickling timeout box, type 180.
When enabling the trickling option, it is important to understand that trickling might send part of the file to the client during the antivirus scan. It is possible that some of the content could be received by the client and the client might become infected before the file is fully scanned.
URI checking is on by default. To turn it off, clear yes in the URI check box.
In the Content size Limit box, type 20000.
In the Scan engine timeout box, type 1800.
Configure fallback settings by clicking the Fallback settings tab. In this example, all fallback options are set to log and permit. Click Log and permit for the following items: Default action, Content size, Engine not ready, Timeout, Out of resource, Too many requests.
Configure notification options by clicking the Notification options tab. You can configure notifications for both fallback blocking and fallback nonblocking actions and for virus detection.
Step-by-Step Procedure
To configure notifications for Fallback settings:
For Notification type, click Protocol.
For Notify mail sender, click yes.
In the Custom message box, type Fallback block action occurred.
In the Custom message subject box, type ***Antivirus fallback Alert***.
To configure notification options for virus detection, click the Notification options cont... tab.
Step-by-Step Procedure
For the Notification type option button, select Protocol.
For the Notify mail sender option button, select yes.
In the Custom message box, type Virus has been detected.
In the Custom message subject box, type ***Virus detected***.
Click OK to check your configuration and save it as a candidate configuration.
If you are done configuring the device, click Actions>Commit.
Step-by-Step Procedure
To configure the Sophos antivirus feature profile using the CLI:
The following example shows you how to create a custom Sophos profile. If you want to use the Juniper Networks preconfigured profile, use the profile named junos-sophos-av-defaults in your Content Security policy. See Example: Configuring Sophos Antivirus Content Security Policies.
Select and configure the engine type. Because you are configuring Sophos antivirus, you configure sophos-engine.
[edit]
user@host# set security utm default-configuration anti-virus type sophos-engine
Commit the configuration.
Select a time interval for updating the data files. The default antivirus pattern-update interval is 1440 minutes (every 24 hours). You can choose to leave this default, or you can change it. You can also force a manual update, if needed. To change the default from every 24 hours to every 48 hours:
[edit security utm default-configuration anti-virus]
user@host# set sophos-engine pattern-update interval 2880
Configure the network device with the proxy server details, to download the pattern update from a remote server:
[edit security utm default-configuration anti-virus]
user@host# set sophos-engine pattern-update proxy
Optionally enable Sophos engine to securely connect to external servers through a proxy. In addition, you can configure proxy authentication within the proxy profile. By setting a username and password, you can enable secure access to external feeds and services.
[edit]
user@host# set services proxy profile proxy-profile protocol http host x.x.x.x port xxxx
user@host# set services proxy profile proxy-profile protocol http username <username>
user@host# set services proxy profile proxy-profile protocol http password <password>
user@host# set security utm default-configuration anti-virus sophos-engine server proxy-profile proxy-profile
In most circumstances, you will not need to change the URL to update the pattern database. If you do need to change this option, use the following command:
[edit security utm default-configuration anti-virus]
user@host# set sophos-engine pattern-update url http://www.example.net/test-download
You can configure the device to notify a specified administrator when data files are updated. This is an e-mail notification with a custom message and a custom subject line.
[edit security utm default-configuration anti-virus]
user@host# set sophos-engine pattern-update email-notify admin-email admin@example.net custom-message “Sophos antivirus data file was updated” custom-message-subject “AV data file updated”
Configure a list of fallback options as block, log and permit, or permit. The default setting is log-and-permit. You can use the default settings, or you can change them.
Configure the content size action. In this example, if the content size is exceeded, the action taken is block.
First create the profile named sophos-prof1.
[edit security utm feature-profile anti-virus]
user@host# set profile sophos-prof1
Configure the content size fallback-option to block.
[edit security utm feature-profile anti-virus profile sophos-prof1]
user@host# set fallback-options content-size block
Configure the default fallback option to log-and-permit.
[edit security utm feature-profile anti-virus profile sophos-prof1]
user@host# set fallback-options default log-and-permit
Configure log-and-permit if the antivirus engine is not ready.
[edit security utm feature-profile anti-virus profile sophos-prof1]
user@host# set fallback-options engine-not-ready log-and-permit
Configure log-and-permit if the device is out of resources.
[edit security utm feature-profile anti-virus profile sophos-prof1]
user@host# set fallback-options out-of-resources log-and-permit
Configure log-and-permit if a virus scan timeout occurs.
[edit security utm feature-profile anti-virus profile sophos-prof1]
user@host# set fallback-options timeout log-and-permit
Configure log-and-permit if there are too many requests for the virus engine to handle.
[edit security utm feature-profile anti-virus profile sophos-prof1]
user@host# set fallback-options too-many-requests log-and-permit
Configure notification options. You can configure notifications for fallback blocking, fallback nonblocking actions, and virus detection.
In this step, configure a custom message for the fallback blocking action and send a notification for protocol-only actions to the administrator and the sender.
[edit security utm feature-profile anti-virus profile sophos-prof1]
user@host# set notification-options fallback-block custom-message ***Fallback block action occurred*** custom-message-subject Antivirus Fallback Alert notify-mail-sender type protocol-only allow email administrator-email admin@example.net
Configure a notification for protocol-only virus detection, and send a notification.
[edit security utm feature-profile anti-virus profile sophos-prof1]
user@host# set notification-options virus-detection type protocol-only notify-mail-sender custom-message-subject ***Virus detected*** custom-message Virus has been detected
Configure content size parameters.
When you configure the content-size value, keep in mind that in certain cases, content size is available in the protocol headers, so the max-content-size fallback is applied before a scan request is sent. However, in many cases, content size is not provided in the protocol headers. In these cases, the TCP payload is sent to the antivirus scanner and accumulates until the end of the payload. If the accumulated payload exceeds the maximum content size value, then max-content-size fallback is applied. The default fallback action is log and permit, so you may want to change this option to block, in which case such a packet is dropped and a block message is sent to the client.
In this example, if the content size exceeds 20 MB, the packet is dropped.
[edit security utm default-configuration anti-virus]
user@host# set scan-options content-size-limit 20000
URI checking is on by default. To turn off URI checking:
[edit security utm default-configuration anti-virus]
user@host# set scan-options no-uri-check
Configure the timeout setting for the scanning operation to 1800 seconds.
[edit security utm default-configuration anti-virus]
user@host# set scan-options timeout 1800
The Sophos Extensible List servers contain the virus and malware database for scanning operations. Set the response timeout for these servers to 3 seconds (the default is 2 seconds).
[edit security utm default-configuration anti-virus]
user@host# set scan-options sxl-timeout 3
Configure the Sophos Extensible List server retry option to 2 retries (the default is 1).
[edit security utm default-configuration anti-virus]
user@host# set scan-options sxl-retry 2
Configure the trickling setting to 180 seconds. If you use trickling, you can also set timeout parameters. Trickling applies only to HTTP. HTTP trickling is a mechanism used to prevent the HTTP client or server from timing out during a file transfer or during antivirus scanning.
When you enable the trickling option, keep in mind that trickling might send part of a file to the client during its antivirus scan. It is therefore possible that some of the content could be received by the client before the file has been fully scanned.
[edit security utm default-configuration anti-virus]
user@host# set trickling timeout 180
Configure the antivirus module to use MIME bypass lists and exception lists. You can use your own custom object lists, or you can use the default list that ships with the device called junos-default-bypass-mime. In this example, you use the lists that you set up earlier.
[edit security utm default-configuration anti-virus]
user@host# set mime-whitelist list avmime2
[edit security utm feature-profile anti-virus]
user@host# set mime-whitelist list exception-avmime2
Configure the antivirus module to use URL bypass lists. If you are using a URL allowlist, this is a custom URL category you have previously configured as a custom object. URL allowlists are valid only for HTTP traffic. In this example you use the lists that you set up earlier.
[edit security utm default-configuration anti-virus]
user@host# set url-whitelist custurl2
Verification
Obtaining Information About the Current Antivirus Status
Purpose
Action
From operational mode, enter the show security
utm anti-virus status command to view the antivirus status.
user@host>show security utm anti-virus status
Meaning
Antivirus key expire date—The license key expiration date.
Update server—URL for the data file update server.
Interval—The time period, in minutes, when the device will update the data file from the update server.
Pattern update status—When the data file will be updated next, displayed in minutes.
Last result—Result of the last update. If you already have the latest version, this will display
already have latest
database
.
Antivirus signature version—Version of the current data file.
Scan engine type—The antivirus engine type that is currently running.
Scan engine information—Result of the last action that occurred with the current scan engine.
Example: Configuring Sophos Antivirus Content Security Policies
This example shows how to create a Content Security policy for Sophos antivirus.
Requirements
Before you create the Content Security policy, create custom objects and the Sophos feature profile.
-
Configure Content Security custom objects and MIME lists. See Example: Configuring Sophos Antivirus Custom Objects.
Configure the Sophos antivirus feature profile. See Example: Configuring Sophos Antivirus Feature Profile.
Overview
After you have created an antivirus feature profile, you configure a Content Security policy for
an antivirus scanning protocol and attach this policy to a feature profile. In this
example, HTTP will be scanned for viruses, as indicated by the
http-profile statement. You can scan other protocols as well by
creating different profiles or adding other protocols to the profile, such as:
imap-profile, pop3-profile, and smtp-profile.
Configuration
Procedure
GUI Quick Configuration
Step-by-Step Procedure
To configure a Content Security policy for Sophos antivirus:
Click the Configure tab from the taskbar, and then select Security>Policy>UTM Policies. Then click Add.
Click the Main tab. In the Policy name box, type utmp3.
Click the Anti-Virus profiles tab. In the HTTP profile list, select sophos-prof1.
Click OK to check your configuration and save it as a candidate configuration.
If you are done configuring the device, select Actions>Commit.
Step-by-Step Procedure
To configure a Content Security policy for Sophos antivirus:
-
Go to the edit security Content Security hierarchy.
[edit]
user@host# edit security utm
-
Create the Content Security policy utmp3 and attach it to the http-profile sophos-prof1. You can use the default Sophos feature profile settings by replacing sophos-prof1 in the above statement with junos-sophos-av-defaults.
[edit security utm]
user@host# set utm-policy utmp3 anti-virus http-profile sophos-prof1
Example: Configuring Sophos Antivirus Firewall Security Policies
This example shows how to create a security policy for Sophos antivirus.
Requirements
Before you create the security policy, create custom objects, the Sophos feature profile, and the Content Security policy.
-
Configure Content Security custom objects and MIME lists. See Example: Configuring Sophos Antivirus Custom Objects.
Configure the Sophos antivirus feature profile. See Example: Configuring Sophos Antivirus Feature Profile.
-
Configure a Content Security policy. See Example: Configuring Sophos Antivirus Content Security Policies.
Overview
Create a firewall security policy that will cause traffic from the untrust zone to the trust zone to be scanned by Sophos antivirus using the feature profile settings defined in Example: Configuring Sophos Antivirus Feature Profile. Because the match application configuration is set to any, all application types will be scanned.
Configuration
Procedure
GUI Quick Configuration
Step-by-Step Procedure
To configure a security policy for Sophos antivirus:
Configure the untrust to trust policy to match any source address or destination address, and select the applications to be scanned to
any.Step-by-Step Procedure
Click the Configure tab from the taskbar, and then select Security>Policy>FW Policies. Then select Add.
In the Policy Name box, type p3.
In the Policy Action box, select permit.
In the From Zone list, select untrust.
In the To Zone list, select trust.
In the Source Address and Destination Address boxes, make sure that Matched is set to any.
In the Applications boxes, select any from the Application/Sets list, and move it to the Matched list.
-
Attach the Content Security policy named utmp3 to the firewall security policy. This will cause matched traffic to be scanned by the Sophos antivirus feature.
Step-by-Step Procedure
-
From the Edit Policy box, click the Application Services tab.
-
In the Content Security Policy list, select utmp3.
-
Click OK to check your configuration and save it as a candidate configuration.
If you are done configuring the device, select Actions>Commit.
Step-by-Step Procedure
To configure a security policy for Sophos antivirus:
Configure the untrust to trust policy to match any source-address.
[edit security]
user@host# set policies from-zone untrust to-zone trust policy p3 match source-address any
Configure the untrust to trust policy to match any destination-address.
[edit security]
user@host# set policies from-zone untrust to-zone trust policy p3 match destination-address any
Configure the untrust to trust policy to match any application type.
[edit security]
user@host# set policies from-zone untrust to-zone trust policy p3 match application any
-
Attach the Content Security policy named utmp3 to the firewall security policy. This will cause matched traffic to be scanned by the Sophos antivirus feature.
[edit security]
user@host# set policies from-zone untrust to-zone trust policy p3 then permit application-services utm-policy utmp3
Verification
Example: Configure Sophos Antivirus Live Protection Version 2.0
Use this configuration example to configure and to verify the Sophos antivirus live protection version 2.0 on your device. Sophos antivirus is an in-the-cloud antivirus solution. The virus pattern and malware database on the external servers maintained by Sophos (Sophos Extensible List) servers isolate and protect your device. Starting in Junos OS Release 23.1R1, content security supports Sophos antivirus live protection version 2.0. The new antivirus version uses the HTTPS protocol to communicate between the SRX Series Firewall and Sophos server.
|
Readability Score |
|
|
Reading Time |
Less than 15 minutes. |
|
Configuration Time |
Less than an hour. |
- Example Prerequisites
- Before You Begin
- Functional Overview
- Topology Overview
- Topology Illustration
- Step-by-step Configuration on Device-Under-Test (DUT)
- Verification
- Appendix 1: Set Commands on All Devices
- Appendix 2: Show Configuration Output on DUT
Example Prerequisites
| Hardware requirements | SRX Series Firewall and vSRX Virtual Firewall |
| Software requirements | Junos OS Release 23.1R1 or later |
| Licensing requirements |
Sophos antivirus live protection version 2.0 license Use the |
Before You Begin
|
Benefits |
The virus pattern and malware database on the external servers maintained by Sophos (Sophos Extensible List) servers isolate and protect your device. Provides HTTPS based secure connection between the SRX Series Firewall and Sophos server. |
|
Useful resources: |
|
|
Know more |
|
|
Hands-on experience |
|
|
Learn more |
|
Functional Overview
Table 2 provides a quick summary of the configuration components deployed in this example.
|
Profiles |
|
| Initiation profile |
The Sophos server configuration on the SRX Series Firewall
includes the SSL initiation profile
( The initiation profile is mandatory to enable the SRX Series Firewall to initiate an HTTPS session with the Sophos server for checking the packets. The SSL initiation profile also encrypts and decrypts packets to and from the Sophos server. |
| Proxy profile |
The SSL proxy profile,
|
|
Feature profile |
The feature profile,
You can have more than one feature profiles for different content security policies. |
|
Policies |
|
|
Content security policy |
The content security policy,
content_security_p1, defines the
antivirus protocols (HTTP, FTP, SMTP, POP3, and IMAP) and
attaches this policy to a security feature profile,
|
|
Security policies |
Two security policies ( We attach the |
|
Security zones |
|
|
|
Network segment at the host (Client) zone. |
|
|
Network segment at the destination server (Web service) zone. |
|
|
Network segment through which the SRX Series Firewall interacts with the Sophos server. |
|
Protocols |
|
|
HTTPS |
HTTPS sessions establish between the client and the Web server, and the SRX Series Firewall and the Sophos server. |
| Primary verification tasks |
|
Topology Overview
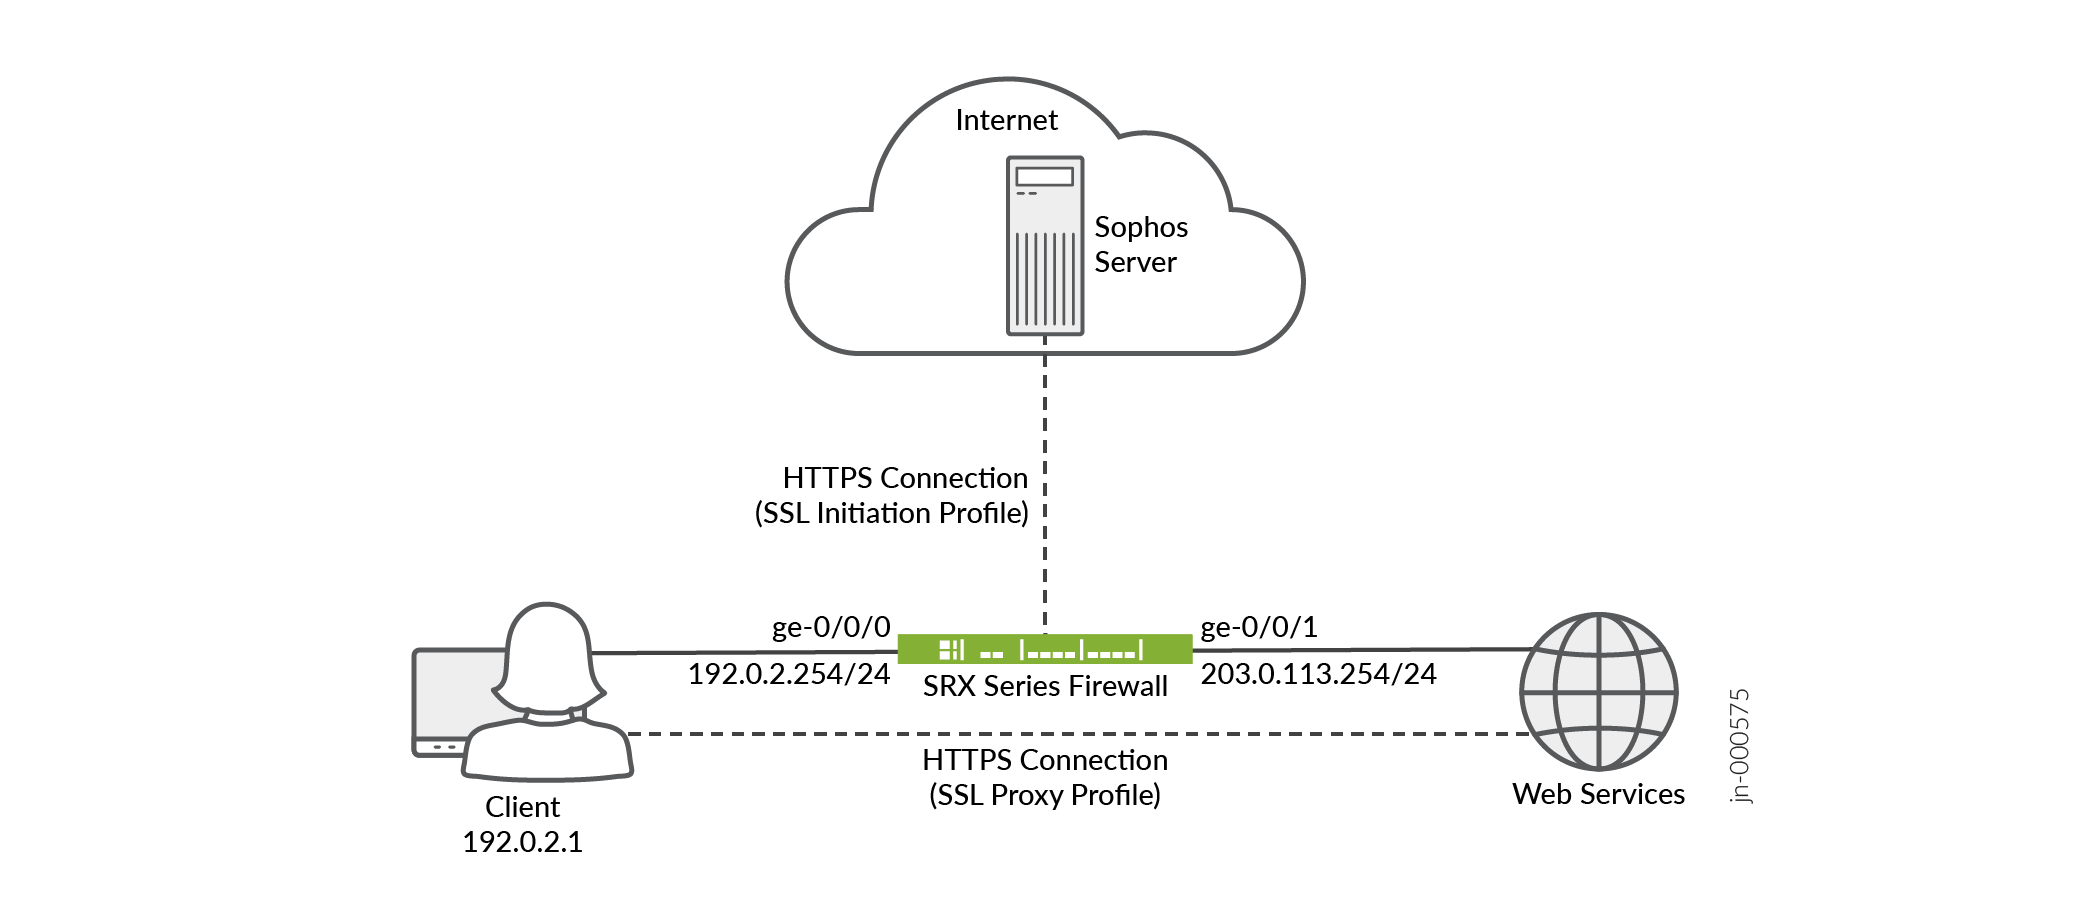
In this example, the client initiates a request to Web service through the SRX Series Firewall. When the SRX Series Firewall receives the request, it contacts the Sophos server for checking the authenticity of the Web service. The Sophos antivirus version 2.0 uses HTTPS connection for the SRX Series Firewall to Sophos server communication. Based on the response received from the Sophos server, the SRX Series Firewall permits or blocks the traffic as defined in the content security policy.
| Topology Components | Role | Function |
|---|---|---|
| Client | Requests Web service | Initiates HTTPS session with the Web server through the SRX Series Firewall. |
| SRX Series Firewall | Juniper Network's Firewall | Initiates HTTPS session with the Sophos antivirus server. It also encrypts and decrypts the packets for the client. |
| Sophos server | Antivirus server | Authenticates the content received from the SRX Series Firewall. |
| Web server | Web service provider | Responds to the client's request. |
Topology Illustration
Step-by-step Configuration on Device-Under-Test (DUT)
For complete sample configurations on the DUT, see:
-
Configure the device interfaces.
[edit interfaces] user@host# set ge-0/0/0 unit 0 family inet address 192.0.2.254/24 user@host# set ge-0/0/1 unit 0 family inet address 203.0.113.254/24 -
Enable Sophos antivirus on the device. Configure the forwarding mode and type of traffic the Sophos antivirus should check.
[edit security] user@host# set utm default-configuration anti-virus type sophos-engine user@host# set utm default-configuration anti-virus forwarding-mode inline-tap user@host# set utm default-configuration anti-virus scan-options no-uri-check -
Define an SSL initiation profile for adding to the Sophos server configuration on the SRX Series Firewall.
[edit services] user@host# set ssl initiation profile ssl_init_prof client-certificate content_security_cert user@host# set ssl initiation profile ssl_init_prof actions ignore-server-auth-failure -
Include the SSL initiation profile into the Sophos server configuration. This configuration is mandatory to enable the SRX Series Firewall to initiate an HTTPS session with the Sophos server for checking the packets. The initiation profile also encrypts and decrypts packets to and from the Sophos server.
[edit security] user@host# set utm default-configuration anti-virus sophos-engine server ssl-profile ssl_init_prof -
Define an SSL proxy profile for applying to the security policies. The SLL proxy profile enables the SRX Series Firewall to decrypt the packets for further application processing.
[edit services] user@host# set ssl proxy profile ssl_pr1 root-ca content_security_cert user@host# set ssl proxy profile ssl_pr1 actions ignore-server-auth-failure -
Define the feature profile to indicate the type of traffic the Sophos antivirus should check by attaching the profile to the content security policies. You can define more than one feature profiles for different content security policies.
[edit security] user@host# set utm feature-profile anti-virus profile content_security_sav_fp -
Define security zones.
[edit security zones] user@host# set security-zone untrust description untrust user@host# set security-zone untrust host-inbound-traffic system-services all user@host# set security-zone untrust host-inbound-traffic protocols all user@host# set security-zone untrust interfaces ge-0/0/1.0 user@host# set security-zone trust description trust user@host# set security-zone trust host-inbound-traffic system-services all user@host# set security-zone trust host-inbound-traffic protocols all user@host# set security-zone trust interfaces ge-0/0/0.0 user@host# set security-zone internet description internet -
Define a content security policy and attach a feature profile to it to indicate the type of traffic the Sophos server should check.
[edit security utm] user@host# set utm-policy content_security_p1 anti-virus http-profile content_security_sav_fp user@host# set utm-policy content_security_p1 anti-virus ftp upload-profile content_security_sav_fp user@host# set utm-policy content_security_p1 anti-virus ftp download-profile content_security_sav_fp user@host# set utm-policy content_security_p1 anti-virus smtp-profile content_security_sav_fp user@host# set utm-policy content_security_p1 anti-virus pop3-profile content_security_sav_fp user@host# set utm-policy content_security_p1 anti-virus imap-profile content_security_sav_fp -
Define security policies and configure match criteria to apply to traffic between the different security zones.
[edit security policies]
user@host# set from-zone trust to-zone untrust policy p1 match source-address any
user@host# set from-zone trust to-zone trust policy p1 match destination-address any
user@host# set from-zone trust to-zone trust policy p1 match application any
user@host# set from-zone trust to-zone trust policy p1 then permit application-services ssl-proxy profile-name ssl_pr1


user@host# set from-zone trust to-zone trust policy p1 then permit application-services utm-policy content_security_p1


user@host# set from-zone trust to-zone trust policy trust_to_internet match source-address any
user@host# set from-zone trust to-zone trust policy trust_to_internet match destination-address any
user@host# set from-zone trust to-zone trust policy trust_to_internet match application any
user@host# set from-zone trust to-zone trust policy trust_to_internet then permit
user@host# set default-policy permit-all
Verification
Provide a list of show commands used to verify the feature in this example.
| Command | Verification Task |
|---|---|
| show security utm anti-virus status |
Displays the type and status of the antivirus installed on your device. |
| show security utm anti-virus statistics |
Displays the performance statistics of the antivirus on your device. |
Antivirus Scan Engine Type Verification
Purpose
Verify the antivirus scan engine type installed on your device.
Action
From operational mode, enter the show security utm anti-virus status to view the status of the antivirus installed.
user@host> show security utm anti-virus status
UTM anti-virus status:

    Anti-virus key expire date: 2024-02-23 16:00:00
    Forwarding-mode: continuous delivery
    Scan engine type: sophos-engine
    Scan engine information: running
Meaning
The sample output confirms the Sophos antivirus is available on your device.
Antivirus Scan Engine Performance Verification
Purpose
Verify the antivirus scan engine performance on your device.
Action
From operational mode, enter the show security utm anti-virus statistics to view the performance statistics of the antivirus on your device.
user@host> show security utm anti-virus statistics
UTM Anti Virus statistics:

Intelligent-prescreening passed:    0
MIME-whitelist passed:              0
URL-whitelist passed:               0
Session abort:                      0
Scan Request:

Total           Clean         Threat-found    Fallback
2                 1                1             0

Fallback:
                            Log-and-Permit    Block             Permit
Engine not ready:                0              0                 0
Out of resources:                0              0                 0
Timeout:                         0              0                 0
Maximum content size:            0              0                 0
Too many requests:               0              0                 0
Decompress error:                0              0                 0
Others:                          0              0                 0
Meaning
The sample output Threat-found value shows that the
antivirus detected 1 threat. The other statistics values are safe.
Appendix 1: Set Commands on All Devices
Set command output on all devices.
set security utm default-configuration anti-virus type sophos-engine
set security utm default-configuration anti-virus forwarding-mode inline-tap
set security utm default-configuration anti-virus scan-options no-uri-check
set security utm default-configuration anti-virus sophos-engine server ssl-profile ssl_init_prof
set security utm feature-profile anti-virus profile content_security_sav_fp
set security utm utm-policy content_security_p1 anti-virus http-profile content_security_sav_fp
set security utm utm-policy content_security_p1 anti-virus ftp upload-profile content_security_sav_fp
set security utm utm-policy content_security_p1 anti-virus ftp download-profile content_security_sav_fp
set security utm utm-policy content_security_p1 anti-virus smtp-profile content_security_sav_fp
set security utm utm-policy content_security_p1 anti-virus pop3-profile content_security_sav_fp
set security utm utm-policy content_security_p1 anti-virus imap-profile content_security_sav_fp
set security zones security-zone untrust description untrust
set security zones security-zone untrust host-inbound-traffic system-services all
set security zones security-zone untrust host-inbound-traffic protocols all
set security zones security-zone untrust interfaces ge-0/0/1.0
set security zones security-zone trust description trust
set security zones security-zone trust host-inbound-traffic system-services all
set security zones security-zone trust host-inbound-traffic protocols all
set security zones security-zone trust interfaces ge-0/0/0.0
set security zones security-zone internet description internet
set security policies from-zone trust to-zone untrust policy p1 match source-address any
set security policies from-zone trust to-zone untrust policy p1 match destination-address any
set security policies from-zone trust to-zone untrust policy p1 match application any
set security policies from-zone trust to-zone untrust policy p1 then permit application-services ssl-proxy profile-name ssl_pr1
set security policies from-zone trust to-zone untrust policy p1 then permit application-services utm-policy content_security_p1
set security policies from-zone trust to-zone internet policy trust_to_internet match source-address any
set security policies from-zone trust to-zone internet policy trust_to_internet match destination-address any
set security policies from-zone trust to-zone internet policy trust_to_internet match application any
set security policies from-zone trust to-zone internet policy trust_to_internet then permit
set security policies default-policy permit-all
set services ssl initiation profile ssl_init_prof client-certificate content_security-cert
set services ssl initiation profile ssl_init_prof actions ignore-server-auth-failure
set services ssl proxy profile ssl_pr1 root-ca content_security-cert
set services ssl proxy profile ssl_pr1 actions ignore-server-auth-failure
Appendix 2: Show Configuration Output on DUT
Show command output on the DUT.
From configuration mode, confirm your configuration by entering the show
security utm, show interfaces, show security
zones, show security policies, and show
services ssl commands. If the output does not display the intended
configuration, repeat the configuration instructions in this example to correct
it.
user@host# show security utm
default-configuration {
    anti-virus {
        type sophos-engine;
        forwarding-mode {
            inline-tap;
        }
        scan-options {
            no-uri-check;
        }
        sophos-engine {
            server {
                ssl-profile ssl_init_prof;
            }
        }
    }
}
utm-policy P1 {
    anti-virus {
        http-profile junos-sophos-av-defaults;
    }
}
utm-policy content_security_p1 {
    anti-virus {
        http-profile content_security_sav_fp;
        ftp {
            upload-profile content_security_sav_fp;
            download-profile content_security_sav_fp;
        }
        smtp-profile content_security_sav_fp;
        pop3-profile content_security_sav_fp;
        imap-profile content_security_sav_fp;
    }
}user@host# show interfaces
ge-0/0/0 {
unit 0 {
family inet {
address 192.0.2.254/24;
}
}
}
ge-0/0/1 {
unit 0 {
family inet {
address 203.0.113.254/24;
}
}
}user@host# show security zones
security-zone untrust {
description untrust;
host-inbound-traffic {
system-services {
all;
}
protocols {
all;
}
}
interfaces {
ge-0/0/1.0;
}
}
security-zone trust {
description trust;
host-inbound-traffic {
system-services {
all;
}
protocols {
all;
}
}
interfaces {
ge-0/0/0.0;
}
}
security-zone internet {
description internet;
}user@host# show security policies
from-zone trust to-zone untrust {
policy p1 {
match {
source-address any;
destination-address any;
application any;
}
then {
permit {
application-services {
ssl-proxy {
profile-name ssl_pr1;
}
utm-policy content_security_p1;
}
}
}
}
}
from-zone trust to-zone internet {
policy trust_to_internet {
match {
source-address any;
destination-address any;
application any;
}
then {
permit;
}
}
}
default-policy {
permit-all;
} user@host# show services ssl
initiation {
profile ssl_init_prof {
client-certificate content_security-cert;
actions {
ignore-server-auth-failure;
}
}
}
proxy {
profile ssl_pr1 {
root-ca content_security-cert;
actions {
ignore-server-auth-failure;
}
}
}Configure Sophos Antivirus File Reputation Groups
The Sophos antivirus classifies the incoming traffic into four file reputation groups, which enable you to control the traffic and provide more control over security. Table 3 lists the four file reputation groups.
|
File Reputation Group |
File Reputation Value |
File Reputation Action |
|---|---|---|
|
Malware |
≤19 |
Block |
|
Potentially Unwanted Applications |
20 thru 29 |
You can configure to permit, log and permit, or block the traffic as per your requirement. |
|
Unknown |
30 thru 69 |
You can configure to permit, log and permit, or block the traffic as per your requirement. |
|
Known good/Clean |
≥70 |
Permit |
To configure the file reputation action, use the following commands:
-
Configure file reputation action for potentially unwanted applications traffic:
[edit]
user@host# set security utm default-configuration anti-virus sophos-engine file-reputation-action potentially-unwanted-applications (block | log-and-permit | permit)
-
Configure file reputation action for unknown traffic:
[edit]
user@host# set security utm default-configuration anti-virus sophos-engine file-reputation-action unknown (block | log-and-permit | permit)
You can view the status of the file reputation action using the show security utm anti-virus statistics command.
See Also
Configure Sophos Antivirus Live Protection Version 2.0 with Web Proxy
You can use a proxy server to establish a secure connection between your security device and the Sophos server. When you configure a proxy server, your device establishes a connection with proxy server and then the proxy server initiates a new connection with the Sophos server.
To configure the proxy server:
-
Create an SSL initiation profile, see profile (SSL Initiation).
-
Attach the SSL initiation profile to Sophos default configuration:
[edit]
user@host# set security utm default-configuration anti-virus sophos-engine server ssl-profile ssl-profile-name
-
Configure the proxy profile:
[edit]
user@host# set services proxy profile proxy-profile-name protocol http host host-name
user@host# set services proxy profile proxy-profile-name protocol http port port-number
-
Attach the Web proxy profile to the Sophos default configuration:
[edit]
user@host# set security utm default-configuration anti-virus sophos-engine server proxy-profile proxy-profile-name
You can view the status of the proxy server using the show security utm anti-virus status command.
See Also
Managing Sophos Antivirus Data Files
Before you begin:
Install a Sophos antivirus license. See the Installation and Upgrade Guide.
Configure Sophos as the antivirus feature for the device. See Example: Configuring Sophos Antivirus Feature Profile. To set the antivirus engine type, you run the
set security utm feature-profile anti-virus
type sophos-engine
statement.
In this example, you configure the security device to update the data files automatically every 4320 minutes (every 3 days). The default data file update interval is 1440 minutes (every 24 hours).
To automatically update Sophos data files:
[edit security utm feature-profile anti-virus]
user@host# set sophos-engine pattern-update interval 4320
The following commands are performed from CLI operational mode.
To manually update data files:
user@host> request security utm anti-virus sophos-engine pattern-update
To manually reload data files:
user@host> request security utm anti-virus sophos-engine pattern-reload
To manually delete data files:
user@host> request security utm anti-virus sophos-engine pattern-delete
To check the status of antivirus, which also shows the data files version:
user@host> show security utm anti-virus status
To check the status of the proxy server:
user@host> show security utm anti-virus status
Change History Table
Feature support is determined by the platform and release you are using. Use Feature Explorer to determine if a feature is supported on your platform.