Address-Assignment Pools for Subscriber Management
Address-Assignment Pools Overview
The address-assignment pool enables you to create centralized IPv4 and IPv6 address pools independent of the client applications that use the pools. The authd process manages the pools and the address allocation, whether the addresses come from local pools or from a RADIUS server.
For example, multiple client applications, such as DHCP, can use the same address-assignment pool to provide addresses for their particular clients. Client applications can acquire addresses for either authenticated or unauthenticated clients. The pool selected for a subscriber, based on the RADIUS server or network matching or other rule, is called the matching pool for the subscriber.
- Address Assignment Types
- Named Address Ranges in Address Assignment Pool
- Address Allocation from Linked Address Pools
- Address Pool Hold-Down State
- Address-Assignment Pool for Neighbor Discovery Router Advertisement
- Excluding Specified Address or Address Range
- Licensing Requirement
- Benefits of Address Assignment Pools
Address Assignment Types
Address-assignment pools support both dynamic and static address assignment. In dynamic address assignment, a client is automatically assigned an address from the address-assignment pool. In static address assignment, which is supported for IPv4 pools only, you reserve an address that is then always used by a particular client. Addresses that are reserved for static assignment are removed from the dynamic address pool and cannot be assigned to other clients.
Named Address Ranges in Address Assignment Pool
You can configure named address ranges within an address-assignment pool. A named range is a subset of the overall address range. A client application can use named ranges to manage address assignment based on client-specific criteria. For example, for IPv4 address-assignment pools, you might create a named range that is based on a specific DHCP option 82 value. Then, when a DHCP client request matches the specified option 82 value, an address from the specified range is assigned to the client.
Address Allocation from Linked Address Pools
You can link address-assignment pools together to provide backup pools for address assignment. When no addresses are available in the primary or in the matching address pool, the device automatically proceeds to the linked (secondary) address pool to search for an available address to allocate.
Although the first pool in a chain of linked pools is generally considered the primary pool, a matching pool is not necessarily the first pool in the chain.
Lets use an example on how the search mechanism works. Consider a chain of three pools— A, B, and C. Pool A is the primary pool, Pool B is the matching pool for certain subscribers based on information returned by the RADIUS server. The search for an available address for those subscribers uses the following sequence:
By default, the matching pool (Pool B) is searched first.
The search moves to the first pool (Pool A) in the chain if address not found.
The search proceeds through the chain (Pool C) until an available address is found and allocated, or until the search determines no addresses are free.
In each pool, all address ranges are fully searched for an address.
You can configure the linked-pool-aggregation statement
to start searching within a block of addresses in each range in the
matching pool and then successively through the linked pools. The
search then moves back to the first pool in the chain and searches
all addresses in all ranges in each pool through the last pool in
the chain.
Address Pool Hold-Down State
You can configure an address-assignment pool in hold-down state. When the address pool is in hold-down state, the pool is no longer available to allocate IP addresses for the subscribers. This configuration gracefully transforms the active pool to an inactive state as the previously allocated addresses are returned to the pool. When the pool is inactive, you can safely perform maintenance on the pool without affecting any active subscribers.
Address-Assignment Pool for Neighbor Discovery Router Advertisement
You can explicitly allocate an address-assignment pool for Neighbor Discovery Router Advertisement (NDRA).
Excluding Specified Address or Address Range
For example, you might want to reserve certain addresses or ranges to be used only for static subscribers. When you configure an address or range to be excluded, and the address or an address within the range, has already been allocated, that subscriber is logged out, the address is deallocated, and the address is marked for exclusion.
Licensing Requirement
This feature requires a license. To understand more about Subscriber Access Licensing , see Subscriber Access Licensing Overview. Please refer to the Juniper Licensing Guide for general information about License Management. Please refer to the product Data Sheets for details, or contact your Juniper Account Team or Juniper Partner.
Benefits of Address Assignment Pools
The address-assignment pool feature supports both subscriber management and DHCP management.
You can create centralized pools of addresses independent of client applications.
You can specify blocks of addresses, named ranges, so that a given address pool can be used to supply different addresses for different client applications or for subscribers that match different sets of criteria.
You can link pools together to ensure that pools are searched for free addresses in a specific manner, contiguously or noncontiguously.
You can gracefully transition an address pool from active to inactive by specifying that no further addresses are allocated from the pool.
Address Allocation from Linked Address Pools
You can link address-assignment pools together into a chain to provide backup pools for address assignment. The pool selected for a subscriber, based on the RADIUS server or network matching or some other rule, is called the matching or matched pool for the subscriber. The matching pool might not be the first (primary) pool in the chain. When no addresses are available for allocation from the matching or primary address pool, the router or switch automatically proceeds to another address pool to search for an available address to allocate. When the search discovers no available addresses anywhere, the search stops and no address is allocated for the subscriber.
The search behavior determines not only how the search progresses along a chain of linked pools, but which address ranges within each pool are searched. Depending on where the search starts, your configuration, and whether previously allocated addresses have been freed, the search may continue in the next linked address pool in the chain, or move back to the first pool in the chain.
The search for an available address starts in the pool that matches the subscriber. In many cases, the matching pool is also the first pool in the chain. For some subscribers, the matching pool is farther down the chain. For example, you might configure the RADIUS server to specify the second pool of a chain rather than the first based on some criteria that it matches during authentication. For another example, you might specify different address ranges for different subscriber groups; whether a particular pool matches a subscriber then depends on which pools are configured for the different address ranges.
The following terms are used to explain the details of the search behavior:
-
lowAddress—The lowest address in a given range within an address pool.
-
highAddress—The highest address in a given range within an address pool.
-
nextAddress—The next address after the last address allocated in a given range within an address pool. This is the address expected to be allocated next. This address, as well as the last range used, is saved as a starting point for searches.
For example, suppose Pool A has a single range that includes the following addresses: 192.0.2.1, 192.0.2.2, 192.0.2.3, 192.0.2.4. In this case, 192.0.2.1 is the lowAddress and 190.0.2.4 is the highAddress. If 192.0.2.2 was the last address allocated from this pool, then nextAddress is 192.0.2.3.
Starting in Junos OS Release 18.1R1, you can configure linked pools to be searched in one of two ways:
-
Contiguous address allocation—This is the default behavior. All addresses in each range of a pool are searched. The search starts in the matched pool, then moves to the first pool in the chain and, if necessary, continues through each linked pool successively to the last pool in the chain. In each pool, all addresses in all ranges are searched for a free address. This method enables addresses to be assigned contiguously; each pool has to be full before another pool is searched.
-
Noncontiguous (aggregated) address allocation—Behavior when the
linked-pool-aggregationstatement is configured. Initially, only certain addresses (from nextAddress to highAddress) are searched in each range of the matched pool. The same search is performed in the linked pool and, if necessary, continues through each linked pool successively to the last pool in the chain.The search then restarts at the first pool in the chain (not necessarily the matched pool). This time, all addresses in all ranges are searched, in all pools through the end of the chain.
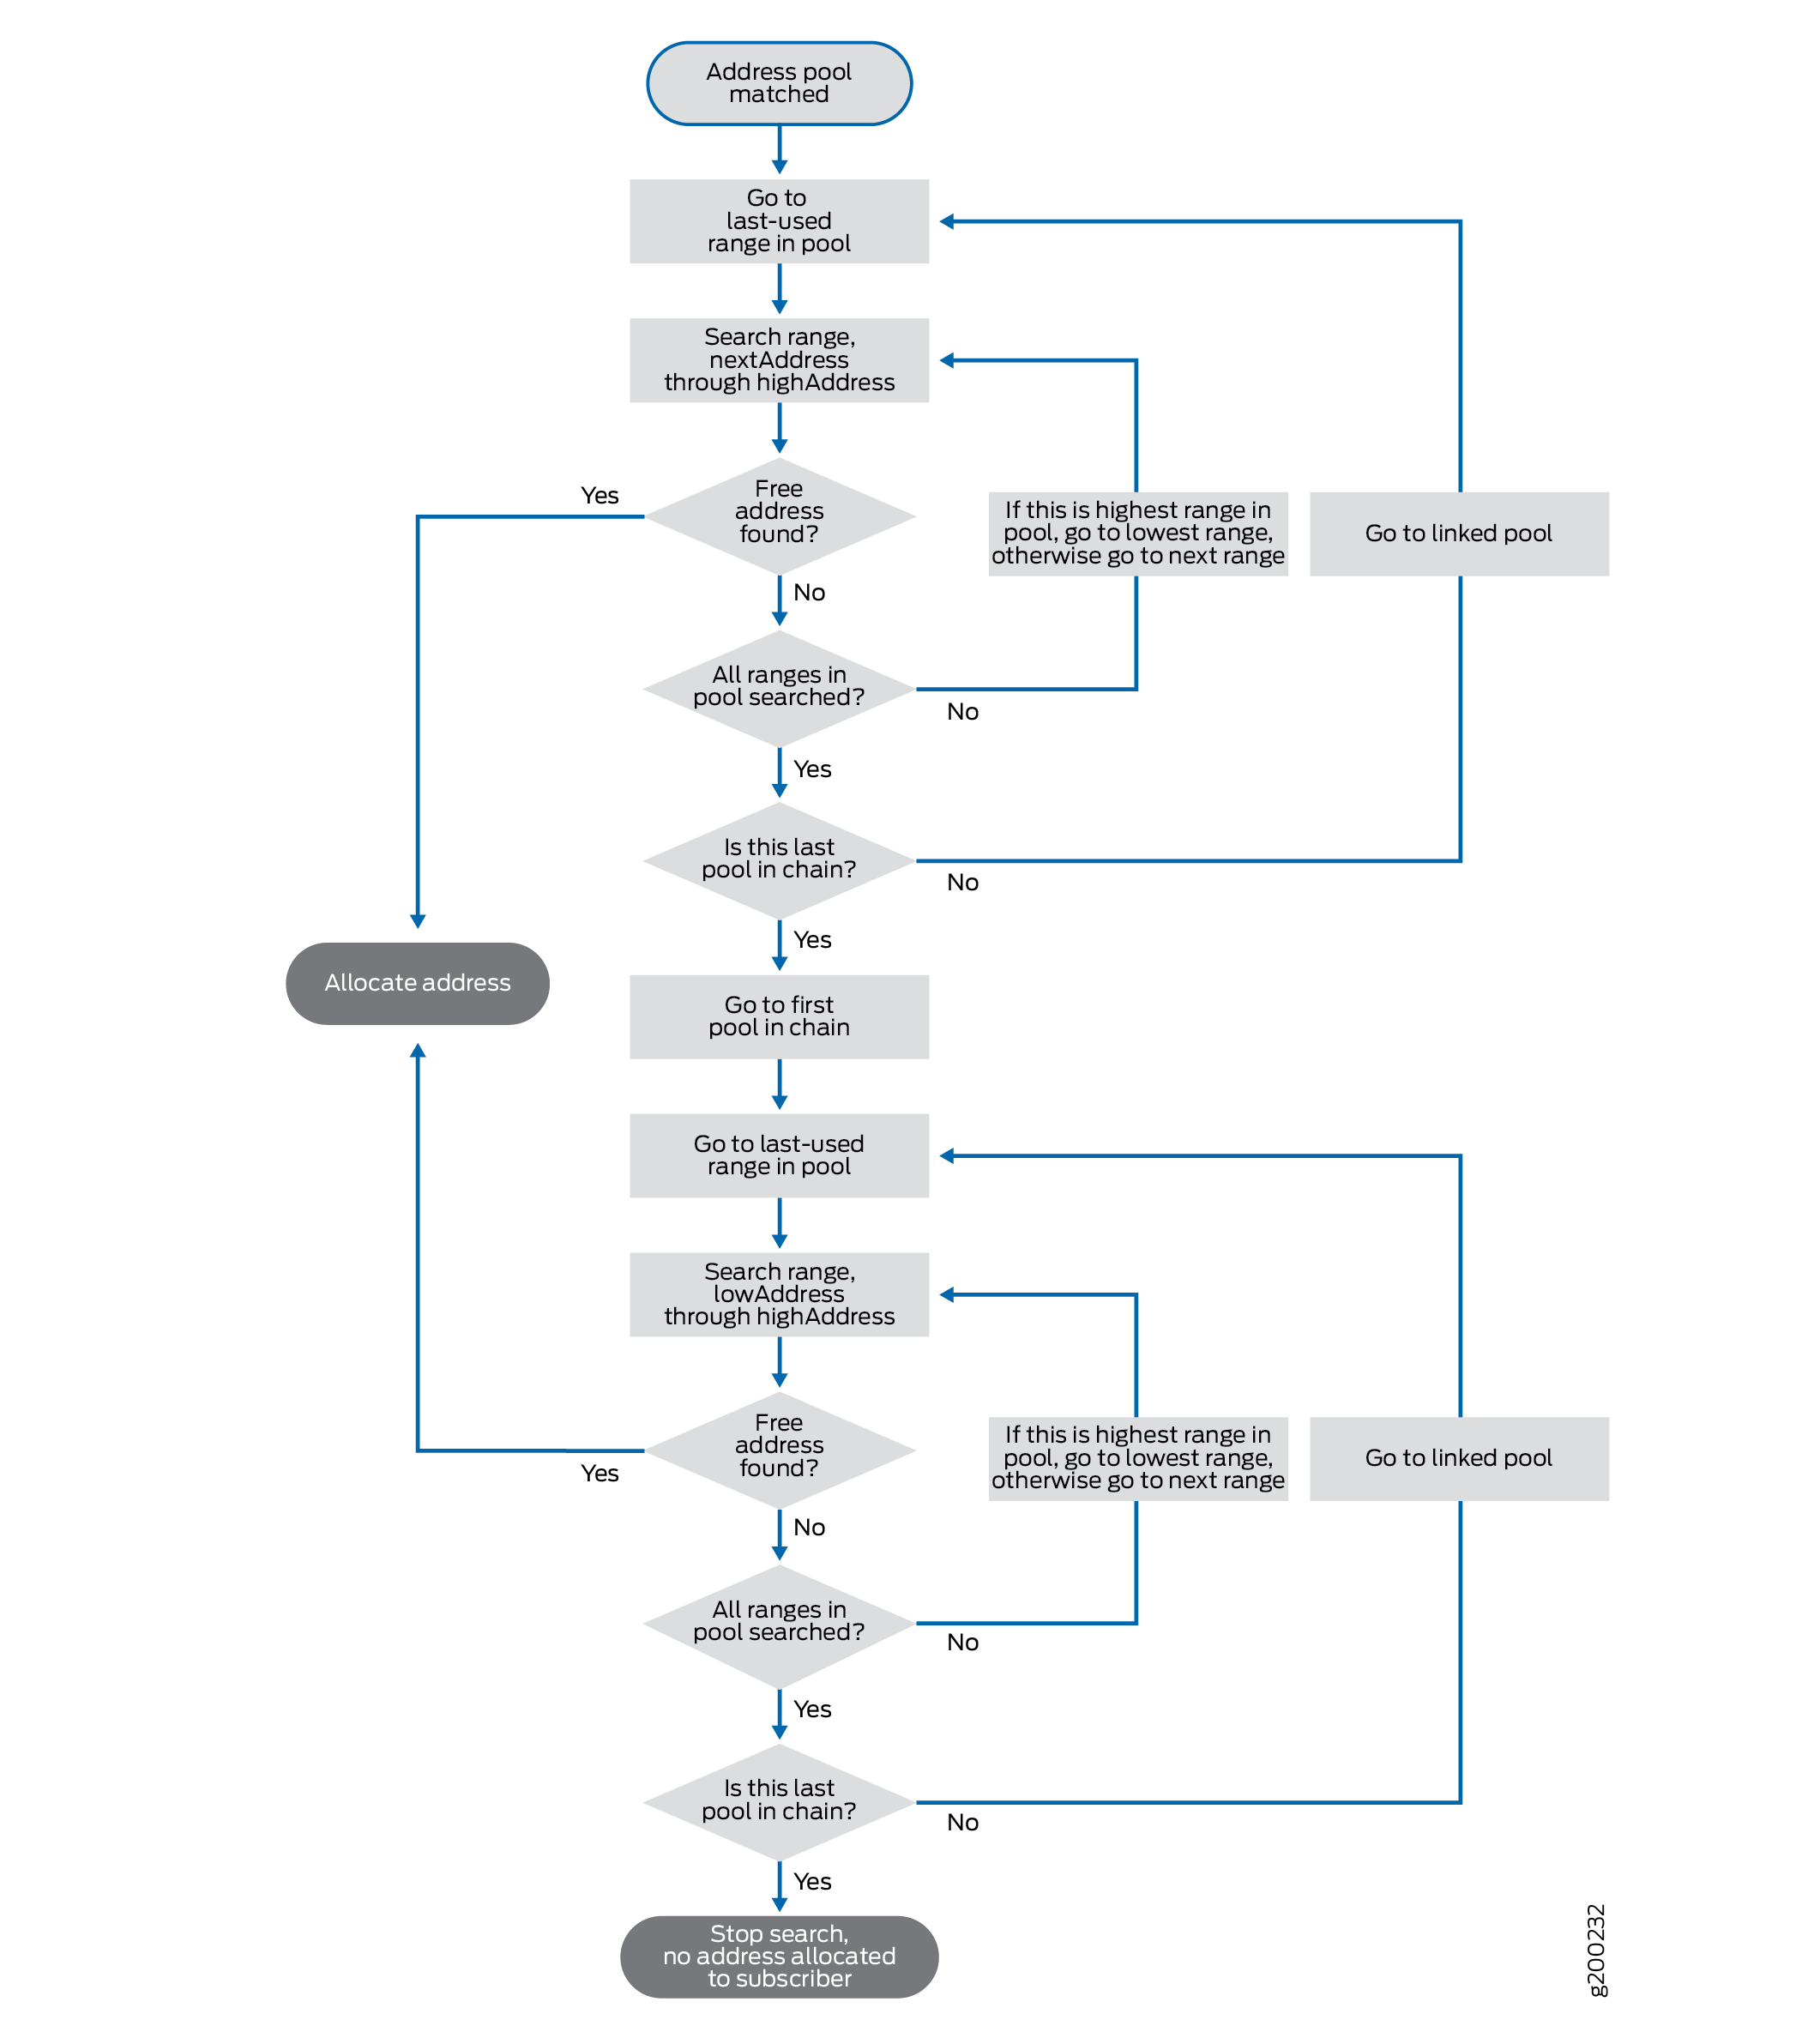
That is the basic functionality, but the details of both searches are fairly complex. Figure 1 shows the default search behavior.
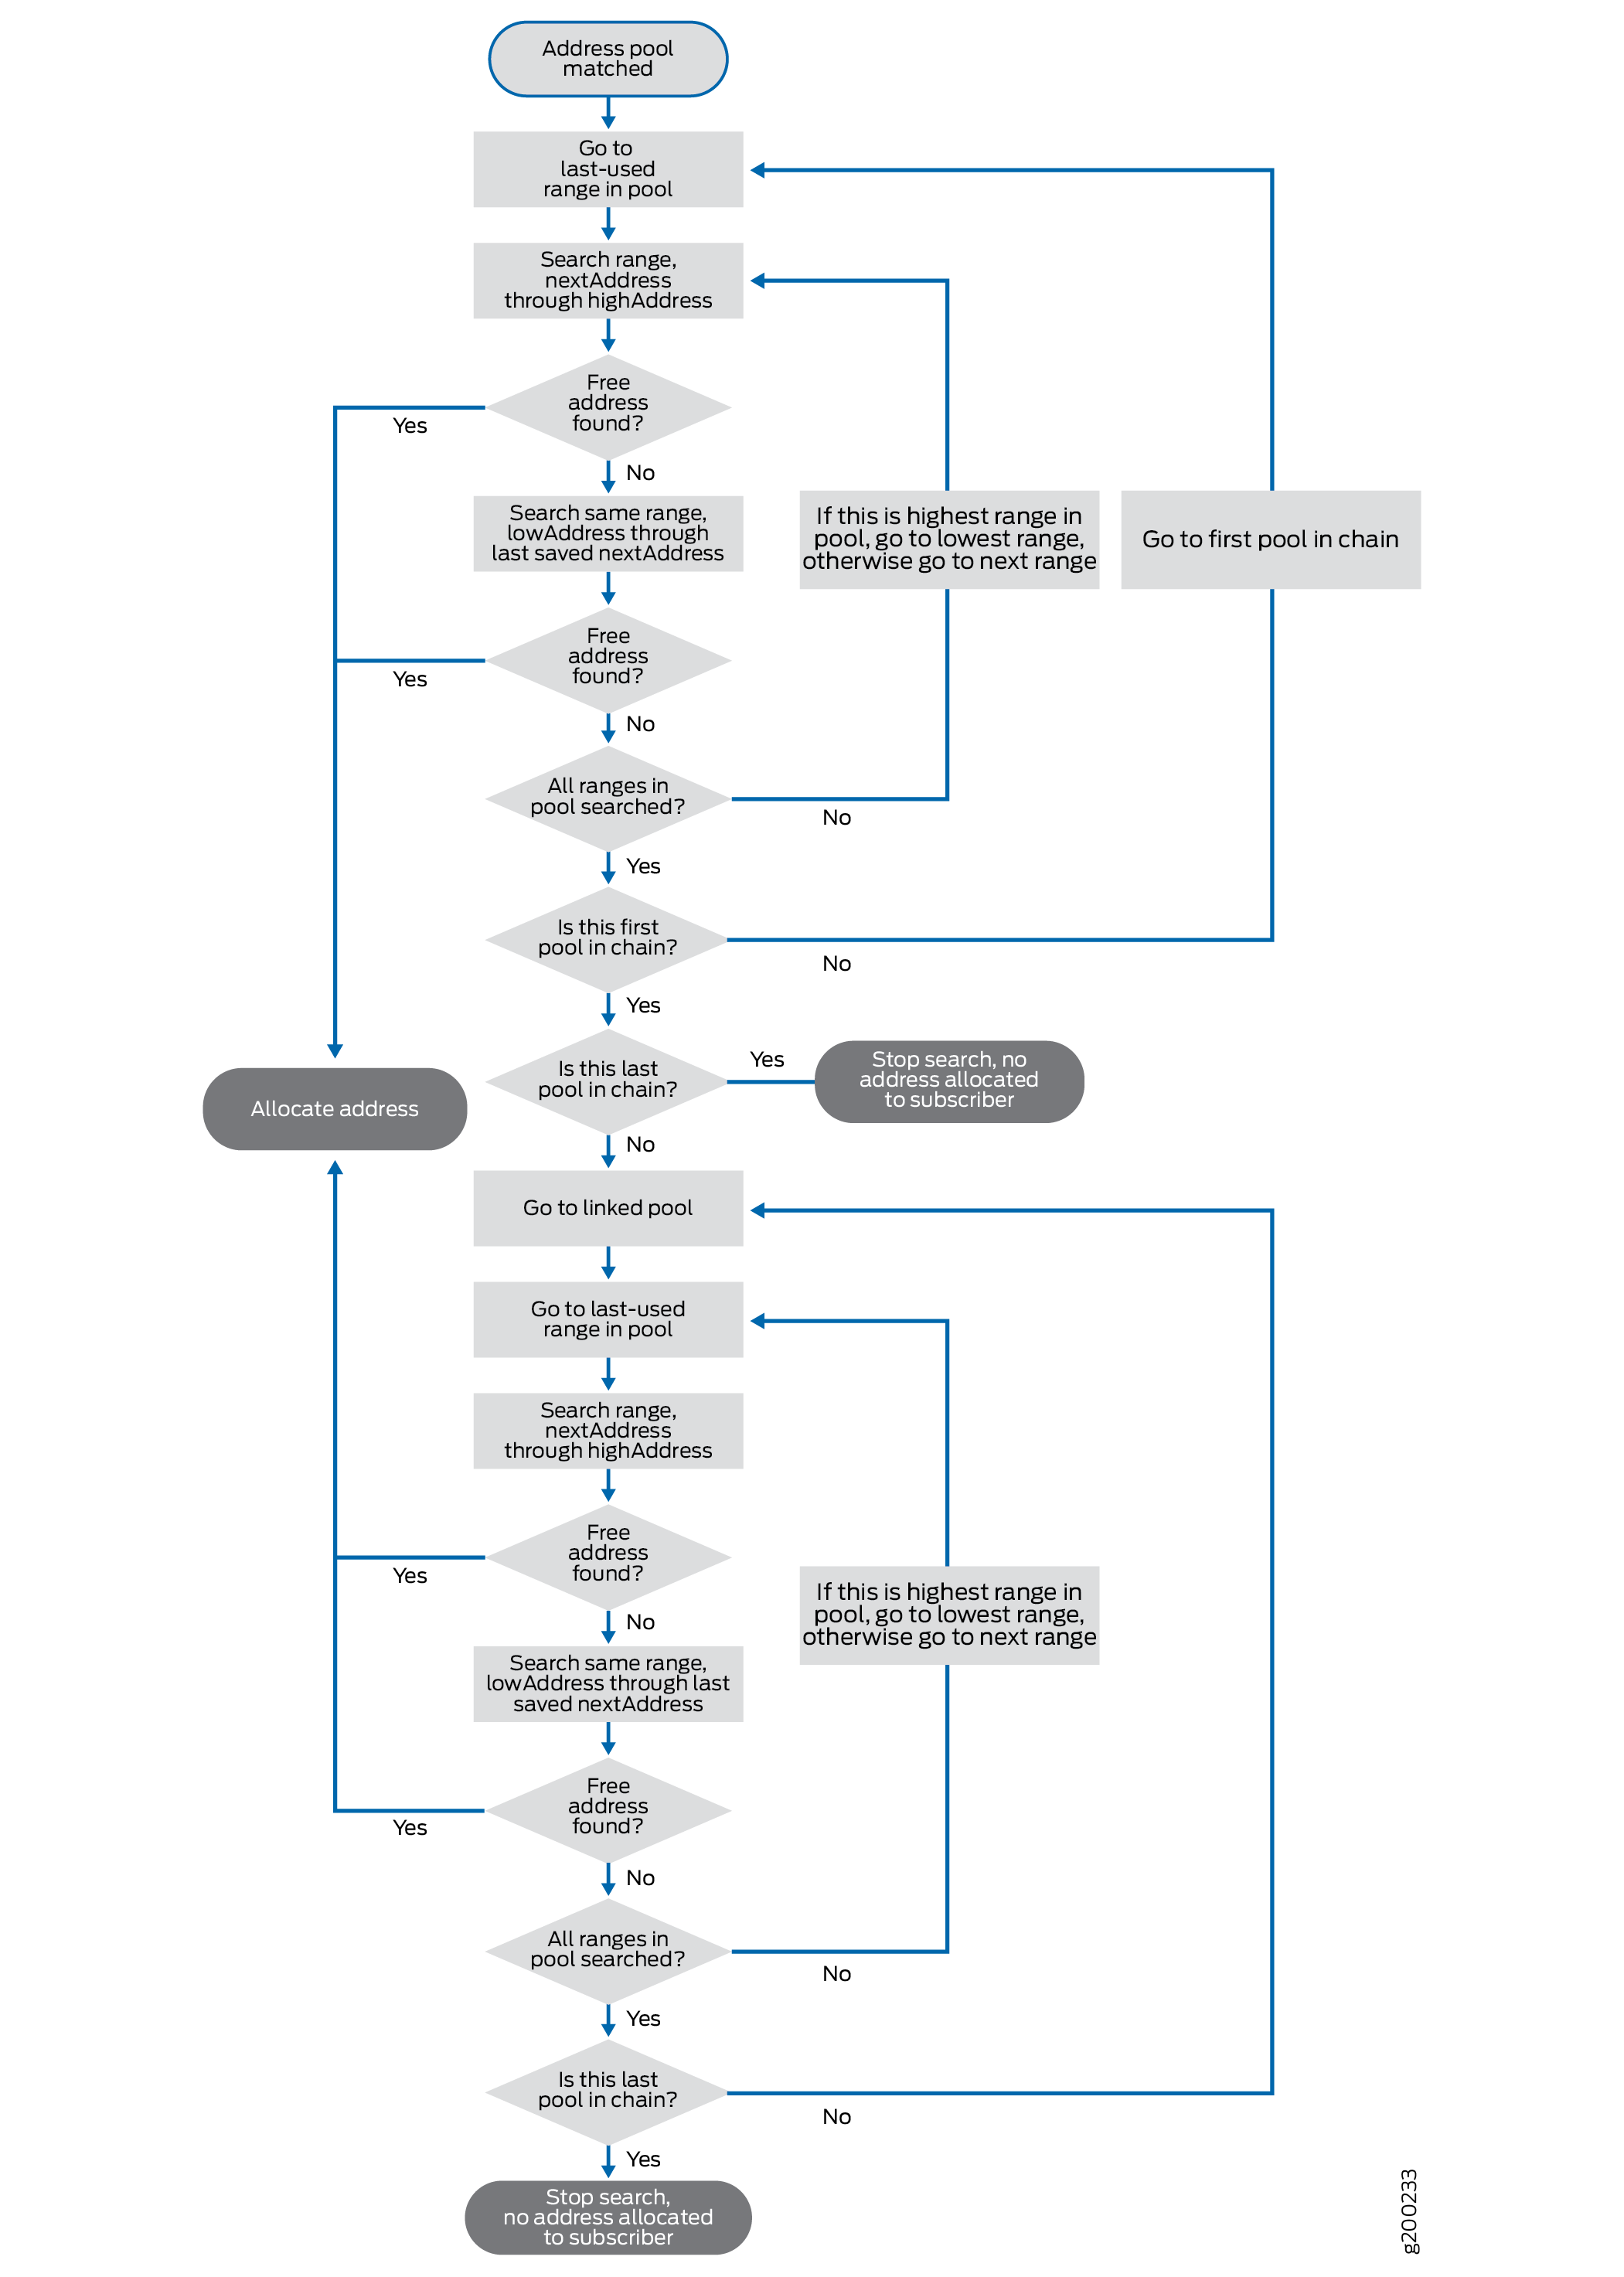
For example, suppose the following conditions exist:
-
Linked address pools A, B, C, and D. Pool C is matched.
-
Each pool has three address ranges, r1, r2, r3. The last used range was r2 in each pool.
If no free address is found, the search proceeds like this: C > A > B > C > D, then stops.
-
Pool C is searched, nextAddress through highAddress in range r2.
-
Pool C is searched, lowAddress through nextAddress in range r2.
-
Pool C is searched, nextAddress through highAddress in range r3.
-
Pool C is searched, lowAddress through nextAddress in range r3.
-
Pool C is searched, nextAddress through highAddress in range r1.
-
Pool C is searched, lowAddress through nextAddress in range r1.
All ranges and addresses in pool C have been searched, so the search moves to the first pool in the chain, A.
-
Pool A is searched, nextAddress through highAddress in range r2.
-
Pool A is searched, lowAddress through nextAddress in range r2.
-
Pool A is searched, nextAddress through highAddress in range r3.
-
Pool A is searched, lowAddress through nextAddress in range r3.
-
Pool A is searched, nextAddress through highAddress in range r1.
-
Pool A is searched, lowAddress through nextAddress in range r1.
All ranges and addresses in pool A have been searched, so the search moves to the next linked pool in the chain, B.
This process continues until all addresses in all ranges in all pools have been searched. The pool search order is C > A > B > C > D, then stops. Depending on where and whether an address is found, the matching pool might be searched twice. This is true unless the matching pool is the first pool in the chain. For example, if pool A is the matching pool in this set of conditions, then the complete search (assuming no address is found) would be A > B > C > D.
Figure 2 shows the search behavior when you include the linked-pool-aggregation statement.
For example, consider the same conditions exist as for the default example:
-
Linked address pools A, B, C, and D. Pool C is matched.
-
Each pool has three address ranges, r1, r2, r3. The last used range was r2 in each pool.
If no free address is found, the search proceeds like this: C > D > A > B > C > D, then stops.
-
Pool C is searched, nextAddress through highAddress in range r2.
-
Pool C is searched, nextAddress through highAddress in range r3.
-
Pool C is searched, nextAddress through highAddress in range r1.
All ranges in pool C have been searched from nextAddress to highAddress, so the search moves to the next linked pool in the chain, D.
-
Pool D is searched, nextAddress through highAddress in range r2.
-
Pool D is searched, nextAddress through highAddress in range r3.
-
Pool D is searched, nextAddress through highAddress in range r1.
All ranges in pool D have been searched from nextAddress to highAddress. Pool D is the last pool in the chain, so the search moves to the first pool in the chain, A.
-
Pool A is searched, lowAddress through highAddress in range r2.
-
Pool A is searched, lowAddress through highAddress in range r3.
-
Pool A is searched, lowAddress through highAddress in range r1.
All ranges and addresses in pool A have been searched, so the search moves to the next linked pool in the chain, B.
-
Pool B is searched, lowAddress through highAddress in range r2.
-
Pool B is searched, lowAddress through highAddress in range r3.
-
Pool B is searched, lowAddress through highAddress in range r1.
All ranges and addresses in pool B have been searched, so the search moves to the next linked pool in the chain, C.
This process continues until all addresses in all ranges in all pools have been searched. The pool search order is C > D > A > B > C > D, then stops. Depending on where and whether an address is found, all pools might be searched twice, even when the matching pool is the first pool in the chain. For example, if pool A is the matching pool in this set of conditions, then the complete search (assuming no address is found) would be A > B > C > D > A > B > C > D.
Address-Assignment Pool Configuration Overview
The address-assignment pool feature supports subscriber management functionality by enabling you to create address pools that can be shared by different client applications. An address-assignment pool can support either IPv4 address or IPv6 addresses. You cannot use the same pool for both types of address.
Address-assignment pools are completely separate
from services PIC-based L2TP LNS address pools, which you create with
the address-pool statement at the [edit access] hierarchy level, and NAT pools, which you create with the pool statement at the [edit services nat] hierarchy level.
To configure an address-assignment pool:
See Also
Configuring an Address-Assignment Pool Name and Addresses
To configure an address-assignment pool, you must specify the name of the pool and configure the addresses for the pool.
To configure an IPv4 address-assignment pool:
To configure an IPv6 address-assignment pool:
Configure the name of the pool and specify the IPv6 family.
[edit access]
user@host# edit address-assignment pool  isp_2 family inet6
Configure the IPv6 network prefix for the address pool. The prefix specification is required when you configure an IPv6 address-assignment pool.
[edit access address-assignment pool isp_2 family inet6]
user@host# set prefix 2001:db8:2008:2009::/32
Configuring a Named Address Range for Dynamic Address Assignment
You can optionally configure multiple named ranges, or subsets, of addresses within an address-assignment pool. During dynamic address assignment, a client can be assigned an address from a specific named range. To create a named range, you specify a name for the range and define the address range.
To create a named range within an IPv4 address-assignment pool:
To create a named range within an IPv6 address-assignment pool:
Specify the name of the address-assignment pool and the IPv6 family.
[edit access]
user@host# edit address-assignment pool isp_2 family inet6
Configure the name of the range and define the range. You can define the range based on the lower and upper boundaries of the prefixes in the range, or based on the length of the prefixes in the range.
[edit access address-assignment pool isp_2 family inet6]
user@host# set range dsl-range low 2001:db8:2008:2010:2011:0100::/64 high 2001:db8:2008:2010:2011:ffff::/64
user@host# set range fiber-east prefix-length 48
Preventing Addresses from Being Allocated from an Address Pool
You can exclude specified addresses or address ranges to prevent them from being allocated from an address pool. For example, you might want to reserve certain addresses or ranges to be used only for static subscribers. When you configure an address or range of addresses to be excluded, and the address or an address within the range has already been allocated, that the subscriber allocated that address is logged out, the address is deallocated, and the address is marked for exclusion.
To exclude an address or range of addresses in an address pool from being allocated:
Specify an individual address.
[edit access address-assignment pool-name family (inet | inet6)]
user@host# set excluded-address ip-address
Specify and name a range of consecutive addresses.
[edit access address-assignment pool-name family (inet | inet6)]
user@host# set excluded-range name low minimum-value high maximum-value
For example, the following partial configuration for an IPv4 address pool defines a range, r1, of addresses to allocate, from 192.168.0.10 through 192.168.128.250. It excludes a single address, 192.168.110.10. It further defines two ranges, exclude1 and exclude2, that specify two sets of consecutive addresses that cannot be allocated from the pool.
pool v4-pool {
    family inet {
        network 192.168.0.0/16;
        range r1 {
            low 192.168.0.10;
            high 192.168.128.250;
        }
        excluded-address 192.168.110.10
        excluded-range  exclude1 {
            low   192.168.12.0
            high 192.168.12.255
        }
        excluded-range  exclude2 {
            low   192.168.98.10
            high 192.168.98.200
        }
    }
}
Similarly, the configuration for pool v6-pool defines a range of addresses to allocate and a range of addresses that are excluded from allocation.
pool v6-pool {
    family inet6 {
        prefix  2016::/64;
        range r2 {
            low 2016::1;
            high 2016::80:ffff;
        }
        excluded-range  exclude3 {
            low   2016::7c:a
            high 2016::7c:ff
        }
    }
}
To view information about excluded addresses, you can use either of the following commands:
user@host> show network-access address-assignment pool pool-name
IP address/prefix       Hardware address      Host/User       Type
192.168.2.1             00:00:5e:00:53:01      user1          DHCP
192.168.2.2             00:00:5e:00:53:02      user2          DHCP
192.168.2.3             00:00:5e:00:53:03      user3          DHCP
192.168.2.4             NA                     EXCLUDED       unknown
user@host> show network-access aaa statistics address-assignment pool pool-name
Address-assignment statistics
...
 Addresses excluded: 1000
...
Configuring Address-Assignment Pool Usage Threshold Traps
You can receive advanced warning that an address pool or linked set of address pools is running short on available addresses by setting usage (utilization) threshold traps. Usage and utilization are used interchangeably to mean the percentage of addresses in an address pool that are currently assigned. An address pool has the following SNMP thresholds associated with it that allow the local address server to signal SNMP traps when certain conditions exist:
high-utilization threshold—When the percentage of addresses assigned from an address pool exceeds this value, a high-utilization SNMP trap is generated. The system sends warning messages as long as this threshold is exceeded.
abated-utilization threshold—When the percentage of addresses assigned from an address pool drops below this value, an abated-utilization trap is generated. The system stops sending the warning messages. Typically, you set the abated-utilization threshold to less than the high-utilization threshold; you cannot set it higher.
The thresholds do not have default values. If you do not configure these thresholds, the system does not send a notification of impending exhaustion as the percentage of addresses assigned approaches 100 percent. The system sends an out-of-address trap only when all addresses in the address pool have been assigned.
Starting in Junos OS Release 19.2R1, the out-of-address trap is not sent unless both the high-utilization threshold and the abated-utilization threshold are configured. When the out-of-address trap is sent, an out-of-address syslog message is also sent.
You can configure thresholds for all address pools at
the [edit access address-assignment] hierarchy level or
for only address pools in a specified routing instance at the [edit routing-instance routing-instance-name] hierarchy level. The configurations below show only the [edit access] configuration.
To set the threshold traps:
Specify the high-utilization threshold for IPv4 or IPv6 address pools.
[edit accessaddress-assignment]
user@host# set high-utilization percentage
user@host# set high-utilization-v6 percentage
Specify the abated-utilization threshold for IPv4 or IPv6 address pools.
[edit accessaddress-assignment]
user@host# set abated-utilization percentage
user@host# set abated-utilization-v6 percentage
In the following example, the high threshold is set to 95% usage and the abated threshold is set to 90% usage for IPv4 address pools. When the number of assigned addresses exceeds 95 percent of the address pool, a high-utilization trap is generated. If all the addresses become assigned from the pool, an out-of-address trap is generated and an out-of-address syslog message is sent. When the number of assigned addresses drops below 90 percent of the address pool, the abated-utilization trap is generated.
[edit accessaddress-assignment]
user@host# set high-utilization 95
user@host# set abated-utilization 90
Configuring Address-Assignment Pool Linking
Address-assignment pool linking enables you to specify a secondary address pool for the router to use when the matching or primary address-assignment pool is fully allocated. You can create a chain of multiple linked pools. For example, you can link Pool A to Pool B, and link Pool B to Pool C. You can link any number of pools serially in a chain, but you cannot create multiple links to or from the same pool. For example, you cannot create links from Pool A to both Pool B and Pool C. Similarly, Pool C cannot be linked from both Pool A and Pool B. An additional consideration is that all address pools in a chain must be of the same family type, IPv4 or IPv6.
When the address pool that matches the subscribers has no available addresses, the router automatically switches over to the linked pool and allocates addresses from that pool. The router uses a linked pool only when the matching address-assignment pool is fully allocated.
Starting in Junos OS Release 18.1, the behavior changes for how to find and allocate a free address in a chain of address pools. You can configure linked pools to be searched in one of two ways:
Contiguous address allocation—Default behavior. All addresses in each range of a pool are searched. The search starts in the matched pool, then moves to the first pool in the chain and, if necessary, continues through each linked pool successively to the last pool in the chain. In each pool, all addresses in all ranges are searched for a free address. This method enables addresses to be assigned contiguously; each pool has to be full before another pool is searched.
Noncontiguous (aggregated) address allocation—Behavior when
linked-pool-aggregationis configured. Initially, only certain addresses (from nextAddress to highAddress) are searched in each range of the matched pool. The same search is performed in the linked pool, if necessary, and continues through each successive linked pool through the last pool in the chain.The search then restarts at the first pool in the chain (not necessarily the matched pool). This time, all addresses in all ranges are searched, in all pools through the end of the chain.
Including the linked-pool-aggregation statement might
be desirable if you configure your RADIUS server to use the IP address
alone to identify subscribers. Typically, subscribers are identified
by the RADIUS server using the subscriber session ID and other criteria.
If you use only the IP address, you might encounter the following
issue with the default behavior when the linked-pool-aggregation statement is not configured. A subscriber can disconnect and that
address can be assigned to the next subscriber. The Acct-Start message
for the second subscriber might be sent before the Acct-Stop message
is sent for the disconnected subscriber. When the Acct-Stop is received,
the new subscriber, identified only by the IP address, can be disconnected.
You can avoid this situation by either including the linked-pool-aggregation statement or configuring your RADIUS server to use the subscriber
session ID (instead of the IP address) for identification.
Before you begin, configure your address pools. See Address-Assignment Pool Configuration Overview.
To link an address-assignment pool to a secondary pool:
For example, the following configuration links Pool_A to Pool_B and then links Pool_B to Pool_C.
[edit access]
user@host# set address-assignment pool Pool_A link Pool_B
user@host# set address-assignment pool Pool_B link Pool_C
Configuring Address-Assignment Pool Hold-Down
The address-assignment pool hold-down feature—also known as passive drain—enables you to gracefully transition an active address pool to an inactive state. When the pool is in the inactive state, you can safely perform maintenance on the pool without affecting any current subscribers (such as adding, changing, or deleting addresses).
When an address-assignment pool is in the hold-down state, no additional addresses are allocated from that pool. However, the hold-down state does not affect any existing subscribers that are using addresses previously assigned from the pool. As the existing subscribers disconnect, their IP addresses are marked as free in the pool, but the addresses are not reallocated due to the pool’s hold-down state. Eventually, when all subscribers have disconnected and their addresses are returned to the pool, the pool becomes inactive.
To place an active address-assignment pool in the hold-down state:
Configuring DHCP Local Address Pool Rapid Drain
You can force the DHCP local server to stop allocating addresses from a specific local address pool by configuring the pool to active-drain mode. This mode enables the server to gracefully terminate subscribers that are already using addresses assigned from that pool and transition them to another pool. When a DHCP subscriber attempts to renew (at the T1 renewal time) the lease on an IP address from a pool now configured for active-drain mode, the DHCP local server replies with a NAK to the subscriber’s renewal request. This response forces the subscriber to renegotiate a lease. The server then allocates a new IP address from an alternative address pool that is not configured for active drain.
The active-drain mode provides a way to rapidly drain subscribers from an address pool. Consequently, the longer the configured lease time for subscribers, the more useful active-drain mode may be. If you do not configure active-drain mode for a pool, then to stop the allocation of its addresses, you must either configure passive-drain mode or delete the pool.
Passive-drain mode places the address pool in a hold-down state. No more addresses are allocated from the pool, but subscribers currently using an assigned address from the pool are not affected. Existing subscribers are allowed to age out. When the subscriber disconnects (or is disconnected by an operator) the address is released, but cannot be reassigned. Eventually, all subscribers have released their addresses, and the pool is no longer active. Because leases for active subscribers are renewed on request, passive-drain mode can take much longer than active-drain mode to recover all addresses in the pool.
Pool deletion disrupts the traffic for each current subscriber using a pool address for as long as it takes for the lease to expire and for the subscriber to renegotiate and obtain a new lease. The server removes all subscribers with an address from the deleted pool. The subscribers attempt to extend the lease but fail because the lease was deleted at the server. When the subscribers subsequently attempt to renegotiate a new lease, it may be granted with an address from a different pool or from RADIUS.
You can delete the active-drain configuration before the address pool is emptied. In this case, lease extensions may be granted for subscribers still having addresses from this pool. This recovery is best effort, because some subscribers are in the process of being logged out by the server when the configuration is deleted. These subscribers cannot be recovered to the pool and must renegotiate a lease. These subscribers might then be assigned an address either from this pool (because it is active again) or from an alternate pool.
If the DHCP client fails to receive notification that the address pool is being drained, it may continue to grant lease extensions to subscribers using this pool. This condition is indicated when the address remains bound to the client beyond the T1 time (up to the T2 time) when it should have been recovered by the pool. In this situation, delete the active-drain configuration, then reconfigure it for the pool to ensure the pool is drained in a timely manner.
In the event of an authd or jdhcpd restart, or of a graceful Routing Engine switchover, pool addresses might still be used by some subscribers for whom a NAK has not been sent to initiate the logout. When the restart or GRES completes, authd sends jdhcpd a notification with a list of subscribers still having addresses from the pool that is configured for active drain. Pool draining can then continue.
Starting in Junos OS Release 18.4R1, the method of address allocation determines the subsequent behavior when authd notifies the DHCP process that an address pool is deleted or being drained.
When addresses are allocated on demand, the family with the address in that pool is logged out immediately when the pool is deleted, or logged out gracefully by the draining process when a DHCP renew or rebind message is received.
When the addresses are preallocated, the addresses for both families are deleted immediately when the pool is deleted, or deleted gracefully by the draining process when a DHCP renew or rebind message is received.
To configure the DHCP local server to stop allocating addresses from an address pool:
You can use the show network-access aaa statistics command to confirm that active drain is configured for a pool.
user@host> show network-access aaa statistics address-assignment pool pool1
Address assignment statistics
  Pool Name: pool1
    Out of Memory: 0
    Out of Addresses: 0
    Address total: 33009
    Addresses in use: 1
    Address Usage (percent): 0
    Pool drain configured: yes
The active-drain feature takes precedence over preservation of the prefix address. Address preservation may ensure that the same delegated prefix is assigned to the subscriber based on the access circuit identifier (ACI). When a subscriber with a preserved prefix logs out, the ACI and prefix are stored in the address preservation table. When that subscriber tries to log in again, the address and ACI are looked up in the table.
Active drain mode affects this behavior. When the prefix is currently part of a pool set to active-drain mode, it is removed from the table and is not assigned to the subscriber when the subscriber tries to log in again.
If active drain is cancelled while the client is in the process of logging out, then the prefix and ACI string are preserved in the table. In this case, the prefix can be assigned to that ACI string when the subscriber logs in again. However, if active drain is cancelled after the client has already logged out and the table has been cleared of the prefix/ACI association, then the subscriber at a subsequent login gets a prefix from the pool that is reactivated and the prefix could be different.
See Also
Configuring Static Address Assignment
You can optionally create a static IPv4 address binding by reserving a specific address for a particular client. The address is removed from the address-assignment pool so that it is not assigned to another client. When you reserve an address, you identify the client host and create a binding between the client MAC address and the assigned IP address. IPv6 address-assignment pools do not support static address binding.
To configure a static binding for an IPv4 address:
Configuring Duplicate IPv4 Address Protection for AAA
Starting in Junos OS Release 14.1, if you are using AAA to supply IPv4 addresses, you can enable duplicate address protection to prevent addresses from being used more than once. If enabled, the following attributes received from external servers are checked:
Framed-IP-Address
Framed-Pool
The router then takes one of the following actions:
If an address matches an address in an address pool, the address is taken from the pool, provided it is available.
If the address is already in use, it is rejected as unavailable and the existing subscriber using the address remains intact.
To configure duplicate address protection:
Starting in Junos OS
Release 18.4R1, you can optionally enable the reassignment of an address
that is currently in use when address protection is configured by
including the reassign-on-match option. When configured, the router disconnects the existing subscriber
and allows the new subscriber to renegotiate. The effect of this configuration
is that the address in use is always reassigned to the new subscriber.
One use case for this override capability occurs when a mobile subscriber is accidentally dropped from the gateway GPRS support node (GGSN), but the GGSN keeps the subscriber’s L2TP session up for some period of time. When the customer tries to reconnect through a different node, the session cannot connect because the original session is still up. Address reassignment enables the new session to preempt the existing session, allowing the subscriber to reconnect.
The existing subscriber is disconnected only when the address is from a RADIUS-sourced address pool. When the address is from a locally configured address pool, the existing subscriber session remains intact.
Do not use the reassign-on-match option
when RADIUS is allocating addresses that are contained in a locally
configured address pool because there is a greater chance of address
collision. We recommend that you do not overlap RADIUS-sourced addresses
with local address pools.
The reassign-on-match option works in the
following way:
A subscriber negotiates access with a given IP address.
The router determines whether that address is in use and where it came from.
When a subscriber is already logged in with that address, the address is not part of a locally configured pool, and address protection is enabled:
The router sends a NAK to the new subscriber, rejecting the request.
The router sends a disconnect request to the existing subscriber. The disconnect request includes a termination ID to report the cause of the logout.
The new (rejected) subscriber can renegotiate and is assigned the IP address.
When a subscriber is already logged in with that address and the address was allocated from a local address pool:
The router sends a NAK to the new subscriber, rejecting the request.
The router does not send a disconnect request to the existing subscriber.
When you add reassign-on-match to an existing duplicate
address protection configuration, it takes effect immediately for
the existing subscribers. Similarly, if you remove reassign-on-match from a configuration, it takes effect immediately, so that a subsequent
request for access with an in-use address does not result in termination
of the existing subscriber.
To enable address reassignment:
-
[edit access address-protection]
user@host# set reassign-on-match
See Also
Example: Configuring an Address-Assignment Pool
Requirements
Create the network access address assignment pool. To expand the pool automatically when it reaches 100% usage, to match the new pool ranges to the original pool size, use a different netmask for each pool.
Configuration
This example shows an address-assignment pool configuration that creates two pools,
one for IPv4 DHCP clients (isp_1), and a second pool
(chi-fiber-ra) that is used for router advertisement.
CLI Quick Configuration
[edit access]
address-assignment {
    neighbor-discovery-router-advertisement chi-fiber-ra;
    pool isp_1 {
         family inet {
            network 192.168.0.0/16;
            range southeast {
                low 192.168.102.2 high 192.168.102.254;
            }
            range northeast {
                low 192.168.119.2 high 192.168.119.250;
            }
            host host.example.net {
                hardware-address 00:00:5E:00:53:90;
                ip-address 192.168.44.12;
            }
            dhcp-attributes {
                option-match {
                    option-82 {
                        circuit-id fiber range northeast;
                    }
                    option-82 {
                        circuit-id cable_net range southeast;
                    }
                }
                boot-file boot.client;
                boot-server 192.168.200.100;
                grace-period 3600;
                maximum-lease-time 18000;
                netbios-node-type p-node;
                router 192.168.44.44 192.168.44.45;
            }
        }
    }
    pool chi-fiber-ra {
        family inet6 {
            prefix 2001:db8:2008:2009:2010::/48;
            range fiber3 {
                low 2001:db8:2008:2009:2010::1/64;
                high 2001:db8:2008:2009:2010::5/64;
            }
        }
    }
}
This example creates an IPv4 address-assignment pool named isp-1, which contains two named address ranges, southeast and northeast. The address-assignment pool also contains
a static binding for client host host.example.net. The
ISP_1 pool configuration also includes the dhcp-attributes statement, indicating that the pool is used for DHCP clients. If
the option 82 circuit-id entry matches the string fiber, then DHCP assigns the client an address from the northeast range. If the option 82 circuit-id matches
the string cable_net, DHCP assigns an address from the southeast range.
The second address-assignment pool created in this example is chi-fiber-ra. The
neighbor-discovery-router-advertisement statement at
the beginning of the syntax specifies that this named address-assignment pool is
used for router advertisement. The syntax at the end of the example configures
the address-assignment pool named chi-fiber-ra.
Subscriber Address Preservation with Aging Timers
Subscriber address preservation saves subscriber IP addresses when the subscriber logs out and restores them when the subscriber logs in again. You can configure the time to hold the preservation.
The address preservation feature enables the system to retain subscriber-assigned addresses or prefixes after a subscriber disconnects. When the subscriber reconnects, the system can reassign the same address or prefix.
Configuring address preservation creates a preserved-address entry when a subscriber
disconnects. The system keys this entry to the subscriber's Agent-Circuit-Id (ACI) received
from the access network. When the subscriber with the same ACI logs in again, the prefix is
retrieved and associated to the subscriber. You can also configure the time to hold the
preservation by using the aging-time statement. If the subscriber reconnects
with the same ACI before the aging time expires, the system matches the key, reissues the
preserved address or prefix, and starts a new aging time on the next disconnect. If the aging
time expires before the subscriber returns, the system removes the preserved entry and returns
the address to normal allocation behavior.
You can preserve IPv4 addresses, IPv6 addresses, and IPv6 delegated prefixes by specifying
the address type under the address-preservation configuration. The
ipv6-address address type includes both the IPv6 /128 WAN address and the
IPv6 Router-Advertisement prefix. Only the enabled address types remain reserved after a
subscriber disconnects; other address types return to their pools immediately.
If you use Address Pool Manager (APM) for address assignment, APM reclaims an address pool when no IP addresses from that pool are assigned to subscribers.
Use the following configuration to enable IP address preservation:
[edit access]
address-preservation {
    address-types (delegated-prefix | ipv4-address | ipv6-address)
}
For example:
set access address-preservation address-types ipv4-address;
You can configure how long resources remain reserved by configuring
aging-time, including separate timers for IPv4 and IPv6. Use the following
configuration to specify the aging time to hold the preserved IP address type:
[edit access]
address-preservation {
    (aging-time seconds | ipv4-aging-time seconds | ipv6-aging-time seconds)
}
Use ipv4-aging-time to configure the aging time for preserved IPv4 addresses
and ipv6-aging-time to configure the aging time for preserved IPv6 addresses.
For example:
set access address-preservation aging-time ipv4-aging-time 600;
The timer starts when the subscriber disconnects. The supported range is 600 through 604800
seconds. The default value for aging-time is 3600 seconds.
When a subscriber logs out, the system updates the address table with the preserved addresses. Use the following command to verify the preserved-address table:
show network-access address-assignment preserved
You can filter the preserved-address table by specifying the address type in the command. For more information about the command, see show network-access address-assignment preserved.
If you delete the address-preservation configuration, the system clears preserved state for the specified address types and makes those addresses immediately reusable. Use the following command to clear the address preservation:
clear network-access address-assignment preserved key all
The ACI is the key that stores the subscriber’s IP address when the subscriber logs out.
Specify key_id or address-type to clear the preservation
based on key or address type. For more information about the command, see clear network-access address-assignment preserved.
Benefits of Address Preservation
-
Improves address continuity by reissuing the same IPv4 or IPv6 address or prefix when subscribers reconnect before the timer expires.
-
Reduces address pool impact with separate hold times for IPv4 and IPv6, retaining each protocol only as needed.
-
Allows quick removal of preserved entries when immediate reuse is required for a specific subscriber or address type.
See Also
Change History Table
Feature support is determined by the platform and release you are using. Use Feature Explorer to determine if a feature is supported on your platform.
reassign-on-match option.