L2TP Tunnel Switching For Multiple-Domain Networks
L2TP Tunnel Switching Overview
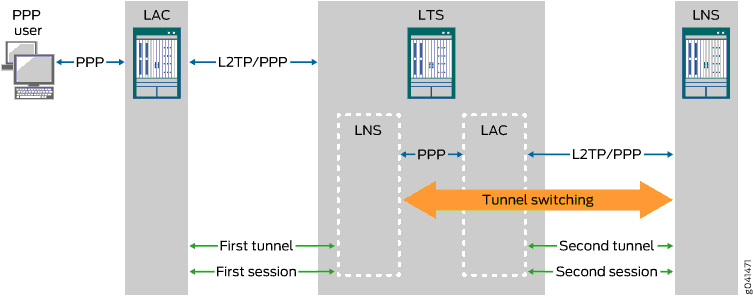
L2TP tunnel switching, also known as L2TP multihop, simplifies the deployment of an L2TP network across multiple domains. A router that lies between a LAC and an LNS is configured as an L2TP tunnel switch (LTS)—sometimes referred to simply as a tunnel switch or a tunnel switching aggregator (TSA)—as shown in Figure 1. The LTS is configured as both an LNS and a LAC. When a remote LAC sends encapsulated PPP packets to the LNS configured on the LTS, the LTS can forward or redirect the packets through a different tunnel to a different LNS beyond the LTS. The logical termination point of the original L2TP session is switched to a different endpoint.
For example, in the network shown in Figure 1, packets from the subscriber provisioned by service provider A are initially targeted at the LNS configured on the LTS. The LTS might redirect those packets to LNS1.

L2TP tunnel switching simplifies network configuration when the administrative domain of a LAC is different from that of the desired LNS. For example:
-
The LTS acts as the LNS for multiple LACs. The individual LACs do not have to have the administrative control or capability required to identify the most appropriate LNS on which to terminate their sessions. The LTS performs that function is centralized in the LTS.
-
The LTS acts as the LAC for multiple LNSs. When a new remote LAC is added to an ISP’s network, the ISP does not have to reconfigure its LNS routers to accommodate the new LAC, because they connect to the LAC on the LTS.
In a Layer 2 wholesale network, the wholesaler can use L2TP tunnel switching to create a flatter network configuration that is easier to manage. The wholesaler bundles Layer 2 sessions from a LAC that are destined for different ISPs—and therefore different LNSs—onto a single L2TP tunnel. This configuration enables a common L2TP control connection to be used for the LAC.
Figure 2 shows an example of L2TP tunnel switching for incoming calls with the following sequence of events:
-
The subscriber opens a PPP session to the LAC.
-
The LAC creates the first L2TP tunnel to the LNS configured on the LTS and the first L2TP session to carry the encapsulated PPP packets.
-
During authentication of this first session, the LTS determines whether to retunnel the session to an LNS beyond the LTS, based on the presence or absence of a tunnel switch profile configured on the LTS.
The tunnel switch profile can be a default profile or it can be applied by the RADIUS server, a domain map configuration, or a tunnel group configuration.
-
If a tunnel switch profile is configured, the LTS creates a second tunnel (if it does not already exist) to the LNS beyond the LTS as specified in the profile and creates the second session in this tunnel.
Application of Tunnel Switch Profiles
You can configure a tunnel switch profile to be applied in several ways:
-
As a default profile applied globally to traffic received from all LACs
-
With a domain map applied to a subscriber session
-
With a tunnel group applied to a subscriber session
-
In your RADIUS server configuration, returned in the Tunnel Switch-Profile VSA (26-91)
You can configure more than one of these methods of application. When multiple tunnel switch profiles are present, the following order of precedence establishes which profile the LTS uses; the order is from highest (RADIUS) to lowest (default profile):
-
RADIUS VSA 26-91 > domain map > tunnel group > global tunnel switch profile
The tunnel switch profile must also reference a tunnel profile. This tunnel profile specifies the characteristics of the second tunnel, to which the subscriber packets are switched.
Termination of Tunnel-Switched Sessions on the LTS
Tunnel switched sessions are terminated on the LTS when any of the following happens:
-
Either the LAC or LNS interface on the LTS receives a Call-Disconnect-Notify (CDN) message (Table 1).
Table 1: Cause of CDN Message CDN Message Is Received On
When
LAC interface
Either of the following occurs:
-
The second session cannot be established.
-
The remote LNS terminates the second session.
LNS interface
Either of the following occurs:
-
The PPPoE client initiates a logout.
-
The originating LAC initiates termination of the tunnel
Both the first and second sessions are terminated because the LTS relays the CDN to the interface that did not receive the CDN. The disconnect cause is the same for both sessions.
-
-
Either the LAC or LNS interface on the LTS receives a Stop-Control-Connection-Notification (StopCCN) message (Table 2).
Table 2: Cause of StopCCN Message StopCCN Message Is Received On
When
LAC interface
Either of the following occurs:
-
The second session cannot be established.
-
The remote LNS terminates the second tunnel.
LNS interface
The originating LAC initiates termination of the tunnel.
The LTS does not relay the StopCCN message, because a given tunnel can contain both switched and nonswitched sessions. Another reason in a wholesale scenario is that the tunnel ending on the LNS on the LTS can contain sessions from LACs from different providers. Instead, the LTS sends a CDN message to the interface that did not receive the StopCCN to terminate the tunnel-switched session. This CDN relays the error code carried in the StopCCN.
-
-
An administrative
clearcommand is issued on the LTS.
Table 3 lists
the actions taken when an administrative clear command
is issued on the LTS.
|
Command |
LAC or LNS Action |
LTS Action |
|---|---|---|
|
|
Clear the destination and all associated tunnels and sessions. |
For each switched session in a tunnel to the destination, clear the corresponding mapped switched session by sending it a CDN message with the cause set to Administrative. |
|
|
Clear all destinations and all associated tunnels and sessions. |
None. |
|
|
Clear the session. |
Clear the corresponding mapped switched session for this session by sending it a CDN message with the cause set to Administrative. |
|
|
Clear all sessions. |
None. |
|
|
Clear the tunnel and all its sessions. |
For each switched session in the tunnel, clear the corresponding mapped switched session by sending it a CDN message with the cause set to Administrative. |
|
|
Clear all tunnels. |
None. |
Tunnel Switching Actions for L2TP AVPs at the Switching Boundary
When L2TP tunnel switching redirects packets to a different LNS, it performs one of the following default actions at the switching boundary for each AVP carried in the L2TP messages:
relay—L2TP transparently forwards the AVP in the switched packet with no alteration.regenerate—L2TP ignores the received AVP that was negotiated by the first tunnel and session. It generates a new AVP for the second session based on the local policy at the LTS and sends this AVP in the switched packet. The local policy may or may not use the value for the AVP received during negotiation for the first session.
Table 4 lists the default action for each AVP. Mandatory AVPs are always included in the L2TP messages from the LAC; optional AVPs might be included in the messages.
You can optionally override the default action taken at the switching boundary for the Bearer Type AVP (18), Calling Number AVP (22), or Cisco NAS Port Info AVP (100). You can configure any of these three AVPs to be dropped from the switched packets or regenerated, or you can restore the default relay action.
L2TP AVPs that have their attribute values hidden are always regenerated at the switching boundary. The value is decoded and sent in clear text when the packet is forwarded to the remote LNS.
AVP Name (Number) |
AVP Type |
L2TP Message Type |
Default Action |
|---|---|---|---|
Assigned Session Id (14) |
Mandatory |
CDN, ICRQ |
Regenerate |
Assigned Tunnel Id (9) |
Mandatory |
SCCRQ |
Regenerate |
Bearer Capabilities (4) |
Optional |
SCCRQ |
Regenerate |
Bearer Type (18) |
Optional |
ICRQ |
Relay |
Call Serial Number (15) |
Mandatory |
ICRQ |
Relay |
Called Number (21) |
Optional |
ICRQ |
Relay |
Calling Number (22) |
Optional |
ICRQ |
Relay |
Challenge (11) |
Optional |
SCCRQ |
Regenerate |
Challenge Response (13) |
Optional |
SCCCN |
Regenerate |
Cisco NAS Port |
Optional |
ICRQ |
Relay |
Failover Capability |
Optional |
SCCRQ |
Regenerate |
Firmware Revision (6) |
Optional |
SCCRQ |
Regenerate |
Framing Capabilities (3) |
Mandatory |
SCCRQ |
Regenerate |
Framing Type (19) |
Mandatory |
ICCN |
Relay |
Host Name (7) |
Mandatory |
SCCRQ |
Regenerate |
Initial Received LCP CONFREQ (26) |
Optional |
ICCN |
Relay When LCP renegotiation is enabled with the |
Last Received LCP CONFREQ (28) |
Optional |
ICCN |
Relay When LCP renegotiation is enabled with the |
Last Sent LCP CONFREQ (27) |
Optional |
ICCN |
Relay When LCP renegotiation is enabled with the |
Message Type (0) |
Mandatory |
All |
Regenerate |
Physical Channel Id (25) |
Optional |
ICRQ |
Regenerate |
Private Group Id (37) |
Optional |
ICCN |
Relay |
Protocol Version (2) |
Mandatory |
SCCRQ |
Regenerate |
Proxy Authen Challenge (31) |
Optional |
ICCN |
Relay When LCP renegotiation is enabled with the |
Proxy Authen ID (32) |
Optional |
ICCN |
Relay When LCP renegotiation is enabled with the |
Proxy Authen Name (30) |
Optional |
ICCN |
Relay When LCP renegotiation is enabled with the |
Proxy Authen Response (33) |
Optional |
ICCN |
Relay When LCP renegotiation is enabled with the |
Proxy Authen Type (29) |
Optional |
ICCN |
Relay When LCP renegotiation is enabled with the |
Receive Window Size (10) |
Optional |
SCCRQ |
Regenerate |
Rx Connect Speed (38) |
Optional |
ICCN |
Relay |
Sequencing Required (39) |
Optional |
ICCN |
Regenerate |
Sub-Address (23) |
Optional |
ICRQ |
Relay |
Tie Breaker (5) |
Optional |
SCCRQ |
Regenerate |
Tunnel Recovery |
Optional |
SCCRQ |
Regenerate |
Tx Connect Speed (24) |
Mandatory |
ICCN |
Relay |
Vendor Name (8) |
Optional |
SCCRQ |
Regenerate |
Configuring L2TP Tunnel Switching
L2TP tunnel switching enables a router configured as an LTS to forward PPP packets carried on one L2TP session to a second L2TP session terminated on a different LNS. To configure L2TP tunnel switching, you must define a tunnel switch profile and then assign that profile.
You can configure tunnel switch profiles for all sessions globally, all sessions in a tunnel group, all sessions in a domain or in your RADIUS server configuration to be returned in the RADIUS Tunnel Switch-Profile VSA (26-91). The order of precedence for tunnel switch profiles from various sources is as follows:
RADIUS VSA 26-91 > domain map > tunnel group > global tunnel switch profile
To define an L2TP tunnel switch profile:
For example, consider the following configuration. which creates three tunnel switch profiles, l2tp-tunnel-switch-profile, lts-profile-groupA, and lts-profile-example-com:
[edit access tunnel-switch-profile l2tp-tunnel-switch-profile]
user@host# set avp bearer-type regenerate
user@host# set avp calling-number regenerate
user@host# set avp cisco-nas-port-info drop
user@host# set tunnel-profile l2tp-tunnel-profile1

[edit access tunnel-switch-profile lts-profile-groupA]
user@host# set tunnel-profile l2tp-tunnel-profile2
[edit access tunnel-switch-profile lts-profile-example.com]
user@host# set tunnel-profile l2tp-tunnel-profile3

[edit services l2tp]
user@host1# set tunnel-switch-profile l2tp-tunnel-switch-profile
user@host1# set tunnel-group groupA tunnel-switch-profile lts-profile-groupA

[edit access domain]
user@host1# set map example.com tunnel-switch-profile lts-profile-example.com
The sample LTS ( Layer-2 Tunnel Switching) configuration for MX-Series devices is as follows:
set services l2tp tunnel-group TG1 l2tp-access-profile DEFAULT
set services l2tp tunnel-group TG1 aaa-access-profile aaa-access-profile
set services l2tp tunnel-group TG1 hello-interval 0
set services l2tp tunnel-group TG1 local-gateway address 192.1.1.1
set services l2tp tunnel-group TG1 local-gateway gateway-name default
set services l2tp tunnel-group TG1 service-interface si-0/0/0
set services l2tp tunnel-group TG1 dynamic-profile lns-profile

set chassis fpc 0 pic 0 inline-services bandwidth 10g
set chassis network-services enhanced-ip

set dynamic-profiles lns-profile routing-instances "$junos-routing-instance" interface "$junos-interface-name"
set dynamic-profiles lns-profile interfaces "$junos-interface-ifd-name" unit "$junos-interface-unit" ppp-options chap
set dynamic-profiles lns-profile interfaces "$junos-interface-ifd-name" unit "$junos-interface-unit" ppp-options pap
set dynamic-profiles lns-profile interfaces "$junos-interface-ifd-name" unit "$junos-interface-unit" family inet unnumbered-address "$junos-loopback-interface"
set dynamic-profiles lns-profile interfaces "$junos-interface-ifd-name" unit "$junos-interface-unit" family inet6 unnumbered-address "$junos-loopback-interface"

set access profile DEFAULT client default l2tp aaa-access-profile aaa-access-profile
set access profile DEFAULT client default l2tp shared-secret "$9$i.T3AtOREyApIcSrLX"
set access profile DEFAULT client default l2tp dynamic-profile lns-profile
set access profile DEFAULT client default user-group-profile l2tp-access-group-profile


set access group-profile l2tp-access-group-profile ppp idle-timeout 200
set access group-profile l2tp-access-group-profile ppp ppp-options pap
set access group-profile l2tp-access-group-profile ppp ppp-options chap
set access group-profile l2tp-access-group-profile ppp keepalive 0

set access tunnel-profile lac-profile tunnel 1 preference 1
set access tunnel-profile lac-profile tunnel 1 identification 1
set access tunnel-profile lac-profile tunnel 1 remote-gateway address 192.1.2.1
set access tunnel-profile lac-profile tunnel 1 remote-gateway gateway-name default
set access tunnel-profile lac-profile tunnel 1 source-gateway address 192.1.2.5
set access tunnel-profile lac-profile tunnel 1 source-gateway gateway-name default
set access tunnel-profile lac-profile tunnel 1 secret "$9$u9CE0BEleW-dsp07Vb2GUCtu"

set access tunnel-switch-profile tsp-profile tunnel-profile lac-profile
set access domain map yogeshn.com tunnel-switch-profile tsp-profile

…
The profile l2tp-tunnel-switch-profile is applied as the global default. When packets are switched according to this profile, the values for the Bearer Type AVP (18) and Calling Number AVP (22) in the L2TP packets are regenerated based on local policy at the L2TP tunnel switch and then sent with the packets. The Cisco NAS Port Info AVP (100) is simply dropped. Finally, l2tp-tunnel-profile1 provides the configuration characteristics of the tunnel to which the traffic is switched.
Tunnel switch profile lts-profile-groupA is applied by means of a tunnel group, groupA; it specifies a different tunnel profile, l2tp-tunnel-profile2 and it does not override any AVP actions. Tunnel switch profile lts-profile-example.com is applied by means of a domain map for the example.com domain; it specifies a different tunnel profile, l2tp-tunnel-profile3 and it does not override any AVP actions.
Setting the L2TP Receive Window Size
You can configure the L2TP receive window size for an L2TP tunnel. The receive window size specifies the number of packets a peer can send before waiting for an acknowledgment from the router.
By default, the receive window size is set to four packets. If the receive window size is set to its default value, the router does not send the Receive Window Size AVP, AVP 10, in its first packet sent during tunnel negotiation to its peer.
To configure the receive window size:
[edit services l2tp tunnel]
user@host# set rx-window-size packets
Setting the L2TP Tunnel Idle Timeout
You can configure the LAC or the LNS to specify how long a tunnel without any sessions remains active. The idle timer starts when the last session on the tunnel is terminated. When the timer expires the tunnel is disconnected. This idle timeout frees up resources otherwise consumed by inactive tunnels.
If you set the idle timeout value to zero, the tunnel is forced to remain active indefinitely after the last session is terminated until one of the following occurs:
You issue the
clear services l2tp tunnelcommand.The remote peer disconnects the tunnel.
Before you downgrade to a Junos OS Release that
does not support this statement, we recommend that you explicitly
unconfigure the feature by including the no idle-timeout statement at the [edit services l2tp tunnel] hierarchy
level.
To set the tunnel idle timeout:
Configure the timeout period.
[edit services l2tp tunnel]
user@host# set idle-timeout seconds
Setting the L2TP Destruct Timeout
You can configure the LAC or the LNS to specify how long the router attempts to maintain dynamic destinations, tunnels, and sessions after they have been destroyed. This destruct timeout aids debugging and other analysis by saving underlying memory structures after the destination, tunnel, or session is terminated. Any specific dynamic destination, tunnel, or session may not be maintained for this entire time period if the resources must be reclaimed early to allow new tunnels to be established.
Before you downgrade to a Junos OS Release that
does not support this statement, we recommend that you explicitly
unconfigure the feature by including the no destruct-timeout statement at the [edit services l2tp] hierarchy level.
To set the L2TP destruct timeout:
Configure the timeout period.
[edit services l2tp]
user@host# set destruct-timeout seconds
Configuring the L2TP Destination Lockout Timeout
When multiple sets of tunneling parameters are available, L2TP uses a selection process to choose the best tunnel for subscriber traffic. As part of this selection process, L2TP locks out destinations it cannot connect to when a subscriber tries to reach a domain. L2TP places the destination on the destination lockout list and excludes the destination from consideration for a configurable period called the destination lockout timeout.
By default, the destination lockout timeout is 300 seconds (5 minutes). You can configure a value from 60 through 3600 seconds (1 minute through 1 hour). When the lockout timeout expires, L2TP assumes that the destination is now available and includes the destination when performing the tunnel selection process. The destination lockout period is a global value and is not individually configurable for particular destinations, tunnels, or tunnel groups.
In general, a locked destination cannot be used until the lockout timer expires. However, when L2TP performs the tunnel selection process, in some circumstances it clears the lockout timer for a locked destination. See Selection When Failover Between Preference Levels Is Configured and Selection When Failover Within a Preference Level Is Configured in LAC Tunnel Selection Overview for detailed information about the selection process.
Configure the lockout timeout to be equal to or shorter than the destruct timeout. Otherwise, the destruct timeout expires before the lockout timeout. In this event, the locked-out destination is destroyed and can be subsequently returned to service before the lockout timeout expires, thus negating the effectiveness of the lockout timeout.
To configure the destination lockout timeout:
Specify the period in seconds.
[edit services l2tp destination]
user@host# set lockout-timeout seconds
The show services l2tp destination lockout command
displays the destination lockout list and for each destination indicates
how much time remains before its timeout expires. The show services
l2tp destination detail command indicates for each destination
whether it is locked and waiting for the timeout to expire or not
locked.
Removing an L2TP Destination from the Destination Lockout List
When a PPP subscriber tries to log in to a domain, L2TP selects a tunnel associated with a destination in that domain and attempts to access the destination. If the connection attempt fails, L2TP places the destination on the destination lockout list. Destinations on this list are excluded from being considered for subsequent connections for a configurable period called the destination lockout timeout.
You can issue the request services l2tp destination unlock command for a particular destination to remove it from the destination
lockout list. The result is that this destination is immediately available
for consideration when a subscriber logs in to the associated domain.
To remove a destination from the destination lockout list:
Specify the name of the destination to be unlocked.
user@host> request services l2tp destination unlock destination-name
Configuring L2TP Drain
For administrative purposes, you can set the state of an L2TP destination or tunnel to drain. This prevents the creation of new sessions, tunnels, and destinations at L2TP LAC and LNS.
You can configure L2TP drain at the global level or for a specific destination or tunnel. If the feature is configured at global L2TP level, then no new destination, tunnel, or session can be created. If the feature is configured for a specific destination, no new tunnel or session can be created at that destination. Similarly, if the feature is configured for a specific tunnel, no new sessions can be assigned to that tunnel, but new destinations and tunnels can be created.
When this feature is configured, the command output of show services l2tp summary, show services l2tp destination, and show services l2tp tunnel displays the state of
the L2TP session, destination, and tunnel as Drain.
Using the Same L2TP Tunnel for Injection and Duplication of IP Packets
You can configure the same L2TP tunnel that is used for subscriber secure policy mirroring to be used for duplication of packets. Packets duplicated are used to inject traffic towards the customer or towards the network. Injection or transmission of packets is supported for all subscriber access modes. A single L2TP tunnel is used for both transmission of packets and duplication of packets. A port or interface that is configured for duplication of packets on one side of an L2TP tunnel is connected to the other tunnel endpoint. The other endpoint of the tunnel can send IP packets using the L2TP tunnel to the port or interface configured for packet duplication, and the IP packets received at that interface can be either forwarded to the customer or sent as though it has been received form the customer.
The remote tunnel endpoint sends an IP tunnel packet that contains an Ethernet MAC address in the payload. If the destination MAC address of the payload packet contains the MAC address of the router, the Ethernet packet is sent in the outgoing direction towards the network, and it is processed and forwarded as though it is received on the customer port. If the source MAC address of the payload packet contains the MAC address of the router, the Ethernet packet is transmitted in the outgoing direction towards the customer port. If the tunnel does not contain the receive-cookie configured, packet injection does not happen. In such a case, any received tunnel packet is counted and dropped in the same manner in which packets that arrive with a wrong cookie are counted and dropped.
To configure the packet to be duplicated and sent towards the
customer or the network (based on the MAC address in the Ethernet
payload), include the decapsulate l2tp output-interface interface-name cookie l2tpv3-cookie statement at the [edit firewall family family-name filter filter-name term term-name then] hierarchy level. You can also configure a counter for
the duplicated or decapsulated L2TP packets by including the count counter-name statement at the [edit firewall family family-name filter filter-name term term-name then] hierarchy level