Help us improve your experience.

Let us know what you think.

Do you have time for a two-minute survey?


Initial Configuration on NFX150 Devices

Factory-Default Settings

The NFX150 device is shipped with the following factory-default settings:

Table 1: Security Policies

Source Zone

Destination Zone

Policy Action

trust

trust

permit

trust

untrust

permit

Table 2: Interface Mapping (for Junos OS Releases 18.1, 18.2 R1, and 18.3 R1)

Port Label

Interface

Virtual Interface

Security Zone

DHCP State

IP Address

0/0 to 0/3

heth-0-0 to heth-0-3

ge-0/0/0 to ge-0/0/3

trust

Server

192.168.2.1/24

0/4

heth-0-4

ge-1/0/1

untrust

Client

ISP assigned

0/5

heth-0-5

ge-1/0/2

untrust

Client

ISP assigned

MGMT

fxp0

N/A

N/A

N/A

192.168.1.1/24

Table 3: Interface Mapping (for Junos OS Releases 18.2 R2 and 18.4R1)

Port Label

Interface

Virtual Interface

Security Zone

DHCP State

IP Address

0/0 to 0/2

heth-0-0 to heth-0-2

ge-0/0/0 to ge-0/0/2

trust

Server

192.168.2.1/24

0/3

heth-0-3

ge-1/0/1

untrust

Client

ISP assigned

0/4

heth-0-4

ge-0/0/3

trust

Server

192.168.2.1/24

0/5

heth-0-5

ge-1/0/2

untrust

Client

ISP assigned

MGMT

fxp0

N/A

N/A

N/A

192.168.1.1/24

Table 4: Interface Mapping (for Junos OS Releases 19.1R1 or later)

Port Label

Interface

Virtual Interface

Security Zone

DHCP State

IP Address

0/0

heth-0-0

ge-1/0/1

untrust

Client

ISP assigned

0/1 to 0/4

heth-0-1 to heth-0-4

ge-0/0/1 to ge-0/0/4

trust

Server

192.168.2.1/24

0/5

heth-0-5

ge-1/0/2

untrust

Client

ISP assigned

MGMT

fxp0

N/A

N/A

N/A

192.168.1.1/24

Table 5: LTE Interfaces

Interface

Security Zone

IP Address

cl-1/1/0

N/A

N/A

dl0 (logical)

untrust

ISP assigned

The NFX150 device is shipped with the following services enabled by default: DHCP, HTTPS, and TFTP.

To provide secure traffic, a basic set of screens are configured on the untrust zone.

Enabling Basic Connectivity

  1. Ensure that the NFX150 device is powered on.
  2. Connect to the console port:
    1. Plug one end of the Ethernet cable into the console port on your NFX150 device.
    2. Connect the other end of the Ethernet cable to the RJ-45—to—DB-9 serial port adapter.
    3. Connect the RJ-45—to—DB-9 serial port adapter to the serial port on the management device. Use the following values to configure the serial port:

      Baud rate—9600; Parity—N; Data bits—8; Stop bits—1; Flow control—None.

    Note:

    We no longer include a DB-9 to RJ-45 cable or a DB-9 to RJ-45 adapter with a CAT5E copper cable as part of the device package. If you require a console cable, you can order it separately with the part number JNP-CBL-RJ45-DB9 (DB-9 to RJ-45 adapter with a CAT5E copper cable).

    Note:

    Alternately, you can use the USB cable to connect to the mini-USB console port on the device. To use the mini-USB console port, you must download the USB driver from the following page and install it on the management device:

    https://www.juniper.net/support/downloads/junos.html

  3. Use any terminal emulation program, such as HyperTerminal, to connect to the device console. The CLI displays a login prompt.
  4. Log in as root and enter the password juniper123. If the software completes booting before you connect to the console, you might need to press the Enter key for the prompt to appear:
    Note:

    Starting with Junos OS Release 18.1R2 or later, the root password is not configured for initial configuration of the NFX150 devices.

  5. Start the CLI:
  6. Enter configuration mode:
  7. Change the password for the root administration user account:
  8. Enable SSH service for the root user:
  9. (Optional) Enable the Internet connection for devices connected on LAN by setting the DNS IP:
  10. Commit the configuration:

Establishing the Connection

  1. Connect the device to the Internet Service Provider (ISP) by using the following step:
    Note:

    For information on interface mapping, see Factory-Default Settings and Factory-Default Settings.

    Connect one of the WAN ports to the ISP. The device is assigned an IP address by the ISP through DHCP.

    Figure 1: Connecting the Interfaces on an NFX150-S1 DeviceConnecting the Interfaces on an NFX150-S1 Device

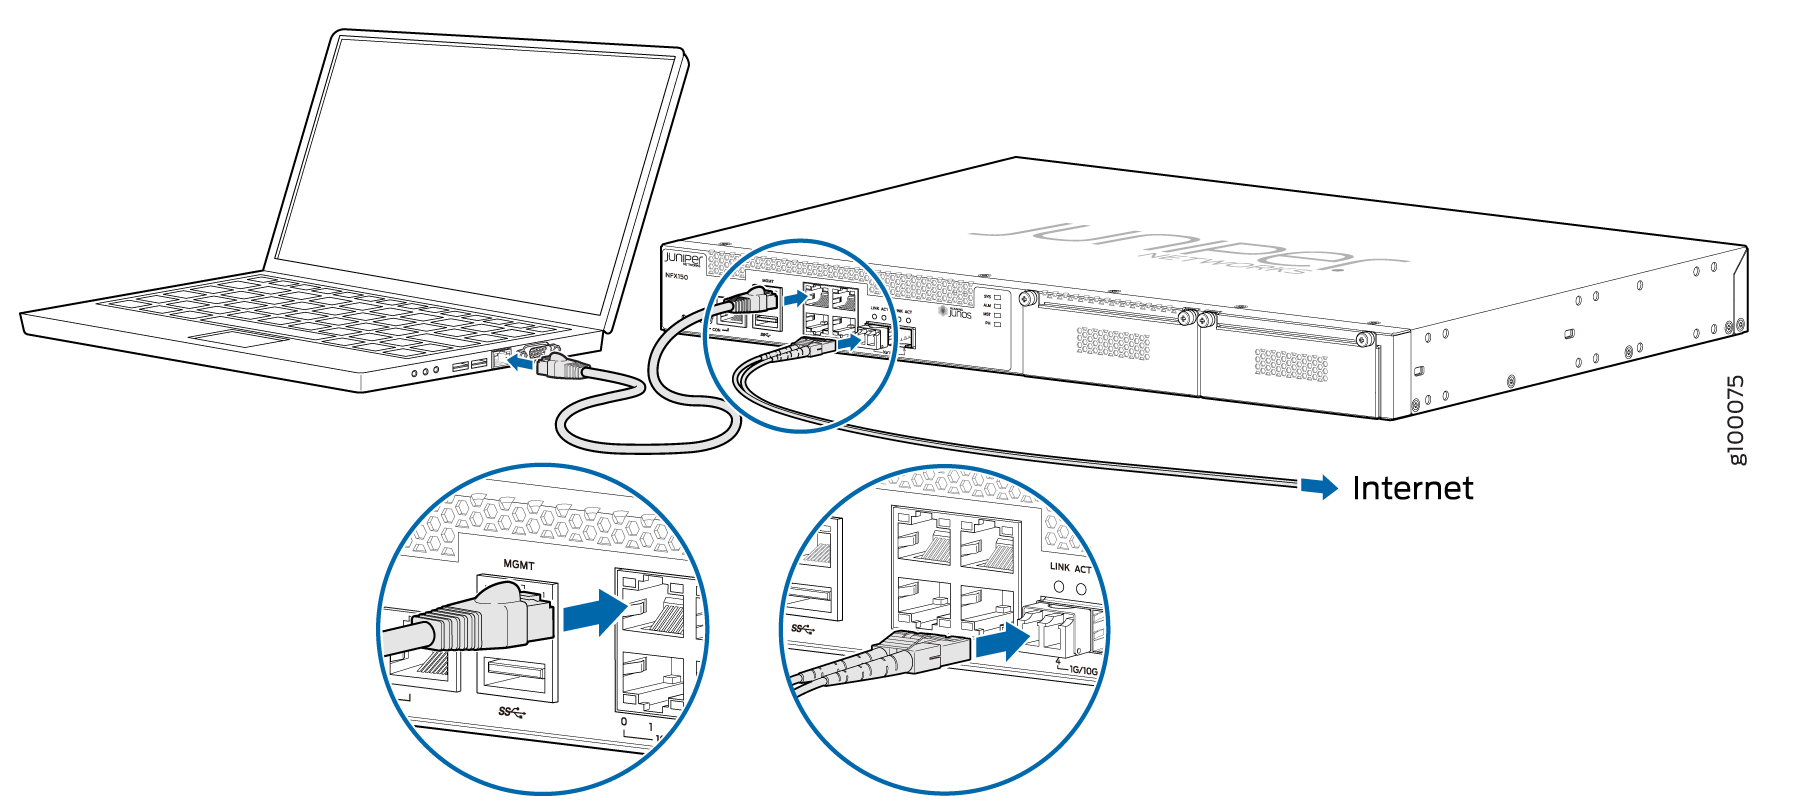
    Optionally, you can obtain a SIM card from the ISP and connect the device through LTE.

    Note:

    The LTE expansion module must be purchased separately.

  2. Connect the laptop to one of the front panel LAN ports. The laptop is assigned an IP address by the DHCP server running on the interface.
  3. Open a browser on your laptop, navigate to https://www.juniper.net, and verify your connectivity.