Setting Up Logical Systems
Logical Systems enable you to create an interface and configure IP addresses. It shows how to add users to a user logical system. For more information, see the following topics:
Using Junos OS to Configure Logical System Administrators
Using Junos OS, you can partition a single router or switch into multiple logical devices that perform independent routing or switching tasks. When creating logical systems, you must configure logical system administrators and interfaces, assign logical interfaces to logical systems, and configure various other logical system statements.
The primary administrator can assign one or more logical system administrators to each logical system. Once assigned to a logical system, administrators are restricted to viewing only configurations of the logical system to which they are assigned and accessing only the operational commands that apply to that particular logical system. This restriction means that these administrators cannot access global configuration statements, and all command output is restricted to the logical system to which the administrators are assigned.
To configure logical system administrators, include the logical-system logical-system-name statement
at the [edit system login class class-name] hierarchy level and apply the class to the user. For example:
[edit]
system {
    login {
        class admin1 {
            permissions all;
            logical-system logical-system-LS1;
        }
        class admin2 {
            permissions view; # Gives users assigned to class admin2 the ability to view
# but not to change the configuration.
            logical-system logical-system-LS2;
        }
        user user1 {
            class admin1;
        }
        user user2 {
            class admin2;
        }
    }
}
Fully implementing logical systems requires that you also configure any protocols, routing statements, switching statements, and policy statements for the logical system.
Example: Creating an Interface on a Logical System
This example shows how to create an interface on a logical system.
Requirements
For the interface on the logical
system to have connectivity, the corresponding physical interface
must be administratively up, and the physical link must be up. You
can verify the status of the physical interface by running the show interfaces terse command.
Overview
In logical systems, you must treat each interface like a point-to-point connection because you can only connect one logical tunnel interface to another at any given time. Also, you must select an interface encapsulation type, specify a DLCI number or VLAN identifier, configure a corresponding protocol family, and set the logical interface unit number of the peering lt interface.
To configure the interface encapsulation type, include
the dlci, encapsulation, family, peer-unit, and vlan-id statements at the following
hierarchy levels:
M Series, MX Series, or T Series router (primary administrator only)—
[edit interfaces lt-fpc/pic/0 unit unit-number]Logical system—
[edit logical-systems logical-system-name interfaces lt-fpc/pic/0 unit unit-number][edit] logical-systems logical-system-name { interfaces { lt-fpc/pic/0 { unit unit-number { encapsulation (ethernet | ethernet-ccc | ethernet-vpls | frame-relay | frame-relay-ccc | vlan | vlan-ccc | vlan-vpls); peer-unit number; # The logical unit number of the peering lt interface. dlci dlci-number; vlan-id vlan-number; family (ccc | inet | inet6 | iso | mpls | tcc); } } } }
Note:When you configure IPv6 addresses on a logical tunnel interface, you must configure unique IPv6 link-local addresses for any logical interfaces that peer with one another. To configure a link-local address, you must be the primary administrator. Include a second IPv6 address with the
addressstatement at the[edit interfaces lt-fpc/pic/port unit unit-number family inet6]hierarchy level. Link-local addresses typically begin with the numbers fe80 (such as fe80::1111:1/64).
In this example, you create the fe-1/1/3 physical interface on the main router. You can also add values for properties that you need to configure on the physical interface, such as physical encapsulation, VLAN tagging (enabling), and link speed.
The example then shows how to assign logical interfaces to a logical system. Once you do this, the logical interfaces are considered part of the logical system.
Any logical interface unit can only be assigned to one system, including the main router. For example, if you configure logical unit 3 in the main router, you cannot configure logical unit 3 in a logical system.
In this example, you create logical unit 0 on Logical System LS1. You can also add values for properties that you need to configure on the logical interface, such as logical interface encapsulation, VLAN ID number, and protocol family.
Configuration
CLI Quick Configuration
To quickly configure this example, copy the
following commands, paste them into a text file, remove any line breaks,
change any details necessary to match your network configuration,
and then copy and paste the commands into the CLI at the [edit] hierarchy level.
set interfaces fe-1/1/3 description "main router interface"
set logical-systems LS1 interfaces fe-1/1/3 unit 0 description "LS1 interface"
set logical-systems LS1 interfaces fe-1/1/3 unit 0 family inet address 10.11.2.2/24
Procedure
Step-by-Step Procedure
The following example requires you to navigate various levels in the configuration hierarchy. For information about navigating the CLI, see Using the CLI Editor in Configuration Mode in the CLI User Guide.
To configure an interface on a logical system:
As the primary administrator, configure the physical interface on the main router.
[edit]
user@host# set interfaces fe-1/1/3 description "main router interface"
Create the logical system interface on the logical unit.
[edit]
user@host# set logical-systems LS1 interfaces fe-1/1/3 unit 0 description "LS1 interface"
user@host# set logical-systems LS1 interfaces fe-1/1/3 unit 0 family inet address 10.11.2.2/24
If you are done configuring the device, commit the configuration.
[edit]
user@host# commit
Verification
To verify that the configuration is working
properly, issue the show interfaces command.
Configuring Logical System Interface Properties
With Junos OS, you can partition a single physical router into multiple logical devices that perform independent routing tasks. Because logical systems perform a subset of the tasks once handled by the physical router, logical systems offer an effective way to maximize the use of a single router.
See Also
Example: Connecting a Logical System to a Physical Router
This example shows how to configure an interface on a logical system to connect to a separate router. The separate router can be a physical router or a logical system on a physical router.
Requirements
PICs must be installed on the two routers.
Overview
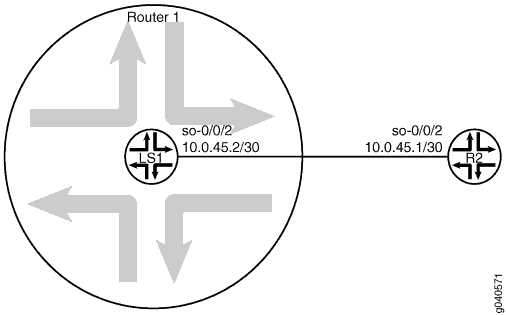
In this example, Logical System LS1 is configured on Router R1. The Logical System LS1 has a direct connection to Router R2.
Topology
Figure 1 shows the topology used in this example.
Configuration
CLI Quick Configuration
To quickly configure this example, copy the
following commands, paste them into a text file, remove any line breaks,
change any details necessary to match your network configuration,
and then copy and paste the commands into the CLI at the [edit] hierarchy level.
Router R1
set interfaces so-0/0/2 description "main router interface to R2"
set logical-systems LS1 interfaces so-0/0/2 unit 0 description LS1->R2
set logical-systems LS1 interfaces so-0/0/2 unit 0 family inet address 10.0.45.2/30
Device R2
set interfaces so-0/0/2 description R2->LS1
set interfaces so-0/0/2 unit 0 family inet address 10.0.45.1/30
Procedure
Step-by-Step Procedure
The following example requires you to navigate various levels in the configuration hierarchy. For information about navigating the CLI, see Using the CLI Editor in Configuration Mode in the CLI User Guide.
To connect a logical system to a physical router:
On Router R1, configure the interface.
[edit]
user@R1# set interfaces so-0/0/2 description "main router interface to R2"
On Router R1, configure the Logical System LS1 interface.
[edit]
user@R1# set logical-systems LS1 interfaces so-0/0/2 unit 0 description LS1->R2
user@R1# set logical-systems LS1 interfaces so-0/0/2 unit 0 family inet address 10.0.45.2/30
On Device R2, configure the interface to Logical System LS1.
[edit]
user@R2# set interfaces so-0/0/2 description R2->LS1
user@R2# set interfaces so-0/0/2 unit 0 family inet address 10.0.45.1/30
If you are done configuring the devices, commit the configurations.
[edit]
user@host# commit
Verification
Confirm that the configuration is working properly.
Verifying Connectivity
Purpose
Make sure that the devices can ping each other.
Action
user@R2> ping 10.0.45.2
PING 10.0.45.2 (10.0.45.2): 56 data bytes
64 bytes from 10.0.45.2: icmp_seq=0 ttl=64 time=3.910 ms
64 bytes from 10.0.45.2: icmp_seq=1 ttl=64 time=3.559 ms
64 bytes from 10.0.45.2: icmp_seq=2 ttl=64 time=3.503 ms
user@R1> set cli logical-system LS1
Logical system: LS1
user@R1:LS1> ping 10.0.45.1
PING 10.0.45.1 (10.0.45.1): 56 data bytes
64 bytes from 10.0.45.1: icmp_seq=0 ttl=64 time=1.217 ms
64 bytes from 10.0.45.1: icmp_seq=1 ttl=64 time=1.183 ms
64 bytes from 10.0.45.1: icmp_seq=2 ttl=64 time=1.121 ms
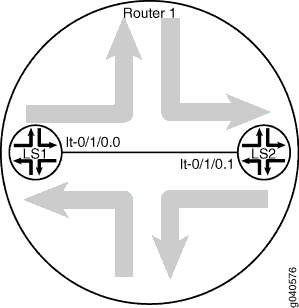
Example: Connecting Logical Systems Within the Same Device Using Logical Tunnel Interfaces on MX Series Routers and EX Series Switches
This example shows how to configure logical tunnel interfaces to connect two logical systems that are configured in a single router.
Requirements
On M Series and T Series routers, you can create a logical tunnel interface if you have a Tunnel Services PIC installed on an Enhanced FPC in your routing platform.
On M40e routers, you can create a logical tunnel interface if you have a Tunnel Services PIC. (An Enhanced FPC is not required.)
On an M7i router, logical tunnel interfaces can be created by using the integrated Adaptive Services Module.
On an MX Series router, the primary administrator
can configure logical tunnel interfaces by including the tunnel-services statement at the [edit chassis fpc slot-number pic number] hierarchy level.
Overview
To connect two logical systems, you configure a logical tunnel interface on both logical systems. Then you configure a peer relationship between the logical tunnel interfaces, thus creating a point-to-point connection. Logical tunnel interfaces behave like regular interfaces. You can configure them with Ethernet, Frame Relay, or another encapsulation type. You can also configure routing protocols across them. In effect, the logical tunnel (lt) interfaces connect two logical systems within the same router. The two logical systems do not share routing tables. This means that you can run dynamic routing protocols between different logical systems within the same router.
You must treat each interface like a point-to-point connection because you can only connect one logical tunnel interface to another at any given time. Also, you must select an interface encapsulation type, configure a corresponding protocol family, and set the logical interface unit number of the peering lt interface.
In this example, the logical tunnel interfaces are configured
to behave as Ethernet interfaces with the encapsulation ethernet statement. The IS-IS Protocol is enabled on the logical tunnel interfaces
with the family iso statement.
When configuring logical tunnel interfaces, note the following:
-
The peering logical interfaces must have the same physical lt interface name. For example, a logical unit on lt-0/1/0 cannot peer with a logical unit on lt-0/0/10. The FPC, PIC, and port numbers must match.
-
The peering logical interfaces must be derived from the same PIC or module.
-
You can configure only one peer unit for each logical interface. For example, unit 0 cannot peer with both unit 1 and unit 2.
-
Logical tunnels are not supported with Adaptive Services, MultiServices, or Link Services PICs, but they are supported on the Adaptive Services Module on M7i routers.
Configuration
CLI Quick Configuration
To quickly configure this example, copy the
following commands, paste them into a text file, remove any line breaks,
change any details necessary to match your network configuration,
and then copy and paste the commands into the CLI at the [edit] hierarchy level.
set logical-systems LS1 interfaces lt-0/1/0 unit 0 description LS1->LS2
set logical-systems LS1 interfaces lt-0/1/0 unit 0 encapsulation ethernet
set logical-systems LS1 interfaces lt-0/1/0 unit 0 peer-unit 1
set logical-systems LS1 interfaces lt-0/1/0 unit 0 family inet address 10.0.8.13/30
set logical-systems LS1 interfaces lt-0/1/0 unit 0 family iso
set logical-systems LS2 interfaces lt-0/1/0 unit 1 description LS2->LS1
set logical-systems LS2 interfaces lt-0/1/0 unit 1 encapsulation ethernet
set logical-systems LS2 interfaces lt-0/1/0 unit 1 peer-unit 0
set logical-systems LS2 interfaces lt-0/1/0 unit 1 family inet address 10.0.8.14/30
set logical-systems LS2 interfaces lt-0/1/0 unit 1 family iso
Procedure
Step-by-Step Procedure
The following example requires you to navigate various levels in the configuration hierarchy. For information about navigating the CLI, see Using the CLI Editor in Configuration Mode in the CLI User Guide.
To connect logical system interfaces:
-
Run the
show interfaces tersecommand to verify that the router has a logical tunnel (lt) interface.user@host> show interfaces terse Interface Admin Link Proto Local Remote so-0/0/0 up down so-0/0/1 up down so-0/0/2 up down so-0/0/3 up down gr-0/1/0 up up ip-0/1/0 up up lt-0/1/0 up up ...
-
Configure the logical tunnel interface on Logical System LS1.
[edit]
user@host# set logical-systems LS1 interfaces lt-0/1/0 unit 0 description LS1->LS2
user@host# set logical-systems LS1 interfaces lt-0/1/0 unit 0 encapsulation ethernet
user@host# set logical-systems LS1 interfaces lt-0/1/0 unit 0 peer-unit 1
user@host# set logical-systems LS1 interfaces lt-0/1/0 unit 0 family inet address 10.0.8.13/30
user@host# set logical-systems LS1 interfaces lt-0/1/0 unit 0 family iso
-
Configure the logical tunnel interface on Logical System LS2.
[edit]
user@host# set logical-systems LS2 interfaces lt-0/1/0 unit 1 description LS2->LS1
user@host# set logical-systems LS2 interfaces lt-0/1/0 unit 1 encapsulation ethernet
user@host# set logical-systems LS2 interfaces lt-0/1/0 unit 1 peer-unit 0
user@host# set logical-systems LS2 interfaces lt-0/1/0 unit 1 family inet address 10.0.8.14/30
user@host# set logical-systems LS2 interfaces lt-0/1/0 unit 1 family iso
-
If you are done configuring the device, commit the configuration.
[edit]
user@host# commit
Verification
Confirm that the configuration is working properly.
Verifying That the Logical Systems Are Up
Purpose
Make sure that the interfaces are properly configured.
Action
user@host> show interfaces terse
Interface               Admin Link Proto    Local                 Remote
so-0/0/0                up    down
so-0/0/1                up    down
so-0/0/2                up    down
so-0/0/3                up    down
gr-0/1/0                up    up
ip-0/1/0                up    up
lt-0/1/0                up    up
lt-0/1/0.0              up    up   inet     10.0.8.13/30
                                   iso
lt-0/1/0.1              up    up   inet     10.0.8.14/30
                                   iso
...
Verifying Connectivity Between the Logical Systems
Purpose
Make sure that the network address appears as directly connected.
Action
user@host> show route logical-system all
logical-system: LS1

inet.0: 2 destinations, 2 routes (2 active, 0 holddown, 0 hidden)
+ = Active Route, - = Last Active, * = Both

10.0.8.12/30       *[Direct/0] 00:00:34
                    > via lt-0/1/0.0
10.0.8.13/32       *[Local/0] 00:00:34
                      Local via lt-0/1/0.0
-----

logical-system: LS2

inet.0: 2 destinations, 2 routes (2 active, 0 holddown, 0 hidden)
+ = Active Route, - = Last Active, * = Both

10.0.8.12/30       *[Direct/0] 00:00:34
                    > via lt-0/1/0.1
10.0.8.14/32       *[Local/0] 00:00:34
                      Local via lt-0/1/0.1
...
Example: Connecting Logical Systems Within the Same Router Using Logical Tunnel Interfaces
This example shows how to configure logical tunnel interfaces to connect two logical systems that are configured in a single MX Series 5G Universal Routing Platform.
Requirements
The MX Series router chassis must have a DPC, MPC, or MIC installed and in the online state.
Overview
To connect two logical systems, you configure a logical tunnel interface on both logical systems. Then you configure a peer relationship between the logical tunnel interfaces, thus creating a point-to-point connection. Logical tunnel interfaces behave like regular interfaces. You can configure them with Ethernet, Frame Relay, or another encapsulation type. You can also configure routing protocols across them. In effect, the logical tunnel (lt) interfaces connect two logical systems within the same router. The two logical systems do not share routing tables. This means that you can run dynamic routing protocols between different logical systems within the same router.
You must treat each interface like a point-to-point connection because you can only connect one logical tunnel interface to another at any given time. Also, you must select an interface encapsulation type, configure a corresponding protocol family, and set the logical interface unit number of the peering lt interface.
In this example, the logical tunnel interfaces are configured
to behave as Ethernet interfaces with the encapsulation ethernet statement. The IS-IS Protocol is enabled on the logical tunnel interfaces
with the family iso statement.
When configuring logical tunnel interfaces, note the following:
-
The peering logical interfaces must have the same lt interface name. For example, a logical unit on lt-0/1/0 cannot peer with a logical unit on lt-0/0/10. The FPC (DPC, MPC, or MIC), PIC, and port numbers must match.
-
The peering logical interfaces must be derived from the same module.
-
You can configure only one peer unit for each logical interface. For example, unit 0 cannot peer with both unit 1 and unit 2.
Configuration
CLI Quick Configuration
To quickly configure this example, copy the
following commands, paste them into a text file, remove any line breaks,
change any details necessary to match your network configuration,
and then copy and paste the commands into the CLI at the [edit] hierarchy level.
set chassis fpc 0 pic 1 tunnel-services bandwidth 1g
set logical-systems LS1 interfaces lt-0/1/0 unit 0 description LS1->LS2
set logical-systems LS1 interfaces lt-0/1/0 unit 0 encapsulation ethernet
set logical-systems LS1 interfaces lt-0/1/0 unit 0 peer-unit 1
set logical-systems LS1 interfaces lt-0/1/0 unit 0 family inet address 10.0.8.13/30
set logical-systems LS1 interfaces lt-0/1/0 unit 0 family iso
set logical-systems LS2 interfaces lt-0/1/0 unit 1 description LS2->LS1
set logical-systems LS2 interfaces lt-0/1/0 unit 1 encapsulation ethernet
set logical-systems LS2 interfaces lt-0/1/0 unit 1 peer-unit 0
set logical-systems LS2 interfaces lt-0/1/0 unit 1 family inet address 10.0.8.14/30
set logical-systems LS2 interfaces lt-0/1/0 unit 1 family iso
Procedure
Step-by-Step Procedure
The following example requires you to navigate various levels in the configuration hierarchy. For information about navigating the CLI, see Using the CLI Editor in Configuration Mode in the CLI User Guide.
To connect logical system interfaces:
-
Run the
show chassis fpccommand to verify that the router has a DPC, MPC, or MIC installed and is in the online state.user@host> show chassis fpc Temp CPU Utilization (%) Memory Utilization (%) Slot State (C) Total Interrupt DRAM (MB) Heap Buffer 0 Online 31 4 0 1024 14 21 1 Empty 2 EmptyThis output shows that slot 1 and slot 2 are empty. Slot 0 is online.
-
Configure FPC slot 0 to support logical tunnel (lt) interfaces.
[edit]
user@host# set chassis fpc 0 pic 1 tunnel-services bandwidth 1g
This command creates several tunnel interface types, including gr, ip, and lt. For this example, the important one is the logical tunnel (lt) interface.
-
Commit the configuration.
[edit]
user@host# commit
-
Run the
show interfaces tersecommand to verify that the router has a logical tunnel (lt) interface.user@host> show interfaces terse Interface Admin Link Proto Local Remote ... gr-0/1/0 up up ip-0/1/0 up up lt-0/1/0 up up ...
-
Configure the logical tunnel interface on Logical System LS1.
[edit]
user@host# set logical-systems LS1 interfaces lt-0/1/0 unit 0 description LS1->LS2
user@host# set logical-systems LS1 interfaces lt-0/1/0 unit 0 encapsulation ethernet
user@host# set logical-systems LS1 interfaces lt-0/1/0 unit 0 peer-unit 1
user@host# set logical-systems LS1 interfaces lt-0/1/0 unit 0 family inet address 10.0.8.13/30
user@host# set logical-systems LS1 interfaces lt-0/1/0 unit 0 family iso
-
Configure the logical tunnel interface on Logical System LS2.
[edit]
user@host# set logical-systems LS2 interfaces lt-0/1/0 unit 1 description LS2->LS1
user@host# set logical-systems LS2 interfaces lt-0/1/0 unit 1 encapsulation ethernet
user@host# set logical-systems LS2 interfaces lt-0/1/0 unit 1 peer-unit 0
user@host# set logical-systems LS2 interfaces lt-0/1/0 unit 1 family inet address 10.0.8.14/30
user@host# set logical-systems LS2 interfaces lt-0/1/0 unit 1 family iso
-
If you are done configuring the device, commit the configuration.
[edit]
user@host# commit
Verification
Confirm that the configuration is working properly.
Verifying That the Logical Systems Are Up
Purpose
Make sure that the interfaces are properly configured.
Action
user@host> show interfaces terse
Interface               Admin Link Proto    Local                 Remote
so-0/0/0                up    down
so-0/0/1                up    down
so-0/0/2                up    down
so-0/0/3                up    down
gr-0/1/0                up    up
ip-0/1/0                up    up
lt-0/1/0                up    up
lt-0/1/0.0              up    up   inet     10.0.8.13/30
                                   iso
lt-0/1/0.1              up    up   inet     10.0.8.14/30
                                   iso
...
Verifying Connectivity Between the Logical Systems
Purpose
Make sure that the network address appears as directly connected by running the command below. You can also ping the IP addresses to confirm the connectivity.
Action
user@host> show route logical-system all
logical-system: LS1

inet.0: 2 destinations, 2 routes (2 active, 0 holddown, 0 hidden)
+ = Active Route, - = Last Active, * = Both

10.0.8.12/30       *[Direct/0] 00:00:34
                    > via lt-0/1/0.0
10.0.8.13/32       *[Local/0] 00:00:34
                      Local via lt-0/1/0.0
-----

logical-system: LS2

inet.0: 2 destinations, 2 routes (2 active, 0 holddown, 0 hidden)
+ = Active Route, - = Last Active, * = Both

10.0.8.12/30       *[Direct/0] 00:00:34
                    > via lt-0/1/0.1
10.0.8.14/32       *[Local/0] 00:00:34
                      Local via lt-0/1/0.1
...