Routing and Interfaces for Primary Logical Systems
Logical systems enables you to configure the interfaces, routing instances and the routing protocol. The primary logical system administrator can display or clear the routing protocol parameters for all logical systems whereas the administrator for the user logical system can display or clear the protocol parameters for their own logical system. For more information, see the following topics:
Understanding Logical Systems Interfaces and Routing Instances
Logical interfaces on the device are allocated among the user logical systems by the primary administrator. The user logical system administrator configures the attributes of the interfaces, including IP addresses, and assigns them to routing instances and zones.
A routing instance is a collection of routing tables, interfaces, and routing protocol parameters. There can be multiple routing tables for a single routing instance—for example, unicast IPv4, unicast IPv6, and multicast IPv4 routing tables can exist in a single routing instance. Routing protocol parameters and options control the information in the routing tables.
Interfaces and routing instances can be configured in the primary logical system and in user logical systems. Configuring an interface or routing instance in a logical system is the same as configuring an interface or routing instance on a device that is not configured for logical systems. Any routing instance created within a logical system is only applicable to that logical system.
The default routing instance, primary, refers to the main inet.0 routing table in the logical system. The primary routing instance is reserved and cannot be specified as a routing instance. Routes are installed in the primary routing instance by default, unless a routing instance is specified. Configure global routing options and protocols for the primary routing instance by including statements at the [edit protocols] and [edit routing-options] hierarchy levels in the logical system.
You can configure only virtual router routing instance type in a user logical system. Only one virtual private LAN service (VPLS) routing instance type can be configured on the device and it must be in the interconnect logical system.
The user logical system administrator can configure and view all attributes for an interface or routing instance in a user logical system. All attributes of an interface or routing instance in a user logical system are also visible to the primary administrator.
Multicast is a “one source, many destinations” method of traffic distribution, which means the destinations needing to receive the information from a particular source receive the traffic stream. The primary and user logical system administrators can configure a logical system to support multicast applications. The same multicast configurations to configure a device as a node in a multicast network can be used in a logical system.
See Also
Example: Configuring Interfaces, Routing Instances, and Static Routes for the Primary and Interconnect Logical Systems and Logical Tunnel Interfaces for the User Logical Systems (Primary Administrators Only)
This topic covers configuration of interfaces, static routes, and routing instances for the primary and interconnect logical systems. It also covers configuration of logical tunnel interfaces for user logical systems.
Requirements
The example uses an SRX5600 device running Junos operating system (Junos OS) with logical systems.
Before you begin:
Read SRX Series Logical Systems Primary Administrator Configuration Tasks Overview to understand how and where this procedure fits in the overall primary administrator configuration process.
Understanding the Interconnect Logical System and Logical Tunnel Interfaces
Overview
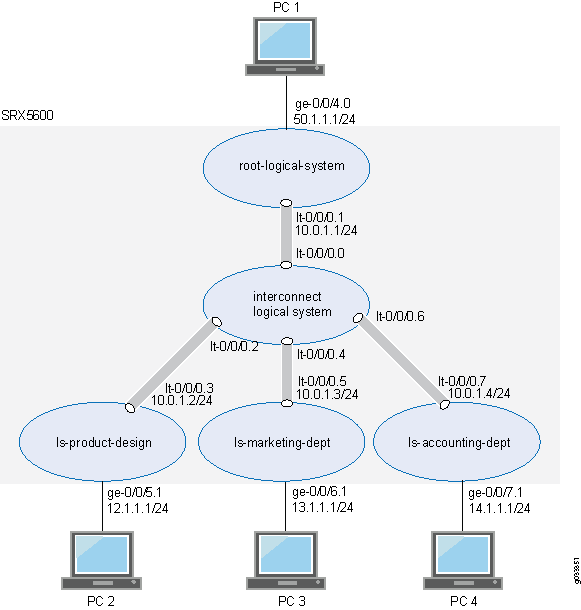
This scenario shows how to configure interfaces for the logical systems on the device, including an interconnect logical system.
For the interconnect logical system, the example configures logical tunnel interfaces lt-0/0/0.0, lt-0/0/0.2, lt-0/0/0.4, and lt-0/0/0.6. The example configures a routing instance called vr-ic and assigns the interfaces to it.
Because the interconnect logical system acts as a virtual switch, it is configured as a virtual private LAN service (VPLS) routing instance type. The interconnect logical system’s lt-0/0/0 interfaces are configured with ethernet-vpls as the encapsulation type. The corresponding peer lt-0/0/0 interfaces in the primary and user logical systems are configured with Ethernet as the encapsulation type.
lt-0/0/0.0 connects to lt-0/0/0.1 on the root logical system.
lt-0/0/0.2 connects to lt-0/0/0.3 on the ls-product-design logical system.
lt-0/0/0.4 connects to lt-0/0/0.5 on the ls-marketing-dept logical system.
lt-0/0/0.6 connects to lt-0/0/0.7 on the ls-accounting-dept logical system.
For the primary logical system, called root-logical-system, the example configures ge-0/0/4.0 and assigns it to the vr1-root routing instance. The example configures lt-0/0/0.1 to connect to lt-0/0/0.0 on the interconnect logical system and assigns it to the vr1-root routing instance. The example configures static routes to allow for communication with other logical systems and assigns them to the vr1-root routing instance.
For the ls-product-design logical system, the example configures lt-0/0/0.3 to connect to lt-0/0/0.2 on the interconnect logical system.
For the ls-marketing-dept logical system, the example configures lt-0/0/0.5 to connect to lt-0/0/0.4 on the interconnect logical system.
For the ls-accounting-dept logical system, the example configures lt-0/0/0.7 to connect to lt-0/0/0.6 on the interconnect logical system.
Figure 1 shows the topology for this deployment including virtual routers and their interfaces for all logical systems.
Topology
Configuration
This topic explains how to configure interfaces for logical systems.
- Configuring Logical Tunnel Interfaces and a Routing Instance for the Interconnect Logical System
- Configuring Interfaces, a Routing Instance, and Static Routes for the Primary Logical System
- Configuring Logical Tunnel Interfaces for the User Logical Systems
Configuring Logical Tunnel Interfaces and a Routing Instance for the Interconnect Logical System
CLI Quick Configuration
To quickly configure this example, copy the
following commands, paste them into a text file, remove any line breaks,
change any details necessary to match your network configuration,
copy and paste the commands into the CLI at the [edit] hierarchy
level, and then enter commit from configuration mode.
set logical-systems interconnect-logical-system interfaces lt-0/0/0 unit 0 encapsulation ethernet-vpls
set logical-systems interconnect-logical-system  interfaces lt-0/0/0 unit 0 peer-unit 1
set logical-systems interconnect-logical-system  interfaces lt-0/0/0 unit 2 encapsulation ethernet-vpls
set logical-systems interconnect-logical-system  interfaces lt-0/0/0 unit 2 peer-unit 3
set logical-systems interconnect-logical-system  interfaces lt-0/0/0 unit 4 encapsulation ethernet-vpls
set logical-systems interconnect-logical-system  interfaces lt-0/0/0 unit 4 peer-unit 5
set logical-systems interconnect-logical-system  interfaces lt-0/0/0 unit 6 encapsulation ethernet-vpls
set logical-systems interconnect-logical-system  interfaces lt-0/0/0 unit 6 peer-unit 7
set logical-systems interconnect-logical-system routing-instances vr-ic instance-type vpls
set logical-systems interconnect-logical-system  routing-instances vr-ic interface lt-0/0/0.0
set logical-systems interconnect-logical-system  routing-instances vr-ic interface lt-0/0/0.2
set logical-systems interconnect-logical-system  routing-instances vr-ic interface lt-0/0/0.4
set logical-systems interconnect-logical-system  routing-instances vr-ic interface lt-0/0/0.6
Step-by-Step Procedure
The following example requires you to navigate various levels in the configuration hierarchy. For instructions on how to do that, see Using the CLI Editor in Configuration Mode in the Junos OS CLI User Guide.
To configure the interconnect system lt-0/0/0 interfaces and routing instances:
Configure the lt-0/0/0 interfaces.
[edit logical-systems]
user@host# set interconnect-logical-system interfaces lt-0/0/0 unit 0 encapsulation ethernet-vpls
user@host# set interconnect-logical-system  interfaces lt-0/0/0 unit 0 peer-unit 1
user@host# set interconnect-logical-system  interfaces lt-0/0/0 unit 2 encapsulation ethernet-vpls
user@host# set interconnect-logical-system  interfaces lt-0/0/0 unit 2 peer-unit 3
user@host# set interconnect-logical-system  interfaces lt-0/0/0 unit 4 encapsulation ethernet-vpls
user@host# set interconnect-logical-system  interfaces lt-0/0/0 unit 4 peer-unit 5
user@host# set interconnect-logical-system  interfaces lt-0/0/0 unit 6 encapsulation ethernet-vpls
user@host# set interconnect-logical-system  interfaces lt-0/0/0 unit 6 peer-unit 7
Configure the routing instance for the interconnect logical system and add its lt-0/0/0 interfaces to it.
[edit logical-systems]
user@host# set interconnect-logical-system routing-instances vr-ic  instance-type vpls
user@host# set interconnect-logical-system  routing-instances vr-ic  interface lt-0/0/0.0
user@host# set interconnect-logical-system  routing-instances vr-ic  interface lt-0/0/0.2
user@host# set interconnect-logical-system  routing-instances vr-ic  interface lt-0/0/0.4
user@host# set interconnect-logical-system  routing-instances vr-ic interface lt-0/0/0.6
Results
From configuration mode, confirm your configuration
by entering the show logical-systems interconnect-logical-system command. If the output does not display the intended configuration,
repeat the configuration instructions in this example to correct it.
If you are done configuring the device, enter commit from configuration mode.
user@host# show logical-systems interconnect-logical-system
    interfaces {
        lt-0/0/0 {
            unit 0 {
                encapsulation ethernet-vpls;
                peer-unit 1;
            }
            unit 2 {
                encapsulation ethernet-vpls;
                peer-unit 3;
            }
            unit 4 {
                encapsulation ethernet-vpls;
                peer-unit 5;
            }
            unit 6 {
                encapsulation ethernet-vpls;
                peer-unit 7;
            }
        }
    }
        routing-instances {
            vr-ic {
                instance-type vpls;
                interface lt-0/0/0.0;
                interface lt-0/0/0.2;
                interface lt-0/0/0.4;
                interface lt-0/0/0.6;
            }
        }
Configuring Interfaces, a Routing Instance, and Static Routes for the Primary Logical System
CLI Quick Configuration
To quickly configure this example, copy the
following commands, paste them into a text file, remove any line breaks,
change any details necessary to match your network configuration,
copy and paste the commands into the CLI at the [edit] hierarchy
level, and then enter commit from configuration mode.
set interfaces ge-0/0/4 vlan-tagging
set interfaces ge-0/0/4 unit 0 vlan-id 600
set interfaces ge-0/0/4 unit 0 family inet address 50.1.1.1/24
set interfaces ge-0/0/5 vlan-tagging
set interfaces ge-0/0/6 vlan-tagging
set interfaces ge-0/0/7 vlan-tagging
set interfaces lt-0/0/0 unit 1 encapsulation ethernet
set interfaces lt-0/0/0 unit 1 peer-unit 0
set interfaces lt-0/0/0 unit 1 family inet address 10.0.1.1/24
set routing-instances vr1-root instance-type virtual-router
set routing-instances vr1-root interface ge-0/0/4.0
set routing-instances vr1-root interface lt-0/0/0.1
set routing-instances vr1-root routing-options static route 12.1.1.0/24 next-hop 10.0.1.2
set routing-instances vr1-root routing-options static route 13.1.1.0/24 next-hop 10.0.1.3
set routing-instances vr1-root routing-options static route 14.1.1.0/24 next-hop 10.0.1.4
Step-by-Step Procedure
The following example requires you to navigate various levels in the configuration hierarchy. For instructions on how to do that, see Using the CLI Editor in Configuration Mode.
To configure the primary logical system interfaces:
Configure the primary (root) logical and lt-0/0/0.1 interfaces.
[edit interfaces]
user@host# set ge-0/0/4 vlan-tagging
user@host# set ge-0/0/4 unit 0 vlan-id 600
user@host# set ge-0/0/4 unit 0 family inet address 50.1.1.1/24
user@host# set lt-0/0/0 unit 1 encapsulation ethernet
user@host# set lt-0/0/0 unit 1 peer-unit 0
user@host# set lt-0/0/0 unit 1 family inet address 10.0.1.1/24
Configure the interfaces for other logical systems to support VLAN tagging.
[edit interfaces]
user@host# set ge-0/0/5 vlan-tagging
user@host# set ge-0/0/6 vlan-tagging
user@host# set ge-0/0/7 vlan-tagging
Configure a routing instance for the primary logical system, assign its interfaces to it, and configure static routes for it.
[edit routing-instances]
user@host# set vr1-root instance-type virtual-router
user@host# set vr1-root interface ge-0/0/4.0
user@host# set vr1-root interface lt-0/0/0.1
user@host# set vr1-root routing-options static route 12.1.1.0/24 next-hop 10.0.1.2
user@host# set vr1-root routing-options static route 13.1.1.0/24 next-hop 10.0.1.3
user@host# set vr1-root routing-options static route 14.1.1.0/24 next-hop 10.0.1.4
Results
From configuration mode, confirm your configuration
by entering the show interfaces and show routing-instances commands. If the output does not display the intended configuration,
repeat the configuration instructions in this example to correct it.
[edit]
user@host# show interfaces
    ge-0/0/4 {
        vlan-tagging;
        unit 0 {
            vlan-id 600;
            family inet {
                address 50.1.1.1/24;
            }
        }
    }
        ge-0/0/5 {
            vlan-tagging;
        }
        ge-0/0/6 {
            vlan-tagging;
        }
        ge-0/0/7 {
            vlan-tagging;
        }
        lt-0/0/0 {
            unit 1 {
                encapsulation ethernet;
                peer-unit 0;
                family inet {
                    address 10.0.1.1/24;
                }
            }
        }
[edit]
user@host# show routing-instances
    vr1-root {
        instance-type virtual-router;
        interface ge-0/0/4.0;
        interface lt-0/0/0.1;
        routing-options {
            static {
                route 14.1.1.0/24 next-hop 10.0.1.4;
                route 12.1.1.0/24 next-hop 10.0.1.2;
                route 13.1.1.0/24 next-hop 10.0.1.3;
            }
        }
    }
If you are done configuring the device, enter commit from configuration mode.
Configuring Logical Tunnel Interfaces for the User Logical Systems
CLI Quick Configuration
To quickly configure this example, copy the
following commands, paste them into a text file, remove any line breaks,
change any details necessary to match your network configuration,
copy and paste the commands into the CLI at the [edit] hierarchy
level, and then enter commit from configuration mode.
set logical-systems ls-product-design interfaces lt-0/0/0 unit 3 encapsulation ethernet
set logical-systems ls-product-design interfaces lt-0/0/0 unit 3 peer-unit 2
set logical-systems ls-product-design interfaces lt-0/0/0 unit 3 family inet address 10.0.1.2/24
set logical-systems ls-marketing-dept interfaces lt-0/0/0 unit 5 encapsulation ethernet
set logical-systems ls-marketing-dept interfaces lt-0/0/0 unit 5 peer-unit 4
set logical-systems ls-marketing-dept interfaces lt-0/0/0 unit 5 family inet address 10.0.1.3/24
set logical-systems ls-accounting-dept interfaces lt-0/0/0 unit 7 encapsulation ethernet
set logical-systems ls-accounting-dept interfaces lt-0/0/0 unit 7 peer-unit 6
set logical-systems ls-accounting-dept interfaces lt-0/0/0 unit 7 family inet address 10.0.1.4/24
Step-by-Step Procedure
The following example requires you to navigate various levels in the configuration hierarchy. For instructions on how to do that, see Using the CLI Editor in Configuration Mode.
Configure the lt-0/0/0 interface for the first user logical system:
[edit logical-systems]
user@host# set ls-product-design interfaces lt-0/0/0 unit 3 encapsulation ethernet
user@host# set ls-product-design interfaces lt-0/0/0 unit 3 peer-unit 2
user@host# set ls-product-design interfaces lt-0/0/0 unit 3 family inet address 10.0.1.2/24
Configure the lt-0/0/0 interface for the second user logical system.
[edit logical-systems]
user@host# set ls-marketing-dept interfaces lt-0/0/0 unit 5 encapsulation ethernet
user@host# set ls-marketing-dept interfaces lt-0/0/0 unit 5 peer-unit 4
user@host# set ls-marketing-dept interfaces lt-0/0/0 unit 5 family inet address 10.0.1.3/24 face
Configure the lt-0/0/0 interface for the third user logical system.
[edit logical-systems]
user@host# set ls-accounting-dept interfaces lt-0/0/0 unit 7 encapsulation ethernet
user@host# set ls-accounting-dept interfaces lt-0/0/0 unit 7 peer-unit 6
user@host# set ls-accounting-dept interfaces lt-0/0/0 unit 7 family inet address 10.0.1.4/24
Results
From configuration mode, confirm your configuration
by entering the show logical-systems ls-product-design interfaces
lt-0/0/0, show logical-systems ls-marketing-dept interfaces
lt-0/0/0 , and show logical-systems ls-accounting-dept
interfaces lt-0/0/0 commands. If the output does not display
the intended configuration, repeat the configuration instructions
in this example to correct it.
user@host# show logical-systems ls-product-design interfaces lt-0/0/0
lt-0/0/0 {
    unit 3 {
        encapsulation ethernet;
        peer-unit 2;
        family inet {
            address 10.0.1.2/24;
        }
    }
}
user@host# show logical-systems ls-marketing-dept interfaces lt-0/0/0
    lt-0/0/0 {
        unit 5 {
            encapsulation ethernet;
            peer-unit 4;
            family inet {
                address 10.0.1.3/24;
            }
        }
    }
}
user@host# show logical-systems ls-accounting-dept interfaces lt-0/0/0
lt-0/0/0 {
    unit 7 {
        encapsulation ethernet;
        peer-unit 6;
        family inet {
            address 10.0.1.4/24;
        }
    }
}
If you are done configuring the device, enter commit from configuration mode.
Verification
To confirm that the configuration is working properly, perform these tasks:
Example: Configuring OSPF Routing Protocol for the Primary Logical Systems
This example shows how to configure OSPF for the primary logical system.
Requirements
Before you begin:
Log in to the primary logical system as the primary administrator. See Example: Configuring Root Password for Logical Systems.
Configure logical interfaces ge-0/0/4.0 and lt-0/0/0.1 for the primary logical system and assign them to the vr1-root routing instance. See Example: Configuring Interfaces, Routing Instances, and Static Routes for the Primary and Interconnect Logical Systems and Logical Tunnel Interfaces for the User Logical Systems (Primary Administrators Only).
Overview
In this example, you configure OSPF for the primary logical system, called root-logical-system, shown in Example: Creating User Logical Systems, Their Administrators, Their Users, and an Interconnect Logical System.
This example enables OSPF routing on the ge-0/0/4.0 and lt-0/0/0.1 interfaces in the primary logical system. You configure the following routing policies to export routes from the Junos OS routing table into OSPF in the vr1-root routing instance:
ospf-redist-direct—Routes learned from directly connected interfaces.
ospf-redist-static—Static routes.
ospf-to-ospf—Routes learned from OSPF.
Configuration
Procedure
CLI Quick Configuration
To quickly configure this example, copy the
following commands, paste them into a text file, remove any line breaks,
change any details necessary to match your network configuration,
copy and paste the commands into the CLI at the [edit] hierarchy level,
and then enter commit from configuration mode.
set policy-options policy-statement ospf-redist-direct from protocol direct
set policy-options policy-statement ospf-redist-direct then accept
set policy-options policy-statement ospf-redist-static from protocol static
set policy-options policy-statement ospf-redist-static then accept
set policy-options policy-statement ospf-to-ospf from protocol ospf
set policy-options policy-statement ospf-to-ospf then accept
set routing-instances vr1-root protocols ospf export ospf-redist-direct
 set routing-instances vr1-root protocols ospf export ospf-redist-static
set routing-instances vr1-root protocols ospf export ospf-to-ospf
set routing-instances vr1-root protocols ospf area 0.0.0.1 interface ge-0/0/4.0
set routing-instances vr1-root protocols ospf area 0.0.0.1 interface lt-0/0/0.1
Step-by-Step Procedure
The following example requires you to navigate various levels in the configuration hierarchy. For instructions on how to do that, see Using the CLI Editor in Configuration Mode in the Junos OS CLI User Guide.
To configure OSPF for the primary logical system:
Log in to the primary logical system as the primary administrator and enter configuration mode.
admin@host> configure
admin@host#
Create routing policies that accept routes.
[edit policy-options]
admin@host# set policy-statement ospf-redist-direct from protocol direct
admin@host# set policy-statement ospf-redist-direct then accept
admin@host# set policy-statement ospf-redist-static from protocol static
admin@host# set policy-statement ospf-redist-static then accept
admin@host# set policy-statement ospf-to-ospf from protocol ospf
admin@host# set policy-statement ospf-to-ospf then accept
Apply the routing policies to routes exported from the Junos OS routing table into OSPF.
[edit routing-instances]
admin@host# set vr1-root protocols ospf export ospf-redist-direct
admin@host# set vr1-root protocols ospf export ospf-redist-static
admin@host# set vr1-root protocols ospf export ospf-to-ospf
Enable OSPF on the logical interfaces.
[edit routing-instances]
admin@host# set vr1-root protocols ospf area 0.0.0.1 interface ge-0/0/4.0
admin@host# set vr1-root protocols ospf area 0.0.0.1 interface lt-0/0/0.1
Results
From configuration mode, confirm your configuration
by entering the show policy-options and show routing-instances commands. If the output does not display the intended configuration,
repeat the configuration instructions in this example to correct it.
For brevity, this show command output includes only
the configuration that is relevant to this example. Any other configuration
on the system has been replaced with ellipses (...).
[edit]
    admin@host# show policy-options
    policy-statement ospf-redist-direct {
        from protocol direct;
        then accept;
    }
    policy-statement ospf-redist-static {
        from protocol static;
        then accept;
    }
    policy-statement ospf-to-ospf {
        from protocol ospf;
        then accept;
    }
    [edit]
admin@host# show routing-instances
    vr1-root {
        ...
        protocols {
            ospf {
                export [ ospf-redist-direct ospf-to-ospf ospf-redist-static ];
                area 0.0.0.1 {
                    interface lt-0/0/0.1;
                    interface ge-0/0/4.0;
                }
            }
        }
    }
If you are done configuring the device, enter commit from configuration mode.
Verification
Confirm that the configuration is working properly.
Verifying OSPF Interfaces
Purpose
Verify OSPF-enabled interfaces.
Action
From the CLI, enter the show ospf interface instance
vr1-root command.
admin@host> show ospf interface instance vr1-root
Interface           State   Area            DR ID           BDR ID          Nbrs
lt-0/0/0.1          DR      0.0.0.0         10.0.1.1        0.0.0.0            0
ge-0/0/4.0          DR      0.0.0.1         10.0.1.1        0.0.0.0            0
Verifying OSPF Neighbors
Purpose
Verify OSPF neighbors.
Action
From the CLI, enter the show ospf neighbor instance
vr1-root command.
admin@host> show ospf neighbor instance vr1-root
Address 	 Interface		State	  ID		   Pri	Dead
10.0.1.2	 plt0.3 		Full	  0.0.0.0	   128	  39
Verifying OSPF Routes
Purpose
Verify OSPF routes.
Action
From the CLI, enter the show ospf route instance
vr1-root command.
admin@host> show ospf route instance vr1-root
Topology default Route Table:

Prefix             Path  Route      NH       Metric NextHop       Nexthop
                   Type  Type       Type            Interface     Address/LSP
10.0.1.0/24        Intra Network    IP            1 lt-0/0/0.1
12.12.1.0/24       Intra Network    IP            1 ge-0/0/4.0