Junos OS Installation and Upgrade Overview
You receive a Juniper Networks device with the Junos® OS preinstalled. When you power on the device, it uses the installed software to start (boot). As new features and software fixes become available, you must upgrade your software for better user experience. Before the upgrade, back up the configuration files. Read this topic to understand what you’ll gain when you upgrade Junos OS.
In the rapidly changing era of mobile, cloud, and the Internet of Things (IoT) technologies, network and security challenges are commonplace. A legacy operating system (OS) for network infrastructure is insufficient to address these challenges. An outdated version of software on your devices increases risks, such as cyber attacks, to both your users and the network environment. In addition, the complexity of maintaining an outdated OS can lower your team’s operational efficiency and cost valuable resources such as time and money. You also run the risk of incurring business loss due to noncompliance with government and other organizational regulations because of an outdated OS on your devices.
We understand that you might have concerns about upgrading to the latest Junos OS, including:
- Network downtime and maintenance disrupting business continuity
- Higher operational cost and lower employee productivity because of learning curves and training
- Configuration compatibility between releases
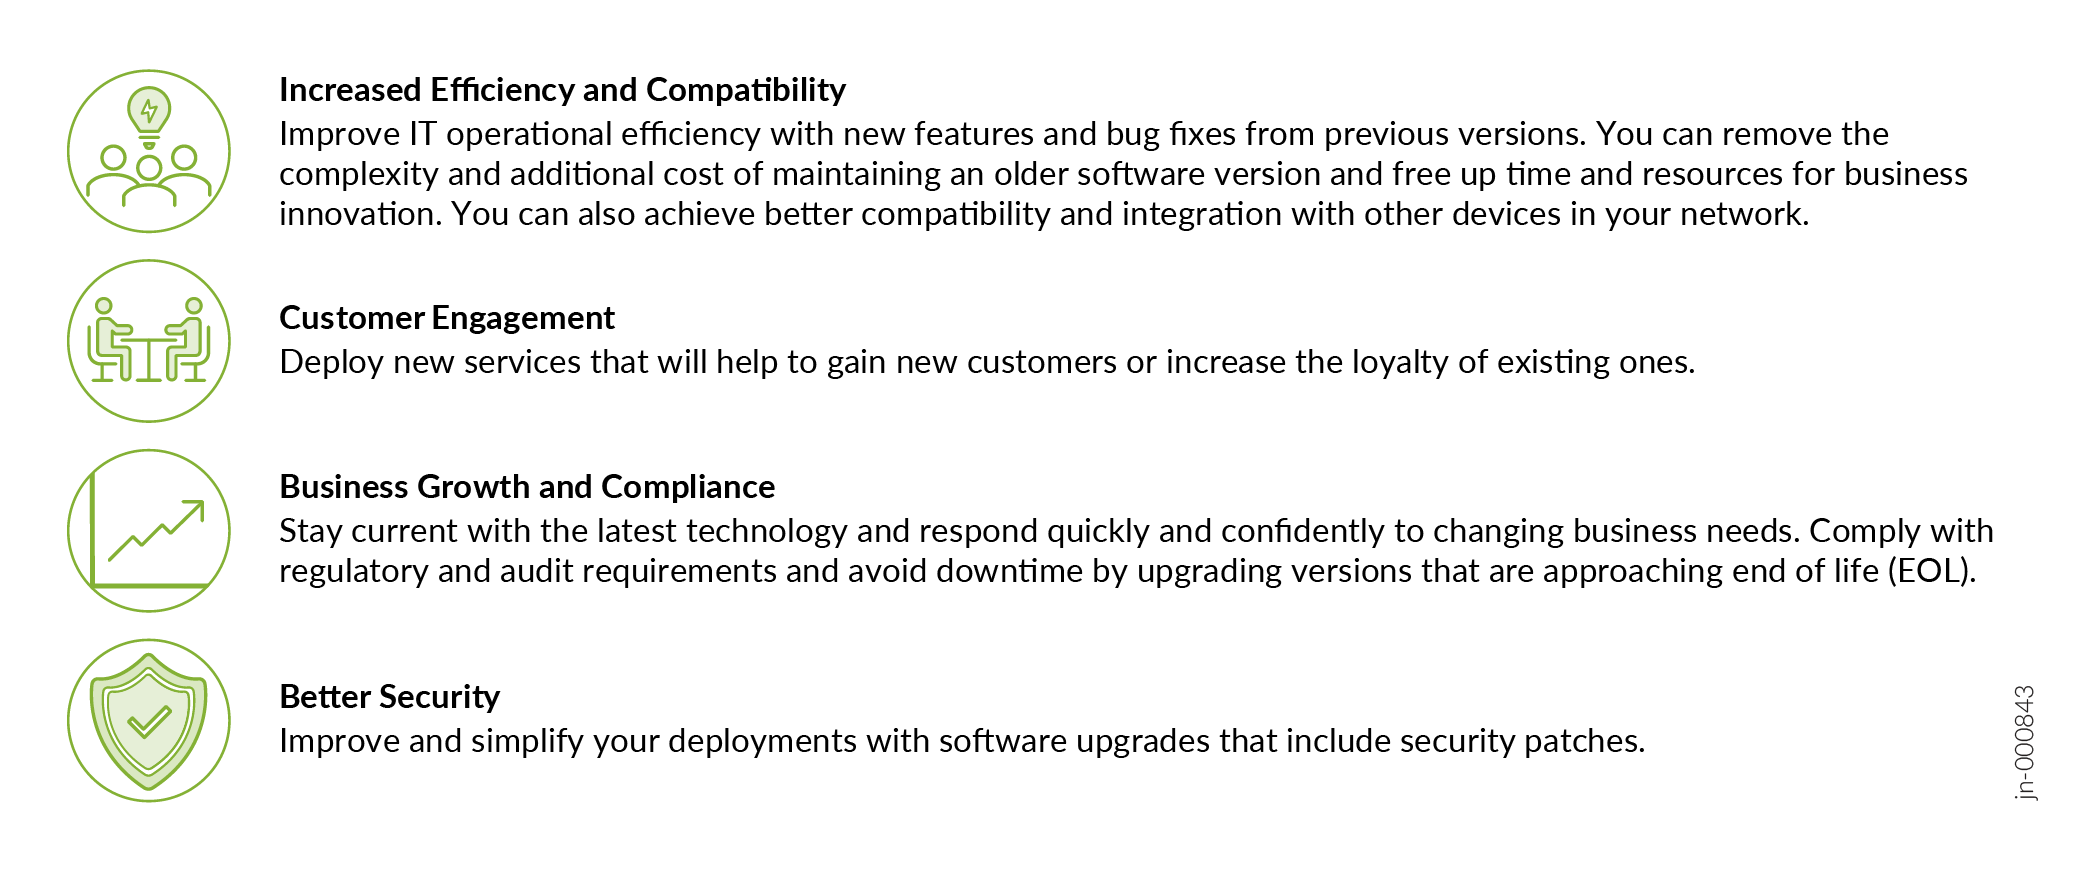
However, the benefits of upgrading to the latest supported Junos OS often outweigh the potential risks of using an outdated OS. A newer version of the Junos OS includes new features, enhancements, and bug fixes; many customers find the value of upgrading to a new version beneficial to their organization with immediate returns from an upgrade. Here are the top benefits of keeping your software up to date:
How You Can Get Started
A Juniper Networks device is delivered with Junos OS preinstalled. When you power on the device, it starts (boots) using the installed software. As new features and software fixes become available, you must upgrade your software to use these features and fixes.
When you upgrade (or downgrade) a Junos OS version, you must first copy a software installation package to your device or other system on your local network. Then you use the CLI to install the new software on the device. You then reboot the device, which boots from the newly installed software.
The first step is to determine the required software version. For more information about software versions, see Junos Software Versions - Suggested Releases to Consider and Evaluate.
Before you install software on a device that is configured with custom YANG data models, back up and remove the configuration data corresponding to these data models from the active configuration. For more information, see Managing YANG Packages and Configurations During a Software Upgrade or Downgrade.
We understand that upgrading on an infrastructure device might require a scheduled downtime as well as tasks before and after the upgrade. Additionally, you might need to create plans and document the upgrade steps to ensure a successful outcome.
When you plan for an upgrade, we recommend that you review:
Product Data Sheets accessible from Products & Services or contact your Juniper Account Team or your Juniper Partner.
Knowledge Base (KB) articles that are related to Junos OS upgrade on our Support site.
The Juniper Licensing User Guide to learn about Junos OS software licensing and which software licenses you might need for your device. The following Table 1 provides a quick reference taking you to the licensing information for your particular platform.
Junos OS Devices |
Reference Topics |
|---|---|
Juniper Networks® EX Series Switches |
|
Juniper Networks® MX Series Universal Routers |
Software Licenses for MX Series Routers and MPC Service Cards |
Juniper Networks® QFX Series Switches |
|
Juniper Networks® SRX Series Firewalls |
We provide a simple upgrade path that enables you to quickly and easily upgrade your Junos OS software and start using the new capabilities on your device. You can perform the upgrade as shown in the following illustration:
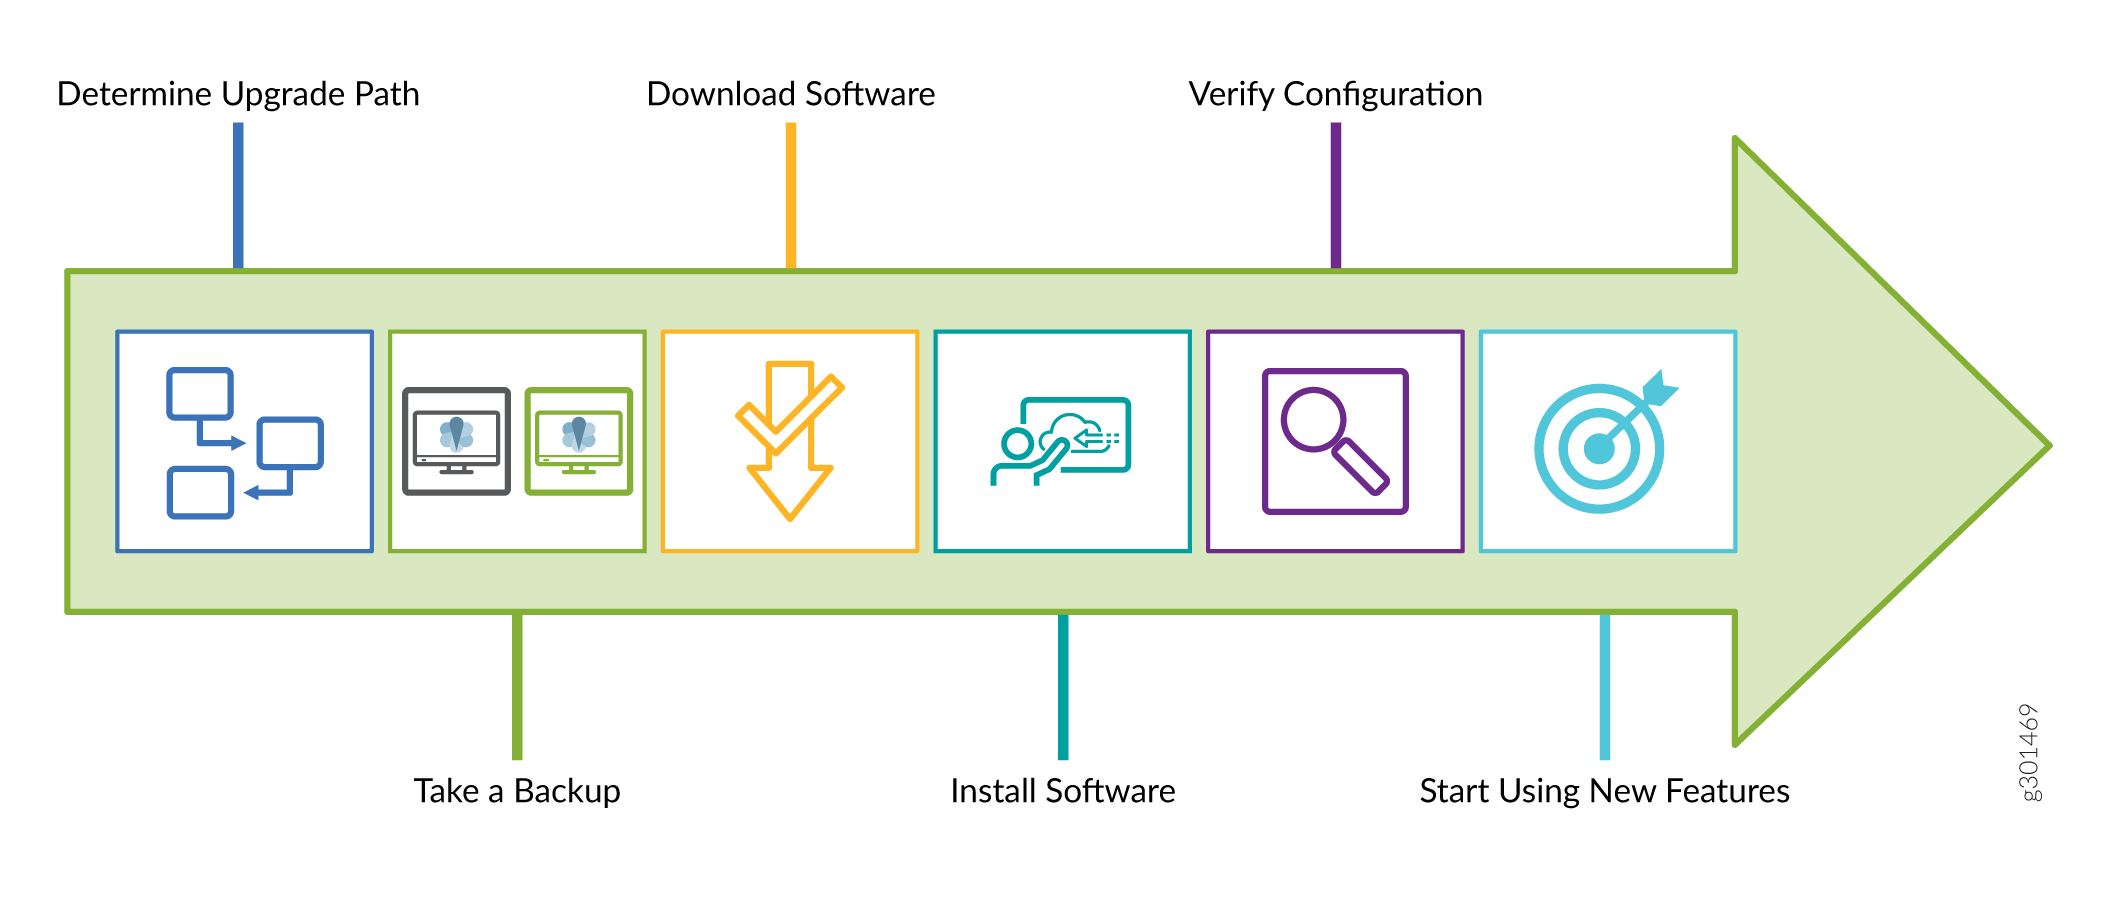
To determine your upgrade path, see the KB article at Junos Software Versions - Suggested Releases to Consider and Evaluate and talk to support at Contact Support.
To take a backup, see Back Up the Current System’s Files.
To download the software, see Downloads. You can find the related KB articles at the Support site.
To install and to verify the software, see:
Installing Software on Routing Devices (Junos OS) for routers.
Installing Software on Switches for switches.
Upgrades for SRX Series Firewalls for firewalls.
Considerations for Junos OS Installation
The following subsections introduce the overall considerations in installing the software:
- Select the Junos OS Installation Type
- Back Up the Current System’s Files
- Determine Which Software Installation Package to Install
- Upgrade Using an Out-of-Band Interface
- Validate the Installation Package with the Current Configuration
Select the Junos OS Installation Type
The three types of installations that you can use to upgrade or downgrade the Junos OS running on your device are standard installation, category change installation, and recovery installation. Before you select the installation type, see Junos OS Installation Package Names to understand the different Junos OS installation packages. To understand which installation type best fits your need, see the following table.
| Standard Installation | The standard installation type is the typical method you use to upgrade or downgrade software on the server. With this method, you can use an installation package that matches the installation package already installed on your device. |
| Category Change Installation | The category change installation type is the process you use to move from one edition of Junos OS to another on the same device. For example, moving from a Junos OS standard installation to a Junos-FIPS installation on a router. When you move from one installation category to another, you must be aware of the restrictions regarding this change. Juniper Networks does not support using the Note:
We have a simple edition scheme—Junos and Junos Limited editions. The Junos edition has full cryptography support. The Junos Limited edition has limited cryptography support. You cannot change between editions. |
| Recovery Installation | The recovery installation type is the process you use to repair a device with damaged software or a condition that prevents the upgrade, downgrade, or change in installation category of the software. |
Back Up the Current System’s Files
We recommend that you create a backup of your device before you start an upgrade. Your device can:
Boot from a backup and come back online in case of an upgrade failure or corruption of the primary boot device because of a power failure during the upgrade.
Retrieve the active configuration files and log files from the backup.
Recover from a known, stable environment in case of an unsuccessful upgrade.
During a successful upgrade, the upgrade package completely reinstalls the existing OS. Although the upgrade process removes all stored files, it retains only the juniper.conf and SSH files. Other information is removed. The juniper.conf file stores the operational device configuration. Therefore, you must back up your existing configuration in case you need to return to it after running the installation program.
To take a backup, you use the system snapshot feature to take a snapshot of the files currently used to run the device. The snapshot captures the complete contents of the /config and /var directories, which include the software that runs on your device, the active configuration, and the rescue configuration. The device copies these files into an alternative (an internal flash or an external USB flash) memory source. You can then use this snapshot to boot the device at the next boot up or as a back-up boot option. When you complete the backup, the existing and backup software installations are identical.
Snapshots taken with the request system snapshot command in a system with Junos OS with upgraded FreeBSD are not the same as snapshots taken with the request system snapshot command in a legacy Junos OS system. To back up your Junos OS with upgraded FreeBSD system devices, use the request system snapshot recovery command.
To determine if your system uses Junos OS with upgraded FreeBSD, see: Junos kernel upgrade to FreeBSD 10+.
When you issue the correct snapshot command, the /root file system is backed up to the /altroot file system and the /config file system is backed up to the /altconfig file system. The /root and /config file systems are on the device’s flash memory device. The /altroot and /altconfig file systems are on the device’s hard disk or solid-state drive (SSD). See Backing Up an Installation Using Snapshots (Junos OS) for more details.
We recommend that you understand the boot sequence on your device before you use the backup. See Boot Sequence on Devices with Routing Engines (Junos OS) for more details.
Determine Which Software Installation Package to Install
We deliver all software releases in signed packages that contain digital signatures to ensure that you download the official Juniper Networks software. You can either download software to the /var/tmp directory of your device, or install it directly from the Downloads page at https://support.juniper.net/support/downloads/.
To learn about the software packages currently running on a device, enter the show version operational mode command at the top level of the CLI. The output of the show version command displays the release number of the installed software but not the installed software edition.
For more information about signed software packages, see the Junos OS Installation Package Names. For information on software images signed with post-quantum cryptography (PQC), see PQC Signatures for Software Images.
Upgrade Using an Out-of-Band Interface
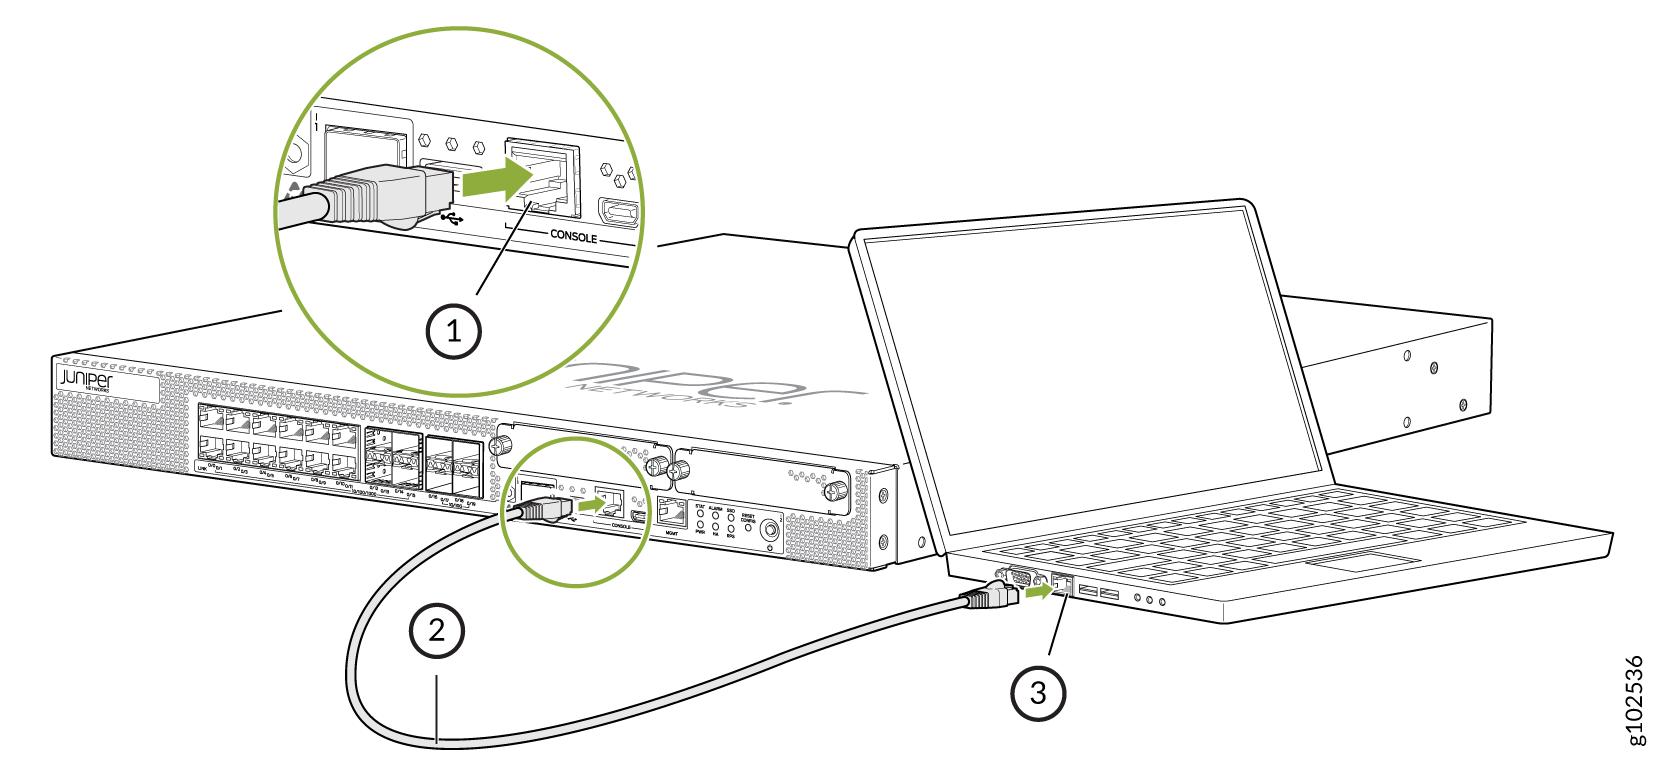
We recommend that you upgrade all individual software packages using an out-of-band connection from the console or the management Ethernet interface. When you upgrade your Junos OS software by connecting to the console port on your Junos OS device, you can:
Connect to the Junos OS device without using the network to which the device might or might not be connected. This connection creates a secondary path to the Junos OS device without relying on the network.
Experience seamless connectivity (you might lose connectivity when you use in-band connections during an upgrade process).
Have root access to the Junos OS device through a terminal or laptop interface, regardless of the state of the Junos OS device, unless it is completely powered off.
Restore a Junos OS device or securely configure a minimum configuration through the terminal interface. A network operations technician located far away can perform these tasks securely on a terminal interface by using a modem, even if the primary network fails. Without a connection to the console port, a technician would have to visit the site to perform these tasks. A remote connection to the Junos OS device through a modem requires:
A cable and a connector, which are provided in the device accessory box.
A DB-9 to DB-25 (or similar) adapter for your modem, which you must purchase separately.
To configure the device initially, you must connect a terminal or laptop computer to the device through the console port, as shown in Figure 2.
Validate the Installation Package with the Current Configuration
When you upgrade or downgrade software, we recommend that you include the validate option with the request system software add command to check whether the candidate software is compatible or not with the current configuration. When you add a package with a different release number, Junos OS validates compatibility between the software and the current configuration by default.
Direct validation of the running configuration does not work when you upgrade to a release that is based on Junos OS with upgraded FreeBSD from a Junos OS release that is based on older versions of the FreeBSD kernel. Therefore, when you upgrade or downgrade between older Junos OS and Junos OS with upgraded FreeBSD, you might have to validate on a different host. For details, see Upgrading and Downgrading to Junos with Upgraded FreeBSD.
If you do not want to validate during the upgrade, you must specify the no-validate option.
Best Practices for Upgrading Junos OS
We suggest that you start with the following best practices to optimize your upgrade experience:
Read the Junos OS Release Notes for the release to which you are upgrading.
Plan and document the upgrade steps to ensure a successful outcome.
Connect your laptop or computer to the Junos OS device through the console port when you use the CLI to upgrade software (recommended).
Connect your device to the Internet.
Back up the current configuration and software.
Delete or commit all uncommitted configuration changes.
Clear files and erase unwanted or unused configurations using the
request system storage cleanupcommand.(Only for Juniper Networks® SRX Series Firewalls) Ensure that both nodes of the firewall pair in a chassis cluster are online and have the same Junos OS version.
Plan for an extended maintenance window, preferably during non-business hours, for the upgrade, troubleshooting, and any post-configuration procedures to minimize impact.
Identify business contacts who will help verify application and network functionality after the upgrade.
Junos OS Installation Package Names
The installation package is used to upgrade or downgrade from one release to another. When installed, the installation package completely reinstalls the software, rebuilds the Junos OS file system, and can erase system logs and other auxiliary information from the previous installation. The installation package does, however, retain the configuration files from the previous installation.
A Junos OS installation package can have one of the following general patterns:
-
prefix-platform-product-architecture-application-binary-interface-release-edition.extension (for installing with the
request system software addcommand) -
prefix-media-media-keyword-platform-architecture-application-binary-interface-release-edition.extension (for images installed from the USB drive or the loader prompt)
-
prefix-flex-release-edition.extension (for enhanced automation variants of Junos OS)
| Field Name | Description |
|---|---|
| prefix | Package name prefix. Different products use different prefixes. These prefixes are explained later in this chapter. |
| host | Host is included in the package name when the platform is Linux based; this prefix indicates the image includes the host software as well as Junos OS. |
| media media-keyword | A media keyword is included in the package name when the software
image cannot be installed using the request system software
add command. Values for the media keyword include the
following:
|
| platform | (Optional) Name of the product series, such as mx or
ptx. |
| product | (Optional) Model number or product variant, such as
5e for the QFX Series switches. |
| architecture | (Optional) CPU architecture of the platform. For example,
x86 for Intel CPUs or arm for
Advanced RISC Machines CPUs. |
| application-binary-interface | (Included when architecture is part of the name.) Indicates the “word length” of the CPU architecture. Values include 32 for 32-bit architectures and 64 for 64-bit architectures. |
| release | Release number. The format of the release number is explained later in this chapter. |
| edition | Edition of the software package. Software editions are explained later in this chapter. |
The software is delivered in signed packages that contain digital signatures, Secure Hash Algorithm (SHA-1), and Message Digest 5 (MD5) checksums. A package is installed only if the checksum within it matches the hash recorded in its corresponding file. Which checksum is used depends on the software version:
-
Digital signatures are used when you upgrade or downgrade between Junos OS Release 7.0 and a later version.
-
The SHA-1 checksum is used when you upgrade or downgrade between Junos OS Release 6.4 and a later version.
-
The MD5 checksum is used when you upgrade or downgrade between Junos OS Release 6.3 or earlier and a later version.
Starting in 2015, the word signed appears less frequently after the edition in the filename. But you might still see it in software installation packages. Whether signed appears or not, all Junos OS images from Junos OS Release 15.1 on are signed for validation.
Extensions are tgz, gz, img, iso, etc.
Junos OS Installation Packages Prefixes
The first part of the installation package filename is a combination of a standard prefix and product designation. Table 3 lists a variety of Junos OS package name prefixes.
Certain hardware platforms run a Junos OS based on an upgraded FreeBSD kernel, greater than FreeBSD 10.x (hereafter called Junos OS with upgraded FreeBSD). To determine if your system uses Junos OS with upgraded FreeBSD, see: Junos kernel upgrade to FreeBSD 10+. Table 3 also indicates the prefixes used for the different platforms running Junos OS with upgraded FreesBSD. For more information about upgrading or downgrading to Junos OS with upgraded FreeBSD, see Upgrade and Downgrade for Junos OS with Upgraded FreeBSD.
Except where indicated in the table, you install these packages using the request
system software add CLI command.
| Installation Package Prefix | Description |
|---|---|
|
jinstall* |
Junos OS for M Series, MX Series, T Series, TX Matrix, and TX Matrix Plus routers. |
|
jinstall64* |
64-bit Junos OS for the JCS1200 Route Reflector, TX Matrix Plus routers with 3D SIBs, and PTX Series Packet Transport Routers. |
|
jinstall-ex* |
Junos OS for the EX Series Ethernet Switch portfolio. |
|
jinstall-host-acx5k* |
Junos OS with upgraded FreeBSD for the ACX5000 Series routers, which are Linux based; this prefix indicates the image includes the host as well as Junos OS. For example, jinstall-host-acx5k-17.2R1.13-signed.tgz. |
|
jinstall-host-ex* |
Junos OS with upgraded FreeBSD for EX4600, which is Linux based; this prefix indicates the image includes the host as well as Junos OS. For example, jinstall-host-ex-4600-17.2R1.13-signed.tgz. |
|
jinstall-host-nfx-2* |
Junos OS with upgraded FreeBSD for NFX2xx platforms that are Linux based; this prefix indicates the image includes the host software and Junos OS. For example, jinstall-host-nfx-2-flex-x86-32-17.2R1.13-secure-signed.tgz. See Junos OS Releases Supported on NFX Series Hardware for a list of which platforms use the nfx-2 package. |
|
jinstall-host-nfx-3* |
Junos OS with upgraded FreeBSD for NFX platforms that are Linux based; this prefix indicates the image includes the host software and Junos OS. For example, jinstall-host-nfx-3-x86-64-22.4R1.10-secure-signed.tgz. See Junos OS Releases Supported on NFX Series Hardware for a list of which platforms use the nfx-3 package. |
|
jinstall-host-ocx* |
Junos OS with upgraded FreeBSD for OCX platforms that are Linux based; this prefix indicates the image includes the host software as well as Junos OS. |
|
jinstall-host-ptx* |
Junos OS with upgraded FreeBSD for PTX platforms that are Linux based; this prefix indicates the image includes the host software as well as Junos OS. |
|
jinstall-host-qfx* |
Junos OS with upgraded FreeBSD for QFX platforms that are Linux based; this prefix indicates the image includes the host software as well as Junos OS. For example, jinstall-host-qfx-5e-x86-64-17.2R1.13.tgz is a package name for Junos OS on the QFX5100. Starting in Junos OS Release 24.2R1, the package prefix for all models of the QFX5110 is jinstall-host-qfx-5x*. For releases before Release 24.2R1, the package prefix for all models of the QFX5110 is jinstall-host-qfx-5e*. |
|
jinstall-ocx-flex* |
OCX Series switches. |
|
jinstall-ppc* |
Junos OS for the ACX Series, MX5, MX10, MX40, MX80, and MX104 routers. |
|
junos-arm* |
Junos OS with Upgraded FreeBSD for EX2300 and EX3400 switches. For example, junos-arm-32-15.1X53-D50.2.tgz. |
|
junos-arm-media-media-keyword* |
Junos OS with Upgraded FreeBSD for EX2300 and EX3400 switches. You install these
images using a method other than the
For example, junos-install-media-usb-arm-32-15.1X53-D50.2.img or junos-install-media-net-arm-32-15.1X53-D50.2.tgz. |
|
junos-install* |
Junos OS with upgraded FreeBSD for EX4100, EX9200, MX Series routers, and SRX Series Firewalls that support Junos OS with upgraded FreeBSD. For example, junos-install-ex-arm-64-22.2R1.3.tgz for EX4100, junos-install-ex92xx-x86-64-17.2R1.13.tgz for EX9200, junos-install-mx-x86-32-15.1R1.9.tgz for MX Series routers, junos-install-srxsme-mips-64-24.4R1.1.tgz for SRX300, SRX320, SRX340, SRX345, and SRX380, and junos-install-srx5000-x86-64-17.3R1.9.tgz for SRX5400, SRX5600, or SRX5800. |
|
junos-install-media-media-keyword* |
Junos OS with upgraded FreeBSD for EX4100, EX9200, MX Series routers, and SRX
Series Firewalls that support Junos OS with upgraded FreeBSD. You install these
images using a method other than the
For example, junos-install-media-usb-mx-x86-32-15.1R1.9.tgz for an MX Series router, junos-install-media-usb-ex-arm-64-22.2R1.3.tgz for EX4100, junos-install-media-usb-ex92xx-17.2R1.13.img.gz for EX9200, junos-install-media-usb-srxsme-mips-64-24.4R1.1.img.gz for SRX300, SRX320, SRX340, SRX345, and SRX380, and junos-install-media-usb-srx5000-x86-64-17.3R1.9.img.gz for SRX5400, SRX5600, and SRX5800. |
|
junos-srx1k3k* |
Junos OS for SRX1400, SRX3400 and SRX3600. |
|
junos-srx5000* |
Junos OS for SRX5400, SRX5600, and SRX5800. |
|
junos-srxentedge* |
Junos OS for SRX1500. |
|
junos-srxhe-x86* |
Junos OS for SRX4600. |
|
junos-srxmr* |
Junos OS for SRX4100 and SRX4200. |
|
junos-srxsme* |
Junos OS for SRX300, SRX320, SRX340, SRX345, SRX380, and SRX550M. |
|
junos-vmhost-install* |
Junos OS with upgraded FreeBSD for devices that use VM Host. You use the
|
|
junos-vmhost-install-media-media-keyword* |
Junos OS with upgraded FreeBSD for devices that use VM Host. You install these
images using the Preboot Execution Environment (PXE) boot server or the USB drive,
and not the
For more information about this installation method, see Copying VM Host Installation Package to the PXE Boot Server or Creating an Emergency Boot Device for Routing Engines with VM Host Support. |
See Also
Junos OS Release Numbers
The release number represents a particular revision of the software that runs on a Juniper Networks routing platform, for example, Junos OS Release 24.2 or 24.4. Each release has certain new features that complement the software processes that support Internet routing protocols, control the device’s interfaces and the device chassis itself, and allow device system management. On the Juniper Networks Support web page, you download software for a particular release number.
In this example, we dissect the format of the software release number to show what it indicates. The generalized format is as follows:
Given the format of
-
m.nZb.s
The software release number 24.2R1.13, for example, maps to this format as follows:
-
m is the main release number of the product, for example, 24.
-
n is the minor release number of the product, for example, 2.
-
Z is the type of software release, for example, R for FRS or maintenance release.
For types of software releases, see Table 4.
-
b is the build number of the product, for example, 1, indicating the FRS rather than a maintenance release.
-
s is the spin number of the product, for example, 13.
|
Release Type |
Description |
|---|---|
|
R |
First revenue ship (FRS) or maintenance release software. R1 is FRS. R2 onward are maintenance releases. |
|
B |
Beta release software. |
|
I |
Internal release software. These are private software releases for verifying fixes. |
|
S |
Service release software, which are released to customers to solve a specific problem—this release will be maintained along with the life span of the underlying release. The service release number is added after the R number, for example, 24.2R2-S1.4. Here S1 represents the 1st service release on top of 24.2R2 and is the 4th re-spin. |
|
X |
Special (eXception) release software. X releases follow a numbering system that differs from the standard release numbering. SRX Series Firewalls follow a special naming convention for Junos OS releases. For more information, refer to the Knowledge Base article KB30092 at https://kb.juniper.net/InfoCenter/index?page=home. |
Junos OS Editions
Editions show up in the installation package name after the release number string and before signed.
In releases earlier than Junos OS Release 15.1, installation packages came in several major software package categories or editions, such as domestic, worldwide, or Federal Information Processing Standard (FIPS). For those still using packages with names including these terms, here is what they indicate:
-
domestic—Junos OS for customers in the United States and Canada and for all other customers with a valid encryption agreement. This edition includes high-encryption capabilities such as IPsec and SSH for data leaving the router or switch. Later images use a null, or empty, edition field for this category.
-
limited—Junos OS for all other customers. This edition does not include any high-encryption capabilities for data leaving the router or switch. Sometimes referred to as the Export edition, starting in Junos OS Release 15.1R1, this category is is renamed to the limited edition.
-
fips—Junos OS that provides advanced network security for customers who need software tools to configure a network of Juniper Networks routers and switches in a Federal Information Processing Standards (FIPS) 140-2 environment. For more information about Junos-FIPS, see FIPS 140-2 Security Compliance. In later images, FIPS, instead of being a separate edition, is an option you select on installation.
Starting with Junos OS 15.1, a simplified edition scheme was started:
-
Junos OS with a null (empty) edition field is the standard image for Junos OS.
-
limited—Version has no cryptographic support and is intended for countries in the Eurasian Customs Union (EACU). These countries have import restrictions on software containing data-plane encryption.
Boot Sequence on Devices with Routing Engines (Junos OS)
Juniper Networks devices start using the installed Junos OS. Bootable copies of Junos OS are stored in various locations: the internal flash disk, the hard drive, the removable media. The following subsections discuss the order of locations checked for a valid bootable operating system.
Boot Order for Devices
Information about the boot order for the various devices with Routing Engines is given in this section in alphabetical order of the device families.
The ACX Series routers attempt to boot from the storage media in the following order:
-
USB storage media device
-
Dual, internal NAND flash device (first da0s1, then da0s2)
The router attempts to boot from the storage media in the following order:
MX80 routers attempt to boot from the storage media in the following order:
-
USB media emergency boot device
-
Dual, internal NAND flash device (first da0, then da1)
MX104 routers attempt to boot from the storage media in the following order:
-
USB storage media device
-
Internal NAND flash device (da0)
The MX Series routers with a Routing Engine that has a solid-state drive (SSD) attempt to boot from the storage media in the following order:
-
USB media emergency boot device (if present)
-
CompactFlash card
-
Solid-state drive (SSD) in the SSD slot 1 or SSD slot 2 (if present)
The MX Series (except for the MX80 routers and the MX104 routers) routers with a Routing Engine that has a hard disk attempt to boot from the storage media in the following order:
-
Removable media emergency boot device, such as a PC Card (if present)
-
CompactFlash card (if present)
-
Hard disk
The PTX Series Packet Transport Routers attempt to boot from the storage media in the following order:
-
USB media emergency boot device
-
CompactFlash card
-
Solid-state drive (SSD) in the Disk 1 slot (if present)
-
Storage media available on the LAN
Booting from an Alternate Boot Device
Do not insert an emergency boot device during normal operations. The router does not operate normally when it is booted from an emergency boot device.
If the router boots from an alternate boot device, Junos OS displays a message indicating this when you log in to the router. For example, the following message shows that the software booted from the hard disk (/dev/ad1s1a):
login: username
Password: password
Last login: date on terminal

--- Junos 8.0 R1 built date
---
--- NOTICE: System is running on alternate media device (/dev/ad2s1a).
This situation results when the router detects a problem with the primary boot device—usually the CompactFlash card—that prevents it from booting, and consequently boots from the alternate boot device (the hard disk drive). When this happens, the primary boot device is removed from the list of candidate boot devices. The problem is usually a serious hardware error. We recommend you contact the Juniper Networks Technical Assistance Center (JTAC).
On MX104 routers, if the router boots from an alternate boot device, Junos OS does not display any message indicating this when you log in to the router.
When the router boots from the alternate boot device, the software and configuration are
only as current as the most recent request system snapshot command.
However, if the mirror-flash-on-disk command was enabled, then the hard
disk drive contains a synchronized, mirror image of the compact flash drive and therefore
the current software and configuration.