ON THIS PAGE
Understanding IP Spoofing in Layer 2 Transparent Mode on Security Devices
Configuring IP Spoofing in Layer 2 Transparent Mode on Security Devices
Example: Blocking Packets with Either a Loose or a Strict Source Route Option Set
Example: Detecting Packets with Either a Loose or a Strict Source Route Option Set
Attacker Evasion Techniques
An attacker might use the SYN and FIN flags to launch the attack. The inset also illustrates the configuration of Screen options designed to block these probes, For more information, see the following topics:
Understanding Attacker Evasion Techniques
Whether gathering information or launching an attack, it is generally expected that the attacker avoids detection. Although some IP address and port scans are blatant and easily detectable, more wily attackers use a variety of means to conceal their activity. Techniques such as using FIN scans instead of SYN scans—which attackers know most firewalls and intrusion detection programs detect—indicate an evolution of reconnaissance and exploit techniques for evading detection and successfully accomplishing their tasks.
Understanding FIN Scans
A FIN scan sends TCP segments with the FIN flag set in an attempt to provoke a response (a TCP segment with the RST flag set) and thereby discover an active host or an active port on a host. Attackers might use this approach rather than perform an address sweep with ICMP echo requests or an address scan with SYN segments, because they know that many firewalls typically guard against the latter two approaches but not necessarily against FIN segments. The use of TCP segments with the FIN flag set might evade detection and thereby help the attackers succeed in their reconnaissance efforts.
Thwarting a FIN Scan
To thwart FIN scans, take either or both of the following actions:
Enable the screen option that specifically blocks TCP segments with the FIN flag set but not the ACK flag, which is anomalous for a TCP segment:
user@host#set security screen fin-no-ack tcp fin-no-ack
user@host#set security zones security-zone name screen fin-no-ack
where
nameis the name of the zone to which you want to apply this screen option .Change the packet processing behavior to reject all non-SYN packets that do not belong to an existing session. The SYN check flag is set as the default.
Note:Changing the packet flow to check that the SYN flag is set for packets that do not belong to existing sessions also thwarts other types of non-SYN scans, such as a null scan (when no TCP flags are set).
Understanding TCP SYN Checking
By default, Junos OS checks for SYN flags in the first packet of a session and rejects any TCP segments with non-SYN flags attempting to initiate a session. You can leave this packet flow as is or change it so that Junos OS does not enforce SYN flag checking before creating a session. Figure 1 illustrates packet flow sequences both when SYN flag checking is enabled and when it is disabled.
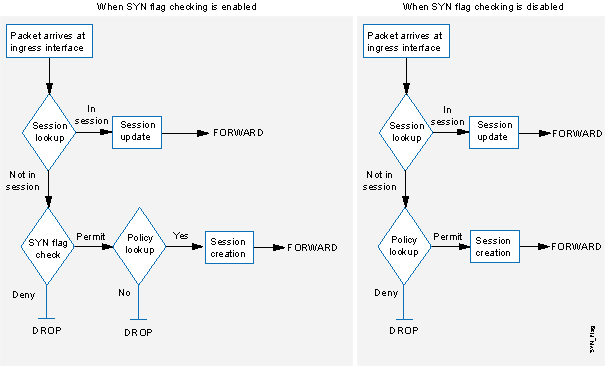
When Junos OS with SYN flag checking enabled receives
a non-SYN TCP segment that does not belong to an existing session,
it drops the packet. By default, Junos OS does not send a TCP RST
to the source host on receiving the non-SYN segment. You can configure
the device to send TCP RST to the source host by using the set
security zones security-zone trust tcp-rst command. If the code
bit of the initial non-SYN TCP packet is RST, the device does not
send a TCP-RST.
Not checking for the SYN flag in the first packets offers the following advantages:
NSRP with Asymmetric Routing—In an active/active NSRP configuration in a dynamic routing environment, a host might send the initial TCP segment with the SYN flag set to one device (Device-A), but the SYN/ACK might be routed to the other device in the cluster (Device-B). If this asymmetric routing occurs after Device-A has synchronized its session with Device-B, all is well. On the other hand, if the SYN/ACK response reaches Device-B before Device-A synchronizes the session and SYN checking is enabled, Device-B rejects the SYN/ACK, and the session cannot be established. With SYN checking disabled, Device-B accepts the SYN/ACK response—even though there is no existing session to which it belongs—and creates a new session table entry for it.
Uninterrupted Sessions—If you reset the device or even change a component in the core section of a policy and SYN checking is enabled, all existing sessions or those sessions to which the policy change applies are disrupted and must be restarted. Disabling SYN checking avoids such disruptions to network traffic flows.
Note:A solution to this scenario is to install the device with SYN checking disabled initially. Then, after a few hours—when established sessions are running through the device—enable SYN checking. The core section in a policy contains the following main components: source and destination zones, source and destination addresses, one or more services, and an action.
However, the previous advantages exact the following security sacrifices:
Reconnaissance Holes—When an initial TCP segment with a non-SYN flag—such as ACK, URG, RST, FIN—arrives at a closed port, many operating systems (Windows, for example) respond with a TCP segment that has the RST flag set. If the port is open, then the recipient does not generate any response.
By analyzing these responses or lack thereof, an intelligence gatherer can perform reconnaissance on the protected network and also on the Junos OS policy set. If a TCP segment is sent with a non-SYN flag set and the policy permits it through, the destination host receiving such a segment might drop it and respond with a TCP segment that has the RST flag set. Such a response informs the perpetrator of the presence of an active host at a specific address and that the targeted port number is closed. The intelligence gatherer also learns that the firewall policy permits access to that port number on that host.
By enabling SYN flag checking, Junos OS drops TCP segments without a SYN flag if they do not belong to an existing session. It does not return a TCP RST segment. Consequently, the scanner gets no replies regardless of the policy set or whether the port is open or closed on the targeted host.
Session Table Floods—If SYN checking is disabled, an attacker can bypass the Junos OS SYN flood protection feature by flooding a protected network with a barrage of TCP segments that have non-SYN flags set. Although the targeted hosts drop the packets—and possibly send TCP RST segments in reply—such a flood can fill up the session table of the Juniper Networks device. When the session table is full, the device cannot process new sessions for legitimate traffic.
By enabling SYN checking and SYN flood protection, you can thwart this kind of attack. Checking that the SYN flag is set on the initial packet in a session forces all new sessions to begin with a TCP segment that has the SYN flag set. SYN flood protection then limits the number of TCP SYN segments per second so that the session table does not become overwhelmed.
If you do not need SYN checking disabled, Juniper
Networks strongly recommends that it be enabled (its default state
for an initial installation of Junos OS). You can enable it with the set flow tcp-syn-check command. With SYN checking enabled,
the device rejects TCP segments with non-SYN flags set unless they
belong to an established session.
Setting TCP SYN Checking
With SYN checking enabled, the device rejects TCP segments with non-SYN flags set unless they belong to an established session. Enabling SYN checking can help prevent attacker reconnaissance and session table floods. TCP SYN checking is enabled by default.
To disable SYN checking:
user@host#set security flow tcp-session no-syn-check
Setting TCP Strict SYN Checking
With strict SYN checking enabled, the device enables the strict three-way handshake check for the TCP session. It enhances security by dropping data packets before the three-way handshake is done. TCP strict SYN checking is disabled by default.
The strict-syn-check option cannot be enabled
if no-syn-check or no-syn-check-in-tunnel is
enabled.
When you enable strict-syn-check the SYN packets
carrying data are dropped.
To enable strict SYN checking:
user@host#set security flow tcp-session strict-syn-check
Understanding IP Spoofing
One method of attempting to gain access to a restricted area of the network is to insert a false source address in the packet header to make the packet appear to come from a trusted source. This technique is called IP spoofing. The mechanism to detect IP spoofing relies on route table entries. For example, if a packet with source IP address 10.1.1.6 arrives at ge-0/0/1, but Junos OS has a route to 10.1.1.0/24 through ge-0/0/0, a check for IP spoofing discovers that this address arrived at an invalid interface as defined in the route table. A valid packet from 10.1.1.6 can only arrive via ge-0/0/0, not ge-0/0/1. Therefore, Junos OS concludes that the packet has a spoofed source IP address and discards it.
Junos OS detects and drops both IPv4 and IPv6 spoofed packets.
Example: Blocking IP Spoofing
This example shows how to configure a screen to block IP spoof attacks.
Requirements
Before you begin, understand how IP Spoofing works. See Understanding IP Spoofing.
Overview
One method of attempting to gain access to a restricted area of a network is to insert a bogus source address in the packet header to make the packet appear to come from a trusted source. This technique is called IP spoofing.
In this example, you configure a screen called screen-1 to block IP spoof attacks and enable the screen in the zone-1 security zone.
Configuration
Procedure
Step-by-Step Procedure
To block IP spoofing:
Configure the screen.
[edit ]
user@host# set security screen ids-option screen-1 ip spoofing
Enable the screen in the security zone.
[edit]
user@host# set security zone security-zone zone-1 screen screen-1
If you are done configuring the device, commit the configuration.
[edit]
user@host# commit
Verification
Confirm that the configuration is working properly.
Verifying the Screens in the Security Zone
Purpose
Verify that the screen is enabled in the security zone.
Action
From operational mode, enter the show security
zones command.
[edit]
user@host> show security zones

Security zone: zone-1
  Send reset for non-SYN session TCP packets: Off
  Policy configurable: Yes
  Screen: screen-1
  Interfaces bound: 1
  Interfaces:
    ge-1/0/0.0
Verifying the Security Screen Configuration
Purpose
Display the configuration information about the security screen.
Action
From operational mode, enter the show security
screen ids-option screen-name command.
[edit]
user@host> show security screen ids-option screen-1
Screen object status:

  Name                      Value
  IP spoofing               enabled
Understanding IP Spoofing in Layer 2 Transparent Mode on Security Devices
In an IP spoofing attack, the attacker gains access to a restricted area of the network and inserts a false source address in the packet header to make the packet appear to come from a trusted source. IP spoofing is most frequently used in denial-of-service (DoS) attacks. When SRX Series Firewalls are operating in transparent mode, the IP spoof-checking mechanism makes use of address book entries. Address books only exist on the Routing Engine. IP spoofing in Layer 2 transparent mode is performed on the Packet Forwarding Engine. Address book information cannot be obtained from the Routing Engine each time a packet is received by the Packet Forwarding Engine. Therefore, address books attached to the Layer 2 zones must be pushed to the Packet Forwarding Engine.
IP spoofing in Layer 2 transparent mode does not support DNS and wildcard addresses.
When a packet is received by the Packet Forwarding Engine, the packet’s source IP address is checked to determine if it is in the incoming zone’s address-book. If the packet’s source IP address is in the incoming zone’s address book, then this IP address is allowed on the interface, and traffic is passed.
If the source IP address is not present in the incoming zone’s address-book, but exists in other zones’, then the IP address is considered a spoofed IP. Accordingly, actions such as drop and logging can be taken depending on the screen configuration (alarm-without-drop).
If the alarm-without-drop option is configured, the Layer 2 and Layer 3 spoofing
packets only trigger an alarm message, but the
packets are not dropped.
If a packet’s source IP address is not present in the incoming zone’s address book or other zones’, then you cannot determine if the IP is spoofed or not. In such instances, the packet is passed.
Junos OS takes into account the following match conditions while it searches for source IP addresses in the address book:
Host-match—The IP address match found in the address-book is an address without a prefix.
Prefix-match—The IP address match found in the address-book is an address with a prefix.
Any-match—The IP address match found in the address-book is “any”, “any-IPv4”, or “any-IPv6”.
No-match—No IP address match is found.
Configuring IP Spoofing in Layer 2 Transparent Mode on Security Devices
You can configure the IP spoof-checking mechanism to determine whether or not an IP is being spoofed.
To configure IP spoofing in Layer 2 transparent mode:
If the alarm-without-drop option is configured,
the Layer 2 spoofing packet only triggers an alarm message, but the
packet is not dropped.
Understanding IP Source Route Options
Source routing was designed to allow users at the source of an IP packet transmission to specify the IP addresses of the devices (also referred to as “hops” ) along the path that they want an IP packet to take on its way to its destination. The original intent of the IP source route options was to provide routing control tools to aid diagnostic analysis. If, for example, the transmission of a packet to a particular destination meets with irregular success, you might first use either the record route or the timestamp IP option to discover the addresses of devices along the path or paths that the packet takes. You can then use either the loose or the strict source route option to direct traffic along a specific path, using the addresses you learned from the results that the record route or timestamp options produced. By changing device addresses to alter the path and sending several packets along different paths, you can note changes that either improve or lessen the success rate. Through analysis and the process of elimination, you might be able to deduce where the trouble lies. See Figure 2.
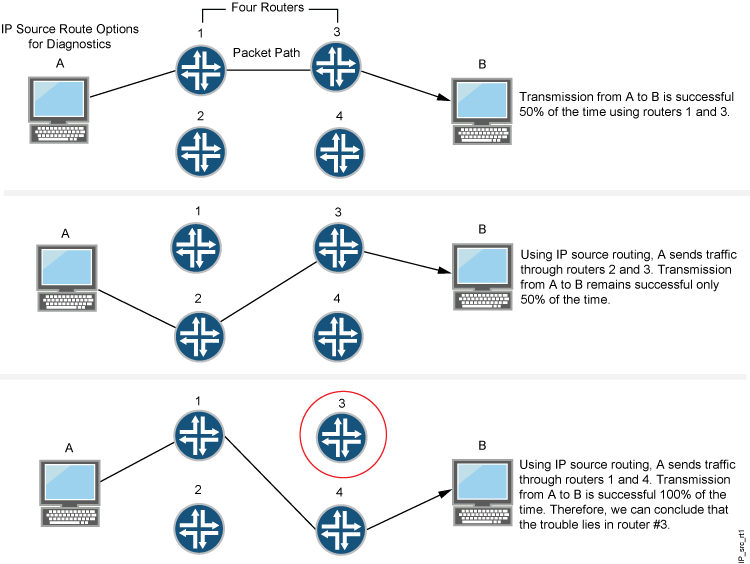
Although the uses of IP source route options were originally benign, attackers have learned to put them to more devious uses. They can use IP source route options to hide their true address and access restricted areas of a network by specifying a different path. For an example showing how an attacker can put both deceptions to use, consider the following scenario as illustrated in Figure 3.

Junos OS only allows traffic 2.2.2.0/24 if it comes through ethernet1, an interface bound to zone_external. Devices 3 and 4 enforce access controls but devices 1 and 2 do not. Furthermore, device 2 does not check for IP spoofing. The attacker spoofs the source address and, by using the loose source route option, directs the packet through device 2 to the 2.2.2.0/24 network and from there out device 1. Device 1 forwards it to device 3, which forwards it to the Juniper Networks device. Because the packet came from the 2.2.2.0/24 subnet and has a source address from that subnet, it seems to be valid. However, one remnant of the earlier chicanery remains: the loose source route option. In this example, you have enabled the deny IP source route screen option for zone_external. When the packet arrives at ethernet3, the device rejects it.
You can enable the device to either block any packets with loose or strict source route options set or detect such packets and then record the event in the counters list for the ingress interface. The screen options are as follows:
Deny IP Source Route Option—Enable this option to block all IP traffic that employs the loose or strict source route option. Source route options can allow an attacker to enter a network with a false IP address.
Detect IP Loose Source Route Option—The device detects packets where the IP option is 3 (Loose Source Routing) and records the event in the screen counters list for the ingress interface. This option specifies a partial route list for a packet to take on its journey from source to destination. The packet must proceed in the order of addresses specified, but it is allowed to pass through other devices in between those specified.
Detect IP Strict Source Route Option—The device detects packets where the IP option is 9 (Strict Source Routing) and records the event in the screen counters list for the ingress interface. This option specifies the complete route list for a packet to take on its journey from source to destination. The last address in the list replaces the address in the destination field. Currently, this screen option is applicable to IPv4 only.
Example: Blocking Packets with Either a Loose or a Strict Source Route Option Set
This example shows how to block packets with either a loose or a strict source route option set.
Requirements
Before you begin, understand how IP source route options work. See Understanding IP Source Route Options.
Overview
Source routing allows users at the source of an IP packet transmission to specify the IP addresses of the devices (also referred to as “hops” ) along the path that they want an IP packet to take on its way to its destination. The original intent of the IP source route options was to provide routing control tools to aid diagnostic analysis.
You can enable the device to either block any packets with loose or strict source route options set or detect such packets and then record the event in the counters list for the ingress interface.
In this example you create the screen called screen-1 to block packets with either a loose or a strict source route option set and enable the screen in the zone-1 security zone.
Configuration
Procedure
Step-by-Step Procedure
To block packets with either the loose or the strict source route option set:
Configure the screen.
[edit ]
user@host# set security screen ids-option screen-1 ip source-route-option
Enable the screen in the security zone.
[edit ]
user@host# set security zones security-zone zone-1 screen screen-1
If you are done configuring the device, commit the configuration.
[edit]
user@host# commit
Verification
Confirm that the configuration is working properly.
Verifying the Screens in the Security Zone
Purpose
Verify that the screen is enabled in the security zone.
Action
From operational mode, enter the show security
zones command.
[edit]
user@host> show security zones
Security zone: zone-1
  Send reset for non-SYN session TCP packets: Off
  Policy configurable: Yes
  Screen: screen-1
  Interfaces bound: 1
  Interfaces:
    ge-1/0/0.0
Verifying the Security Screen Configuration
Purpose
Display the configuration information about the security screen.
Action
From operational mode, enter the show security
screen ids-option screen-name command.
[edit]
user@host> show security screen ids-option screen-1
Screen object status:

Name                                    Value
IP source route option                  enabled
Example: Detecting Packets with Either a Loose or a Strict Source Route Option Set
This example shows how to detect packets with either a loose or a strict source route option set.
Requirements
Before you begin, understand how IP source route options work. See Understanding IP Source Route Options.
Overview
Source routing allows users at the source of an IP packet transmission to specify the IP addresses of the devices (also referred to as “hops” ) along the path that they want an IP packet to take on its way to its destination. The original intent of the IP source route options was to provide routing control tools to aid diagnostic analysis.
You can enable the device to either block any packets with loose or strict source route options set or detect such packets and then record the event in the counters list for the ingress interface.
In this example, you create two screens called screen-1 and screen-2 to detect and record, but not block, packets with a loose or strict source route option set and enable the screens in zones zone-1 and zone-2.
Configuration
Procedure
Step-by-Step Procedure
To detect and record, but not block, packets with a loose or strict source route option set:
Configure the loose source screen.
[edit]
user@host# set security screen ids-option screen-1 ip loose-source-route-option
Configure the strict source route screen.
[edit]
user@host# set security screen ids-option screen-2 ip strict-source-route-option
Note:Currently, this screen option supports IPv4 only.
Enable the screens in the security zones.
[edit]
user@host# set  security zones security-zone zone-1 screen screen-1
user@host# set  security zones security-zone zone-2 screen screen-2
If you are done configuring the device, commit the configuration.
[edit]
user@host# commit
Verification
Confirm that the configuration is working properly.
Verifying the Screens in the Security Zone
Purpose
Verify that the screen is enabled in the security zone.
Action
From operational mode, enter the show security
zones command.
[edit]
user@host> show security zones

Security zone: zone-1
  Send reset for non-SYN session TCP packets: Off
  Policy configurable: Yes
  Screen: screen-1
  Interfaces bound: 1
  Interfaces:
    ge-1/0/0.0
Security zone: zone-2
  Send reset for non-SYN session TCP packets: Off
  Policy configurable: Yes
  Screen: screen-2
  Interfaces bound: 1
  Interfaces:
    ge-2/0/0.0
Verifying the Security Screen Configuration
Purpose
Display the configuration information about the security screen.
Action
From operational mode, enter the show security
screen ids-option screen-name command.
[edit]
user@host> show security screen ids-option screen-1
Screen object status:

Screen object status:

Name                                       Value
IP loose source route option               enabled
[edit]
user@host> show security screen ids-option screen-2
Screen object status:

Screen object status:

Name                                      Value
IP strict source route option             enabled