ON THIS PAGE
Example: Applying Routing Policies at Different Levels of the BGP Hierarchy
Configuring Routing Policies to Control BGP Route Advertisements
Example: Configuring a Routing Policy to Advertise the Best External Route to Internal Peers
Optimizing BGP Configuration for Faster-Convergence in Junos
Example: Configuring BGP Prefix-Based Outbound Route Filtering
Understanding the Default BGP Routing Policy on Packet Transport Routers (PTX Series)
Example: Overriding the Default BGP Routing Policy on PTX Series Packet Transport Routers
Conditional Advertisement Enabling Conditional Installation of Prefixes Use Cases
Conditional Advertisement and Import Policy (Routing Table) with certain match conditions
Implicit filter for Default EBGP Route Propagation Behavior without Policies
Basic BGP Routing Policies
Understanding Routing Policies
Each routing policy is identified by a policy name. The name can contain letters, numbers, and hyphens (-) and can be up to 255 characters long. To include spaces in the name, enclose the entire name in double quotation marks. Each routing policy name must be unique within a configuration.
Once a policy is created and named, it must be applied before it is active. You apply
routing policies using the import and export
statements at the protocols protocol-name level in
the configuration hierarchy.
In the import statement, you list the name of the routing policy to be
evaluated when routes are imported into the routing table from the routing protocol.
In the export statement, you list the name of the routing policy to be
evaluated when routes are being exported from the routing table into a dynamic routing
protocol. Only active routes are exported from the routing table.
To specify more than one policy and create a policy chain, you list the policies using a space as a separator. If multiple policies are specified, the policies are evaluated in the order in which they are specified. As soon as an accept or reject action is executed, the policy chain evaluation ends.
Explicitly Configured Routes
An explicitly configured route is a route that you have configured. Direct routes are not explicitly configured. They are created as a result of IP addresses being configured on an interface. Explicitly configured routes include aggregate, generated, local, and static routes. (An aggregate route is a route that distills groups of routes with common addresses into one route. A generated route is a route used when the routing table has no information about how to reach a particular destination. A local route is an IP address assigned to a router interface. A static route is an unchanging route to a destination.)
The policy framework software treats direct and explicitly configured routes as if they are learned through routing protocols; therefore, they can be imported into the routing table. Routes cannot be exported from the routing table to the pseudoprotocol, because this protocol is not a real routing protocol. However, aggregate, direct, generated, and static routes can be exported from the routing table to routing protocols, whereas local routes cannot.
By default, BGP exports only BGP-learned routes. Routes learned from other protocols (like static, direct, or IGP) are not exported unless explicitly permitted by a routing policy.
Explicit policies override implicit preferences. When a routing policy is configured, it will take precedence over implicit behavior. If you have not configured a routing policy, then BGP applies the implicit preference behavior. By design, BGP prefers a locally configured explicit policy over any implicit preference.
See Also
Example: Applying Routing Policies at Different Levels of the BGP Hierarchy
This example shows BGP configured in a simple network topology and explains how routing polices take effect when they are applied at different levels of the BGP configuration.
Requirements
No special configuration beyond device initialization is required before configuring this example.
Overview
For BGP, you can apply policies as follows:
-
BGP global
importandexportstatements—Include these statements at the[edit protocols bgp]hierarchy level (for routing instances, include these statements at the[edit routing-instances routing-instance-name protocols bgp]hierarchy level). -
Group
importandexportstatements—Include these statements at the[edit protocols bgp group group-name]hierarchy level (for routing instances, include these statements at the[edit routing-instances routing-instance-name protocols bgp group group-name]hierarchy level). -
Peer
importandexportstatements—Include these statements at the[edit protocols bgp group group-name neighbor address]hierarchy level (for routing instances, include these statements at the[edit routing-instances routing-instance-name protocols bgp group group-name neighbor address]hierarchy level). -
family
importandexportstatements—Include these statements at the[edit protocols bgp family nlri]hierarchy level (for routing instances, include these statements at the[edit routing-instances routing-instance-name protocols bgp family nlri]hierarchy level).
A peer-level import or export statement overrides a group import or export statement. A group-level import or export statement overrides a global BGP import or export statement.
In this example, a policy named send-direct is applied at the global level,
another policy named send-192.168.0.1 is applied at the group level, and a third
policy named send-192.168.20.1 is applied at the neighbor level.
user@host# show protocols
bgp {
    local-address 172.16.1.1;
    export send-direct;
    group internal-peers {
        type internal;
        export send-192.168.0.1;
        neighbor 172.16.2.2 {
            export send-192.168.20.1;
        }
        neighbor 172.16.3.3;
    }
    group other-group {
        type internal;
        neighbor 172.16.4.4;
    }
}
A key point, and one that is often misunderstood and that can lead to problems, is that in such a configuration, only the most explicit policy is applied. A neighbor-level policy is more explicit than a group-level policy, which in turn is more explicit than a global policy.
The neighbor 172.16.2.2 is subjected only to the send-192.168.20.1 policy. The neighbor 172.16.3.3, lacking anything more specific, is subjected only to the send-192.168.0.1 policy. Meanwhile, neighbor 172.16.4.4 in group other-group has no group or neighbor-level policy, so it uses the send-direct policy.
If you need to have neighbor 172.16.2.2 perform the function of all three policies, you can write and apply a new neighbor-level policy that encompasses the functions of the other three, or you can apply all three existing policies, as a chain, to neighbor 172.16.2.2.
Topology
Figure 1 shows the sample network.
CLI Quick Configuration shows the configuration for all of the devices in Figure 1.
The section #d191e247__d191e501 describes the steps on Device R1.
Configuration
CLI Quick Configuration
To quickly configure this example,
copy the following commands, paste them into a text file, remove any line breaks, change any
details necessary to match your network configuration, and then copy and paste the commands
into the CLI at the [edit] hierarchy level.
Device R1
set interfaces fe-1/2/0 unit 0 description to-R2
set interfaces fe-1/2/0 unit 0 family inet address 10.10.10.1/30
set interfaces lo0 unit 0 family inet address 172.16.1.1/32
set protocols bgp local-address 172.16.1.1
set protocols bgp export send-direct
set protocols bgp group internal-peers type internal
set protocols bgp group internal-peers export send-static-192.168.0
set protocols bgp group internal-peers neighbor 172.16.2.2 export send-static-192.168.20
set protocols bgp group internal-peers neighbor 172.16.3.3
set protocols bgp group other-group type internal
set protocols bgp group other-group neighbor 172.16.4.4
set protocols ospf area 0.0.0.0 interface lo0.0 passive
set protocols ospf area 0.0.0.0 interface fe-1/2/0.0
set policy-options policy-statement send-direct term 1 from protocol direct
set policy-options policy-statement send-direct term 1 then accept
set policy-options policy-statement send-static-192.168.0 term 1 from protocol static
set policy-options policy-statement send-static-192.168.0 term 1 from route-filter 192.168.0.0/24 orlonger
set policy-options policy-statement send-static-192.168.0 term 1 then accept
set policy-options policy-statement send-static-192.168.20 term 1 from protocol static
set policy-options policy-statement send-static-192.168.20 term 1 from route-filter 192.168.20.0/24 orlonger
set policy-options policy-statement send-static-192.168.20 term 1 then accept
set routing-options static route 192.168.0.1/32 discard
set routing-options static route 192.168.20.1/32 discard
set routing-options router-id 172.16.1.1
set routing-options autonomous-system 17
Device R2
set interfaces fe-1/2/0 unit 0 description to-R1
set interfaces fe-1/2/0 unit 0 family inet address 10.10.10.2/30
set interfaces fe-1/2/1 unit 0 description to-R3
set interfaces fe-1/2/1 unit 0 family inet address 10.10.10.5/30
set interfaces lo0 unit 0 family inet address 172.16.2.2/32
set protocols bgp group internal-peers type internal
set protocols bgp group internal-peers local-address 172.16.2.2
set protocols bgp group internal-peers neighbor 172.16.3.3
set protocols bgp group internal-peers neighbor 172.16.1.1
set protocols bgp group internal-peers neighbor 172.16.4.4
set protocols ospf area 0.0.0.0 interface lo0.0 passive
set protocols ospf area 0.0.0.0 interface fe-1/2/0.0
set protocols ospf area 0.0.0.0 interface fe-1/2/1.0
set routing-options router-id 172.16.2.2
set routing-options autonomous-system 17
Device R3
set interfaces fe-1/2/1 unit 0 description to-R2
set interfaces fe-1/2/1 unit 0 family inet address 10.10.10.6/30
set interfaces fe-1/2/2 unit 0 description to-R4
set interfaces fe-1/2/2 unit 0 family inet address 10.10.10.9/30
set interfaces lo0 unit 0 family inet address 172.16.3.3/32
set protocols bgp group internal-peers type internal
set protocols bgp group internal-peers local-address 172.16.3.3
set protocols bgp group internal-peers neighbor 172.16.2.2
set protocols bgp group internal-peers neighbor 172.16.1.1
set protocols bgp group internal-peers neighbor 172.16.4.4
set protocols ospf area 0.0.0.0 interface lo0.0 passive
set protocols ospf area 0.0.0.0 interface fe-1/2/1.0
set protocols ospf area 0.0.0.0 interface fe-1/2/2.0
set routing-options router-id 172.16.3.3
set routing-options autonomous-system 17
Device R4
set interfaces fe-1/2/2 unit 0 description to-R3
set interfaces fe-1/2/2 unit 0 family inet address 10.10.10.10/30
set interfaces lo0 unit 0 family inet address 172.16.4.4/32
set protocols bgp group internal-peers type internal
set protocols bgp group internal-peers local-address 172.16.4.4
set protocols bgp group internal-peers neighbor 172.16.2.2
set protocols bgp group internal-peers neighbor 172.16.1.1
set protocols bgp group internal-peers neighbor 172.16.3.3
set protocols ospf area 0.0.0.0 interface lo0.0 passive
set protocols ospf area 0.0.0.0 interface fe-1/2/2.0
set routing-options router-id 172.16.4.4
set routing-options autonomous-system 17
Procedure
Step-by-Step Procedure
The following example requires you to navigate various levels in the configuration hierarchy. For information about navigating the CLI, see Using the CLI Editor in Configuration Mode in the CLI User Guide.
To configure an IS-IS default route policy:
Configure the device interfaces.
[edit interfaces]
user@R1# set fe-1/2/0 unit 0 description to-R2
user@R1# set fe-1/2/0 unit 0 family inet address 10.10.10.1/30
user@R1# set lo0 unit 0 family inet address 172.16.1.1/32
Enable OSPF, or another interior gateway protocols (IGP), on the interfaces.
[edit protocols OSPF area 0.0.0.0]
user@R1# set interface lo0.0 passive
user@R1# set interface fe-1/2/0.0
Configure static routes.
[edit routing-options]
user@R1# set static route 192.168.0.1/32 discard
user@R1# set static route 192.168.20.1/32 discard
Enable the routing policies.
[edit protocols policy-options]
user@R1# set policy-statement send-direct term 1 from protocol direct
user@R1# set policy-statement send-direct term 1 then accept
user@R1# set policy-statement send-static-192.168.0 term 1 from protocol static
user@R1# set policy-statement send-static-192.168.0 term 1 from route-filter 192.168.0.0/24 orlonger
user@R1# set policy-statement send-static-192.168.0 term 1 then accept
user@R1# set policy-statement send-static-192.168.20 term 1 from protocol static
user@R1# set policy-statement send-static-192.168.20 term 1 from route-filter 192.168.20.0/24 orlonger
user@R1# set policy-statement send-static-192.168.20 term 1 then accept
Configure BGP and apply the export policies.
[edit protocols bgp]
user@R1# set local-address 172.16.1.1
user@R1# set protocols bgp export send-direct
user@R1# set group internal-peers type internal
user@R1# set group internal-peers export send-static-192.168.0
user@R1# set group internal-peers neighbor 172.16.2.2 export send-static-192.168.20
user@R1# set group internal-peers neighbor 172.16.3.3
user@R1# set group other-group type internal
user@R1# set group other-group neighbor 172.16.4.4
Configure the router ID and autonomous system (AS) number.
[edit routing-options]
user@R1# set router-id 172.16.1.1
user@R1# set autonomous-system 17
If you are done configuring the device, commit the configuration.
[edit]
user@R1# commit
Results
From configuration mode, confirm your configuration by issuing the show interfaces, show protocols, show policy-options, and show routing-options commands. If the output does not display the intended configuration, repeat the instructions
in this example to correct the configuration.
user@R1# show interfaces
fe-1/2/0 {
    unit 0 {
        description to-R2;
        family inet {
            address 10.10.10.1/30;
        }
    }
}
lo0 {
    unit 0 {
        family inet {
            address 172.16.1.1/32;
        }
    }
}
user@R1# show protocols
bgp {
    local-address 172.16.1.1;
    export send-direct;
    group internal-peers {
        type internal;
        export send-static-192.168.0;
        neighbor 172.16.2.2 {
            export send-static-192.168.20;
        }
        neighbor 172.16.3.3;
    }
    group other-group {
        type internal;
        neighbor 172.16.4.4;
    }
}
ospf {
    area 0.0.0.0 {
        interface lo0.0 {
            passive;
        }
        interface fe-1/2/0.0;
    }
}
user@R1# show policy-options
policy-statement send-direct {
    term 1 {
        from protocol direct;
        then accept;
    }
}
policy-statement send-static-192.168.0 {
    term 1 {
        from {
            protocol static;
            route-filter 192.168.0.0/24 orlonger;
        }
        then accept;
    }
}
policy-statement send-static-192.168.20 {
    term 1 {
        from {
            protocol static;
            route-filter 192.168.20.0/24 orlonger;
        }
        then accept;
    }
}
user@R1# show routing-options
static {
    route 192.168.0.1/32 discard;
    route 192.168.20.1/32 discard;
}
router-id 172.16.1.1;
autonomous-system 17;
Verification
Confirm that the configuration is working properly.
Verifying BGP Route Learning
Purpose
Make sure that the BGP export policies are working as expected by checking the routing tables.
Action
user@R1> show route protocol direct

inet.0: 11 destinations, 11 routes (11 active, 0 holddown, 0 hidden)
+ = Active Route, - = Last Active, * = Both

172.16.1.1/32         *[Direct/0] 1d 22:19:47
                    > via lo0.0
10.10.10.0/30      *[Direct/0] 1d 22:19:47
                    > via fe-1/2/0.0
user@R1> show route protocol static

inet.0: 11 destinations, 11 routes (11 active, 0 holddown, 0 hidden)
+ = Active Route, - = Last Active, * = Both

192.168.0.1/32     *[Static/5] 02:20:03
                      Discard
192.168.20.1/32    *[Static/5] 02:20:03
Discarduser@R2> show route protocol bgp
inet.0: 11 destinations, 11 routes (11 active, 0 holddown, 0 hidden)
+ = Active Route, - = Last Active, * = Both
192.168.20.1/32 *[BGP/170] 02:02:40, localpref 100, from 172.16.1.1
AS path: I, validation-state: unverified
> to 10.10.10.1 via fe-1/2/0.0user@R3> show route protocol bgp
inet.0: 11 destinations, 11 routes (11 active, 0 holddown, 0 hidden)
+ = Active Route, - = Last Active, * = Both
192.168.0.1/32 *[BGP/170] 02:02:51, localpref 100, from 172.16.1.1
AS path: I, validation-state: unverified
> to 10.10.10.5 via fe-1/2/1.0user@R4> show route protocol bgp
inet.0: 9 destinations, 11 routes (9 active, 0 holddown, 0 hidden)
+ = Active Route, - = Last Active, * = Both
172.16.1.1/32 [BGP/170] 1d 20:38:54, localpref 100, from 172.16.1.1
AS path: I, validation-state: unverified
> to 10.10.10.9 via fe-1/2/2.0
10.10.10.0/30 [BGP/170] 1d 20:38:54, localpref 100, from 172.16.1.1
AS path: I, validation-state: unverified
> to 10.10.10.9 via fe-1/2/2.0Meaning
On Device R1, the show route protocol direct command displays two
direct routes: 172.16.1.1/32 and 10.10.10.0/30. The show route protocol static command displays two static routes: 192.168.0.1/32 and 192.168.20.1/32.
On Device R2, the show route protocol bgp command shows that the only route
that Device R2 has learned through BGP is the 192.168.20.1/32 route.
On Device R3, the show route protocol bgp command shows that the only route
that Device R3 has learned through BGP is the 192.168.0.1/32 route.
On Device R4, the show route protocol bgp command shows that the only routes
that Device R4 has learned through BGP are the 172.16.1.1/32 and 10.10.10.0/30 routes.
Verifying BGP Route Receiving
Purpose
Make sure that the BGP export policies are working as expected by checking the BGP routes received from Device R1.
Action
user@R2> show route receive-protocol bgp 172.16.1.1

inet.0: 11 destinations, 11 routes (11 active, 0 holddown, 0 hidden)
  Prefix                  Nexthop              MED     Lclpref    AS path
* 192.168.20.1/32         172.16.1.1                      100        I
user@R3> show route receive-protocol bgp 172.16.1.1

inet.0: 11 destinations, 11 routes (11 active, 0 holddown, 0 hidden)
  Prefix                  Nexthop              MED     Lclpref    AS path
* 192.168.0.1/32          172.16.1.1                      100        I
user@R4> show route receive-protocol bgp 172.16.1.1

inet.0: 9 destinations, 11 routes (9 active, 0 holddown, 0 hidden)
  Prefix                  Nexthop              MED     Lclpref    AS path
  172.16.1.1/32              172.16.1.1                      100        I
  10.10.10.0/30           172.16.1.1                      100        I
Meaning
On Device R2, the route receive-protocol bgp 172.16.1.1 command
shows that Device R2 received only one BGP route, 192.168.20.1/32, from Device R1.
On Device R3, the route receive-protocol bgp 172.16.1.1 command shows that
Device R3 received only one BGP route, 192.168.0.1/32, from Device R1.
On Device R4, the route receive-protocol bgp 172.16.1.1 command shows that
Device R4 received two BGP routes, 172.16.1.1/32 and 10.10.10.0/30, from Device R1.
In summary, when multiple policies are applied at different CLI hierarchies in BGP, only the most specific application is evaluated, to the exclusion of other, less specific policy applications. Although this point might seem to make sense, it is easily forgotten during router configuration, when you mistakenly believe that a neighbor-level policy is combined with a global or group-level policy, only to find that your policy behavior is not as anticipated.
Example: Injecting OSPF Routes into the BGP Routing Table
This example shows how to create a policy that injects OSPF routes into the BGP routing table.
Requirements
Before you begin:
Configure network interfaces.
Configure external peer sessions. See Example: Configuring External BGP Point-to-Point Peer Sessions.
Configure interior gateway protocol (IGP) sessions between peers.
Overview
In this example, you create a routing policy called injectpolicy1 and a routing term called injectterm1. The policy injects
OSPF routes into the BGP routing table.
Topology
Configuration
Configuring the Routing Policy
CLI Quick Configuration
To quickly configure this example, copy the
following commands, paste them into a text file, remove any line breaks,
change any details necessary to match your network configuration,
copy and paste the commands into the CLI at the [edit] hierarchy level,
and then enter commit from configuration mode.
set policy-options policy-statement injectpolicy1 term injectterm1 from protocol ospf
set policy-options policy-statement injectpolicy1 term injectterm1 from area 0.0.0.1
set policy-options policy-statement injectpolicy1 term injectterm1 then accept
set protocols bgp export injectpolicy1
Step-by-Step Procedure
The following example requires you to navigate various levels in the configuration hierarchy. For information about navigating the CLI, see Using the CLI Editor in Configuration Mode in the CLI User Guide.
To inject OSPF routes into a BGP routing table:
Create the policy term.
[edit policy-options policy-statement injectpolicy1]
user@host# set term injectterm1
Specify OSPF as a match condition.
[edit policy-options policy-statement injectpolicy1 term injectterm1]
user@host# set from protocol ospf
Specify the routes from an OSPF area as a match condition.
[edit policy-options policy-statement injectpolicy1 term injectterm1]
user@host# set from area 0.0.0.1
Specify that the route is to be accepted if the previous conditions are matched.
[edit policy-options policy-statement injectpolicy1 term injectterm1]
user@host# set then accept
Apply the routing policy to BGP.
[edit]
user@host# set protocols bgp export injectpolicy1
Results
Confirm your configuration by entering the show
policy-options and show protocols bgp commands from
configuration mode. If the output does not display the intended configuration,
repeat the instructions in this example to correct the configuration.
user@host# show policy-options
policy-statement injectpolicy1 {
    term injectterm1 {
        from {
            protocol ospf;
            area 0.0.0.1;
        }
        then accept;
    }
}
user@host# show protocols bgp
export injectpolicy1;
If you are done configuring the device, enter commit from configuration mode.
Configuring Tracing for the Routing Policy
CLI Quick Configuration
To quickly configure this example, copy the
following commands, paste them into a text file, remove any line breaks,
change any details necessary to match your network configuration,
copy and paste the commands into the CLI at the [edit] hierarchy level,
and then enter commit from configuration mode.
set policy-options policy-statement injectpolicy1 term injectterm1 then trace
set routing-options traceoptions file ospf-bgp-policy-log
set routing-options traceoptions file size 5m
set routing-options traceoptions file files 5
set routing-options traceoptions flag policy
Step-by-Step Procedure
The following example requires you to navigate various levels in the configuration hierarchy. For information about navigating the CLI, see Using the CLI Editor in Configuration Mode in the CLI User Guide.
Include a trace action in the policy.
[edit policy-options policy-statement injectpolicy1 term injectterm1]
user@host# then trace
Configure the tracing file for the output.
[edit routing-options traceoptions]
user@host# set file ospf-bgp-policy-log
user@host# set file size 5m
user@host# set file files 5
user@host# set flag policy
Results
Confirm your configuration by entering the show
policy-options and show routing-options commands
from configuration mode. If the output does not display the intended
configuration, repeat the instructions in this example to correct
the configuration.
user@host# show policy-options
policy-statement injectpolicy1 {
    term injectterm1 {
        then {
            trace;
        }
    }
}
user@host# show routing-options
traceoptions {
    file ospf-bgp-policy-log size 5m files 5;
    flag policy;
}
If you are done configuring the device, enter commit from configuration mode.
Verification
Troubleshooting
Using the show log Command to Examine the Actions of the Routing Policy
Problem
The routing table contains unexpected routes, or routes are missing from the routing table.
Solution
If you configure policy tracing as shown in this example,
you can run the show log ospf-bgp-policy-log command to
diagnose problems with the routing policy. The show log ospf-bgp-policy-log command displays information about the routes that the injectpolicy1 policy term analyzes and acts upon.
Configuring Routing Policies to Control BGP Route Advertisements
All routing protocols use the Junos OS routing table to store the routes that they learn and to determine which routes they should advertise in their protocol packets. Routing policy allows you to control which routes the routing protocols store in and retrieve from the routing table. For information about routing policy, see the Routing Policies, Firewall Filters, and Traffic Policers User Guide.
When configuring BGP routing policy, you can perform the following tasks:
- Applying Routing Policy
- Setting BGP to Advertise Inactive Routes
- Configuring BGP to Advertise the Best External Route to Internal Peers
- Configuring How Often BGP Exchanges Routes with the Routing Table
- Disabling Suppression of Route Advertisements
Applying Routing Policy
You define routing policy at the [edit policy-options] hierarchy level. To apply policies you have defined for BGP, include
the import and export statements within the
BGP configuration.
You can apply policies as follows:
-
BGP global
importandexportstatements—Include these statements at the[edit protocols bgp]hierarchy level (for routing instances, include these statements at the[edit routing-instances routing-instance-name protocols bgp]hierarchy level). -
Group
importandexportstatements—Include these statements at the[edit protocols bgp group group-name]hierarchy level (for routing instances, include these statements at the[edit routing-instances routing-instance-name protocols bgp group group-name]hierarchy level). -
Peer
importandexportstatements—Include these statements at the[edit protocols bgp group group-name neighbor address]hierarchy level (for routing instances, include these statements at the[edit routing-instances routing-instance-name protocols bgp group group-name neighbor address]hierarchy level). -
family
importandexportstatements—Include these statements at the[edit protocols bgp family nlri]hierarchy level (for routing instances, include these statements at the[edit routing-instances routing-instance-name protocols bgp family nlri]hierarchy level).
A peer-level import or export statement
overrides a group import or export statement.
A group-level import or export statement overrides
a global BGP import or export statement.
To apply policies, see the following sections:
- Applying Policies to Routes Being Imported into the Routing Table from BGP
- Applying Policies to Routes Being Exported from the Routing Table into BGP
Applying Policies to Routes Being Imported into the Routing Table from BGP
To apply policy to routes being imported into the routing table
from BGP, include the import statement, listing the names
of one or more policies to be evaluated:
import [ policy-names ];
For a list of hierarchy levels at which you can include this statement, see the statement summary section for this statement.
If you specify more than one policy, they are evaluated in the order specified, from first to last, and the first matching filter is applied to the route. If no match is found, BGP places into the routing table only those routes that were learned from BGP routing devices.
Applying Policies to Routes Being Exported from the Routing Table into BGP
To apply policy to routes being exported from the routing table
into BGP, include the export statement, listing the names
of one or more policies to be evaluated:
export [ policy-names ];
For a list of hierarchy levels at which you can include this statement, see the statement summary section for this statement.
If you specify more than one policy, they are evaluated in the order specified, from first to last, and the first matching filter is applied to the route. If no routes match the filters, the routing table exports into BGP only the routes that it learned from BGP.
Setting BGP to Advertise Inactive Routes
By default, BGP stores the route information it receives from
update messages in the Junos OS routing table, and the routing table
exports only active routes into BGP, which BGP then advertises to
its peers. To have the routing table export to BGP the best route
learned by BGP even if Junos OS did not select it to be an active
route, include the advertise-inactive statement:
advertise-inactive;
For a list of hierarchy levels at which you can include this statement, see the statement summary section for this statement.
Configuring BGP to Advertise the Best External Route to Internal Peers
In general, deployed BGP implementations do not advertise the external route with the highest local preference value to internal peers unless it is the best route. Although this behavior was required by an earlier version of the BGP version 4 specification, RFC 1771, it was typically not followed in order to minimize the amount of advertised information and to prevent routing loops. However, there are scenarios in which advertising the best external route is beneficial, in particular, situations that can result in IBGP route oscillation.
In Junos OS Release 9.3 and later, you can configure BGP to advertise the best external route into an internal BGP (IBGP) mesh group, a route reflector cluster, or an autonomous system (AS) confederation, even when the best route is an internal route.
In order to configure the advertise-external statement
on a route reflector, you must disable intracluster reflection with
the no-client-reflect statement.
When a routing device is configured as a route reflector for a cluster, a route advertised by the route reflector is considered internal if it is received from an internal peer with the same cluster identifier or if both peers have no cluster identifier configured. A route received from an internal peer that belongs to another cluster, that is, with a different cluster identifier, is considered external.
In a confederation, when advertising a route to a confederation border router, any route from a different confederation sub-AS is considered external.
You can also configure BGP to advertise the external route only if the route selection process reaches the point where the multiple exit discriminator (MED) metric is evaluated. As a result, an external route with an AS path worse (that is, longer) than that of the active path is not advertised.
Junos OS also provides support for configuring a BGP export policy that matches on the state of an advertised route. You can match on either active or inactive routes. For more information, see the Routing Policies, Firewall Filters, and Traffic Policers User Guide.
To configure BGP to advertise the best external path to internal
peers, include the advertise-external statement:
advertise-external;
The advertise-external statement is supported at
both the group and neighbor level. If you configure the statement
at the neighbor level, you must configure it for all neighbors in
a group. Otherwise, the group is automatically split into different
groups.
For a complete list of hierarchy levels at which you can configure this statement, see the statement summary section for this statement.
To configure BGP to advertise the best external path only if
the route selection process reaches the point where the MED value
is evaluated, include the conditional statement:
advertise-external {
    conditional;
}
Configuring How Often BGP Exchanges Routes with the Routing Table
BGP stores the route information it receives from update messages in the routing table, and the routing table exports active routes from the routing table into BGP. BGP then advertises the exported routes to its peers. By default, the exchange of route information between BGP and the routing table occurs immediately after the routes are received. This immediate exchange of route information might cause instabilities in the network reachability information. To guard against this, you can delay the time between when BGP and the routing table exchange route information.
To configure how often BGP and the routing table exchange route
information, include the out-delay statement:
out-delay seconds;
By default, the routing table retains some of the route information
learned from BGP. To have the routing table retain all or none of
this information, include the keep statement:
keep (all | none);
For a list of hierarchy levels at which you can include these statements, see the statement summary sections for these statements.
The routing table can retain the route information learned from BGP in one of the following ways:
Default (omit the
keepstatement)—Keep all route information that was learned from BGP, except for routes whose AS path is looped and whose loop includes the local AS.keep all—Keep all route information that was learned from BGP.keep none—Discard routes that were received from a peer and that were rejected by import policy or other sanity checking, such as AS path or next hop. When you configurekeep nonefor the BGP session and the inbound policy changes, Junos OS forces readvertisement of the full set of routes advertised by the peer.
In an AS path healing situation, routes with looped paths theoretically
could become usable during a soft reconfiguration when the AS path
loop limit is changed. However, there is a significant memory usage
difference between the default and keep all.
Consider the following scenarios:
A peer readvertises routes back to the peer from which it learned them.
This can happen in the following cases:
Another vendor's routing device advertises the routes back to the sending peer.
The Junos OS peer’s default behavior of not readvertising routes back to the sending peer is overridden by configuring
advertise-peer-as.
A provider edge (PE) routing device discards any VPN route that does not have any of the expected route targets.
When keep all is configured, the behavior of discarding
routes received in the above scenarios is overridden.
Disabling Suppression of Route Advertisements
Junos OS does not advertise the routes learned from one EBGP
peer back to the same external BGP (EBGP) peer. In addition, the software
does not advertise those routes back to any EBGP peers that are in
the same AS as the originating peer, regardless of the routing instance.
You can modify this behavior by including the advertise-peer-as statement in the configuration. To disable the default advertisement
suppression, include the advertise-peer-as statement:
advertise-peer-as;
The route suppression default behavior is disabled if the as-override statement is included in the configuration.
If you include the advertise-peer-as statement in
the configuration, BGP advertises the route regardless of this check.
To restore the default behavior, include the no-advertise-peer-as statement in the configuration:
no-advertise-peer-as;
If you include both the as-override and no-advertise-peer-as statements in the configuration, the no-advertise-peer-as statement is ignored. You can include these statements at multiple
hierarchy levels.
For a list of hierarchy levels at which you can include these statements, see the statement summary section for these statements.
See Also
Example: Configuring a Routing Policy to Advertise the Best External Route to Internal Peers
The BGP protocol specification, as defined in RFC 1771, specifies that a BGP peer shall advertise to its internal peers the higher preference external path, even if this path is not the overall best (in other words, even if the best path is an internal path). In practice, deployed BGP implementations do not follow this rule. The reasons for deviating from the specification are as follows:
Minimizing the amount of advertised information. BGP scales according to the number of available paths.
Avoiding routing and forwarding loops.
There are, however, several scenarios in which the behavior, specified in RFC 1771, of advertising the best external route might be beneficial. Limiting path information is not always desirable as path diversity might help reduce restoration times. Advertising the best external path can also address internal BGP (IBGP) route oscillation issues as described in RFC 3345, Border Gateway Protocol (BGP) Persistent Route Oscillation Condition.
The advertise-external statement modifies the behavior
of a BGP speaker to advertise the best external path to IBGP peers,
even when the best overall path is an internal path.
The advertise-external statement is supported
at both the group and neighbor level. If you configure the statement
at the neighbor level, you must configure it for all neighbors in
a group. Otherwise, the group is automatically split into different
groups.
The conditional option limits the behavior of the advertise-external setting, such that the external route is
advertised only if the route selection process reaches the point where
the multiple exit discriminator (MED) metric is evaluated. Thus, an
external route is not advertised if it has, for instance, an AS path
that is worse (longer) than that of the active path. The conditional option restricts external path advertisement to when the best external
path and the active path are equal until the MED step of the route
selection process. Note that the criteria used for selecting the best
external path is the same whether or not the conditional option is configured.
Junos OS also provides support for configuring a BGP export policy that matches the state of an advertised route. You can match either active or inactive routes, as follows:
policy-options {
    policy-statement name{
        from state (active|inactive);
    }
}
This qualifier only matches when used in the context of an export
policy. When a route is being advertised by a protocol that can advertise
inactive routes (such as BGP), state inactive matches routes
advertised as a result of the advertise-inactive and advertise-external statements.
For example, the following configuration can be used
as a BGP export policy toward internal peers to mark routes advertised
due to the advertise-external setting with a user-defined
community. That community can be later used by the receiving routers
to filter out such routes from the forwarding table. Such a mechanism
can be used to address concerns that advertising paths not used for
forwarding by the sender might lead to forwarding loops.
user@host# show policy-options
policy-statement mark-inactive {
    term inactive {
        from state inactive;
        then {
            community set comm-inactive;
        }
    }
    term default {
        from protocol bgp;
        then accept;
    }
    then reject;
}
community comm-inactive members 65536:65284;
Requirements
Junos OS 9.3 or later is required.
Overview
This example shows three routing devices. Device R2 has an external BGP (EBGP) connection to Device R1. Device R2 has an IBGP connection to Device R3.
Device R1 advertises 172.16.6.0/24. Device R2 does not set the local preference in an import policy for Device R1’s routes, and thus 172.16.6.0/24 has the default local preference of 100.
Device R3 advertises 172.16.6.0/24 with a local preference of 200.
When the advertise-external statement is not configured
on Device R2, 172.16.6.0/24 is not advertised by Device R2 toward
Device R3.
When the advertise-external statement is configured
on Device R2 on the session toward Device R3, 172.16.6.0/24 is advertised
by Device R2 toward Device R3.
When advertise-external conditional is configured
on Device R2 on the session toward Device R3, 172.16.6.0/24 is not
advertised by Device R2 toward Device R3. If you remove the then
local-preference 200 setting on Device R3 and add the path-selection
as-path-ignore setting on Device R2 (thus making the path selection
criteria equal until the MED step of the route selection process),
172.16.6.0/24 is advertised by Device R2 toward Device R3.
To configure the advertise-external statement
on a route reflector, you must disable intracluster reflection with
the no-client-reflect statement, and the client cluster must be fully meshed to
prevent the sending of redundant route advertisements.
When a routing device is configured as a route reflector for a cluster, a route advertised by the route reflector is considered internal if it is received from an internal peer with the same cluster identifier or if both peers have no cluster identifier configured. A route received from an internal peer that belongs to another cluster, that is, with a different cluster identifier, is considered external.
Topology
Figure 2 shows the sample network.
CLI Quick Configuration shows the configuration for all of the devices in Figure 2.
The section #d194e169__d194e347 describes the steps on Device R2.
Configuration
CLI Quick Configuration
To quickly
configure this example, copy the following commands, paste them into
a text file, remove any line breaks, change any details necessary
to match your network configuration, and then copy and paste the commands
into the CLI at the [edit] hierarchy level.
Device R1
set interfaces fe-1/2/0 unit 0 description to-R2
set interfaces fe-1/2/0 unit 0 family inet address 10.0.0.1/30
set interfaces lo0 unit 0 family inet address 192.168.0.1/32
set protocols bgp group ext type external
set protocols bgp group ext export send-static
set protocols bgp group ext peer-as 200
set protocols bgp group ext neighbor 10.0.0.2
set policy-options policy-statement send-static term 1 from protocol static
set policy-options policy-statement send-static term 1 from route-filter 172.16.6.0/24 exact
set policy-options policy-statement send-static term 1 then accept
set policy-options policy-statement send-static term 2 then reject
set routing-options static route 172.16.6.0/24 reject
set routing-options router-id 192.168.0.1
set routing-options autonomous-system 100
Device R2
set interfaces fe-1/2/0 unit 0 description to-R1
set interfaces fe-1/2/0 unit 0 family inet address 10.0.0.2/30
set interfaces fe-1/2/1 unit 0 description to-R3
set interfaces fe-1/2/1 unit 0 family inet address 10.0.0.5/30
set interfaces lo0 unit 0 family inet address 192.168.0.2/32
set protocols bgp group ext type external
set protocols bgp group ext peer-as 100
set protocols bgp group ext neighbor 10.0.0.1
set protocols bgp group int type internal
set protocols bgp group int local-address 192.168.0.2
set protocols bgp group int advertise-external
set protocols bgp group int neighbor 192.168.0.3
set protocols ospf area 0.0.0.0 interface fe-1/2/1.0
set protocols ospf area 0.0.0.0 interface lo0.0 passive
set routing-options router-id 192.168.0.2
set routing-options autonomous-system 200
Device R3
set interfaces fe-1/2/0 unit 6 family inet address 10.0.0.6/30
set interfaces lo0 unit 0 family inet address 192.168.0.3/32
set protocols bgp group int type internal
set protocols bgp group int local-address 192.168.0.3
set protocols bgp group int export send-static
set protocols bgp group int neighbor 192.168.0.2
set protocols ospf area 0.0.0.0 interface fe-1/2/0.6
set protocols ospf area 0.0.0.0 interface lo0.0 passive
set policy-options policy-statement send-static term 1 from protocol static
set policy-options policy-statement send-static term 1 then local-preference 200
set policy-options policy-statement send-static term 1 then accept
set routing-options static route 172.16.6.0/24 reject
set routing-options static route 0.0.0.0/0 next-hop 10.0.0.5
set routing-options autonomous-system 200
Procedure
Step-by-Step Procedure
The following example requires that you navigate various levels in the configuration hierarchy. For information about navigating the CLI, see Using the CLI Editor in Configuration Mode in the Junos OS CLI User Guide.
To configure Device R2:
Configure the device interfaces.
[edit interfaces]
user@R2# set fe-1/2/0 unit 0 description to-R1
user@R2# set fe-1/2/0 unit 0 family inet address 10.0.0.2/30
user@R2# set fe-1/2/1 unit 0 description to-R3
user@R2# set fe-1/2/1 unit 0 family inet address 10.0.0.5/30
user@R2# set lo0 unit 0 family inet address 192.168.0.2/32
Configure OSPF or another interior gateway protocol (IGP).
[edit protocols ospf area 0.0.0.0]
user@R2# set interface fe-1/2/1.0
user@R2# set interface lo0.0 passive
Configure the EBGP connection to Device R1.
[edit protocols bgp group ext]
user@R2# set type external
user@R2# set peer-as 100
user@R2# set neighbor 10.0.0.1
Configure the IBGP connection to Device R3.
[edit protocols bgp group int]
user@R2# set type internal
user@R2# set local-address 192.168.0.2
user@R2# set neighbor 192.168.0.3
Add the
advertise-externalstatement to the IBGP group peering session.[edit protocols bgp group int] user@R2# set advertise-external
Configure the autonomous system (AS) number and the router ID.
[edit routing-options ]
user@R2# set router-id 192.168.0.2
user@R2# set autonomous-system 200
Results
From configuration mode, confirm your configuration
by entering the show interfaces, show protocols, show policy-options, and show routing-options commands. If the output does not display the intended configuration,
repeat the instructions in this example to correct the configuration.
user@R2# show interfaces
fe-1/2/0 {
    unit 0{
        description to-R1;
        family inet {
            address 10.0.0.2/30;
        }
    }
}
fe-1/2/1 {
    unit 0 {
        description to-R3;
        family inet {
            address 10.0.0.5/30;
        }
    }
}
lo0 {
    unit 0 {
        family inet {
            address 192.168.0.2/32;
        }
    }
}
user@R2# show protocols
bgp {
    group ext {
        type external;
        peer-as 100;
        neighbor 10.0.0.1;
    }
    group int {
        type internal;
        local-address 192.168.0.2;
        advertise-external;
        neighbor 192.168.0.3;
    }
}
ospf {
    area 0.0.0.0 {
        interface fe-1/2/1.0;
        interface lo0.0 {
            passive;
        }
    }
}
user@R2# show routing-options
router-id 192.168.0.2;
autonomous-system 200;
If you are done configuring the device, enter commit from configuration mode.
Verification
Confirm that the configuration is working properly.
- Verifying the BGP Active Path
- Verifying the External Route Advertisement
- Verifying the Route on Device R3
- Experimenting with the conditional Option
Verifying the BGP Active Path
Purpose
On Device R2, make sure that the 172.16.6.0/24 prefix is in the routing table and has the expected active path.
Action
user@R2> show route 172.16.6

inet.0: 8 destinations, 9 routes (8 active, 1 holddown, 0 hidden)
+ = Active Route, - = Last Active, * = Both

172.16.6.0/24      *[BGP/170] 00:00:07, localpref 200, from 192.168.0.3
                      AS path: I, validation-state: unverified
                    > to 10.0.0.6 via fe-1/2/1.0
                    [BGP/170] 03:23:03, localpref 100
                      AS path: 100 I, validation-state: unverified
                    > to 10.0.0.1 via fe-1/2/0.0
Meaning
Device R2 receives the 172.16.6.0/24 route from both Device R1 and Device R3. The route from Device R3 is the active path, as designated by the asterisk (*). The active path has the highest local preference. Even if the local preferences of the two routes were equal, the route from Device R3 would remain active because it has the shortest AS path.
Verifying the External Route Advertisement
Purpose
On Device R2, make sure that the 172.16.6.0/24 route is advertised toward Device R3.
Action
user@R2> show route advertising-protocol bgp 192.168.0.3

inet.0: 8 destinations, 9 routes (8 active, 1 holddown, 0 hidden)
  Prefix                  Nexthop              MED     Lclpref    AS path
  172.16.6.0/24           10.0.0.1                     100        100 I
Meaning
Device R2 is advertising the 172.16.6.0/24 route toward Device R3.
Verifying the Route on Device R3
Purpose
Make sure that the 172.16.6.0/24 prefix is in Device R3’s routing table.
Action
user@R3> show route 172.16.6.0/24

inet.0: 7 destinations, 8 routes (7 active, 0 holddown, 0 hidden)
+ = Active Route, - = Last Active, * = Both

172.16.6.0/24      *[Static/5] 03:34:14
                      Reject
                    [BGP/170] 06:34:43, localpref 100, from 192.168.0.2
                      AS path: 100 I, validation-state: unverified
                    > to 10.0.0.5 via fe-1/2/0.6
Meaning
Device R3 has the static route and the BGP route for 172.16.6.0/24.
Note that the BGP route is hidden on Device R3 if the route
is not reachable or if the next hop cannot be resolved. To fulfill
this requirement, this example includes a static default route on
Device R3 (static route 0.0.0.0/0 next-hop 10.0.0.5).
Experimenting with the conditional Option
Purpose
See how the conditional option works in
the context of the BGP path selection algorithm.
Action
On Device R2, add the
conditionaloption.[edit protocols bgp group int] user@R2# set advertise-external conditional user@R2# commit
On Device R2, check to see if the 172.16.6.0/24 route is advertised toward Device R3.
user@R2> show route advertising-protocol bgp 192.168.0.3
As expected, the route is no longer advertised. You might need to wait a few seconds to see this result.
On Device R3, deactivate the
then local-preferencepolicy action.[edit policy-options policy-statement send-static term 1] user@R3# deactivate logical-systems R3 then local-preference user@R3# commit
On Device R2, ensure that the local preferences of the two paths are equal.
user@R2> show route 172.16.6.0/24

inet.0: 8 destinations, 9 routes (8 active, 0 holddown, 0 hidden)
+ = Active Route, - = Last Active, * = Both

172.16.6.0/24      *[BGP/170] 08:02:59, localpref 100
                      AS path: 100 I, validation-state: unverified
                    > to 10.0.0.1 via fe-1/2/0.0
                    [BGP/170] 00:07:51, localpref 100, from 192.168.0.3
                      AS path: I, validation-state: unverified
                    > to 10.0.0.6 via fe-1/2/1.0
On Device R2, add the
as-path-ignorestatement.[edit protocols bgp] user@R2# set path-selection as-path-ignore user@R2# commit
On Device R2, check to see if the 172.16.6.0/24 route is advertised toward Device R3.
user@R2> show route advertising-protocol bgp 192.168.0.3

inet.0: 8 destinations, 9 routes (8 active, 0 holddown, 0 hidden)
  Prefix                  Nexthop              MED     Lclpref    AS path
* 172.16.6.0/24           10.0.0.1                     100        100 I
As expected, the route is now advertised because the AS path length is ignored and because the local preferences are equal.
Optimizing BGP Configuration for Faster-Convergence in Junos
BGP in Junos OS includes several features designed to quickly restore traffic forwarding after a failure or topology change. These include BGP core protection (PIC edge), eBGP Fast Reroute (FRR), state compression, and graceful restart. However, there are scenarios where full protocol convergence is required before traffic can resume. The following recommendations will help you optimize your BGP configuration for the fastest possible convergence.
Recommendations
Reuse a single policy across peers with the same logic.
Avoid creating multiple policies with identical logic but different names. Instead, reuse a single policy for multiple peers.
Combine policies when peers share similar logic.
If multiple BGP peers share the same core policy logic, you can optimize policy management by consolidating their rules into a single export policy rather than maintaining separate peer-specific policies. This approach reduces configuration complexity and improves scalability.
Example:
Instead of configuring separate export policies for each peer:
set policy-options policy-statement <export-peer1> term 1 from community <community-1>
set policy-options policy-statement <export-peer1> then accept

set policy-options policy-statement <export-peer2> term 1 from community <community-1>
set policy-options policy-statement <export-peer2> then accept
You can consolidate them into a single export policy:
set policy-options policy-statement <export-common> term 1 from community <community-1>
set policy-options policy-statement <export-common> then accept

set protocols bgp group <peers> export <export-common>
Configure export policies at the group level.
- Do not configure export policies on a per-neighbor basis, such
as:
set protocols bgp group <foo> neighbor 192.168.1.1 export <policy-1>
set protocols bgp group <foo> neighbor 192.168.1.2 export <policy-2>
Instead, configure the policy at the group level for all neighbors that share the same export policy:
set protocols bgp group <foo> export <common-policy>
CAUTION:If different per-neighbor export policies are applied within a BGP group, Junos OS will trigger a group-split, forcing affected peers to leave the group and reset their sessions. This can disrupt traffic and cause unexpected behavior. To avoid this, always ensure consistent policy application at the group level unless an explicit per-neighbor override is required.
- Do not configure export policies on a per-neighbor basis, such
as:
Enable Path MTU Discovery or set the TCP MSS to avoid IP fragmentation.
To optimize BGP session performance and prevent IP fragmentation, you should either:
- Enable Path MTU Discovery (PMTUD).
Manually configure the TCP Maximum Segment Size (MSS) to an optimal value.
Configuration Commands:
- Enable Path MTU Discovery (PMTUD) for BGP
sessions:
set protocols bgp group <external> mtu-discovery
This allows the router to dynamically adjust the MTU size for BGP sessions based on network conditions.
Set a manual TCP MSS value (for example, 1400 bytes) for BGP sessions:
set protocols bgp group <external> tcp-mss 1400
This manually limits the TCP segment size, preventing fragmentation if PMTUD is disabled or unreliable.
Note: As a best practice, use PMTUD whenever possible, but if the network blocks ICMP messages required for PMTUD, set an appropriate TCP MSS value manually based on your network MTU.Configure large MTU on all interfaces and links between BGP peers.
Ensure that every interface and link between peers supports a large MTU to optimize performance.
Caveats
Export policy changes may trigger session resets.
-
In Junos OS, if the export policy for one peer within a shared Adj-RIB-Out changes, Junos moves the peer to a different (or new) Adj-RIB-Out. This transition resets the BGP session for that peer.
-
This reset can be disruptive, especially for peers that advertise a large number of prefixes (for example, uplink providers).
-
Recommendation: If avoiding session resets is critical, consider creating a dedicated Adj-RIB-out by configuring separate BGP groups. This trade-off improves stability but may impact path processing performance.
See Also
Example: Configuring BGP Prefix-Based Outbound Route Filtering
This example shows how to configure a Juniper Networks router to accept route filters from remote peers and perform outbound route filtering using the received filters.
Requirements
Before you begin:
Configure the router interfaces.
Configure an interior gateway protocol (IGP).
Overview
You can configure a BGP peer to accept route filters from remote peers and perform outbound route filtering using the received filters. By filtering out unwanted updates, the sending peer saves resources needed to generate and transmit updates, and the receiving peer saves resources needed to process updates. This feature can be useful, for example, in a virtual private network (VPN) in which subsets of customer edge (CE) devices are not capable of processing all the routes in the VPN. The CE devices can use prefix-based outbound route filtering to communicate to the provider edge (PE) routing device to transmit only a subset of routes, such as routes to the main data centers only.
The maximum number of prefix-based outbound route filters that a BGP peer can accept is 5000. If a remote peer sends more than 5000 outbound route filters to a peer address, the additional filters are discarded, and a system log message is generated.
You can configure interoperability for the routing device as a whole or for specific BGP groups or peers only.
Topology
In the sample network, Device CE1 is a router from another vendor. The configuration shown in this example is on Juniper Networks Router PE1.
Figure 3 shows the sample network.
Configuration
CLI Quick Configuration
To quickly configure this example, copy the
following commands, paste them into a text file, remove any line breaks,
change any details necessary to match your network configuration,
and then copy and paste the commands into the CLI at the [edit] hierarchy level.
PE1
set protocols bgp group cisco-peers type external
set protocols bgp group cisco-peers description “to CE1”
set protocols bgp group cisco-peers local-address 192.168.165.58
set protocols bgp group cisco-peers peer-as 35
set protocols bgp group cisco-peers outbound-route-filter bgp-orf-cisco-mode
set protocols bgp group cisco-peers outbound-route-filter prefix-based accept inet
set protocols bgp group cisco-peers neighbor 192.168.165.56
set routing-options autonomous-system 65500
Procedure
Step-by-Step Procedure
The following example requires that you navigate various levels in the configuration hierarchy. For information about navigating the CLI, see Using the CLI Editor in Configuration Mode in the Junos OS CLI User Guide.
To configure Router PE1 to accept route filters from Device CE1 and perform outbound route filtering using the received filters:
Configure the local autonomous system.
[edit routing-options]
user@PE1# set autonomous-system 65500
Configure external peering with Device CE1.
[edit protocols bgp group cisco-peers]
user@PE1# set type external
user@PE1# set description “to CE1”
user@PE1# set local-address 192.168.165.58
user@PE1# set peer-as 35
user@PE1# set neighbor 192.168.165.56
Configure Router PE1 to accept IPv4 route filters from Device CE1 and perform outbound route filtering using the received filters.
[edit protocols bgp group cisco-peers]
user@PE1# set outbound-route-filter prefix-based accept inet
(Optional) Enable interoperability with routing devices that use the vendor-specific compatibility code of 130 for outbound route filters and the code type of 128.
The IANA standard code is 3, and the standard code type is 64.
[edit protocols bgp group cisco-peers]
user@PE1# set outbound-route-filter bgp-orf-cisco-mode
Results
From configuration mode, confirm your configuration
by entering the show protocols and show routing-options commands. If the output does not display the intended configuration,
repeat the instructions in this example to correct the configuration.
user@PE1# show protocols
group cisco-peers {
    type external;
    description “to CE1”;
    local-address 192.168.165.58;
    peer-as 35;
    outbound-route-filter {
        bgp-orf-cisco-mode;
        prefix-based {
            accept {
                inet;
            }
        }
    }
    neighbor 192.168.165.56;
}
user@PE1# show routing-options
autonomous-system 65500;
If you are done configuring the device, enter commit from configuration mode.
Verification
Confirm that the configuration is working properly.
Verifying the Outbound Route Filter
Purpose
Display information about the prefix-based outbound route filter received from Device CE1.
Action
From operational mode, enter the show bgp neighbor orf detail command.
user@PE1> show bgp neighbor orf 192.168.165.56 detail
   Peer: 192.168.165.56 Type: External
   Group: cisco-peers

   inet-unicast
    Filter updates recv:          4 Immediate:          0
    Filter: prefix-based            receive
            Updates recv:          4
      Received filter entries:
        seq 10 2.2.0.0/16 deny minlen 0 maxlen 0
        seq 20 3.3.0.0/16 deny minlen 24 maxlen 0
        seq 30 4.4.0.0/16 deny minlen 0 maxlen 28
        seq 40 5.5.0.0/16 deny minlen 24 maxlen 28
Verifying the BGP Neighbor Mode
Purpose
Verify that the bgp-orf-cisco-mode setting
is enabled for the peer by making sure that the ORFCiscoMode option is displayed in the show bgp neighbor command
output.
Action
From operational mode, enter the show bgp neighbor command.
user@PE1> show bgp neighbor
Peer: 192.168.165.56 AS 35       Local: 192.168.165.58 AS 65500
  Type: External    State: Active         Flags: <>
  Last State: Idle          Last Event: Start
  Last Error: None
  Export: [ adv_stat ]
  Options: <Preference LocalAddress AddressFamily PeerAS Refresh>
  Options: <ORF ORFCiscoMode>
  Address families configured: inet-unicast
  Local Address: 192.168.165.58 Holdtime: 90 Preference: 170
  Number of flaps: 0
  Trace options: detail open detail refresh
  Trace file: /var/log/orf size 5242880 files 20
Understanding the Default BGP Routing Policy on Packet Transport Routers (PTX Series)
On PTX Series Packet Transport routers, the default BGP routing policy differs from that of other Junos OS routing devices. The default routing policy of the PTX Series 3000 and 5000 Series routers will not install BGP routes in the forwarding table, unless you configure another policy to override it. All other PTX Series routers will install BGP learned routes to the forwarding information base (FIB) and packet forwading engine (PFE) without the need for a policy.
The PTX Series routers are MPLS transit platforms that do IP forwarding, typically using interior gateway protocol (IGP) routes. The PTX Series Packet Forwarding Engine can accommodate a relatively small number of variable-length prefixes.
A PTX Series router can support full BGP routes in the control plane so that it can be used as a route reflector (RR). It can do exact-length lookup multicast forwarding and can build the multicast forwarding plane for use by the unicast control plane (for example. to perform a reverse-path forwarding lookup for multicast).
Given the PFE limitation, the default routing policy for PTX Series routers is for BGP routes not to be installed in the forwarding table. You can override the default routing policy and select certain BGP routes to install in the forwarding table.
The default behavior for load balancing and BGP routes on PTX Series routers is as follows. It has the following desirable characteristics:
Allows you to override the default behavior without needing to alter the default policy directly
Reduces the chance of accidental changes that nullify the defaults
Sets no flow-control actions, such as accept and reject
The default routing policy on the PTX Series routers is as follows:
user@host# show policy-options | display inheritance defaults no-comments
policy-options {
    policy-statement junos-ptx-series-default {
        term t1 {
            from {
                protocol bgp;
                rib inet.0;
            }
            then no-install-to-fib;
        }
        term t2 {
            from {
                protocol bgp;
                rib inet6.0;
            }
            then no-install-to-fib;
        }
        term t3 {
            then load-balance per-packet;
        }
    }
}
routing-options {
    forwarding-table {
        default-export junos-ptx-series-default;
    }
}
user@host# show routing-options forwarding-table default-export | display inheritance defaults no-comments
default-export junos-ptx-series-default;
As shown here, the junos-ptx-series-default policy
is defined in [edit policy-options]. The policy is applied
in [edit routing-options forwarding-table], using the default-export statement. You can view these default configurations
by using the | display inheritance flag.
Also, you can use the show policy command to view
the default policy.
user@host> show policy junos-ptx-series-default
Policy junos-ptx-series-default:
    Term t1:
        from proto BGP
         inet.0
        then install-to-fib no
    Term t2:
        from proto BGP
         inet6.0
        then install-to-fib no
    Term t3:
then load-balance per-packetWe strongly recommend that you do not alter the junos-ptx-series-default routing policy directly.
Junos OS chains the junos-ptx-series-default policy
and any user-configured export policy. Because the junos-ptx-series-default policy does not use flow-control actions, any export policy that
you configure is executed (by way of the implicit next-policy action)
for every route. Thus you can override any actions set by the junos-ptx-series-default policy. If you do not configure an
export policy, the actions set by junos-ptx-series-default policy are the only actions.
You can use the policy action install-to-fib to
override the no-install-to-fib action.
Similarly, you can set the load-balance per-prefix action to override the load-balance per-packet action.
See Also
Example: Overriding the Default BGP Routing Policy on PTX Series Packet Transport Routers
This example shows how to override the default routing policy on packet transport routers, such as the PTX Series Packet Transport Routers.
Requirements
This example requires Junos OS Release 12.1 or later.
Overview
By default, the PTX Series routers do not install BGP routes in the forwarding table.
For PTX Series routers, the configuration of the from protocols bgp condition with the then accept action does not have the usual result that it has on other Junos OS routing devices. With the following routing policy on PTX Series routers, BGP routes do not get installed in the forwarding table.
user@host# show policy-options
policy-statement accept-no-install {
    term 1 {
        from protocol bgp;
        then accept;
    }
}
user@host# show routing-options
forwarding-table {
    export accept-no-install;
}
user@host> show route forwarding-table
Routing table: default.inet
Internet:
Destination        Type RtRef Next hop           Type Index NhRef Netif
default            perm     0                    rjct    36     2
No BGP routes are installed in the forwarding table. This is the expected behavior.
This example shows how to use the then install-to-fib action to effectively override the default BGP routing policy.
Configuration
CLI Quick Configuration
To quickly configure this example, copy the following commands, paste them into a text file, remove any line breaks, change any details necessary to match your network configuration, and then copy and paste the commands into the CLI at the [edit] hierarchy level.
set policy-options prefix-list install-bgp 66.0.0.1/32
set policy-options policy-statement override-ptx-series-default term 1 from prefix-list install-bgp
set policy-options policy-statement override-ptx-series-default term 1 then load-balance per-prefix
set policy-options policy-statement override-ptx-series-default term 1 then install-to-fib
set routing-options forwarding-table export override-ptx-series-default
Installing Selected BGP Routes in the Forwarding Table
Step-by-Step Procedure
The following example requires you to navigate various levels in the configuration hierarchy. For information about navigating the CLI, see Using the CLI Editor in Configuration Mode in the Junos OS CLI User Guide.
To install selected BGP routes in the forwarding table:
Configure a list of prefixes to install in the forwarding table.
[edit policy-options prefix-list install-bgp]
user@host# set 66.0.0.1/32
Configure the routing policy, applying the prefix list as a condition.
[edit policy-options policy-statement override-ptx-series-default term 1]
user@host# set from prefix-list install-bgp
user@host# set then install-to-fib
user@host# set then load-balance per-prefix
Apply the routing policy to the forwarding table.
[edit routing-options forwarding-table]
user@host# set export override-ptx-series-default
Results
From configuration mode, confirm your configuration by entering the show policy-options and show routing-options commands. If the output does not display the intended configuration, repeat the instructions in this example to correct the configuration.
user@host# show policy-options
prefix-list install-bgp {
    66.0.0.1/32;
}
policy-statement override-ptx-series-default {
    term 1 {
        from {
            prefix-list install-bgp;
        }
        then {
            load-balance per-prefix;
            install-to-fib;
        }
    }
}
user@host# show routing-options
forwarding-table {
    export override-ptx-series-default;
}
If you are done configuring the device, enter commit from configuration mode.
Verification
Confirm that the configuration is working properly.
Verifying That the Selected Route Is Installed in the Forwarding Table
Purpose
Make sure that the configured policy overrides the default policy.
Action
From operational mode, enter the show route forwarding-table command.
user@host> show route forwarding-table destination 66.0.0.1
Internet:
Destination        Type RtRef Next hop           Type Index NhRef Netif
66.0.0.1/32        user     0                    indr 2097159     3
                                                 ulst 2097156     2
                              5.1.0.2            ucst   574     1 et-6/0/0.1
                              5.2.0.2            ucst   575     1 et-6/0/0.2
Meaning
This output shows that the route to 66.0.0.1/32 is installed in the forwarding table.
Conditional Advertisement Enabling Conditional Installation of Prefixes Use Cases
Networks are usually subdivided into smaller, more-manageable units called autonomous systems (ASs). When BGP is used by routers to form peer relationships in the same AS, it is referred to as internal BGP (IBGP). When BGP is used by routers to form peer relationships in different ASs, it is referred to as external BGP (EBGP).
After performing route sanity checks, a BGP router accepts the routes received from its peers and installs them into the routing table. By default, all routers in IBGP and EBGP sessions follow the standard BGP advertisement rules. While a router in an IBGP session advertises only the routes learned from its direct peers, a router in an EBGP session advertises all routes learned from its direct and indirect peers (peers of peers). Hence, in a typical network configured with EBGP, a router adds all routes received from an EBGP peer into its routing table and advertises nearly all routes to all EBGP peers.
A service provider exchanging BGP routes with both customers and peers on the Internet is at risk of malicious and unintended threats that can compromise the proper routing of traffic, as well as the operation of the routers.
This has several disadvantages:
Non-aggregated route advertisements—A customer could erroneously advertise all its prefixes to the ISP rather than an aggregate of its address space. Given the size of the Internet routing table, this must be carefully controlled. An edge router might also need only a default route out toward the Internet and instead be receiving the entire BGP routing table from its upstream peer.
BGP route manipulation—If a malicious administrator alters the contents of the BGP routing table, it could prevent traffic from reaching its intended destination.
BGP route hijacking—A rogue administrator of a BGP peer could maliciously announce a network’s prefixes in an attempt to reroute the traffic intended for the victim network to the administrator’s network to either gain access to the contents of traffic or to block the victim’s online services.
BGP denial of service (DoS)—If a malicious administrator sends unexpected or undesirable BGP traffic to a router in an attempt to use all of the router’s available BGP resources, it might result in impairing the router’s ability to process valid BGP route information.
Conditional installation of prefixes can be used to address all the problems previously mentioned. If a customer requires access to remote networks, it is possible to install a specific route in the routing table of the router that is connected with the remote network. This does not happen in a typical EBGP network and hence, conditional installation of prefixes becomes essential.
ASs are not only bound by physical relationships but by business or other organizational relationships. An AS can provide services to another organization, or act as a transit AS between two other ASs. These transit ASs are bound by contractual agreements between the parties that include parameters on how to connect to each other and most importantly, the type and quantity of traffic they carry for each other. Therefore, for both legal and financial reasons, service providers must implement policies that control how BGP routes are exchanged with neighbors, which routes are accepted from those neighbors, and how those routes affect the traffic between the ASs.
There are many different options available to filter routes received from a BGP peer to both enforce inter-AS policies and mitigate the risks of receiving potentially harmful routes. Conventional route filtering examines the attributes of a route and accepts or rejects the route based on such attributes. A policy or filter can examine the contents of the AS-Path, the next-hop value, a community value, a list of prefixes, the address family of the route, and so on.
In some cases, the standard “acceptance condition” of matching a particular attribute value is not enough. The service provider might need to use another condition outside of the route itself, for example, another route in the routing table. As an example, it might be desirable to install a default route received from an upstream peer, only if it can be verified that this peer has reachability to other networks further upstream. This conditional route installation avoids installing a default route that is used to send traffic toward this peer, when the peer might have lost its routes upstream, leading to black-holed traffic. To achieve this, the router can be configured to search for the presence of a particular route in the routing table, and based on this knowledge accept or reject another prefix.
Example: Configuring a Routing Policy for Conditional Advertisement Enabling Conditional Installation of Prefixes in a Routing Table explains how the conditional installation of prefixes can be configured and verified.
See Also
Conditional Advertisement and Import Policy (Routing Table) with certain match conditions
BGP accepts all non-looped routes learned from neighbors and imports them into the RIB-In table. If these routes are accepted by the BGP import policy, they are then imported into the inet.0 routing table. In cases where only certain routes are required to be imported, provisions can be made such that the peer routing device exports routes based on a condition or a set of conditions.
The condition for exporting a route can be based on:
The peer the route was learned from
The interface the route was learned on
Some other required attribute
For example:
[edit]
policy-options {
    condition condition-name {
        if-route-exists address table table-name;
    }
}
This is known as conditional installation of prefixes and is described in Example: Configuring a Routing Policy for Conditional Advertisement Enabling Conditional Installation of Prefixes in a Routing Table.
Conditions in routing policies can be configured irrespective of whether they are a part of the export or import policies or both. The export policy supports these conditions inherited from the routing policy based on the existence of another route in the routing policy. However, the import policy doesn't support these conditions, and the conditions are not executed even if they are present.
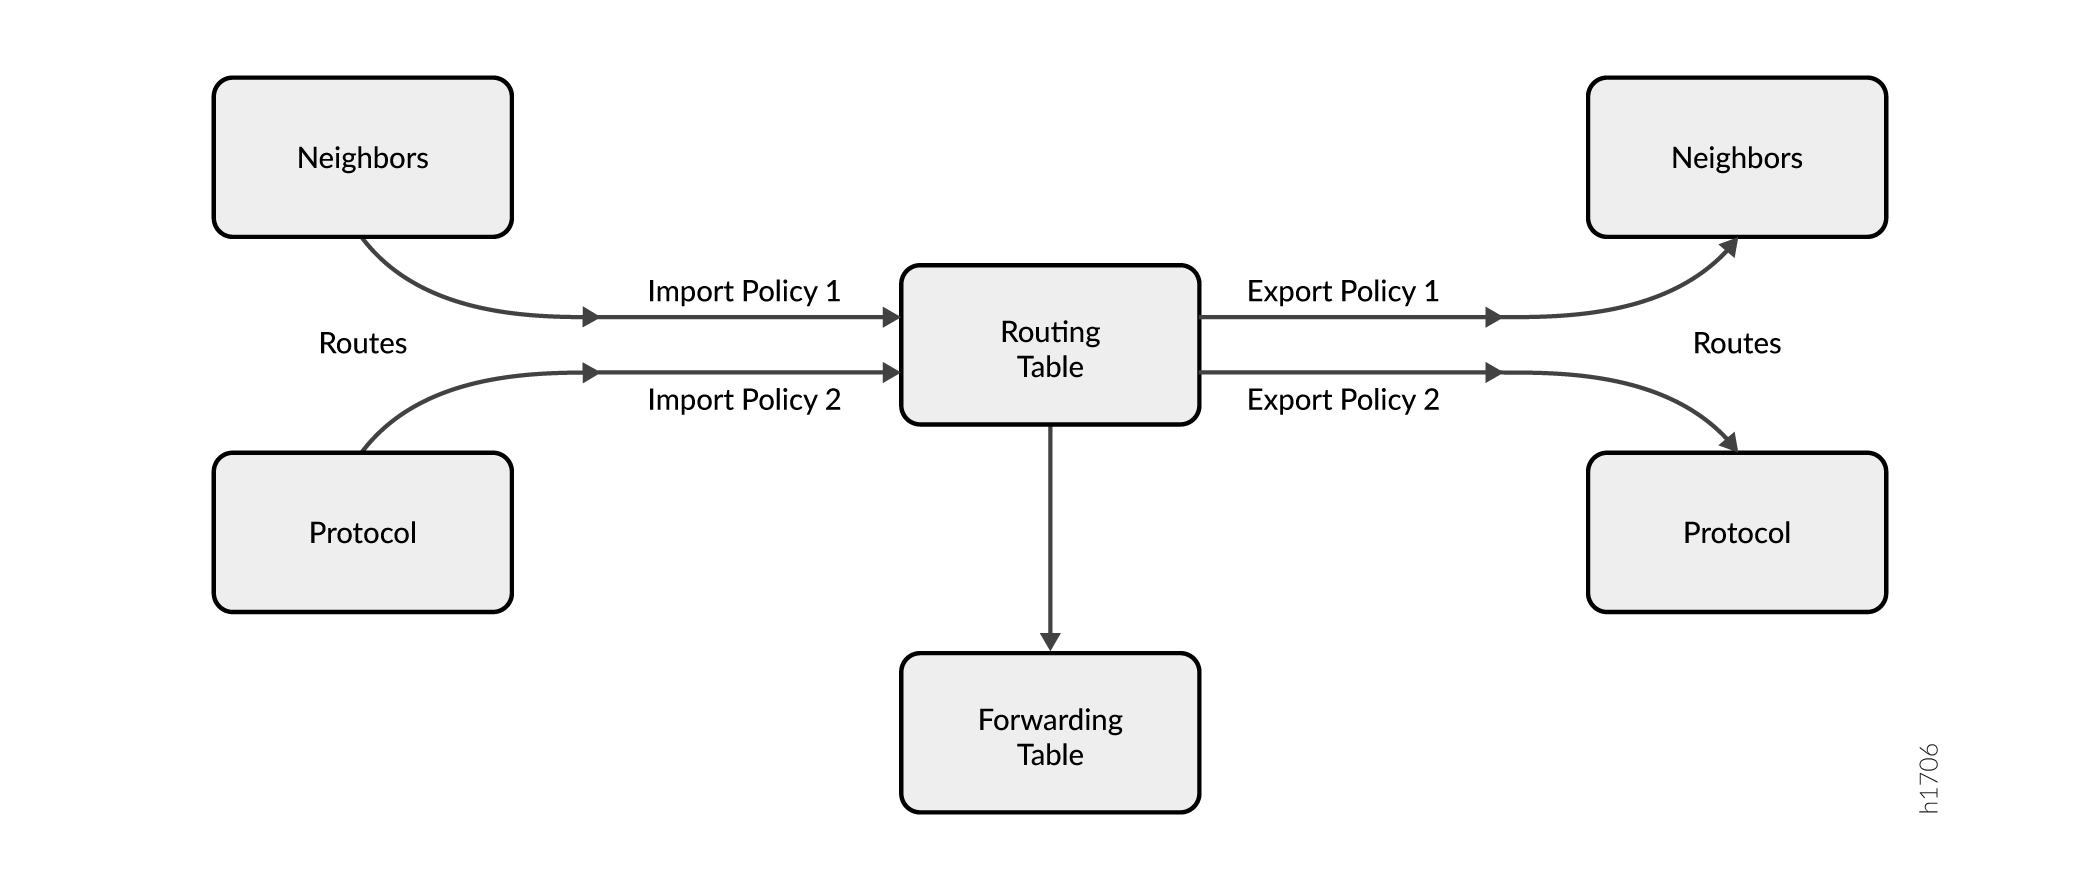
Figure 4 illustrates where BGP import and export policies are applied. An import policy is
applied to inbound routes that are visible in the output of the show route
receive-protocol bgp neighbor-address command. An export
policy is applied to outbound routes that are visible in the output of the show
route advertising-protocol bgp neighbor-address
command.
To enable conditional installation of prefixes, an export policy must be configured on the device where the prefix export has to take place. The export policy evaluates each route to verify that it satisfies all the match conditions under the from statement. It also searches for the existence of the route defined under the condition statement (also configured under the from statement).
If the route does not match the entire set of required conditions defined in the policy, or if the route defined under the condition statement does not exist in the routing table, the route is not exported to its BGP peers. Thus, a conditional export policy matches the routes for the desired route or prefix you want installed in the peers’ routing table.
To configure the conditional installation of prefixes with the help of an export policy:
Create a
conditionstatement to check prefixes.[edit] policy-options { condition condition-name { if-route-exists address table table-name; } }Create an export policy with the newly created condition using the
conditionstatement.[edit] policy-options { policy-statement policy-name { term 1 { from { protocols bgp; condition condition-name; } then { accept; } } } }Apply the export policy to the device that requires only selected prefixes to be exported from the routing table.
[edit] protocols bgp { group group-name { export policy-name; } }
See Also
Example: Configuring a Routing Policy for Conditional Advertisement Enabling Conditional Installation of Prefixes in a Routing Table
This example shows how to configure conditional installation of prefixes in a routing table using BGP export policy.
Requirements
This example uses the following hardware and software components:
M Series Multiservice Edge Routers, MX Series 5G Universal Routing Platforms, or T Series Core Routers
Junos OS Release 9.0 or later
Overview
In this example, three routers in three different autonomous systems (ASs) are connected and configured with the BGP protocol. The router labeled Internet, which is the upstream router, has five addresses configured on its lo0.0 loopback interface (172.16.11.1/32, 172.16.12.1/32, 172.16.13.1/32, 172.16.14.1/32, and 172.16.15.1/32), and an extra loopback address (192.168.9.1/32) is configured as the router ID. These six addresses are exported into BGP to emulate the contents of a BGP routing table of a router connected to the Internet, and advertised to North.
The North and South routers use the 10.0.89.12/30 and 10.0.78.12/30 networks, respectively, and use 192.168.7.1 and 192.168.8.1 for their respective loopback addresses.
Figure 5 shows the topology used in this example.
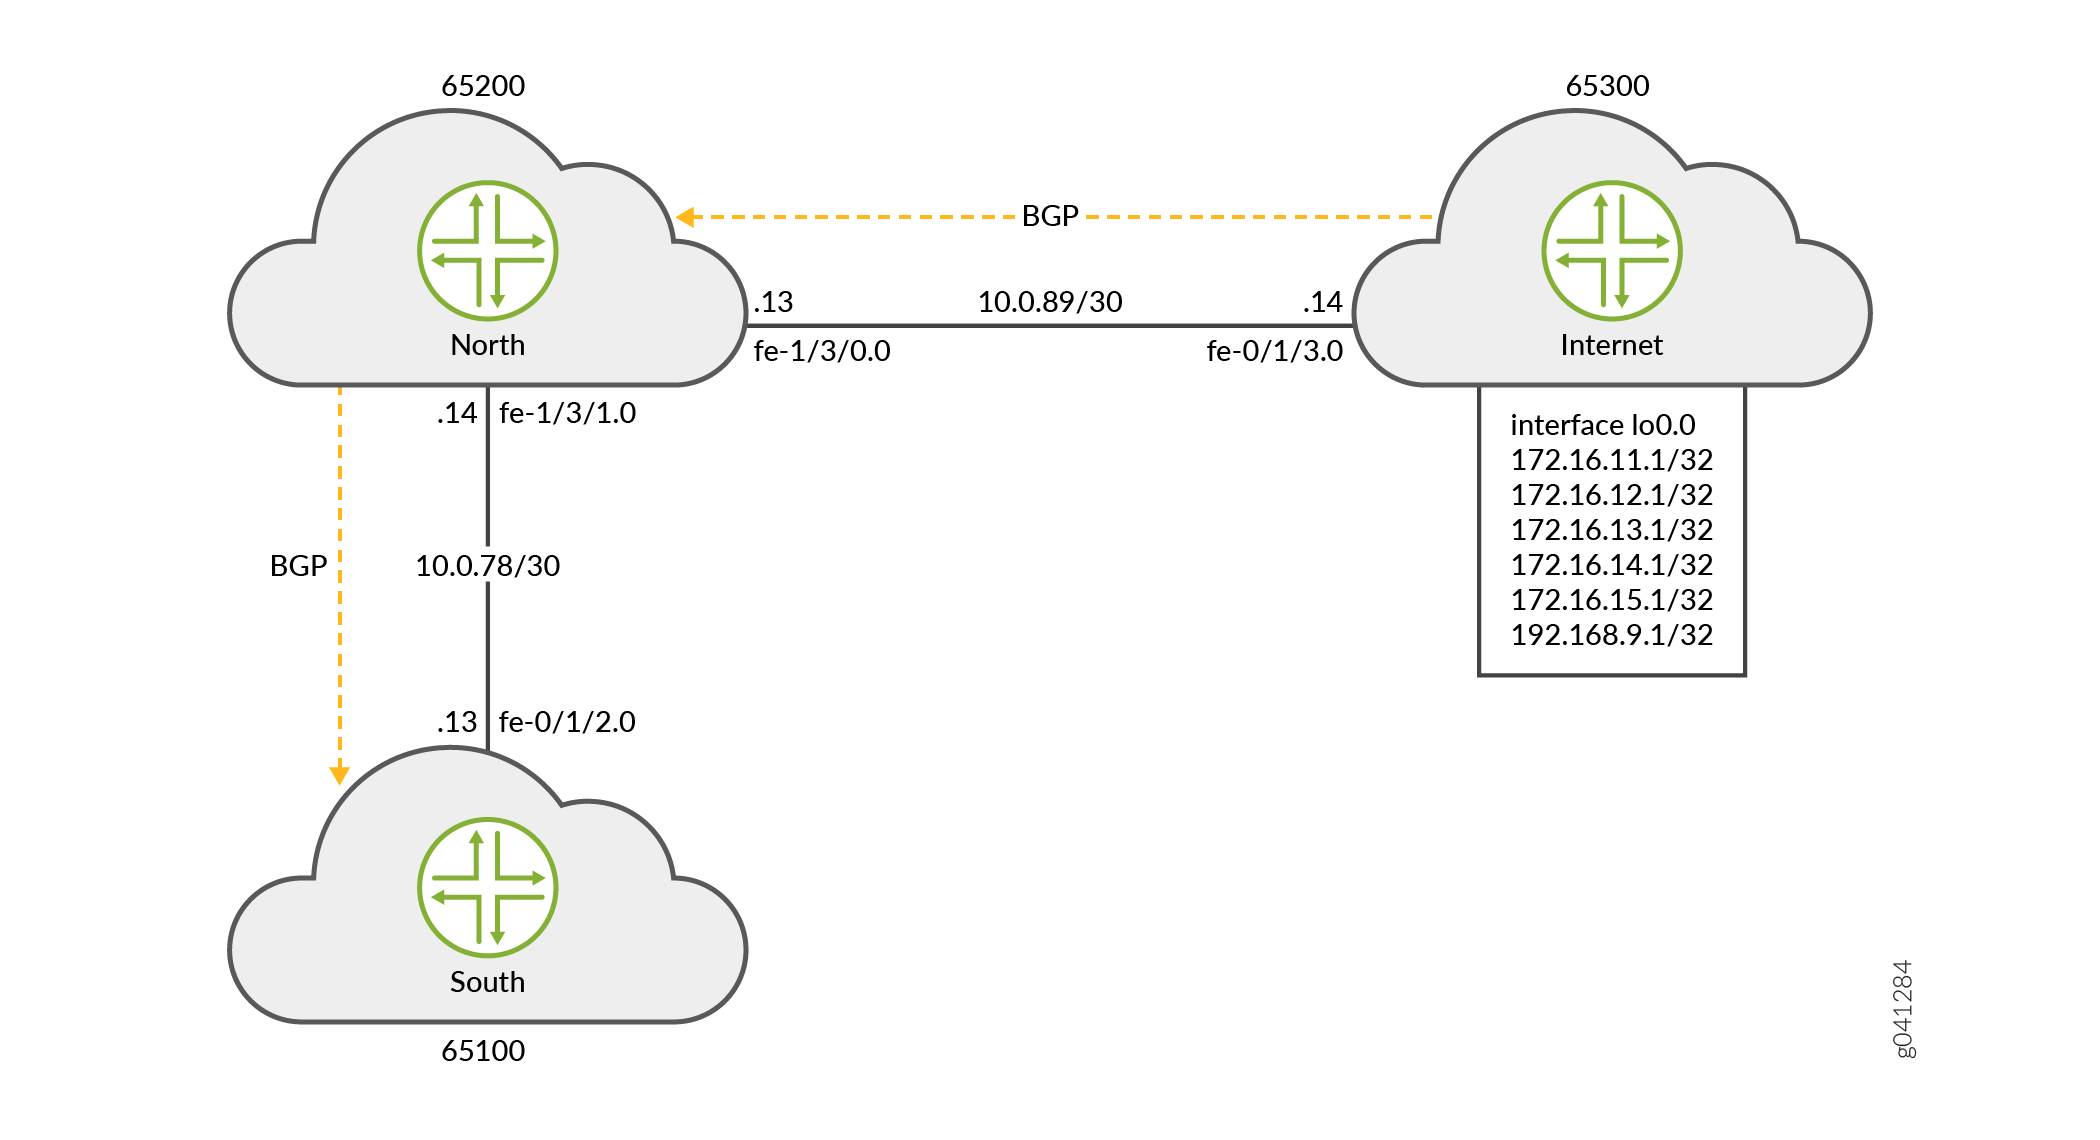
Router North exports the 172.16.0.0/16 BGP routes it learns from Router Internet to Router South. These routes might represent the routes owned by the Internet router's domain. In addition, when the specific 172.16.11.1/32 route is present, Router North also advertises a default route. The 172.16.11.1 route might represent the Internet router's link to a tier 1 transit peering provider that provides full internet connectivity.
Router South receives all six routes, but should only install the default route and one other specific route (172.16.11.1/32) in its routing table.
To summarize, the example meets the following requirements:
-
On North, send all 172.16/16 prefixes. In addition, also send 0/0 to South only if a particular route is present in the inet.0 routing table (in this example 172.16.11.1/32).
-
On South, accept and install the default route and the 172.16.11.1/32 route in the routing and forwarding tables. Drop all other routes. Consider that South might be a lower-end device that cannot accept a full Internet routing table. As a result the operator only wants South to have the default route and one other specific prefix.
The first requirement is met with an export policy on North:
user@North# show policy-options
policy-statement conditional-export-bgp {
term prefix_11 {
from {
protocol bgp;
route-filter 172.16.0.0/16 orlonger;
}
then accept;
}
term conditional-default {
from {
route-filter 0.0.0.0/0 exact;
condition prefix_11;
}
then accept;
}
term others {
then reject;
}
}
condition prefix_11 {
if-route-exists {
172.16.11.1/32;
table inet.0;
}
}
The logic of the conditional export policy can be summarized as follows: If 0/0 is present, and if 172.16.11.1/32 is present, then send the 0/0 prefix. This implies that if 172.16.11.1/32 is not present, then do not send 0/0.
The second requirement is met with an import policy on South:
user@South# show policy-options
policy-statement import-selected-routes {
term 1 {
from {
rib inet.0;
neighbor 10.0.78.14;
route-filter 0.0.0.0/0 exact;
route-filter 172.16.11.1/32 exact;
}
then accept;
}
term 2 {
then reject;
}
}
In this example, four routes are dropped as a result of the import policy on South. This is because the export policy on North leaks all of the routes received from Internet, and the import policy on South excludes some of these routes.
It is important to understand that in Junos OS, although an import policy (inbound route filter) might reject a route, not use it for traffic forwarding, and not include it in an advertisement to other peers, the router retains these routes as hidden routes. These hidden routes are not available for policy or routing purposes. However, they do occupy memory space on the router. A service provider filtering routes to control the amount of information being kept in memory and processed by a router might want the router to entirely drop the routes being rejected by the import policy.
Hidden routes can be viewed by using the show route receive-protocol bgp
neighbor-address hidden command. The hidden
routes can then be retained or dropped from the routing table by configuring the
keep all | none statement at the [edit protocols
bgp] or [edit protocols bgp group
group-name] hierarchy level.
The rules of BGP route retention are as follows:
-
By default, all routes learned from BGP are retained, except those where the AS path is looped. (The AS path includes the local AS.)
-
By configuring the
keep allstatement, all routes learned from BGP are retained, even those with the local AS in the AS path. -
By configuring the
keep nonestatement, BGP discards routes that were received from a peer and that were rejected by import policy or other sanity checking. When this statement is configured and the inbound policy changes, Junos OS re-advertises all the routes advertised by the peer.
When you configure keep all or keep none and the
peers support route refresh, the local speaker sends a refresh message and performs
an import evaluation. For these peers, the sessions do not restart. To determine if
a peer supports refresh, check for Peer supports Refresh capability
in the output of the show bgp neighbor command.
If you configure keep all or keep none and the
peer does not support session restart, the associated BGP sessions are restarted
(flapped).
Topology
Configuration
CLI Quick Configuration
To quickly configure this example, copy the
following commands, paste them into a text file, remove any line breaks,
change any details necessary to match your network configuration,
and then copy and paste the commands into the CLI at the [edit] hierarchy level.
Router Internet
set interfaces lo0 unit 0 family inet address 172.16.11.1/32 set interfaces lo0 unit 0 family inet address 172.16.12.1/32 set interfaces lo0 unit 0 family inet address 172.16.13.1/32 set interfaces lo0 unit 0 family inet address 172.16.14.1/32 set interfaces lo0 unit 0 family inet address 172.16.15.1/32 set interfaces lo0 unit 0 family inet address 192.168.9.1/32 set interfaces fe-0/1/3 unit 0 family inet address 10.0.89.14/30 set protocols bgp group toNorth local-address 10.0.89.14 set protocols bgp group toNorth peer-as 65200 set protocols bgp group toNorth neighbor 10.0.89.13 set protocols bgp group toNorth export into-bgp set policy-options policy-statement into-bgp term 1 from interface lo0.0 set policy-options policy-statement into-bgp term 1 then accept set routing-options router-id 192.168.9.1 set routing-options autonomous-system 65300
Router North
set interfaces fe-1/3/1 unit 0 family inet address 10.0.78.14/30 set interfaces fe-1/3/0 unit 0 family inet address 10.0.89.13/30 set interfaces lo0 unit 0 family inet address 192.168.8.1/32 set protocols bgp group toInternet local-address 10.0.89.13 set protocols bgp group toInternet peer-as 65300 set protocols bgp group toInternet neighbor 10.0.89.14 set protocols bgp group toSouth local-address 10.0.78.14 set protocols bgp group toSouth export conditional-export-bgp set protocols bgp group toSouth peer-as 65100 set protocols bgp group toSouth neighbor 10.0.78.13 set policy-options policy-statement conditional-export-bgp term prefix_11 from protocol bgp set policy-options policy-statement conditional-export-bgp term prefix_11 from route-filter 172.16.0.0/16 orlonger set policy-options policy-statement conditional-export-bgp term prefix_11 then accept set policy-options policy-statement conditional-export-bgp term conditional-default from route-filter 0.0.0.0/0 exact set policy-options policy-statement conditional-export-bgp term conditional-default from condition prefix_11 set policy-options policy-statement conditional-export-bgp term conditional-default then accept set policy-options policy-statement conditional-export-bgp term others then reject set policy-options condition prefix_11 if-route-exists 172.16.11.1/32 set policy-options condition prefix_11 if-route-exists table inet.0 set routing-options static route 0/0 reject set routing-options router-id 192.168.8.1 set routing-options autonomous-system 65200
Router South
set interfaces fe-0/1/2 unit 0 family inet address 10.0.78.13/30 set interfaces lo0 unit 0 family inet address 192.168.7.1/32 set protocols bgp group toNorth local-address 10.0.78.13 set protocols bgp group toNorth import import-selected-routes set protocols bgp group toNorth peer-as 65200 set protocols bgp group toNorth neighbor 10.0.78.14 set policy-options policy-statement import-selected-routes term 1 from neighbor 10.0.78.14 set policy-options policy-statement import-selected-routes term 1 from route-filter 172.16.11.1/32 exact set policy-options policy-statement import-selected-routes term 1 from route-filter 0.0.0.0/0 exact set policy-options policy-statement import-selected-routes term 1 then accept set policy-options policy-statement import-selected-routes term 2 then reject set routing-options router-id 192.168.7.1 set routing-options autonomous-system 65100
Configuring Conditional Installation of Prefixes
Step-by-Step Procedure
The following example requires that you navigate various levels in the configuration hierarchy. For information about navigating the CLI, see Using the CLI Editor in Configuration Mode in the Junos OS CLI User Guide.
To configure conditional installation of prefixes:
Configure the router interfaces forming the links between the three routers.
Router Internet [edit interfaces] user@Internet# set fe-0/1/3 unit 0 family inet address 10.0.89.14/30
Router North [edit interfaces] user@North# set fe-1/3/1 unit 0 family inet address 10.0.78.14/30 user@North# set fe-1/3/0 unit 0 family inet address 10.0.89.13/30
Router South [edit interfaces] user@South# set fe-0/1/2 unit 0 family inet address 10.0.78.13/30
Configure five loopback interface addresses on Router Internet to emulate BGP routes learned from the Internet that are to be imported into the routing table of Router South, and configure an additional address (192.168.9.1/32) that will be configured as the router ID.
Router Internet [edit interfaces lo0 unit 0 family inet] user@Internet# set address 172.16.11.1/32 user@Internet# set address 172.16.12.1/32 user@Internet# set address 172.16.13.1/32 user@Internet# set address 172.16.14.1/32 user@Internet# set address 172.16.15.1/32 user@Internet# set address 192.168.9.1/32
Also, configure the loopback interface addresses on Routers North and South.
Router North [edit interfaces lo0 unit 0 family inet] user@North# set address 192.168.8.1/32
Router South [edit interfaces lo0 unit 0 family inet] user@South# set address 192.168.7.1/32
Configure the static default route on Router North to be advertised to Router South.
[edit routing-options] user@North# set static route 0/0 reject
Define the condition for exporting prefixes from the routing table on Router North.
[edit policy-options condition prefix_11] user@North# set if-route-exists 172.16.11.1/32 user@North# set if-route-exists table inet.0
Define export policies (
into-bgpandconditional-export-bgp) on Routers Internet and North respectively, to advertise routes to BGP.Note:Ensure that you reference the condition,
prefix_11(configured in Step 4), in the export policy.Router Internet [edit policy-options policy-statement into-bgp ] user@Internet# set term 1 from interface lo0.0 user@Internet# set term 1 then accept
Router North [edit policy-options policy-statement conditional-export-bgp] user@North# set term prefix_11 from protocol bgp user@North# set term prefix_11 from route-filter 172,16.0.0/16 orlonger user@North# set term prefix_11 then accept user@North# set term conditional-default from route-filter 0.0.0.0/0 exact user@North# set term conditional-default from condition prefix_11 user@North# set term conditional-default then accept user@North# set term others then reject
Define an import policy (
import-selected-routes) on Router South to import some of the routes advertised by Router North into its routing table.[edit policy-options policy-statement import-selected-routes ] user@South# set term 1 from neighbor 10.0.78.14 user@South# set term 1 from route-filter 172.16.11.1/32 exact user@South# set term 1 from route-filter 0.0.0.0/0 exact user@South# set term 1 then accept user@South# set term 2 then reject
Configure BGP on all three routers to enable the flow of prefixes between the autonomous systems.
Note:Ensure that you apply the defined import and export policies to the respective BGP groups for prefix advertisement to take place.
Router Internet [edit protocols bgp group toNorth] user@Internet# set local-address 10.0.89.14 user@Internet# set peer-as 65200 user@Internet# set neighbor 10.0.89.13 user@Internet# set export into-bgp
Router North [edit protocols bgp group toInternet] user@North# set local-address 10.0.89.13 user@North# set peer-as 65300 user@North# set neighbor 10.0.89.14
[edit protocols bgp group toSouth] user@North# set local-address 10.0.78.14 user@North# set peer-as 65100 user@North# set neighbor 10.0.78.13 user@North# set export conditional-export-bgp
Router South [edit protocols bgp group toNorth] user@South# set local-address 10.0.78.13 user@South# set peer-as 65200 user@South# set neighbor 10.0.78.14 user@South# set import import-selected-routes
Configure the router ID and autonomous system number for all three routers.
Note:In this example, the router ID is configured based on the IP address configured on the lo0.0 interface of the router.
Router Internet [edit routing options] user@Internet# set router-id 192.168.9.1 user@Internet# set autonomous-system 65300
Router North [edit routing options] user@North# set router-id 192.168.8.1 user@North# set autonomous-system 65200
Router South [edit routing options] user@South# set router-id 192.168.7.1 user@South# set autonomous-system 65100
Results
From configuration mode, confirm your configuration
by issuing the show interfaces, show protocols bgp, show policy-options, and show routing-options commands. If the output does not display the intended configuration,
repeat the instructions in this example to correct the configuration.
Device Internet
user@Internet# show interfaces
fe-0/1/3 {
unit 0 {
family inet {
address 10.0.89.14/30;
}
}
}
lo0 {
unit 0 {
family inet {
address 172.16.11.1/32;
address 172.16.12.1/32;
address 172.16.13.1/32;
address 172.16.14.1/32;
address 172.16.15.1/32;
address 192.168.9.1/32;
}
}
}
user@Internet# show protocols bgp
group toNorth {
local-address 10.0.89.14;
export into-bgp;
peer-as 65200;
neighbor 10.0.89.13;
}
user@Internet# show policy-options
policy-statement into-bgp {
term 1 {
from interface lo0.0;
then accept;
}
}
user@Internet# show routing-options router-id 192.168.9.1; autonomous-system 65300;
Device North
user@North# show interfaces
fe-1/3/1 {
unit 0 {
family inet {
address 10.0.78.14/30;
}
}
}
fe-1/3/0 {
unit 0 {
family inet {
address 10.0.89.13/30;
}
}
}
lo0 {
unit 0 {
family inet {
address 192.168.8.1/32;
}
}
}
user@North# show protocols bgp
group toInternet {
local-address 10.0.89.13;
peer-as 65300;
neighbor 10.0.89.14;
}
group toSouth {
local-address 10.0.78.14;
export conditional-export-bgp;
peer-as 65100;
neighbor 10.0.78.13;
}
user@North# show policy-options
policy-statement conditional-export-bgp {
term prefix_11 {
from {
protocol bgp;
route-filter 172.16.0.0/16 orlonger;
}
then accept;
}
term conditional-default {
from {
route-filter 0.0.0.0/0 exact;
condition prefix_11;
}
then accept;
}
term others {
then reject;
}
}
condition prefix_11 {
if-route-exists {
172.16.11.1/32;
table inet.0;
}
}
user@North# show routing-options
static {
route 0.0.0.0/0 reject;
}
router-id 192.168.8.1;
autonomous-system 65200;
Device South
user@South# show interfaces
fe-0/1/2 {
unit 0 {
family inet {
address 10.0.78.13/30;
}
}
}
lo0 {
unit 0 {
family inet {
address 192.168.7.1/32;
}
}
}
user@South# show protocols bgp
bgp {
group toNorth {
local-address 10.0.78.13;
import import-selected-routes;
peer-as 65200;
neighbor 10.0.78.14;
}
}
user@South# show policy-options
policy-statement import-selected-routes {
term 1 {
from {
neighbor 10.0.78.14;
route-filter 172.16.11.1 exact;
route-filter 0.0.0.0/0 exact;
}
then accept;
}
term 2 {
then reject;
}
}
user@South# show routing-options router-id 192.168.7.1; autonomous-system 65100;
If you are done configuring the routers, enter commit from configuration mode.
Verification
Confirm that the configuration is working properly.
- Verifying BGP
- Verifying Prefix Advertisement from Router Internet to Router North
- Verifying Prefix Advertisement from Router North to Router South
- Verifying BGP Import Policy for Installation of Prefixes
- Verifying Conditional Export from Router North to Router South
- Verifying the Presence of Routes Hidden by Policy (Optional)
Verifying BGP
Purpose
Verify that BGP sessions have been established between the three routers.
Action
From operational mode, run the show bgp neighbor neighbor-address command.
Check the BGP session on Router Internet to verify that Router North is a neighbor.
user@Internet> show bgp neighbor 10.0.89.13 Peer: 10.0.89.13+179 AS 65200 Local: 10.0.89.14+56187 AS 65300 Type: External State: Established Flags: [ImportEval Sync] Last State: OpenConfirm Last Event: RecvKeepAlive Last Error: None Export: [ into-bgp ] Options: [Preference LocalAddress PeerAS Refresh] Local Address: 10.0.89.14 Holdtime: 90 Preference: 170 Number of flaps: 0 Peer ID: 192.168.8.1 Local ID: 192.168.9.1 Active Holdtime: 90 Keepalive Interval: 30 Group index: 0 Peer index: 0 BFD: disabled, down Local Interface: fe-0/1/3.0 NLRI for restart configured on peer: inet-unicast NLRI advertised by peer: inet-unicast NLRI for this session: inet-unicast Peer supports Refresh capability (2) Stale routes from peer are kept for: 300 Peer does not support Restarter functionality NLRI that restart is negotiated for: inet-unicast NLRI of received end-of-rib markers: inet-unicast NLRI of all end-of-rib markers sent: inet-unicast Peer supports 4 byte AS extension (peer-as 65200) Peer does not support Addpath Table inet.0 Bit: 10000 RIB State: BGP restart is complete Send state: in sync Active prefixes: 0 Received prefixes: 0 Accepted prefixes: 0 Suppressed due to damping: 0 Advertised prefixes: 6 Last traffic (seconds): Received 9 Sent 18 Checked 28 Input messages: Total 12 Updates 1 Refreshes 0 Octets 232 Output messages: Total 14 Updates 1 Refreshes 0 Octets 383 Output Queue[0]: 0Check the BGP session on Router North to verify that Router Internet is a neighbor.
user@North> show bgp neighbor 10.0.89.14 Peer: 10.0.89.14+56187 AS 65300 Local: 10.0.89.13+179 AS 65200 Type: External State: Established Flags: [ImportEval Sync] Last State: OpenConfirm Last Event: RecvKeepAlive Last Error: None Options: [Preference LocalAddress PeerAS Refresh] Local Address: 10.0.89.13 Holdtime: 90 Preference: 170 Number of flaps: 0 Peer ID: 192.168.9.1 Local ID: 192.168.8.1 Active Holdtime: 90 Keepalive Interval: 30 Group index: 0 Peer index: 0 BFD: disabled, down Local Interface: fe-1/3/0.0 NLRI for restart configured on peer: inet-unicast NLRI advertised by peer: inet-unicast NLRI for this session: inet-unicast Peer supports Refresh capability (2) Stale routes from peer are kept for: 300 Peer does not support Restarter functionality NLRI that restart is negotiated for: inet-unicast NLRI of received end-of-rib markers: inet-unicast NLRI of all end-of-rib markers sent: inet-unicast Peer supports 4 byte AS extension (peer-as 65300) Peer does not support Addpath Table inet.0 Bit: 10001 RIB State: BGP restart is complete Send state: in sync Active prefixes: 6 Received prefixes: 6 Accepted prefixes: 6 Suppressed due to damping: 0 Advertised prefixes: 0 Last traffic (seconds): Received 14 Sent 3 Checked 3 Input messages: Total 16 Updates 2 Refreshes 0 Octets 402 Output messages: Total 15 Updates 0 Refreshes 0 Octets 348 Output Queue[0]: 0
Check the following fields in these outputs to verify that BGP sessions have been established:
Peer—Check if the peer AS number is listed.
Local—Check if the local AS number is listed.
State—Ensure that the value is
Established. If not, check the configuration again and seeshow bgp neighborfor more details on the output fields.
Similarly, verify that Routers North and South form peer relationships with each other.
Meaning
BGP sessions are established between the three routers.
Verifying Prefix Advertisement from Router Internet to Router North
Purpose
Verify that the routes sent from Router Internet are received by Router North.
Action
From operational mode on Router Internet, run the
show route advertising-protocol bgp neighbor-addresscommand.user@Internet> show route advertising-protocol bgp 10.0.89.13 inet.0: 8 destinations, 8 routes (8 active, 0 holddown, 0 hidden) Prefix Nexthop MED Lclpref AS path * 172.16.11.1/32 Self I * 172.16.12.1/32 Self I * 172.16.13.1/32 Self I * 172.16.14.1/32 Self I * 172.16.15.1/32 Self I * 192.168.9.1/32 Self I
The output verifies that Router Internet advertises the routes 172.16.11.1/32, 172.16.12.1/32, 172.16.13.1/32, 172.16.14.1/32, 172.16.15.1/32, and 192.168.9.1/32 (the loopback address used as router ID) to Router North.
From operational mode on Router North, run the
show route receive-protocol bgp neighbor-addresscommand.user@North> show route receive-protocol bgp 10.0.89.14 inet.0: 12 destinations, 12 routes (12 active, 0 holddown, 0 hidden) Prefix Nexthop MED Lclpref AS path * 172.16.11.1/32 10.0.89.14 65300 I * 172.16.12.1/32 10.0.89.14 65300 I * 172.16.13.1/32 10.0.89.14 65300 I * 172.16.14.1/32 10.0.89.14 65300 I * 172.16.15.1/32 10.0.89.14 65300 I * 192.168.9.1/32 10.0.89.14 65300 I
The output verifies that Router North has received all the routes advertised by Router Internet.
Meaning
Prefixes sent by Router Internet have been successfully installed into the routing table on Router North.
Verifying Prefix Advertisement from Router North to Router South
Purpose
Verify that the routes received from Router Internet and the static default route are advertised by Router North to Router South.
Action
From operational mode on Router North, run the
show route 0/0 exactcommand.user@North> show route 0/0 exact inet.0: 12 destinations, 12 routes (12 active, 0 holddown, 0 hidden) + = Active Route, - = Last Active, * = Both 0.0.0.0/0 *[Static/5] 00:10:22 RejectThe output verifies the presence of the static default route (0.0.0.0/0) in the routing table on Router North.
From operational mode on Router North, run the
show route advertising-protocol bgp neighbor-addresscommand.user@North> show route advertising-protocol bgp 10.0.78.13 inet.0: 12 destinations, 12 routes (12 active, 0 holddown, 0 hidden) Prefix Nexthop MED Lclpref AS path * 0.0.0.0/0 Self I * 172.16.11.1/32 Self 65300 I * 172.16.12.1/32 Self 65300 I * 172.16.13.1/32 Self 65300 I * 172.16.14.1/32 Self 65300 I * 172.16.15.1/32 Self 65300 I
The output verifies that Router North is advertising the static route and the 172.16.11.1/32 route received from Router Internet, as well as many other routes, to Router South.
Verifying BGP Import Policy for Installation of Prefixes
Purpose
Verify that the BGP import policy successfully installs the required prefixes.
Action
See if the import policy on Router South is operational by checking if only the static default route from Router North and the 172.16.11.1/32 route from Router South are installed in the routing table.
From operational mode, run the show route receive-protocol
bgp neighbor-address command.
user@South> show route receive-protocol bgp 10.0.78.14 inet.0: 10 destinations, 11 routes (6 active, 0 holddown, 4 hidden) Prefix Nexthop MED Lclpref AS path * 0.0.0.0/0 10.0.78.14 65200 I * 172.16.11.1/32 10.0.78.14 65200 65300 I
The output verifies that the BGP import policy is operational on Router South, and only the static default route of 0.0.0.0/0 from Router North and the 172.16.11.1/32 route from Router Internet have leaked into the routing table on Router South.
Meaning
The installation of prefixes is successful because of the configured BGP import policy.
Verifying Conditional Export from Router North to Router South
Purpose
Verify that when Device Internet stops sending the 172.16.11.1/32 route, Device North stops sending the default 0/0 route.
Action
Cause Device Internet to stop sending the 172.16.11.1/32 route by deactivating the 172.16.11.1/32 address on the loopback interface.
[edit interfaces lo0 unit 0 family inet] user@Internet# deactivate address 172.16.11.1/32 user@Internet# commit
From operational mode on Router North, run the
show route advertising-protocol bgp neighbor-addresscommand.user@North> show route advertising-protocol bgp 10.0.78.13 inet.0: 11 destinations, 11 routes (11 active, 0 holddown, 0 hidden) Prefix Nexthop MED Lclpref AS path * 172.16.12.1/32 Self 65300 I * 172.16.13.1/32 Self 65300 I * 172.16.14.1/32 Self 65300 I * 172.16.15.1/32 Self 65300 I
The output verifies that Router North is not advertising the default route to Router South. This is the expected behavior when the 172.16.11.1/32 route is not present.
Reactivate the 172.16.11.1/32 address on Device Internet’s loopback interface.
[edit interfaces lo0 unit 0 family inet] user@Internet# activate address 172.16.11.1/32 user@Internet# commit
Verifying the Presence of Routes Hidden by Policy (Optional)
Purpose
Verify the presence of routes hidden by the import policy configured on Router South.
This section demonstrates the effects of various changes you can make to the configuration depending on your needs.
Action
View routes hidden from the routing table of Router South by:
Using the
hiddenoption for theshow route receive-protocol bgp neighbor-addresscommand.Deactivating the import policy.
From operational mode, run the
show route receive-protocol bgp neighbor-address hiddencommand to view hidden routes.user@South> show route receive-protocol bgp 10.0.78.14 hidden inet.0: 10 destinations, 11 routes (6 active, 0 holddown, 4 hidden) Prefix Nexthop MED Lclpref AS path 172.16.12.1/32 10.0.78.14 65200 65300 I 172.16.13.1/32 10.0.78.14 65200 65300 I 172.16.14.1/32 10.0.78.14 65200 65300 I 172.16.15.1/32 10.0.78.14 65200 65300 I
The output verifies the presence of routes hidden by the import policy (172.16.12.1/32, 172.16.13.1/32, 172.16.14.1/32, and 172.16.15.1/32) on Router South.
Deactivate the BGP import policy by configuring the
deactivate importstatement at the[edit protocols bgp group group-name]hierarchy level.[edit protocols bgp group toNorth] user@South# deactivate import user@South# commit
Run the
show route receive-protocol bgp neighbor-addressoperational mode command to check the routes after deactivating the import policy.user@South> show route receive-protocol bgp 10.0.78.14 inet.0: 10 destinations, 11 routes (10 active, 0 holddown, 0 hidden) Prefix Nexthop MED Lclpref AS path * 0.0.0.0/0 10.0.78.14 65200 I * 172.16.11.1/32 10.0.78.14 65200 65300 I * 172.16.12.1/32 10.0.78.14 65200 65300 I * 172.16.13.1/32 10.0.78.14 65200 65300 I * 172.16.14.1/32 10.0.78.14 65200 65300 I * 172.16.15.1/32 10.0.78.14 65200 65300 I
The output verifies the presence of previously hidden routes (172.16.12.1/32, 172.16.13.1/32, 172.16.14.1/32, and 172.16.15.1/32).
Activate the BGP import policy and remove the hidden routes from the routing table by configuring the
activate importandkeep nonestatements respectively at the[edit protocols bgp group group-name]hierarchy level.[edit protocols bgp group toNorth] user@South# activate import user@South# set keep none user@South# commit
From operational mode, run the
show route receive-protocol bgp neighbor-address hiddencommand to check the routes after activating the import policy and configuring thekeep nonestatement.user@South> show route receive-protocol bgp 10.0.78.14 hidden inet.0: 6 destinations, 7 routes (6 active, 0 holddown, 0 hidden)
The output verifies that the hidden routes are not maintained in the routing table because of the configured
keep nonestatement.
Implicit filter for Default EBGP Route Propagation Behavior without Policies
This section talks about using an implicit filter to regulate the EBGP route propagation behavior when there is no explicit policy configured.
Benefits
This feature provides the following benefits:
Regulates BGP implementation—Prevents EBGP speakers from becoming a silent pass-through where it accepted and advertised all routes by default. This feature effectively brings down the increase in transit traffic on leaf autonomous systems, especially when they are multi-homed to any upstream Internet Service Providers. Thus, it also prevents silent dropping of traffic, Denial of Service, and global internet outages.
Implicit filter—The configuration facilitates the use of an implicit filter, where the default behavior is still set to receive and advertise all routes by default. The configuration statement only adds an option to specify enable or disable for accept, reject, reject-always clauses, when required. The implicit filter ensures that the users with existing deployments that rely on the default BGP policy do not experience operational disruptions.
Overview
BGP is the current inter-domain Autonomous protocol used for global Internet routing. It also supports various services such as VPNs, and link state, which are not intended for global usage.
BGP implementation, including the default EBGP behavior is guided by RFC4271, A Border Gateway Protocol 4 (BGP-4). However, it does not provide any explicit guidance on specifying what routes should be distributed. This leads to the original BGP implementation being a silent pass-through for routes without any filtering and therefore, causing an increase in traffic, resulting in global Internet outages.
Starting in Junos OS Release 20.3R1, we have introduced an implicit
filter defaults ebgp no-policy at the existing [edit
protocols bgp] hierarchy level. The configuration separates
the default policy for receive and advertise, into separate clauses
(accept, reject, or reject-always) to permit the behavior to vary
independently.
If there is no explicit policy configured, the implicit filter allows you to enable the default eBGP receive and advertise behavior in one of three states as follows:
Values |
Default Policy |
What it does |
|---|---|---|
accept |
receive |
Accepts to receive all routes (also the default behavior). |
advertise |
Accepts to advertise all routes (also the default behavior). |
|
reject |
receive |
Rejects to receive routes of type inet unicast and inet6 unicast in instance types primary, vrf, virtual-router, and non-forwarding. |
advertise |
Rejects to advertise routes of type inet unicast and inet6 unicast in instance types primary, vrf, virtual-router, and non-forwarding. |
|
reject-always |
receive |
Rejects to receive all routes. |
advertise |
Rejects to advertise all routes. |