Local Preference for BGP Routes
Understanding Route Preference Values (Administrative Distance)
The Junos OS routing protocol process assigns a default preference value (also known as an administrative distance) to each route that the routing table receives. The default value depends on the source of the route. The preference value is a value from 0 through 4,294,967,295 (232 – 1), with a lower value indicating a more preferred route. Table 1 lists the default preference values.
|
How Route Is Learned |
Default Preference |
Statement to Modify Default Preference |
|---|---|---|
|
Directly connected network |
0 |
– |
|
System routes |
4 |
– |
|
Static and Static LSPs |
5 |
|
|
ARI-TS |
5 |
ARI-TS preference. Starting in Junos OS Release 22.2R1, ARI routes are installed as ARI-TS protocol routes instead of static routes as installed in the earlier Junos OS releases. |
|
Static LSPs |
6 |
MPLS preference Note:
In Junos OS Releases prior to
10.4, if you configure a static MPLS LSP using the
|
|
RSVP-signaled LSPs |
7 |
RSVP |
|
SR-TE |
8 |
SR-TE preference |
|
LDP-signaled LSPs |
9 |
LDP |
|
OSPF internal route |
10 |
OSPF preference |
| OSPF SR route |
10 |
Labelled OSPF preference |
|
access-internal route |
12 |
– |
|
access route |
13 |
– |
|
IS-IS SR route |
14 |
Labelled IS-IS preference |
|
IS-IS Level 1 internal route |
15 |
IS-IS preference |
|
IS-IS Level 2 internal route |
18 |
IS-IS preference |
|
Redirects |
30 |
– |
|
Kernel |
40 |
– |
|
SNMP |
50 |
– |
|
Router discovery |
55 |
– |
|
RIP |
100 |
RIP preference |
|
RIPng |
100 |
RIPng preference |
|
PIM |
105 |
|
|
DVMRP |
110 |
|
|
Aggregate |
130 |
|
|
OSPF AS external routes |
150 |
OSPF external-preference |
|
IS-IS Level 1 external route |
160 |
IS-IS external-preference |
|
IS-IS Level 2 external route |
165 |
IS-IS external-preference |
|
BGP |
170 |
BGP preference, export, import |
|
MSDP |
175 |
|
|
EVPN Type-5 |
170 |
|
|
EVPN Type-2 (locally learned MAC/IP) |
7 |
EVPN routes have different preference values based on their type. Type-2 routes for locally learned MAC/IP entries have a preference of 7, while Type-5 routes (IP Prefix routes) have a preference of 170.
In general, the narrower the scope of the statement, the higher precedence its preference value is given, but the smaller the set of routes it affects. To modify the default preference value for routes learned by routing protocols, you generally apply routing policy when configuring the individual routing protocols. You also can modify some preferences with other configuration statements, which are indicated in the table.
See Also
Example: Configuring the Preference Value for BGP Routes
This example shows how to specify the preference for routes learned from BGP. Routing information can be learned from multiple sources. To break ties among equally specific routes learned from multiple sources, each source has a preference value. Routes that are learned through explicit administrative action, such as static routes, are preferred over routes learned from a routing protocol, such as BGP or OSPF. This concept is called administrative distance by some vendors.
Requirements
No special configuration beyond device initialization is required before you configure this example.
Overview
Routing information can be learned from multiple sources, such as through static configuration, BGP, or an interior gateway protocol (IGP). When Junos OS determines a route’s preference to become the active route, it selects the route with the lowest preference as the active route and installs this route into the forwarding table. By default, the routing software assigns a preference of 170 to routes that originated from BGP. Of all the routing protocols, BGP has the highest default preference value, which means that routes learned by BGP are the least likely to become the active route.
Some vendors have a preference (distance) of 20 for external BGP (EBGP) and a distance of 200 for internal BGP (IGBP). Junos OS uses the same value (170) for both EBGP and IBGP. However, this difference between vendors has no operational impact because Junos OS always prefers EBGP routes over IBGP routes.
Another area in which vendors differ is in regard to IGP distance compared to BGP distance. For example, some vendors assign a distance of 110 to OSPF routes. This is higher than the EBGP distance of 20 , and results in the selection of an EBGP route over an equivalent OSPF route. In the same scenario, Junos OS chooses the OSPF route, because of the default preference 10 for an internal OSPF route and 150 for an external OSPF route, which are both lower than the 170 preference assigned to all BGP routes.
In a multivendor environment, you might want to change the preference
value for BGP routes so that Junos OS chooses an EBGP route instead
of an OSPF route. To accomplish this goal, one option is to include
the
preference
statement in the EBGP configuration. To modify the default
BGP preference value, include the preference statement,
specifying a value from 0 through 4,294,967,295 (232 – 1).
Another
way to achieve multivendor compatibility is to include the
advertise-inactive
statement in the EBGP configuration. This causes the routing
table to export to BGP the best route learned by BGP even if Junos
OS did not select it to be an active route. By default, BGP stores
the route information it receives from update messages in the Junos
OS routing table, and the routing table exports only active routes
into BGP, which BGP then advertises to its peers. The advertise-inactive statement causes Junos OS to advertise the best BGP route that is
inactive because of IGP preference. When you use the advertise-inactive statement, the Junos OS device uses the OSPF route for forwarding,
and the other vendor’s device uses the EBGP route for forwarding.
However, from the perspective of an EBGP peer in a neighboring AS,
both vendors’ devices appear to behave the same way.
Topology
In the sample network, Device R1 and Device R2 have EBGP routes to each other and also OSPF routes to each other.
This example shows the routing tables in the following cases:
-
Accept the default preference values of 170 for BGP and 10 for OSPF.
-
Change the BGP preference to 8.
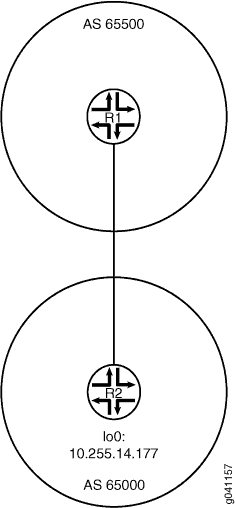
Figure 1 shows the sample network.
Configuration
CLI Quick Configuration
To quickly configure this example, copy the
following commands, paste them into a text file, remove any line breaks,
change any details necessary to match your network configuration,
and then copy and paste the commands into the CLI at the [edit] hierarchy level.
Device R1
set interfaces fe-1/2/0 unit 4 family inet address 1.12.0.1/30
set interfaces lo0 unit 2 family inet address 10.255.71.24/32
set protocols bgp export send-direct
set protocols bgp group ext type external
set protocols bgp group ext preference 8
set protocols bgp group ext peer-as 65000
set protocols bgp group ext neighbor 1.12.0.2
set protocols ospf area 0.0.0.0 interface fe-1/2/0.4
set protocols ospf area 0.0.0.0 interface 10.255.71.24
set policy-options policy-statement send-direct term 1 from protocol direct
set policy-options policy-statement send-direct term 1 then accept
set routing-options autonomous-system 65500
Device R2
set interfaces fe-1/2/0 unit 6 family inet address 1.12.0.2/30
set interfaces lo0 unit 3 family inet address 10.255.14.177/32
set protocols bgp export send-direct
set protocols bgp group ext type external
set protocols bgp group ext peer-as 65500
set protocols bgp group ext neighbor 1.12.0.1
set protocols ospf area 0.0.0.0 interface fe-1/2/0.6
set protocols ospf area 0.0.0.0 interface 10.255.14.177
set policy-options policy-statement send-direct term 1 from protocol direct
set policy-options policy-statement send-direct term 1 then accept
set routing-options autonomous-system 65000
Procedure
Step-by-Step Procedure
The following example requires that you navigate various levels in the configuration hierarchy. For information about navigating the CLI, see Using the CLI Editor in Configuration Mode in the Junos OS CLI User Guide.
To configure Device R1:
-
Configure the interfaces.
[edit interfaces]
user@R1# set fe-1/2/0 unit 4 family inet address 1.12.0.1/30
user@R1# set lo0 unit 2 family inet address 10.255.71.24/32
-
Configure the local autonomous system.
[edit routing-options]
user@R1# set autonomous-system 65500
-
Configure the external peering with Device R2.
[edit protocols bgp]
user@R1# set export send-direct
user@R1# set group ext type external
user@R1# set group ext preference 8
user@R1# set group ext peer-as 65000
user@R1# set group ext neighbor 1.12.0.2
-
Configure OSPF.
[edit protocols ospf area 0.0.0.0]
user@R1# set interface fe-1/2/0.4
user@R1# set interface 10.255.71.24
-
Configure the routing policy.
[edit policy-options policy-statement send-direct term 1]
user@R1# set from protocol direct
user@R1# set then accept
Results
From configuration mode, confirm your configuration
by entering the show interfaces, show policy-options, show protocols, and show routing-options commands.
If the output does not display the intended configuration, repeat
the instructions in this example to correct the configuration.
user@R1# show interfaces
fe-1/2/0 {
    unit 4 {
        family inet {
            address 1.12.0.1/30;
        }
    }
}
lo0 {
    unit 2 {
        family inet {
            address 10.255.71.24/32;
        }
    }
}user@R1# show policy-options
policy-statement send-direct {
term 1 {
from protocol direct;
then accept;
}
}user@R1# show protocols
protocols {
bgp {
export send-direct;
group ext {
type external;
preference 8;
peer-as 65000;
neighbor 1.12.0.2;
}
}
ospf {
area 0.0.0.0 {
interface fe-1/2/0.4;
interface 10.255.71.24;
}
}
}user@R1# show routing-options autonomous-system 65500;
If you are done configuring the device, enter commit from configuration mode. Repeat these steps on Device R2.
Verification
Confirm that the configuration is working properly.
Verifying the Preference
Purpose
Make sure that the routing tables on Device R1 and Device R2 reflect the fact that Device R1 is using the configured EBGP preference of 8, and Device R2 is using the default EBGP preference of 170.
Action
From operational mode, enter the show route command.
user@R1> show route
inet.0: 5 destinations, 7 routes (5 active, 0 holddown, 0 hidden)
+ = Active Route, - = Last Active, * = Both
1.12.0.0/30 *[Direct/0] 3d 07:03:01
> via fe-1/2/0.4
[BGP/8] 01:04:49, localpref 100
AS path: 65000 I
> to 1.12.0.2 via fe-1/2/0.4
1.12.0.1/32 *[Local/0] 3d 07:03:01
Local via fe-1/2/0.4
10.255.14.177/32 *[BGP/8] 01:04:49, localpref 100
AS path: 65000 I
> to 1.12.0.2 via fe-1/2/0.4
[OSPF/10] 3d 07:02:16, metric 1
> to 1.12.0.2 via fe-1/2/0.4
10.255.71.24/32 *[Direct/0] 3d 07:03:01
> via lo0.2
224.0.0.5/32 *[OSPF/10] 5d 03:42:16, metric 1
MultiRecvuser@R2> show route
inet.0: 5 destinations, 7 routes (5 active, 0 holddown, 0 hidden)
+ = Active Route, - = Last Active, * = Both
1.12.0.0/30 *[Direct/0] 3d 07:03:30
> via fe-1/2/0.6
[BGP/170] 00:45:36, localpref 100
AS path: 65500 I
> to 1.12.0.1 via fe-1/2/0.6
1.12.0.2/32 *[Local/0] 3d 07:03:30
Local via fe-1/2/0.6
10.255.14.177/32 *[Direct/0] 3d 07:03:30
> via lo0.3
10.255.71.24/32 *[OSPF/10] 3d 07:02:45, metric 1
> to 1.12.0.1 via fe-1/2/0.6
[BGP/170] 00:45:36, localpref 100
AS path: 65500 I
> to 1.12.0.1 via fe-1/2/0.6
224.0.0.5/32 *[OSPF/10] 5d 03:42:45, metric 1
MultiRecvMeaning
The output shows that on Device R1, the active path to Device R2’s loopback interface (10.255.14.177/32) is a BGP route. The output also shows that on Device R2, the active path to Device R1’s loopback interface (10.255.71.24/32) is an OSPF route.
Example: Using Routing Policy to Set a Preference Value for BGP Routes
This example shows how to use routing policy to set the preference for routes learned from BGP. Routing information can be learned from multiple sources. To break ties among equally specific routes learned from multiple sources, each source has a preference value. Routes that are learned through explicit administrative action, such as static routes, are preferred over routes learned from a routing protocol, such as BGP or OSPF. This concept is called administrative distance by some vendors.
Requirements
No special configuration beyond device initialization is required before you configure this example.
Overview
Routing information can be learned from multiple sources, such as through static configuration, BGP, or an interior gateway protocol (IGP). When Junos OS determines a route’s preference to become the active route, it selects the route with the lowest preference as the active route and installs this route into the forwarding table. By default, the routing software assigns a preference of 170 to routes that originated from BGP. Of all the routing protocols, BGP has the highest default preference value, which means that routes learned by BGP are the least likely to become the active route.
Some vendors have a preference (distance) of 20 for external BGP (EBGP) and a distance of 200 for internal BGP (IGBP). Junos OS uses the same value (170) for both EBGP and IBGP. However, this difference between vendors has no operational impact because Junos OS always prefers EBGP routes over IBGP routes.
Another area in which vendors differ is in regard to IGP distance compared to BGP distance. For example, some vendors assign a distance of 110 to OSPF routes. This is higher than the EBGP distance of 20, and results in the selection of an EBGP route over an equivalent OSPF route. In the same scenario, Junos OS chooses the OSPF route, because of the default preference 10 for an internal OSPF route and 150 for an external OSPF route, which are both lower than the 170 preference assigned to all BGP routes.
This example shows a routing policy that matches routes from specific next hops and sets a preference. If a route does not match the first term, it is evaluated by the second term.
Topology
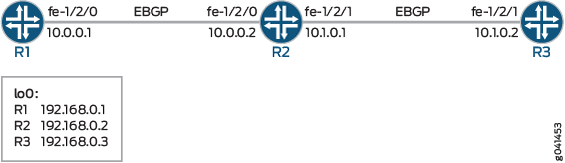
In the sample network, Device R1 and Device R3 have EBGP sessions with Device R2.
On Device R2, an import policy takes the following actions:
For routes received through BGP from next-hop 10.0.0.1 (Device R1), set the route preference to 10.
For routes received through BGP from next-hop 10.1.0.2 (Device R3), set the route preference to 15.
Figure 2 shows the sample network.
CLI Quick Configuration shows the configuration for all of the devices in Figure 2.
The section #d11e86__d11e235 describes the steps on Device R2.
Configuration
CLI Quick Configuration
To quickly configure
this example, copy the following commands, paste them into a text
file, remove any line breaks, change any details necessary to match
your network configuration, and then copy and paste the commands into
the CLI at the [edit] hierarchy level.
Device R1
set interfaces fe-1/2/0 unit 0 family inet address 10.0.0.1/30 set interfaces lo0 unit 0 family inet address 192.168.0.1/32 set protocols bgp group ext type external set protocols bgp group ext export send-direct set protocols bgp group ext peer-as 200 set protocols bgp group ext neighbor 10.0.0.2 set policy-options policy-statement send-direct term 1 from protocol direct set policy-options policy-statement send-direct term 1 then accept set routing-options autonomous-system 100
Device R2
set interfaces fe-1/2/0 unit 0 family inet address 10.0.0.2/30 set interfaces fe-1/2/1 unit 0 family inet address 10.1.0.1/30 set interfaces lo0 unit 0 family inet address 192.168.0.2/32 set protocols bgp group ext type external set protocols bgp group ext import set-preference set protocols bgp group ext export send-direct set protocols bgp group ext neighbor 10.0.0.1 peer-as 100 set protocols bgp group ext neighbor 10.1.0.2 peer-as 300 set policy-options policy-statement send-direct term 1 from protocol direct set policy-options policy-statement send-direct term 1 then accept set policy-options policy-statement set-preference term term1 from protocol bgp set policy-options policy-statement set-preference term term1 from next-hop 10.0.0.1 set policy-options policy-statement set-preference term term1 then preference 10 set policy-options policy-statement set-preference term term2 from protocol bgp set policy-options policy-statement set-preference term term2 from next-hop 10.1.0.2 set policy-options policy-statement set-preference term term2 then preference 15 set routing-options autonomous-system 200
Device R3
set interfaces fe-1/2/1 unit 0 family inet address 10.1.0.2/30 set interfaces lo0 unit 0 family inet address 192.168.0.3/32 set protocols bgp group ext type external set protocols bgp group ext export send-direct set protocols bgp group ext peer-as 200 set protocols bgp group ext neighbor 10.1.0.1 set policy-options policy-statement send-direct term 1 from protocol direct set policy-options policy-statement send-direct term 1 then accept set routing-options autonomous-system 300
Procedure
Step-by-Step Procedure
The following example requires that you navigate various levels in the configuration hierarchy. For information about navigating the CLI, see Using the CLI Editor in Configuration Mode in the Junos OS CLI User Guide.
To configure Device R2:
Configure the device interfaces.
[edit interfaces] user@R2# set fe-1/2/0 unit 0 family inet address 10.0.0.2/30 user@R2# set fe-1/2/1 unit 0 family inet address 10.1.0.1/30 user@R2# set lo0 unit 0 family inet address 192.168.0.2/32
Configure the local autonomous system.
[edit routing-options] user@R2# set autonomous-system 200
Configure the routing policy that sends direct routes.
[edit policy-options policy-statement send-direct term 1] user@R2# set from protocol direct user@R2# set then accept
Configure the routing policy that changes the preference of received routes.
[edit policy-options policy-statement set-preference] user@R2# set term term1 from protocol bgp user@R2# set term term1 from next-hop 10.0.0.1 user@R2# set term term1 then preference 10 user@R2# set term term2 from protocol bgp user@R2# set term term2 from next-hop 10.1.0.2 user@R2# set term term2 then preference 15
Configure the external peering with Device R2.
[edit protocols bgp group ext] user@R2# set type external user@R2# set export send-direct user@R2# set neighbor 10.0.0.1 peer-as 100 user@R2# set neighbor 10.1.0.2 peer-as 300
Apply the
set-preferencepolicy as an import policy.This affects Device R2’s routing table and has no impact on Device R1 and Device R3.
[edit protocols bgp group ext] user@R2# set import set-preference
Results
From configuration mode, confirm your configuration
by entering the show interfaces, show protocols, show policy-options, and show routing-options commands. If the output does not display the intended configuration,
repeat the instructions in this example to correct the configuration.
user@R2# show interfaces
fe-1/2/0 {
unit 0 {
family inet {
address 10.0.0.2/30;
}
}
}
fe-1/2/1 {
unit 0 {
family inet {
address 10.1.0.1/30;
}
}
}
lo0 {
unit 0{
family inet {
address 192.168.0.2/32;
}
}
}
user@R2# show protocols
bgp {
group ext {
type external;
import set-preference;
export send-direct;
neighbor 10.0.0.1 {
peer-as 100;
}
neighbor 10.1.0.2 {
peer-as 300;
}
}
}
user@R2# show policy-options
policy-statement send-direct {
term 1 {
from protocol direct;
then accept;
}
}
policy-statement set-preference {
term term1 {
from {
protocol bgp;
next-hop 10.0.0.1;
}
then {
preference 10;
}
}
term term2 {
from {
protocol bgp;
next-hop 10.1.0.2;
}
then {
preference 15;
}
}
}
user@R2# show routing-options autonomous-system 200;
If you are done configuring the device, enter commit from configuration mode.
Verification
Confirm that the configuration is working properly.
Verifying the Preference
Purpose
Make sure that the routing tables on Device R1 and Device R2 reflect the fact that Device R1 is using the configured EBGP preference of 8, and Device R2 is using the default EBGP preference of 170.
Action
From operational mode, enter the show route protocols
bgp command.
user@R2> show route protocols bgp
inet.0: 7 destinations, 9 routes (7 active, 0 holddown, 0 hidden)
+ = Active Route, - = Last Active, * = Both
10.0.0.0/30 [BGP/10] 04:42:23, localpref 100
AS path: 100 I, validation-state: unverified
> to 10.0.0.1 via fe-1/2/0.0
10.1.0.0/30 [BGP/15] 04:42:23, localpref 100
AS path: 300 I, validation-state: unverified
> to 10.1.0.2 via fe-1/2/1.0
192.168.0.1/32 *[BGP/10] 04:42:23, localpref 100
AS path: 100 I, validation-state: unverified
> to 10.0.0.1 via fe-1/2/0.0
192.168.0.3/32 *[BGP/15] 04:42:23, localpref 100
AS path: 300 I, validation-state: unverified
> to 10.1.0.2 via fe-1/2/1.0
Meaning
The output shows that on Device R2, the preference values have been changed to 15 for routes learned from Device R3, and the preference values have been changed to 10 for routes learned from Device R1.
Understanding the Local Preference Metric for Internal BGP Routes
Internal BGP (IBGP) sessions use a metric called the local preference, which is carried in IBGP update packets in the path attribute LOCAL_PREF. When an autonomous system (AS) has multiple routes to another AS, the local preference indicates the degree of preference for one BGP route over the other BGP routes. The BGP route with the highest local preference value is preferred.
The LOCAL_PREF path attribute is always advertised to IBGP peers and to neighboring confederations. It is never advertised to external BGP (EBGP) peers. The default behavior is to not modify the LOCAL_PREF path attribute if it is present.
The default LOCAL_PREF path attribute value of 100 applies at export time only, when the routes are exported from the routing table into BGP.
If a BGP route is received without a LOCAL_PREF attribute, the route is stored in the routing table and advertised by BGP as if it were received with a LOCAL_PREF value of 100. A non-BGP route that is advertised by BGP is advertised with a LOCAL_PREF value of 100 by default.
See Also
Example: Configuring the Local Preference Value for BGP Routes
This example shows how to configure local preference in internal BGP (IBGP) peer sessions.
Requirements
No special configuration beyond device initialization is required before you configure this example.
Overview
To change the local preference metric advertised in the path
attribute, you must include the local-preference statement, specifying
a value from 0 through 4,294,967,295 (232 – 1).
There are several reasons you might want to prefer one path over another. For example, compared to other paths, one path might be less expensive to use, might have higher bandwidth, or might be more stable.
Figure 3 shows a typical network with internal peer sessions and multiple exit points to a neighboring AS.
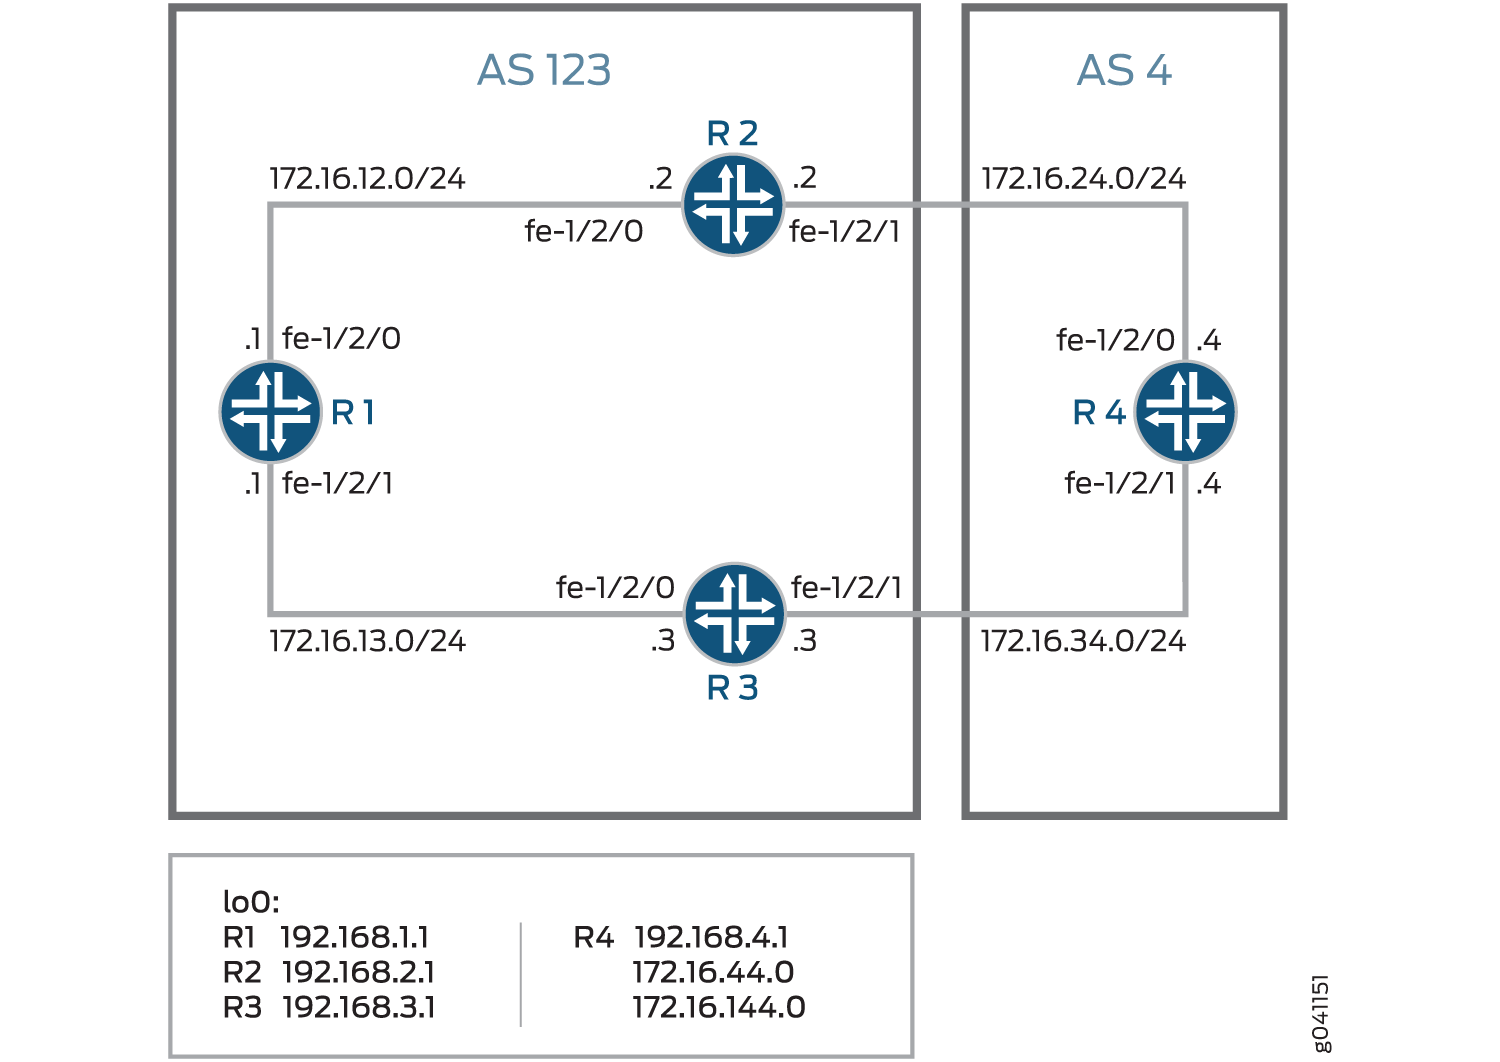
To reach Device R4, Device R1 can take a path through either Device R2 or Device R3. By default, the local preference is 100 for either route. When the local preferences are equal, Junos OS has rules for breaking the tie and choosing a path. (See Understanding BGP Path Selection.) In this example, the active route is through Device R2 because the router ID of Device R2 is lower than the router ID of Device R3. The following example shows how to override the default behavior with an explicit setting for the local preference. The example configures a local preference of 300 on Device R3, thereby making Device R3 the preferred path to reach Device R4.
Configuration
- CLI Quick Configuration
- Configuring Device R1
- Configuring Device R2
- Configuring Device R3
- Configuring Device R4
CLI Quick Configuration
To quickly configure this example, copy the
following commands, paste them into a text file, remove any line breaks,
change any details necessary to match your network configuration,
and then copy and paste the commands into the CLI at the [edit] hierarchy level.
Device R1
set interfaces fe-1/2/0 unit 1 family inet address 12.12.12.1/24 set interfaces fe-1/2/1 unit 2 family inet address 13.13.13.1/24 set interfaces lo0 unit 1 family inet address 192.168.1.1/32 set protocols bgp group internal type internal set protocols bgp group internal local-address 192.168.1.1 set protocols bgp group internal export send-direct set protocols bgp group internal neighbor 192.168.2.1 set protocols bgp group internal neighbor 192.168.3.1 set protocols ospf area 0.0.0.0 interface lo0.1 passive set protocols ospf area 0.0.0.0 interface fe-1/2/0.1 set protocols ospf area 0.0.0.0 interface fe-1/2/1.2 set policy-options policy-statement send-direct term 1 from protocol direct set policy-options policy-statement send-direct term 1 then accept set routing-options autonomous-system 123 set routing-options router-id 192.168.1.1
Device R2
set interfaces fe-1/2/0 unit 3 family inet address 12.12.12.2/24 set interfaces fe-1/2/1 unit 4 family inet address 24.24.24.2/24 set interfaces lo0 unit 2 family inet address 192.168.2.1/32 set protocols bgp group internal type internal set protocols bgp group internal local-address 192.168.2.1 set protocols bgp group internal export send-direct set protocols bgp group internal neighbor 192.168.1.1 set protocols bgp group internal neighbor 192.168.3.1 set protocols bgp group external type external set protocols bgp group external export send-direct set protocols bgp group external peer-as 4 set protocols bgp group external neighbor 24.24.24.4 set protocols ospf area 0.0.0.0 interface lo0.2 passive set protocols ospf area 0.0.0.0 interface fe-1/2/0.3 set protocols ospf area 0.0.0.0 interface fe-1/2/1.4 set policy-options policy-statement send-direct term 1 from protocol direct set policy-options policy-statement send-direct term 1 then accept set routing-options autonomous-system 123 set routing-options router-id 192.168.2.1
Device R3
set interfaces fe-1/2/0 unit 5 family inet address 13.13.13.3/24 set interfaces fe-1/2/1 unit 6 family inet address 34.34.34.3/24 set interfaces lo0 unit 3 family inet address 192.168.3.1/32 set protocols bgp group internal type internal set protocols bgp group internal local-address 192.168.3.1 set protocols bgp group internal export send-direct set protocols bgp group internal neighbor 192.168.1.1 set protocols bgp group internal neighbor 192.168.2.1 set protocols bgp group external type external set protocols bgp group external export send-direct set protocols bgp group external peer-as 4 set protocols bgp group external neighbor 34.34.34.4 set protocols ospf area 0.0.0.0 interface lo0.3 passive set protocols ospf area 0.0.0.0 interface fe-1/2/0.5 set protocols ospf area 0.0.0.0 interface fe-1/2/1.6 set policy-options policy-statement send-direct term 1 from protocol direct set policy-options policy-statement send-direct term 1 then accept set routing-options autonomous-system 123 set routing-options router-id 192.168.3.1
Device R4
set interfaces fe-1/2/0 unit 7 family inet address 24.24.24.4/24 set interfaces fe-1/2/1 unit 8 family inet address 34.34.34.4/24 set interfaces lo0 unit 4 family inet address 192.168.4.1/32 set protocols bgp group external type external set protocols bgp group external export send-direct set protocols bgp group external peer-as 123 set protocols bgp group external neighbor 34.34.34.3 set protocols bgp group external neighbor 24.24.24.2 set policy-options policy-statement send-direct term 1 from protocol direct set policy-options policy-statement send-direct term 1 then accept set routing-options autonomous-system 4 set routing-options router-id 192.168.4.1
Configuring Device R1
Step-by-Step Procedure
The following example requires you to navigate various levels in the configuration hierarchy. For information about navigating the CLI, see Using the CLI Editor in Configuration Mode in the Junos OS CLI User Guide.
To configure Device R1:
Configure the interfaces.
[edit interfaces fe-1/2/0 unit 1] user@R1# set family inet address 12.12.12.1/24 [edit interfaces fe-1/2/1 unit 2] user@R1# set family inet address 13.13.13.1/24 [edit interfaces lo0 unit 1] user@R1# set family inet address 192.168.1.1/32
Configure BGP.
[edit protocols bgp group internal] user@R1# set type internal user@R1# set local-address 192.168.1.1 user@R1# set export send-direct user@R1# set neighbor 192.168.2.1 user@R1# set neighbor 192.168.3.1
Configure OSPF.
[edit protocols ospf area 0.0.0.0] user@R1# set interface lo0.1 passive user@R1# set interface fe-1/2/0.1 user@R1# set interface fe-1/2/1.2
Configure a policy that accepts direct routes.
Note:Other useful options for this scenario might be to accept routes learned through OSPF or local routes.
[edit policy-options policy-statement send-direct term 1] user@R1# set from protocol direct user@R1# set then accept
Configure the router ID and autonomous system (AS) number.
[edit routing-options] user@R1# set autonomous-system 123 user@R1# set router-id 192.168.1.1
Results
From configuration mode, confirm your configuration
by entering the show interfaces, show policy-options, show protocols, and show routing-options commands.
If the output does not display the intended configuration, repeat
the instructions in this example to correct the configuration.
user@R1# show interfaces
fe-1/2/0 {
unit 1 {
family inet {
address 12.12.12.1/24;
}
}
}
fe-1/2/1 {
unit 2 {
family inet {
address 13.13.13.1/24;
}
}
}
lo0 {
unit 1 {
family inet {
address 192.168.1.1/32;
}
}
}
user@R1# show policy-options
policy-statement send-direct {
    term 1 {
        from protocol direct;
        then accept;
    }
}
user@R1# show protocols
bgp {
group internal {
type internal;
local-address 192.168.1.1;
export send-direct;
neighbor 192.168.2.1;
neighbor 192.168.3.1;
}
}
ospf {
area 0.0.0.0 {
interface lo0.1 {
passive;
}
interface fe-1/2/0.1;
interface fe-1/2/1.2;
}
}
user@R1# show routing-options autonomous-system 123; router-id 192.168.1.1;
If you are done configuring the device, enter commit from configuration mode.
Configuring Device R2
Step-by-Step Procedure
The following example requires you to navigate various levels in the configuration hierarchy. For information about navigating the CLI, see Using the CLI Editor in Configuration Mode in the Junos OS CLI User Guide.
To configure Device R2:
Configure the interfaces.
[edit interfaces fe-1/2/0 unit 3] user@R2# set family inet address 12.12.12.21/24 [edit interfaces fe-1/2/1 unit 4] user@R2# set family inet address 24.24.24.2/24 [edit interfaces lo0 unit 2] user@R2# set family inet address 192.168.2.1/32
Configure BGP.
[edit protocols bgp group internal] user@R2# set type internal user@R2# set local-address 192.168.2.1 user@R2# set export send-direct user@R2# set neighbor 192.168.1.1 user@R2# set neighbor 192.168.3.1 [edit protocols bgp group external] user@R2# set type external user@R2# set export send-direct user@R2# set peer-as 4 user@R2# set neighbor 24.24.24.4
Configure OSPF.
[edit protocols ospf area 0.0.0.0] user@R2# set interface lo0.2 passive user@R2# set interface fe-1/2/0.3 user@R2# set interface fe-1/2/1.4
Configure a policy that accepts direct routes.
Note:Other useful options for this scenario might be to accept routes learned through OSPF or local routes.
[edit policy-options policy-statement send-direct term 1] user@R2# set from protocol direct user@R2# set then accept
Configure the router ID and autonomous system (AS) number.
[edit routing-options] user@R2# set autonomous-system 123 user@R2# set router-id 192.168.2.1
Results
From configuration mode, confirm your configuration
by entering the show interfaces, show policy-options, show protocols, and show routing-options commands.
If the output does not display the intended configuration, repeat
the instructions in this example to correct the configuration.
user@R2# show interfaces
fe-1/2/0 {
unit 3 {
family inet {
address 12.12.12.2/24;
}
}
}
fe-1/2/1 {
unit 4 {
family inet {
address 24.24.24.2/24;
}
}
}
lo0 {
unit 2 {
family inet {
address 192.168.2.1/32;
}
}
}
user@R2# show policy-options
policy-statement send-direct {
term 1 {
from protocol direct;
then accept;
}
}
user@R2# show protocols
bgp {
group internal {
type internal;
local-address 192.168.2.1;
export send-direct;
neighbor 192.168.1.1;
neighbor 192.168.3.1;
}
group external {
type external;
export send-direct;
peer-as 4;
neighbor 24.24.24.4;
}
}
ospf {
area 0.0.0.0 {
interface lo0.2 {
passive;
}
interface fe-1/2/0.3;
interface fe-1/2/1.4;
}
}
user@R2# show routing-options autonomous-system 123; router-id 192.168.2.1;
If you are done configuring the device, enter commit from configuration mode.
Configuring Device R3
Step-by-Step Procedure
The following example requires you to navigate various levels in the configuration hierarchy. For information about navigating the CLI, see Using the CLI Editor in Configuration Mode in the Junos OS CLI User Guide.
To configure Device R3:
Configure the interfaces.
[edit interfaces fe-1/2/0 unit 5] user@R3# set family inet address 13.13.13.3/24 [edit interfaces fe-1/2/1 unit 6] user@R3# set family inet address 34.34.34.3/24 [edit interfaces lo0 unit 3] user@R3# set family inet address 192.168.3.1/32
Configure BGP.
[edit protocols bgp group internal] user@R3# set type internal user@R3# set local-address 192.168.3.1 user@R3# set export send-direct user@R3# set neighbor 192.168.1.1 user@R3# set neighbor 192.168.2.1 [edit protocols bgp group external] user@R3# set type external user@R3# set export send-direct user@R3# set peer-as 4 user@R3# set neighbor 34.34.34.4
Configure OSPF.
[edit protocols ospf area 0.0.0.0] user@R3# set interface lo0.3 passive user@R3# set interface fe-1/2/0.5 user@R3# set interface fe-1/2/1.6
Configure a policy that accepts direct routes.
Note:Other useful options for this scenario might be to accept routes learned through OSPF or local routes.
[edit policy-options policy-statement send-direct term 1] user@R3# set from protocol direct user@R3# set then accept
Configure the router ID and autonomous system (AS) number.
[edit routing-options] user@R3# set autonomous-system 123 user@R3# set router-id 192.168.3.1
Results
From configuration mode, confirm your configuration
by entering the show interfaces, show policy-options, show protocols, and show routing-options commands.
If the output does not display the intended configuration, repeat
the instructions in this example to correct the configuration.
user@R3# show interfaces
fe-1/2/0 {
unit 5 {
family inet {
address 13.13.13.3/24;
}
}
}
fe-1/2/1 {
unit 6 {
family inet {
address 34.34.34.3/24;
}
}
}
lo0 {
unit 3 {
family inet {
address 192.168.3.1/32;
}
}
}
user@R3# show policy-options
policy-statement send-direct {
term 1 {
from protocol direct;
then accept;
}
}
user@R3# show protocols
bgp {
group internal {
type internal;
local-address 192.168.3.1;
export send-direct;
neighbor 192.168.1.1;
neighbor 192.168.2.1;
}
group external {
type external;
export send-direct;
peer-as 4;
neighbor 34.34.34.4;
}
}
ospf {
area 0.0.0.0 {
interface lo0.3 {
passive;
}
interface fe-1/2/0.5;
interface fe-1/2/1.6;
}
}
user@R3# show routing-options autonomous-system 123; router-id 192.168.3.1;
If you are done configuring the device, enter commit from configuration mode.
Configuring Device R4
Step-by-Step Procedure
The following example requires you to navigate various levels in the configuration hierarchy. For information about navigating the CLI, see Using the CLI Editor in Configuration Mode in the Junos OS CLI User Guide.
To configure Device R4:
Configure the interfaces.
[edit interfaces fe-1/2/0 unit 7] user@R4# set family inet address 24.24.24.4/24 [edit interfaces fe-1/2/1 unit 8] user@R4# set family inet address 34.34.34.4/24 [edit interfaces lo0 unit 4] user@R4# set family inet address 192.168.4.1/32
Configure BGP.
[edit protocols bgp group external] user@R4# set type external user@R4# set export send-direct user@R4# set peer-as 123 user@R4# set neighbor 34.34.34.3 user@R4# set neighbor 24.24.24.2
Configure a policy that accepts direct routes.
Note:Other useful options for this scenario might be to accept routes learned through OSPF or local routes.
[edit policy-options policy-statement send-direct term 1] user@R4# set from protocol direct user@R4# set then accept
Configure the router ID and autonomous system (AS) number.
[edit routing-options] user@R4# set autonomous-system 4 user@R4# set router-id 192.168.4.1
Results
From configuration mode, confirm your configuration
by entering the show interfaces, show policy-options, show protocols, and show routing-options commands.
If the output does not display the intended configuration, repeat
the instructions in this example to correct the configuration.
user@R4# show interfaces
fe-1/2/0 {
unit 7 {
family inet {
address 24.24.24.4/24;
}
}
}
fe-1/2/1 {
unit 8 {
family inet {
address 34.34.34.4/24;
}
}
}
lo0 {
unit 4 {
family inet {
address 192.168.4.1/32;
}
}
}
user@R4# show policy-options
policy-statement send-direct {
term 1 {
from protocol direct;
then accept;
}
}
user@R4# show protocols
bgp {
group external {
type external;
export send-direct;
peer-as 123;
neighbor 34.34.34.3;
neighbor 24.24.24.2;
}
}
user@R4# show routing-options autonomous-system 4; router-id 192.168.4.1;
If you are done configuring the device, enter commit from configuration mode.
Verification
Confirm that the configuration is working properly.
- Checking the Active Path From Device R1 to Device R4
- Altering the Local Preference to Change the Path Selection
- Rechecking the Active Path From Device R1 to Device R4
Checking the Active Path From Device R1 to Device R4
Purpose
Verify that the active path from Device R1 to Device R4 goes through Device R2.
Action
From operational mode, enter the show route protocol
bgp command.
user@R1> show route protocol bgp
inet.0: 11 destinations, 18 routes (11 active, 0 holddown, 0 hidden)
+ = Active Route, - = Last Active, * = Both
12.12.12.0/24 [BGP/170] 00:11:48, localpref 100, from 192.168.2.1
AS path: I
> to 12.12.12.2 via fe-1/2/0.1
13.13.13.0/24 [BGP/170] 00:11:48, localpref 100, from 192.168.3.1
AS path: I
> to 13.13.13.3 via fe-1/2/1.2
24.24.24.0/24 [BGP/170] 00:11:48, localpref 100, from 192.168.2.1
AS path: I
> to 12.12.12.2 via fe-1/2/0.1
34.34.34.0/24 [BGP/170] 00:11:48, localpref 100, from 192.168.3.1
AS path: I
> to 13.13.13.3 via fe-1/2/1.2
192.168.2.1/32 [BGP/170] 00:11:48, localpref 100, from 192.168.2.1
AS path: I
> to 12.12.12.2 via fe-1/2/0.1
192.168.3.1/32 [BGP/170] 00:11:48, localpref 100, from 192.168.3.1
AS path: I
> to 13.13.13.3 via fe-1/2/1.2
192.168.4.1/32 *[BGP/170] 00:05:14, localpref 100, from 192.168.2.1
AS path: 4 I
> to 12.12.12.2 via fe-1/2/0.1
[BGP/170] 00:05:14, localpref 100, from 192.168.3.1
AS path: 4 I
> to 13.13.13.3 via fe-1/2/1.2Meaning
The asterisk (*) shows that the preferred path is through Device R2. In the default configuration, Device R2 has a lower router ID than Device R3. The router ID is controlling the path selection.
Altering the Local Preference to Change the Path Selection
Purpose
Change the path so that it goes through Device R3.
Action
From configuration mode, enter the set local-preference
300 command.
[edit protocols bgp group internal] user@R3# set local-preference 300 user@R3# commit
Rechecking the Active Path From Device R1 to Device R4
Purpose
Verify that the active path from Device R1 to Device R4 goes through Device R3.
Action
From operational mode, enter the show route protocol
bgp command.
user@R1> show route protocol bgp
inet.0: 11 destinations, 17 routes (11 active, 0 holddown, 0 hidden)
+ = Active Route, - = Last Active, * = Both
12.12.12.0/24 [BGP/170] 00:16:48, localpref 100, from 192.168.2.1
AS path: I
> to 12.12.12.2 via fe-1/2/0.1
13.13.13.0/24 [BGP/170] 00:00:22, localpref 300, from 192.168.3.1
AS path: I
> to 13.13.13.3 via fe-1/2/1.2
24.24.24.0/24 [BGP/170] 00:16:48, localpref 100, from 192.168.2.1
AS path: I
> to 12.12.12.2 via fe-1/2/0.1
34.34.34.0/24 [BGP/170] 00:00:22, localpref 300, from 192.168.3.1
AS path: I
> to 13.13.13.3 via fe-1/2/1.2
192.168.2.1/32 [BGP/170] 00:16:48, localpref 100, from 192.168.2.1
AS path: I
> to 12.12.12.2 via fe-1/2/0.1
192.168.3.1/32 [BGP/170] 00:00:22, localpref 300, from 192.168.3.1
AS path: I
> to 13.13.13.3 via fe-1/2/1.2
192.168.4.1/32 *[BGP/170] 00:00:21, localpref 300, from 192.168.3.1
AS path: 4 I
> to 13.13.13.3 via fe-1/2/1.2 Meaning
The asterisk (*) shows that the preferred path is through Device R3. In the altered configuration, Device R3 has a higher local preference than Device R2. The local preference is controlling the path selection.
Example: Configuring BGP to Advertise Inactive Routes
By default, BGP readvertises only active routes.
To have the routing table export to BGP the best route learned by
BGP even if Junos OS did not select it to be an active route, include
the advertise-inactive statement:
advertise-inactive;
In Junos OS, BGP advertises BGP routes that are installed or
active, which are routes selected as the best based on the BGP path
selection rules. The advertise-inactive statement allows
nonactive BGP routes to be advertised to other peers.
If the routing table has two BGP routes where one is active
and the other is inactive, the advertise-inactive statement
does not advertise the inactive BGP prefix. This statement does not
advertise an inactive BGP route in the presence of another active
BGP route. However, if the active route is a static route, the advertise-inactive statement advertises the inactive BGP route.
The advertise-inactive statement does not help to advertise the
inactive route from the VRF when the router is configured as a route reflector.
Junos OS also provides support for configuring a BGP export policy that matches the state of an advertised route. You can match either active or inactive routes, as follows:
policy-options {
policy-statement name{
from state (active|inactive);
}
}
This qualifier only matches when used in the context of an export
policy. When a route is being advertised by a protocol that can advertise
inactive routes (such as BGP), state inactive matches routes
advertised as a result of the advertise-inactive (or advertise-external) statement.
For example, the following configuration can be used
as a BGP export policy to mark routes advertised due to the advertise-inactive setting with a user-defined community. That community can be later
used by the receiving routers to filter out such routes from the forwarding
table. Such a mechanism can be used to address concerns that advertising
paths not used for forwarding by the sender might lead to forwarding
loops.
user@host# show policy-options
policy-statement mark-inactive {
term inactive {
from state inactive;
then {
community set comm-inactive;
}
}
term default {
from protocol bgp;
then accept;
}
then reject;
}
community comm-inactive members 65536:65284;
Requirements
No special configuration beyond device initialization is required before configuring this example.
Overview
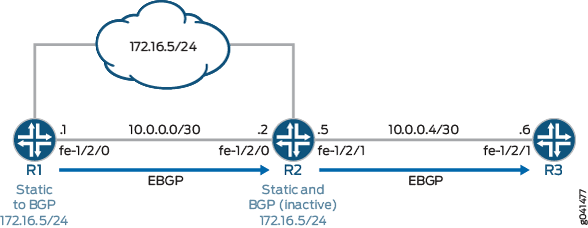
In this example, Device R2 has two external BGP (EBGP) peers, Device R1 and Device R3.
Device R1 has a static route to 172.16.5/24. Likewise, Device
R2 also has a static route to 172.16.5/24. Through BGP, Device R1
sends information about its static route to Device R2. Device R2 now
has information about 172.16.5/24 from two sources—its own static
route and the BGP-learned route received from Device R1. Static routes
are preferred over BGP-learned routes, so the BGP route is inactive
on Device R2. Normally Device R2 would send the BGP-learned information
to Device R3, but Device R2 does not do this because the BGP route
is inactive. Device R3, therefore, has no information about 172.16.5/24
unless you enable the advertise-inactive command on Device
R2, which causes Device R2 to send the BGP-learned to Device R3.
Topology
Figure 4 shows the sample network.
CLI Quick Configuration shows the configuration for all of the devices in Figure 4.
The section #d14e128__d14e255 describes the steps on Device R2.
Configuration
CLI Quick Configuration
To quickly
configure this example, copy the following commands, paste them into
a text file, remove any line breaks, change any details necessary
to match your network configuration, and then copy and paste the commands
into the CLI at the [edit] hierarchy level.
Device R1
set interfaces fe-1/2/0 unit 0 family inet address 10.0.0.1/30 set interfaces lo0 unit 0 family inet address 192.168.0.1/32 set protocols bgp group to_R2 type external set protocols bgp group to_R2 export send-static set protocols bgp group to_R2 neighbor 10.0.0.2 peer-as 200 set policy-options policy-statement send-static term 1 from protocol static set policy-options policy-statement send-static term 1 then accept set routing-options static route 172.16.5.0/24 discard set routing-options static route 172.16.5.0/24 install set routing-options autonomous-system 100
Device R2
set interfaces fe-1/2/0 unit 0 family inet address 10.0.0.2/30 set interfaces fe-1/2/1 unit 0 family inet address 10.0.0.5/30 set interfaces lo0 unit 0 family inet address 192.168.0.2/32 set protocols bgp group to_R1 type external set protocols bgp group to_R1 neighbor 10.0.0.1 peer-as 100 set protocols bgp group to_R3 type external set protocols bgp group to_R3 advertise-inactive set protocols bgp group to_R3 neighbor 10.0.0.6 peer-as 300 set routing-options static route 172.16.5.0/24 discard set routing-options static route 172.16.5.0/24 install set routing-options autonomous-system 200
Device R3
set interfaces fe-1/2/1 unit 0 family inet address 10.0.0.6/30 set interfaces fe-1/2/0 unit 9 family inet address 10.0.0.9/30 set interfaces lo0 unit 0 family inet address 192.168.0.3/32 set protocols bgp group ext type external set protocols bgp group ext peer-as 200 set protocols bgp group ext neighbor 10.0.0.5 set routing-options autonomous-system 300
Procedure
Step-by-Step Procedure
The following example requires that you navigate various levels in the configuration hierarchy. For information about navigating the CLI, see Using the CLI Editor in Configuration Mode in the Junos OS CLI User Guide.
To configure Device R2:
Configure the device interfaces.
[edit interfaces] user@R2# set fe-1/2/0 unit 0 family inet address 10.0.0.2/30 user@R2# set fe-1/2/1 unit 0 family inet address 10.0.0.5/30 user@R2# set lo0 unit 0 family inet address 192.168.0.2/32
Configure the EBGP connection to Device R1.
[edit protocols bgp group to_R1] user@R2# set type external user@R2# set neighbor 10.0.0.1 peer-as 100
Configure the EBGP connection to Device R3.
[edit protocols bgp group to_R3] user@R2# set type external user@R2# set neighbor 10.0.0.6 peer-as 300
Add the
advertise-inactivestatement to the EBGP group peering session with Device R3.[edit protocols bgp group to_R3] user@R2# set advertise-inactive
Configure the static route to the 172.16.5.0/24 network.
[edit routing-options static] user@R2# set route 172.16.5.0/24 discard user@R2# set route 172.16.5.0/24 install
Configure the autonomous system (AS) number.
[edit routing-options]
user@R2# set autonomous-system 200
Results
From configuration mode, confirm your configuration
by entering the show interfaces, show protocols, show policy-options, and show routing-options commands. If the output does not display the intended configuration,
repeat the instructions in this example to correct the configuration.
user@R2# show interfaces
fe-1/2/0 {
    unit 0 {
        family inet {
            address 10.0.0.2/30;
        }
    }
}
fe-1/2/1 {
    unit 0 {
        family inet {
            address 10.0.0.5/30;
        }
    }
}
lo0 {
    unit 0 {
        family inet {
            address 192.168.0.2/32;
        }
    }
}
user@R2# show protocols
bgp {
    group to_R1 {
        type external;
        neighbor 10.0.0.1 {
            peer-as 100;
        }
    }
    group to_R3 {
        type external;
        advertise-inactive;
        neighbor 10.0.0.6 {
            peer-as 300;
        }
    }
}
user@R2# show routing-options
static {
    route 172.16.5.0/24 {
        discard;
        install;
    }
}
autonomous-system 200;
If you are done configuring the device, enter commit from configuration mode.
Verification
Confirm that the configuration is working properly.
- Verifying the BGP Active Path
- Verifying the External Route Advertisement
- Verifying the Route on Device R3
- Experimenting with the advertise-inactive Statement
Verifying the BGP Active Path
Purpose
On Device R2, make sure that the 172.16.5.0/24 prefix is in the routing table and has the expected active path.
Action
user@R2> show route 172.16.5

inet.0: 7 destinations, 8 routes (7 active, 0 holddown, 0 hidden)
+ = Active Route, - = Last Active, * = Both

172.16.5.0/24      *[Static/5] 21:24:38
                      Discard
                    [BGP/170] 21:21:41, localpref 100
                      AS path: 100 I, validation-state: unverified
                    > to 10.0.0.1 via fe-1/2/0.0
Meaning
Device R2 receives the 172.16.5.0/24 route from both Device R1 and from its own statically configured route. The static route is the active path, as designated by the asterisk (*). The static route path has the lowest route preference (5) as compared to the BGP preference (170). Therefore, the static route becomes active.
Verifying the External Route Advertisement
Purpose
On Device R2, make sure that the 172.16.5.0/24 route is advertised toward Device R3.
Action
user@R2> show route advertising-protocol bgp 10.0.0.6


inet.0: 6 destinations, 7 routes (6 active, 0 holddown, 0 hidden)
  Prefix                  Nexthop              MED     Lclpref    AS path
  172.16.5.0/24           Self                                    100 I
Meaning
Device R2 is advertising the 172.16.5.0/24 route toward Device R3
Verifying the Route on Device R3
Purpose
Make sure that the 172.16.6.0/24 prefix is in Device R3’s routing table.
Action
user@R3> show route 172.16.5.0/24

inet.0: 5 destinations, 5 routes (5 active, 0 holddown, 0 hidden)
+ = Active Route, - = Last Active, * = Both

172.16.5.0/24      *[BGP/170] 00:01:19, localpref 100
                      AS path: 200 100 I, validation-state: unverified
                    > to 10.0.0.5 via fe-1/2/1.0
Meaning
Device R3 has the BGP-learned route for 172.16.5.0/24.
Experimenting with the advertise-inactive Statement
Purpose
See what happens when the advertise-inactive statement is removed from the BGP configuration on Device R2.
Action
On Device R2, deactivate the
advertise-inactivestatement.[edit protocols bgp group to_R3] user@R2# deactivate advertise-inactive user@R2# commit
On Device R2, check to see if the 172.16.5.0/24 route is advertised toward Device R3.
user@R2> show route advertising-protocol bgp 10.0.0.6
As expected, the route is no longer advertised.
On Device R3, ensure that the 172.16.5/24 route is absent from the routing table.
user@R3> show route 172.16.5/24
Meaning
Device R1 advertises route 172.16.5/24 to Device R2,
but Device R2 has a manually configured static route for this prefix.
Static routes are preferred over BGP routes, so Device R2 installs
the BGP route as an inactive route. Because the BGP route is not active,
Device R2 does not readvertise the BGP route to Device R3. This is
the default behavior in Junos OS. If you add the advertise-inactive statement to the BGP configuration on Device R2, Device R2 readvertises
nonactive routes.
Change History Table
Feature support is determined by the platform and release you are using. Use Feature Explorer to determine if a feature is supported on your platform.
static-label-switched-path the default preference value is 6.