Configure Active Directory as Identity Source
Learn how to configure Active Directory as identity source on your firewall.
Example: Configure Active Directory as Identity Source on SRX Series Firewall
This example shows how to implement the integrated user firewall feature by configuring a Windows Active Directory domain, an LDAP base, unauthenticated users to be directed to captive portal, and a security policy based on a source identity. All configurations in this example for the captive portal are over the Transport Layer Security (TLS).
Requirements
This example uses the following hardware and software components:
-
One SRX Series Firewall
-
Junos OS Release 12.1X47-D10 or later for SRX Series Firewalls
No special configuration beyond device initialization is required before configuring this feature.
Learn how to enroll a certificate, see Enroll a Certificate.
Overview
In a typical scenario for the integrated user firewall feature, domain and non-domain users want to access the Internet through an SRX Series Firewall. The SRX Series Firewall reads and analyzes the event log of the domain controllers configured in the domain. Thus, the SRX Series Firewall detects domain users on an Active Directory domain controller. Active Directory domain generates an authentication table as the Active Directory authentication source for the integrated user firewall. The SRX Series Firewall uses this information to enforce the policy to achieve user-based or group-based access control.
For any non-domain user or domain user on a non-domain device, the network administrator can specify a captive portal to force the user to submit to firewall authentication (if the SRX Series Firewall supports captive portal for the traffic type. For example, HTTP). After the user enters a name and password and passes firewall authentication, the SRX Series Firewall gets firewall authentication user-to-group mapping information from the LDAP server and can enforce user firewall policy control over the user accordingly.
Starting with Junos OS Release 17.4R1, you can use IPv6 addresses for Active Directory domain controllers in addition to IPv4 addresses. To illustrate this support, this example uses 2001:db8:0:1:2a0:a502:0:1da as the address for the domain controller.
You cannot use the Primary Group, whether by its default name of Domain Users or any other name, if you changed it, in integrated user firewall configurations.
When a new user is created in Active Directory (AD), the user is added to the global security group Primary Group which is by default Domain Users. The Primary Group is less specific than other groups created in AD because all users belong to it. Also, it can become very large.
Configuration
Procedure
CLI Quick Configuration
To quickly configure this example, copy the following commands to a text file, remove any line breaks, change any details necessary to match your network configuration, copy and paste the commands into the CLI at the [edit] hierarchy level, and then enter commit from configuration mode.
set services user-identification active-directory-access domain example.net user-group-mapping ldap base DC=example,DC=net user administrator password $ABC123
set services user-identification active-directory-access domain example.net user administrator password $ABC123
set services user-identification active-directory-access domain example.net domain-controller ad1 address 2001:db8:0:1:2a0:a502:0:1da
set access profile profile1 authentication-order ldap
set access profile profile1 authentication-order password
set access profile profile1 ldap-options base-distinguished-name CN=Users,DC=example,DC=net
set access profile profile1 ldap-options search search-filter sAMAccountName=
set access profile profile1 ldap-options search admin-search distinguished-name CN=Administrator,CN=Users,DC=example,DC=net
set access profile profile1 ldap-options search admin-search password $ABC123
set access profile profile1 ldap-server 192.0.2.3
set access profile profile1 ldap-server 192.0.2.3 tls-type start-tls
set access profile profile1 ldap-server 192.0.2.3 tls-peer-name peername
set access profile profile1 ldap-server 192.0.2.3 tls-timeout 3
set access profile profile1 ldap-server 192.0.2.3 tls-min-version v1.2
set access profile profile1 ldap-server 192.0.2.3 no-tls-certificate-check
set security policies from-zone trust to-zone untrust policy p1 match source-address any
set security policies from-zone trust to-zone untrust policy p1 match destination-address any
set security policies from-zone trust to-zone untrust policy p1 match application any
set security policies from-zone trust to-zone untrust policy p1 match source-identity unauthenticated-user
set security policies from-zone trust to-zone untrust policy p1 match source-identity unknown-user
set security policies from-zone trust to-zone untrust policy p1 then permit firewall-authentication user-firewall access-profile profile1
set security policies from-zone trust to-zone untrust policy p1 then permit firewall-authentication user-firewall domain example.net
set security policies from-zone trust to-zone untrust policy p2 match source-address any
set security policies from-zone trust to-zone untrust policy p2 match destination-address any
set security policies from-zone trust to-zone untrust policy p2 match application any
set security policies from-zone trust to-zone untrust policy p2 match source-identity “example.net\user1”
set security policies from-zone trust to-zone untrust policy p2 then permit
set security user-identification authentication-source active-directory-authentication-table priority 125
Step-by-Step Procedure
The following example requires you to navigate various levels in the configuration hierarchy. For instructions on how to do that, see Using the CLI Editor in Configuration Mode in the CLI User Guide.
To establish a Windows Active Directory domain, to configure captive portal, and to configure another security policy, perform the steps in this section.
Once configured, when traffic arrives, the SRX Series Firewall consults the user firewall process, which in turn consults the Active Directory authentication source to determine whether the source is in its authentication table. If the user firewall hits an authentication entry, the SRX Series Firewall checks the policy configured in Step 4 for further action. If the user firewall does not hit any authentication entry, the SRX Series Firewall checks the policy configured in Step 3 to enforce the user to do captive portal.
Configure the LDAP base distinguished name.
[edit services user-identification]
user@host# set active-directory-access domain example.net user-group-mapping ldap base DC=example,DC=net user administrator password $ABC123
Configure a domain name, the username and password of the domain, and the name and IP address of the domain controller in the domain.
[edit services user-identification]
user@host# set active-directory-access domain example.net user administrator password $ABC123
user@host# set active-directory-access domain example.net domain-controller ad1 address 2001:db8:0:1:2a0:a502:0:1da
-
Configure an access profile and set the authentication order and LDAP options.
[edit access profile profile1]
user@host# set authentication-order ldap
user@host# set authentication-order password
user@host# set ldap-options base-distinguished-name CN=Users,DC=example,DC=net
user@host# set ldap-options search search-filter sAMAccountName=
user@host# set ldap-options search admin-search distinguished-name CN=Administrator,CN=Users,DC=example,DC=net
user@host# set ldap-options search admin-search password $ABC123
user@host# set ldap-server 192.0.2.3
user@host# set ldap-server 192.0.2.3 tls-type start-tls
user@host# set ldap-server 192.0.2.3 tls-peer-name peername
user@host# set ldap-server 192.0.2.3 tls-timeout 3
user@host# set ldap-server 192.0.2.3 tls-min-version v1.2
user@host# set ldap-server 192.0.2.3 no-tls-certificate-check
When the
no-tls-certificate-checkoption is configured, the SRX Series Firewall ignores the validation of the server’s certificate and accepts the certificate without checking. Configure a policy for the source-identity “unauthenticated-user” and “unknown-user” and enable the firewall authentication captive portal. Configuring the source identity is required in case there is no authentication sources configured, it is disconnected.
[edit security policies from-zone trust to-zone untrust policy p1]
user@host# set match source-address any
user@host# set match destination-address any
user@host# set match application any
user@host# set match source-identity unauthenticated-user
user@host# set match source-identity unknown-user
user@host# set then permit firewall-authentication user-firewall access-profile profile1
user@host#set then permit firewall-authentication user-firewall domain example.net
Configure a second policy to enable a specific user.
[edit security policies from-zone trust to-zone untrust policy p2]
user@host# set match source-address any
user@host# set match destination-address any
user@host# set match application any
user@host# set match source-identity “example.net\user1”
user@host# set then permit
When you specify a source identity in a policies statement, prepend the domain name and a backslash to the group name or username. Enclose the combination in quotation marks.
Set the Active Directory authentication table as the authentication source for integrated user firewall information retrieval and specify the sequence in which user information tables are checked.
[edit security]
user@host# set user-identification authentication-source active-directory-authentication-table priority 125
You must set the Active Directory authentication table as the authentication source for integrated user firewall information retrieval and specify the sequence in which user information tables are checked using the command
set security user-identification authentication-source active-directory-authentication-table priority value.The default value of this option is 125. The default priority for all the authentication sources is as follows:
Local authentication: 100
Integrated user firewall: 125
User role firewall: 150
Unified Access Control (UAC): 200
The field
priorityspecifies the sources for the Active Directory authentication table. The value set determines the sequence for searching among various supported authentication tables to retrieve a user role. Note that these are the only currently supported values. You can enter any value from 0 through 65,535. The default priority of the Active Directory authentication table is 125. This means that even if you do not specify a priority value, the Active Directory authentication table will be searched starting at sequence of value 125 (integrated user firewall).A unique priority value is assigned to each authentication table. Lower the value, higher is the priority. For example, a table with priority 120 is searched before a table with priority 200. Setting the priority value of a table to 0 disables the table and eliminates the priority value from the search sequence.
For more details, see Understanding Active Directory Authentication Tables .
Results
From configuration mode, confirm your integrated user firewall configuration by entering
the show services user-identification active-directory-access command. If
the output does not display the intended configuration, repeat the configuration
instructions in this example to correct it.
user@host# show services user-identification active-directory-access
    domain example.net {
        user {
            administrator;
            password "$ABC123"; ## SECRET-DATA
        }
        domain-controller ad1 {
            address 2001:db8:0:1:2a0:a502:0:1da;
        }
        user-group-mapping {
            ldap {
                base DC=example,DC=net;
                user {
                    administrator;
                    password "$ABC123"; ## SECRET-DATA
                }
            }
        }
    }
From configuration mode, confirm your policy configuration by entering the show
security policies command. If the output does not display the intended
configuration, repeat the configuration instructions in this example to correct it.
user@host# show security policies
    from-zone trust to-zone untrust {
        policy p1 {
            match {
                source-address any;
                destination-address any;
                application any;
                source-identity [ unauthenticated-user unknown-user ];
            }
            then {
                permit {
                    firewall-authentication {
                        user-firewall {
                            access-profile profile1;
                            domain example.net;
                        }
                    }
                }
            }
        }
        policy p2 {
            match {
                source-address any;
                destination-address any;
                application any;
                source-identity “example.net\user1”;
            }
            then {
                permit;
            }
        }
    }
From configuration mode, confirm your access profile configuration by entering the
show access profile profile1 command. If the output does not display
the intended configuration, repeat the configuration instructions in this example to
correct it.
user@host# show access profile profile1
authentication-order [ ldap password ];
ldap-options {
    base-distinguished-name CN=Users,DC=example,DC=net;
    search {
        search-filter sAMAccountName=;
        admin-search {
            distinguished-name CN=Administrator,CN=Users,DC=example,DC=net;
            password "$ABC123"; ## SECRET-DATA
        }
    }
}
ldap-server {
    192.0.2.3 {
        tls-type start-tls;
        tls-timeout 3;
        tls-min-version v1.2;
        no-tls-certificate-check;
        tls-peer-name peername;
    }
}
If you are done configuring the device, enter commit from configuration
mode.
Verification
Confirm that the configuration is working properly.
- Verifying Connectivity to a Domain Controller
- Verifying the LDAP Server
- Verifying Authentication Table Entries
- Verifying IP-to-User Mapping
- Verifying IP Probe Counts
- Verifying User-to-Group Mapping Queries
Verifying Connectivity to a Domain Controller
Purpose
Verify that at least one domain controller is configured and connected.
Action
From operational mode, enter the show services user-identification
active-directory-access domain-controller status command.
Meaning
The domain controller is shown to be connected or disconnected.
Verifying the LDAP Server
Purpose
Verify that the LDAP server is providing user-to-group mapping information.
Action
From operational mode, enter the show services user-identification
active-directory-access user-group-mapping status command.
Meaning
The LDAP server address, port number, and status are displayed.
Verifying Authentication Table Entries
Purpose
See which groups users belong to and the users, groups, and IP addresses in a domain.
Action
From operational mode, enter the show services user-identification
active-directory-access active-directory-authentication-table all
command.
Meaning
The IP addresses, usernames, and groups are displayed for each domain.
Verifying IP-to-User Mapping
Purpose
Verify that the event log is being scanned.
Action
From operational mode, enter the show services user-identification
active-directory-access statistics ip-user-mapping command.
Meaning
The counts of the queries and failed queries are displayed.
Verifying IP Probe Counts
Purpose
Verify that IP probes are occurring.
Action
From operational mode, enter the show services user-identification
active-directory-access statistics ip-user-probe command.
Meaning
The counts of the IP probes and failed IP probes are displayed.
Verifying User-to-Group Mapping Queries
Purpose
Verify that user-to-group mappings are being queried.
Action
From operational mode, enter the show services user-identification
active-directory-access statistics user-group-mapping command.
Meaning
The counts of the queries and failed queries are displayed.
Example: Configure Active Directory as Identity Source on SRX Series Firewalls to Use Web-Redirect for Unauthenticated and Unknown Users
This example shows how to use web-redirect for unauthenticated users and unknown users to redirect to the authentication page through http.
Requirements
This example uses the following hardware and software components:
One SRX Series Firewall
Junos OS Release 15.1X49-D70 or later for SRX Series Firewalls
No special configuration beyond device initialization is required before configuring this feature.
Overview
The fwauth access profile redirects web-redirect requests of pass-through traffic to HTTP webauth (in JWEB httpd
server). Once authentication is successful, fwauth creates a firewall
authentication for the user firewall.
Configuration
CLI Quick Configuration
To quickly configure this example, copy the
following commands to a text file, remove any line breaks, change
any details necessary to match your network configuration, copy and
paste the commands into the CLI at the [edit] hierarchy
level, and then enter commit from configuration
mode.
set system services web-management http
set interfaces ge-0/0/1 unit 0 family inet address 192.0.2.0/24 web-authentication http
set security policies from-zone trust to-zone untrust policy p1 match source-address any
set security policies from-zone trust to-zone untrust policy p1 match destination-address any
set security policies from-zone trust to-zone untrust policy p1 match application any
set security policies from-zone trust to-zone untrust policy p1 match source-identity unauthenticated-user
set security policies from-zone trust to-zone untrust policy p1 match source-identity unknown-user
set security policies from-zone trust to-zone untrust policy p1 then permit firewall-authentication user-firewall access-profile profile1 web-redirect
set security policies from-zone trust to-zone untrust policy p1 then permit firewall-authentication user-firewall domain ad03.net
Procedure
Step-by-Step Procedure
The following example requires you to navigate various levels in the configuration hierarchy. For instructions on how to do that, see Using the CLI Editor in Configuration Mode.
To configure the integrated user firewall to use web-redirect for unauthenticated users requesting access to HTTP-based resources:
Enable Web-management support for HTTP traffic.
[edit system services]
user@host# set system services web-management http
Configure interfaces and assign IP addresses. Enable Web authentication on ge-0/0/1 interface.
[edit interfaces]
user@host# set interfaces ge-0/0/1 unit 0 family inet address 192.0.2.0/24 web-authentication http
Configure security policies that specifies an unauthenticated-user or unknown-user as the source-identity.
[edit security policies from-zone trust to-zone untrust policy p1]
user@host# set match source-address any
user@host# set match destination-address any
user@host# set match application any
user@host# set match source-identity unauthenticated-user
user@host# set match source-identity unknown-user
Starting with Junos OS 17.4R1, you can assign IPv6 addresses in addition to IPv4 addresses when you configure source addresses. To configure IPv6 source address, issue
anyorany-IPv6command at [edit security policies from-zone trust to-zone untrust policy policy-name match source-address] hierarchy level.Configure a security policy that permits firewall authentication of a user firewall with
web-redirectas the action and specifies a pre configured access profile for the user.[edit security policies from-zone trust to-zone untrust policy p1] user@host# set then permit firewall-authentication user-firewall access-profile profile1 web-redirect
Configure a security policy that specifies the domain name.
[edit security policies from-zone trust to-zone untrust policy p1]
user@host# set then permit firewall-authentication user-firewall domain ad03.net
Results
From configuration mode, confirm your configuration
by entering the show system services command. If the output
does not display the intended configuration, repeat the configuration
instructions in this example to correct it.
user@host# show system services
    web-management {
         http {
             port 123;
        }
    }
From configuration mode, confirm your integrated user-firewall
configuration by entering the show interfaces command.
If the output does not display the intended configuration, repeat
the configuration instructions in this example to correct it.
user@host# show interfaces
     ge-0/0/1 {
         unit 0 {
             family inet {
                address 192.0.2.0/24 {
                    web-authentication http;
                 }
                 }
            }
        }
From configuration mode, confirm your integrated user-firewall
configuration by entering the show security policies command.
If the output does not display the intended configuration, repeat
the configuration instructions in this example to correct it.
user@host# show security policies
    from-zone trust to-zone untrust {
        policy p1 {
            match {
                source-address any;
                destination-address any;
                application any;
                source-identity unauthenticated-user;
                source-identity unknown-user;
            }
            then {
                permit {
                    firewall-authentication {
                        user-firewall {
                            access-profile profile1;
                             web-redirect;
                            domain ad03.net;
                        }
                    }
                }
            }
        }
    }
From configuration mode, confirm your policy configuration by
entering the show security policies command. If the output
does not display the intended configuration, repeat the configuration
instructions in this example to correct it.
If you are done configuring the device, enter commit from configuration mode.
Verification
Verify the Configuration.
Purpose
Verify that the configuration is correct.
Action
From operational mode, enter the show security
policies command.
Sample Output
user@host> show security policies


    Default policy: permit-all


    From zone: PCzone, To zone: Tunnelzone

        Policy: p1, State: enabled, Index: 4, Scope Policy: 0, Sequence number: 1

            Source addresses: any

                Destination addresses: any

                Applications: junos-ftp, junos-tftp, junos-dns-tcp, junos-dns-udp

                Action: permit
Meaning
Display the security policy that permits firewall authentication of a user firewall with web-redirect as the action.
Example: Configure Active Directory as Identity Source on SRX Series Firewalls to Use Web-Redirect-to-HTTPS to Authenticate Unauthenticated and Unknown Users
This example shows how to use web-redirect-to-https for unauthenticated and unknown users attempting to access an HTTPS site to enable them to authenticate through the SRX Series Firewall’s internal webauth server.
You can also use web-redirect-https to authenticate users attempting to access an HTTP site, although not shown in this example.
Requirements
This example uses the following hardware and software components:
One SRX Series Firewall
Junos OS Release 15.1X49-D70 or later for SRX Series Firewalls
Overview
The web-redirect-https feature allows you to securely authenticate unknown and unauthenticated users attempting to access either HTTP or HTTPS resources by redirecting the user’s browser to the SRX Series services gateway’s internal HTTPS webauth server for authentication. That is, the webauth server sends an HTTPS response to the client system redirecting its browser to connect to the webauth server for user authentication. The interface on which the client’s request arrives is the interface to which the redirect response is sent. HTTPS, in this case, secures the authentication process, not the user’s traffic.
After the user has been authenticated, a message is displayed to inform the user about the successful authentication. The browser is redirected to launch the user’s original destination URL, whether to an HTTP or HTTPS site, without requiring the user to retype that URL. The following message is displayed:
Redirecting to the original url, please wait.
If the user’s target resource is to an HTTPS URL, for this process to succeed the configuration must include an SSL termination profile that is referenced in the applicable security policy. An SSL termination profile is not required if the target is an HTTP URL.
Use of this feature allows for a richer user login experience. For example, instead of a pop-up prompt asking the user to enter their user name and password, users are presented with the login page in a browser. Use of web-redirect-https has the same effect as if the user typed the Web authentication IP address in a client browser. In that sense, web-redirect-https provides a seamless authentication experience; the user does not need to know the IP address of the Web authentication source, but only the IP address of the resource that they are attempting to access.
For integrated user firewall, the security policy configuration statement includes the source-identity tuple, which allows you to specify a category of users to whom the security policy applies, in this case unauthenticated and unknown users. Specifying “any” as the value of the source-address tuple allows the source-identity tuple value to control the match.
For security reasons, it is recommended that you use the web-redirect-https for authentication instead of web-redirect, which is also supported. The web-redirect authentication feature uses HTTP for the authentication process, in which case the authentication information is sent in the clear and is therefore readable.
This example assumes that the user is attempting to access an HTTPS resource such as https://mymailsite.com.
Configuration
Procedure
CLI Quick Configuration
To quickly configure this example, copy the
following commands to a text file, remove any line breaks, change
any details necessary to match your network configuration, copy and
paste the commands into the CLI at the [edit] hierarchy
level, and then enter commit from configuration
mode.
set system services web-management https pki-local-certificate my-test-cert
set interfaces ge-0/0/1 unit 0 family inet address 192.0.2.0/24 web-authentication https
set security policies from-zone trust to-zone untrust policy p1 match source-address any
set security policies from-zone trust to-zone untrust policy p1 match destination-address any
set security policies from-zone trust to-zone untrust policy p1 match application any
set security policies from-zone trust to-zone untrust policy p1 match source-identity unauthenticated-user
set security policies from-zone trust to-zone untrust policy p1 match source-identity unknown-user
set security policies from-zone trust to-zone untrust policy p1 then permit firewall-authentication user-firewall domain mydomain.net
set security policies from-zone trust to-zone untrust policy p1 then permit firewall-authentication user-firewall access-profile profile1 web-redirect-to-https
set security policies from-zone trust to-zone untrust policy p1 then permit firewall-authentication user-firewall ssl-termination-profile my-ssl-profile
set services ssl termination profile my-ssl-profile server-certificate my-test-cert
set access profile profile1 ldap-server 198.51.100.0/24 tls-type start-tls
set access profile profile1  ldap-server 198.51.100.0/24 tls-peer-name peer1
set access profile profile1 ldap-server 198.51.100.0/24 tls-timeout 3
set access profile profile1 ldap-server 198.51.100.0/24 tls-min-version v1.1
Step-by-Step Procedure
The following example requires you to navigate various levels in the configuration hierarchy. For instructions on how to do that, see Using the CLI Editor in Configuration Mode.
To configure web-redirect-to-https for unauthenticated users or unknown users requesting access to HTTPS-based resources, enter the following statement.
Enable Web-management support for HTTPS traffic.
[edit system services]
user@host# set system services web-management https pki-local-certificate my-test-cert
Note that this example applies to HTTPS user traffic, but web-redirect-to-https authentication is also supported for authenticated users whose traffic is to an HTTP URL site, although that specific scenario is not shown here. In that case, an SSL termination profile is not required.
Configure interfaces and assign IP addresses. Enable Web authentication on ge-0/0/1 interface.
[edit interfaces]
user@host# set interfaces ge-0/0/1 unit 0 family inet address 192.0.2.0/24 web-authentication https
Configure a security policy that specifies unauthenticated-user and unknown-user as the source-identity tuple values.
[edit security policies from-zone trust to-zone untrust policy p1]
user@host# set match source-address any
user@host# set match destination-address any
user@host# set match application any
user@host# set match source-identity unauthenticated-user
user@host# set match source-identity unknown-user
Starting with Junos OS 17.4R1, you can assign IPv6 addresses in addition to IPv4 addresses when you configure source addresses. To configure IPv6 source address, issue
anyorany-IPv6command at the [edit security policies from-zone trust to-zone untrust policy policy-name match source-address] hierarchy level.Configure the security policy to permit firewall authentication of a user firewall with
web-redirect-to-httpsas the action and that specifies a preconfigured access profile for the user.[edit security policies from-zone trust to-zone untrust policy p1] user@host# set then permit firewall-authentication user-firewall access-profile profile1 web-redirect-to-https
Configure the domain name for the security policy.
[edit security policies from-zone trust to-zone untrust policy p1]
user@host# set then permit firewall-authentication user-firewall domain mydomain.net
Configure the security policy to reference the SSL termination profile to be used.
If you have an existing appropriate SSL termination profile that provides the services needed for your implementation, you can use it. Otherwise, follow Step 7 to create one.
[edit security policies from-zone trust to-zone untrust policy p1]
user@host# set then permit firewall-authentication user-firewall ssl-termination-profile my-ssl-profile
Specify the profile to be used for SSL termination services.
[edit services]
user@host# set ssl termination profile my-ssl-profile server-certificate my-cert-type
Define the TLS type to configure the LDAP over StartTLS.
[edit access]
user@host# set profile profile1 ldap-server 198.51.100.0/24 tls-type start-tls
Configure the peer host name to be authenticated.
[edit access]
user@host# set access profile profile1 ldap-server 198.51.100.0/24 tls-peer-name peer1
Specify the timeout value on the TLS handshake. You can enter 3 through 90 seconds.
[edit access]
user@host# set access profile profile1 ldap-server 198.51.100.0/24 tls-timeout 3
Specify TLS version (v1.1 and v1.2 are supported) as the minimum protocol version enabled in connections.
[edit ]
user@host# set access profile profile1 ldap-server 198.51.100.0/24 tls-min-version v1.1
Results
From configuration mode, confirm your configuration
by entering the show system services command. If the output
does not display the intended configuration, repeat the configuration
instructions in this example to correct it.
user@host# show system services
    web-management {
        https {
        pki-local-certificate my-test-cert;
    }
From configuration mode, confirm your integrated user-firewall
configuration by entering the show services ssl command.
If the output does not display the intended configuration, repeat
the configuration instructions in this example to correct it.
user@host# show services ssl
    termination {
        profile my-ssl-profile {
            server-certificate my-cert-type;
                 }
            }
From configuration mode, confirm your integrated user-firewall
configuration by entering the show interfaces command.
If the output does not display the intended configuration, repeat
the configuration instructions in this example to correct it.
user@host# show interfaces
     ge-0/0/1 {
         unit 0 {
             family inet {
                address 192.0.2.0/24 {
                    web-authentication {
                        https;
                     }
                 }
            }
        }
From configuration mode, confirm your integrated user-firewall
configuration by entering the show security policies command.
If the output does not display the intended configuration, repeat
the configuration instructions in this example to correct it.
user@host# show security policies
    from-zone trust to-zone untrust {
        policy p1 {
            match {
                source-address any;
                destination-address any;
                application any;
                source-identity unauthenticated-user;
                source-identity unknown-user;
            }
            then {
                permit {
                    firewall-authentication {
                        user-firewall {
                            access-profile profile1;
                            web-redirect-to-https;
                            domain mydomain.net;
                            ssl-termination-profile my-ssl-profile;
                        }
                    }
                }
            }
        }
From configuration mode, confirm your access profile configuration
by entering the show access profile profile1 command. If
the output does not display the intended configuration, repeat the
configuration instructions in this example to correct it.
user@host# show access profile profile1
    ldap-server {
        198.51.100.0/24 {
            tls-type start-tls;
            tls-timeout 3;
            tls-min-version v1.1;
            tls-peer-name peer1;
        }
    }
If you are done configuring the device, enter commit from configuration mode.
Example: Configure the Device Identity Authentication Feature
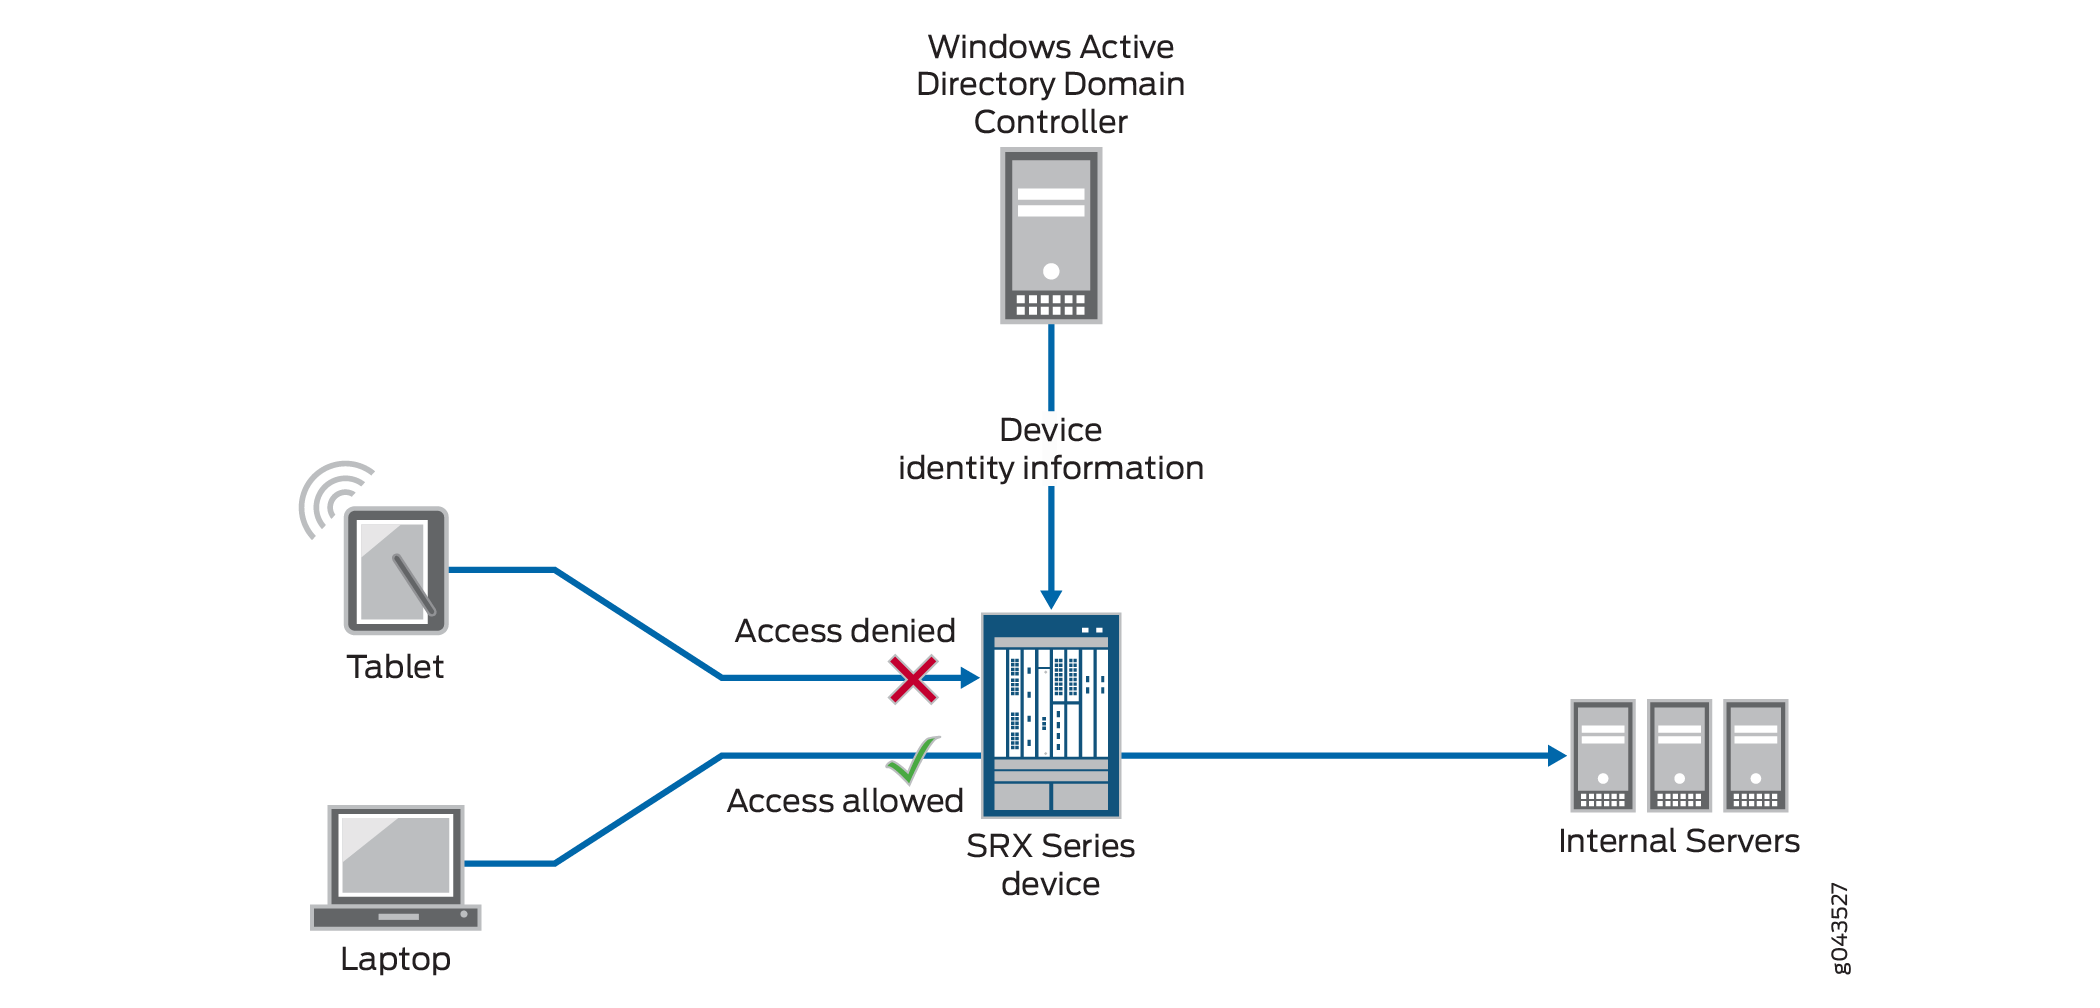
This example shows how to configure the device identity authentication feature to control access to network resources based on the identity of an authenticated device, not its user. This example uses Microsoft Active Directory as the authentication source. It covers how to configure a device identity profile that characterizes a device, or set of devices, and how to reference that profile in a security policy. If a device matches the device identity and the security policy parameters, the security policy’s action is applied to traffic issuing from that device.
For various reasons, you might want to use the identity of a device for resource access control. For example, you might not know the identity of the user. Also some companies might have older switches that do not support 802.1, or they might not have a network access control (NAC) system. The device identity authentication feature was designed to offer a solution to these and other similar situations by enabling you to control network access based on the device identity. You can control access for a group of devices that fit the device identity specification or an individual device.
Requirements
This example uses the following hardware and software components:
An SRX Series Services Gateway device running Junos OS Release 15.1X49-D70 or later.
Microsoft Active Directory with a domain controller and the Lightweight Directory Access Protocol (LDAP) server
The Active Directory domain controller has a high-performance configuration of 4 cores and 8 gigabytes of memory.
Note:The SRX Series obtains the IP address of a device by reading the domain controller event log. The process that reads the event log consumes domain controller CPU resources, which might lead to high CPU usage. For this reason, the Active Directory domain controller should have a high-performance configuration of at least 4 cores and 8 gigabytes of memory.
A server on the internal corporate network.
Overview
Starting with Junos OS Release 15.1X49-D70 and Junos OS Release 17.3R1, the SRX Series provides support for controlling access to network resources based on the identity of a device authenticated by Active Directory or a third-party network access control (NAC) system. This example uses Active Directory as the authentication source.
You must configure the authentication source for this feature to work.
This example covers the following configuration parts:
Zones and their interfaces
You must configure the zones to which the source and destination entities specified in the security policy belong. If you do not configure them, the security policy that references the device identity profile will be invalid.
A device identity profile
You configure the device identity profile apart from the security policy; you refer to it from a security policy. A device identity profile specifies a device identity that can be matched by one or more devices. For Active Directory, you can specify only the device-identity attribute in the profile.
In this example, the device-identity attribute specification is company-computers.
Note:The device identity profile is referred to as
end-user-profilein the CLI.A security policy
You configure a security policy whose action is applied to traffic issuing from any device that matches the device identity profile attributes and the rest of the security policy’s parameters.
Note:You specify the name of the device identity profile in the security policy’s
source-end-user-profilefield.Authentication source
You configure the authentication source to be used to authenticate the device. This example uses Active Directory as the device identity authentication source.
If Active Directory is the authentication source, the SRX Series obtains identity information for an authenticated device by reading the Active Directory domain’s event log. The device then queries the LDAP interface of Active Directory to identify the groups that the device belongs to, using the device’s IP address for the query.
For this purpose, the device implements a Windows Management Instrumentation (WMI) client with Microsoft Distributed COM/Microsoft RPC stacks and an authentication mechanism to communicate with the Windows Active Directory controller in the Active Directory domain. It is the device wmic daemon that extracts device information from the event log of the Active Directory domain.
The wmic daemon also monitors the Active Directory event log for changes by using the same WMI DCOM interface. When changes occur, the device adjusts its local device identity authentication table to reflect those changes.
Starting with Junos OS Release 17.4R1, you can assign IPv6 addresses to Active Directory domain controllers and the LDAP server. Prior to Junos OS Release 17.4R1, you could assign only IPv4 addresses.
Topology
In this example, users who belong to the marketing-zone zone want to access resources on the internal corporate servers. Access control is based on the identity of the device. In this example, company-computers is specified as the device identity. Therefore, the security policy action is applied only to devices that fit that specification and match the security policy criteria. It is the device that is either granted or denied access to the server resources. Access is not controlled based on user identification.
Two SRX Series zones are established: one that includes the network devices (marketing-zone) and one that includes the internal servers (servers-zone). The SRX Series Firewall interface ge-0/0/3.1, whose IP address is 192.0.2.18/24, is assigned to the marketing-zone zone. The SRX Series Firewall interface ge-0/0/3.2, whose IP address is 192.0.2.14/24, is assigned to the servers-zone zone.
This examples covers the following activity:
-
The SRX Series Firewall connects to the Active Directory domain controller using the WMI DCOM interface to obtain information about devices authenticated by Active Directory.
When a user logs in to the network and is authenticated, information about the user’s device is written to the event log.
The SRX Series extracts the device information from the event log of the Active Directory domain controller.
The SRX Series uses the extracted information to obtain a list of the groups that the device belongs to from the Active Directory LDAP server.
The SRX Series creates a local device identity authentication table and stores the device identity information that it obtained from the domain controller and LDAP server in the table.
-
When traffic from a device arrives at the SRX Series Firewall, the SRX Series checks the device identity authentication table for a matching entry for the device that issued the traffic.
If the SRX Series finds a matching entry for the device that is requesting access, it checks the security policy table for a security policy whose
source-end-user-profilefield specifies a device identity profile with a device-identity specification that matches that of the device requesting access.The matching security policy is applied to traffic issuing from the device.
Figure 1 show the topology for this example.
Configuration
To configure the device identity feature in an Active Directory environment, perform these tasks:
- CLI Quick Configuration
- Configuring the Integrated User Firewall Device Identity Authentication Feature in an Active Directory Environment
- Results
CLI Quick Configuration
To quickly configure this example, copy the following commands to a text file, remove any line breaks, change any details necessary to match your network configuration, copy and paste the commands into the CLI at the [edit] hierarchy level, and then enter commit from configuration mode.
set interfaces ge-0/0/3.1 family inet address 192.0.2.18/24
set interfaces ge-0/0/3.2 family inet address 192.0.2.14/24
set security zones security-zone marketing-zone interfaces ge-0/0/3.1 host-inbound-traffic system-services all
set security zones security-zone marketing-zone interfaces ge-0/0/3.1 host-inbound-traffic protocols all
set security zones security-zone servers-zone interfaces ge-0/0/3.2 host-inbound-traffic system-services all
set security zones security-zone servers-zone interfaces ge-0/0/3.2 host-inbound-traffic protocols all
set services user-identification device-information authentication-source active-directory
set services user-identification device-information end-user-profile profile-name marketing-west-coast domain-name example.net
set services user-identification device-information end-user-profile profile-name marketing-west-coast attribute device-identity string company-computers
set security policies from-zone marketing-zone to-zone servers-zone policy mark-server-access match source-address any destination-address any
set security policies from-zone marketing-zone to-zone servers-zone policy mark-server-access match application any
set security policies from-zone marketing-zone to-zone servers-zone policy mark-server-access match source-end-user-profile marketing-west-coast
set security policies from-zone marketing-zone to-zone servers-zone policy mark-server-access then permit
set services user-identification active-directory-access domain example.net user user1 password pswd
set services user-identification active-directory-access domain example.net domain-controller dc-example address 203.0.113.0
set services user-identification active-directory-access domain example.net ip-user-mapping discovery-method wmi event-log-scanning-interval 30
set services user-identification active-directory-access domain example.net ip-user-mapping discovery-method wmi initial-event-log-timespan 1
set services user-identification active-directory-access domain example.net user-group-mapping ldap authentication-algorithm simple
set services user-identification active-directory-access domain example.net user-group-mapping ldap address 198.51.100.9 port 389
set services user-identification active-directory-access domain example.net user-group-mapping ldap base dc=example,dc=net
set services user-identification active-directory-access authentication-entry-timeout 100
set services user-identification active-directory-access wmi-timeout 60
Configuring the Integrated User Firewall Device Identity Authentication Feature in an Active Directory Environment
Step-by-Step Procedure
This procedure includes the configuration statements required to configure the SRX Series Firewall to support the device identity authentication feature in an Active Directory environment.
Configure the interfaces to be used for the marketing-zone and the servers-zone.
[edit interfaces]
user@host# set ge-0/0/3.1 family inet address 192.0.2.18/24
user@host# set ge-0/0/3.2 family inet address 192.0.2.14/24
Configure the marketing-zone and the servers-zone and assign interfaces to them.
[edit security zones]
user@host# set security-zone marketing-zone interfaces ge-0/0/3.1 host-inbound-traffic system-services all
user@host# set security-zone marketing-zone interfaces ge-0/0/3.1 host-inbound-traffic protocols all
user@host# set security-zone servers-zone interfaces ge-0/0/3.2 host-inbound-traffic system-services all
user@host# set security-zone servers-zone interfaces ge-0/0/3.2 host-inbound-traffic protocols all
Configure the authentication source to specify Microsoft Active Directory. You must specify the authentication source for the device identity feature to work. This is a required value.
[edit services user-identification]
user@host# set device-information authentication-source active-directory
Configure the device identity specification for the device identity profile, which is also referred to as
end-user-profile.[edit services user-identification] user@host# set device-information end-user-profile profile-name marketing-west-coast domain-name example.net user@host#set device-information end-user-profile profile-name marketing-west-coast attribute device-identity string company-computers
Configure a security policy, called mark-server-access, that references the device identity profile called marketing-west-coast. The security policy allows any device that belongs to the marketing-zone zone (and that matches the device identity profile specification) access to the target server’s resources.
[edit security policies]
user@host# set from-zone marketing-zone to-zone servers-zone policy mark-server-access match source-address any destination-address any
user@host# set security policies from-zone marketing-zone to-zone servers-zone policy mark-server-access match source-end-user-profile marketing-west-coast
user@host# set security policies from-zone marketing-zone to-zone servers-zone policy mark-server-access match application any
user@host# set security policies from-zone marketing-zone to-zone servers-zone policy mark-server-access then permit
-
Configure the SRX Series Firewall to communicate with Active Directory and to use the LDAP service.
To get the group information necessary to implement the device identity authentication feature, the SRX Series Firewall uses the Lightweight Directory Access Protocol (LDAP). The SRX Series acts as an LDAP client communicating with an LDAP server. Typically, the Active Directory domain controller acts as the LDAP server. The LDAP module in the device, by default, queries the Active Directory in the domain controller.
[edit services user-identification]
user@host# set active-directory-access domain example.net user user1 password pswd
user@host# set active-directory-access domain example.net domain-controller dc-example address 203.0.113.0
user@host# set active-directory-access  domain example.net ip-user-mapping discovery-method wmi event-log-scanning-interval 30
user@host# set active-directory-access domain example.net ip-user-mapping discovery-method wmi  initial-event-log-timespan 1
user@host set active-directory-access domain example.net user-group-mapping ldap address 198.51.100.9 port 389
user@host# set active-directory-access domain example.net user-group-mapping ldap base dc=example,dc=net
user@host# set active-directory-access domain example.net user-group-mapping ldap authentication-algorithm simple
user@host# set active-directory-access authentication-entry-timeout 100
user@host# set active-directory-access wmi-timeout 60
Results
Enter show interfaces in configuration mode.
user@host#show interfaces
ge-0/0/3 {
    unit 1 {
        family inet {
            address 192.0.2.18/24;
        }
    }
    unit 2 {
        family inet {
            address 192.0.2.14/24;
        }
    }
}
Enter show security zones in configuration mode.
user@host#show security zones
security-zone marketing-zone {
    interfaces {
        ge-0/0/3.1 {
            host-inbound-traffic {
                system-services {
                    all;
                }
                protocols {
                    all;
                }
            }
        }
    }
}
security-zone servers-zone {
    interfaces {
        ge-0/0/3.2 {
            host-inbound-traffic {
                system-services {
                    all;
                }
                protocols {
                    all;
                }
            }
        }
    }
}
Enter show services user-identification device-information
end-user-profile in configuration mode.
user@host#show services user-identification device-information end-user-profile
domain-name example.net
attribute device-identity {
    string company-computers;
}
Enter show services user-identification device-information
authentication-source in configuration mode.
user@host#show services user-identification device-information authentication-source
active-directory;
Enter show security policies in configuration mode.
user@host#show security policies
from-zone marketing-zone to-zone servers-zone {
    policy mark-server-access {
        match {
            source-address any;
            destination-address any;
            application any;
            source-end-user-profile {
                marketing-west-coast;
            }
        }
        then {
            permit;
        }
    }
}
Enter show services user-identification active-directory-access in configuration mode.
user@host#show services user-identification active-directory-access
domain example-net {
    user {
        user1;
        password $ABC123; ## SECRET-DATA
    }
    ip-user-mapping {
        discovery-method {
            wmi {
                event-log-scanning-interval 30;
                initial-event-log-timespan 1;
            }
        }
    }
    user-group-mapping {
        ldap {
            base dc=example,DC=net;
            address 198.51.100.9 {
                port 389;
            }
        }
    }
}
Enter show services user-identification active-directory-access
domain example-net in configuration mode.
user@host#show services user-identification active-directory-access domain example-net
user {
    user1;
    password $ABC123 ## SECRET-DATA
}
domain-controller dc-example {
    address 203.0.113.0;
}
Verification
Verify the Device Identity Authentication Table Contents
Purpose
Verify that the device identity authentication table contains the expected entries and their groups.
Action
In this case, the device identity authentication table contains three entries. The following command displays extensive information for all three entries.
Enter show services user-identification device-information
table all extensive command in operational mode to display the
table’s contents.
Sample Output
command-name
Domain: example.net
Total entries: 3
  Source IP: 192.0.2.19
    Device ID: example-dev1
    Device-Groups: device_group1,
    device_group2,device_group3,
    device_group4, device_group5
    device-identity: company-computers
    Location1: us1
    Referred by: mark-server-access
  Source IP: 192.0.2.22
    Device ID: example-dev2
    Device-Groups: device_group06,
    device_group7, device_group8,
    device_group9, device_group10
    device-identity: company-computers
    Location1: us1
    Referred by: mark-server-access
Source IP: 192.0.2.19
		 Device ID: example-dev3
   Device-Groups: device_group1, device_group2,
   device_group3, device_group4, device_group5
   device-identity: company-computers
   Location1: us1
   Referred by: mark-server-access
Meaning
The table should contain entries with information for all authenticated devices and the groups that they belong to.
Example: Configure User Identity Information to Session Log Based On Source Zone
This example shows how to configure the integrated user firewall zone-based user identity feature that directs the system to log user identity information based on the source zone (from-zone) configured in the security policy. The zone-based user identity feature widens the scope of users whose identity information is written to the log to include all users who belong to the zone whose traffic matches the security policy.
Requirements
This feature is supported starting with Junos OS 15.1X49-D60 and Junos OS Release 17.3R1. You can configure and run this feature on any of the currently supported SRX Series Firewalls beginning with Junos OS 15.1X49-D60.
Overview
This example shows how to configure integrated user firewall to log user identity information in the session log based on the source zone in the security policy. For this to occur, the zone specified as the source zone must be configured for source identity logging. For zone-based user identity logging, the security policy’s actions must include session create (session-init) and session close (session-close) events.
When all conditions are met, the user’s name is written to the log at the beginning of the session (or session initialization) and at the beginning of the close of the session (or session tear-down). Note that if a security policy denies the user access to the resource, an entry identifying the user by name is written to the log, that is, if session close is configured.
When you use the zone-based user identity feature, it is the source zone (from-zone) in the security policy that initiates the user identity logging event.
Prior to introduction of this feature, it was necessary to include the source identity tuple (source-identity) in a security policy to direct the system to write user identity information to the log—that is, the user name or the group name. The user identity was written to the log if the source-identity tuple was configured in any of the policies in a zone pair that matched the user’s traffic and the session close log was configured.
However, the source identity feature is specific to an individual user or a group of users, and it constrains application of the security policy in that regard.
It is the user name that is stored in the local Active Directory table which the system writes to the log when the policy’s source zone is configured for user-identity logging. The SRX Series Firewall previously obtained the user identity information by reading the domain controller event log. The SRX Series Firewall stored that information in its Active Directory table.
You can use the source-identity tuple in a security policy that also specifies as its source zone a zone that was configured for user identity logging. Because integrated user firewall collects the names of the groups that a user belongs to from Microsoft Domain Controllers only when integrated user firewall relies on the source identity tuple, if you use the zone-based user identity logging feature without also configuring source-identity, the log will contain only the name of the user requesting access and not the groups that the user belongs to.
After you configure a zone to support source identity logging, the zone is reusable as the from-zone specification in any security policy for which you want user identity information logged.
To summarize, the user’s name is written to the log if:
The user belongs to the zone configured for source identity logging.
The user Issues a resource access request whose generated traffic matches a security policy whose source zone (from-zone) tuple specifies a qualifying zone.
The security policy includes as part of its actions the session initialize (session-init) and session end (session-close) events.
The source identity log function benefits include the ability to:
Cover a wide range of users in a single specification—that is, all users who belong to a zone that is configured for source identity logging.
Continue to use an address range for the source address in a security policy without forfeiting user identity logging.
Reuse a zone that is configured for source identity logging in more than one security policy.
Because it is configured independent of the security policy, you can specify the zone as the source zone in one or more policies.
The user identity is not logged if you specify a zone configured for zone-based user identity logging as the destination zone rather than as the source zone.
For this function to work, you must configure the following information:
The source identity log statement configured for a zone that is used as the source zone (from-zone) in the intended security policy.
A security policy that specifies:
A qualifying zone as its source zone.
The session-init and the session-close events as part of its actions.
Configuration
To configure the source identity logging feature, perform these tasks:
- CLI Quick Configuration
- Configuring a Zone to Support Source Identity Logging and Using It in a Security Policy
- Results
CLI Quick Configuration
To quickly configure this example, copy the
following commands, paste them into a text file, remove any line breaks,
change any details necessary to match your network configuration,
copy and paste the commands into the CLI at the [edit] hierarchy
level, and then enter commit from configuration mode.
set security zones security-zone trust source-identity-log
set security policies from-zone trust to-zone untrust policy appfw-policy1 match source-address any destination-address any application junos-ftp
set security policies from-zone trust to-zone untrust policy appfw-policy1 then permit
set security policies from-zone trust to-zone untrust policy appfw-policy1 then log session-init
set security policies from-zone trust to-zone untrust policy appfw-policy1 then log session-close
Configuring a Zone to Support Source Identity Logging and Using It in a Security Policy
Step-by-Step Procedure
The following example requires you to navigate various levels in the configuration hierarchy. For instructions on how to do that, see Using the CLI Editor in Configuration Mode.
Configure source identity logging for the trust zone. When this zone is used as the source zone in a security policy, the system writes the user identity information to the session log for all users to whom the security policy applies.
[edit security]
user@host# set zones security-zone trust source-identity-log
Configure a security policy called appfw-policy1 that specifies the zone trust as the term for its source zone. Source identity logging is applied to any user whose traffic matches the security policy’s tuples.
This security policy allows the user to access the junos-ftp service. When the session is established for the user, the user’s identity is logged. It is also logged at the close of the session.
[edit security]
user@host# set policies from-zone trust to-zone untrust policy appfw-policy1 match source-address any destination-address any application junos-ftp
user@host#  set policies from-zone trust to-zone untrust policy appfw-policy1 then permit
Configure the appfw-policy1 security policy’s actions to include logging of the session initiation and session close events.
Note:You must configure the security policy to log session initiation and session close events for the source identity log function to take effect. The user identity information is written to the log in conjunction with these events.
[edit security]
user@host# set policies from-zone trust to-zone untrust policy appfw-policy1 then log session-init
user@host# set policies from-zone trust to-zone untrust policy appfw-policy1 then log session-close
Results
From configuration mode, confirm your configuration
by entering the show security zones command. If the output
does not display the intended configuration, repeat the configuration
instructions in this example to correct it.
Verification
This section shows the session log generated for the user session. The log output:
Shows the user name, user1, which appears at the outset of session open and then again at the outset of session close.
The security policy configuration that caused the user name to be written to the log specifies the zone trust as its source zone. The zone trust was configured for source identity logging.
Includes information obtained from the user’s request traffic, the policy matching criteria, and the NAT setup.
Contains identity information about the user, which is obtained from the Active Directory database. That information includes the role parameter for “MyCompany/Administrator”, which shows the groups that the user belongs to.
In this scenario, the user requested access to the Juniper Networks junos-ftp service, which the log also records. Table 1 calls out the parts of the log that are specific to the source identity log function configuration:
session create This is the session initiation which begins the first section of the log that records the session setup information. The user’s name, user1, is displayed at the beginning of the session create log recording. |
user1 RT_FLOW_SESSION_CREATE |
Session create is followed by standard information that defines the session based on the user’s traffic that matches security policy tuples. |
|
source address, the source port, the destination address, the destination port. |
source-address="198.51.100.13/24" source-port="635" destination-address="198.51.100.10/24" destination-port="51" |
application service This is the application service that the user requested access to and which the security policy permitted. |
service-name="junos-ftp" |
source zone, destination zone Further down the log are the zone specifications which show trust as the source zone and untrust as the destination zone as defined. |
source-zone-name="trust" destination-zone-name="untrust" |
session close This is the session close initiation, which begins the second part of the log record that covers session tear-down and close. The user’s name, user1, is displayed at the beginning of the session close record. |
user1 RT_FLOW - RT_FLOW_SESSION_CLOSE |
Verify that the User Identity Information Was Logged
Purpose
Note that integrated user firewall collects groups configured as the source-identity only from Microsoft Domain Controllers. If you use the zone-based user-identity feature without configuring source-identity, the log will contain only the user’s name, that is, no group informations is recorded. In that case, the “roles=” section of the log will show “N/A”. In the following example, it is assumed that the source-identity tuple was used and the “roles=” section shows a long list of the groups that the user “Administrator” belongs to.
Action
Display the log information.
Sample Output
command-name
<14>1 2015-01-19T15:03:40.482+08:00 user1 RT_FLOW - RT_FLOW_SESSION_CREATE [user@host2636 192.0.2.123 source-address=”198.51.100.13“ source-port=”635” destination-address=”198.51.100.10” destination-port=”51” service-name=”junos-ftp” nat-source-address=”203.0.113.10” nat-source-port=”12349” nat-destination-address ="198.51.100.13" nat-destination-port="3522" nat-rule-name="None" dst-nat-rule-name="None" protocol-id="6" policy-name="appfw-policy1" source-zone-name="trust" destination-zone-name="untrust" session-id-22="12245" username="MyCompany/Administrator " roles="administrators, Users, Enterprise Admins, Schema Admins, ad, Domain Users, Group Policy Creator Owners, example-team, Domain Admins" packet-incoming-interface="ge-0/0/0.1" application="UNKNOWN" nested-application="UNKNOWN" encrypted="UNKNOWN"] session created 192.0.2.1/21 junos-ftp 10.1.1.12/32898->10.3.1.10/21 junos-ftp 10.1.1.1/547798->10.1.2.10/21 None None 6 appfw-policy1 trust untrust 20000025 MyCompany/Administrator (administrators, Users, Enterprise Admins, Schema Admins, ad, Domain Users, Group Policy Creator Ownersexample-team, Domain Admins) ge-0/0/0.0 UNKNOWN UNKNOWN UNKNOWN
<14>1 2015-01-19T15:03:59.427+08:00 user1 RT_FLOW - RT_FLOW_SESSION_CLOSE
[user@host2636 192.0.2.123 reason="idle Timeout” source-address=”198.51.100.13“ source-port=”635”" destination-address=”198.51.100.10” destination-port=”51" service-name="junos-ftp" nat-source-address="203.0.113.10" nat-source-port="12349"  nat-destination-address ="198.51.100.13" "nat-destination-port="3522" src-nat-rule-name="None" dst-nat-rule-name="None" protocol-id="6"
policy-name="appfw-policy1" source-zone-name="trust" destination-zone-name="untrust"session-id-32="20000025" packets-from-client="3" bytes-from-client="180"
packets-from-server="0" bytes-from-server="0" elapsed-time="19"
application="INCONCLUSIVE" nested-application="INCONCLUSIVE" username=" J
“MyCompany /Administrator” roles="administrators, Users, Enterprise Admins,
Schema Admins, ad, Domain Users, Group Policy Creator Owners, example-team,
Domain Admins" packet-incoming-interface="ge-0/0/0.1" encrypted="UNKNOWN"]
session closed idle Timeout: 111.1.1.10/1234>10.1.1.11/21 junos-ftp 10.1.1.12/32898->10.3.1.10/21 1 None None 6 appfw-policy1 trust untrust 20000025 3(180) 0(0) 19
INCONCLUSIVE INCONCLUSIVE MyCompany/Administrator (administrators, Users, Enterprise Admins, Schema Admins, ad, Domain Users, Group Policy Creator Owners, example-team, Domain Admins) ge-0/0/0.1 UNKNOWN
Configure Active Directory as Identity Source on Firewall
Table 2 describes the steps to configure Active Directory as Identity Source on your firewall.
|
Configuration Step |
Command |
|---|---|
|
Step 1: Configure authentication-table You can configure active directory authentication table. You can configure priority option. |
Authentication table
Authentication table priority
|
|
Step 2: Configure timeout You can configure valid authentication entry and invalid authentication entry
timeout for entries in the authentication table. The default
You can view timeout information for authentication table entries. |
Valid authentication entries
Invalid authentication entries
View timeout information
|
|
Step 3: Configure Windows Event Log Verification and Statistics You can verify that the authentication table is getting IP address and user information. You can see statistics about reading the event log. You can configure firewall authentication as backup to WMIC |
Windows Event Log Verification
Windows Event Log Statistics
Firewall authentication as backup to WMIC
|
|
Step 4: Configure domain PC probing On-demand probing is enabled by default. You can disable on-demand probing. When on-demand probing is disabled, manual probing is available. You can configure probe timeout value. The default timeout is 10 seconds. You can display probe statistics. |
Disable on-demand probing
Enable manual probing
Probe timeout value
Display probe statistics
|
|
Step 5: Configure LDAP Server Status and Statistics You can verify the LDAP connection status. You can see counts of queries made to the LDAP server. |
LDAP server status
LDAP server statistics
|
Configure Active Directory as Identity Source on NFX Devices
In a typical scenario for the integrated user firewall feature, domain users want to access the Internet through an NFX device. The device reads and analyzes the event log of the domain controllers configured in the domain. Thus, the device detects domain users on an Active Directory domain controller. Active Directory domain generates an authentication table as the Active Directory authentication source for the integrated user firewall. The device uses this information to enforce the policy to achieve user-based or group-based access control.
When a new user is created in Active Directory (AD), the user is added to the global security group Primary Group which is by default Domain Users. The Primary Group is less specific than other groups created in AD because all users belong to it. Also, it can become very large.
You cannot use the Primary Group, whether by its default name of Domain Users or any other name, if you changed it, in integrated user firewall configurations.
To establish a Windows Active Directory domain and to configure another security policy:
To verify that the configuration is working properly:
Verify that at least one domain controller is configured and connected by entering the show services user-identification active-directory-access domain-controller status command.
Verify that the LDAP server is providing user-to-group mapping information by entering the show services user-identification active-directory-access user-group-mapping status command..
Verify the authentication table entries by entering the show services user-identification active-directory-access active-directory-authentication-table all command. The IP addresses, usernames, and groups are displayed for each domain.
Verifying IP-to-user mapping by entering the show services user-identification active-directory-access statistics ip-user-mapping command. The counts of the queries and failed queries are displayed.
Verify that IP probes are occurring by entering the show services user-identification active-directory-access statistics ip-user-probe command.
Verify that user-to-group mappings are being queried by entering the show services user-identification active-directory-access statistics user-group-mapping command.