View Device Details in Installed Base
This topic describes the Device Details page available under the Installed Base tab on the Inventory page.
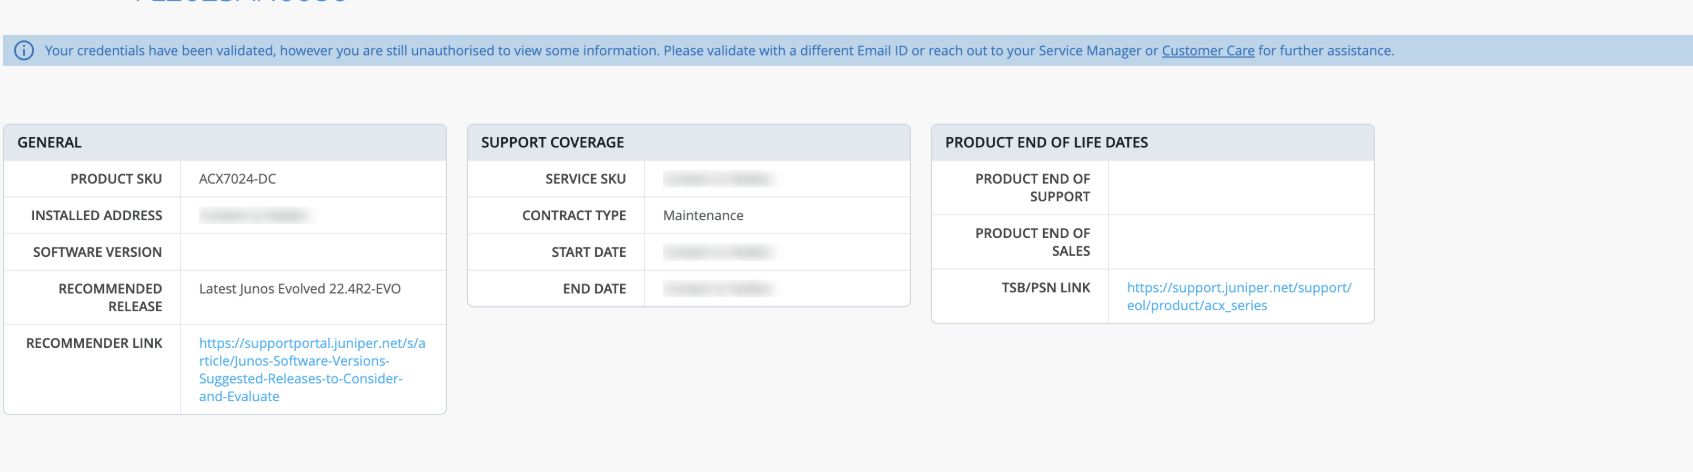
JSI displays detailed support information about the device in the Device Details page of Installed Base.
To access the Installed Base Device Details page for a device, navigate to Organization > Inventory > Installed Base and click the device entry in the table. The Device Details page for the device appears.
To validate your identity:
Hover over the blurred fields and click Validate.
The Validate Juniper Account pop-up appears.
-
Enter your Juniper registered account credentials (email address and password) that you created through Juniper Support Portal and click Validate.
On successful validation, the page is refreshed and displays the customer-centric information that you are entitled to access.
For more information on validating your identity, see Validate Your Juniper Account.
The Device Details page displays the following information:
SUPPORT COVERAGE
Displays information on the support contract present for the device.
For field descriptions, see Table 2.
Product END OF LIFE DATES
Displays information on the product End of Support and End of Sales milestones for the device.
For field descriptions, see Table 3.
SOFTWARE END OF LIFE DATES
Displays information on the software installed on the device.
ADVISORIES
-
Security Vulnerabilities—Click the link to view information on the security vulnerabilities advisories published by the Juniper Security Incident Response (SIRT) team for the device.
Note:If the Juniper Networks device is in cloud-connected (Assured or Onboarded) state, the Security Incident Response Team Tickets page displays a list of security vulnerabilities specific to the type of Juniper Networks device and the Junos OS version installed.
But if the Juniper device is not connected to cloud, the Security Incident Response Team Tickets page displays a pop-up indicating that you must connect the device to cloud to view the list of security vulnerabilities specific to the device.
Click OK to be redirected to the Installed Base page. To connect the device to cloud from the Installed Base page, click Adopt Devices. From the drop-down list, select the type of device (switch, router, or WAN edge) you want to adopt. Copy the outbound SSH commands and commit them on the device. For more information, see Adopt a Device.
The security vulnerabilities page for a device also displays a banner with the total counts and percentages of critical, high, medium, and low severity vulnerabilities for the device. You can filter the advisories relevant to the device based on the severity level. Click a severity level criterion on the banner to filter the advisories for that level. For example, if you click the Critical count or the Critical Vulnerabilities percentage criteria, the advisories are filtered to display only the critical advisories for the device.
From the Security Incident Response Team Tickets page, select an entry to view the Device SIRT Quick View pane. The Device SIRT Quick View pane displays detailed information about the advisory.
For more information on the fields on the Security Incident Response Team Tickets page and Device SIRT Quick View pane, see Table 5.
-
Pro-Active Bug Notifications—Click the link to view information on the known software issues impacting the device.
Note:If the Juniper Networks device is cloud-connected (Assured or Onboarded), the Proactive Bug Notifications page displays a list of known software issues relevant to the type of Juniper Networks device and the Junos OS version installed.
But if a Juniper device is not connected to cloud, the Proactive Bug Notifications page displays a pop-up indicating that you must connect the device to cloud to view the list of known software issues specific to the device.
Click OK to be redirected to the Installed Base page. To connect the device to cloud from the Installed Base page, click Adopt Devices. From the drop-down list, select the type of device (switch, router, or WAN edge) you want to adopt. Copy the outbound SSH commands and commit them on the device. For more information, see Adopt a Device.
The Proactive Bug Notifications page displays a banner with the total counts and percentages of critical, major, and minor known software issues for the device. You can filter Proactive Bug Notifications for a device based on the risk level. Click a risk level criterion on the banner to filter the PBNs for that level. For example, if you click the Critical count or the Critical Customer Risk percentage criteria, the advisories are filtered to display only the critical customer risk PBNs for the device.
From the Proactive Bug Notifications page, select an entry to view the Device PBN Quick View pane.
For more information on the fields on the Proactive Bug Notifications page and Device Quick View pane, see Table 6.
| Field | Description |
|---|---|
| Product SKU |
Stock Keeping Unit (SKU) number assigned to the device. |
| Installed Address |
Address of the site where the device is installed. Note:
The field remains blurred until your account is validated. |
| Software Version |
Junos OS version installed on the device. Note:
The field appears blank for non-cloud connected devices. |
| Recommended Release | Recommended Junos OS software version for the device. |
| Recommended Link | Link to a Juniper Support Portal Knowledge Base article with a list of recommended Junos OS versions for each Juniper platform. |
| Field | Description |
|---|---|
| Service SKU | SKU assigned to the device’s service contract. Note:
The field remains blurred until your account is validated. |
| Contract Type | Type of active support coverage provided for the device. Example: Maintenance. |
| Start Date | Date on which the service contract starts for the device. Note:
The field remains blurred until your account is validated. |
| End Date | Date on which the service contract ends for the device. Note:
The field remains blurred until your account is validated. |
| Field | Description |
|---|---|
| Product End of Support | Date on which the product reaches end of support. |
| Product End of Sales | Date on which the product reaches end of sales. |
| TSP/PSN Link | Link to the bulletin that communicates end of support notifications for the device type. |
| Field | Description |
|---|---|
| Sofware Version End of Support | Date on which the Junos OS software version installed on the device reaches end of support. |
| Software Version End of Engineering | Date on which the Junos OS software version installed on the device reaches end of engineering-level support. |
| Software Version End of Life Link | Link to the Junos OS Dates & Milestones page in the Juniper support website. This page contains dates of important milestones for all Junos OS versions. |
| Field | Description |
|---|---|
| JSA ID | Unique value that identifies the security advisory on Juniper Networks Support Portal. |
| Title | Synopsis of the security advisory. |
| Severity | Severity rating of the security advisory. The values are:
|
| Affected Models | Device models affected by the security advisory. |
| OS Versions Affected | Junos or Junos Evo versions affected by the security advisory. |
| Release Date | Date on which the security advisory was first published. |
| JSA Updated Date | Date on which the security advisory was last updated. |
| Problem | Description of the security advisory. |
| Solution | Solution for the security vulnerability described in the advisory. |
| Workaround | Detailed explanation on how to temporarily resolve the problem. |
| Affected Series | Identifies one or more product series affected by the security advisory. |
| Release Notes | Short description of the security advisory. |
| CVSS Score | Common Vulnerability Scoring System (CVSS) severity assessment score of the advisory in the range of 0-10.This field is available on the SIRT Quick View Pane only. |
| View SIRT details | Link to the advisory in the Juniper Networks Support Portal.You can view this link in the SIRT Quick View Pane. |
| Field | Description |
|---|---|
| ID | Unique value that identifies the Problem Report. |
| Headline | Synopsis of the problem. |
| Customer Risk | Classification of the potential impact to the customer if the bug was
encountered in the network. The values include:
|
| Bug Type | Indicates the phase or activity during which the problem was discovered. Example: Day-1. |
| Trigger | Describes the events that happened before or at the time the problem occurred, or the event that caused the problem. |
| Introduced In | Junos or Junos Evo release where the problem was first found and reported. |
| Fixed In | Junos or Junos Evo release in which the problem was resolved. |
| Release Notes | Short description of the problem. |
| Restoration | Indicates how the service can be restored when the problem
occurs. Values include:
|
| Restoration Steps | Steps to restore the service when the problem occurs. |
| Workaround | Detailed explanation of how to temporarily resolve the problem until a permanent resolution is available. |
| Workaround Provided | Indicates whether a workaround for the problem is provided or
not. Values include:
|
| Product Family | Identifies one or more products affected by the problem. |