Unpack and Mount an SSR1400
Unpack the appliance using the recommended tools and following the recommended procedure.
Tools and Parts Required to Unpack the SSR1400 Appliance
To unpack the appliance and prepare for installation, you need the following tools:
-
Phillips (+) screwdriver, number 2
-
A box cutter or packing knife to slice open the tape that seals the boxes
Unpack an SSR1400
The SSR1400 is shipped in a cardboard carton and secured with foam packing material.
The SSR1400 is maximally protected inside the cardboard carton. Do not unpack it until you are ready to begin installation.
To unpack the SSR1400:
- Move the cardboard carton to a staging area as close to the installation site as possible, where you have enough room to remove the components from the chassis.
- Position the cardboard carton with the arrows pointing up.
- Carefully open the top of the cardboard carton.
- Remove the foam covering the top of the SSR1400.
- Verify the parts received against the list in Table 1.
- Store the brackets and bolts inside the accessory box.
- Save the shipping carton and packing materials in case you need to move or ship the appliance at a later time.
Verify Parts Received with the SSR1400
The shipment includes a packing list. Check the parts you receive in the shipping carton against the items on the packing list. The parts shipped depend on the configuration you order.
If any part on the packing list is missing, contact your customer service representative or contact Juniper customer care from within the U.S. or Canada by telephone at 1-888-314-5822. For international-dial or direct-dial options in countries without toll-free numbers, see https://www.juniper.net/support/requesting-support.html.
| Component | Quality |
|---|---|
|
SSR1400 Chassis Part number: SSR1400-CHAS SSR1400-DC-CHAS |
1 |
|
SSR1400-CHAS AC Power supply (preinstalled) Part number: JNP-650W-AC-SSRHE |
2 AC |
|
SSR1400-DC-CHAS DC Power Supplies (preinstalled) Part number: JPSU-650W-DC-F-AFO |
2 DC |
|
Fan Part number: JNP-FAN-SSRHE |
4 |
|
AC power cord appropriate for your geographical location. DC power cords are not shipped with the device. |
2 |
|
Rack mount kit Part number: JNP-RMK-SSRHE |
|
|
RJ-45 to USB A serial cable |
1 |
|
Documentation Roadmap |
1 |
Install the SSR1400 in a Rack
You can install an SSR1400 appliance into a four-post rack or a cabinet.
Complete these prerequisites before you install the appliance:
-
Prepare the site for installation as described in Site Preparation Checklist for SSR1400.
-
Be sure the site has adequate clearance for both airflow and hardware maintenance, as described in SSR1400 Site Guidelines and Requirements.
-
Unpack the appliance as described in Unpack an SSR1400.
Ensure that you have the Phillips (+) screwdriver, number 2.
Installing the chassis in a rack requires two people: one person lifts the chassis while the other secures it to the rack.
Ensure the rear of the chassis is supported throughout the process of mounting the appliance into the rack.
Before mounting the appliance on a rack or in a cabinet, have a qualified technician verify that the rack or cabinet is strong enough to support the appliance's weight. Have the technician verify also that the rack or cabinet is adequately supported at the installation site.
If you are installing more than one appliance on a rack or in a cabinet, install the first appliance at the bottom of the rack.
To mount the SSR1400 on a four-post rack:
-
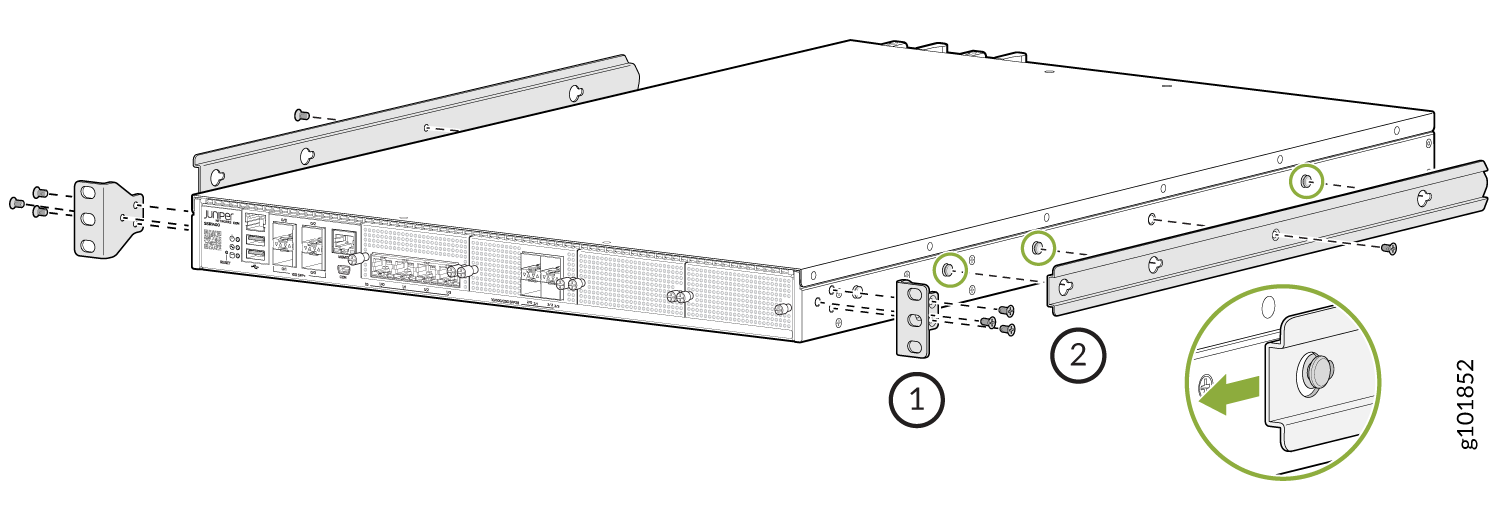
Position the side mounting rails such that the keyholes of the side
mounting rails align with the shoulder screws on the chassis. Slide and lock
the side mounting rails in place and use two M3 flat-head screws to
secure.
Figure 1: Install Front Mounting Brackets and Side Mounting Rails
-
While you’re holding the SSR1400 in place, have a second person insert and
tighten the rack-mount screws to secure the front mounting brackets to the
rack rails. Make sure to tighten the screws in the two bottom holes first
and then tighten the screws in the two top holes next.
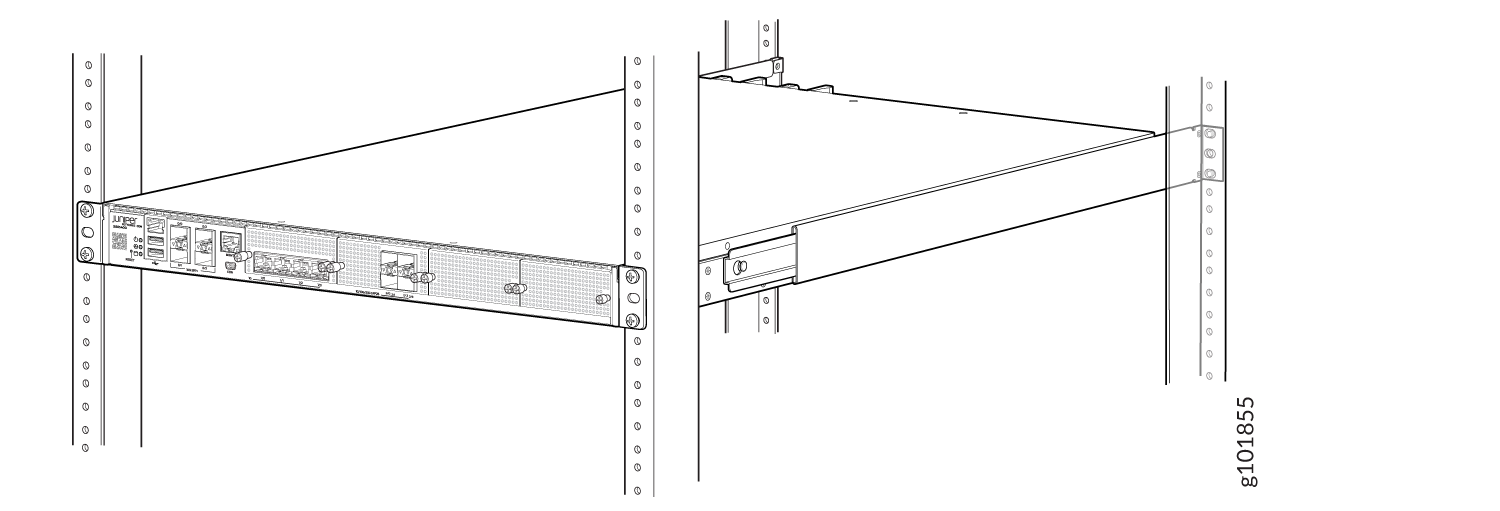
Figure 2: Install the SSR1400 Appliance in a Four-Post Rack

-
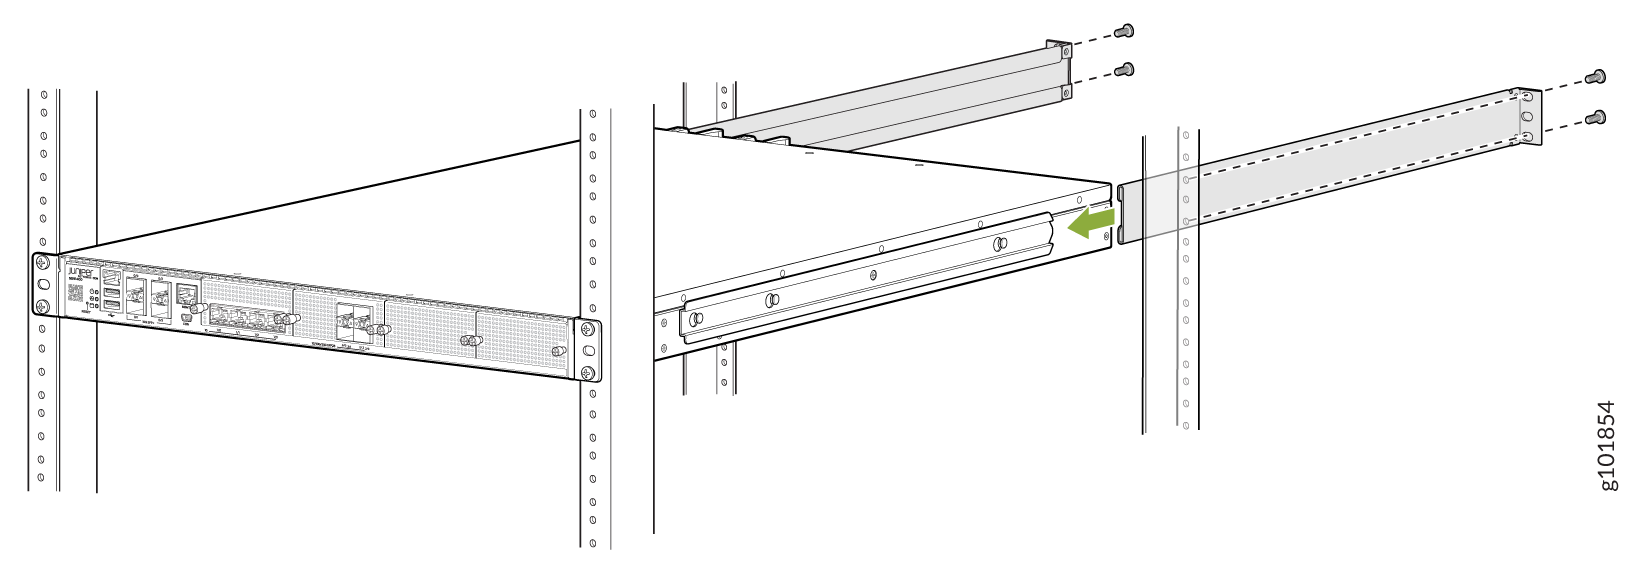
Secure the rear mounting blades on each side of the chassis to the rack
post, using rack mounting screws.
Figure 3: Install the Rear Mounting Blades on an SSR1400 Appliance
-
Check that the front mounting brackets on each side of the rack are lined
up with each other.
Figure 4: SSR1400 Appliance Installed in a Four-Post Rack