Returning the Chassis or Components
Locating the Serial Number on a QFX10002 or Component
If you are returning a switch or component to Juniper Networks for repair or replacement, you must locate the serial number of the switch or component. You must provide the serial number to the Juniper Networks Technical Assistance Center (JTAC) when you contact them to obtain a Return Materials Authorization (RMA). S
If the switch is operational and you can access the command-line interface (CLI), you can list serial numbers for the switch and for some components with a CLI command. If you do not have access to the CLI or if the serial number for the component does not appear in the command output, you can locate the serial number ID label on the switch or component.
If you want to find the serial number ID label on a component, you need to remove the component from the switch chassis, for which you must have the required parts and tools available.
- Listing the Chassis and Component Details Using the CLI
- Locating the Chassis Serial Number ID Label on a QFX10002 Switch
- Locating the Serial Number ID Labels on FRU Components
Listing the Chassis and Component Details Using the CLI
To list the QFX10002 and components and their serial numbers,
use the show chassis hardware CLI operational mode command.
user@device> show chassis hardware

Hardware inventory:
Item             Version  Part number  Serial number     Description
Chassis                                UNDEFINED         QFX10002-72Q
Pseudo CB 0
Routing Engine 0          BUILTIN      BUILTIN           QFX Routing Engine
FPC 0            REV 05   750-055415   ACAM4157          QFX10002-72Q
  CPU                     BUILTIN      BUILTIN           FPC CPU
  PIC 0                   BUILTIN      BUILTIN           72X40G
    Xcvr 0       REV 01   740-032986   QB350182          QSFP+-40G-SR4
    Xcvr 10      REV 01   740-038623   MOC12456230055    QSFP+-40G-CU1M
    Xcvr 11      REV 01   740-032986   QB510226          QSFP+-40G-SR4
    Xcvr 12      REV 01   740-032986   QB440609          QSFP+-40G-SR4
    Xcvr 16      REV      740-038624   APF14260038RA4    QSFP+-40G-CU3M
    Xcvr 17      REV      740-038624   APF14260030150    QSFP+-40G-CU3M
    Xcvr 18      REV      740-038624   APF14260038RAR    QSFP+-40G-CU3M
    Xcvr 19      REV 01   740-038624   1414600Q          QSFP+-40G-CU3M
    Xcvr 20      REV 01   740-038623   MOC13156230239    QSFP+-40G-CU1M
    Xcvr 21      REV 01   740-032986   QB510219          QSFP+-40G-SR4
    Xcvr 23      REV 01   740-032986   QC470754          QSFP+-40G-SR4
    Xcvr 30      REV 01   740-038623   MOC13046230019    QSFP+-40G-CU1M
    Xcvr 31      REV 01   740-032986   QC261385          QSFP+-40G-SR4
    Xcvr 34      REV 01   740-032986   QC261445          QSFP+-40G-SR4
    Xcvr 35      REV 01   740-032986   QA500044          QSFP+-40G-SR4
    Xcvr 40      REV 01   740-038623   MOC13046230090    QSFP+-40G-CU1M
    Xcvr 41      REV 01   740-032986   QC270406          QSFP+-40G-SR4
    Xcvr 50      REV 01   740-038623   MOC13156230526    QSFP+-40G-CU1M
    Xcvr 51      REV 01   740-032986   QB120441          QSFP+-40G-SR4
    Xcvr 60      REV 01   740-038624   MOC13046240143    QSFP+-40G-CU3M
    Xcvr 61      REV 01   740-032986   QB341320          QSFP+-40G-SR4
    Xcvr 70      REV 01   740-032986   QB190181          QSFP+-40G-SR4
    Xcvr 71      REV 01   740-032986   QA480159          QSFP+-40G-SR4
  Mezz           REV 05   711-053333   ACAM4115          Mezzanine Board
Power Supply 2   REV 01   740-054405   1EDN4470094       JPSU-1600W-AC-AFO
Power Supply 3   REV 01   740-054405   1EDN4470121       JPSU-1600W-AC-AFO
Fan Tray 0                                               QFX10002 Fan Tray 0, Front to Back Airflow - AFO
Fan Tray 1                                               QFX10002 Fan Tray 1, Front to Back Airflow - AFO
Fan Tray 2                                               QFX10002 Fan Tray 2, Front to Back Airflow - AFO

{master:0}
You must remove the fan module to read the fan serial number from the serial number ID label. The fan module serial number cannot be viewed through the CLI. Fan Tray 2 refers to the third module from the left, counting from 0.
Locating the Chassis Serial Number ID Label on a QFX10002 Switch
The serial number ID label is located on a label on the top cover.
Locating the Serial Number ID Labels on FRU Components
The power supplies and fan modules installed in a QFX10002 are field-replaceable units (FRUs). For each FRU, you must remove the FRU from the switch chassis to see the FRU serial number ID label.
AC power supply—The serial number ID label is on the top of the AC power supply.
Fan module—The serial number ID label is on the top of the fan module.
Removing the Solid State Drives for RMA
The QFX10002 has two solid-state drives (SSDs) that store the software images, system logs, and the configuration files. Before returning a chassis to Juniper Networks as part of a Return Merchandise Authorization (RMA), you have the option of removing the SSDs and disposing them according to your own company’s security procedures. Before you begin this procedure, ensure you have the following tools:
-
ESD grounding strap (not provided)
-
Number 2 Phillips screwdriver
Use this optional procedure to remove the drives from the QFX10002 after the device has shutdown and removed from the rack or cabinet.
-
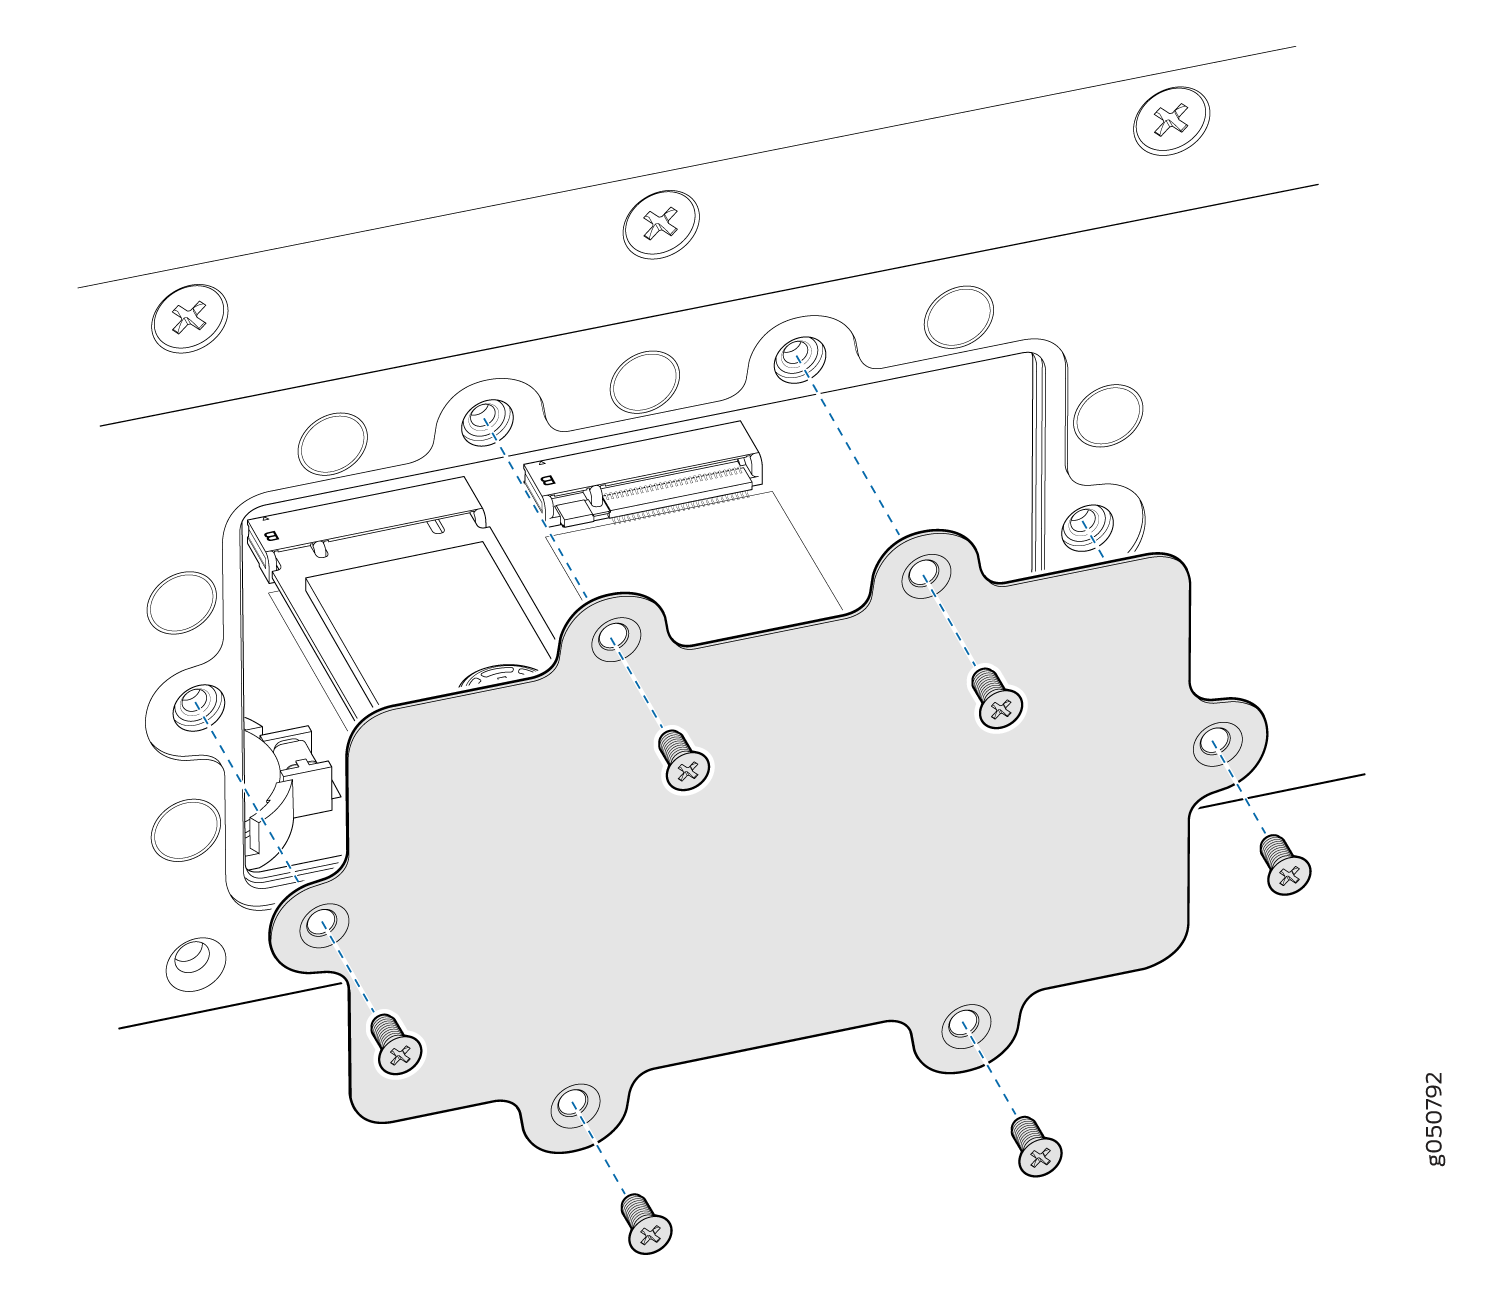
Using the number 2 Phillips screwdriver, remove the six
flat-head screws that secure the access door on the right-side of
the device. Retain the screws for later use.
Figure 1: Removing or Replacing Flat-head Screws in the Access Door
-
Reach inside of the cavity and unscrew the two thumb-screw
fasteners and set aside with the screws.
Figure 2: Remove or Replacing the Thumb-screw Fasteners
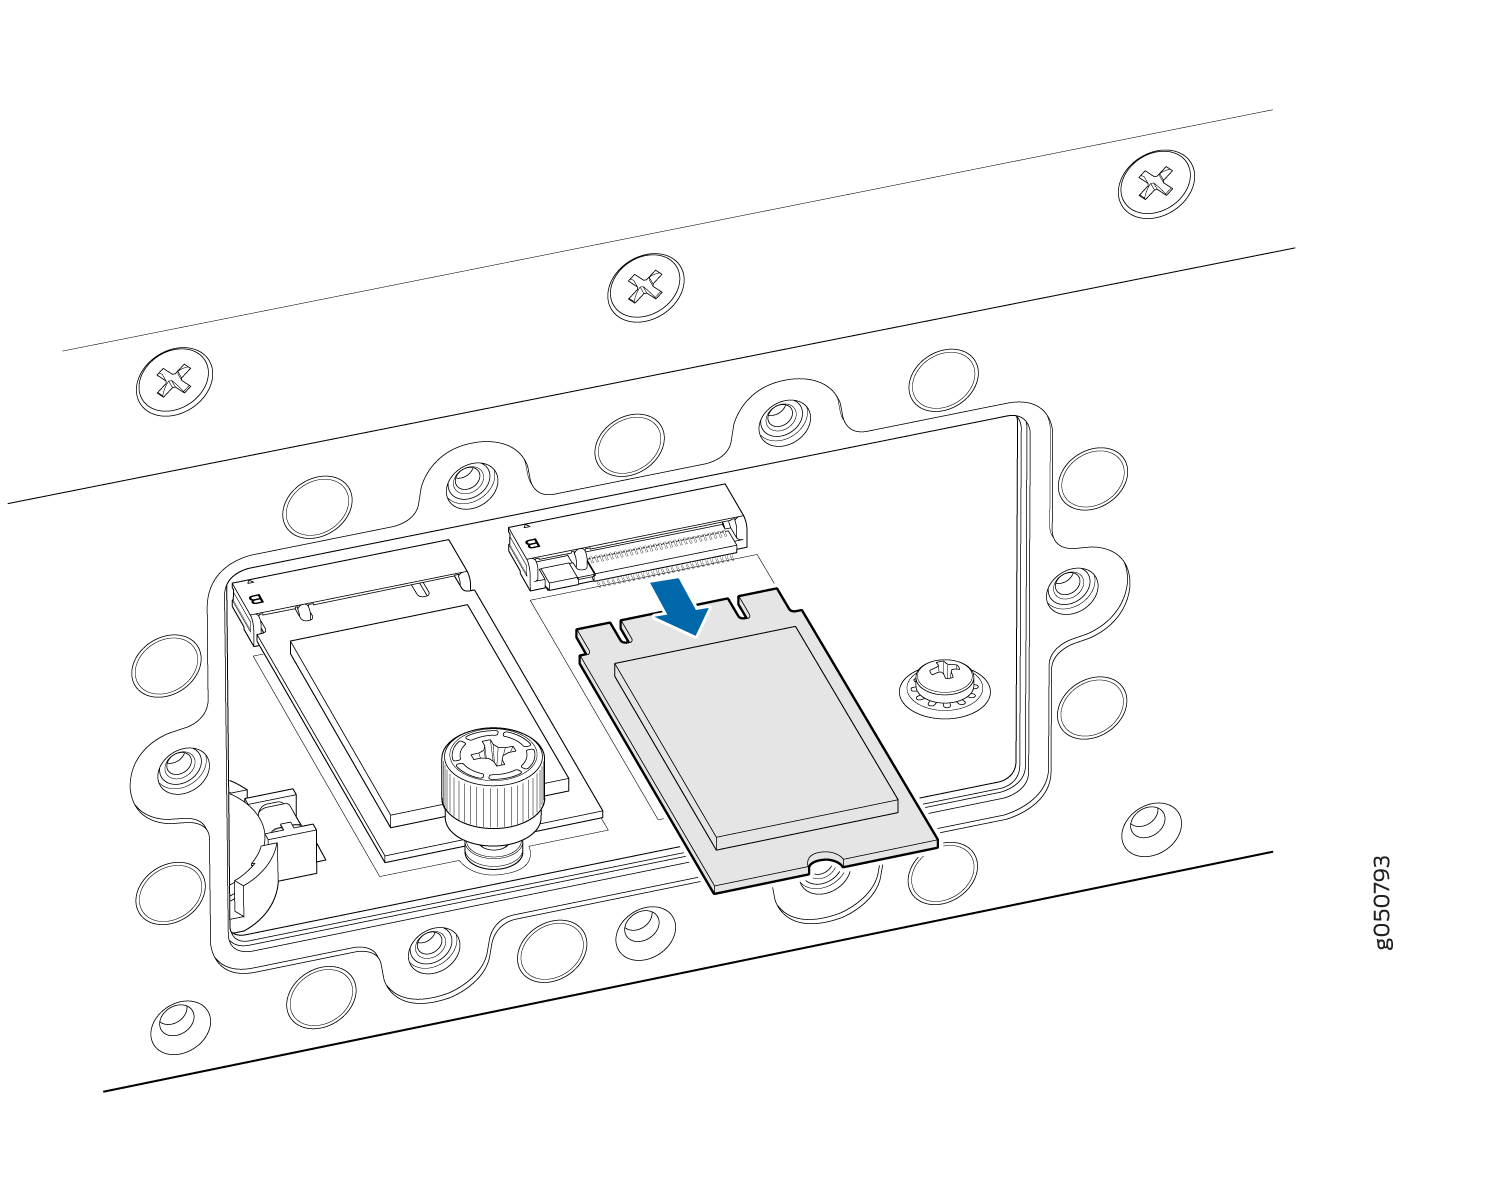
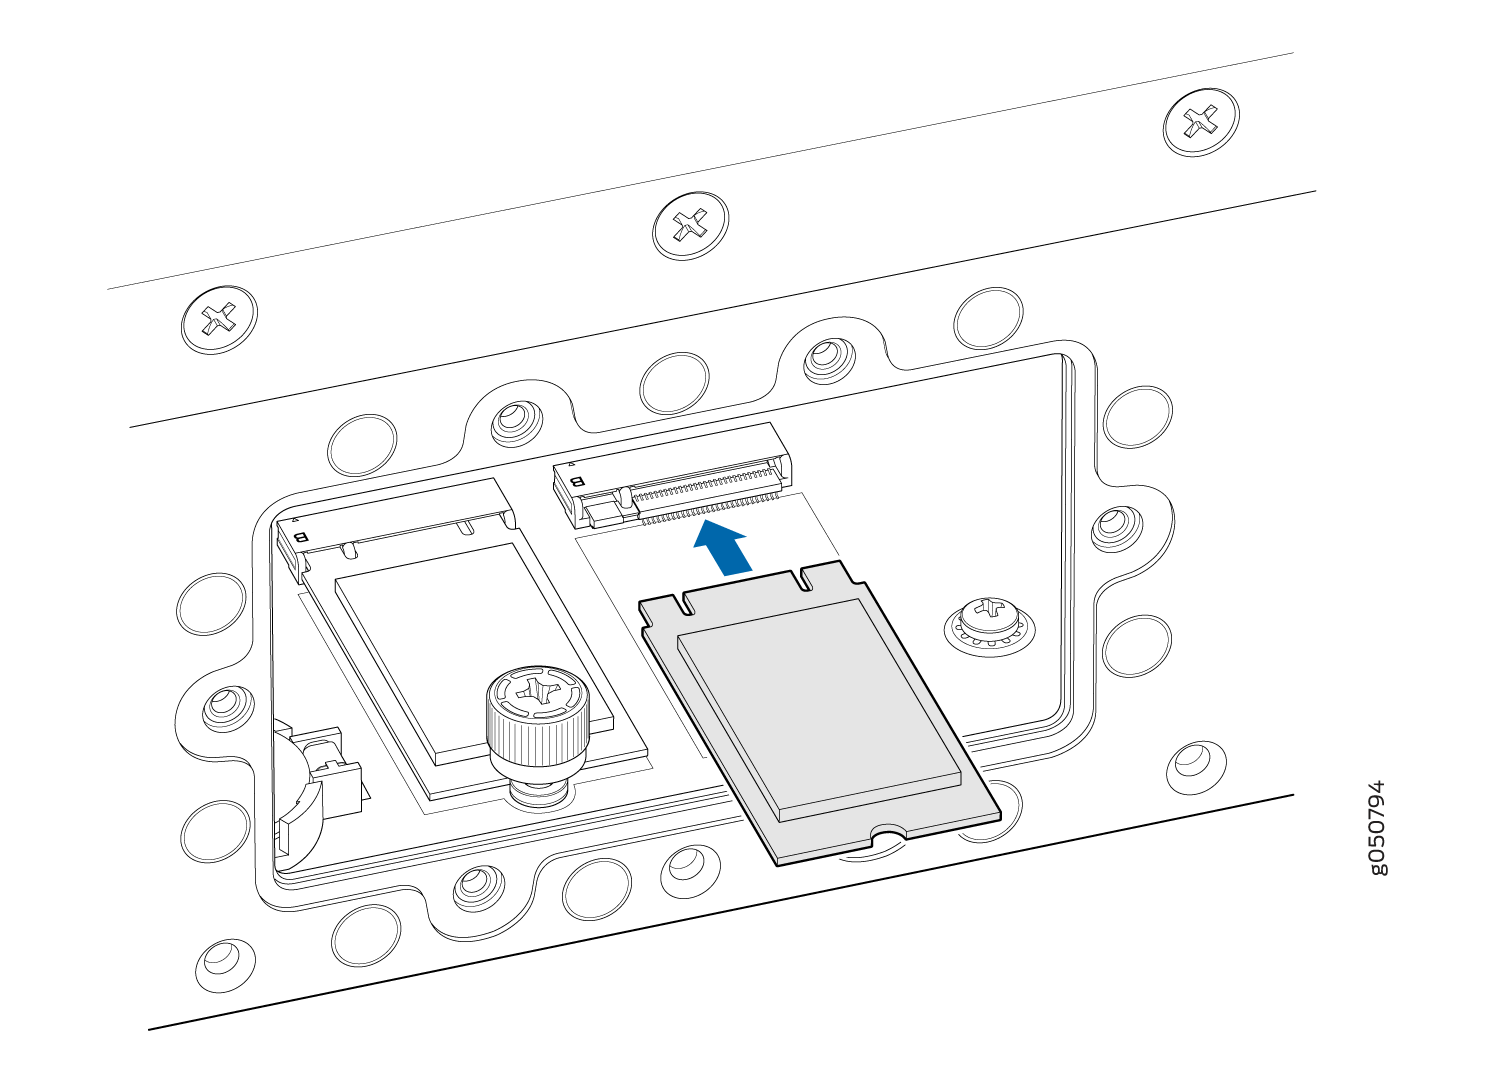
-
Slide the SSD out of the slot and set aside; repeat with
the second SSD.
Figure 3: Removing the SSDs
See Also
Returning a QFX10002 or Component for Repair or Replacement
If you need to return a QFX10002 or component to Juniper Networks for repair or replacement, follow this procedure:
For more information about return and repair policies, see the customer support page at https://www.juniper.net/support/guidelines.html .
See Also
Packing a QFX10002 or Component for Shipping
If you are returning a QFX10002 or component to Juniper Networks for repair or replacement, pack the item as described in this topic.
Before you pack a QFX10002 or component:
Ensure that you have taken the necessary precautions to prevent electrostatic discharge (ESD) damage. See Prevention of Electrostatic Discharge Damage.
Retrieve the original shipping carton and packing materials. Contact your JTAC representative if you do not have these materials, to learn about approved packing materials. See Contact Customer Support.
Ensure that you have the following parts and tools available:
ESD grounding strap.
Antistatic bag, one for each component.
If you are returning the chassis, an appropriate screwdriver for the mounting screws used on your rack or cabinet.
This topic describes:
Packing a QFX10002 Switch for Shipping
To pack a QFX10002 for shipping:
- Power down the switch and remove the power cables. See Powering Off a QFX10002.
- Remove the cables that connect the QFX100002 to all external devices.
- Remove all field-replaceable units (FRUs) from the device.
- Position a mechanical lift under the device. If a mechanical lift is not available, have two people support the weight of the switch while another person uses the screwdriver to remove the front mounting screws that attach the chassis mounting brackets to the rack or cabinet.
- Remove the switch from the rack or cabinet (see QFX10002 Installation Safety Guidelines) and place the switch in an antistatic bag.
- Place the switch in the shipping carton.
- Place the packing foam on top of and around the switch.
- If you are returning accessories or FRUs with the switch, pack them as instructed in Packing a QFX10002 or Component for Shipping.
- Replace the accessory box on top of the packing foam.
- Close the top of the cardboard shipping box and seal it with packing tape.
- Write the RMA number on the exterior of the box to ensure proper tracking.
Packing QFX10002 Switch Components for Shipping
Do not stack switch components. Return individual components in separate boxes if they do not fit together on one level in the shipping box.
To pack and ship QFX10002 switch components:
Place individual FRUs in antistatic bags.
Ensure that the components are adequately protected with packing materials and packed so that the pieces are prevented from moving around inside the carton.
Close the top of the cardboard shipping box and seal it with packing tape.
Write the RMA number on the exterior of the box to ensure proper tracking.