Help us improve your experience.

Let us know what you think.

Do you have time for a two-minute survey?


Powering the PTX5000 On and Off

Powering On the Three-Phase AC-Powered PTX5000

To power on the AC-powered PTX5000 with three-phase delta AC PDUs or three-phase wye AC PDUs, and with AC PSMs:

Note:

After powering off a PDU, you must wait at least 60 seconds before powering it on again.

  1. Verify that the power distribution units (PDUs) and power supply modules (PSMs) are fully inserted in the chassis and that the captive screws on the faceplates are tightened.
  2. Verify that an external management device is connected to one of the Routing Engine ports on the Control Board (AUXILIARY or CONSOLE).
    Note:

    The management Ethernet port labeled HOST/ETHERNET on the Control Board is not available until after the initial software configuration. You can monitor the startup process during the initial installation using devices connected to the AUXILIARY or CONSOLE ports.

  3. Turn on power to the external management device.
  4. Switch on the customer-site circuit breakers to provide voltage to the AC power cords.
  5. Verify that the PDUs are receiving power.
    • On the three-phase wye AC PDUs, verify that the green 220-240 V/346-415 V 30 A 50-60 Hz LED is lit steadily green.

    • On the three-phase delta AC PDUs, verify that the green 200-240 V~ 60 A 50-60 Hz LED is lit steadily green.

  6. Switch the circuit breaker on one of the PDUs to the on (|) position.
  7. Verify that the green CB ON LEDs on the PDU faceplate are lit steadily. The CB ON LEDs blink momentarily, then light steadily to indicate that the circuit breaker is on.
    Note:

    After a PDU is powered on, it can take up to 60 seconds for status indicators—such as the LEDs on the PDU and PSMs, the command output displays, and messages on the LCD display on the craft interface—to indicate that the PDU and PSMs are functioning normally. Ignore error indicators that appear during the first 60 seconds.

  8. Move the OUTPUT power switch on the PDU to the on (|) position.
  9. Verify that the PDU OK LED on the PDU faceplate is lit steadily, indicating that the PDU is correctly installed and is functioning properly.
    Note:

    If the PDU OK LED does not light steadily, repeat the installation and cabling procedures.

  10. Repeat steps 6 through 9 for the other PDU.
  11. Check the LEDs on the PSMs. For each PSM, verify that the AC IN OK and DC IN OK LEDs are lit steadily green, and that the Fault LED is off.
    Note:

    If the Input OK and Output OK LEDs do not light steadily or if the FAULT LED is lit, see Troubleshooting the PTX5000 Power System in the PTX5000 Packet Transport Router Hardware Guide.

  12. On the external management device connected to the Routing Engine, monitor the startup process to verify that the system has booted properly.

Powering On the Single-Phase AC-Powered PTX5000

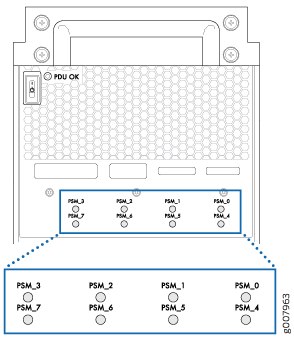
To power on the AC-powered PTX5000 with high-capacity single-phase AC PDUs, and with AC PSMs:

Note:

After powering off a PDU, you must wait at least 60 seconds before powering it on again.

  1. Verify that the PDUs and PSMs are fully inserted in the chassis and that the captive screws on the faceplates are tightened.
  2. Verify that an external management device is connected to one of the Routing Engine ports on the Control Board (AUXILIARY or CONSOLE).
    Note:

    The management Ethernet port labeled HOST/ETHERNET on the Control Board is not available until after the initial software configuration. You can monitor the startup process during the initial installation using devices connected to the AUXILIARY or CONSOLE ports.

  3. Turn on power to the external management device.
  4. Switch on the customer-site circuit breakers to provide voltage to the AC power cords.
  5. Verify that the PDUs are receiving power. Verify that the green PDU OK LED is lit steadily green.
  6. Switch on one of the PDUs to by turning its power switch to the on (|) position.
    Note:

    After a PDU is powered on, it can take up to 60 seconds for status indicators—such as the LEDs on the PDU and PSMs, the command output displays, and messages on the LCD display on the craft interface—to indicate that the PDU and PSMs are functioning normally. Ignore error indicators that appear during the first 60 seconds.

  7. Verify that the PDU OK LED on the PDU faceplate is lit steadily, which indicates that the PDU is correctly installed and is functioning properly.
    Note:

    If the PDU OK LED does not light steadily, repeat the installation and cabling procedures.

  8. Check the LEDs on the PSMs. For each PSM, verify that the PSM LEDs are lit steadily green.
    Figure 1: PSM LEDs on the Single-Phase AC PDUPSM LEDs on the Single-Phase AC PDU
    Note:

    If the PSM LED does not light steadily, see Troubleshooting the PTX5000 Power System in the PTX5000 Packet Transport Router Hardware Guide.

  9. Repeat steps 6 through 8 for the other PDU.
  10. On the external management device connected to the Routing Engine, monitor the startup process to verify that the system has booted properly.

Powering On the DC Powered PTX5000 with 60-A DC PDUs and 60-A DC PSMs

To power on the DC-powered PTX5000 with 60-A DC PDUs and 60-A DC PSMs:

Note:

After powering off a power supply, you must wait at least 60 seconds before powering it on again.

  1. Verify that the power distribution units (PDUs) and power supply modules (PSMs) are fully inserted in the chassis and that the captive screws on the faceplates are tightened.
  2. Verify that an external management device is connected to one of the Routing Engine ports on the Control Board (AUXILIARY or CONSOLE).
    Note:

    The management Ethernet port labeled HOST/ETHERNET on the Control Board is not available until after the initial software configuration. You can monitor the startup process during the initial installation using devices connected to the AUXILIARY or CONSOLE ports.

  3. Turn on power to the external management device.
  4. Switch on the customer-site circuit breakers to provide voltage to the DC power source cables.
  5. Attach an electrostatic discharge (ESD) grounding strap to your bare wrist, and connect the strap to one of the ESD points on the chassis.
  6. Verify that the green DC IN LEDs for both inputs on the PDU faceplate are lit steadily green, indicating that the inputs are receiving power.
  7. Switch all the input power switches on one of the PDUs to the on (|) position.
  8. Verify that the green SW ON LEDs on the PDU faceplate are lit steadily. The SW ON LEDs blink momentarily, then light steadily to indicate that the input power switches are on.
    Note:

    After a PDU is powered on, it can take up to 60 seconds for status indicators—such as the LEDs on the PDU and PSMs, the command output displays, and messages on the LCD display on the craft interface—to indicate that the PDU and PSMs are functioning normally. Ignore error indicators that appear during the first 60 seconds.

  9. Move the OUTPUT power switch on the PDU to the on (|) position.
  10. Verify that the PDU OK LED on the PDU faceplate is lit steadily and that the FAULT LED is off, indicating that the PDU is correctly installed and is functioning properly.
    Note:

    If the PDU OK LED does not light steadily, repeat the installation and cabling procedures.

  11. Check the LEDs on the PSMs. For each PSM, verify that the Input OK and Output OK LEDs are lit steadily green, and that the Fault LED is off.
    Note:

    If the Input OK and Output OK LEDs do not light steadily or if the FAULT LED is lit, see Troubleshooting the PTX5000 Power System in the PTX5000 Packet Transport Router Hardware Guide.

  12. On the external management device connected to the Routing Engine, monitor the startup process to verify that the system has booted properly.
  13. Repeat steps 7 through 12 for the other PDU.
Note:

The Routing Engine boots as the PDU completes its startup sequence. If the Routing Engine finishes booting and you need to power off the system, see Powering Off the PTX5000 in the PTX5000 Packet Transport Router Hardware Guide.

After powering on a power supply, you must wait at least 60 seconds before powering it off.

Powering On the DC Powered PTX5000 with 120-A DC PDUs and 120-A DC PSMs

To power on the DC-powered PTX5000 with 120-A DC PDUs and 120-A DC PSMs:

Note:

After powering off a power supply, you must wait at least 60 seconds before powering it on again.

  1. Verify that the power distribution units (PDUs) and power supply modules (PSMs) are fully inserted in the chassis and that the captive screws on the faceplates are tightened.
  2. Verify that an external management device is connected to one of the Routing Engine ports on the Control Board (AUXILIARY or CONSOLE).
    Note:

    The management Ethernet port labeled HOST/ETHERNET on the Control Board is not available until after the initial software configuration. You can monitor the startup process during the initial installation using devices connected to the AUXILIARY or CONSOLE ports.

  3. Turn on power to the external management device.
  4. Switch on the customer-site circuit breakers to provide voltage to the DC power source cables.
  5. Attach an electrostatic discharge (ESD) grounding strap to your bare wrist, and connect the strap to one of the ESD points on the chassis.
  6. Verify that the green –48 V 120 A LEDs on the PDU faceplate are lit steadily green, indicating that the inputs are receiving power.
  7. Switch all the circuit breakers on one of the PDUs to the on (|) position.
  8. Verify that the green CB ON LEDs on the PDU faceplate are lit steadily. The CB ON LEDs blink momentarily, then light steadily to indicate that the circuit breakers are on.
    Note:

    After a PDU is powered on, it can take up to 60 seconds for status indicators—such as the LEDs on the PDU and PSMs, the command output displays, and messages on the LCD display on the craft interface—to indicate that the PDU and PSMs are functioning normally. Ignore error indicators that appear during the first 60 seconds.

  9. Move the OUTPUT power switch on the PDU to the on (|) position.
  10. Verify that the PDU OK LED on the PDU faceplate is lit steadily and that the FAULT LED is off, indicating that the PDU is correctly installed and is functioning properly.
    Note:

    If the PDU OK LED does not light steadily, repeat the installation and cabling procedures.

  11. Check the LEDs on the PSMs. For each PSM, verify that the Input OK and Output OK LEDs are lit steadily green, and that the Fault LED is off.
    Note:

    If the Input OK and Output OK LEDs do not light steadily or if the FAULT LED is lit, see Troubleshooting the PTX5000 Power System in the PTX5000 Packet Transport Router Hardware Guide.

  12. On the external management device connected to the Routing Engine, monitor the startup process to verify that the system has booted properly.
  13. Repeat steps 7 through 12 for the other PDU.
Note:

The Routing Engine boots as the PDU completes its startup sequence. If the Routing Engine finishes booting and you need to power off the system, see the Powering Off the PTX5000 in the PTX5000 Packet Transport Router Hardware Guide.

After powering on a power supply, you must wait at least 60 seconds before powering it off.

Powering On the DC-Powered PTX5000 with High Capacity DC PDUs and High Capacity DC PSMs

To power on the DC-powered PTX5000 with High Capacity DC PDUs and High Capacity DC PSMs:

Note:

After powering off a power supply, you must wait at least 60 seconds before powering it on again.

  1. Verify that the power distribution units (PDUs) and power supply modules (PSMs) are fully inserted in the chassis and that the captive screws on the faceplates are tightened.
  2. Verify that an external management device is connected to one of the Routing Engine ports on the Control Board (AUXILIARY or CONSOLE).
    Note:

    The management Ethernet port labeled HOST/ETHERNET on the Control Board is not available until after the initial software configuration. You can monitor the startup process during the initial installation using devices connected to the AUXILIARY or CONSOLE ports.

  3. Turn on power to the external management device.
  4. Switch on the customer-site circuit breakers to provide voltage to the DC power source cables.
  5. Attach an electrostatic discharge (ESD) grounding strap to your bare wrist, and connect the strap to one of the ESD points on the chassis.
  6. Switch the power switch on one of the PDUs to the on (|) position.
  7. Verify that the green PDU OK LED is lit steadily green, indicating that the inputs are receiving power.
  8. Verify that the -1 and -2 LEDs for each installed PSM are lit green. Also check the input 1 OK, input 2 OK, output OK, and fault () LEDs on each PSM.
    Note:

    The -1 and -2 LEDs are lit depending on the number of PSMs connected to each PDU. A minimum of three PSMs are required out of a maximum of eight per PDU. Also, each PSM has LEDs indicating input and output status.

    Note:

    After a PDU is powered on, it can take up to 60 seconds for status indicators—such as the LEDs on the PDU and PSMs, the command output displays, and messages on the LCD display on the craft interface—to indicate that the PDU and PSMs are functioning normally. Ignore error indicators that appear during the first 60 seconds.

    Note:

    If the PDU OK and PSM LEDs do not light steadily or if the fault () LED on the PSM is lit, see Troubleshooting the PTX5000 Power System in the PTX5000 Packet Transport Router Hardware Guide.

  9. On the external management device connected to the Routing Engine, monitor the startup process to verify that the system has booted properly.
  10. Repeat Step 6 through Step 8 for the other PDU.
Note:

The Routing Engine boots as the PDU completes its startup sequence. If the Routing Engine finishes booting and you need to power off the system, see the Powering Off the PTX5000 in the PTX5000 Packet Transport Router Hardware Guide.

After powering on a power supply, you must wait at least 60 seconds before powering it off.

Powering Off the PTX5000

Powering Off a PTX5000 with RE-DUO-C2600-16G Routing Engines

To power off a PTX5000 with RE-DUO-C2600-16G Routing Engines:

Note:

After powering on a power supply, wait at least 60 seconds before powering it off.

  1. On an external management device connected to the PTX5000, issue the request system halt both-routing-engines operational mode command. The command shuts down the Routing Engines cleanly, so their state information is preserved. See request system halt in the Software Installation and Upgrade Guide for more information about the command.

    If the PTX5000 contains only one Routing Engine, issue the request system halt command.

    Wait until a message appears on the console confirming that the operating system has halted.

  2. Attach an electrostatic discharge (ESD) grounding strap to your bare wrist, and connect the strap to one of the ESD points on the chassis.
  3. Move the power switch on the PDU to the off (O) position.
  4. Perform these additional steps for your specific PDU:
    • 120-A DC PDU—Switch the circuit breakers on the PDU to the off (O) position.

    • 60-A DC PDU—Switch the power input switches on the PDU to the off (O) position.

    • Three-phase delta AC PDU or three-phase wye AC PDU—Switch the circuit breaker on the PDU to the off (O) position.

  5. Repeat steps 3 and 4 for the other PDU.
  6. Verify that the PDU OK LED on the PDU faceplate is off. Verify that these additional LEDs are off for your specific PDU:
    • 120-A DC PDU—Verify that the CB ON LED is off.

    • 60-A DC PDU—Verify that the SW ON LED is off.

    • Three-phase delta AC PDU or three-phase wye AC PDU—Verify that the CB ON LED is off.

    Note:

    After powering off a power supply, you must wait at least 60 seconds before powering it on again.

Powering Off a PTX5000 with RE-PTX-X8-64G Routing Engines

To power off a PTX5000 with RE-PTX-X8-64G Routing Engines:

Note:

After powering on a power supply, wait at least 60 seconds before powering it off.

  1. On an external management device connected to the PTX5000, issue the request vmhost halt routing-engine both operational mode command. The command shuts down the Routing Engines cleanly, so their state information is preserved. See request vmhost halt in the Software Installation and Upgrade Guide for more information about the command.

    If the PTX5000 contains only one Routing Engine, issue the request vmhost halt command.

    Wait until a message appears on the console confirming that the operating system has halted.

  2. Attach an electrostatic discharge (ESD) grounding strap to your bare wrist, and connect the strap to one of the ESD points on the chassis.
  3. Move the power switch on the PDU to the off (O) position.
  4. Perform these additional steps for your specific PDU:
    • 120-A DC PDU—Switch the circuit breakers on the PDU to the off (O) position.

    • 60-A DC PDU—Switch the power input switches on the PDU to the off (O) position.

    • Three-phase delta AC PDU or three-phase wye AC PDU—Switch the circuit breaker on the PDU to the off (O) position.

  5. Repeat steps 3 and 4 for the other PDU.
  6. Verify that the PDU OK LED on the PDU faceplate is off. Verify that these additional LEDs are off for your specific PDU:
    • 120-A DC PDU—Verify that the CB ON LED is off.

    • 60-A DC PDU—Verify that the SW ON LED is off.

    • Three-phase delta AC PDU or three-phase wye AC PDU—Verify that the CB ON LED is off.

    Note:

    After powering off a power supply, you must wait at least 60 seconds before powering it on again.