Returning the PTX5000 Chassis or Components
Displaying PTX5000 Component Serial Numbers
Before contacting Juniper Networks, Inc. to request a Return Materials Authorization (RMA), you must find the serial number on the PTX5000 or component. To list all of the PTX5000 components and their serial numbers, enter the following command-line interface (CLI) command:
user@host> show chassis hardware
user@host> show chassis hardware
Hardware inventory:
Item             Version  Part number  Serial number     Description
Chassis                                JN11D1FD7AJA      PTX5000
Midplane         REV 03   711-031896   ABAC5589          Midplane-8S
FPM              REV 08   760-030647   EG1679            Front Panel Display
PDU 0            Rev 05   740-032019   ZE00006           DC Power Dist Unit
  PSM 0          Rev 05   740-032022   ZJ00018           DC 12V Power Supply
  PSM 1          Rev 04   740-032022   ZC00052           DC 12V Power Supply
  PSM 2          Rev 04   740-032022   ZD00051           DC 12V Power Supply
  PSM 3          Rev 05   740-032022   ZJ00060           DC 12V Power Supply
CCG 0            REV 04   750-030653   EG3703            Clock Generator
Routing Engine 0 REV 05   740-026942   P737A-002231      RE-DUO-2600
Routing Engine 1 REV 06   740-026942   P737A-002438      RE-DUO-2600
CB 0             REV 08   750-030625   EG5519            Control Board
CB 1             REV 08   750-030625   EG5516            Control Board
FPC 0            REV 18   750-036844   EJ3080            FPC
  CPU            REV 12   711-030686   EJ3260            SNG PMB
FPC 2            REV 13   750-036844   EG5065            FPC
  CPU            REV 09   711-030686   EG4082            SNG PMB
  PIC 0          REV 14   750-031913   EG5127            24x 10GE(LAN) SFP+
    Xcvr 0       REV 01   740-031980   143363A00240      SFP+-10G-SR
    Xcvr 1       REV 01   740-031981   UK90PZ1           SFP+-10G-LR
    Xcvr 3       REV 01   740-031981   UK90Q46           SFP+-10G-LR
    Xcvr 6       REV 01   740-031980   B11H02560         SFP+-10G-SR
    Xcvr 7       REV 01   740-031980   B11C01589         SFP+-10G-SR
    Xcvr 10      REV 01   740-031980   123363A01094      SFP+-10G-SR
    Xcvr 11      REV 01   740-031980   AK80LKF           SFP+-10G-SR
    Xcvr 12      REV 01   740-031980   183363A01528      SFP+-10G-SR
    Xcvr 14      REV 01   740-031980   193363A01079      SFP+-10G-SR
    Xcvr 15      REV 01   740-031980   AK80MC8           SFP+-10G-SR
    Xcvr 16      REV 01   740-031980   AJC0BHC           SFP+-10G-SR
    Xcvr 19      REV 01   740-021309   J08D26856         SFP+-10G-LR
    Xcvr 21      REV 01   740-031980   AK80KCT           SFP+-10G-SR
    Xcvr 22      REV 01   740-031981   UK90PZL           SFP+-10G-LR
    Xcvr 23      REV 01   740-031980   AK80N1V           SFP+-10G-SR
FPC 3            REV 13   750-036844   EG5074            FPC
  CPU            REV 09   711-030686   EG4064            SNG PMB
  PIC 1          REV 10   750-031903   EG0325            SNG Load
FPC 5            REV 06   750-036844   EH3198            FPC
  CPU
  PIC 0          REV 14   750-031913   EG5134            24x 10GE(LAN) SFP+
    Xcvr 0       REV 01   740-031980   AK80LBH           SFP+-10G-SR
    Xcvr 1       REV 01   740-031980   B11B03724         SFP+-10G-SR
    Xcvr 5       REV 01   740-031980   B11J00818         SFP+-10G-SR
    Xcvr 7       REV 01   740-031980   B11B06125         SFP+-10G-SR
    Xcvr 10      REV 01   740-031980   B11H02529         SFP+-10G-SR
    Xcvr 11      REV 01   740-031980   AK80LFB           SFP+-10G-SR
    Xcvr 15      REV 01   740-031980   B11J00687         SFP+-10G-SR
    Xcvr 18      REV 01   740-031980   AK80MQX           SFP+-10G-SR
    Xcvr 19      REV 01   740-021309   J08C17257         SFP+-10G-LR
    Xcvr 22      REV 01   740-031980   B11J00730         SFP+-10G-SR
    Xcvr 23      REV 01   740-031980   AK80KEE           SFP+-10G-SR
  PIC 1          REV 08   750-036710   EG3105            2x 40GE CFP
    Xcvr 0       REV 01   740-034554   B260HLT           CFP-40G-LR4
    Xcvr 1       REV 01   740-034554   B11C02847         CFP-40G-LR4
FPC 6            REV 18   750-036844   EJ4391            FPC
  CPU            REV 12   711-030686   EJ3257            SNG PMB
FPC 7            REV 18   750-036844   EJ4382            FPC
  CPU            REV 12   711-030686   EJ3238            SNG PMB
SPMB 0           REV 10   711-030686   EG5418            SNG PMB
SPMB 1           REV 09   711-030686   EG5373            SNG PMB
SIB 0            REV 07   750-030631   EG4858            SIB-I-8S
SIB 1            REV 07   750-030631   EG4872            SIB-I-8S
SIB 2            REV 07   750-030631   EG4866            SIB-I-8S
SIB 3            REV 07   750-030631   EG6011            SIB-I-8S
SIB 4            REV 07   750-030631   EG4907            SIB-I-8S
SIB 5            REV 07   750-030631   EG4879            SIB-I-8S
SIB 6            REV 07   750-030631   EG4864            SIB-I-8S
SIB 7            REV 07   750-030631   EG4899            SIB-I-8S
SIB 8            REV 07   750-030631   EG4880            SIB-I-8S
Fan Tray 0       REV 04   760-032784   EG1496            Vertical Fan Tray
Fan Tray 1       REV 04   760-030642   EG1335            Horizontal Fan Tray
Fan Tray 2       REV 02   760-030642   ED4952            Horizontal Fan Tray
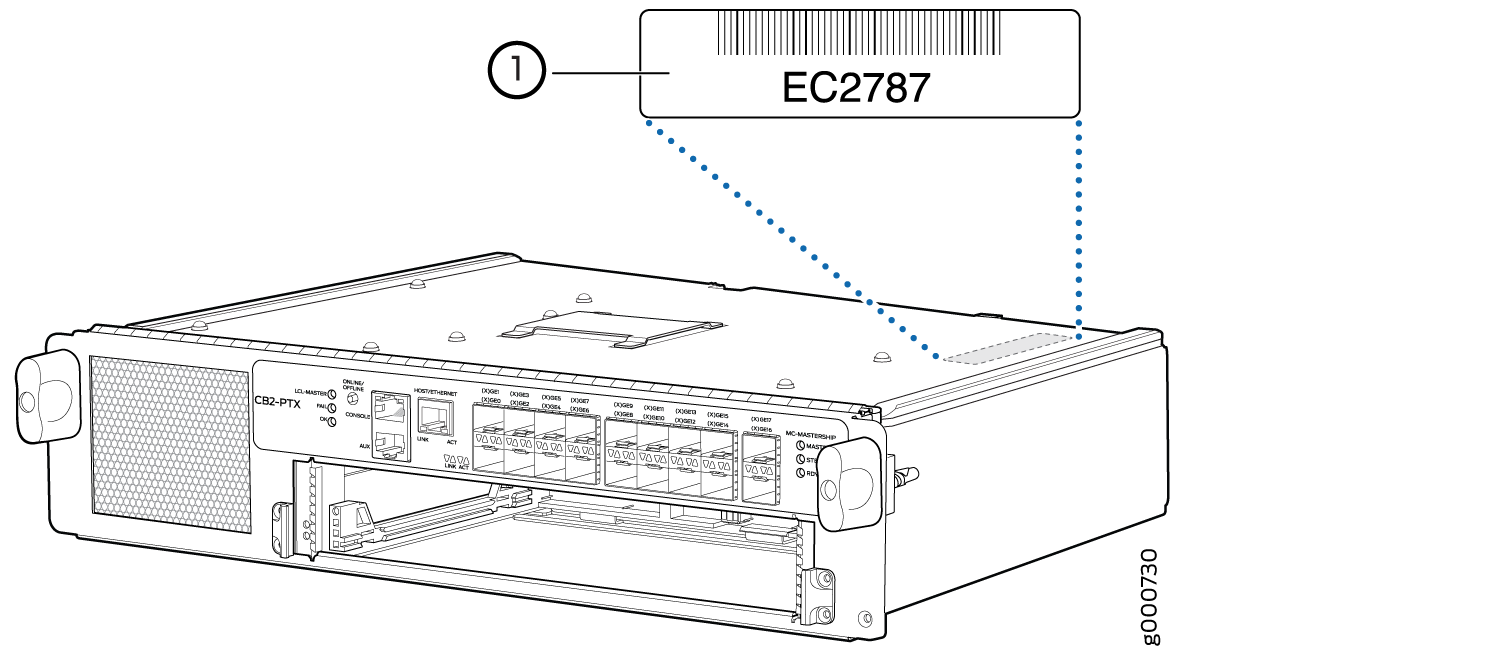
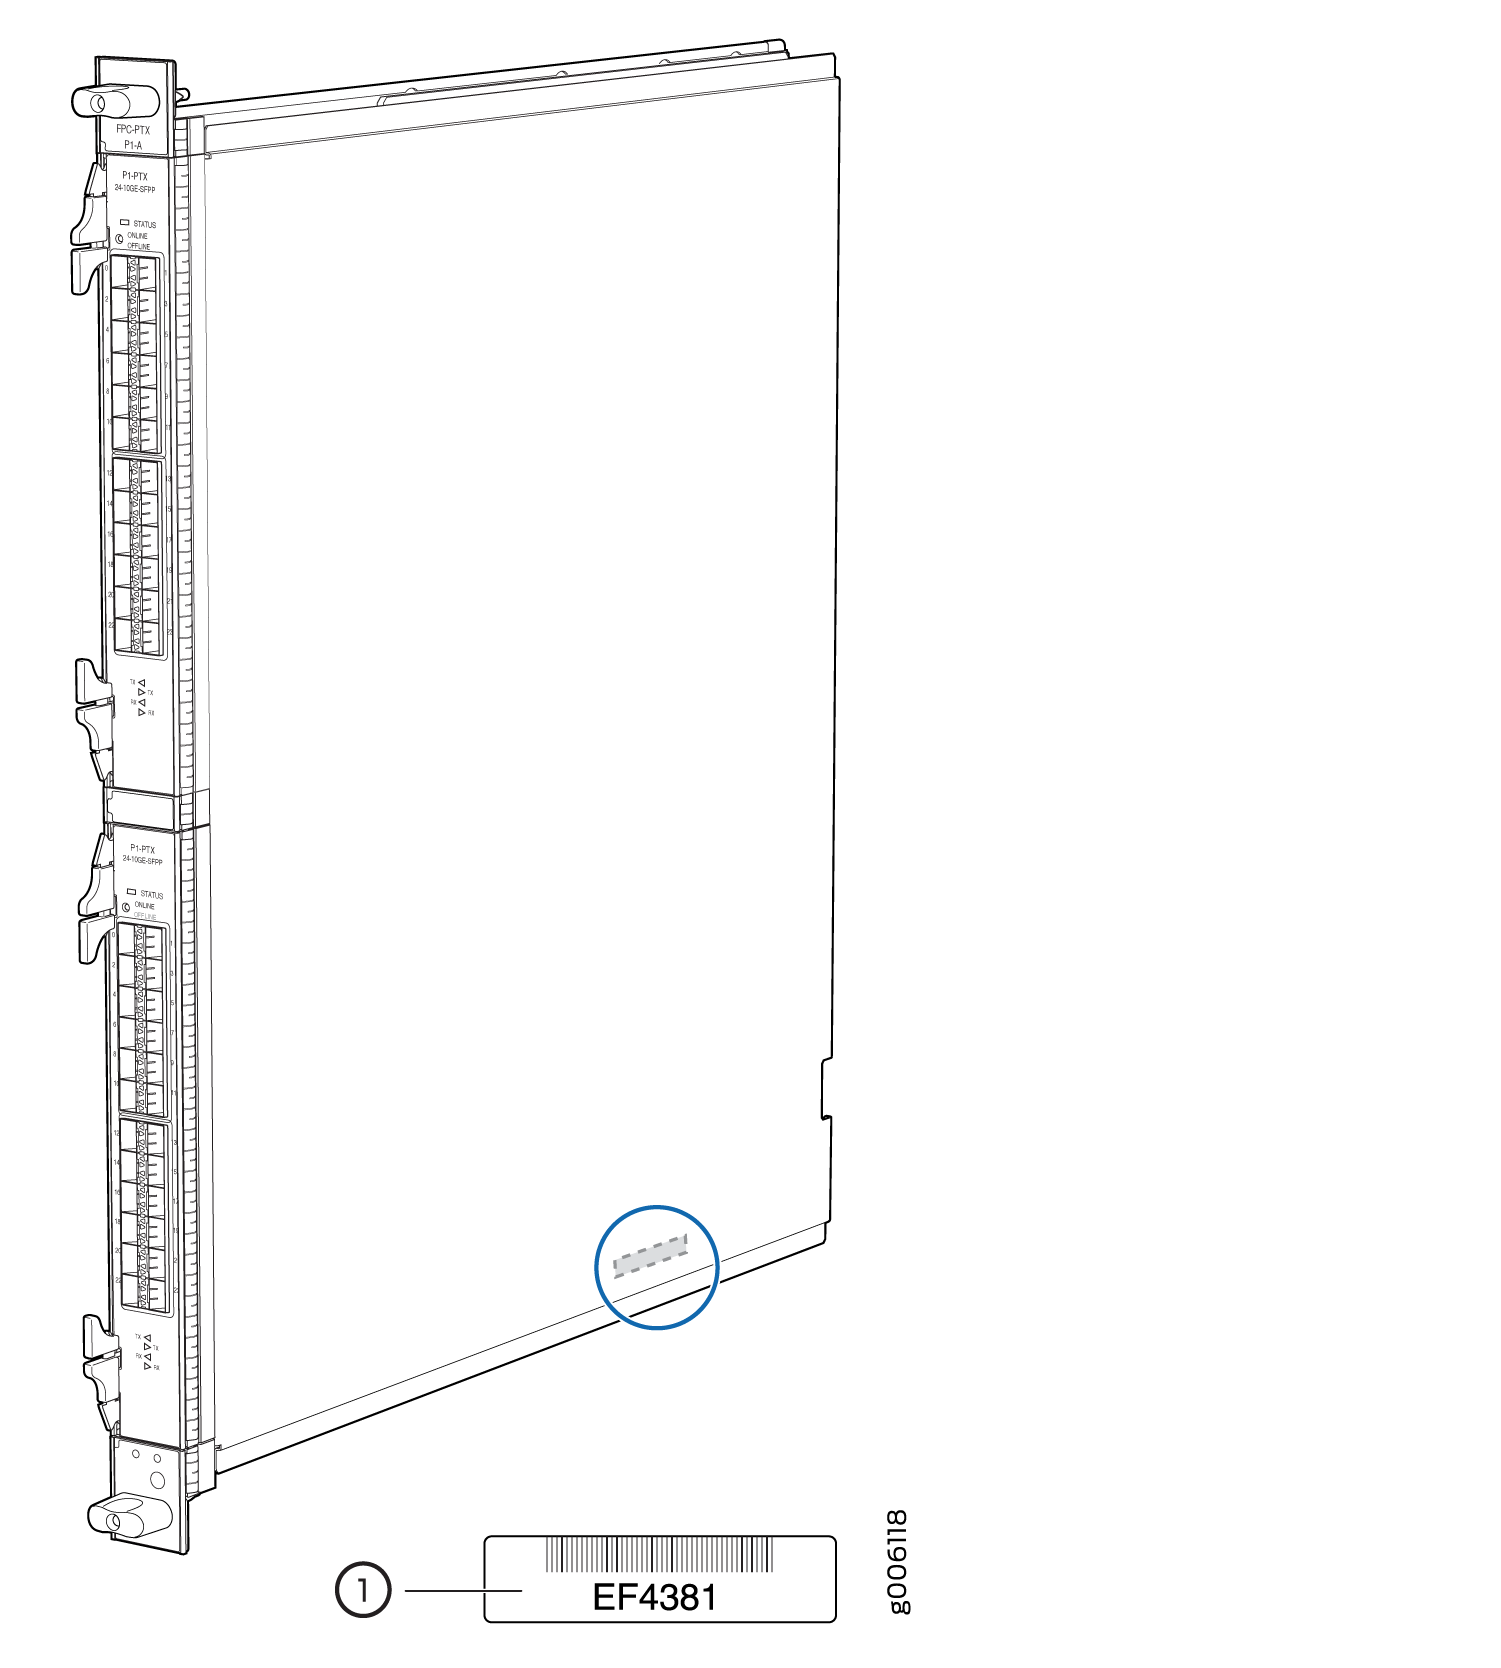
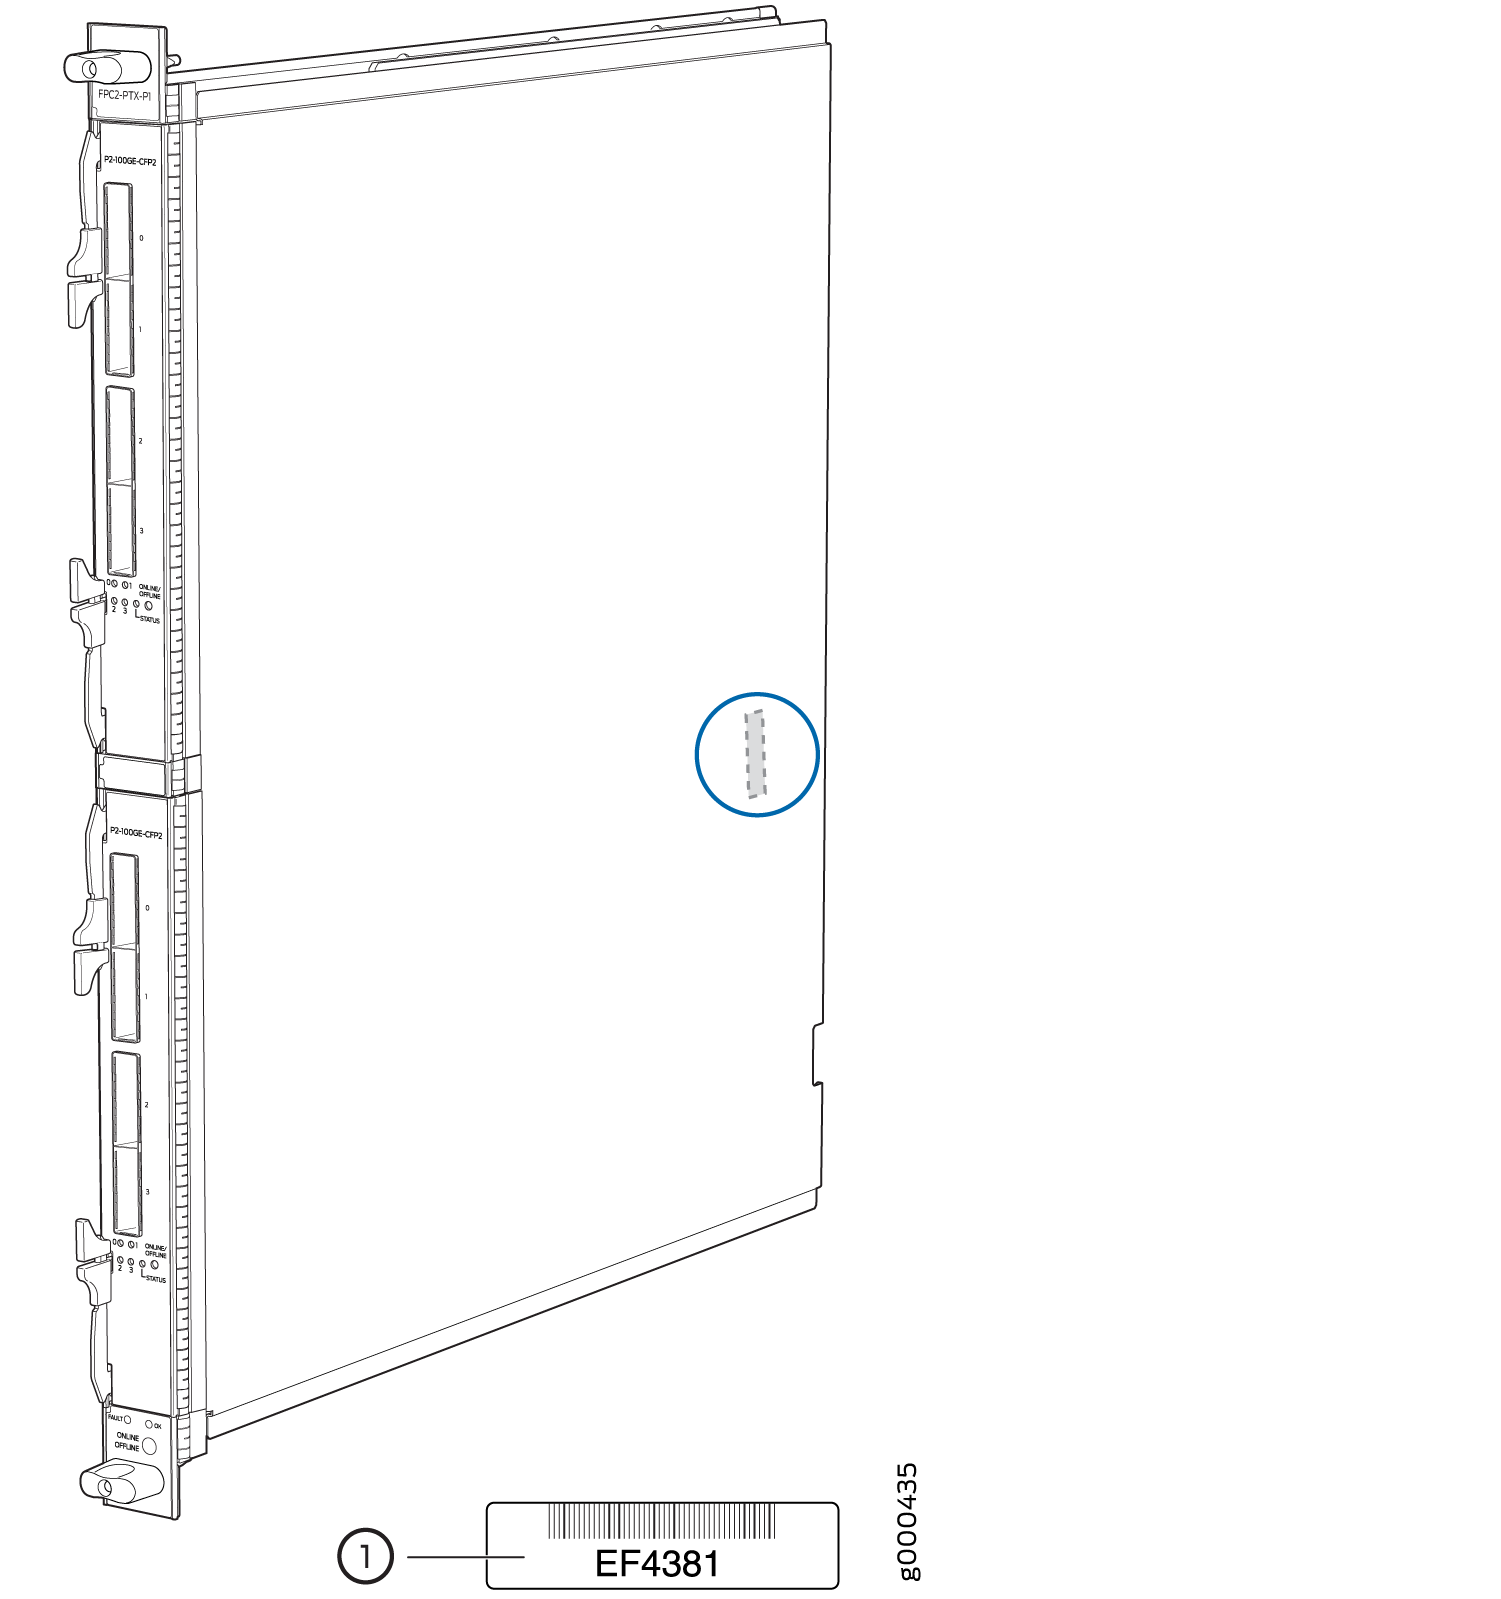
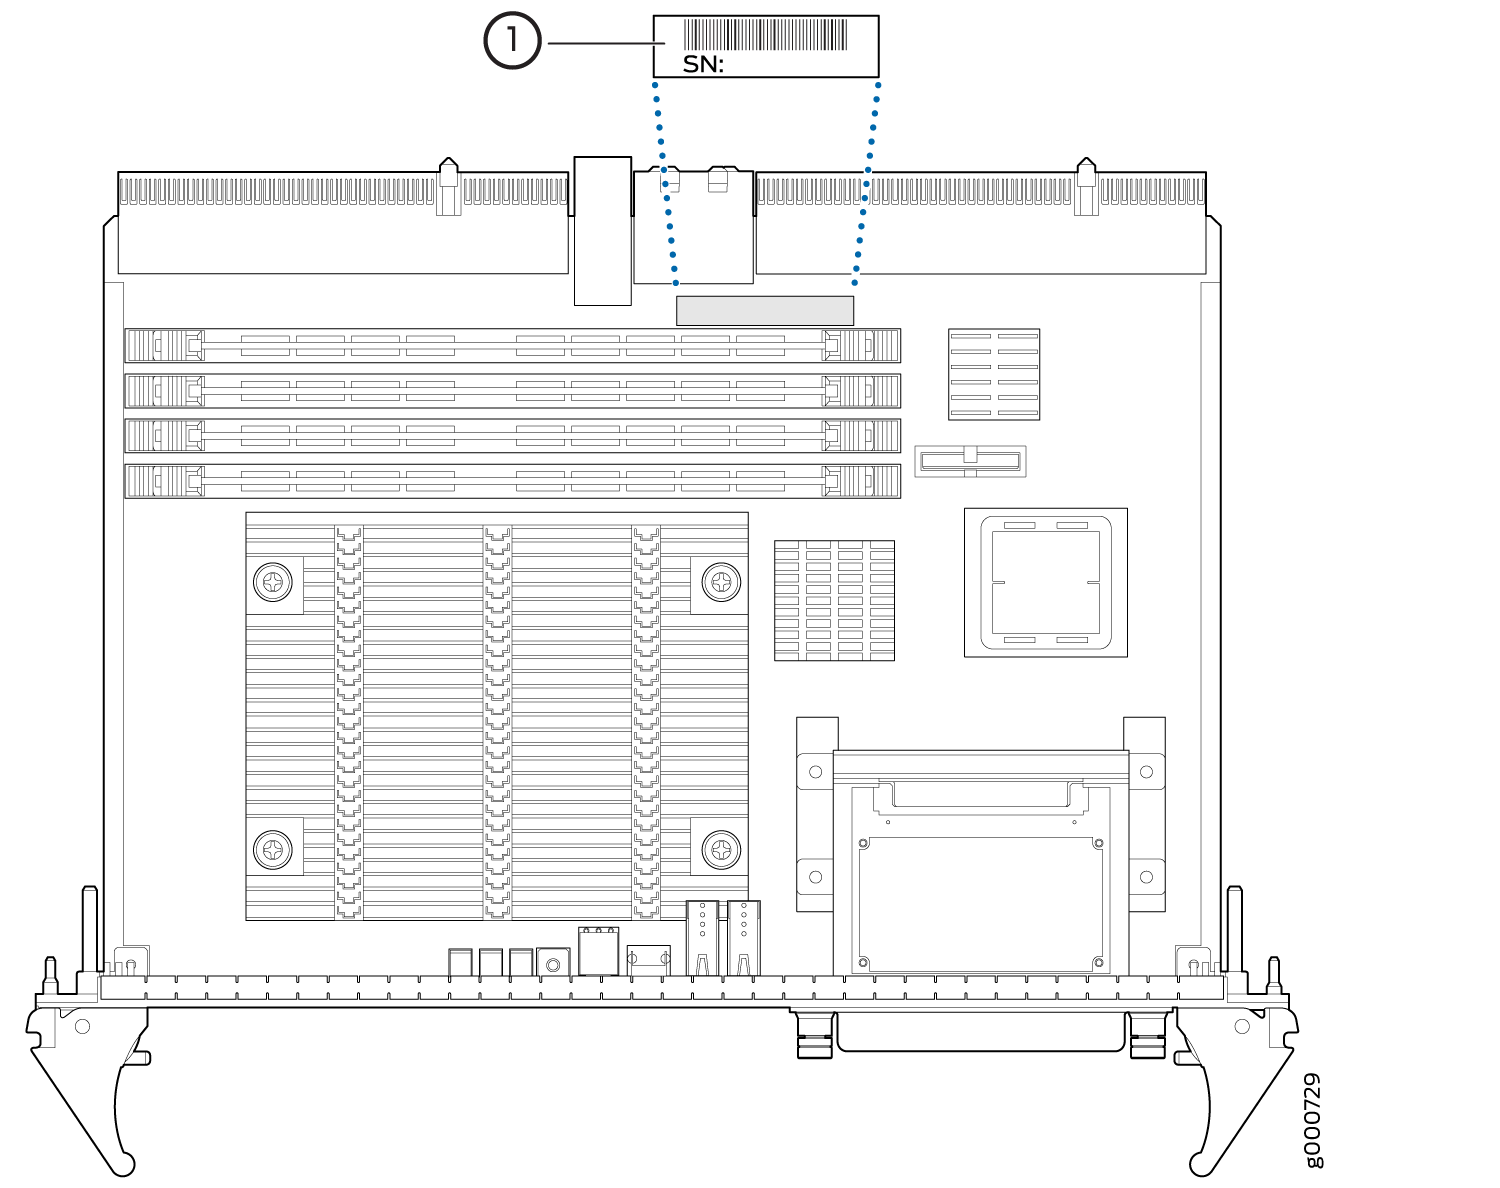
Most components also have a small rectangular serial number ID label (see Figure 1) attached to the component body.

PTX5000 Component Serial Number Locations
- Horizontal Air Filter Serial Number Label
- Chassis Serial Number Label
- CCG Serial Number Label
- Control Board Serial Number Label
- Craft Interface Serial Number Label
- Horizontal Fan Tray Serial Number Label
- Vertical Fan Tray Serial Number Label
- FPC Serial Number Label
- PIC Serial Number Label
- PDU Serial Number Label
- PSM Serial Number Label
- Routing Engine Serial Number Label
- SIB Serial Number Label
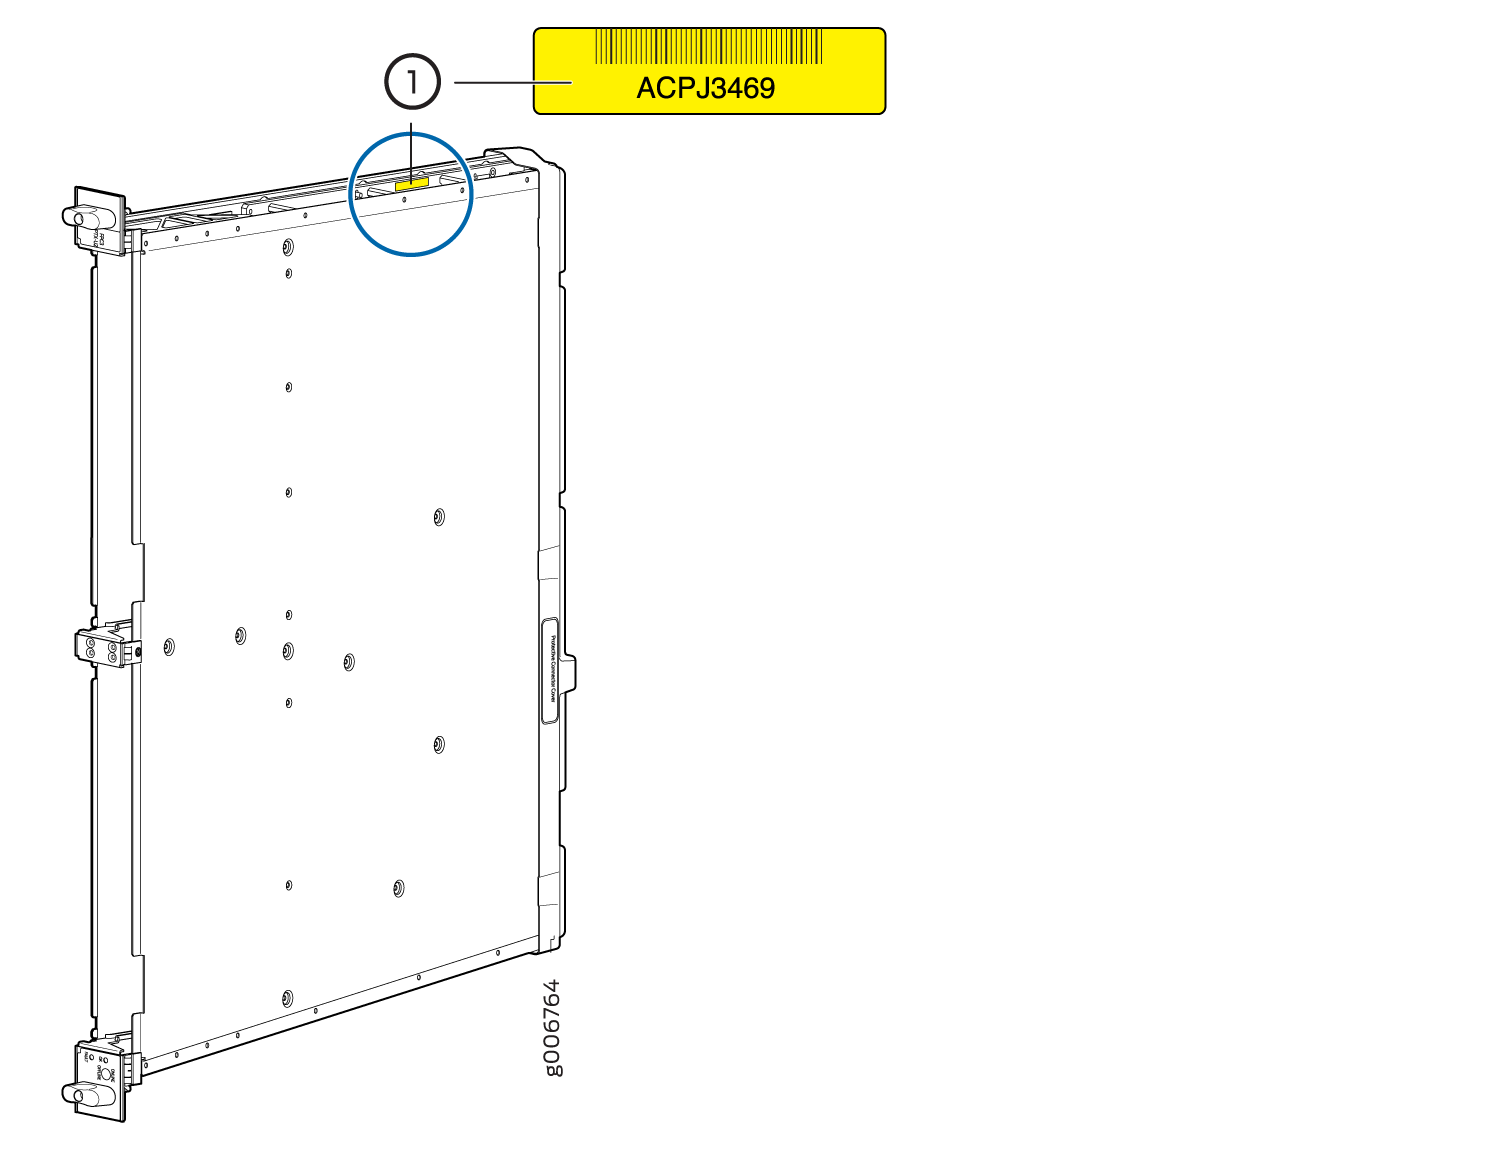
Horizontal Air Filter Serial Number Label
The serial number label is located on the horizontal air filter as shown in Figure 2.
Chassis Serial Number Label
The serial number label is located on the chassis as shown in Figure 3.
CCG Serial Number Label
The serial number label is located a shown in Figure 4.
Control Board Serial Number Label
The serial number label is located as shown in Figure 4.

Craft Interface Serial Number Label
The serial number label is located as shown in Figure 7.
Horizontal Fan Tray Serial Number Label
The serial number label is located as shown in Figure 8.
Vertical Fan Tray Serial Number Label
The serial number label is located as shown in Figure 9.
FPC Serial Number Label
The location of the FPC serial number label depends on the FPC model number, as shown in Figure 10, Figure 11, and Figure 12.
PIC Serial Number Label
The serial number label for the 10-Gigabit Ethernet PIC is located on the PIC as shown in Figure 13.
The serial number label for the 40-Gigabit Ethernet PIC is located on the PIC as shown in Figure 14.
The serial number label for the 100-Gigabit Ethernet PIC is located on the PIC as shown in Figure 15.
The serial number label for the 100-Gigabit Ethernet CFP2 PIC is located on the PIC as shown in Figure 16.
PDU Serial Number Label
The serial number label is located as shown in Figure 17 and Figure 18).
PSM Serial Number Label
The serial number label is located as shown in Figure 19 and Figure 20.
Routing Engine Serial Number Label
The serial number label is located as shown in Figure 21.
Contact Customer Support to Obtain a Return Material Authorization
If you need to return a device or hardware component to Juniper Networks for repair or replacement, obtain a Return Material Authorization (RMA) number from Juniper Networks Technical Assistance Center (JTAC). You must obtain an RMA number before you attempt to return the component.
After locating the serial number of the device or hardware component you want to return, open a service request with the Juniper Networks Technical Assistance Center (JTAC) on the Web or by telephone.
Before you request an RMA number from JTAC, be prepared to provide the following information:
-
Your existing service request number, if you have one
-
Serial number of the component
-
Your name, organization name, telephone number, fax number, and shipping address
-
Details of the failure or problem
-
Type of activity being performed on the device when the problem occurred
-
Configuration data displayed by one or more
showcommands
You can contact JTAC 24 hours a day, seven days a week on the Web or by telephone:
-
Service Request Manager: https://support.juniper.net/support
-
Telephone: +1-888-314-JTAC (+1-888-314-5822), toll free in U.S., Canada, and Mexico
For international or direct-dial options in countries without toll free numbers, see https://support.juniper.net/support.
If you are contacting JTAC by telephone, enter your 12-digit service request number followed by the pound (#) key for an existing case, or press the star (*) key to be routed to the next available support engineer.
The support representative validates your request and issues an RMA number for return of the component.
Tools and Parts Required to Remove Components from a PTX5000
To remove components from the PTX5000 or the PTX5000 from a rack, you need the following tools and parts:
2.5-mm flat-blade (–) screwdriver, for detaching alarm relay terminal block
7/16-in. (11-mm) nut driver
Blank panels to cover empty slots
Electrostatic bag or antistatic mat, for each component
Electrostatic discharge (ESD) grounding wrist strap
Flat-blade (–) screwdriver
Mechanical lift (for the chassis)
Phillips (+) screwdrivers, numbers 1 and 2
Rubber safety cap for fiber-optic interfaces and cable
Wire cutters
Packing the PTX5000 for Shipment
To pack the PTX5000 for shipment:
- Retrieve the shipping crate and packing materials in which the PTX5000 was originally shipped. If you do not have these materials, contact your Juniper Networks representative about approved packaging materials.
- Attach an electrostatic discharge (ESD) grounding strap to your bare wrist, and connect the strap to one of the ESD points on the chassis.
- On the console or other management device connected to the primary Routing Engine, enter CLI operational mode. To power off the PTX5000, see Powering Off the PTX5000.
- Disconnect power from the PTX5000. For instructions, see the procedure to disconnect power inReplacing a PTX5000 120-A DC PDU.
- Remove the cables that connect to all external devices..
- Remove all Field Replaceable Units (FRUs) from the PTX5000.
- Remove the PTX5000 from the rack. Place the mechanical lift platform under the router, unscrew and remove the mounting screws from the rack, and move the router to the shipping crate.
- Place the PTX5000 in the shipping crate or onto the pallet. If on a pallet, bolt the router to the pallet.
- Cover the PTX5000 with an ESD bag and place the packing foam on top of and around the router.
- Replace the accessory box on top of the packing foam.
- Securely tape the box closed or place the crate cover over the PTX5000.
- Write the RMA number on the exterior of the box to ensure proper tracking.
Packing PTX5000 Components for Shipment
To pack and ship individual components:
When you return components, make sure they are adequately protected with packing materials and packed so that the pieces are prevented from moving around inside the carton.
Use the original shipping materials if they are available.
Place individual boards in electrostatic bags.
Write the RMA number on the exterior of the box to ensure proper tracking.
Do not stack any of the PTX5000 components.