Connect the PTX10008 to Power
PTX10008 routers support both AC, DC, high-voltage alternating current (HVAC) and high-voltage direct current (HVDC) power supplies. To connect power to a PTX10008 router, read the following procedures.
Do not mix power supply models in the same chassis in a running environment. DC and HVDC can coexist in the same chassis during the hot swap of DC for HVDC.
Connect the PTX10008 Router to Earth Ground
To meet safety and electromagnetic interference (EMI) requirements and to ensure proper operation, you must connect the chassis to earth ground before you connect it to power.
You must install the PTX10008 in a restricted-access location and ensure that the chassis is always properly grounded. The PTX10008 has a two-hole protective grounding terminal provided on the chassis. See Figure 2. Under all circumstances, use this grounding connection to ground the chassis. For AC-powered systems, you must also use the grounding wire in the AC power cord along with the two-hole grounding lug connection. This tested system meets or exceeds all applicable EMC regulatory requirements with the two-hole protective grounding terminal.
If an external ground connection is required, ensure that a licensed electrician has attached an appropriate grounding lug to the grounding cable you supply. Using a grounding cable with an incorrectly attached lug can damage the switch.
Mount your router in the rack before attaching the grounding lug to the router.
Ensure that you have the following parts and tools available:
-
An electrostatic discharge (ESD) grounding strap (provided).
-
Protective earthing terminal lug for your grounding cable (provided)—This bracket attaches to the lower left corner of the router chassis next to the bottom power supply, providing a protective earthing terminal for the router. The grounding lug required is a Panduit LCD4-14A-L or equivalent.
-
Grounding cable for your PTX10008 (not provided)—The grounding cable must be the same size or heavier than the input wire of each power supply.
-
A Phillips screwdriver (not provided) to tighten the two screws that are mounted on the chassis.
The terminal lugs provided for the JNP10K-PWR-DC2 are Panduit LCD4-14A-L, or equivalent, and sized for 4 AWG (21.1 mm2) power source cables. The 4 AWG (21.1 mm²) stranded wire should be rated 90° C, or per local electrical code. When using all JNP10K-PWR-DC power supply modules in the chassis, the DC power source cables that you provide must be 6 AWG (13.3 mm²) stranded wire. We recommend that you install heat-shrink tubing insulation around the crimped section of the power cables and lugs.
An AC-powered PTX10008 gains additional grounding when you plug the power supply in the router into a grounded AC power outlet by using an AC power cord appropriate for your geographical location. See PTX10008 Power Cables Specifications.
To connect earth ground to a PTX10008:
- Wrap and fasten one end of the ESD grounding strap around
your bare wrist and connect the other end of the strap to one of the
ESD points on the chassis (see Figure 1).Figure 1: ESD Point for the PTX10008
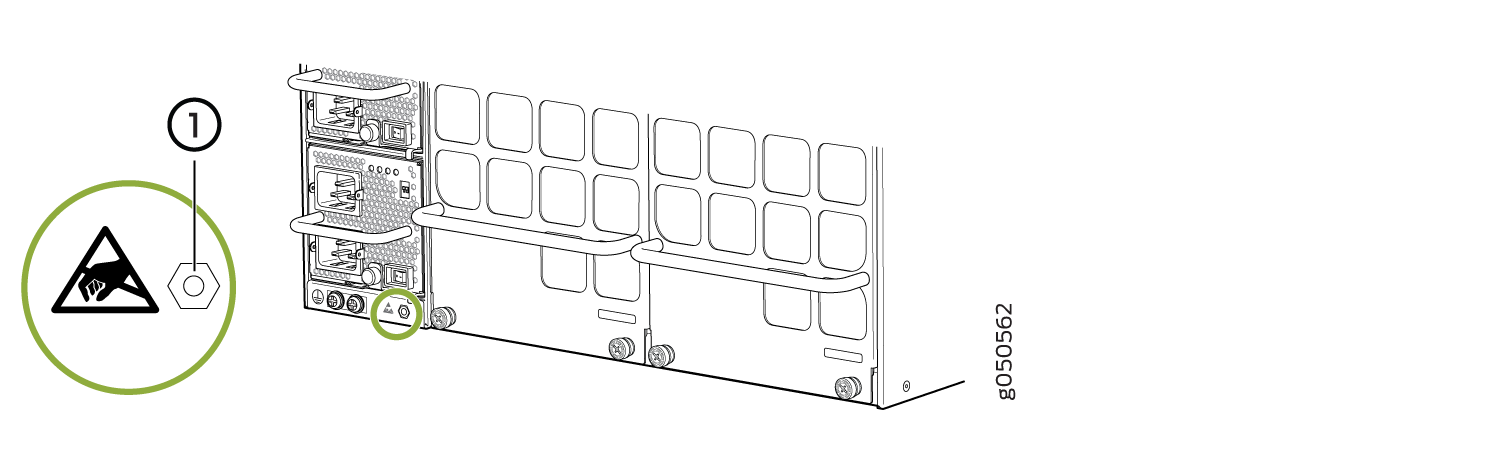 1—
1—ESD point
-
Place the chassis grounding lug and cable over the screw holes, with the cable
connection pointing to the left. See Figure 2.
Figure 2: Connect a Grounding Cable to the PTX10008

Connect AC Power to a PTX10008
Before you begin to connect power to the router, be sure you understand how to prevent ESD damage. See Prevention of Electrostatic Discharge Damage.
After you ground the chassis, add power supplies, and supply power to the chassis, the system initiates the power-on sequence. This sequence can start incrementally with a single power supply, but we do not recommend that you bring up a PTX10008 system with less than three power supplies.
To connect AC power to a PTX10008 chassis:
See Also
Connect DC Power to a PTX10008
Before you begin to connect power to the router, be sure you understand how to prevent electrostatic discharge (ESD) damage. See Prevention of Electrostatic Discharge Damage.
The overall process of bringing up a DC-powered chassis involves the proper cabling of the individual power supplies, adding the power supplies to the chassis, and supplying power. The power-on sequence can start incrementally with a single power supply, but it is not recommended that you bring up a PTX10008 system with less than three power supplies.
Each power supply input feed must be connected to a dedicated DC power source outlet.
To connect DC power to a PTX10008 chassis:
- Connect the chassis to earth ground (see Figure 3).Figure 3: ESD Point for the PTX100081—
ESD point
CAUTION:To meet safety and electromagnetic interference (EMI) requirements and to ensure proper operation, a PTX10008 router must be adequately grounded before it is connected to power.
For installations that require a separate grounding conductor to the chassis, use the protective earthing terminal on the rear panel of the PTX10008 to connect to the earth ground.