Install and Remove PTX10004 Power System Components
The PTX10004 routers support AC, DC, high-voltage alternating current (HVAC), and high-voltage direct current (HVDC) power supplies. To install and remove the power supplies in a PTX10004, read the following sections. All power supply models are hot-insertable and hot-removeable field-replaceable units (FRUs). You can install up to three power supplies in the rear of the chassis in the slots provided along the left side.
Use the same type of power supply in all slots. Do not mix power supply models in the same chassis.
See the heat symbol  .
Wear heat-resistant hand gloves while accessing the fan tray and power supply.
.
Wear heat-resistant hand gloves while accessing the fan tray and power supply.
Install a JNP10K-PWR-AC3 Power Supply
Use the same type of power supply in all slots. Do not mix power supply models in a production chassis. The only time you are allowed to have two models concurrently running in a system is when you are in the process of hot-swapping all JNP10K-PWR-AC/JNP10K-PWR-AC2 power supplies with JNP10K-PWR-AC3 power supplies.
Protect yourself from severe burns by wearing heat-protective gloves when removing a running JNP10K-PWR-AC3 power supply from the chassis. The power supply can reach temperatures of 158°F through 176°F (70°C to 80°C) when the equipment is On.
Before you install a JNP10K-PWR-AC3 power supply in the chassis:
-
Ensure that you have followed all safety warnings and cautions.
-
Ensure that you understand how to prevent ESD damage. See Prevention of Electrostatic Discharge Damage.
-
If the AC power source outlets have a power switch, set them to the off (O) position. Ensure that you have the following parts and tools available to install the JNP10K-PWR-AC3 power supply:
-
Electrostatic discharge (ESD) grounding strap
-
Phillips (+) screwdriver, number 1
-
Power cables appropriate for your geographical location (for low-voltage installations) or input amperage (for high-voltage installations). See PTX10004 Power Cable Specifications.
-
To install a JNP10K-PWR-AC3 power supply in a PTX10004:
-
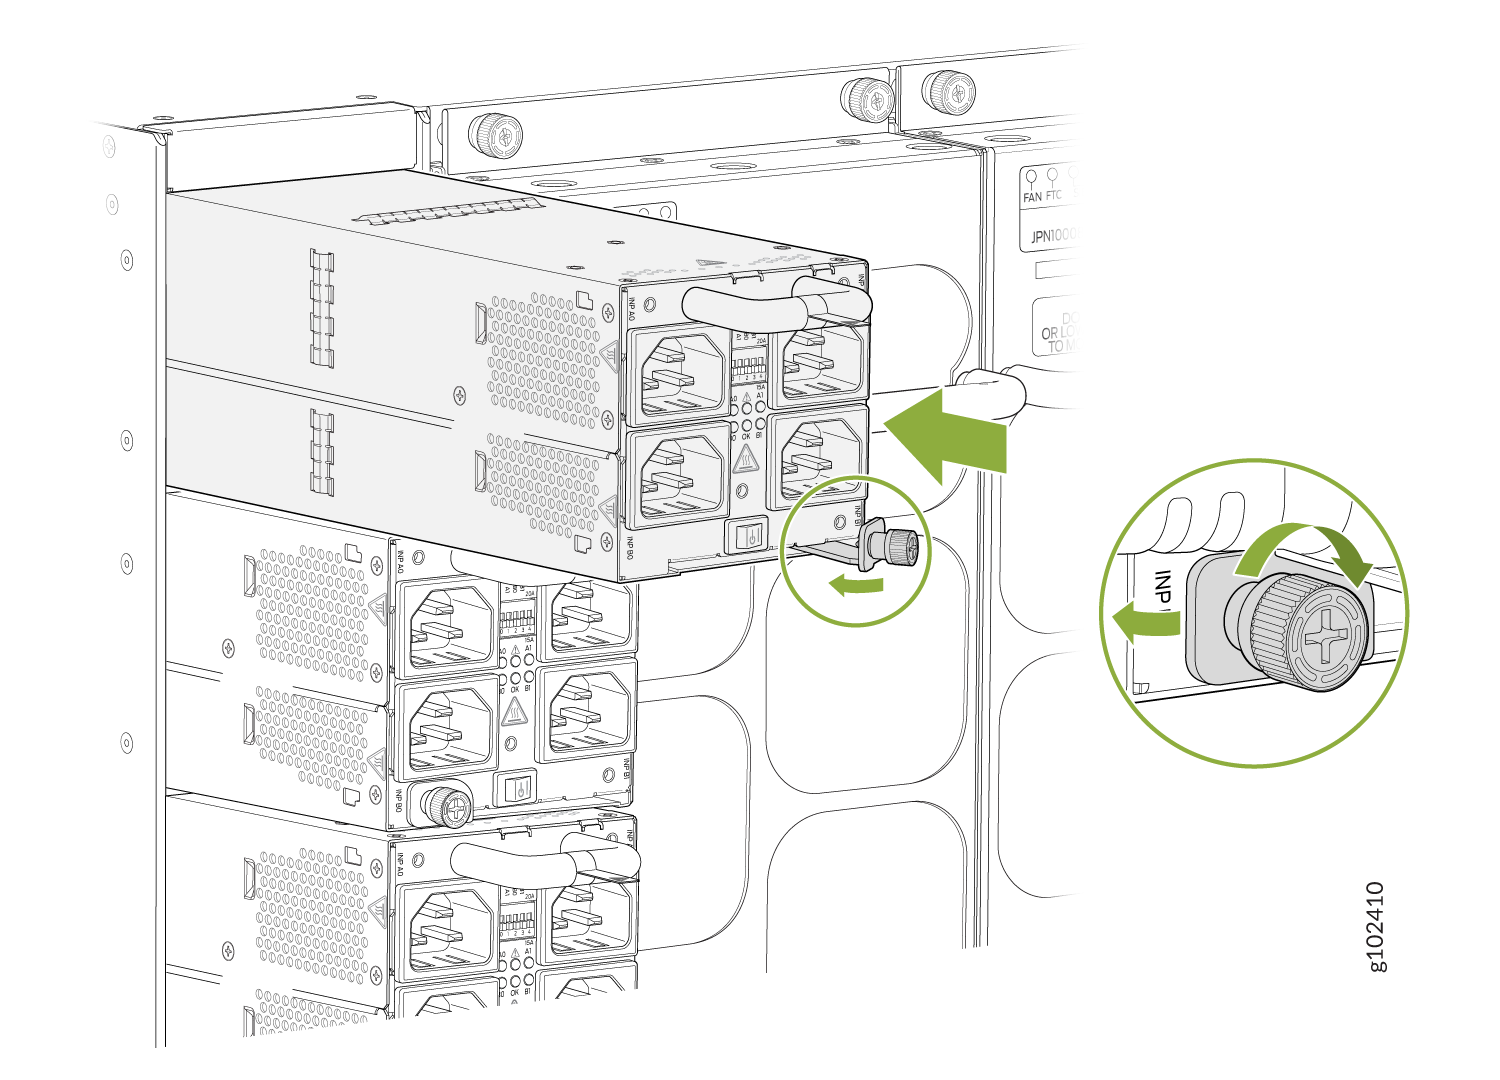
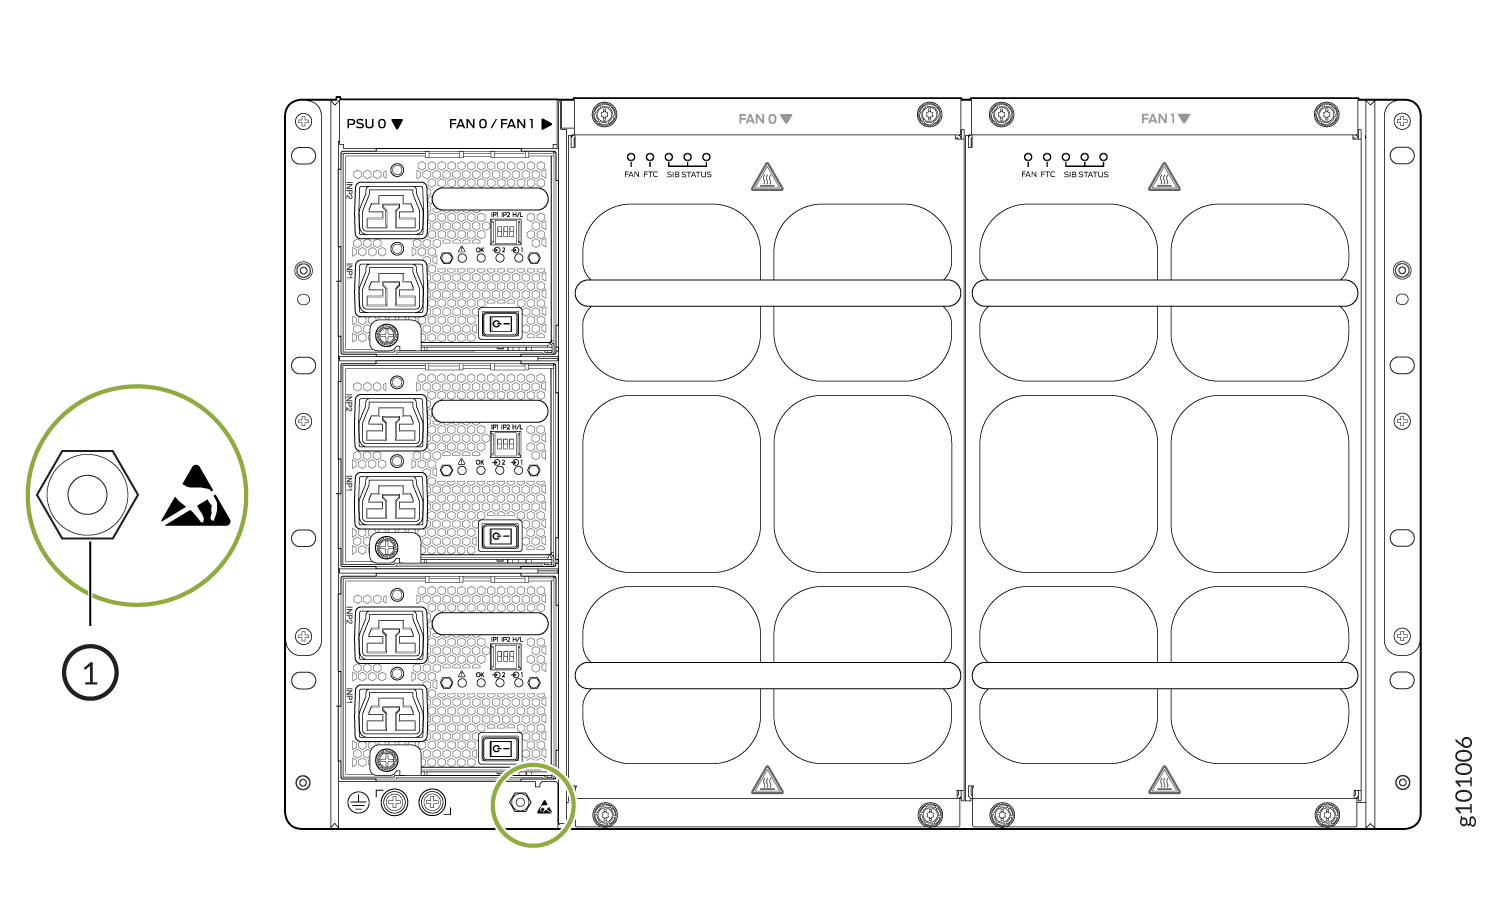
Wrap and fasten one end of the ESD grounding strap around your bare wrist
and connect the other end of the strap to an ESD point on the chassis. There
is an ESD point located next to the protective earthing terminal and below
PSU 2 on the rear of the PTX10004 (see Figure 31).
Figure 1: ESD Point on the Rear of the PTX10004
 1—
1—ESD point
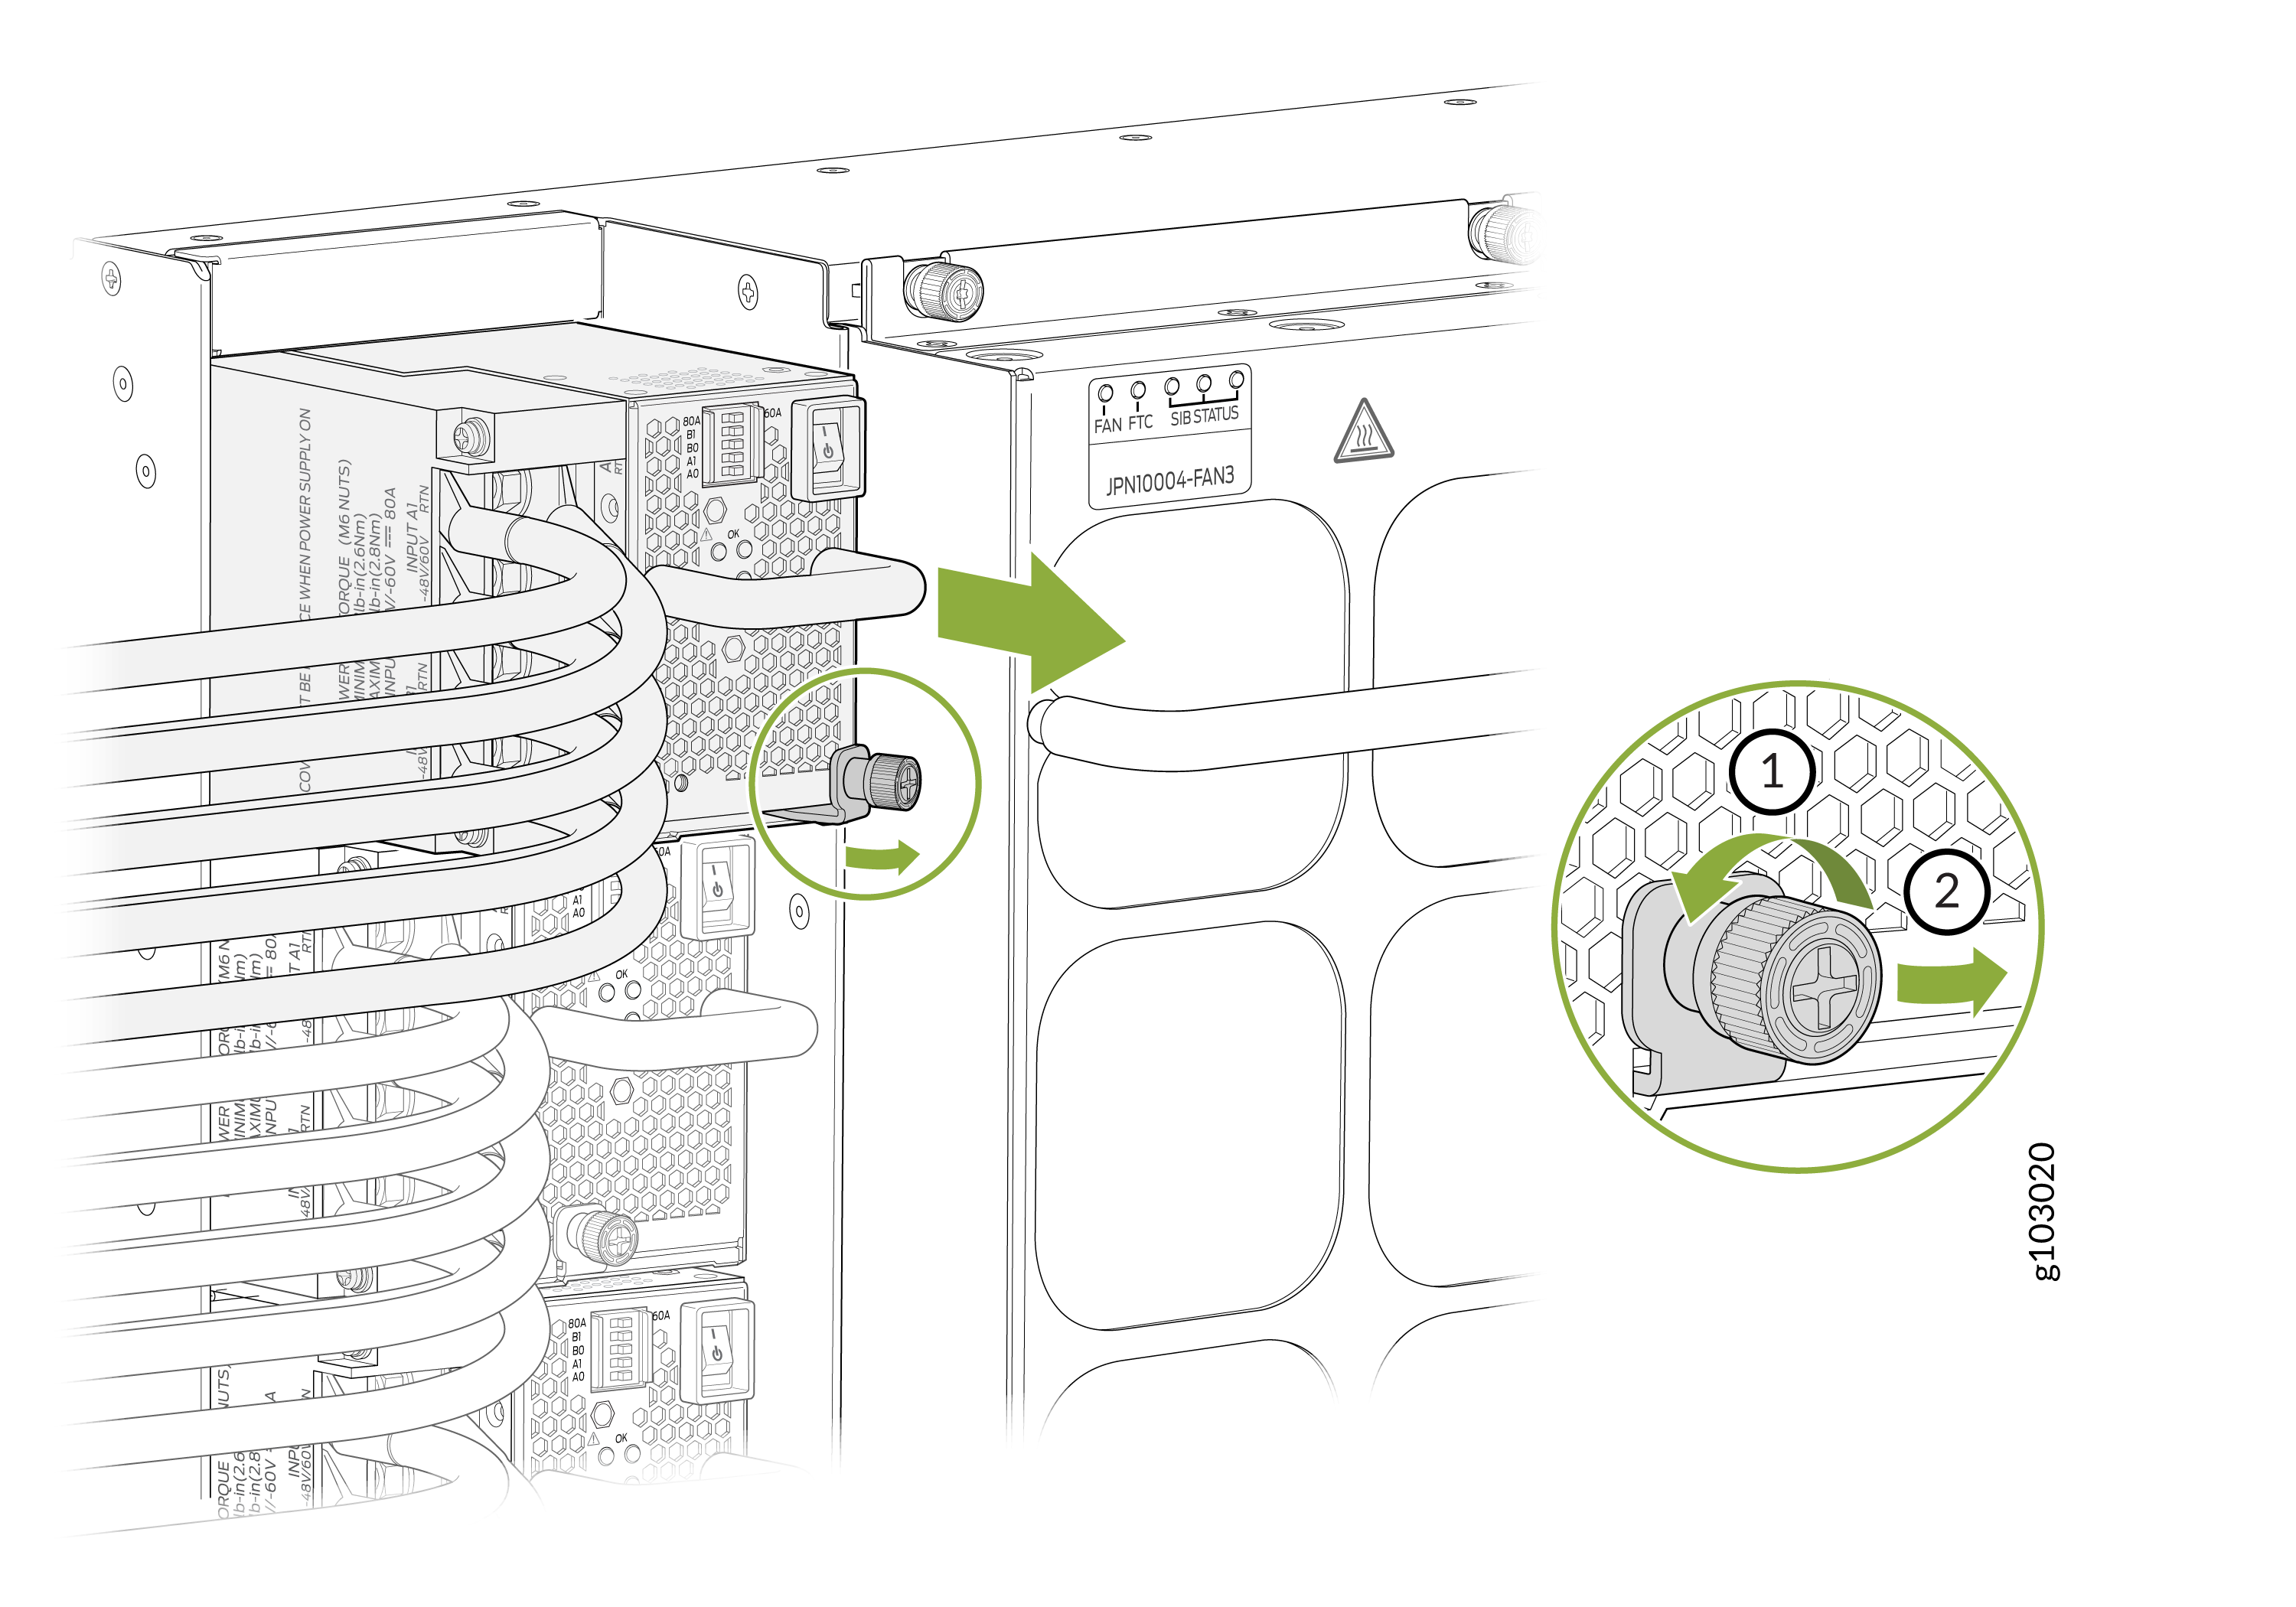
-
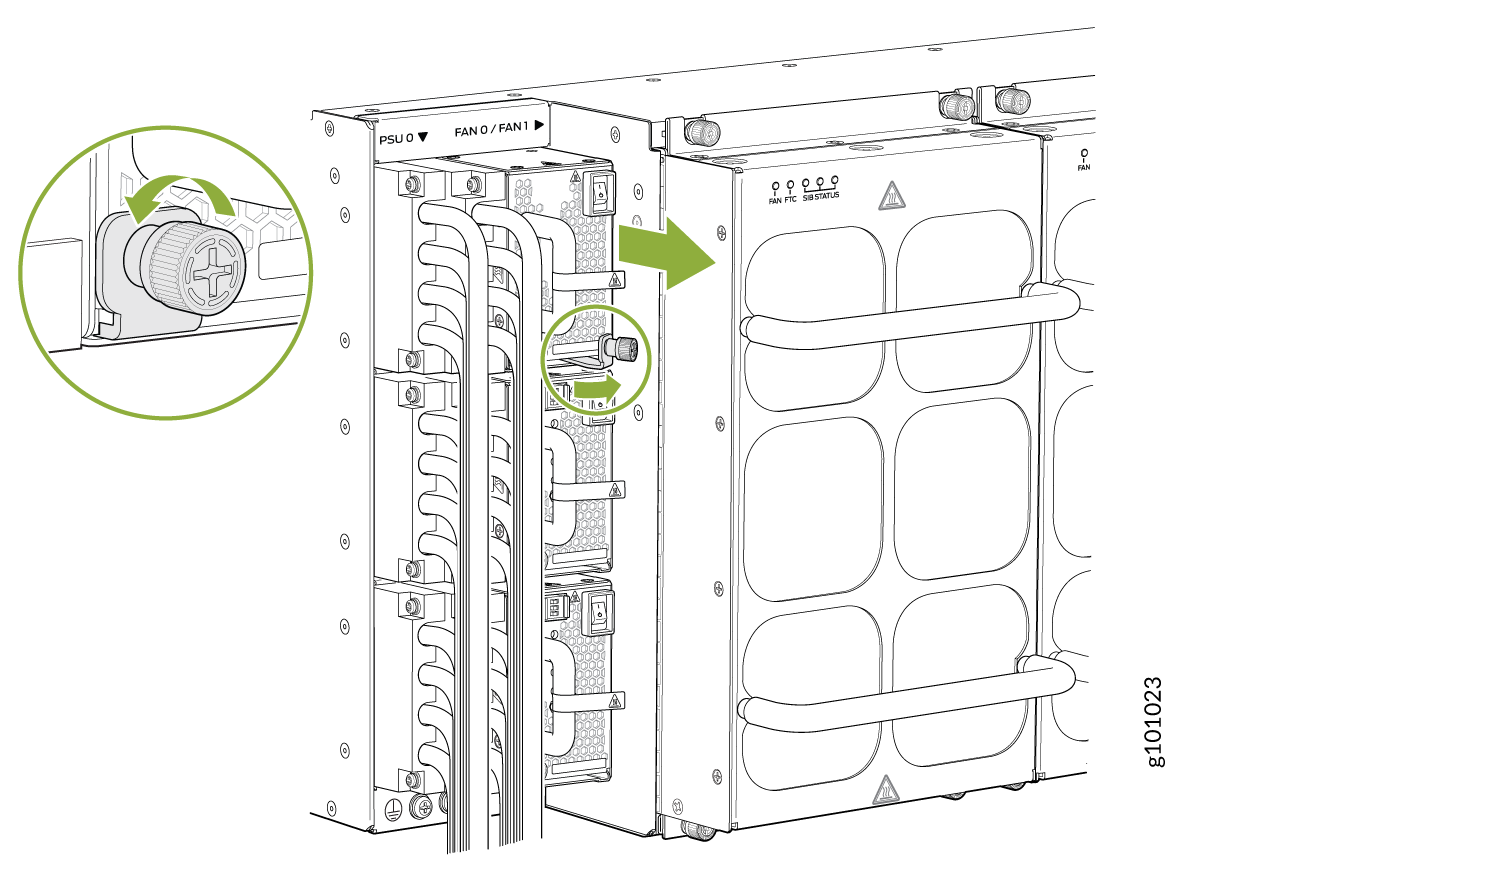
Using both hands, place the power supply in the power supply slot on the
rear of the system. Slide the power supply straight into the chassis until
the power supply is fully seated in the slot. Ensure that the power supply
faceplate is flush with any adjacent power supply faceplates or power supply
covers (see Install a JNP10K-PWR-AC3 Power Supply).
Figure 2: Install a JNP10K-PWR-AC3
-
Attach each power cable to a dedicated power source (A0, B0, A1, and B1).
The JNP10K-PWR-AC3 only requires that each power supply be connected to a
separate source.
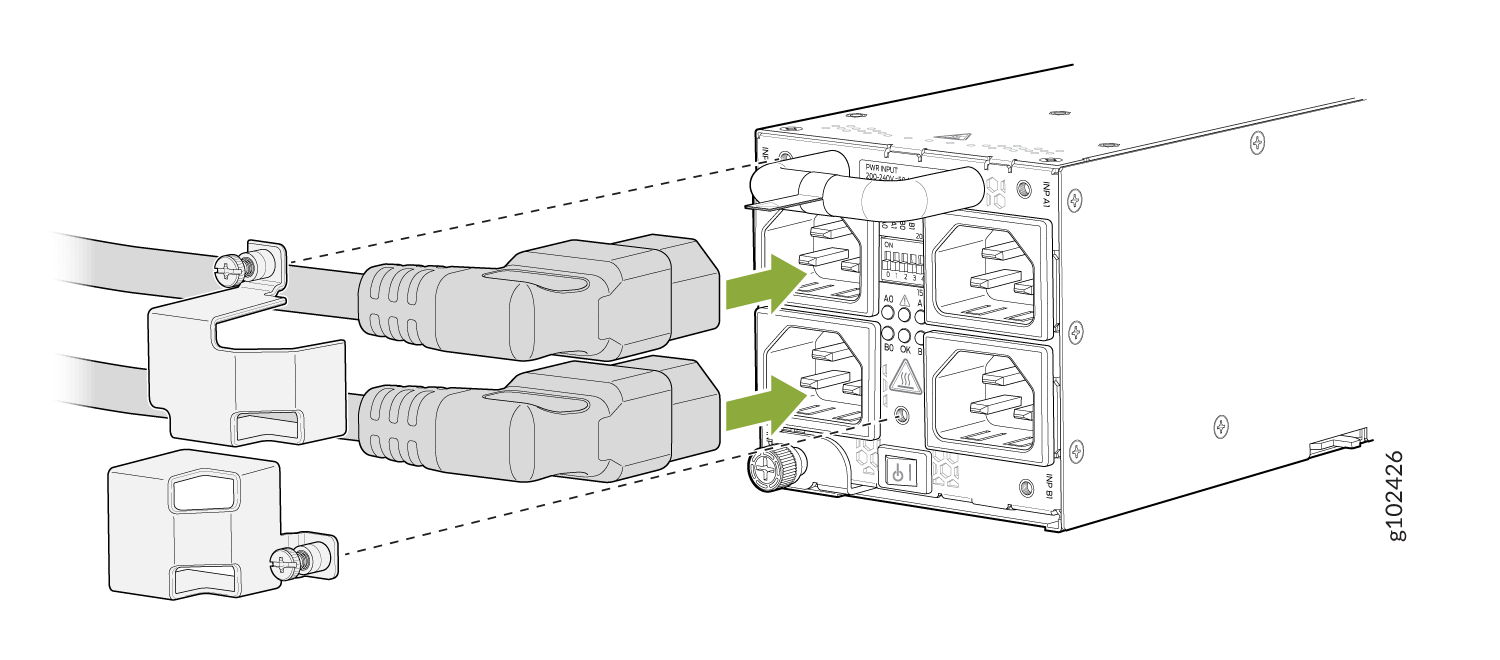
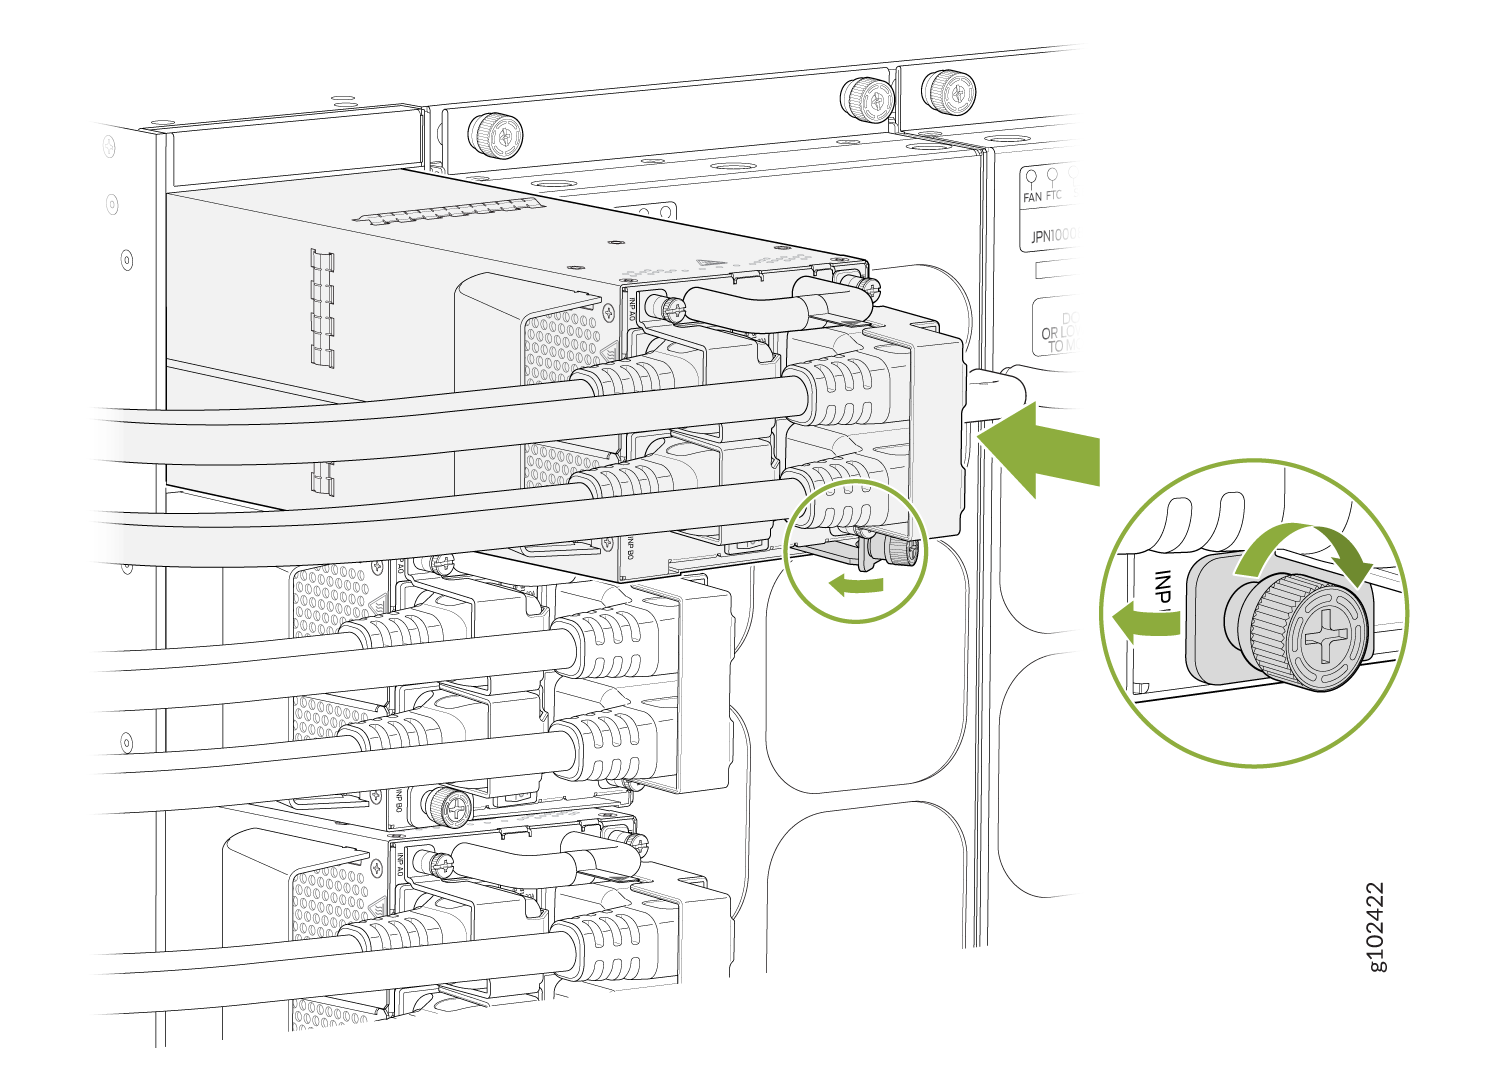
-
When installing the right angle power cords, the left column of
inputs (A0 and B0) should be connected first. After connecting the
A0 and/or B0 inputs, secure the plugs using the retainer
(SKU#540-175625) for the A0 plug and retainer (SKU#540-175626) for
the B0 plug. The retainers are attached to the PSU faceplate with a
single captive fastener using a #1 Philips screws drive. See Figure 3.
Figure 3: Plug Retainers for A0 and B0 Inputs
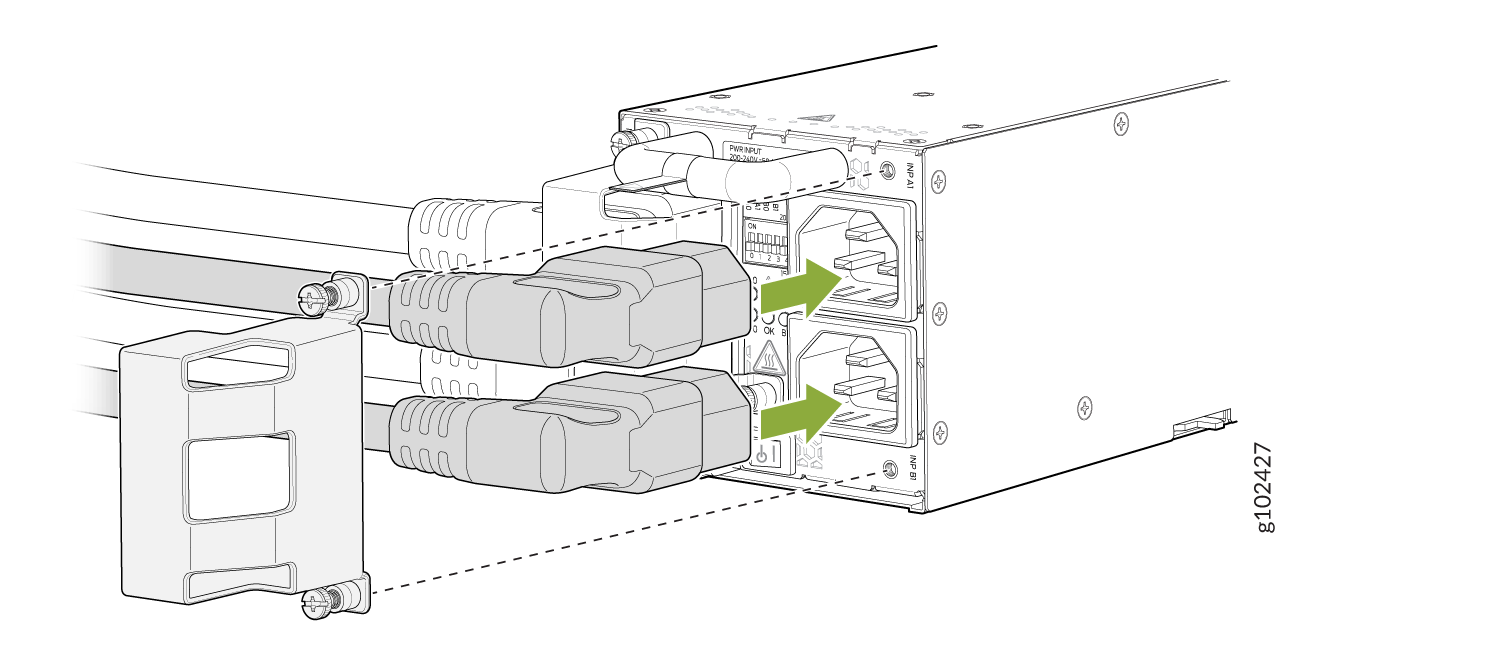
-
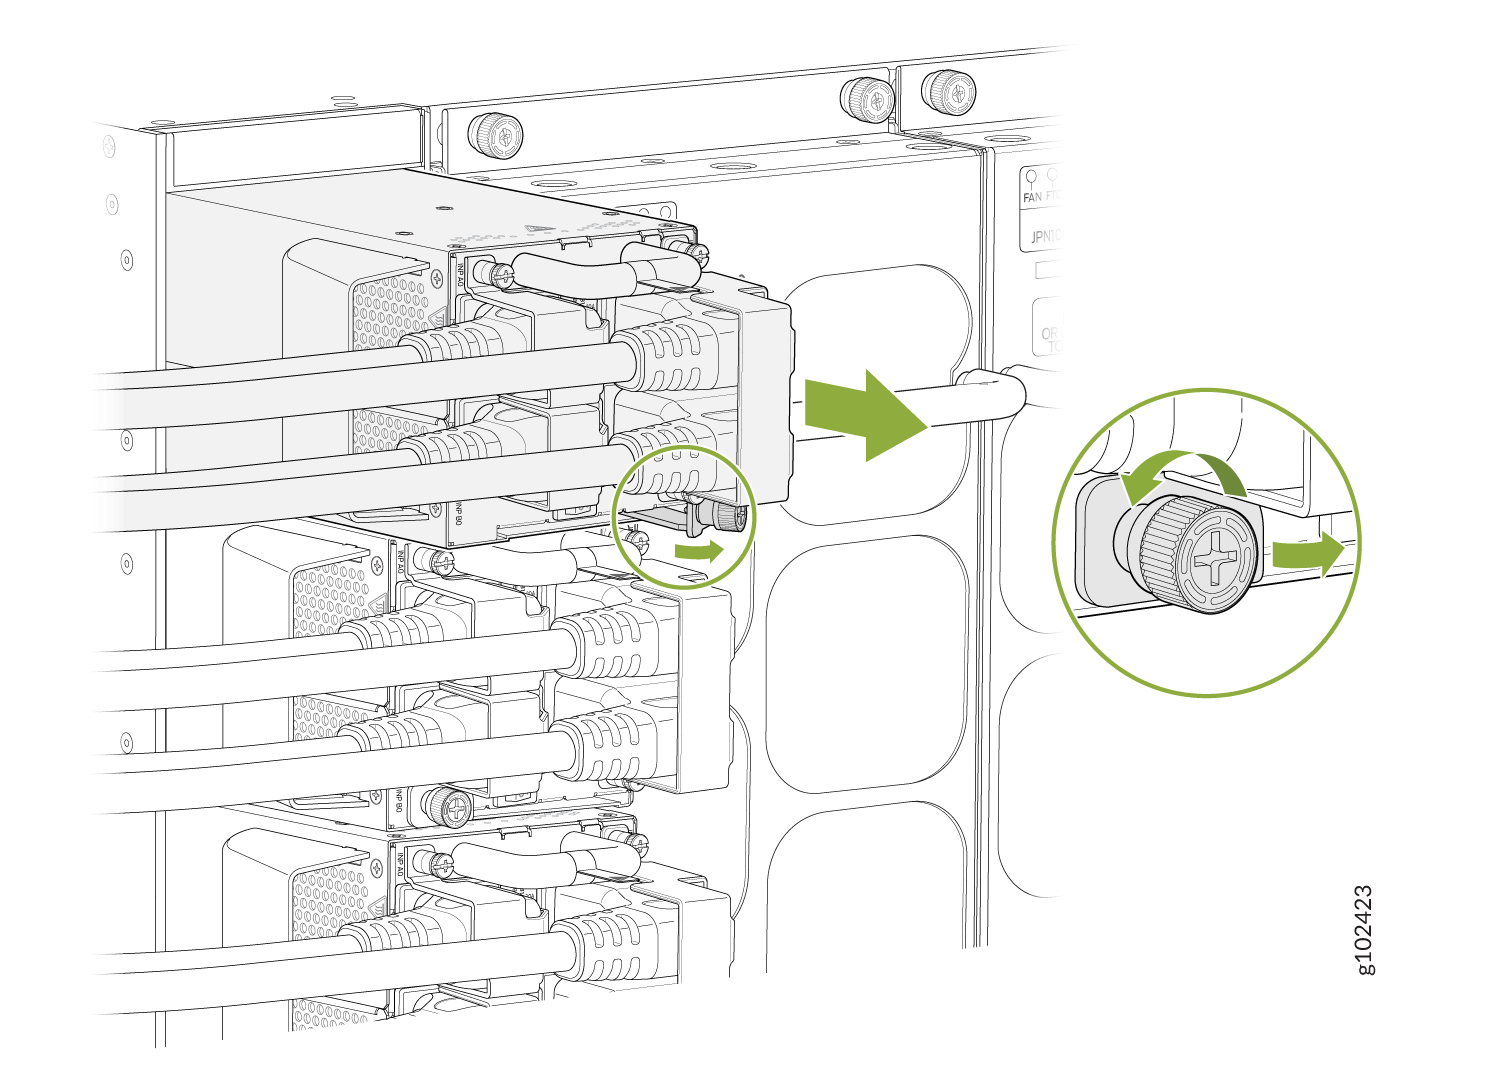
Next connect the right column of inputs (A1 and B1). After
connecting the A1 and/or B1 inputs, secure the plugs using the
retainers (SKU#540-175627). The right column plug retainer is
attached to the PSU faceplate with two captive screws using a #1
Philips screwdriver. See Figure 4.
Figure 4: Plug Retainers for A1 and B1 Inputs
-
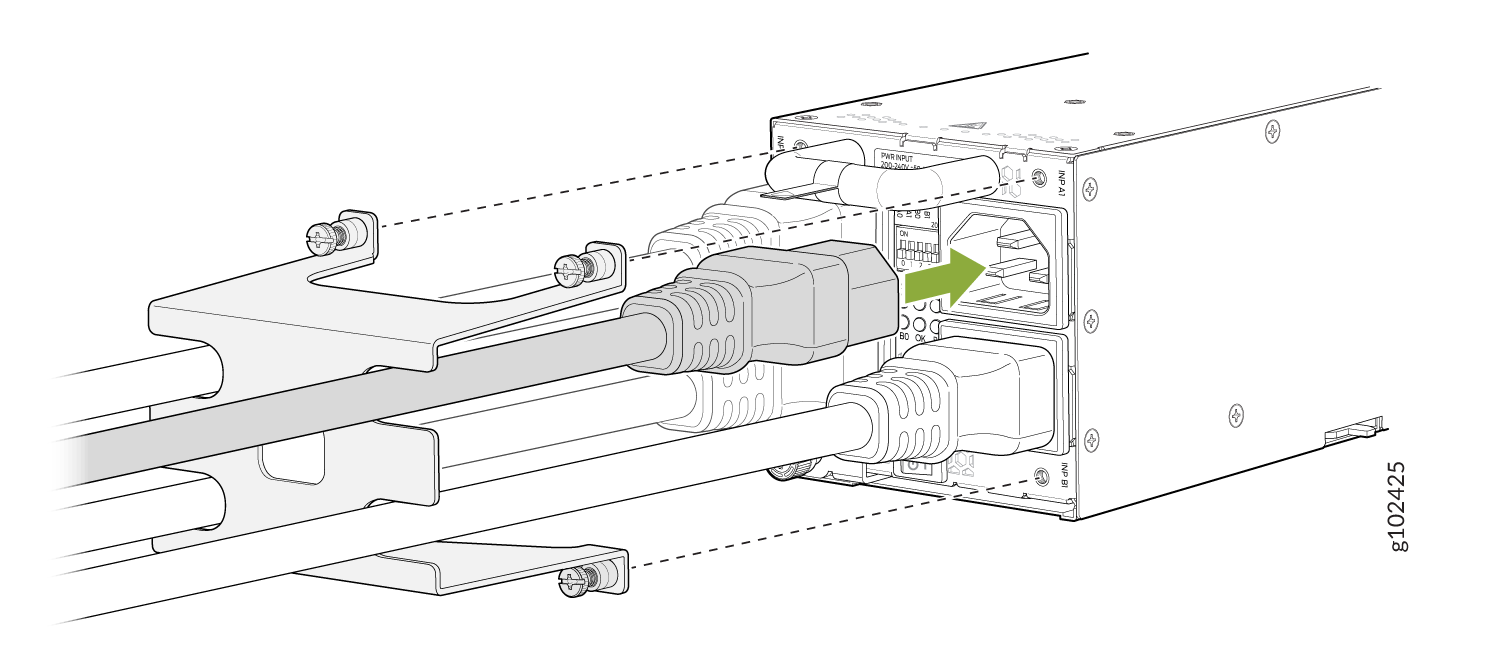
If you want to use straight power cords, you may connect the
straight power cords in any order. After connecting the straight
power cords, secure the plugs with the retainer (SKU#540-175624).
The retainer is attached to the PSU faceplate with three captive
fasteners using a #1 Philips screw driver. See Figure 5
Figure 5: Connecting Straight Power Cords
Note:Installing baffle is optional, and only to be used when you want to redirect the air flow from the left side of the PSU to the rear of the router. This ensures NEBs compliance.
The baffle should be installed before the power supply is inserted int the router. See Figure 6
Figure 6: Installing Baffle in JNPR10K-PWR-AC3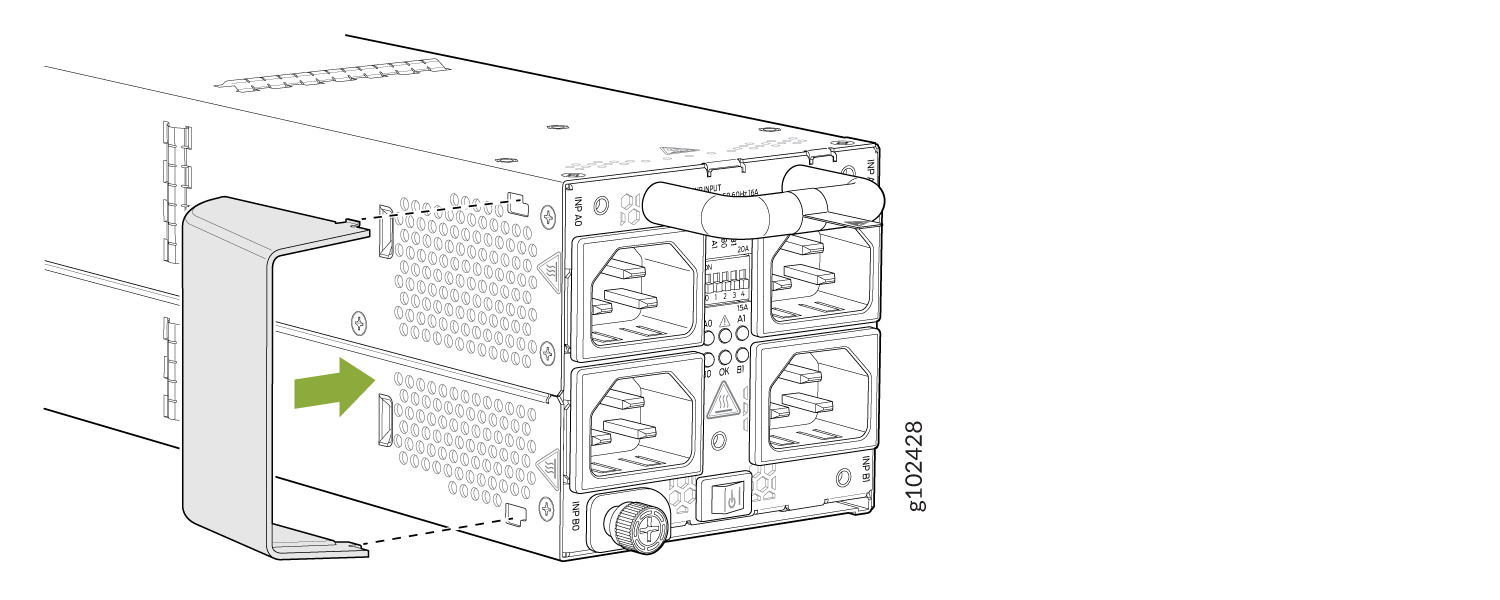
-
When installing the right angle power cords, the left column of
inputs (A0 and B0) should be connected first. After connecting the
A0 and/or B0 inputs, secure the plugs using the retainer
(SKU#540-175625) for the A0 plug and retainer (SKU#540-175626) for
the B0 plug. The retainers are attached to the PSU faceplate with a
single captive fastener using a #1 Philips screws drive. See Figure 3.
-
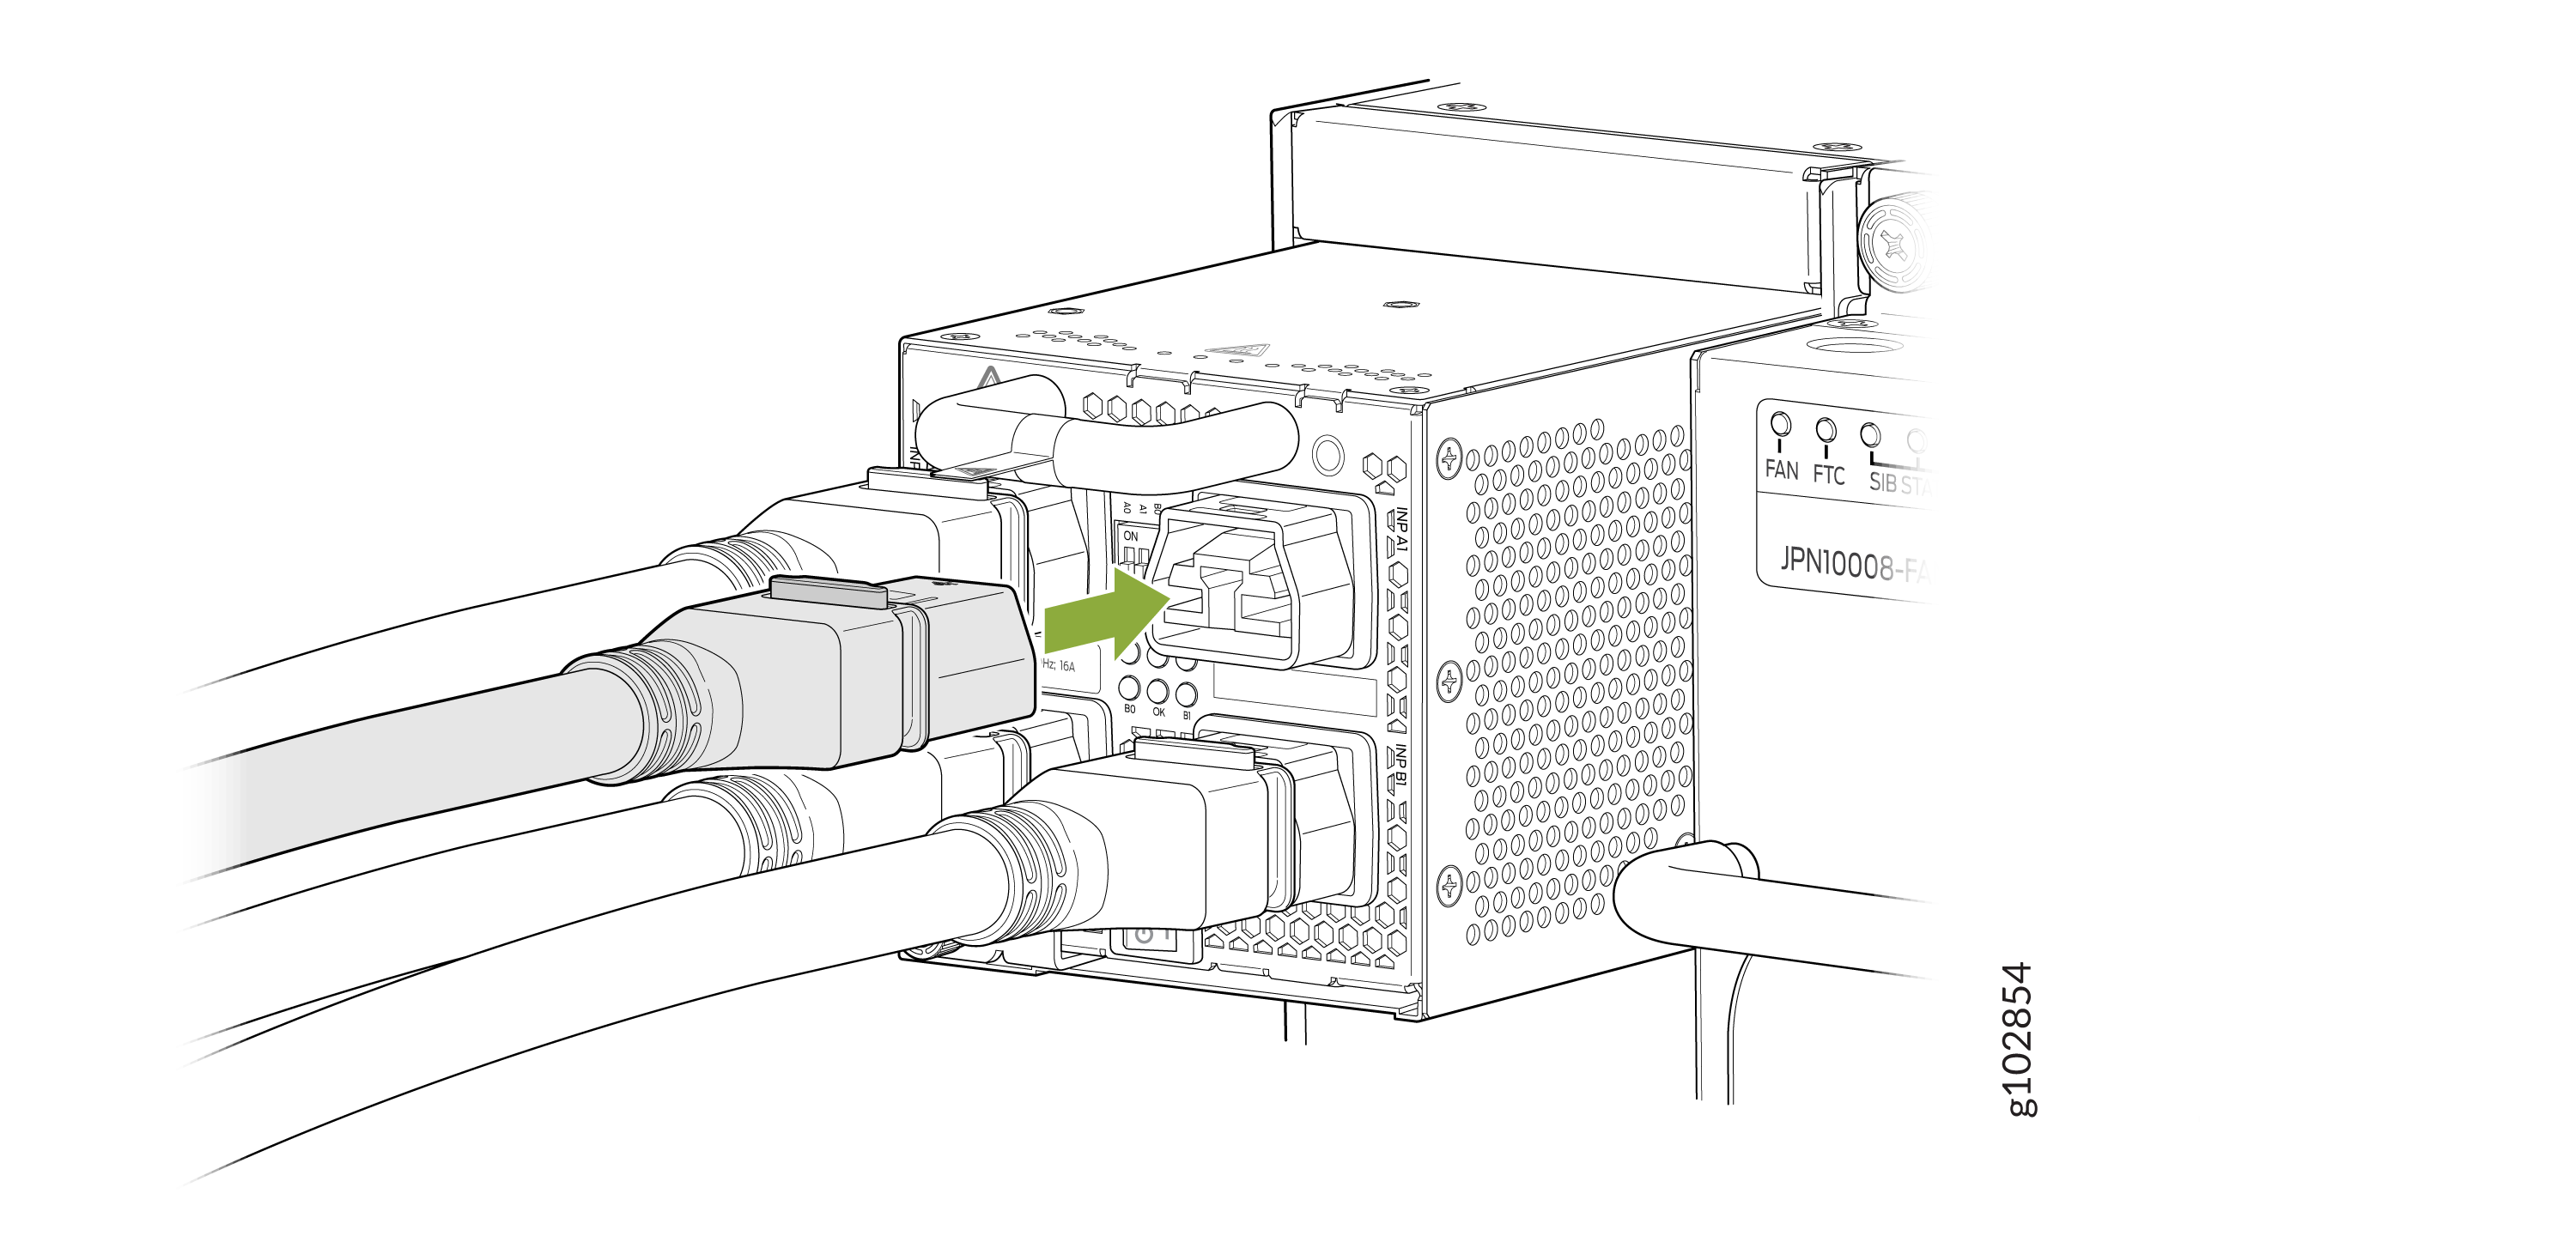
For each power cable, insert the end of the cable with C21 connector into
the JNP10K-PWR-AC3 power supply. Use the retainers to keep the power cord in
its place in the power supply. See Figure 7
Figure 7: Installing a JNPR10K-PWR-AC3 using RA Power Cords with Baffle
 Warning:
Ensure that the power cords do not block access to router components or drape where people can trip on them.
Remove a JNP10K-PWR-AC3 Power Supply
Before you remove a JNP10K-PWR-AC3 power supply from the chassis:
-
Ensure that you understand how to prevent ESD damage. See Prevention of Electrostatic Discharge Damage.
-
Ensure that you have the following parts and tools available:
-
Heat-protective gloves able to withstand temperatures of 158°F (70°C)
-
Electrostatic discharge (ESD) grounding strap
-
Phillips (+) screwdriver, number 1
-
Replacement power supply or a cover for the power supply slot
-
Protect yourself from severe burns by wearing heat-protective gloves when removing a working JNP10K-PWR-AC3 power supply from the chassis. The power supply can reach temperatures of 158°F through 176°F (70°C to 80°C) when the equipment is On.
Before you remove a power supply, ensure that you have power supplies sufficient to power the router left in the chassis. See Power Requirements for PTX10004 Components.
Do not leave the power supply slot empty for a long time while the router is operational. Either replace the power supply promptly or install a ABPM or a cover over the empty slot.
To remove a JNP10K-PWR-AC3 power supply from a PTX10004 router:
-
Wrap and fasten one end of the ESD grounding strap around your bare wrist
and connect the other end of the strap to an ESD point on the chassis. There
is an ESD point located next to the protective earthing terminal and below
PSU 2 on the rear of the PTX10004 (see Figure 33).
Figure 8: ESD Point on the Rear of the PTX10004
1—
ESD point
-
Remove the retainers using a #1 Philips screw driver and detach the power
cords from the PSU.
Figure 9: Detach the Power Cords from JNP10K-PWR-AC3 Power Supply
-
Unscrew the captive screw counterclockwise by using the
Phillips (+) screwdriver, number 1. See Figure 10.
Note:
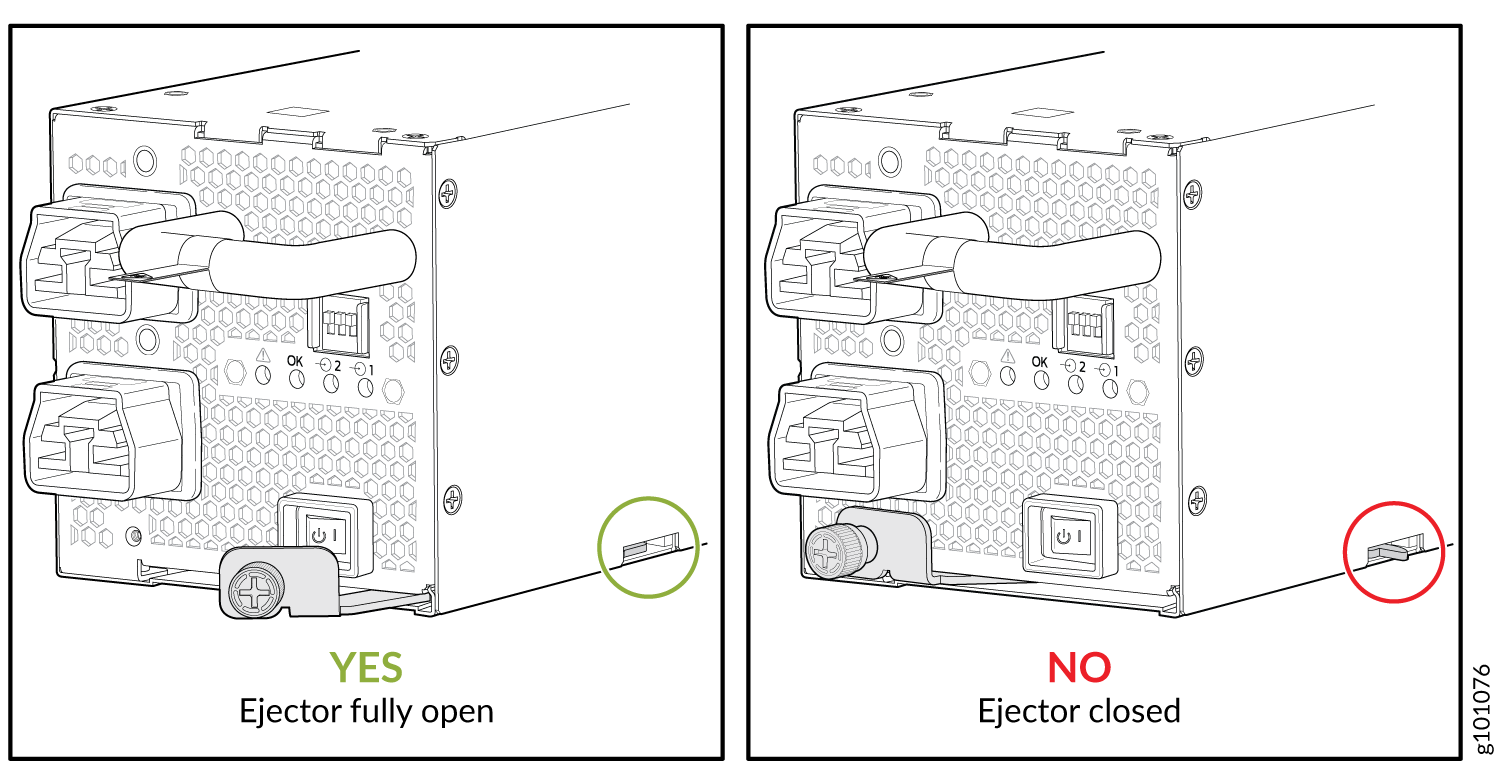
Ensure that the ejector is fully open to avoid scratching the chassis.
Figure 10: Remove a JNP10K-PWR-AC3 Power Supply from a PTX10004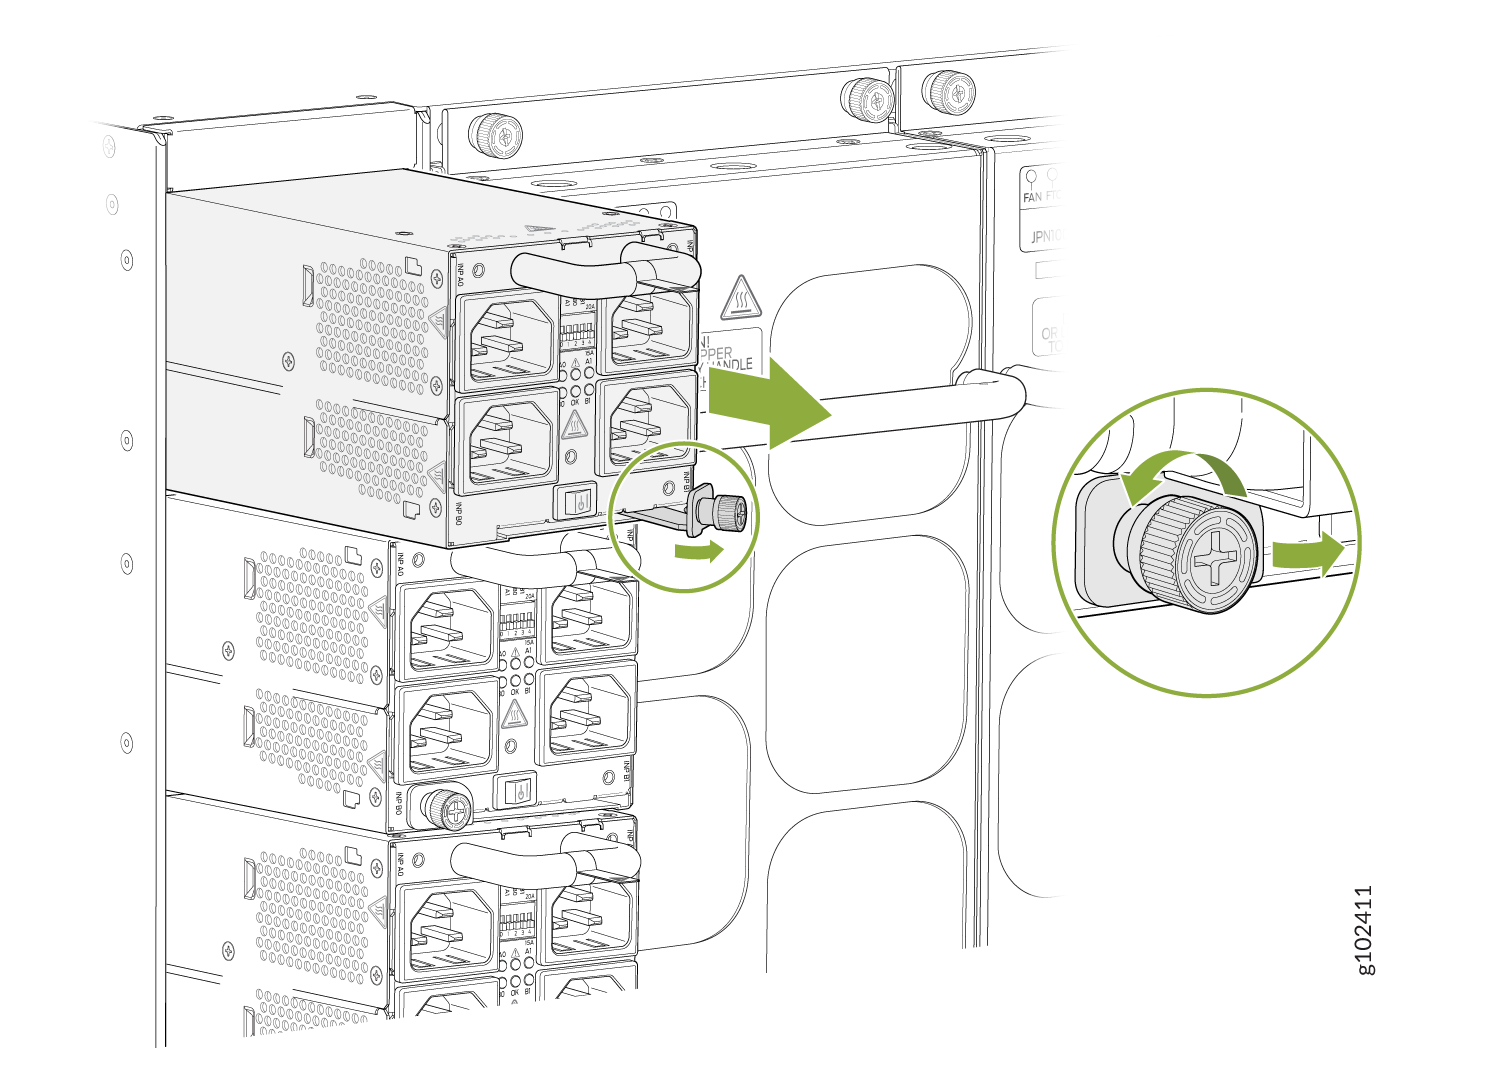
-
Wear heat protective gloves before you remove the power supply from the
chassis.
Install a JNP10K-PWR-DC3 Power Supply
Before you install a JNP10K-PWR-DC3 power supply in the chassis:
-
Ensure that you follow all safety warnings and cautions.
Note:Before performing DC power procedures, ensure that power is removed from the DC circuit. To ensure that all power is off, locate the circuit breaker on the panel board that services the DC circuit, switch the circuit breaker to the off (O) position, and tape the switch handle of the circuit breaker in the off position.
Note:Protect yourself from severe burns by wearing heat-protective gloves when removing a working JNP10K-PWR-DC3 power supply from the chassis. JNP10K-PWR-DC3 power supplies can reach temperatures of 158 °F through 176 °F (70 °C through 80 °C) when the equipment is on.
Note:Before you connect power to the router, a licensed electrician must attach a cable lug to the grounding and power cables that you supply. A cable with an incorrectly attached lug can damage the router (for example, by causing a short circuit).
Note:Use the same type of power supply in all slots. Do not mix AC and DC power supplies in a production chassis.
Note:To meet safety and electromagnetic interference (EMI) requirements and to ensure proper operation, you must connect the PTX10004 routers to earth ground before you connect them to power. For installations that require a separate grounding conductor to the chassis, use the protective earthing terminal on the router chassis to connect to earth ground. For instructions on connecting a PTX10004 router to ground using a separate grounding conductor, see Connect the PTX10004 Router to Earth Ground.
Note:The battery returns of the JNP10K-PWR-DC3 power supply must be connected as an isolated DC return (DC-I).
-
Review how to prevent ESD damage. See Prevention of Electrostatic Discharge Damage.
-
Ensure that you have the following parts and tools available before you install a DC power supply:
-
Electrostatic discharge (ESD) grounding strap
-
The provided terminal lugs for the JNP10K-PWR-DC3 (Panduit LCD4-14A-L for straight lugs, LCD-4-14AH-L for 45° lugs, or equivalent) and sized for 4 AWG (21.1 mm²) power source cables. We recommend that you install heat-shrink tubing insulation around the crimpled section of the power cables and lugs (see step 9).
-
13/32 in. (10 mm) nut driver or socket wrench
-
Phillips (+) screwdrivers, numbers 1 and 2
-
Multimeter
-
The JNP10K-PWR-DC3 power supply in a PTX10004 chassis is a hot-removable and hot-insertable field-replaceable unit (FRU). You can install up to three power supplies in the rear along the left side of the chassis.
To install a JNP10K-PWR-DC3 power supply in a PTX10004:
-
Wrap and fasten one end of the ESD grounding strap around your bare wrist
and connect the other end of the strap to an ESD point on the chassis. An
ESD point is located next to the protective earthing terminal and below
PSU 2 on the rear of the PTX10004 (see Figure 11).
Figure 11: ESD Point on the Rear of the PTX10004
1—
ESD point
-
Remove the plastic cable cover from the power input terminals by using the
Phillips (+) screwdriver, number 2 to loosen the screws (see Figure 12).
Figure 12: Remove the Plastic Cable Cover on a JNP10K-PWR-DC3 Power Supply
-
Verify that the DC power cables are labeled correctly before making
connections to the power supply. In a typical power distribution scheme
where the return is connected to chassis ground at the battery plant, you
can use a multimeter to verify the resistance of the -48 V and
RTN DC cables to the chassis ground.
-
The cable with very high resistance (indicating an open circuit) to chassis ground is negative (-) and will be installed on the -48 V (input) DC power input terminal.
-
The cable with very low resistance (indicating a closed circuit) to chassis ground is positive (+) and will be installed on the RTN (return) DC power input terminal.
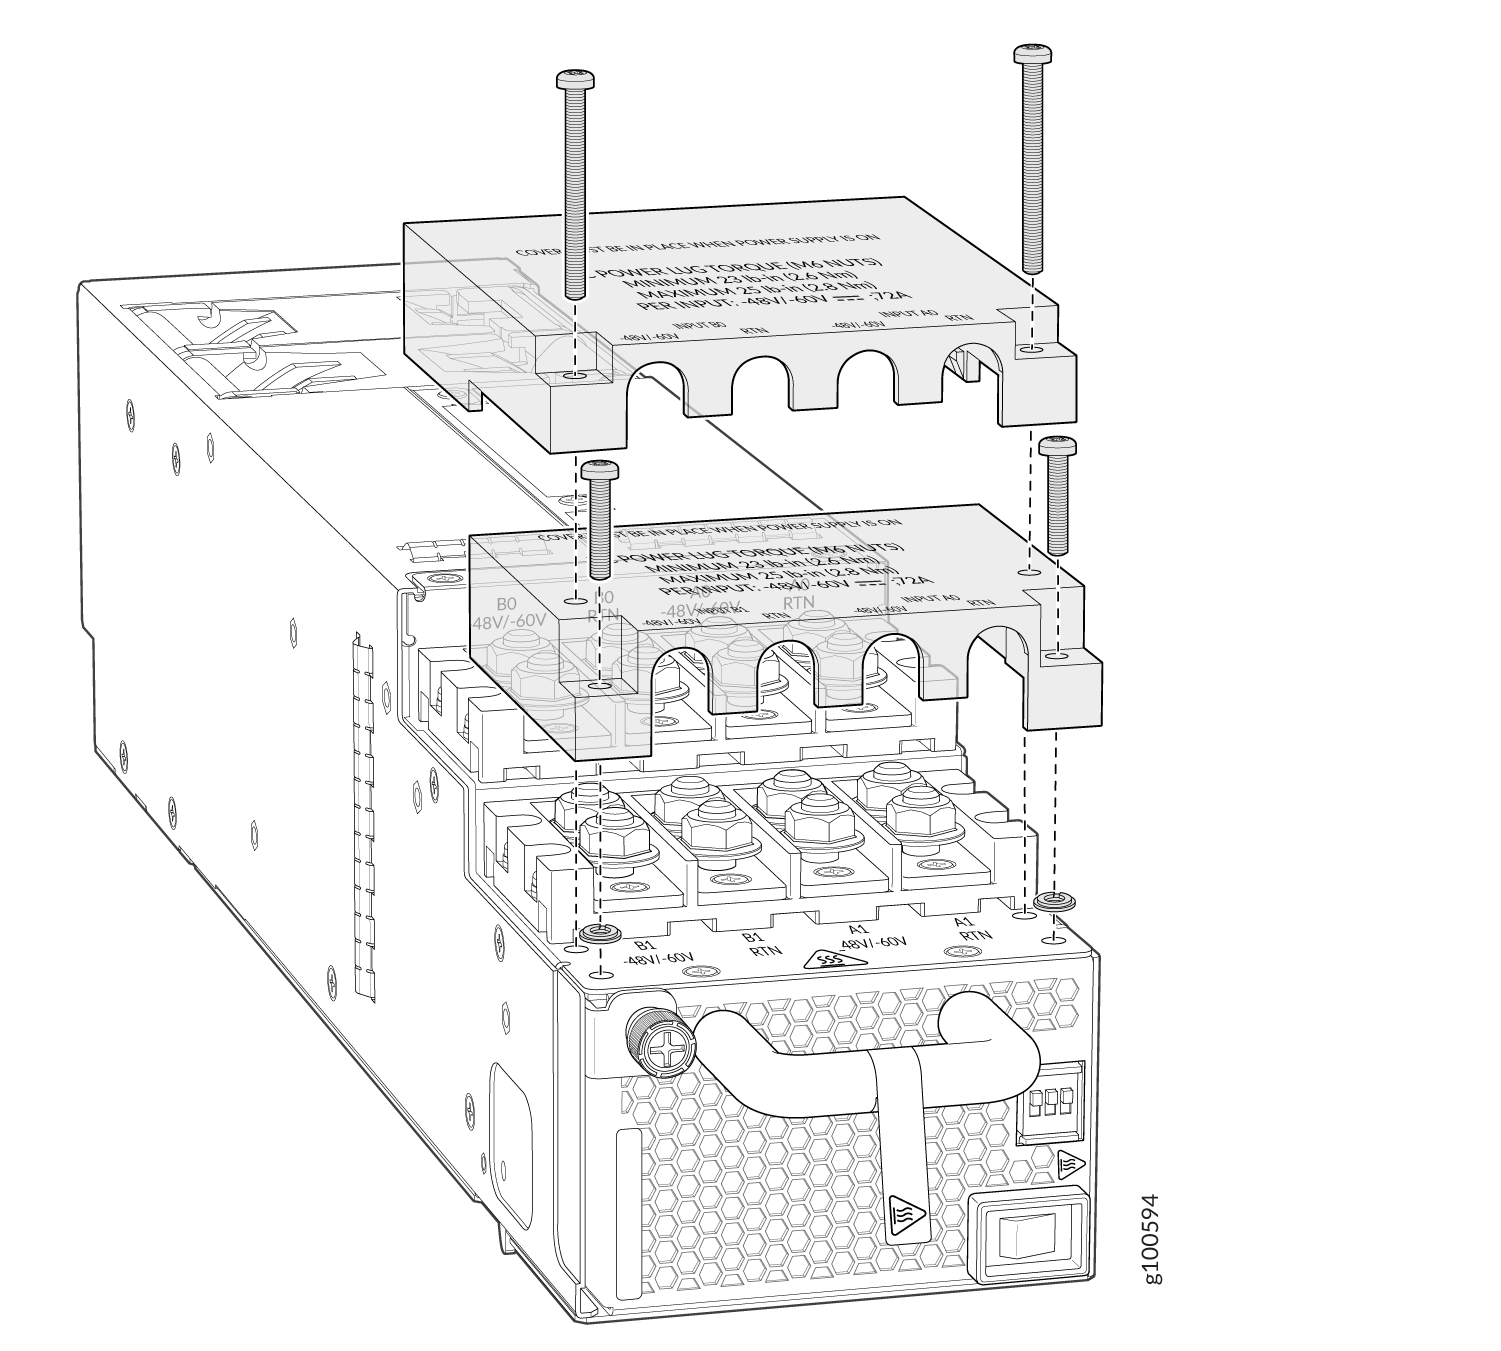
The JNP10K-PWR-DC3 power supply is the equivalent of four power supplies in a single housing. Each JNP10K-PWR-DC3 has four independent sets of DC power input terminals:
-
Input A0: RTN -48 V/-60 V
-
Input B0: RTN -48 V/-60 V
-
Input A1: RTN -48 V/-60 V
-
Input B1: RTN -48 V/-60 V
We recommend source redundancy (source A and source B) to all inputs to ensure reliability of the system. If two power sources are not available, then use two feeds from the same source to provide power distribution reliability. Two feeds mean two independent power distribution routes from the source to the system. See Figure 13.
Figure 13: JNP10K-PWR-DC3 Input Terminal Marking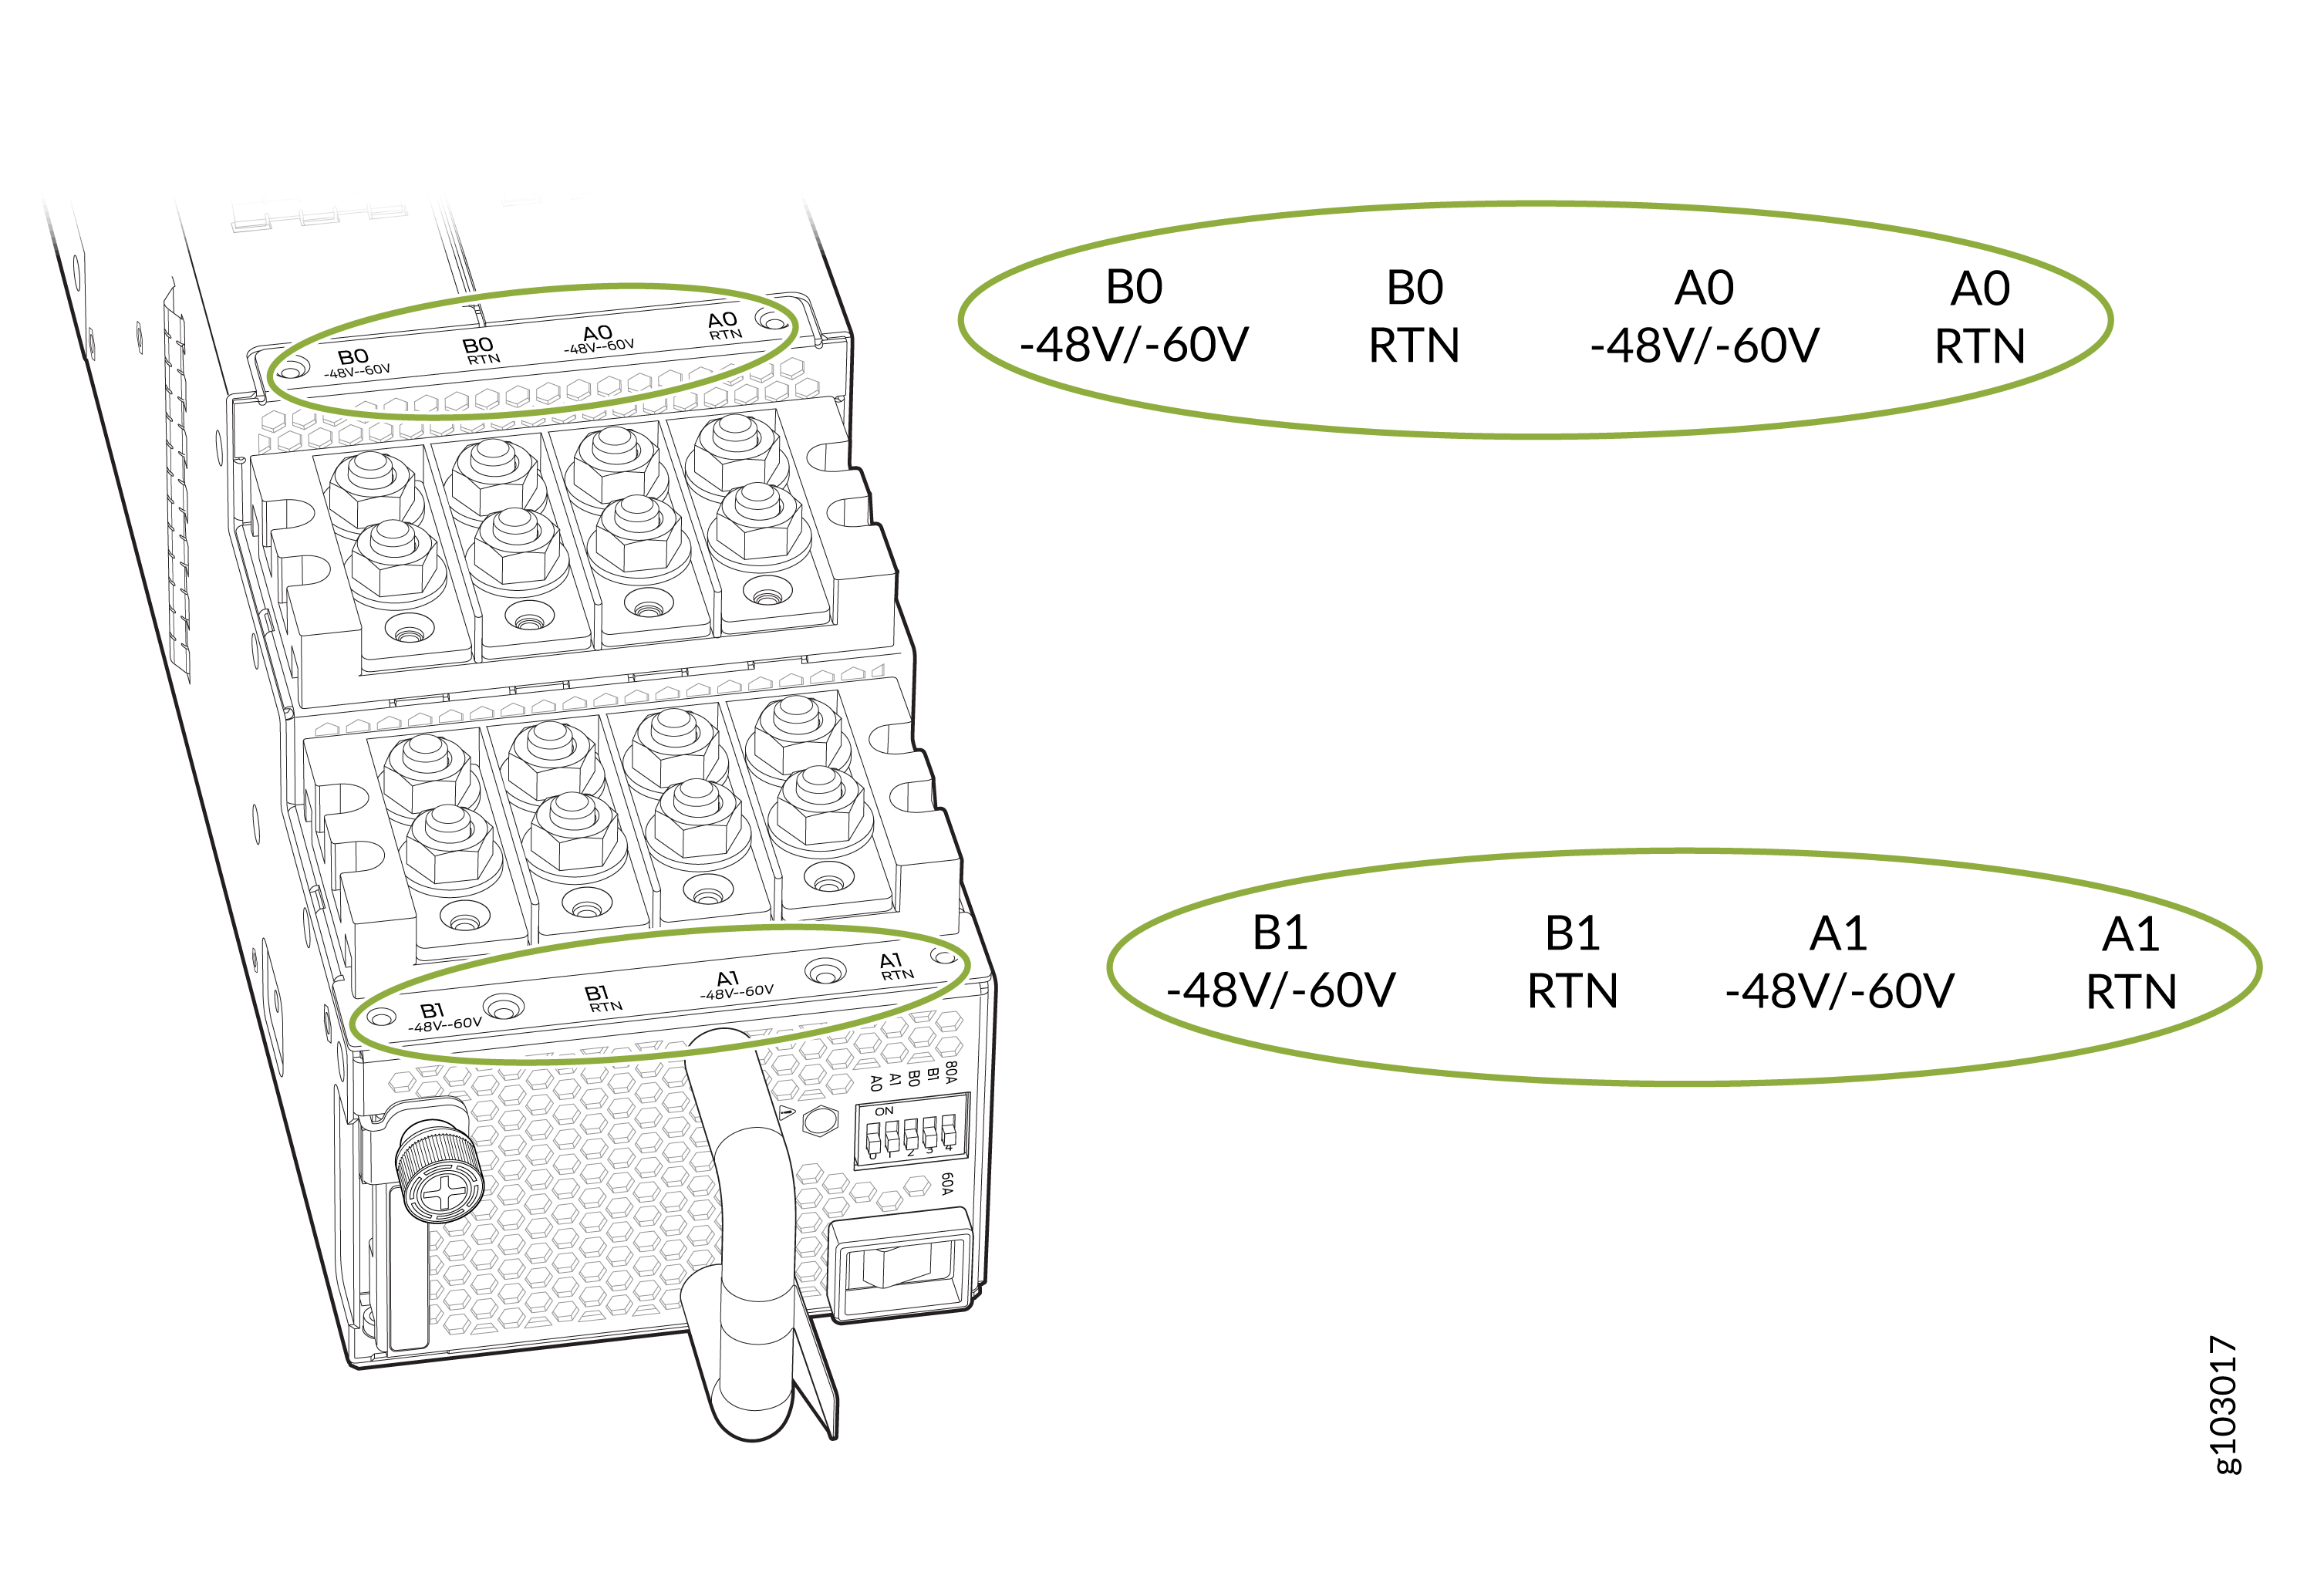 CAUTION:
You must ensure that power connections maintain proper polarity. The power source cables might be labeled (+) and (–) to indicate their polarity. There is no standard color coding for DC power cables.
-
-
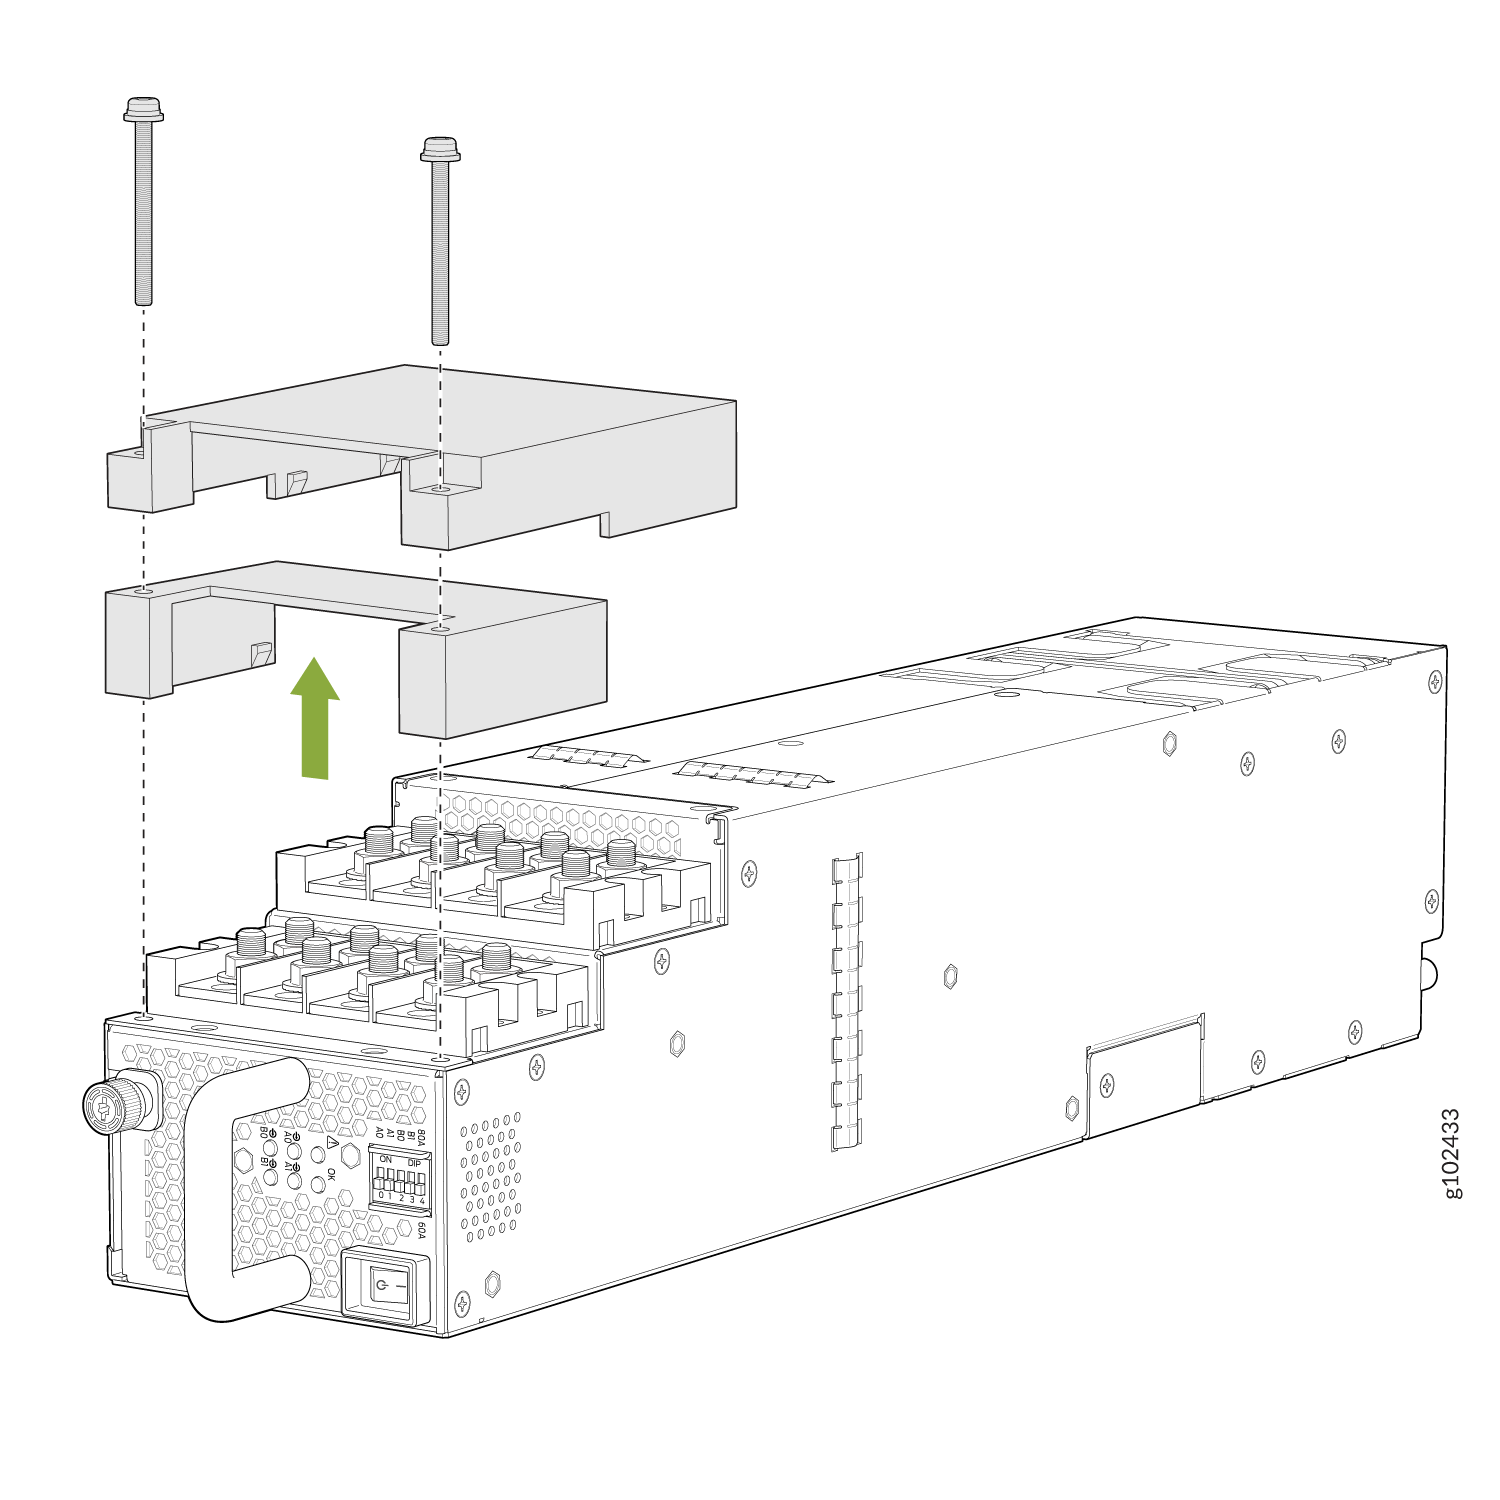
Install heat-shrink tubing insulation around the power cables.
To install heat-shrink tubing:
- Slide the tubing over the portion of the cable where it is attached to the lug barrel. Ensure that tubing covers the end of the wire and the barrel of the lug attached to it.
- Shrink the tubing with a heat gun. Ensure that you heat all sides of the tubing evenly so that it shrinks around the cable tightly.
Figure 14 shows the steps to install heat-shrink tubing.
Note:Do not overheat the tubing.
Figure 14: How to Install Heat-Shrink Tubing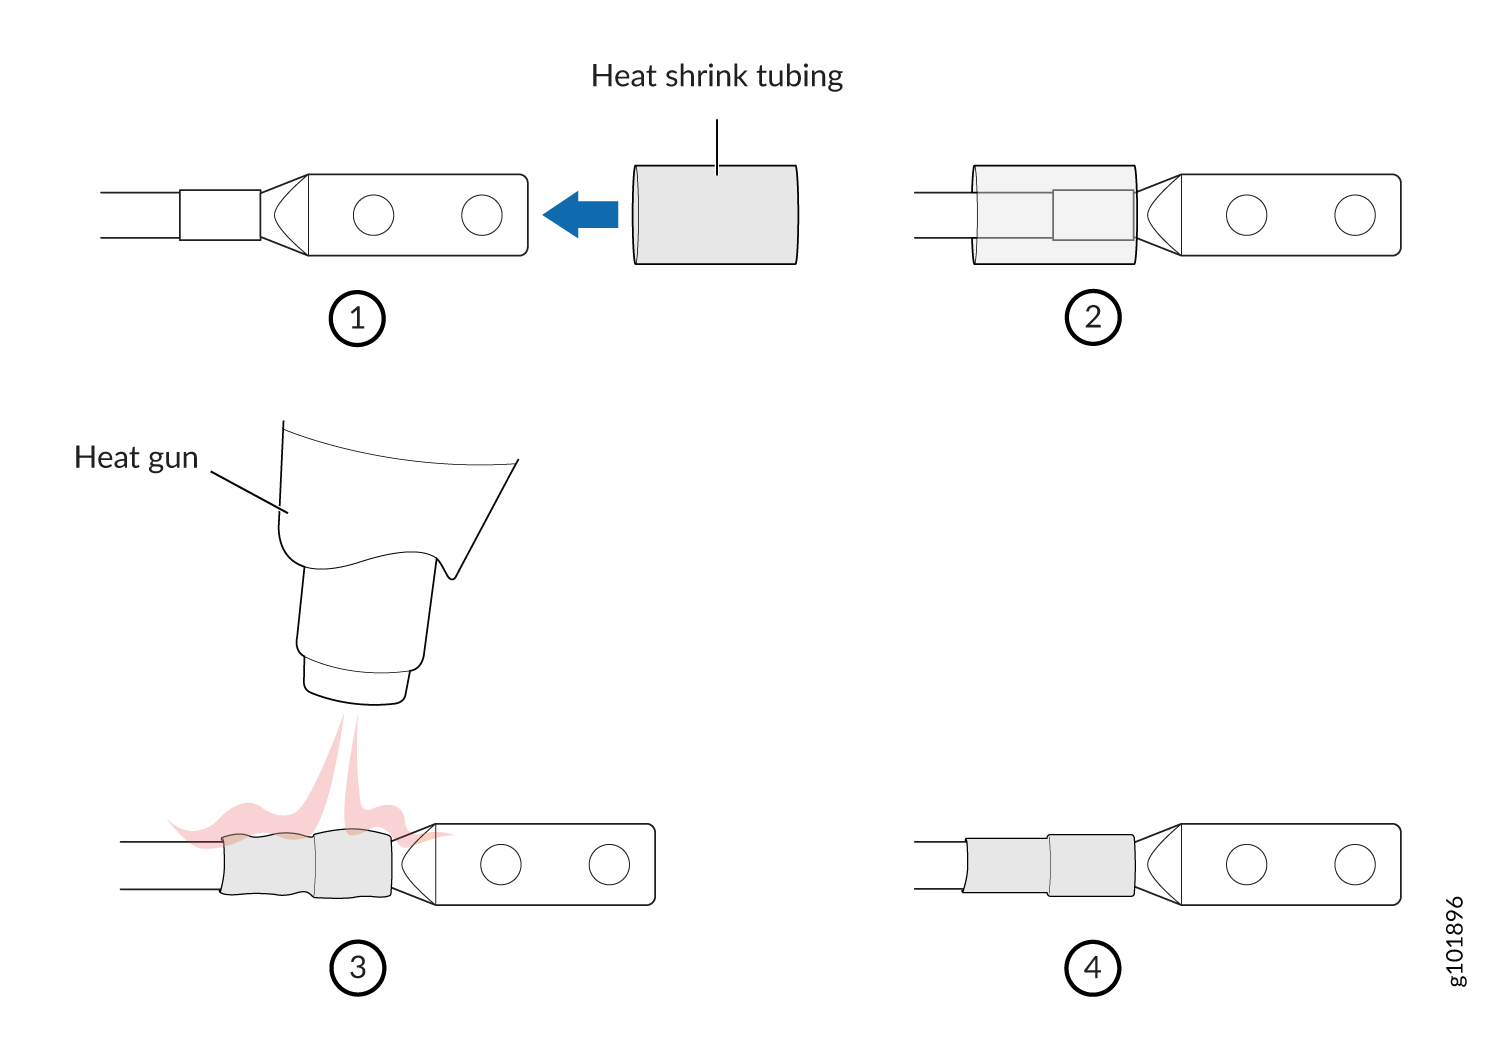
-
Install each power cable lug on the relevant DC power input terminal,
securing each cable lug with the nut (see Figure 15 and Figure 16). Apply between 23 lb-in.
(2.6 Nm) and 25 lb-in. (2.8 Nm) of torque to each nut. (Use the 13/32 in.
(10 mm) nut driver or socket wrench.)
Secure each positive (+) DC source power cable lug to the RTN (return) DC power input terminal.
Secure each negative (–) DC source power cable lug to the –48 V (input) DC power input terminal.
Figure 15: Connect the DC Power Source Cables to a JNP10K-PWR-DC3 Power Supply (INP-A1) Figure 16: Connect the DC Power Source Cables to a JNP10K-PWR-DC3 Power Supply (INP-A0)
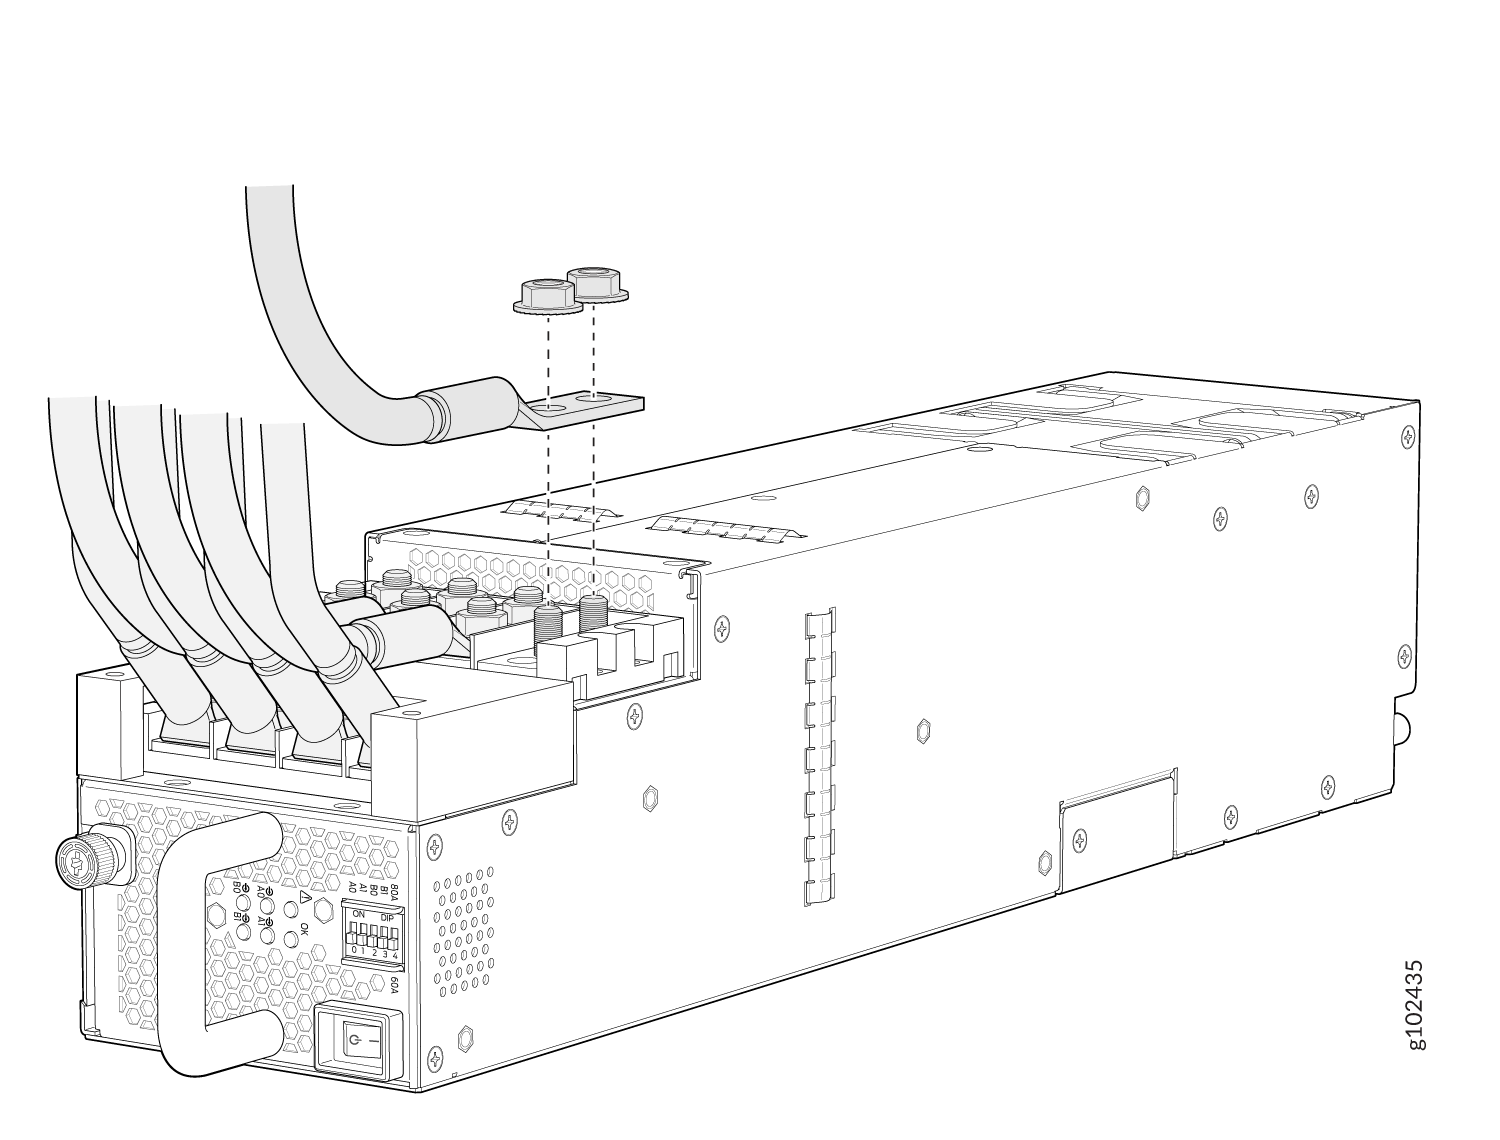
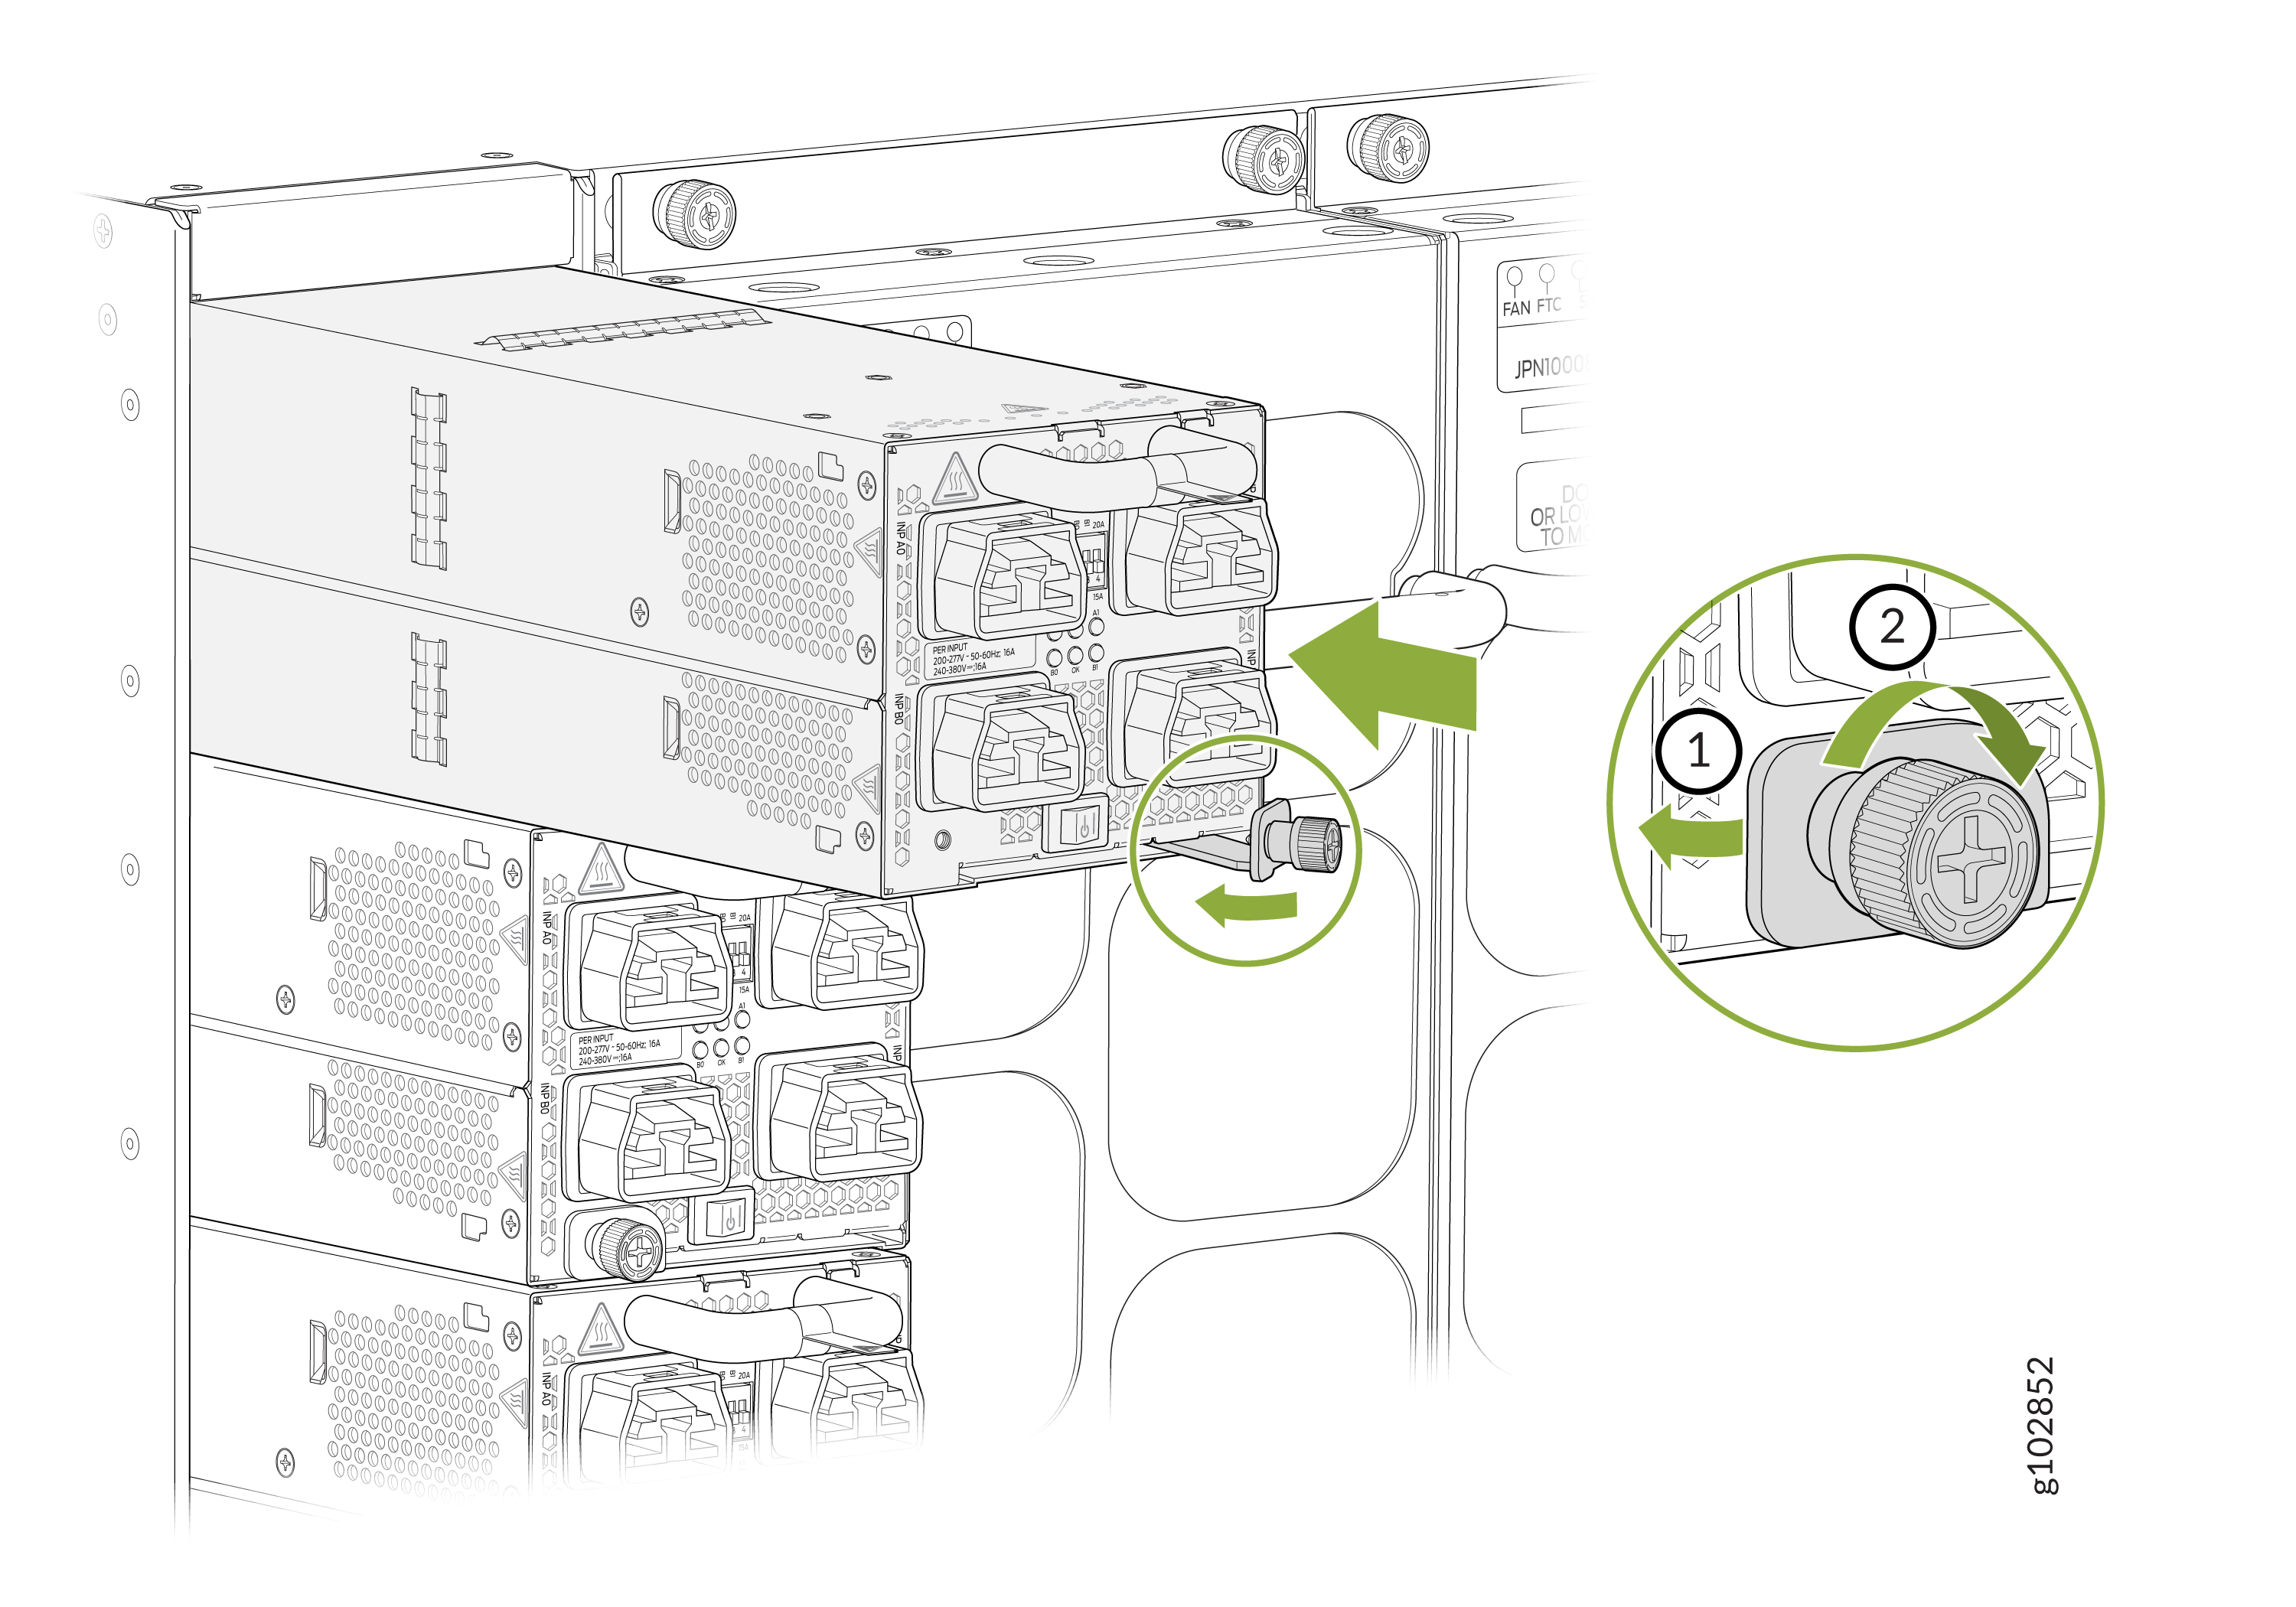
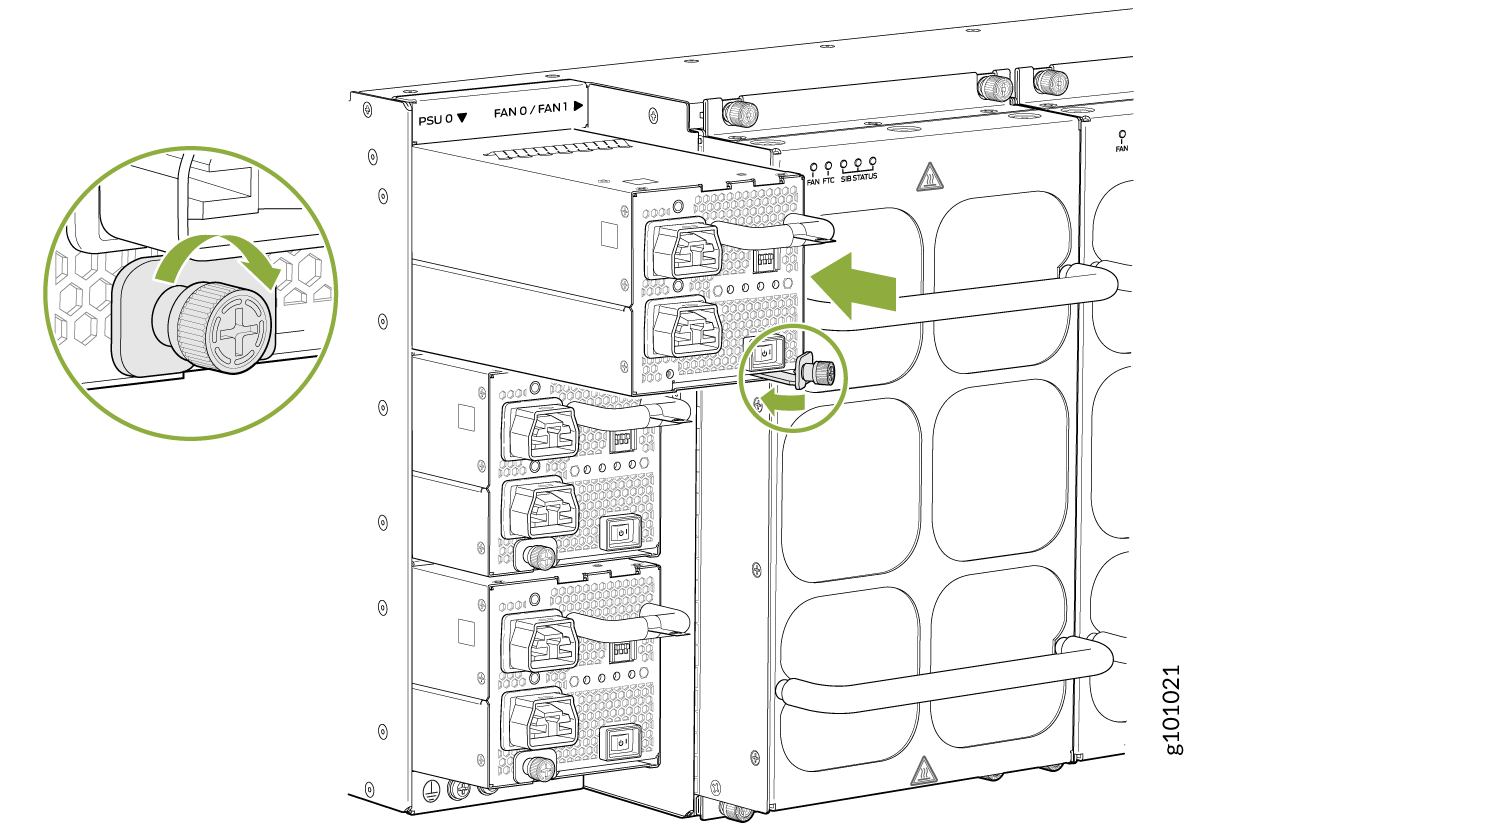
-
Tighten the captive screw by turning it clockwise with the Phillips (+)
screwdriver, number 1. When the captive screw is completely tight, the latch
locks into the router chassis.
Figure 17: Install a JNP10K-PWR-DC3 in a PTX10004
 1—
1—Lock latch
2—Tighten captive screw (clockwise)
Remove a JNP10K-PWR-DC3 Power Supply
Before you remove a DC power supply from the router:
-
Review how to prevent ESD damage. See Prevention of Electrostatic Discharge Damage.
-
Ensure that the following parts and tools are available before you remove a JNP10K-PWR-DC3 power supply:
-
Heat-protective gloves that can withstand temperatures from 158° F to 176° F (70° C to 80° C)
-
Electrostatic discharge (ESD) grounding strap
-
Phillips (+) screwdriver, numbers 1 and 2
-
13/32 in. (10 mm) nut driver or socket wrench
-
Replacement power supply or a cover for the power supply slot
-
A working JNP10K-PWR-DC3 power supply can reach temperatures of 158 °F
through 176 °F (70 °C through 80 °C) when the equipment is on. In order to
avoid injury, do not touch a running power supply with your bare
hands.
Before you remove a power supply, ensure that you have power supplies sufficient to power the router left in the chassis. See Power Requirements for PTX10004 Components.
Do not leave the power supply slot empty for a long time while the router is operational. Either replace the power supply promptly or install an Active Blank Power Module (ABPM) over the empty slot.
To remove a JNP10K-PWR-DC3 power supply from a PTX10004 router:
-
Wrap and fasten one end of the ESD grounding strap around your bare wrist
and connect the other end of the strap to an ESD point on the chassis. An
ESD point is located next to the protective earthing terminal and below
PSU 2 on the rear of the PTX10004 (see Figure 18).
Figure 18: ESD Point on the Rear of the MX10004
1—
ESD point
-
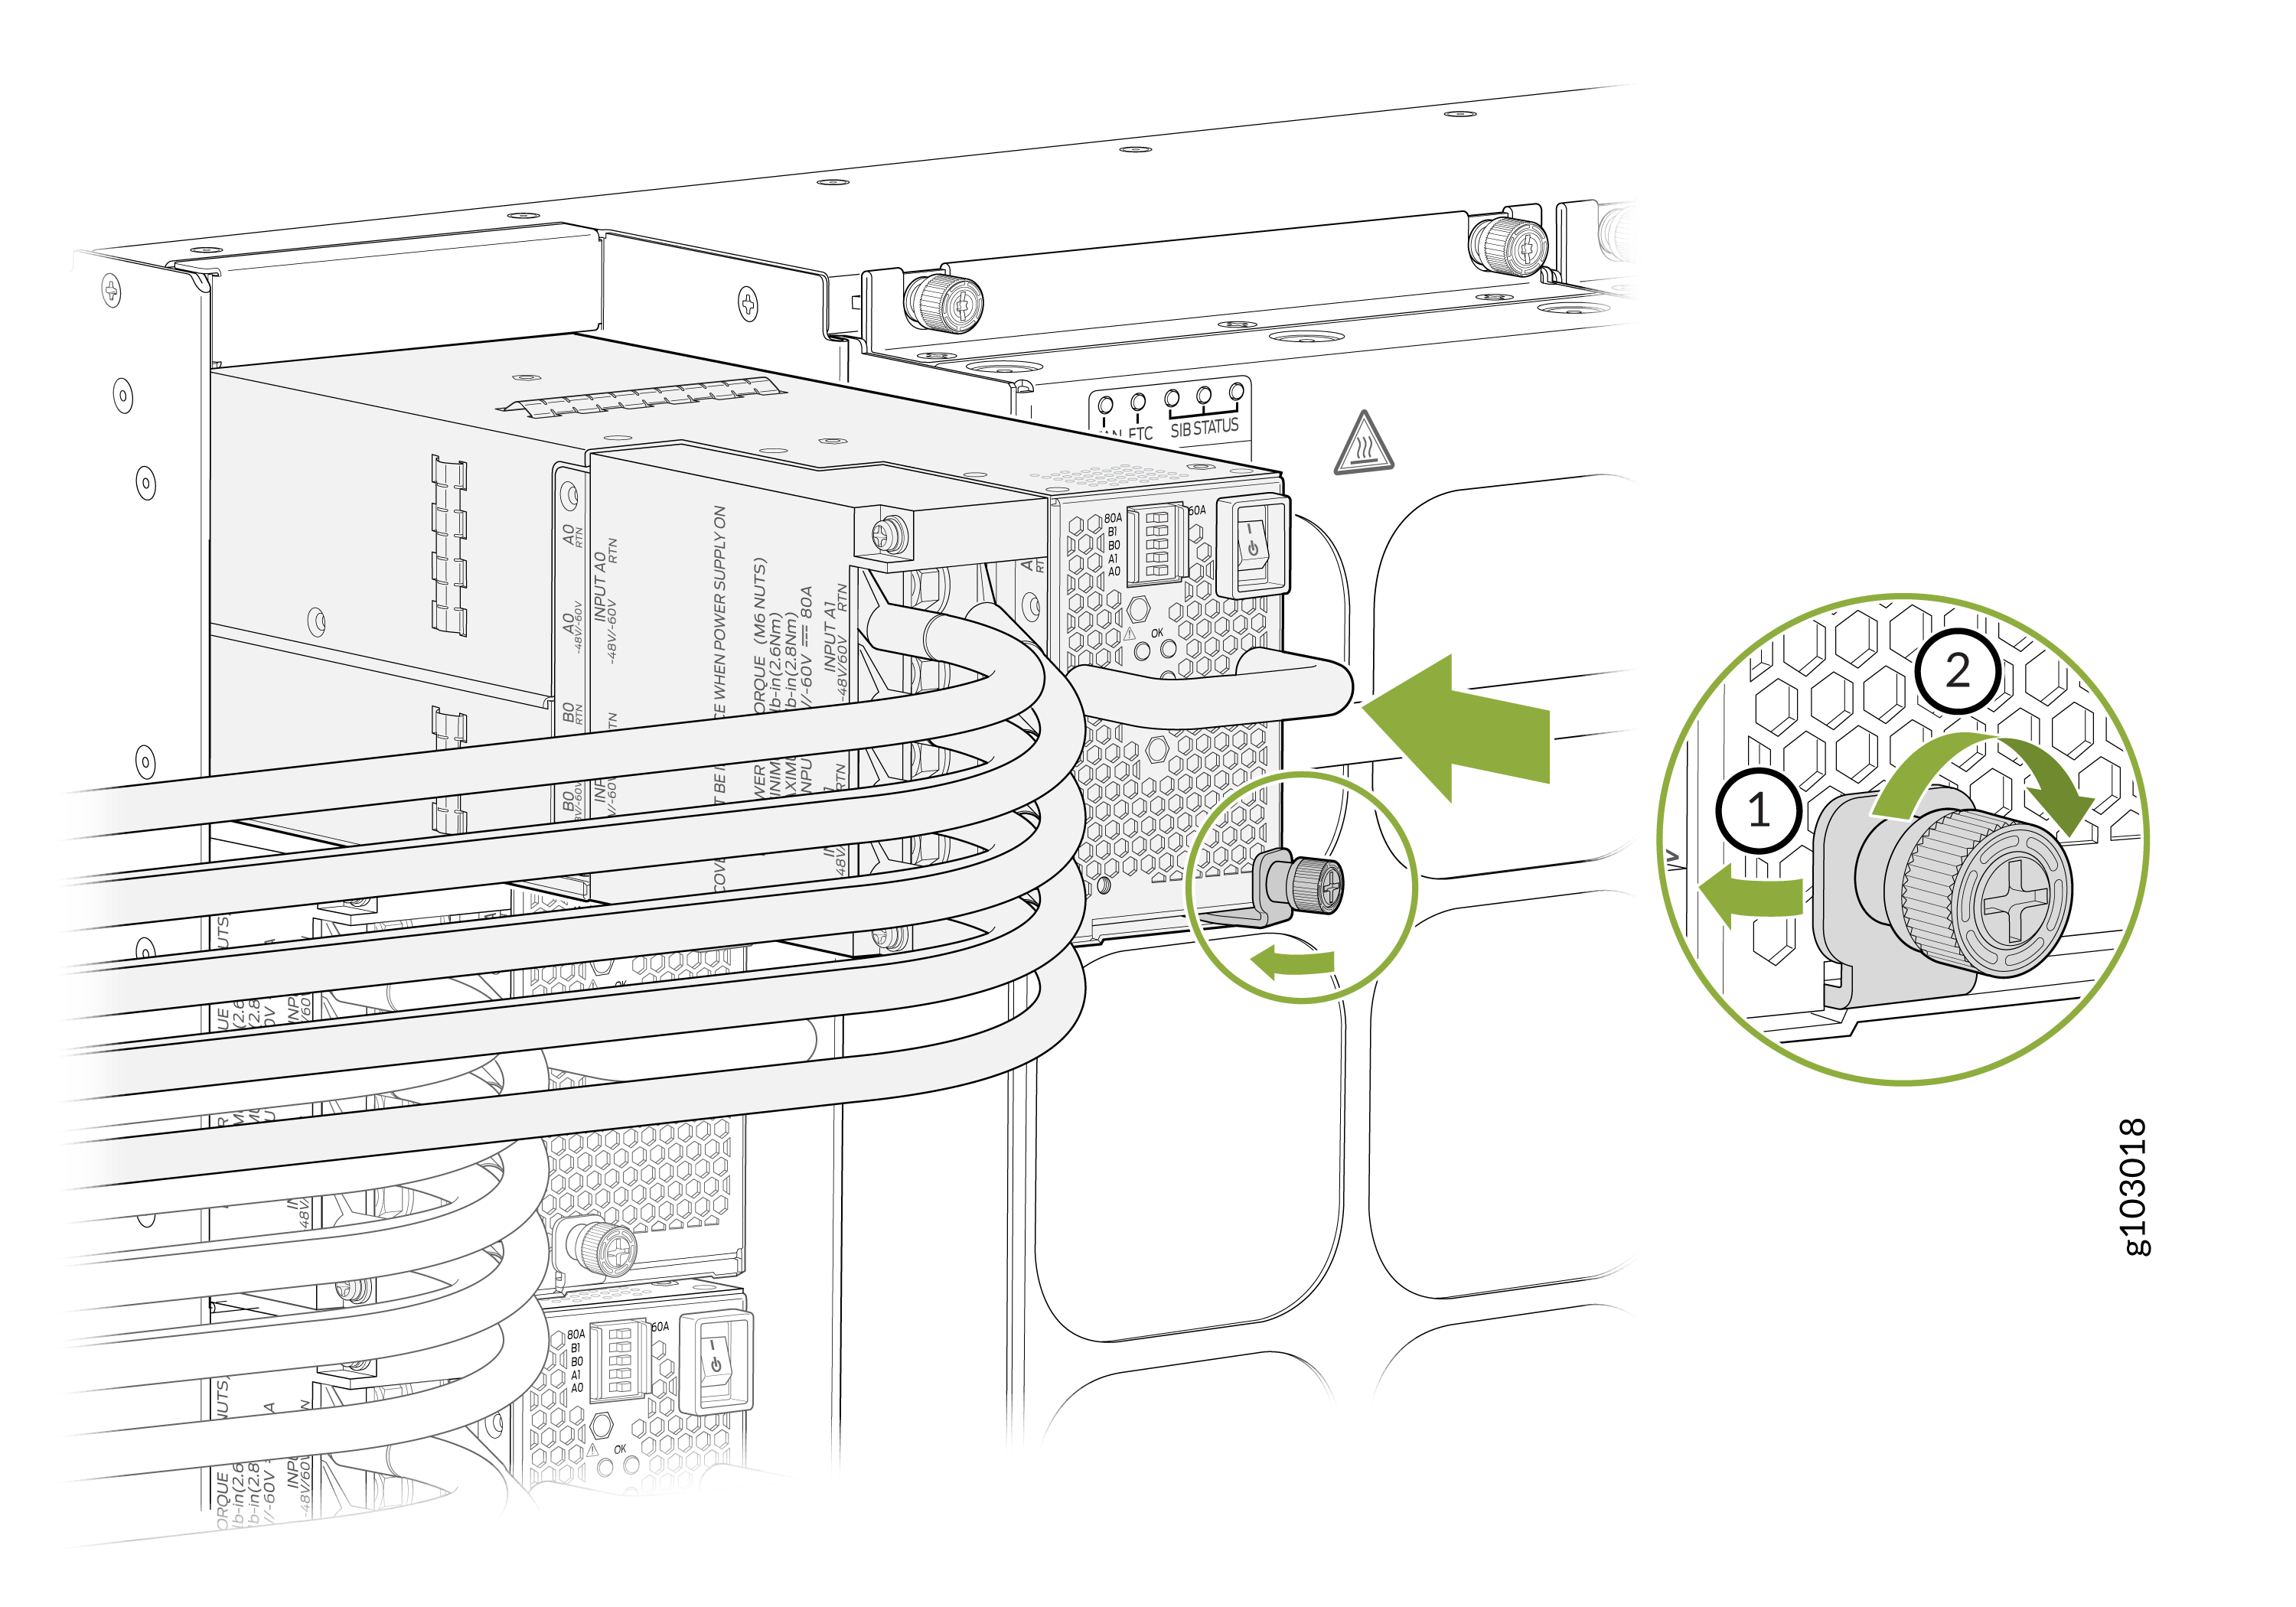
Unscrew the captive screw counterclockwise using the Phillips (+)
screwdriver, number 1. See Figure 19.
Figure 19: Remove a JNP10K-PWR-DC3 Power Supply from a PTX10004
 1—
1—Loosen captive screw (counterclockwise)
2—Release latch
-
Rotate the captive screw away from the faceplate of the power supply to
release the latch.
Note:
Ensure that the ejector is fully open to prevent damaging the chassis. See Figure 20.
Figure 20: Open Power Supply Ejector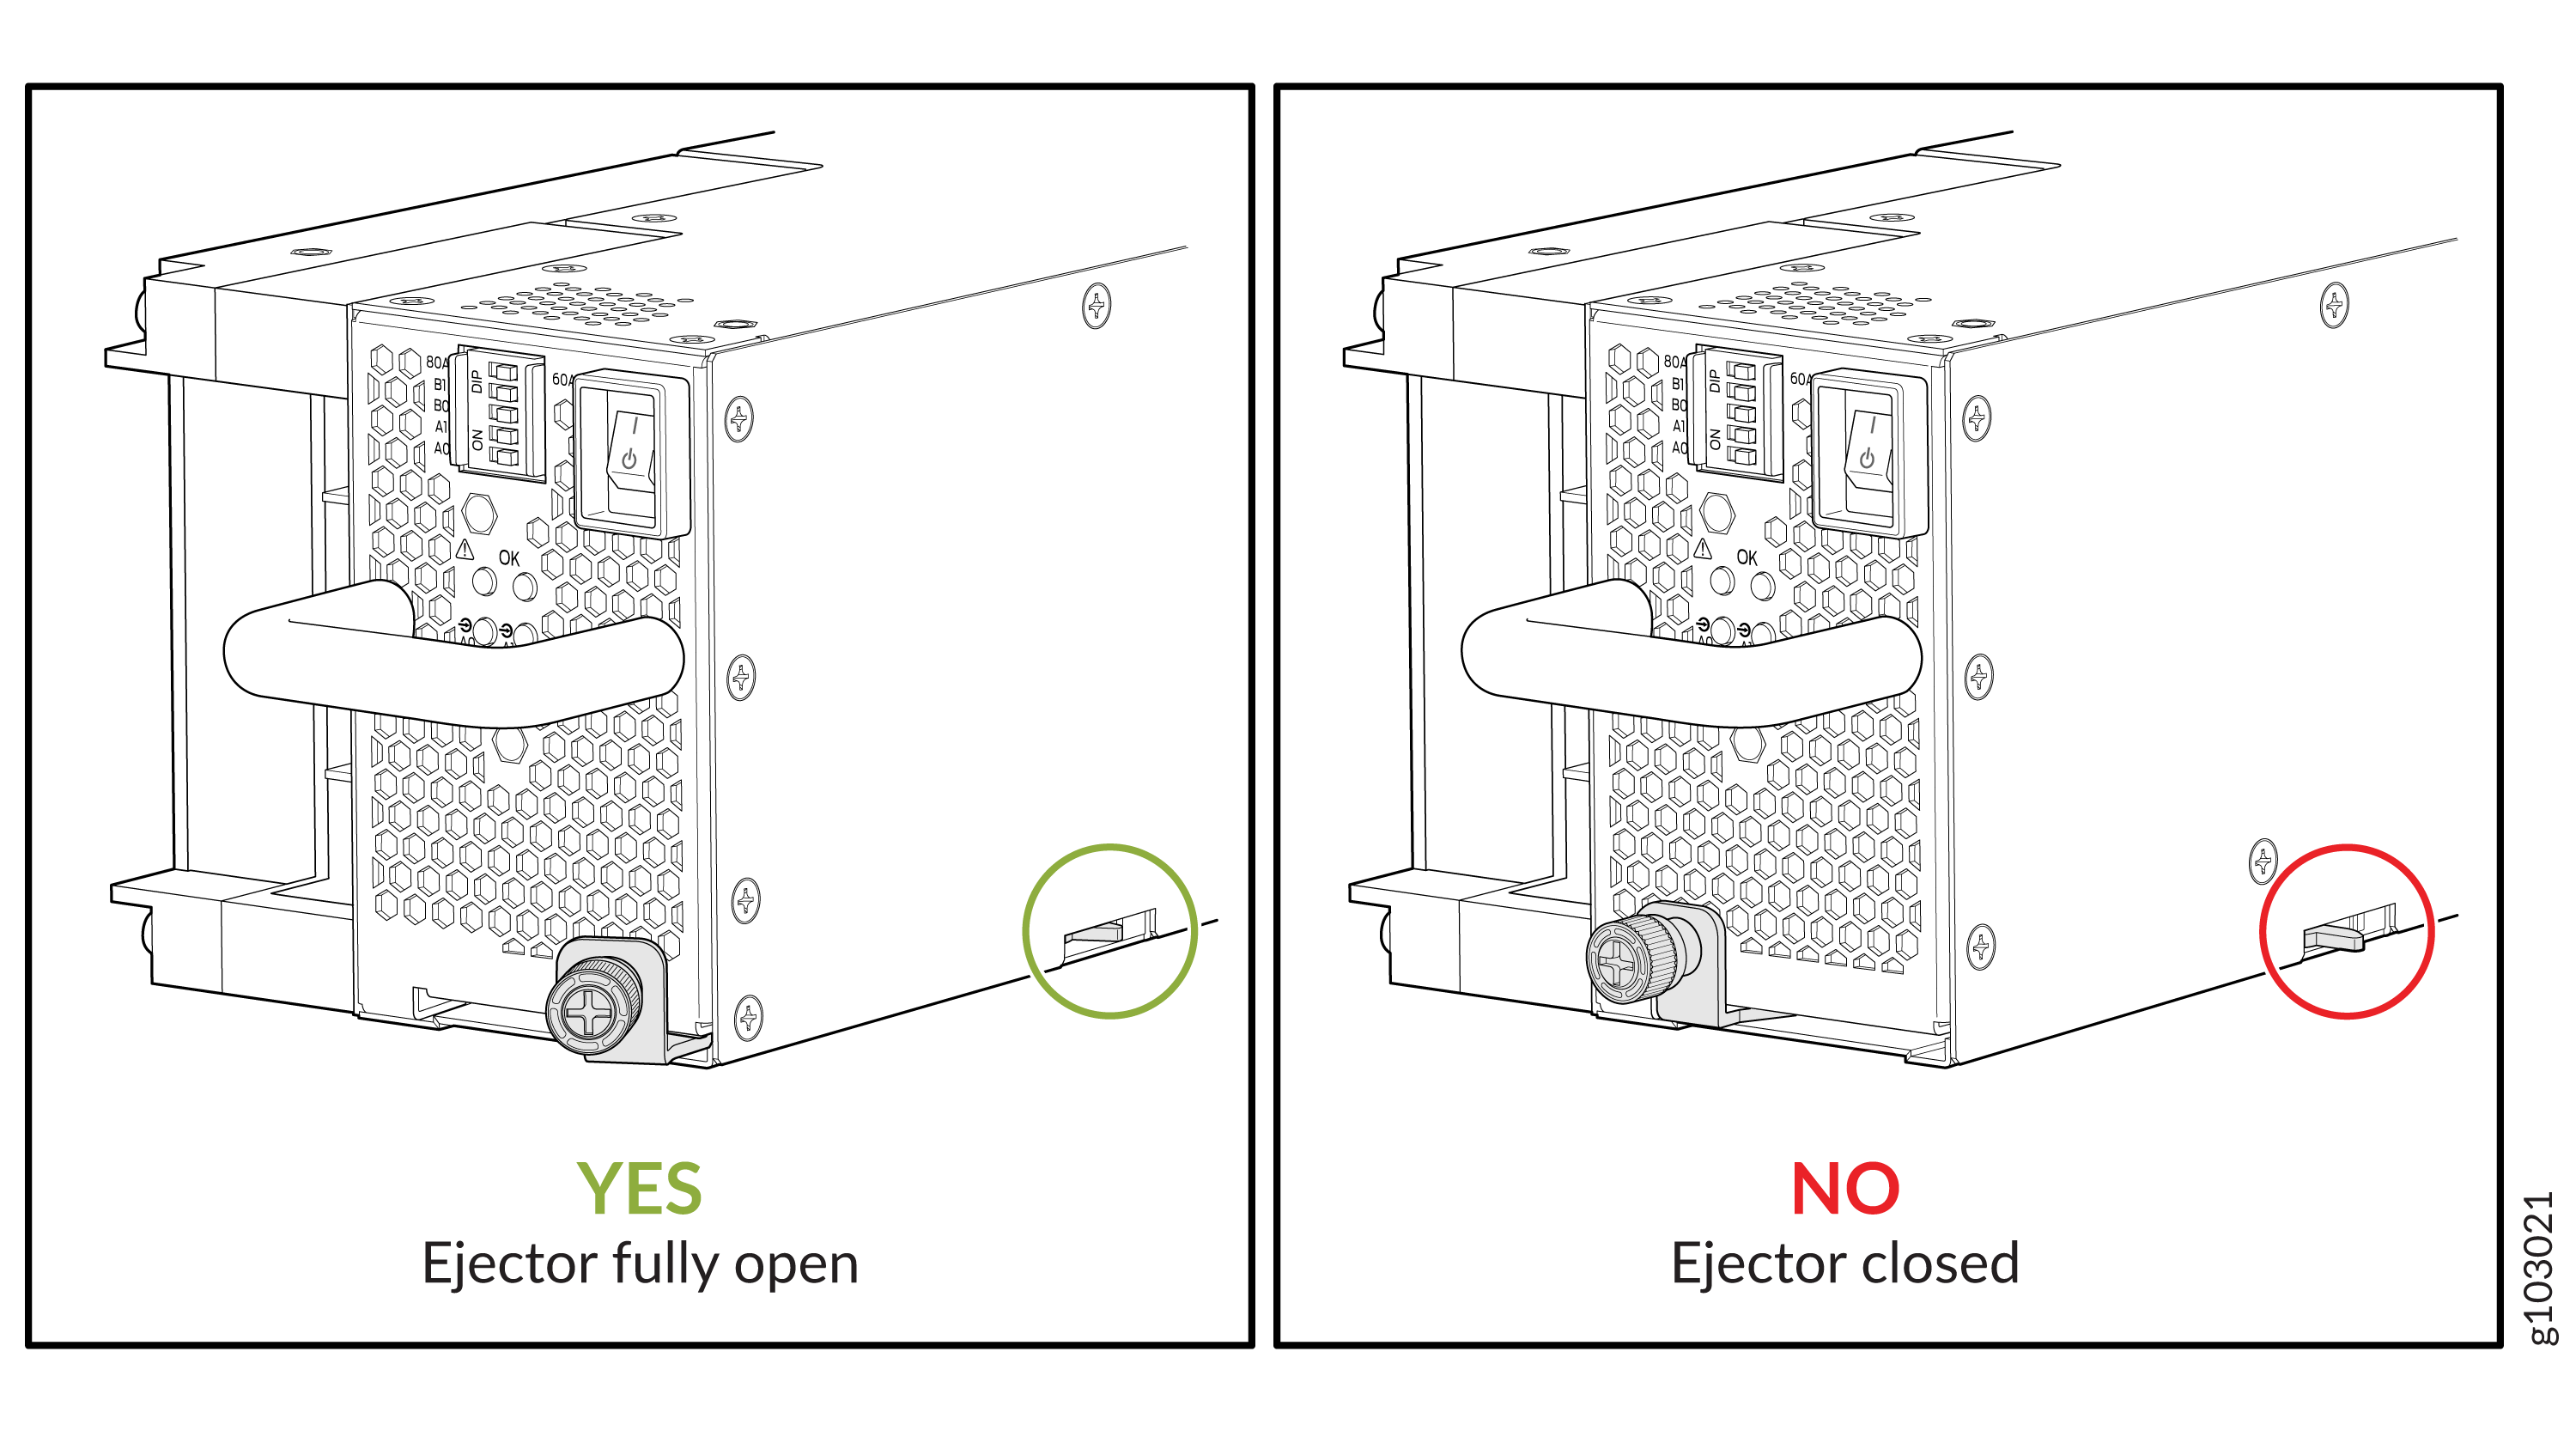
Install a JNP10K-PWR-AC3H Power Supply
Use the same type of power supply in all slots. Do not mix power supply models in a production chassis. The only time you are allowed to have two models concurrently running in a system is when you are in the process of hot-swapping all JNP10K-PWR-AC/JNP10K-PWR-AC2 power supplies with JNP10K-PWR-AC3H power supplies.
Protect yourself from severe burns by wearing heat-protective gloves when removing a running JNP10K-PWR-AC3H power supply from the chassis. The power supply can reach temperatures of 158°F through 176°F (70°C to 80°C) when the equipment is On.
Before you install a JNP10K-PWR-AC3H power supply in the chassis:
-
Ensure that you have followed all safety warnings and cautions.
-
Ensure that you understand how to prevent ESD damage. See Prevention of Electrostatic Discharge Damage.
-
If the AC power source outlets have a power switch, set them to the off (O) position. Ensure that you have the following parts and tools available to install the JNP10K-PWR-AC3H power supply:
-
Electrostatic discharge (ESD) grounding strap
-
Phillips (+) screwdriver, number 1
-
Power cables appropriate for your geographical location (for low-voltage installations) or input amperage (for high-voltage installations). See PTX10004 Power Cable Specifications.
-
To install a JNP10K-PWR-AC3H power supply in a PTX10004:
-
Wrap and fasten one end of the ESD grounding strap around your bare wrist
and connect the other end of the strap to an ESD point on the chassis. There
is an ESD point located next to the protective earthing terminal and below
PSU 2 on the rear of the PTX10004 (see Figure 31).
Figure 21: ESD Point on the Rear of the PTX10004
1—
ESD point
-
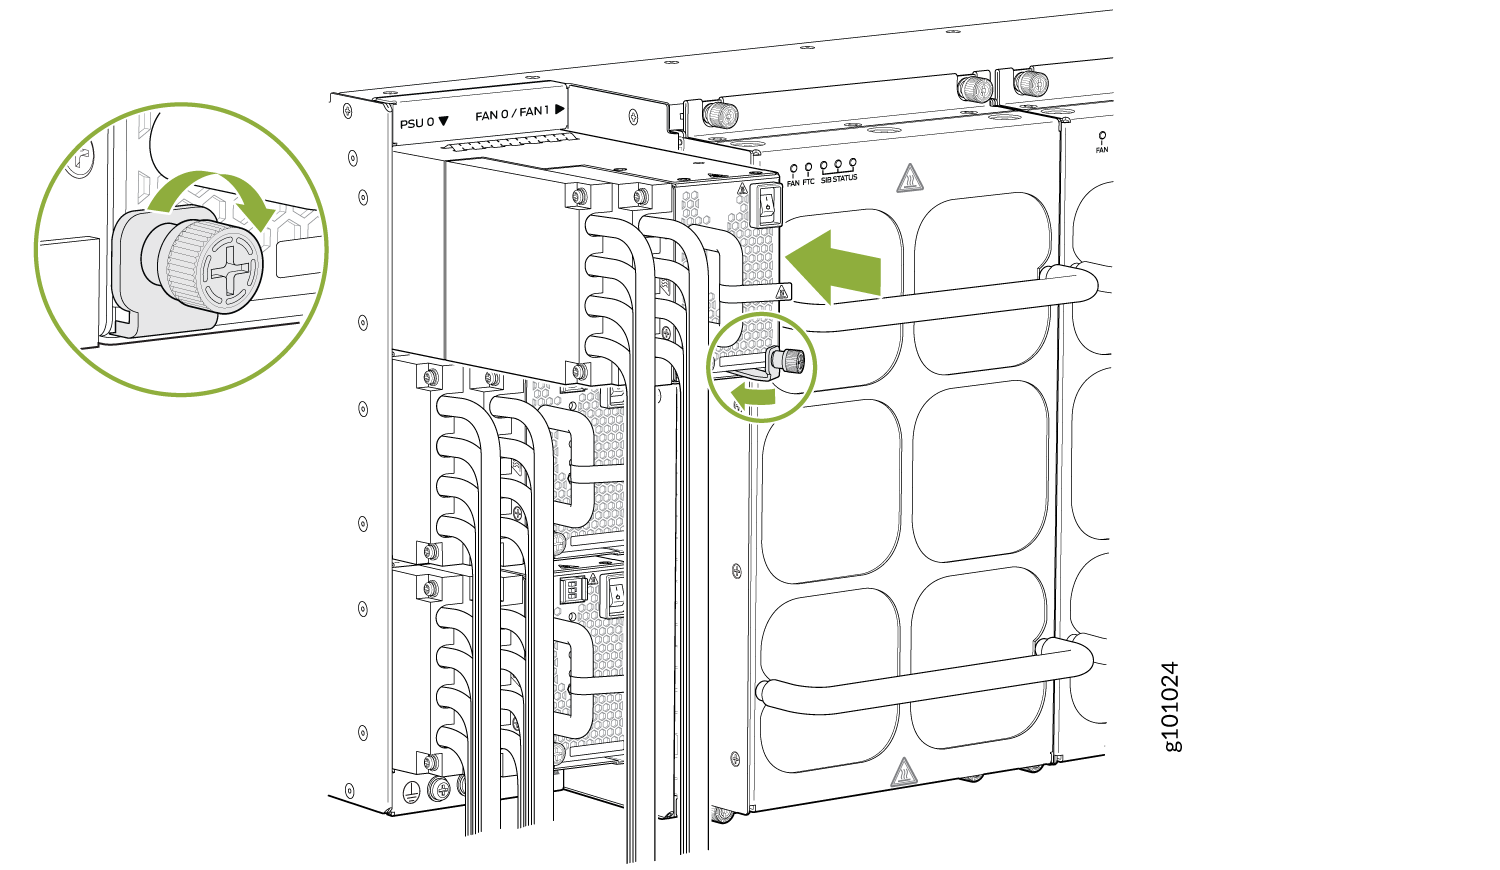
Using both hands, place the power supply in the power supply slot on the
rear of the system. Slide the power supply straight into the chassis until
the power supply is fully seated in the slot. Ensure that the power supply
faceplate is flush with any adjacent power supply faceplates or power supply
covers (see Figure 22).
Figure 22: Install a JNP10K-PWR-AC3H
-
Attach each power cable to a dedicated power source (A0, B0, A1, and B1).
The JNP10K-PWR-AC3H only requires that each power supply be connected to a
separate source.
-
When installing the right angle power cords, the left column of
inputs (A0 and B0) should be connected first. See Figure 3.
Figure 23: Right Angle Plugs for A0 and B0 Inputs of AC3H

-
Next connect the right column of inputs A1 and/or B1. See Figure 24.
Figure 24: Right Angle Plugs for A1 and B1 Inputs of AC3H
-
If you want to use straight power cords, you may connect the
straight power cords in any order. See Figure 5
Figure 25: Connecting Straight Power Cords to AC3H
Note:Installing baffle is optional, and only to be used when you want to redirect the air flow from the left side of the PSU to the rear of the router. This ensures NEBs compliance.
The baffle should be installed before the power supply is inserted int the router. See Figure 26.
Figure 26: Installing Baffle in JNPR10K-PWR-AC3H
-
When installing the right angle power cords, the left column of
inputs (A0 and B0) should be connected first. See Figure 3.
-
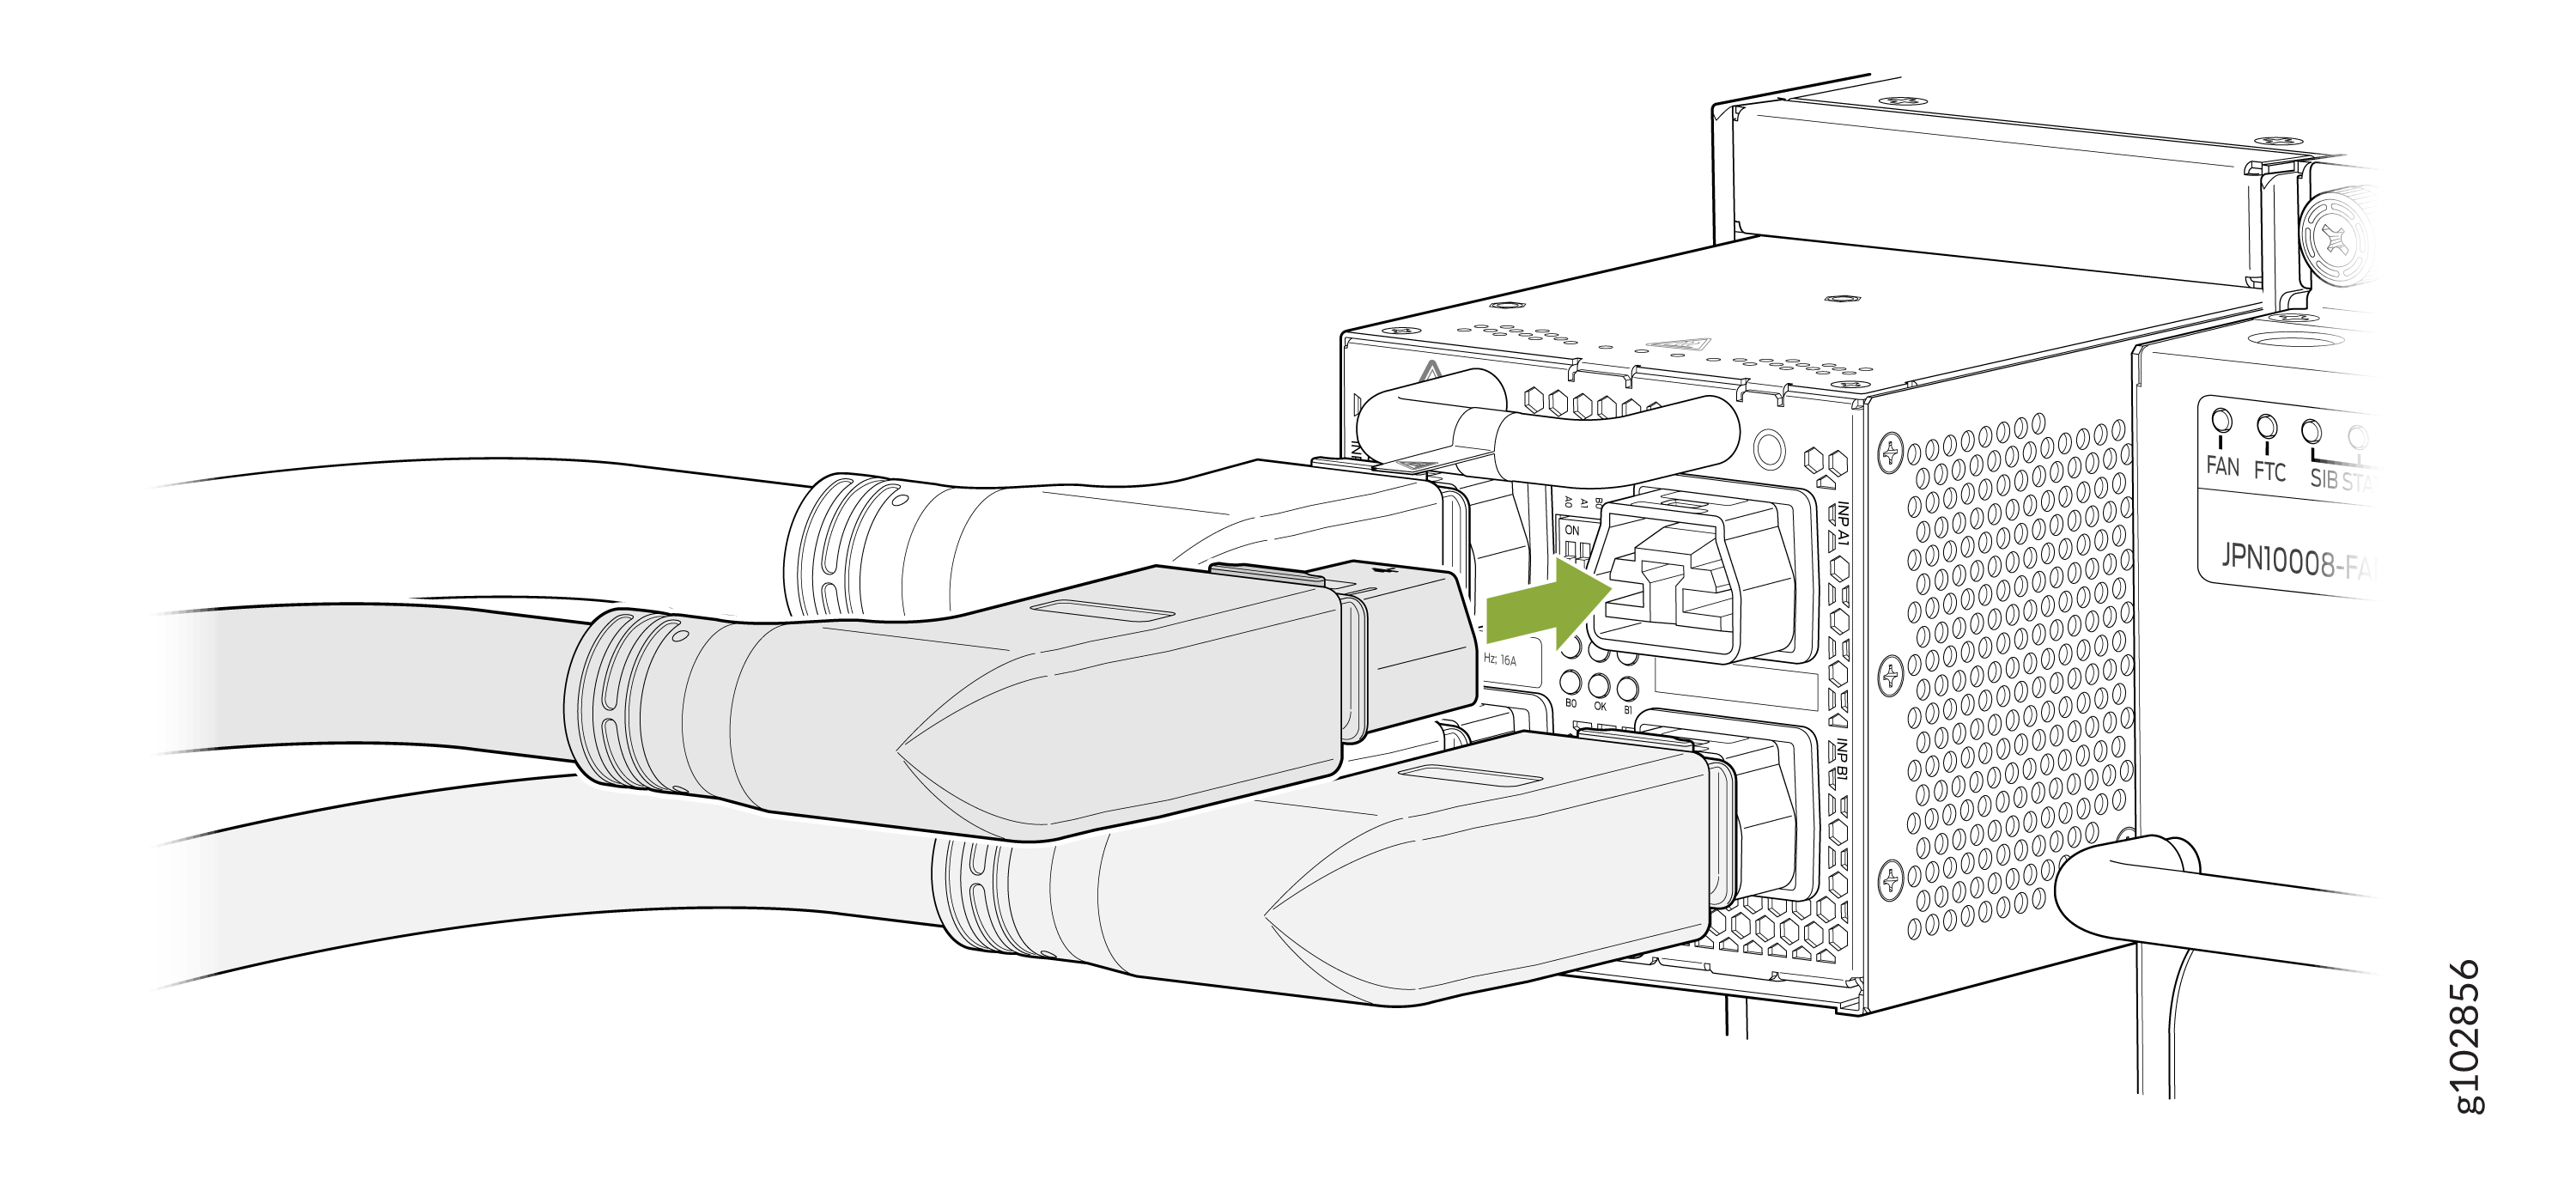
For each power cable, insert the end of the cable with C21 connector into
the JNP10K-PWR-AC3H power supply. Use the retainers to keep the power cord
in its place in the power supply. See Figure 27.
Figure 27: Installing a JNPR10K-PWR-AC3H using RA Power Cords with Baffle
Warning:
Ensure that the power cords do not block access to router components or drape where people can trip on them.
Remove a JNP10K-PWR-AC3H Power Supply
Before you remove a JNP10K-PWR-AC3H power supply from the chassis:
-
Ensure that you understand how to prevent ESD damage. See Prevention of Electrostatic Discharge Damage.
-
Ensure that you have the following parts and tools available:
-
Heat-protective gloves able to withstand temperatures of 158°F (70°C)
-
Electrostatic discharge (ESD) grounding strap
-
Phillips (+) screwdriver, number 1
-
Replacement power supply or a cover for the power supply slot
-
Protect yourself from severe burns by wearing heat-protective gloves when removing a working JNP10K-PWR-AC3H power supply from the chassis. The power supply can reach temperatures of 158°F through 176°F (70°C to 80°C) when the equipment is On.
Before you remove a power supply, ensure that you have power supplies sufficient to power the router left in the chassis. See Power Requirements for PTX10004 Components.
Do not leave the power supply slot empty for a long time while the router is operational. Either replace the power supply promptly or install a ABPM or a cover over the empty slot.
To remove a JNP10K-PWR-AC3H power supply from a PTX10004 router:
-
Wrap and fasten one end of the ESD grounding strap around your bare wrist
and connect the other end of the strap to an ESD point on the chassis. There
is an ESD point located next to the protective earthing terminal and below
PSU 2 on the rear of the PTX10004 (see Figure 33).
Figure 28: ESD Point on the Rear of the PTX10004
1—
ESD point
-
Remove the retainers using a #1 Philips screw driver and detach the power
cords from the PSU.
Figure 29: Detach the Power Cords from JNP10K-PWR-AC3H Power Supply
-
Unscrew the captive screw counterclockwise by using the
Phillips (+) screwdriver, number 1. See Figure 30.
Note:
Ensure that the ejector is fully open to avoid scratching the chassis.
Figure 30: Remove a JNP10K-PWR-AC3H Power Supply from a PTX10004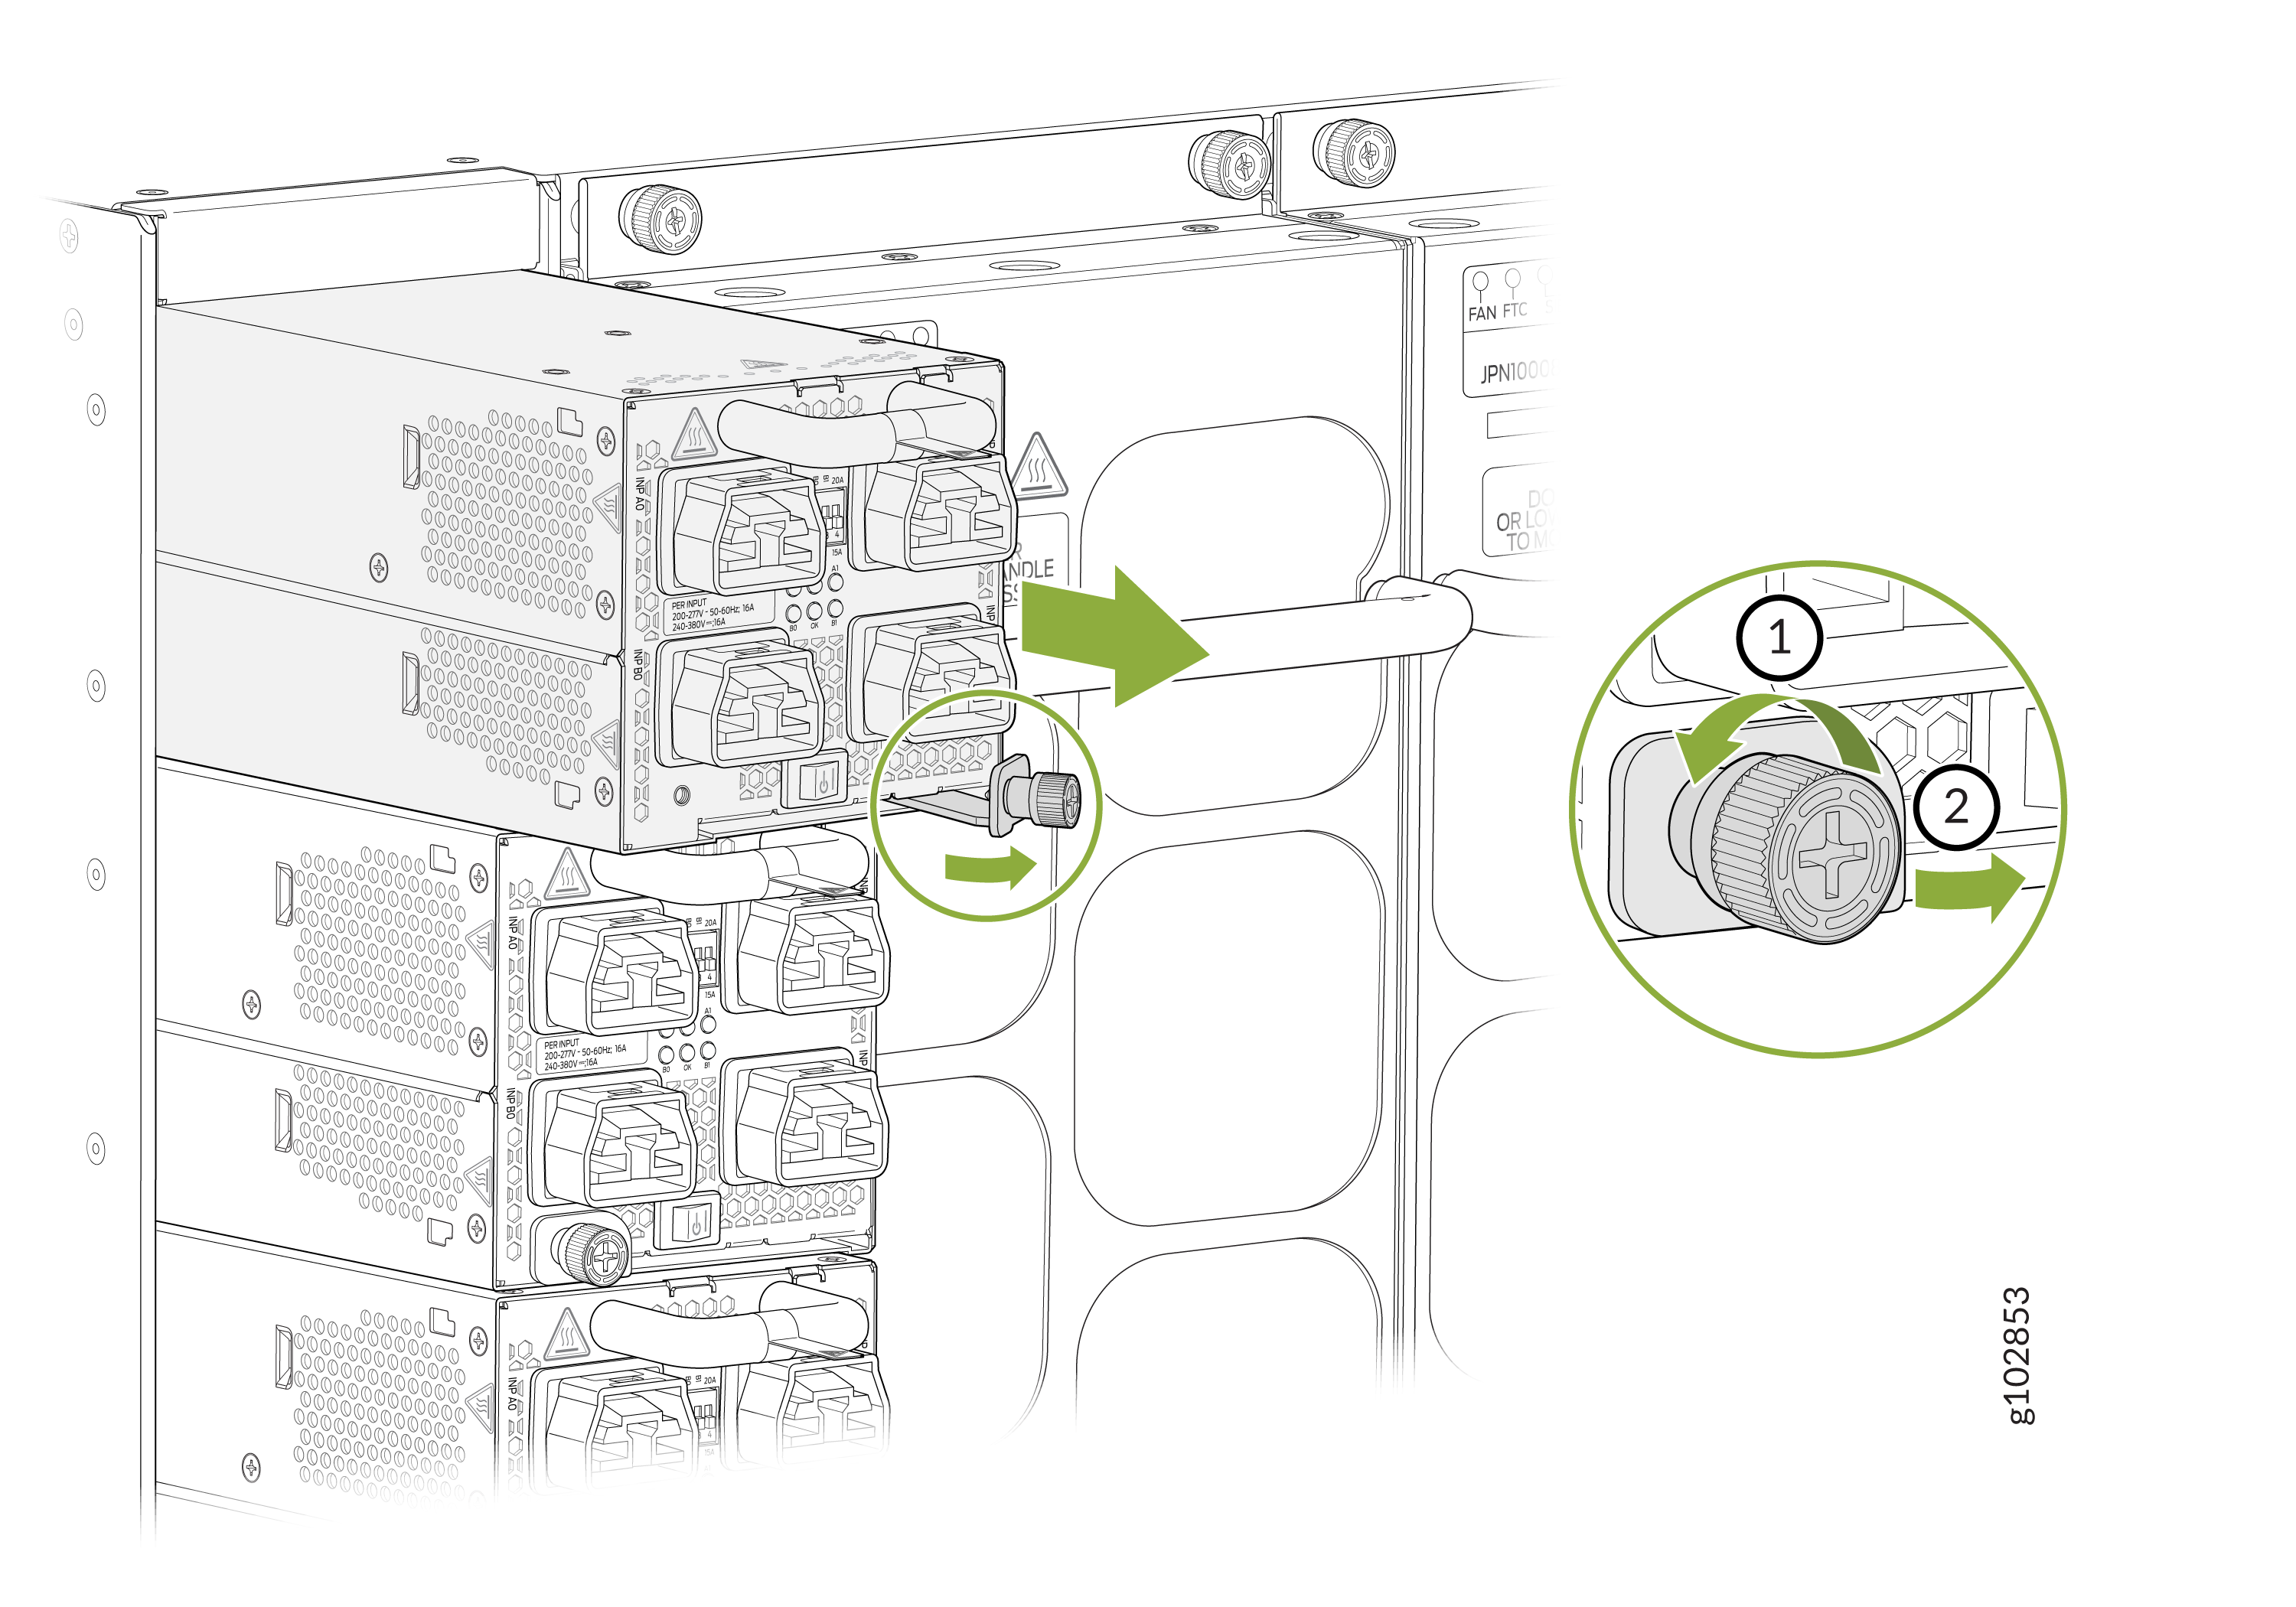
-
Wear heat protective gloves before you remove the power supply from the
chassis.
Install a JNP10K-PWR-AC2 Power Supply
Use the same type of power supply in all slots. Do not mix power supply models in a production chassis. The only time you are allowed to have two models concurrently running in a system is when you are in the process of swapping out all JNP10K-PWR-AC3 power supplies with all JNP10K-PWR-AC2 power supplies.
Protect yourself from severe burns by wearing heat-protective gloves when removing a running JNP10K-PWR-AC2 power supply from the chassis. The power supply can reach temperatures between 158°F to 176°F (70°C to 80°C) under running conditions.
Before you install a JNP10K-PWR-AC2 power supply in the chassis:
-
Ensure that you have followed all safety warnings and cautions.
-
Ensure that you understand how to prevent ESD damage. See Prevention of Electrostatic Discharge Damage.
-
If the AC or DC power source outlets have a power switch, set them to the off (O) position. Ensure that you have the following parts and tools available to install the JNP10K-PWR-AC2 power supply:
-
Electrostatic discharge (ESD) grounding strap
-
Phillips (+) screwdriver, number 1
-
Power cables appropriate for your geographical location (for low-voltage installations) or input amperage (for high-voltage installations). See PTX10004 Power Cable Specifications. HVAC and HVDC connectors and lugs must be installed by a qualified electrician before installation.
-
To install a JNP10K-PWR-AC2 power supply in a PTX10004:
-
Wrap and fasten one end of the ESD grounding strap around your bare wrist
and connect the other end of the strap to an ESD point on the chassis. There
is an ESD point located next to the protective earthing terminal and below
PSU 2 on the rear of the PTX10004 (see Figure 31).
Figure 31: ESD Point on the Rear of the PTX10004
 1—
1—ESD point
-
Using both hands, place the power supply in the power supply slot on the
rear of the system. Slide the power supply straight into the chassis until
the power supply is fully seated in the slot. Ensure that the power supply
faceplate is flush with any adjacent power supply faceplates or power supply
covers (see Figure 32).
Figure 32: Install a JNP10K-PWR-AC2
Troubleshooting an Unsupported Power Supply Unit on Junos OS Evolved
Problem
Description
When you partially insert a power supply unit (PSU) into a powered-up device, the PSU contacts the power connector, but fails to engage the short pin. Although the status LEDs light up without the short pin engagement, Junos OS Evolved ignores the PSU.
Cause
Without detecting the short pin engagement, Junos OS Evolved ignores the PSU, even if you push the PSU further in to engage the short pin. Junos OS Evolved checks the engagement of the short pin only thrice. The checks happen at an interval of 500 milliseconds (ms) after you partially insert the PSU. After the three attempts, Junos OS Evolved assumes that the PSU is not accessible and marks it as an unsupported PSU.
Solution
For Junos OS Evolved to recognize the PSU:
Unplug the PSU from the rear of the chassis by pulling out the PSU halfway to disconnect the backplane power connector.
Wait for 30 seconds.
Slide the PSU straight into the chassis until the PSU is fully seated in the slot. Ensure that the PSU faceplate is flush with any adjacent PSU faceplates or PSU covers.
The status LEDs light up.
Check whether the PSU is registered by Junos OS Evolved.
Issue the CLI show chassis environment psm command to check the status of the installed PSU. As shown in the sample output, the value Online in the row labeled State indicates that the PSU is functioning normally:
user@host> show chassis environment psm
PSM 2 status:
  State                      Online
  Temperature                32 degrees C / 89 degrees F
  Temperature 1              34 degrees C / 93 degrees F
  Temperature 2              35 degrees C / 95 degrees F
  Temperature 3              44 degrees C / 111 degrees F
  Fans                       OK
  AC Input A0                OK
  AC Input A1                OK
  AC Input B0                OK
  AC Input B1                OK
  Check Input A0 Alarm       No
  Check Input A1 Alarm       No
  Check Input B0 Alarm       No
  Check Input B1 Alarm       No
  DC Output                  OK
  Hours Used                 506
  Firmware Version           Pri MCU 101.101.101.101
                             Sec MCU 102.102
                             Com MCU 101
                             led MCU 100
  Fan 1                      14304
  Fan 2                      15648
  HVDC Mode                  All Inputs are AC
  Health check Information:
      Status:                   Health Check Passed
      Last Result:              Passed
      Last Execution:           2024-01-31 06:58:29 UTC
      Next Scheduled Run:       2024-02-07 06:58:29 UTC
Remove a JNP10K-PWR-AC2 Power Supply
Before you remove a JNP10K-PWR-AC2 power supply from the chassis:
-
Ensure that you understand how to prevent ESD damage. See Prevention of Electrostatic Discharge Damage.
-
Ensure that you have the following parts and tools available:
-
Heat-protective gloves able to withstand temperatures of 158°F (70°C)
-
Electrostatic discharge (ESD) grounding strap
-
Phillips (+) screwdriver, number 1
-
Replacement power supply or a cover for the power supply slot
-
Protect yourself from severe burns by wearing heat-protective gloves when removing a working JNP10K-PWR-AC2 power supply from the chassis. These power supplies can reach temperatures between 158°F and 176°F (70°C to 80°C) under running conditions.
Before you remove a power supply, ensure that you have power supplies sufficient to power the router left in the chassis. See Power Requirements for PTX10004 Components.
Do not leave the power supply slot empty for a long time while the router is operational. Either replace the power supply promptly or install a cover over the empty slot.
To remove a JNP10K-PWR-AC2 power supply from a PTX10004 router:
-
Wrap and fasten one end of the ESD grounding strap around your bare wrist
and connect the other end of the strap to an ESD point on the chassis. There
is an ESD point located next to the protective earthing terminal and below
PSU 2 on the rear of the PTX10004 (see Figure 33).
Figure 33: ESD Point on the Rear of the PTX10004
1—
ESD point
-
Unscrew the captive screw counterclockwise by using the
Phillips (+) screwdriver, number 1. See Figure 34.
Note:
Ensure that the ejector is fully open to avoid scratching the chassis.
Figure 34: Remove a JNP10K-PWR-AC2 Power Supply from a PTX10004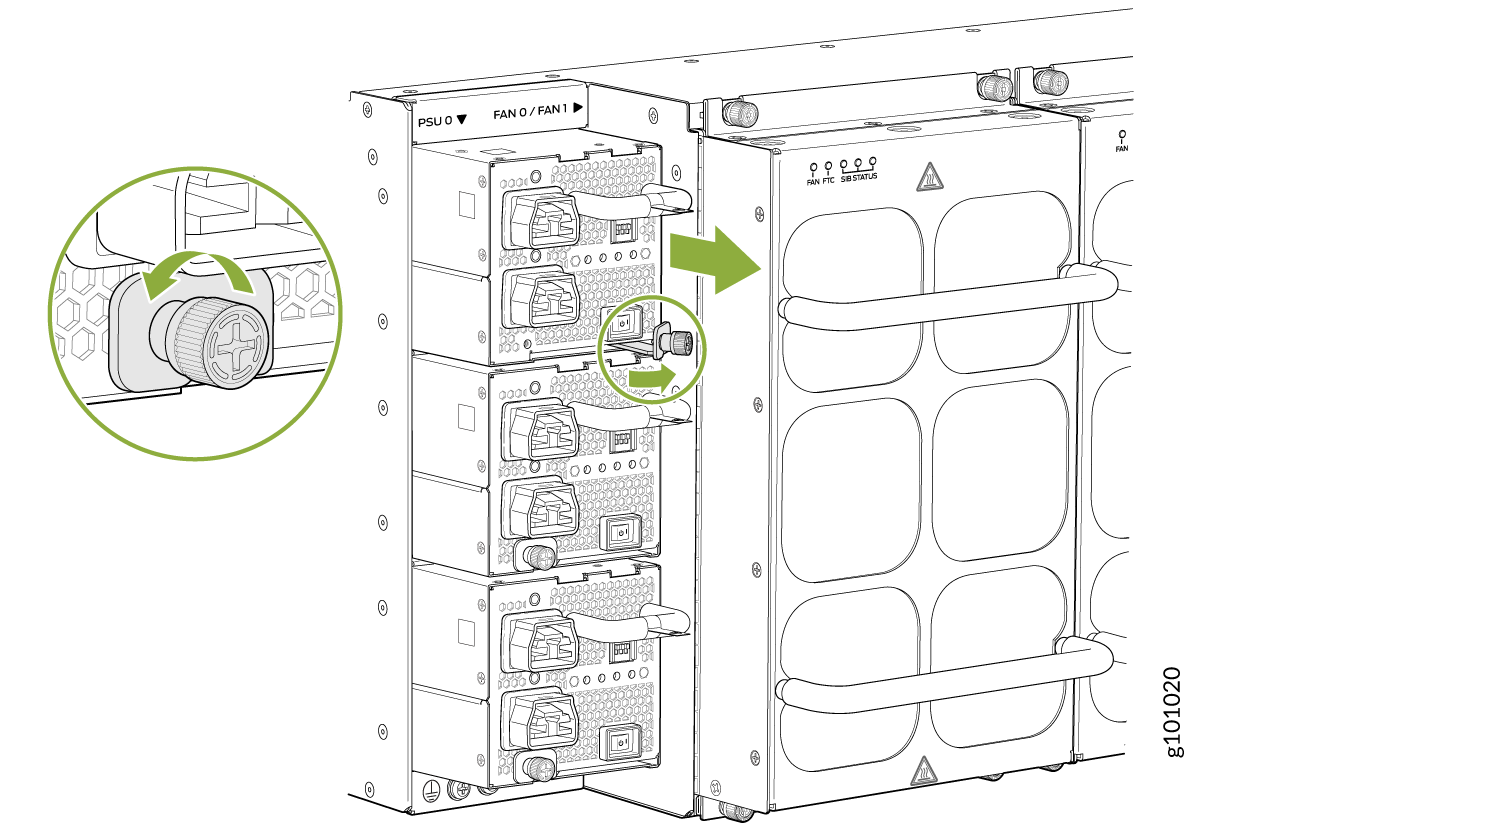
-
Wear heat protective gloves before you remove the power supply from the
chassis.
Install a JNP10K-PWR-DC2 Power Supply
Before you install a JNP10K-PWR-DC2 power supply in the chassis:
-
Ensure that you follow all safety warnings and cautions.
Warning:Before performing DC power procedures, ensure that power is removed from the DC circuit. To ensure that all power is off, locate the circuit breaker on the panel board that services the DC circuit, switch the circuit breaker to the off (O) position, and tape the switch handle of the circuit breaker in the off position.
Warning:Protect yourself from severe burns by wearing heat-protective gloves when removing a working JNP10K-PWR-DC2 power supply from the chassis. JNP10K-PWR-DC2 power supplies can reach temperatures between 158°F and 176°F (70°C to 80°C) under running conditions.
CAUTION:Before you connect power to the router, a licensed electrician must attach a cable lug to the grounding and power cables that you supply. A cable with an incorrectly attached lug can damage the router (for example, by causing a short circuit).
CAUTION:Use the same type of power supply in all slots. Do not mix power supply models in a production chassis.
CAUTION:To meet safety and electromagnetic interference (EMI) requirements and to ensure proper operation, you must connect the PTX10004 routers to earth ground before you connect them to power. For installations that require a separate grounding conductor to the chassis, use the protective earthing terminal on the router chassis to connect to earth ground. For instructions on connecting a PTX10004 router to ground using a separate grounding conductor, see Connect the PTX10004 Router to Earth Ground.
Note:The battery returns of the JNP10K-PWR-DC2 power supply must be connected as an isolated DC return (DC-I).
-
Ensure that you understand how to prevent ESD damage. See Prevention of Electrostatic Discharge Damage.
-
Ensure that you have the following parts and tools available to install a DC power supply:
-
Electrostatic discharge (ESD) grounding strap
-
Use high-current cable assembly, CBL-PWR2-BARE (not provided) with the cable lugs (provided) attached.
The provided terminal lugs for the JNP10K-PWR-DC2 are Panduit LCD4-14A-L, or equivalent, and sized for 4 AWG (21.1 mm2) power source cables. The 4 AWG (21.1 mm²) stranded wire should be rated 75° C or per local electrical code. We recommend that you install heat-shrink tubing insulation around the crimped section of the power cables and lugs.
-
13/32 in. (10 mm) nut driver or socket wrench
-
Phillips (+) screwdrivers, numbers 1 and 2
-
Multimeter
-
To install a JNP10K-PWR-DC2 power supply in a PTX10004:
-
Wrap and fasten one end of the ESD grounding strap around your bare wrist
and connect the other end of the strap to an ESD point on the chassis. There
is an ESD point located next to the protective earthing terminal and below
PSU 2 on the rear of the PTX10004 (see Figure 35).
Figure 35: ESD Point on the Rear of the PTX10004
1—
ESD point
-
Remove the plastic cable cover from the power input terminals by using the
Phillips (+) screwdriver, number 2, to loosen the screws (see Figure 36).
Figure 36: Remove the Plastic Cable Cover on a JNP10K-PWR-DC2 Power Supply
-
Verify that the DC power cables are correctly labeled before making
connections to the power supply. In a typical power distribution scheme
where the return is connected to chassis ground at the battery plant, you
can use a multimeter to verify the resistance of the
–48V and RTN DC cables to
chassis ground:
-
The cable with very high resistance (indicating an open circuit) to chassis ground is negative (–) and will be installed on the –48V (input) DC power input terminal.
-
The cable with very low resistance (indicating a closed circuit) to chassis ground is positive (+) and will be installed on the RTN (return) DC power input terminal.
The JNP10K-PWR-DC2 power supply is the equivalent of two power supplies in a single housing. Each JNP10K-PWR-DC2 has four independent sets of DC power input terminals:
-
INPUT A0: : RTN –48V/–60V
-
INPUT B0: : RTN –48V/–60V
-
INPUT A1: : RTN –48V/–60V
-
INPUT B1: : RTN –48V/–60V
Figure 37: JNP10K-PWR-DC2 Input Terminal Marking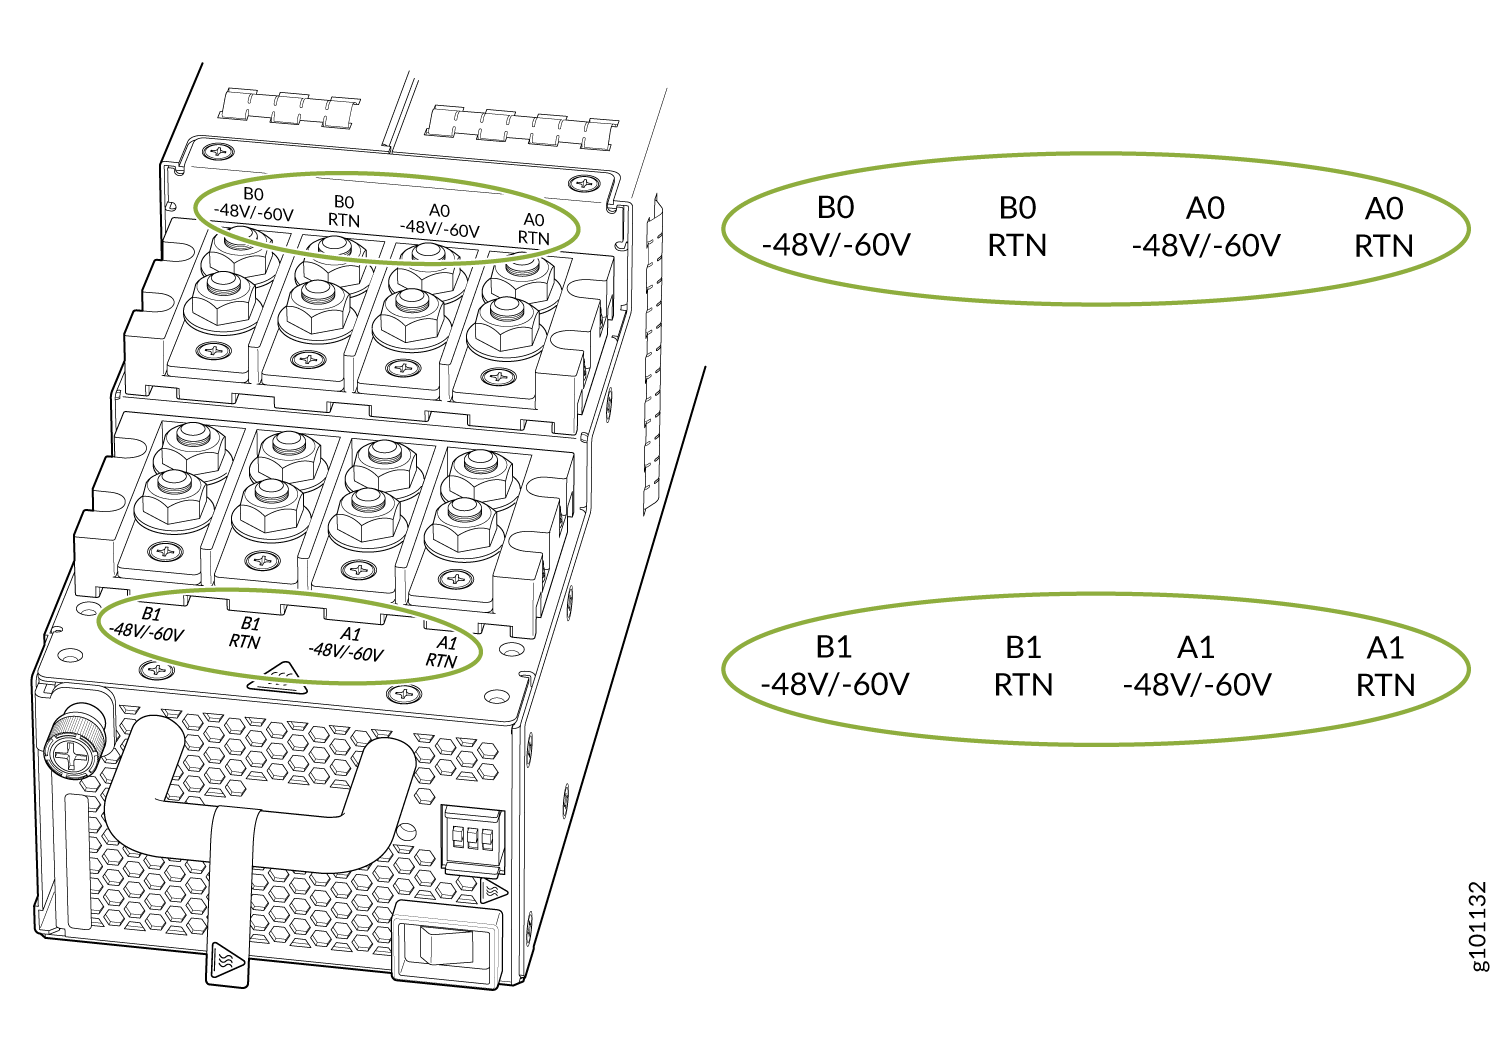 CAUTION:
You must ensure that power connections maintain the proper polarity. The power source cables might be labeled (+) and (–) to indicate their polarity. There is no standard color coding for DC power cables.
We recommend source redundancy (source A and source B) to all inputs to ensure reliability of the system.
If you have two independent power sources (source A and source B): We recommend that you have four sets of independent power feeds—two from source A and two from source B. You must connect the two feeds from source A to terminals A0 and A1 on the power supply and the two feeds from source B to terminals B0 and B1 on the power supply. This will provide the power supply with source and power distribution redundancy.
If you have only one power source and want power distribution redundancy: We recommend that you have four sets of independent power feeds from that source. You must connect the feeds to terminals A0, A1, B0, and B1 on the power supply. This will provide the power supply with power distribution redundancy.
If you have only one power source and do not want power distribution redundancy: We recommend that you have four sets of independent power feeds from that source. You must connect one pair of feeds to terminal A0 or B0 on the power supply, and you must connect the other pair of feeds to terminal A1 or B1. In this scenario, the power supply delivers the full output power of 5500 W.
If you connect one power feed to A0 and another power feed to B0 or if you connect one power feed to A1 and another power feed to B1, the power supply delivers only half the output power—2750 W. That is because terminals A0 and B0 are associated with PS0 power supply (2750 W) and terminals A1 and B1 are associated with PS1 power supply (2750 W).
-
-
Install heat-shrink tubing insulation around the power cables.
To install heat-shrink tubing:
-
Slide the tubing over the portion of the cable where it is attached to the lug barrel. Ensure that tubing covers the end of the wire and the barrel of the lug attached to it.
-
Shrink the tubing with a heat gun. Ensure that you heat all sides of the tubing evenly so that it shrinks around the cable tightly.
Figure 38 shows the steps to install heat-shrink tubing.
Note:Do not overheat the tubing.
Figure 38: How to Install Heat-Shrink Tubing
-
-
Install each power cable lug on the DC power input terminal, securing it
with the nut (see Figure 39). Apply between 24 lb-in. (2.7 Nm) and 25 lb-in. (2.8 Nm) of torque to
each nut. (Use the 13/32 in. [10 mm] nut driver or socket wrench.)
-
Secure each positive (+) DC source power cable lug to the RTN (return) DC power input terminal.
-
Secure each negative (–) DC source power cable lug to the –48V (input) DC power input terminal.
Figure 39: Connect the DC Power Source Cables to a JNP10K-PWR-DC2 Power Supply
-
-
Tighten the captive screw by turning it clockwise by using the
Phillips (+) screwdriver, number 1. When the screw is completely tight, the
latch locks into the router chassis.
Figure 40: Install a JNP10K-PWR-DC2 in a PTX10004
-
Set the three DIP switches to indicate the number of input sources and to
indicate high or low power. See Table 5
and Figure 41.
Set both enable switches to the on position when using both source inputs. When not using source redundancy, set the unused source to the off position. The LED turns red and indicates an error if a source input is not in use and the enable switch is on.
Table 5: Set the JNP10K-PWR-DC2 DIP Switches Switch
State
Description
1
On
IP0 is present.
Off
IP0 is not present.
2
On
IP1 is present.
Off
IP1 is not present.
3
On
Enabled for 80-A feed; 2750 W for a single feed, 5500 W for dual feeds.
Off
Enabled for 60-A feed; 2200 W for a single feed, 4400 W for dual feeds.
Figure 41: Set the Enable Switches for the Power Source 1—
1—DIP switches
2—Power switch, on (|), and standby (O)
Remove a JNP10K-PWR-DC2 Power Supply
Before you remove a DC power supply from the router:
-
Ensure that you understand how to prevent ESD damage. See Prevention of Electrostatic Discharge Damage.
-
Ensure that you have the following parts and tools available to remove a JNP10K-PWR-DC2 power supply:
-
Heat-protective gloves able to withstand temperatures between 158°F to 176°F (70°C to 80°C)
-
Electrostatic discharge (ESD) grounding strap
-
Phillips (+) screwdriver, numbers 1 and 2
-
13/32 in. (10 mm) nut driver or socket wrench
-
Replacement power supply or a cover for the power supply slot
-
A working JNP10K-PWR-DC2 power supply can reach temperatures of up to 158°F and 176°F (70°C to 80°C) under running conditions. In order to avoid injury, do not touch a running power supply with your bare hands.
Before you remove a power supply, ensure that you have power supplies sufficient to power the router left in the chassis. See PTX10004 Power Planning and Power Requirements for PTX10004 Components.
Do not leave the power supply slot empty for a long time while the router is operational. Either replace the power supply promptly or install a cover over the empty slot.
To remove a JNP10K-PWR-DC2 power supply from a PTX10004 router:
-
Wrap and fasten one end of the ESD grounding strap around your bare wrist
and connect the other end of the strap to an ESD point on the chassis. There
is an ESD point located next to the protective earthing terminal and below
PSU 2 on the rear of the PTX10004 (see Figure 42).
Figure 42: ESD Point on the Rear of the PTX10004
1—
ESD point
-
Unscrew the captive screw counterclockwise using the Phillips (+)
screwdriver, number 1. (See Figure 43 )
Figure 43: Remove a JNP10K-PWR-DC2 Power Supply on a PTX10004
-
Rotate the captive screw away from the faceplate of the power supply to
release the latch.
Note:
Ensure that the ejector is fully open to avoid seeing the chassis. See Figure 44.
Figure 44: Open Power Supply Ejector