
コマンドを使用してクラウド Juniper Security Director へのブラウンフィールドSRXシリーズファイアウォールのオンボーディング
このトピックでは、CLIコマンドを使用して、既存のサービス中のSRXシリーズファイアウォールを Juniper Security Director Cloud にオンボーディングする簡単な手順を説明します。
始める前に
-
ファイアウォールSRXシリーズそれぞれのポートで Juniper Security Director Cloud 完全修飾ドメイン名(FQDN)と通信できることを確認します。ホームリージョンごとにFQDNは異なります。FQDNマッピングの詳細については、以下の表を参照してください。
表1:リージョンからFQDNへのマッピング 地域 目的 ポート IPv4/IPv6 の FQDN 北バージニア州
ZTP
443
IPv4:srx.sdcloud.juniperclouds.net
IPv6:srx-v6.sdcloud.juniperclouds.net
アウトバウンドSSH
7804
IPv4:srx.sdcloud.juniperclouds.net
IPv6:srx-v6.sdcloud.juniperclouds.net
Syslog TLS
6514
IPv4:srx.sdcloud.juniperclouds.net
IPv6:srx-v6.sdcloud.juniperclouds.net
オハイオ州
ZTP
443
IPv4:srx.jsec2-ohio.juniperclouds.net
IPv6:srx-v6.jsec2-ohio.juniperclouds.net
アウトバウンドSSH
7804
IPv4:srx.jsec2-ohio.juniperclouds.net
IPv6:srx-v6.jsec2-ohio.juniperclouds.net
Syslog TLS
6514
IPv4:srx.jsec2-ohio.juniperclouds.net
IPv6:srx-v6.jsec2-ohio.juniperclouds.net
カナダ、モントリオール
ZTP
443
IPv4:srx.jsec-montreal2.juniperclouds.net
IPv6:srx-v6.jsec-montreal2.juniperclouds.net
アウトバウンドSSH
7804
IPv4:srx.jsec-montreal2.juniperclouds.net
IPv6:srx-v6.jsec-montreal2.juniperclouds.net
Syslog TLS
6514
IPv4:srx.jsec-montreal2.juniperclouds.net
IPv6:srx-v6.jsec-montreal2.juniperclouds.net
フランクフルト、ドイツ
ZTP
443
IPv4:srx.jsec-frankfurt.juniperclouds.net
IPv6:srx-v6.jsec-frankfurt.juniperclouds.net
アウトバウンドSSH
7804
IPv4:srx.jsec-frankfurt.juniperclouds.net
IPv6:srx-v6.jsec-frankfurt.juniperclouds.net
Syslog TLS
6514
IPv4:srx.jsec-frankfurt.juniperclouds.net
IPv6:srx-v6.jsec-frankfurt.juniperclouds.net
-
TCPポート53とUDPポート53を使用して、Google DNSサーバー(IPアドレス - 8.8.8.8および8.8.4.4)に接続します。Google DNSサーバーは、SRXシリーズファイアウォールの工場出荷時設定でデフォルトサーバーとして指定されています。ZTPを使用してファイアウォールをオンボーディングする際には、これらのデフォルトDNSサーバーを使用する必要があります。他の方法を使用してファイアウォールをオンボーディングする場合でも、プライベートDNSサーバーを使用できます。プライベートDNSサーバーが Juniper Security Directorクラウド FQDNを解決できることを確認する必要があります。
ワークフロー
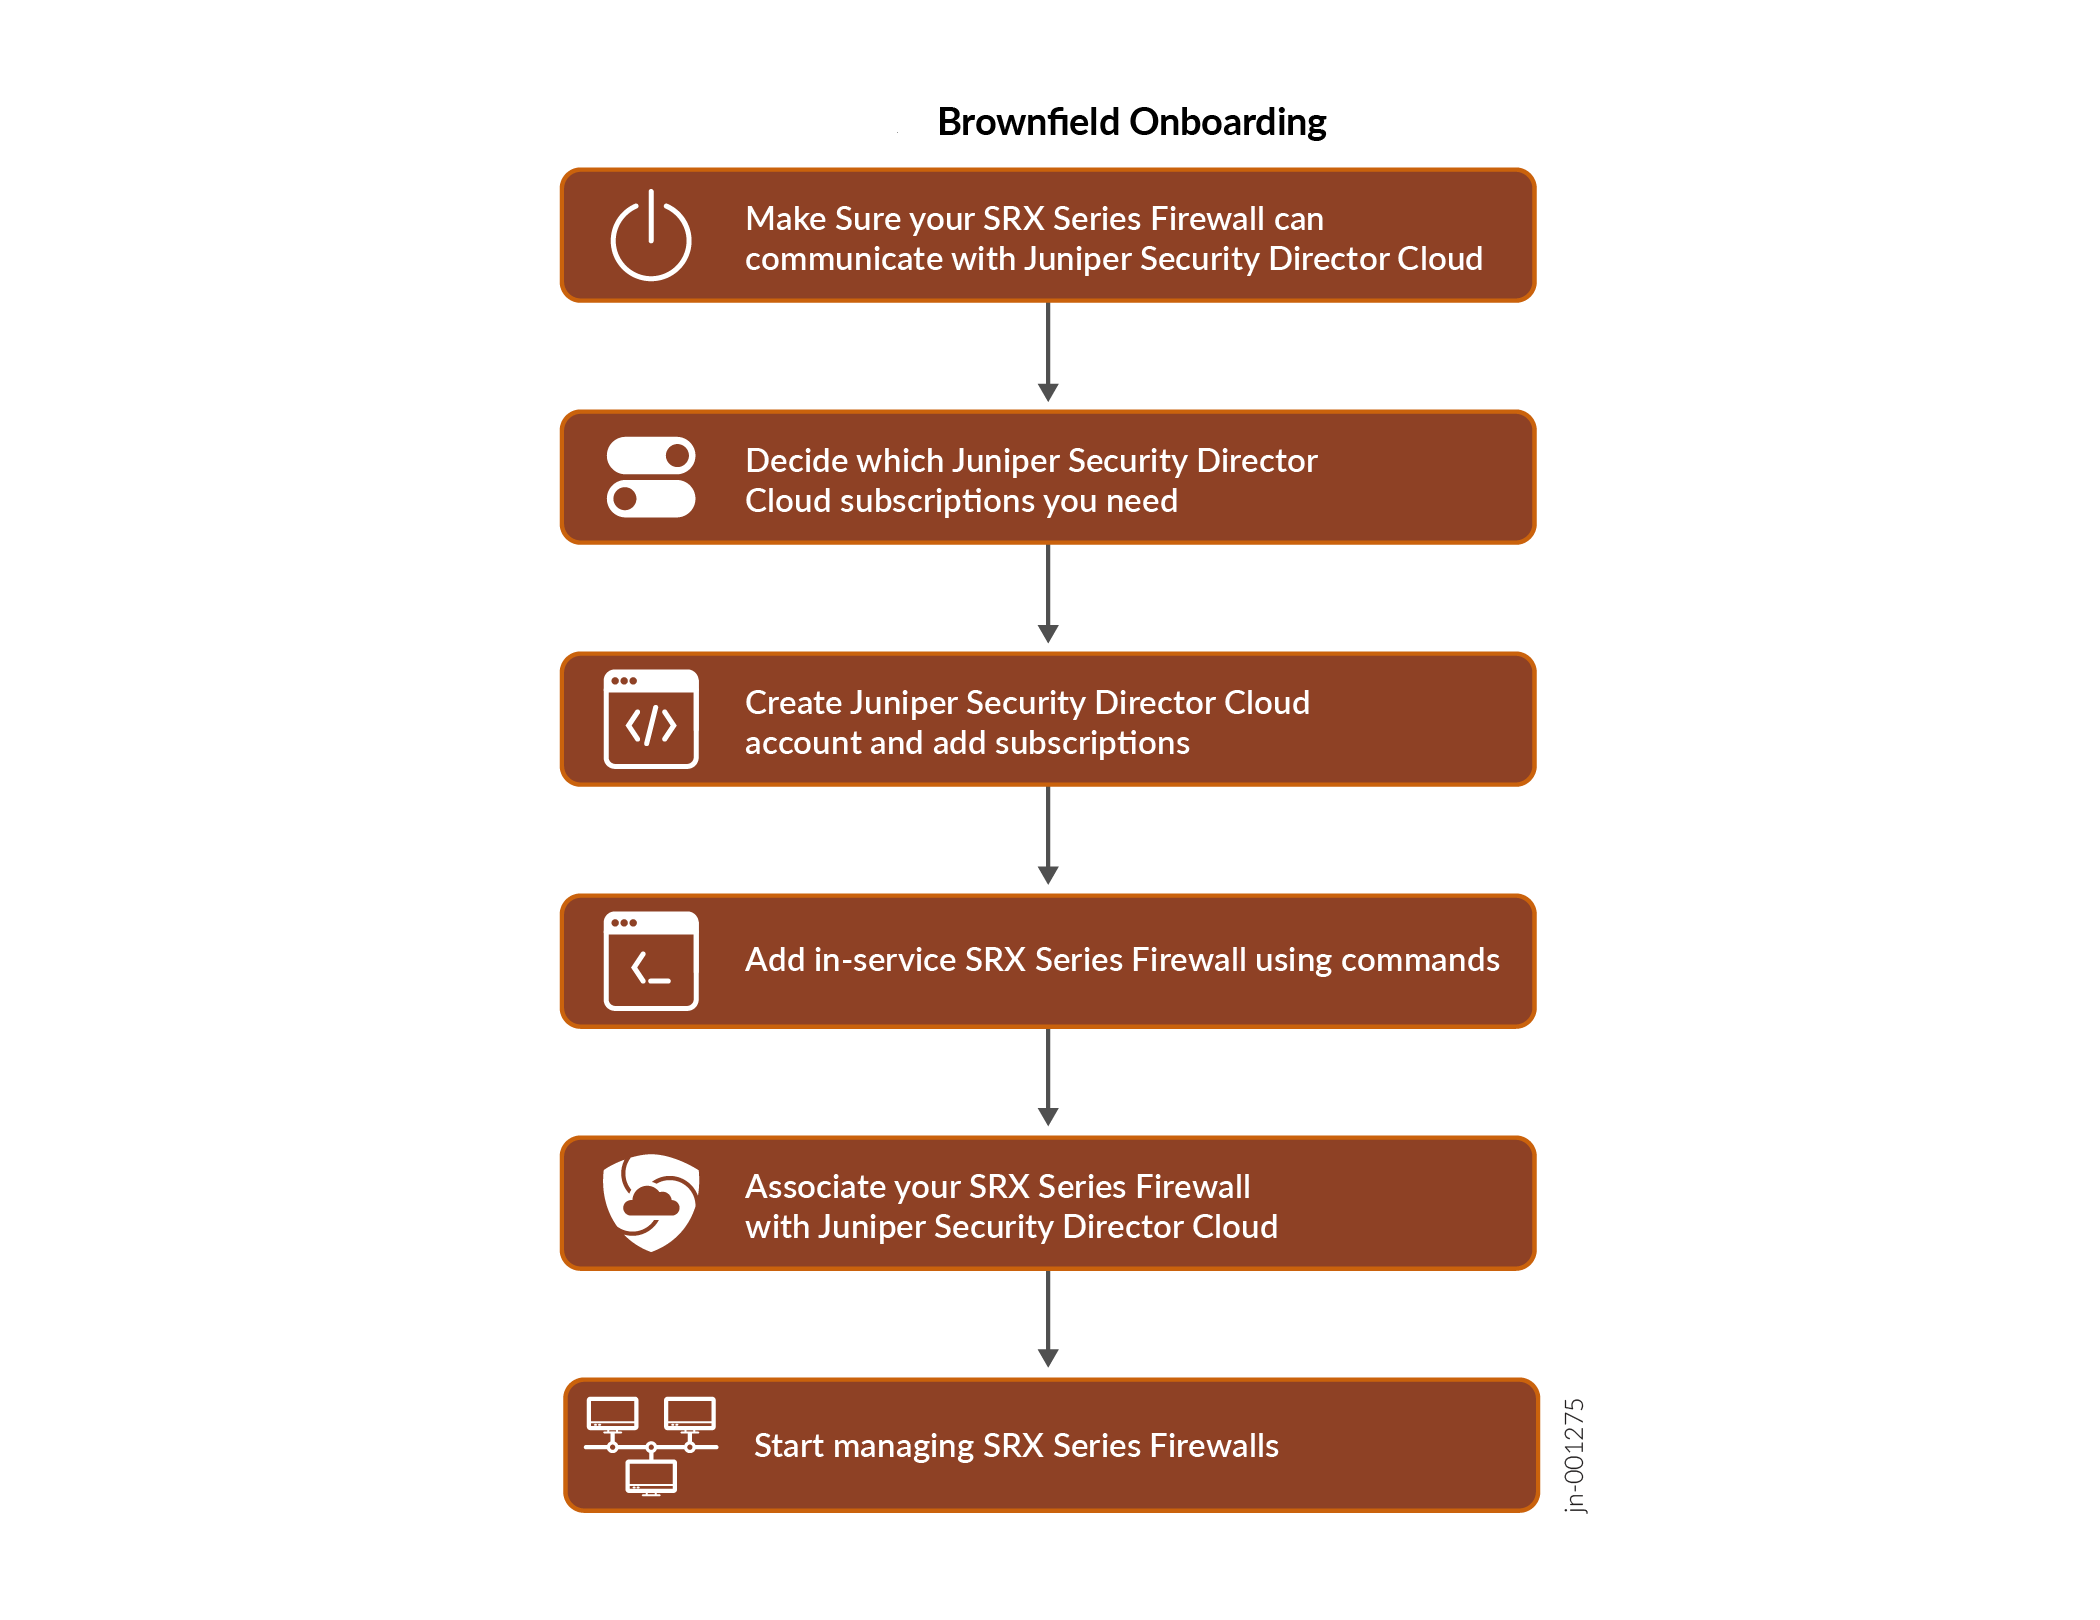 におけるクラウドJuniper Security DirectorへのSRXシリーズファイアウォールのオンボーディング
また、以下の方法を使用して、既存のサービス中(ブラウンフィールド)SRXシリーズファイアウォールをオンボーディングすることもできます。
- J-Webを使用して、既存のサービス中(ブラウンフィールド)SRXシリーズファイアウォールを Juniper Security Director Cloud にオンボーディング(採用)するには、「 J-Webを使用してJuniper Security DirectorクラウドにSRXシリーズファイアウォールを追加する」を参照してください。
- Security Directorオンプレミスを使用して、既存のサービス中(ブラウンフィールド)SRXシリーズファイアウォールを Juniper Security Directorクラウド にオンボーディング(採用)するには、「 Juniper Security Directorクラウドにデバイスを追加する」を参照してください。
SRXシリーズファイアウォールをJuniper Security Director Cloudにオンボーディングします
- 必要な Juniper Security Director Cloudサブスクリプション を決定します。サブスクリプションのご購入については、営業担当者またはアカウントマネージャーにお問い合わせください。ポータルでデフォルトで利用可能な 30 日間のトライアル サブスクリプションを使用することもできます。
- https://sdcloud.juniperclouds.net/ に移動し、組織アカウントを作成をクリックします。
画面の指示に従ってアカウントをアクティブ化します。アカウントアクティベーションリクエストが承認されるまでに最大7営業日かかります。
- Juniper Security Director Cloudポータルにログインし、サブスクリプションを追加をクリックし、詳細を入力してOKをクリックします
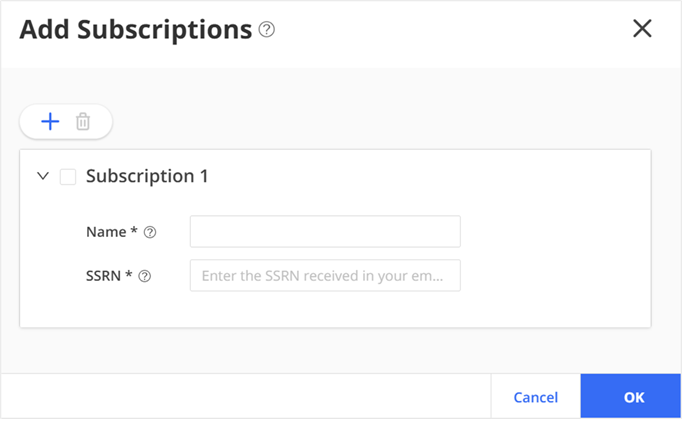
追加したサブスクリプションを から表示します。サブスクリプションが表示されない場合は、 ページに移動してステータスを確認してください。
- Juniper Security Director Cloudに移動し、を選択します。+アイコンをクリックしてデバイスを追加します。
- SRXデバイスを導入をクリックし、以下のいずれかを選択します。
-
SRXデバイス
-
SRXクラスター
-
SRXマルチノード高可用性(MNHA)ペア
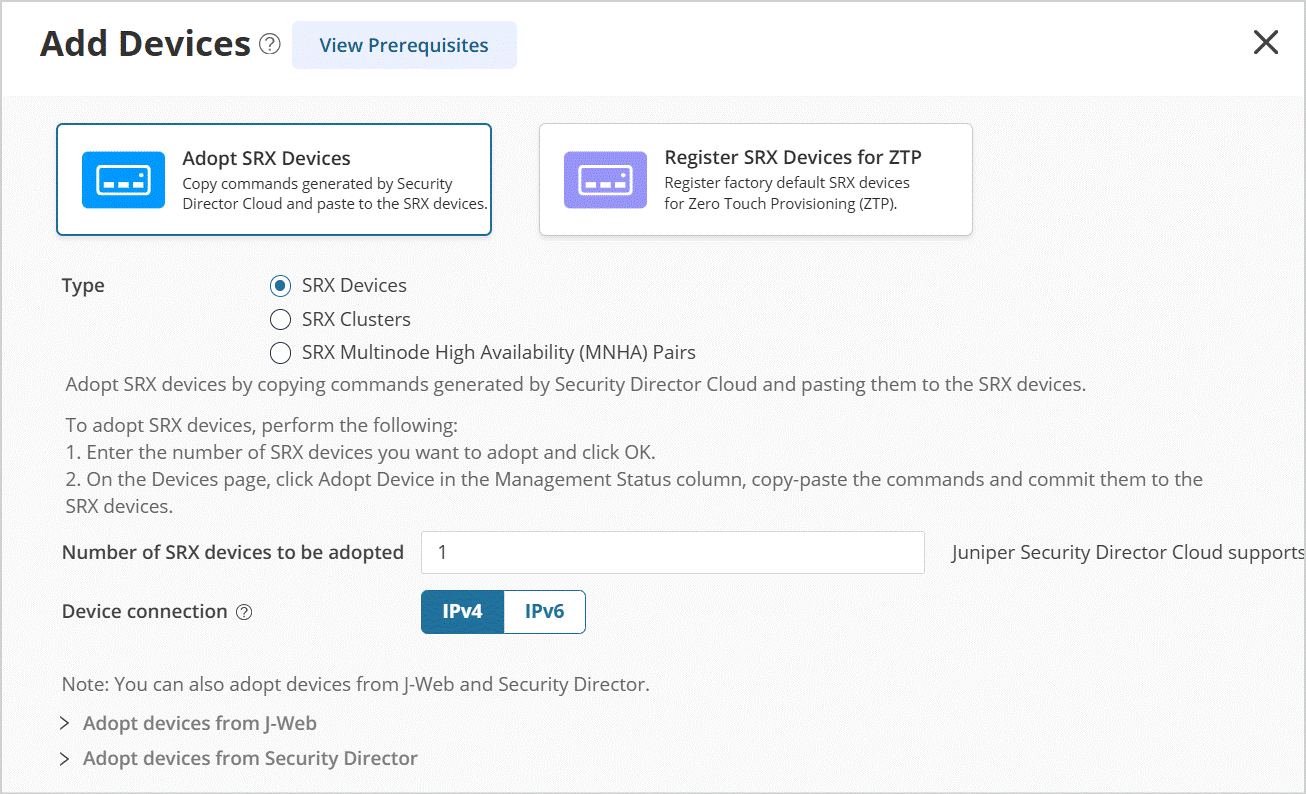 画面
画面
-
- デバイスページからコマンドをコピーアンドペーストして、SRXシリーズファイアウォールに貼り付けます。プライマリクラスターデバイスコンソール、またはMNHAペア内の各デバイスのコマンドを貼り付けます。変更をコミットします。
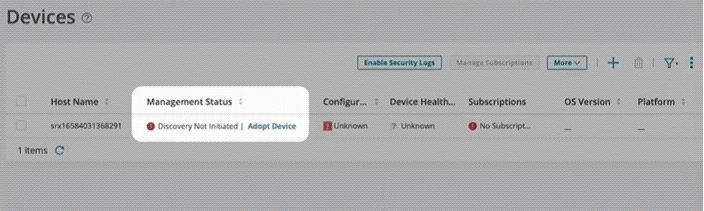
デバイスの検出には数秒かかります。デバイス検出が成功したら、 デバイス ページで以下のフィールドを確認します。
-
管理ステータスが「検出中」から「アップ」に変わります。
-
インベントリステータス と デバイス構成ステータス が「 同期外 」から 「同期中」に変わります。
検出に失敗した場合は、 ページに移動してステータスを表示します。
デバイスを Juniper Security Director Cloud サブスクリプションに関連付ける準備ができました。
-
SRXシリーズファイアウォールを Juniper Security Directorクラウド サブスクリプションに関連付ける
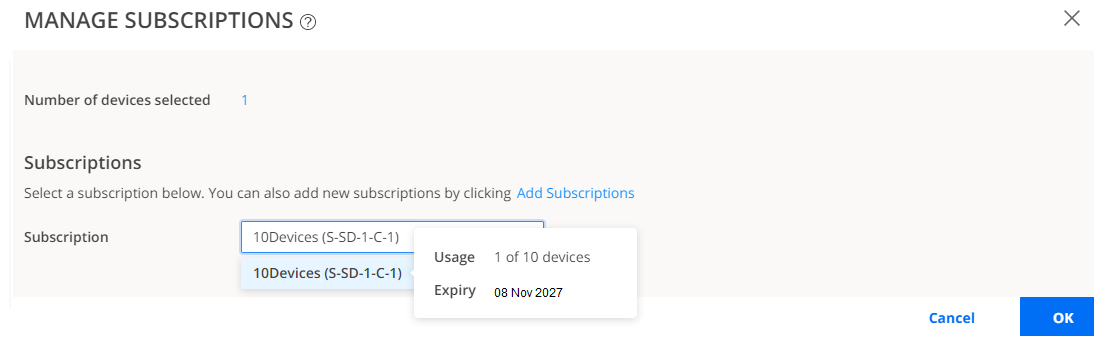
- ]に移動し、デバイスを選択して、[Manage Subscriptions]をクリックします。画面の指示に従います。
- サブスクリプション 列 にデバイスのサブスクリプション名が表示されていることを確認します。
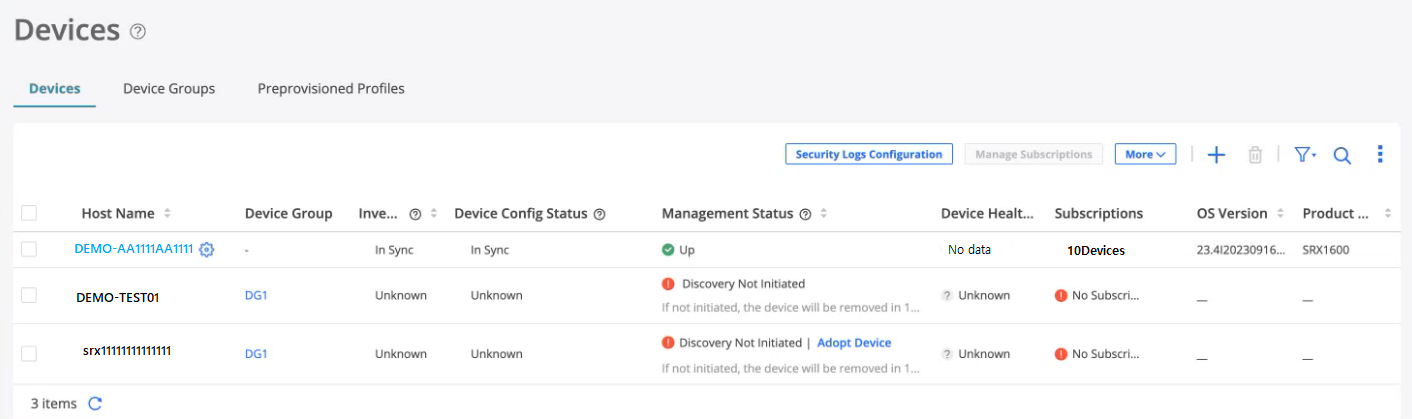
おめでとうございます!デバイスが Juniper Security Directorクラウドに正常に関連付けられました。
Juniper Security Directorクラウドの機能を確認する
Juniper Security Direct Cloudのセットアップが開始されたので、ビジネスニーズを満たすJuniper Security Director Cloudの他の機能もご確認ください。特に役立つと思われる機能をいくつか紹介します。
| 必要に応じて | 次に |
|---|---|
| セキュリティポリシーを作成またはインポートし、セキュリティポリシーにルールを追加し、デバイスにセキュリティポリシーを展開します |
セキュリティポリシーの概要を参照してください |
| コンテンツセキュリティプロファイルを設定して、複数のセキュリティ脅威タイプからネットワークを保護します |
コンテンツセキュリティプロファイルの概要を参照してください |
| ATPクラウドを設定して、進化するセキュリティ脅威からネットワーク内のすべてのホストを保護 |
ファイル検査プロファイルの概要を参照してください |
| 見つかったウイルス、ダウンしているインターフェイス、攻撃数、CPUの急増、システム再起動、セッションなど、トラフィックログとネットワークイベントを表示します |
セッションの概要とすべてのセキュリティイベントの概要を参照してください |