
ジュニパー AP の登録
ジュニパー Mist クラウドから管理できるようにするには、アクセスポイント(AP)を要求する必要があります。
APを申請するには、請求コードまたはアクティベーションコードのいずれかが必要です。どちらの場合も、以下のいずれかの方法を使用してAPを要求できます。
-
Mist AIモバイルアプリ
-
Webブラウザ
APの請求コードまたはアクティベーションコードを取得する
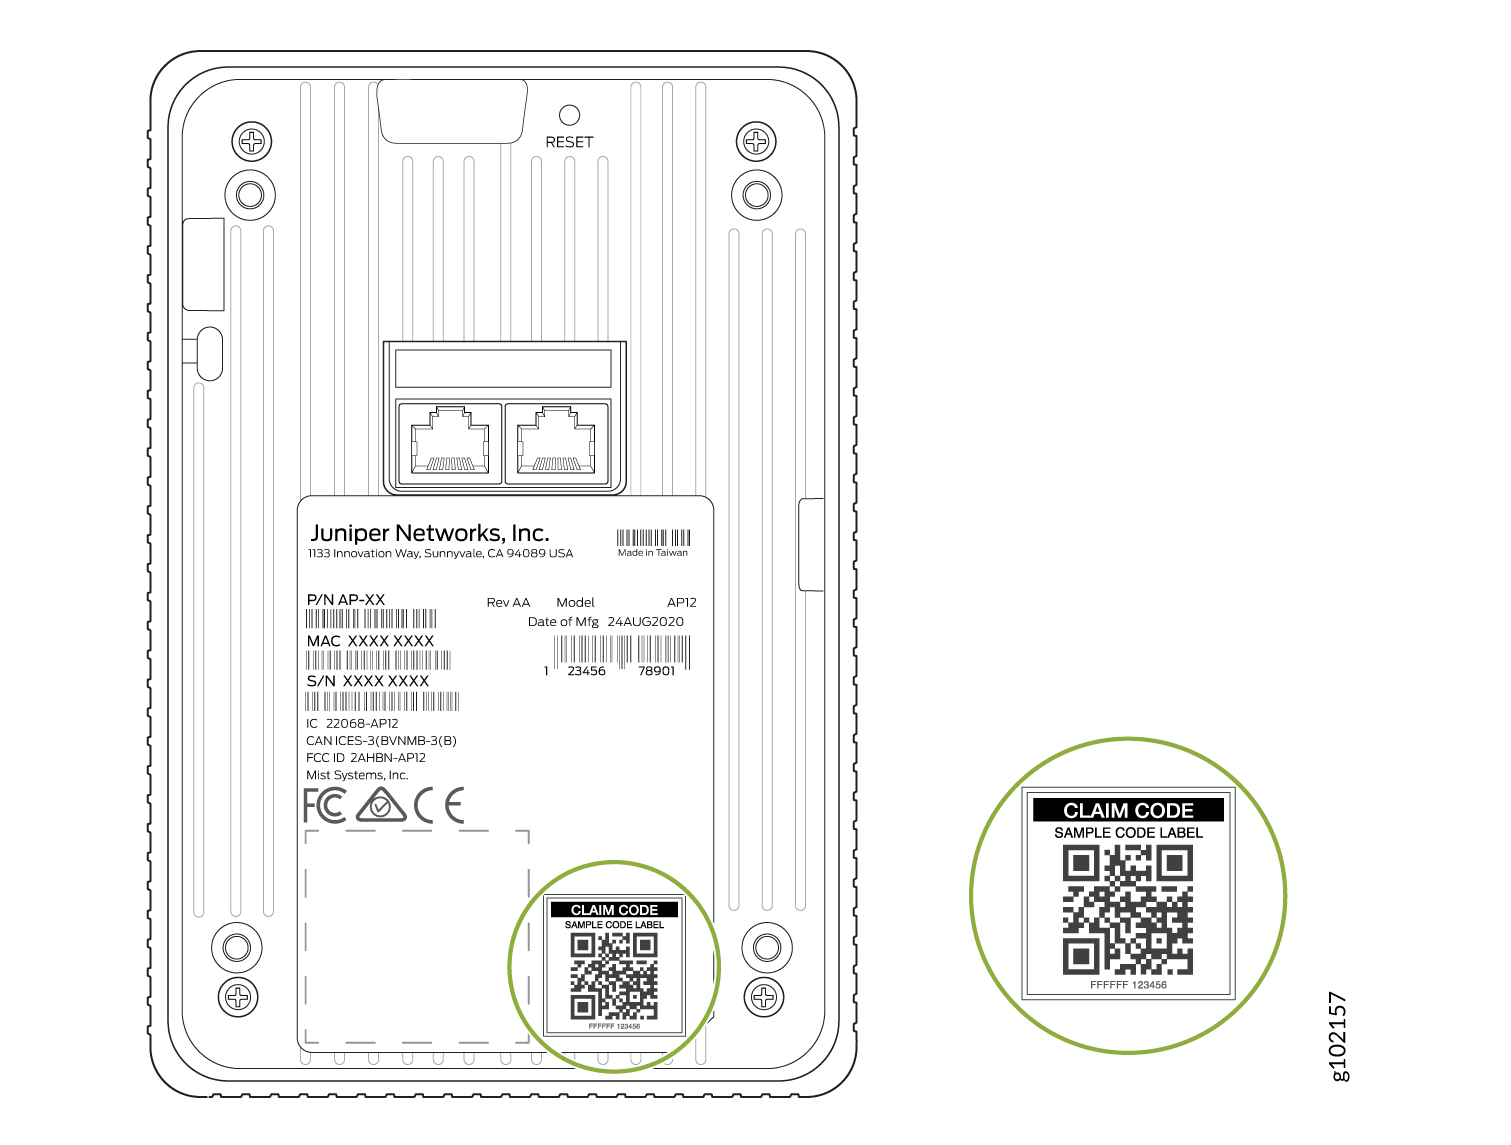
- 単一のAPを請求するには、APの背面にある請求/QRコードを使用します。
Webブラウザを使用してAPを要求する
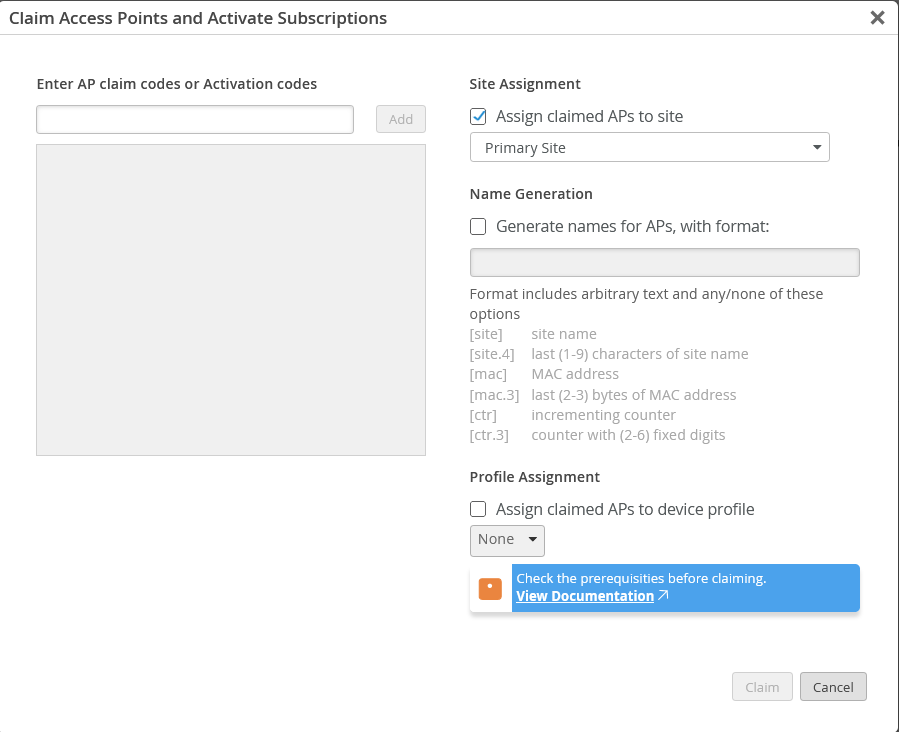
Webブラウザを使用して、単一のAPまたは複数のAPをオンボーディングできます。単一のAPをオンボーディングする場合は、APの背面にある請求コードまたはQRコードを使用します。複数のAPをオンボーディングする場合は、注文書に記載されているアクティベーションコードを使用します。
複数のAPを同時に要求し、アクティベーションコードを使用してPOに記載されているサブスクリプションをアクティブ化できます。サブスクリプション のアクティブ化を参照してください。
Webブラウザを使用してAPを要求するには:
- アクティベーションコードまたは請求コードを入力します。
Mist AIモバイルアプリを使用してAPを申請する
携帯電話からMist AIモバイルアプリを使用して単一のAPをオンボーディングするには:
- APをタップして詳細を表示します。
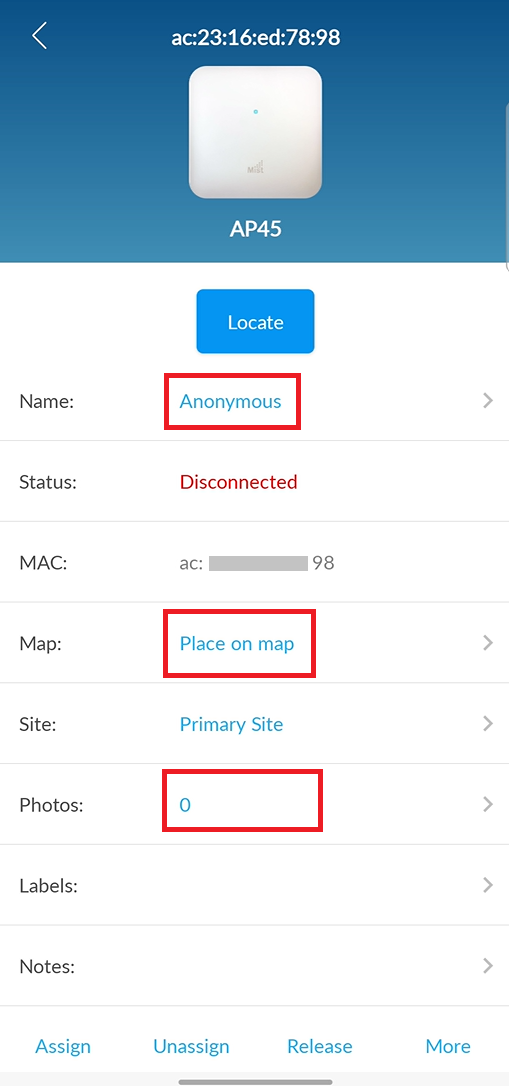
AP詳細画面から、APの名前変更、間取り図への設定、APのリリース、写真の追加など、さまざまなタスクを実行できます。オプションをタップするだけで、詳細を更新できます。APの名前を変更するには、AP名をタップし、新しい名前を入力します。
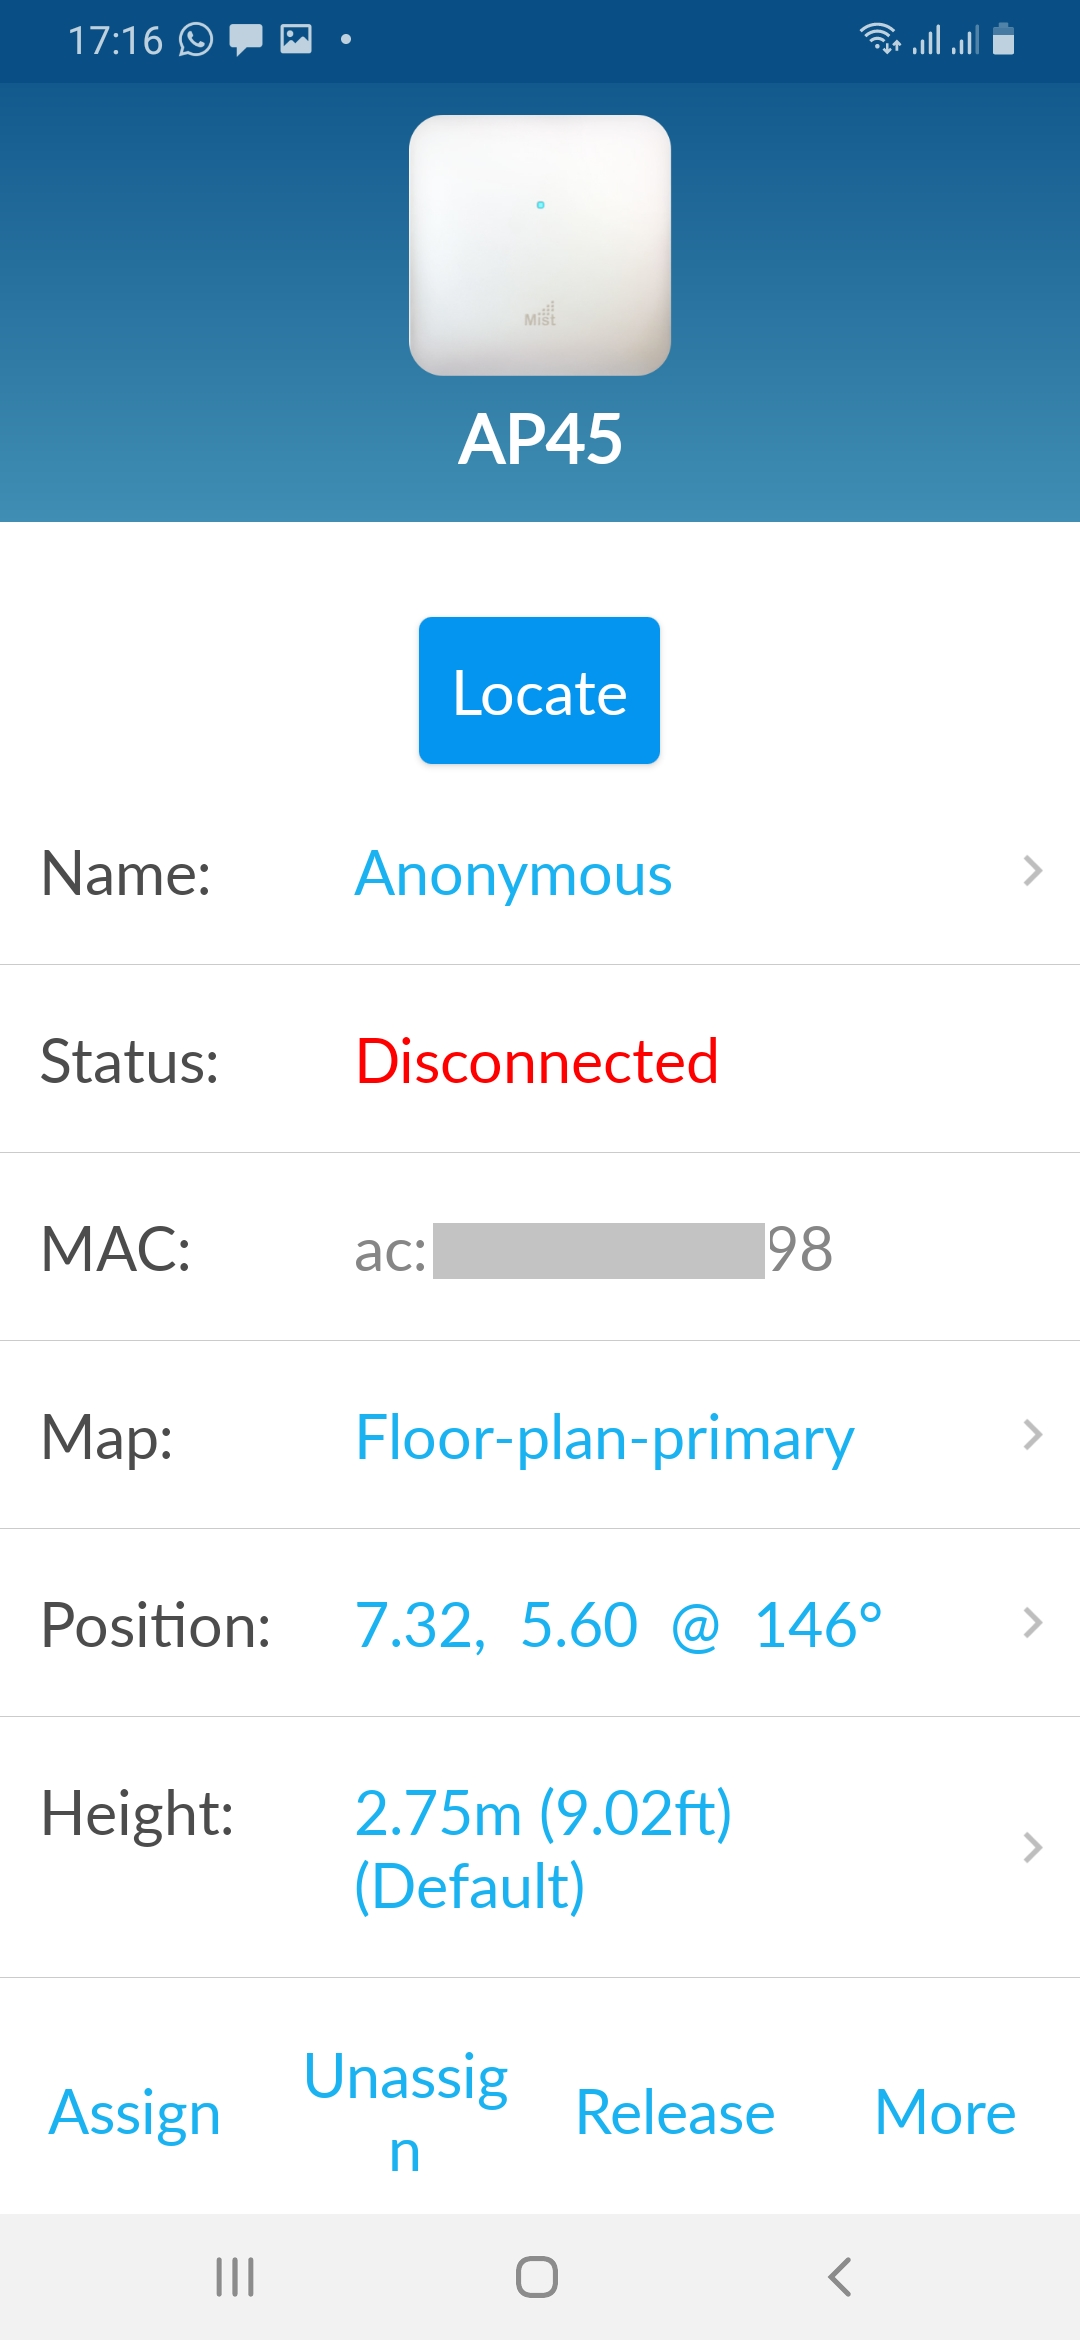
間取り図に AP を配置するには、[ マップ上に配置] をタップします。このオプションを使用するには、ジュニパー Mist™ポータルの ロケーション>ライブビュー にフロアプランがすでにアップロードされている必要があります。 フロアプランの追加とスケーリングを参照してください。APを間取り図に配置すると、APの位置やAPが取り付けられている高さ(変更可能なデフォルト値)などの詳細が表示されます。
次のビデオでは、Mist AIモバイルアプリを使用してMist APを申請するプロセスも示しています。 このプロセスについては、4:00からビデオを開始してください。
Hello, my name is Keir Asher from Juniper University Education Services, and today I'm going to show you the simplicity and ease it is to onboard a Mist access point on your network. This truly has done an excellent job taking out the complexity of the onboard process. Before we get into it, let's look at this obviously very simple installation we'll be using.
I have a switch that basically connects to a firewall to get out to the internet. Now in order for a smooth implementation, we need to make sure of a few requirements that are met. First things first, there needs to be some device to provide the AP with power.
In this case, I'm using an EX2200C with PoE+. The switch port it connects to needs to be either a trunk port with a defined native VLAN or an untagged VLAN assigned to it. We'll be using the latter.
Next, the network that the AP connects to must have a DHCP server associated to it and have internet access that includes outbound port TCP 443 to be open. Finally, all subdomains for the Mistsys.net domain name need to be resolvable. As you can also see, I've listed the port configuration that we'll be using.
However, before you can add an AP to your network, you need to be able to manage it. Because the MIST wireless solutions are managed from the cloud, we need to browse to manage.mist.com and create an account and an organization. Here you can see I've already created an account and logged in.
My particular account has many organizations associated with it and for the sake of demonstration, I'll create a new one bearing in mind these are easily deleted once completed. From my account, I go to the Utilities tab and click Create Organization. Give your organization a name and click OK.
This will open a new tab allowing you to now manage your organization. All organizations by default will come with a primary site already set up. From the Sites page, you are allowed to add additional sites.
Again, for this example, I'll add a site. One thing you may notice is that you have certain configuration options available that will apply to any access points bound to that particular site. Next, I'm going to show you a wireless LAN that I've created for a different organization that has been configured. It just needs to be added to our AP once it's been onboarded.
Now that my on-premise site is ready to go, I'm ready to onboard the access point. This slide depicts the process using the MIST AI mobile application.
In this case, I'm using my Android phone for this demonstration. However, the Apple version is much the same. We start by logging into the application with your account information and selecting our organization as seen in Step 2. Once selected, we want to claim the access point to our organization in Step 3. Clicking on the Claim AP to Org will open my camera and prompt me to take a picture of the QR claim code on the other underside of my access point.
Once focused, it will automatically populate the AP information to the app as seen in Step 5. Now click Edit and select the unassigned AP to display a check mark seen in Step 6. If you have predefined or existing sites associated with this organization, you'll be prompted to select the site in Step 7. The access point has now been added as shown in Step 8. Clicking the AP will display a very high level information of the AP. With the AP added, we are now ready to go back to the MIST user interface to complete our onboard process. From the interface, we return to the access point section.
Under the unassigned section, you can see I have an EX2300 switch attached to this organization. Right above it is our newly added AP. Select the AP and assign it to our lab site.
This step will take a minute or two to add the AP and assign it to the site. Eventually, it will show a status of Connected. Click the AP and create a name.
In this portion, you can see what items are configurable for the specific AP as well as informational items like upstream switchport. Since we've already added a WLAN, it'll automatically add that WLAN to this AP unless otherwise specified. That being said, let's connect to our network and test it out.
Hey, great success! Let's go check and see our newly connected client. Now let's go back and recap with another slide. Back to our super simple basic diagram now showing our AP is onboarded.
MIST has truly simplified Wi-Fi engineering by removing much of the difficulty associated with adding new devices. The process for adding multiple devices at scale is additionally simplified through flexible onboarding options like automating it via REST API. You can also config RF templates as well as configuration templates and bulk AP naming are just a few things available to you.
Additionally, MIST has 100% feature parity between the GUI and the API to suit any operator's management needs. Hungry for more? Head over to mist.com documentation for comprehensive and thorough collection of documentation. Thanks for watching.
Visit the Juniper Education Services website to learn more about courses. View our full range of classroom, online, and e-learning courses, learning paths, industry segment and technology specific training paths, Juniper Networks Certification Program, the ultimate demonstration of your competence, and the training community from forums to social media. Join the discussion.