Azure IdP統合による証明書ベース(EAP-TLS)認証の構成
次の手順に従って、Juniper Mist™組織を Microsoft Entra ID に登録し、Juniper Mist に ID プロバイダーを追加し、ユーザー グループの認証ポリシーを作成します。
外部のアイデンティティプロバイダーの(IdP)を統合することで、拡張認証プロトコル-トランスポート層セキュリティ(EAP-TLS)認証プロセスを拡張できます。この統合により、IdP は EAP-TLS 認証交換を検証し、信頼できるユーザーのみがネットワークにアクセスできるようにします。IdP と EAP-TLS 認証の統合による追加検証を導入することで、ネットワーク アクセス コントロール(NAC)の堅牢性を高めることができます。
Juniper Mist™では、Microsoft Azure Active Directory (AD) (現在は Microsoft Entra ID と呼ばれています) を OAuth を使用してプロバイダーのとして統合できます。この統合により、Azure ADをMist Access Assuranceと組み合わせてプロバイダーのとして活用し、以下を実行できます。
- OAuth経由でユーザー名とパスワードを確認する委任認証を行うことで、EAP-TTLS経由でユーザーを認証します。
- ユーザー・グループ・メンバーシップを取得して、認証ポリシーで活用します。
- ユーザー アカウントの状態情報 (アクティブ/中断) を取得します。
- EAP-TLSまたはEAP-TTLS経由でユーザーを承認する。
Azure AD は、Juniper Mist Access Assurance で認証ポリシーを微調整するために使用できる次の詳細を返します。
-
グループ メンバーシップ: ユーザーが属するグループに関する情報は、ユーザー ロールとアクセス許可に関する分析情報を提供します。
-
アカウントの検証:アカウントのステータスは、Juniper Mist Access Assuranceが有効なアクティブユーザーのみにネットワークアクセスを許可するようにするために不可欠です。
-
追加のユーザーコンテキスト:ユーザーに関する追加情報を収集することで、ユーザーのプロファイルをよりよく理解できます。プロバイダーのルックアップを設定すると、システムは設定されたプロバイダーのにAPIリクエストを送信して、認証されたユーザーの追加コンテキストを取得します。
概要
このタスクでは、証明書を評価するときに、特定のドメイン名に関連付けられている共通名 (CN) の Azure AD を検索する方法について説明します。Azure AD 検索の結果は、認証ポリシーの定義に使用するユーザーに関する追加情報をフェッチします。このタスクは、ワイヤレスネットワークに適用されます。
このタスクの前提条件として、EAP-TLS 認証を構成する必要があります。詳細については、 証明書ベース(EAP-TLS)認証の設定 を参照してください。
この例では、次のことを行います。
- Azure AD を IdP として使用するために、Azure portal で新しいアプリケーションを作成します。
- Azure AD を IdP として統合し、登録済みのアプリケーションに対する Microsoft Graph の API アクセス許可を付与します。
- Juniper Mist ポータルにログインしているユーザーの詳細を取得します。
- IdP がログインしているユーザーについて取得する追加の詳細を使用して、認証ポリシーをさらに調整します。
OktaをIdPとして使用して認証を作成するには、次のビデオをご覧ください。
Create the authentication policies with Mist Access Assurance considering the same exact scenario with TLS users authenticating using certificates and TLS users authenticating using credentials. The first thing that we will do is we will import the root CA certificate so we can trust the certificates on our client signed by that CA. So we'll go to organization > access certificates and I'll click on add certificate authority.
I will go to my folder where I have all the pre-configured items ready. I'm going to copy my root CA cert, import it in here. It's the same cert we used with the other two vendors. It's now imported, it's decoded, we're good to go and good to proceed. We'll then go to organization authentication policies. Actually we go to identity providers first.
We need to configure an identity provider in here and unlike with ClearPass and ICE, we don't need to have a local AD on-prem. We would actually be able to talk to Okta as our identity provider to fetch the user group information to authenticate users and provide them with network access. So I will click on add IDP.
I will select this connector type as auth since we will use native API connector to talk to Okta. I will open my setup instructions since my Okta app has been pre-created. Same as AD for other providers so I'm going to take tenants. I'm going to select the auth type as Okta, paste the tenant ID. I'll take the client ID, paste it in here. I'll take the private key so we can authenticate ourselves to Okta.
Add it right there and finally I'll configure the ROPC API ID for TTLS authentication and it's secret. The last thing I will do is I will configure the domain name. So the domain name would actually tell us based on the user realm like when the user signs in as user at like in this case lab.mystify.com. We'll take that domain based on the domain. We'll talk to a respective IDP in our configuration so just give it a name called Okta. Click create. We have our IDP configured now.
The last step is to go to access authentication policies and create the two policies that we need based on our requirements. First, we will create a rule for certificate authentication. What we'll then do is in the match criteria on the left hand side we will use labels to match in certain conditions.
In our case, we need to match on wireless users that are using certificates or TTLS to authenticate and we also need it to match on the group employee that we will take from IDP. But as you can see by default we are not having any label associated with the group so what we can do is we can create a label right from that same place. We'll call it employee group.
We will select label type as directory attribute and the label value will be group and the actual value will be employee. Click create. We can now select this label on the left hand side. It shows up here as the directory attribute. Now we are matching on all these three conditions. Then on the right hand side we are deciding what we want to do with these types of users. By default we will allow access to the network but we also want to assign VLAN 750 and role corp. Again we need to create labels for that. So we'll go and create first corp VLAN label.
The label type will be AAA attribute and the value would be VLAN. I'll configure it as 750. I'll then create corp role attribute and I'll just configure it as corp. And then I'm going to create also labels for BYD VLAN and BYD role. So 751 and finally BYD role. Good to go.
So we can select corp VLAN and corp role. Now we'll create one more rule for our users that are doing TTLS based authentication. So we'll call it credential authentication and we'll match on wireless users that are doing TTLS and that they're also part of the same employee group.
And on the right hand side we'll assign them BYD VLAN and BYD role. At this point we can hit save and our authentication policy setup is done. The last thing is to create the actual WLAN template. So I'm going to go to WLAN templates. I'm going to create a new one. I'm going to call it MIST 802.1X. I'm going to click create.
Add a WLAN. Select security as 802.1X. And in this case we don't need to configure radio servers one by one. We don't need to add APs as radio clients. None of that is required. We'll just go and select MIST authentication as our authentication service. That's it. We'll then just go on and configure dynamic VLANs. It's the same two VLANs that we will be sending. So 750.751. Click create and just assign this template to the org.
Click save. At this point we should be able to test with our client devices. We have one laptop that's connected using a certificate. It got the role corp. We have a mobile device that connected using TTLS using username and password and got the role BYD. And now let's take a look deeper and look at the client insights.
What can we see with MIST access assurance here? So what you could see is in addition to the all the client events that are coming from the access point and that are showing the user experience, from the network perspective, you also see all the events coming from the NAC side of things as the client goes through the authentication and authorization process. So, first event is, okay, we're seeing the client certificate. We are grabbing all the metadata about the user certificate.
We see that the client trusted our server cert that's provided by the MIST authentication service. We'll then did a IDP lookup against Okta. And we got all the user group information from Okta. So we know now this user is part of all these user groups. And we see one of these groups is actually employee, which we needed to match on. And finally, when we look at the NAC client allowed access event, we're saying, okay, this client is good to go. It's allowed in the network. This is the VLAN that we are assigning from a NAC perspective. This is the user role that we are assigning from the NAC perspective.
And this is the authentication rule that hit during that process. So if we click on that link, it will actually go and highlight, this is the rule that this particular user hit during the auth process, right? Similarly, if we look at the mobile device, if we look at the client insights, we're now seeing that in this case, client trusted the service certificate, but instead of showing the client certificate, it actually did the IDP authentication using username and password credentials against Okta. Finally, we got the user role and group information from Okta.
And we've allowed client to access the network, assign a different VLAN 751 and different user group. But in this case, we are hitting a different authentication rule in our policy. So again, if we click on it, we're saying that particular user went through a different role.
ワイヤレス ネットワークの証明書ベース (EAP-TLS) 認証を構成する
- Microsoft Azure portal で、Azure AD に IdP コネクタを設定します。
- 左側のナビゲーション バーで、 [アプリの登録] を選択します。
図 1: 新しいアプリケーション登録アプリケーションを既に登録している場合は、「 所有アプリケーション 」タブに移動します。アプリケーション名をクリックすると、クライアント ID、テナント ID、クライアント シークレットなどの詳細が表示されます。
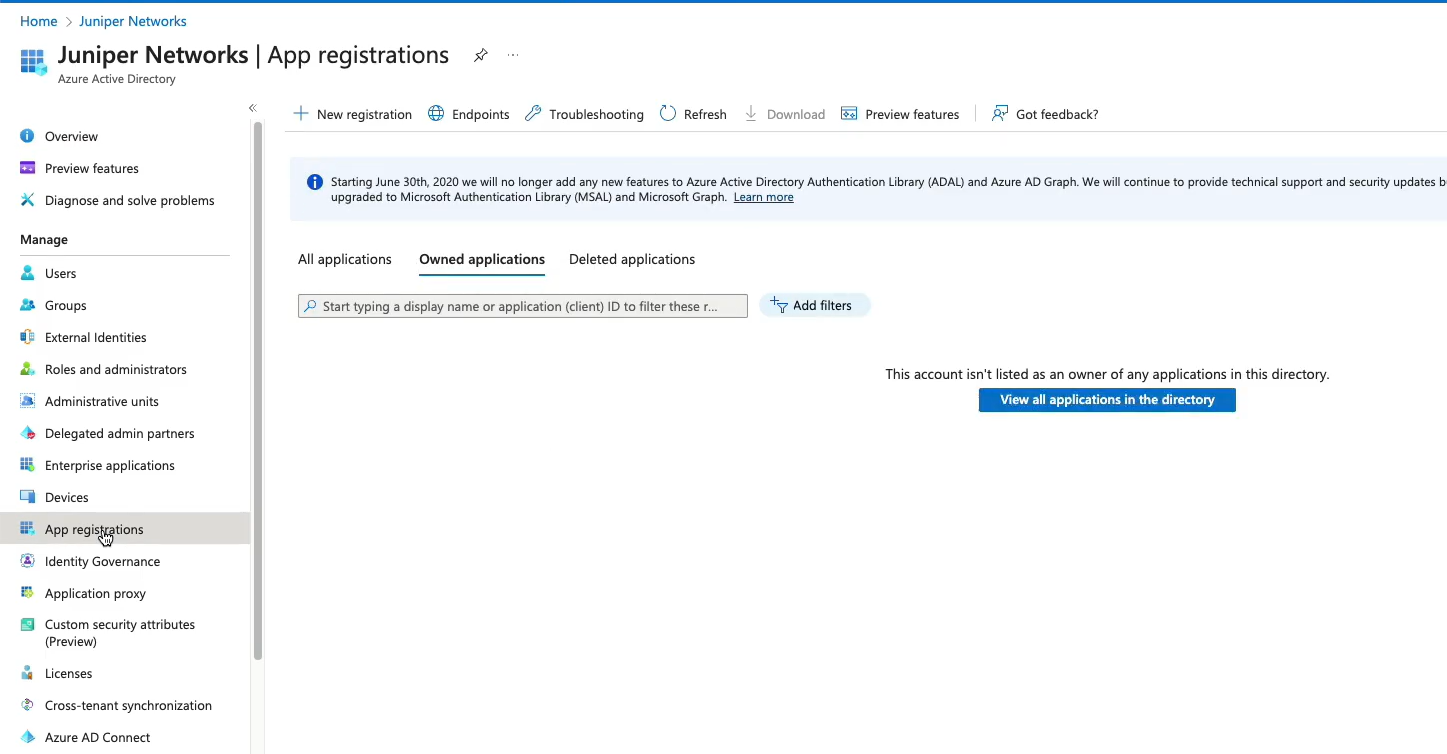 Azure portal で新しいアプリケーションを登録する場合は、 [ 新規登録 ] タブをクリックします。[新規登録(New Registration)] ページで、次のフィールドに必要な情報を入力します。次の一覧の [名前] フィールドには、サンプルのユーザー入力が表示されます。
- [名前(Name)]:Mist AA IDP connectorを入力します
- [サポートされているアカウント タイプ(Supported Account Type)]: [この組織のディレクトリ内のアカウントのみ(Accounts in this organization directory only)] を選択します。
- 「登録」をクリックして続行します。
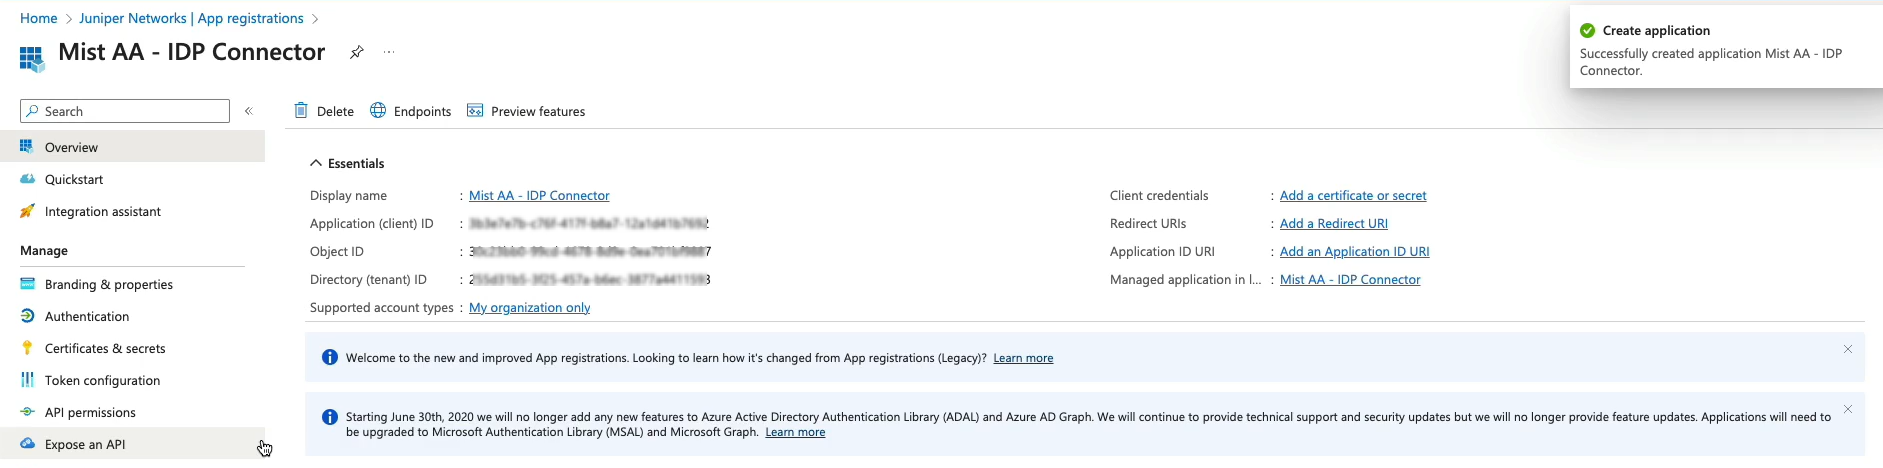
図 2 に示すように、新しく作成されたコネクタに関する情報を表示するページが表示されます。図2:新しいアプリケーションの詳細
- 左側のナビゲーション バーで、 [証明書とシークレット] > [新しいクライアント シークレット] を選択します。
次の詳細を入力し、「 追加」をクリックします。
- 名前
- 有効期限
図 3: クライアント シークレットの詳細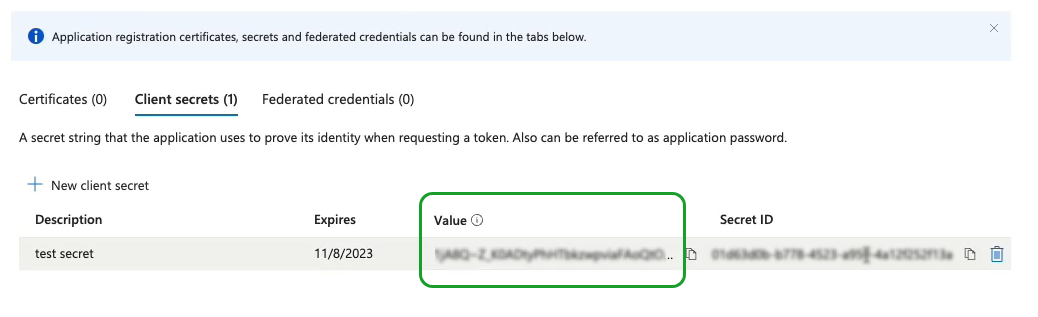
「値」フィールドの情報を書き留めます。この情報は、Azure AD を IdP として追加するときに、Juniper Mist ポータルの [OAuth クライアント資格情報クライアント シークレット ] フィールドに必要です。
- 左側のナビゲーション バーで、 [アプリの登録] を選択します。
- 委任のアクセス許可とアプリケーションのアクセス許可を Azure AD アプリケーションに付与します。これらのアクセス許可を使用すると、アプリケーションはユーザー、グループ、およびディレクトリ情報を読み取ることができます。
- [アクセス許可の追加] ページの [Microsoft Graph] で、[委任されたアクセス許可] タブと [アプリケーションのアクセス許可] タブに次のアクセス許可を追加します。
-
- Directory.Read.All (英語)
- Group.Read.All (英語)
- User.Read (英語)
- User.Read.All (英語)
[grant admin consent for your AD (AD の管理者の同意を付与する)] をクリックします (図 4 参照)。
図 4: アプリケーション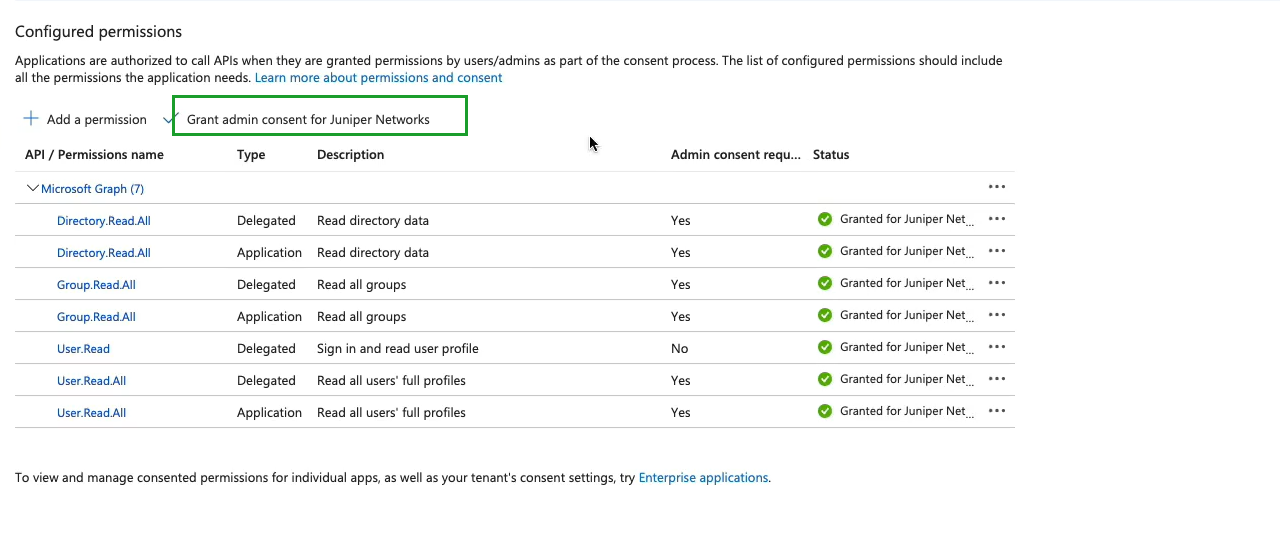 の API アクセス許可
アプリケーションが Azure AD で動作するには、アプリケーションのアクセス許可が必要です。 委任されたアクセス許可は、コネクタが認証にユーザー名とパスワードを使用する場合に不可欠です。
-
- [アクセス許可の追加] ページの [Microsoft Graph] で、[委任されたアクセス許可] タブと [アプリケーションのアクセス許可] タブに次のアクセス許可を追加します。
- Juniper Mist ポータルで、Azure AD をプロバイダーのとして追加します。
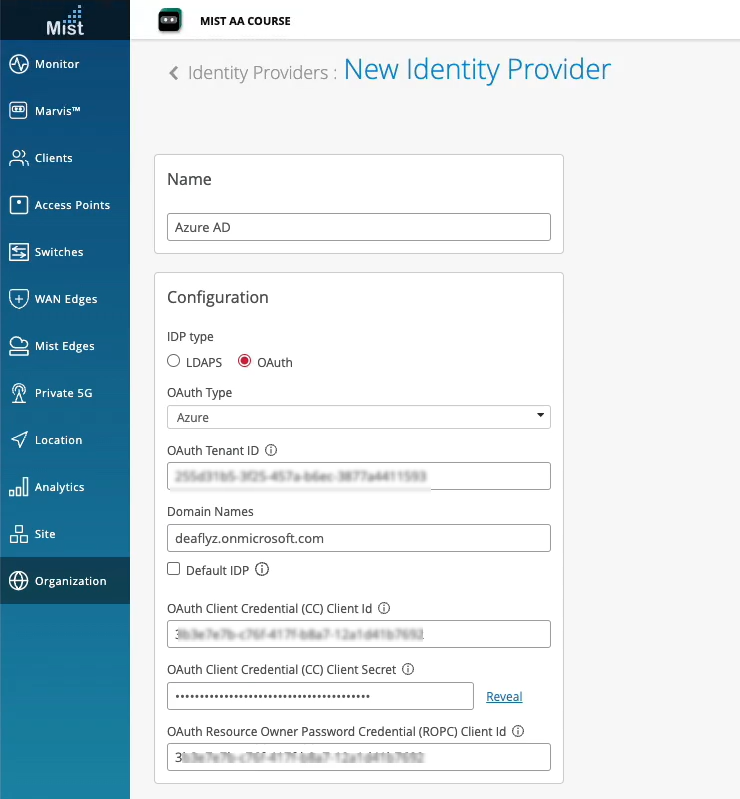
- [新しい ID プロバイダー] ページで、必要な情報を入力します (図 5 を参照)。
図 5: Azure AD を ID プロバイダー
 として追加する
- 名前 - IdP 名を入力します (この例では Azure AD を使用)
- IDP 種別 - [OAuth] を選択します。
- OAuth タイプ - ドロップダウン リストから [Azure ] を選択します。
- [OAuth テナント ID(OAuth Tenant ID)]:Azure AD テナント ID を入力します。
- [Domain Names]:ドメイン名、つまりユーザのユーザ名を入力します(例:username@domain.com)。ドメイン名フィールドは、受信認証リクエストを調べて、それぞれのユーザー名と関連するドメインを識別します。コネクタのドメイン名を設定すると、コネクタは通信する必要がある Azure テナントを識別できます。
- OAuth クライアント資格情報 (CC) クライアント ID — 登録済みの Azure AD アプリケーションのクライアント ID を入力します。
- OAuth クライアント資格情報 (CC) クライアント シークレット - Azure AD アプリケーション シークレット。Azure AD アプリケーション シークレット。Azure portal が IdP コネクタ用に生成したクライアント シークレットの値コンポーネントを入力します。
- OAuth リソース所有者パスワード資格情報 (ROPC) クライアント ID — Azure AD アプリケーション ID を入力します。このIDは、OAuthクライアント資格証明クライアントIDと同じです。
- [新しい ID プロバイダー] ページで、必要な情報を入力します (図 5 を参照)。
EAP-TLS を使用してユーザーを認証すると、Juniper Mist はユーザー名を指定されたドメイン名と照合します。Juniper Mist、対応する Azure AD テナントに API 要求を送信して、そのユーザーの詳細をフェッチします。
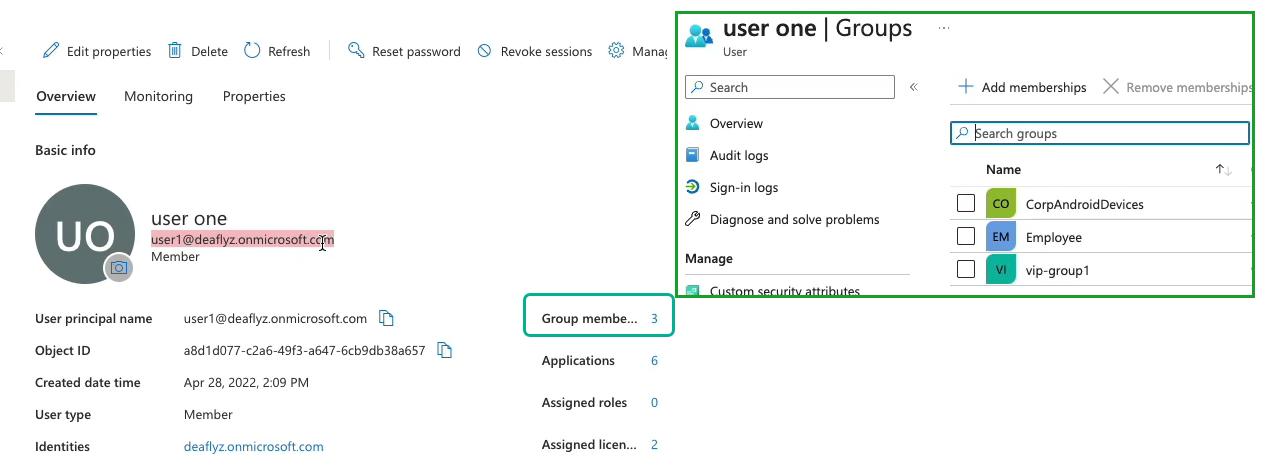
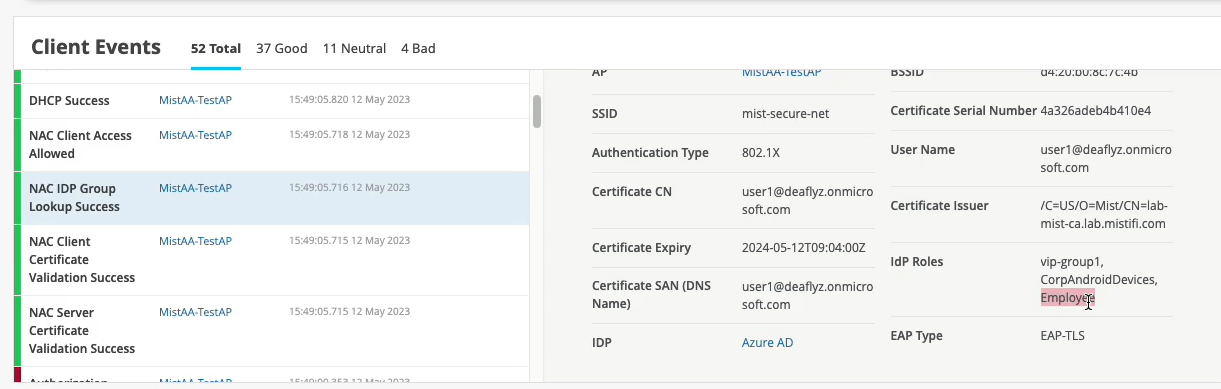
図 7 と 図 6 は、Azure AD と Juniper Mist ポータルでのユーザーの詳細を示しています。
 のユーザーの詳細
Juniper Mist ポータルでは、Azure AD によって返されるグループ メンバーシップ情報を表示できます。Juniper Mist ポータルで、 [> Insights > Client Events の監視 ] に移動して情報を表示します。
 Juniper Mistユーザーの詳細
図 7 の例では、ユーザーは Employee というグループに属しています。
グループの詳細に基づいて認証ポリシーを作成できます。
グループの詳細に基づく認証ポリシーの作成
IdPによって取得されたユーザーグループメンバーシップに基づいて、ディレクトリ属性を持つラベルを使用して認証ポリシーを作成できます。
認証ポリシーを作成するには、次の手順に従います。
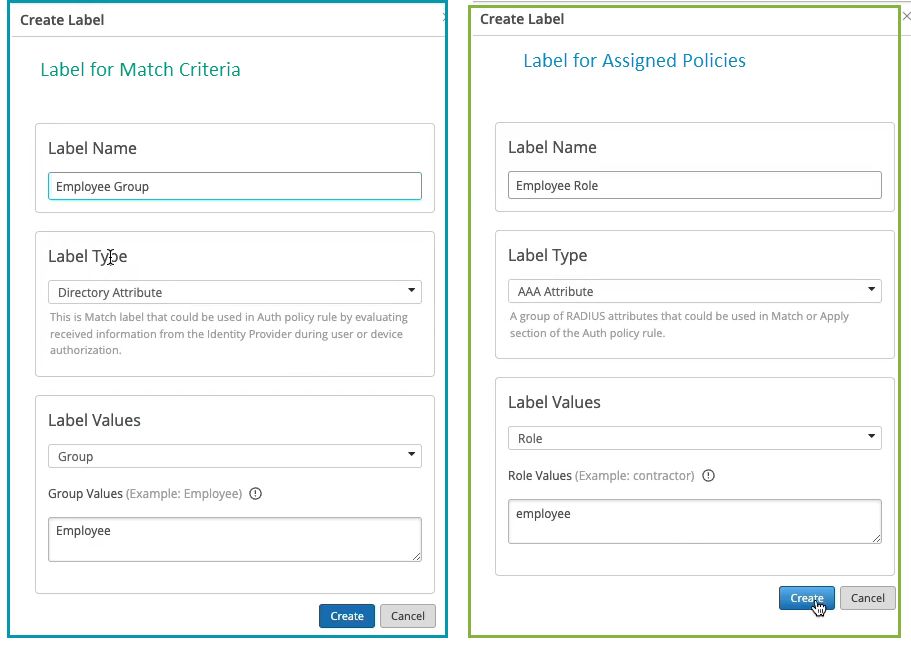
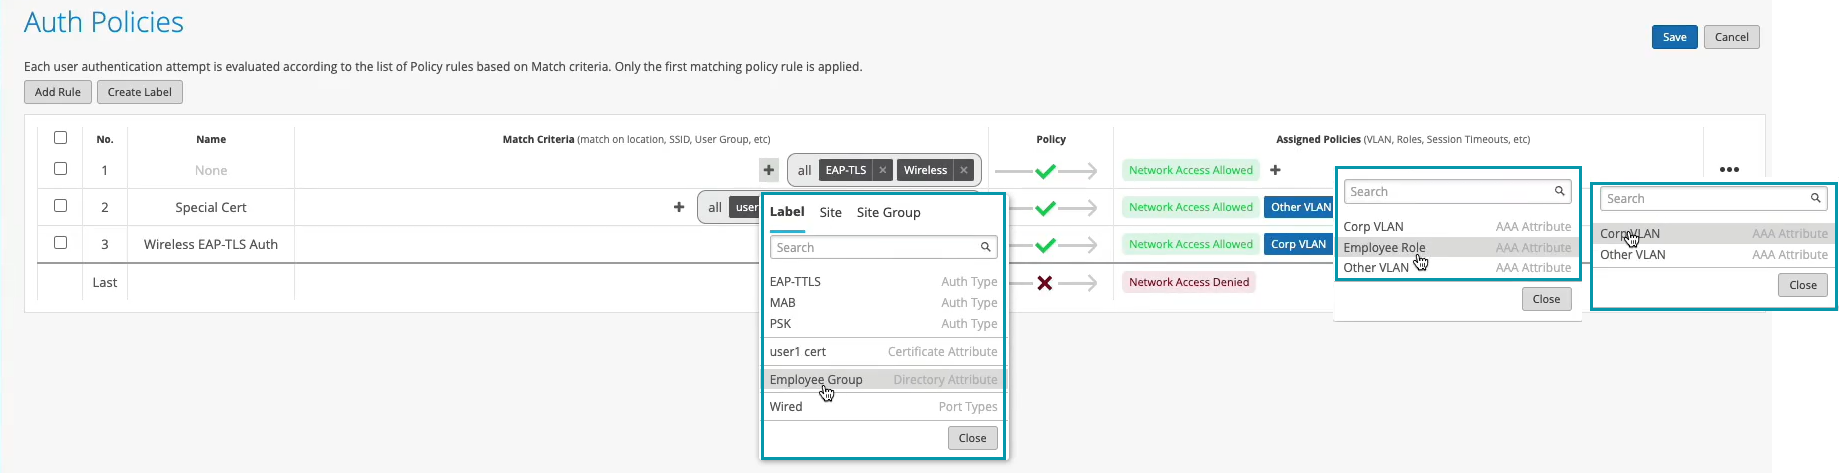
- 「認証ポリシー」ページで、「ラベルの作成」をクリックし、詳細を入力します。
図8:認証ポリシー
 のラベル
のラベル
- IdP によって取得されたユーザー グループ メンバーシップに基づいて、ラベル タイプが [ディレクトリ属性] のラベル Employee Group を作成します。ラベル値を [グループ] として選択し、グループ値を [従業員] として選択します。このラベルをポリシーの一致条件として使用します。
- ラベルタイプが AAA 属性 のラベル Employee Role を作成します。ラベル値として [ロール] を選択し、ロール値として [従業員] を選択します。このラベルを使用して、ポリシーを割り当てます。
- 「ルールの追加」をクリックして、認証ポリシーを作成します。新しい行が挿入され、新しいポリシーを追加できます。
図 9: 認証ポリシー
 のラベルの作成
ポリシー名を入力します。
「一致条件」列の追加アイコン(+)をクリックし、表示されるリストからユーザー・ラベルを選択します。ディレクトリ属性に基づいて作成したラベル (Employee Group) を選択します。
[ポリシー] 列で、チェック マーク アイコン (✓) をクリックし、次に特定するリソースに適用するアクション ([許可] または [ブロック]) を選択します。
[Assigned Policies] 列の [+] をクリックし、割り当てられたポリシーの AAA 属性に基づいて作成したラベル([Employee Role])を選択します。ユーザーは従業員グループに属しているため、従業員ロールを割り当てて企業VLANに移動できます
- 「保存」をクリックします。
図 10 に、完成した認証ポリシーを示します。
図 10: 認証ポリシー
WLAN テンプレートでの認証ポリシーの作成
WLAN テンプレートに認証ポリシーを追加すると、そのポリシーはこのテンプレートを使用するすべての WLAN に適用されます。まず、ポリシーで参照する必要があるラベルを作成します。次に、テンプレートを編集してポリシーを追加します。
- WxLANポリシーでこれらのラベルを使用できるように、ユーザーのラベルを作成します。
- 識別するユーザーに対して、適切な [ラベルの種類] と [ラベル値] を選択します。
ユーザーのラベル タイプには、AAA 属性、アクセス ポイント、WiFi クライアント、WLAN などがあります。値は選択したタイプによって異なります。
次の例では、[AAA Attribute] タイプが選択され、[Label Value] が [ユーザー グループ] です。システム・ユーザー・グループに対応するラベルを作成することで、ユーザー・グループごとに異なるポリシーを作成できます。図11:新しい atp レルムの作成ラベル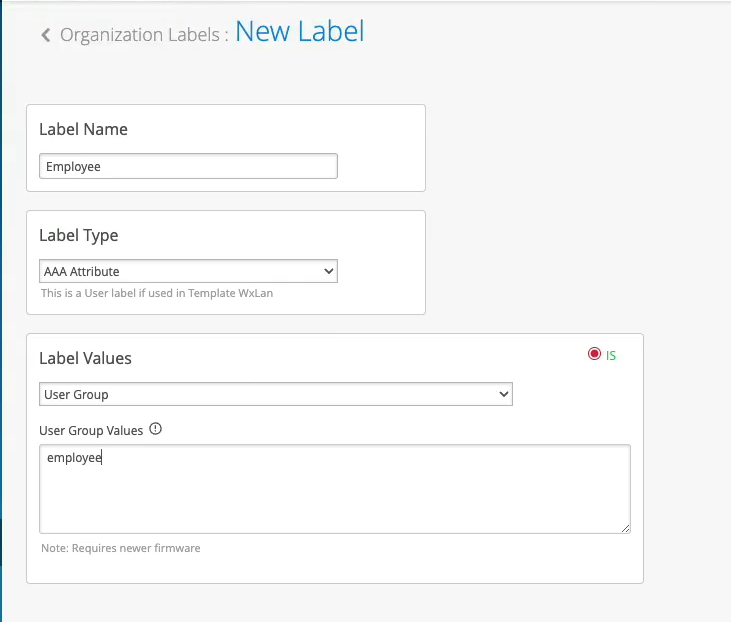
- 識別するユーザーに対して、適切な [ラベルの種類] と [ラベル値] を選択します。
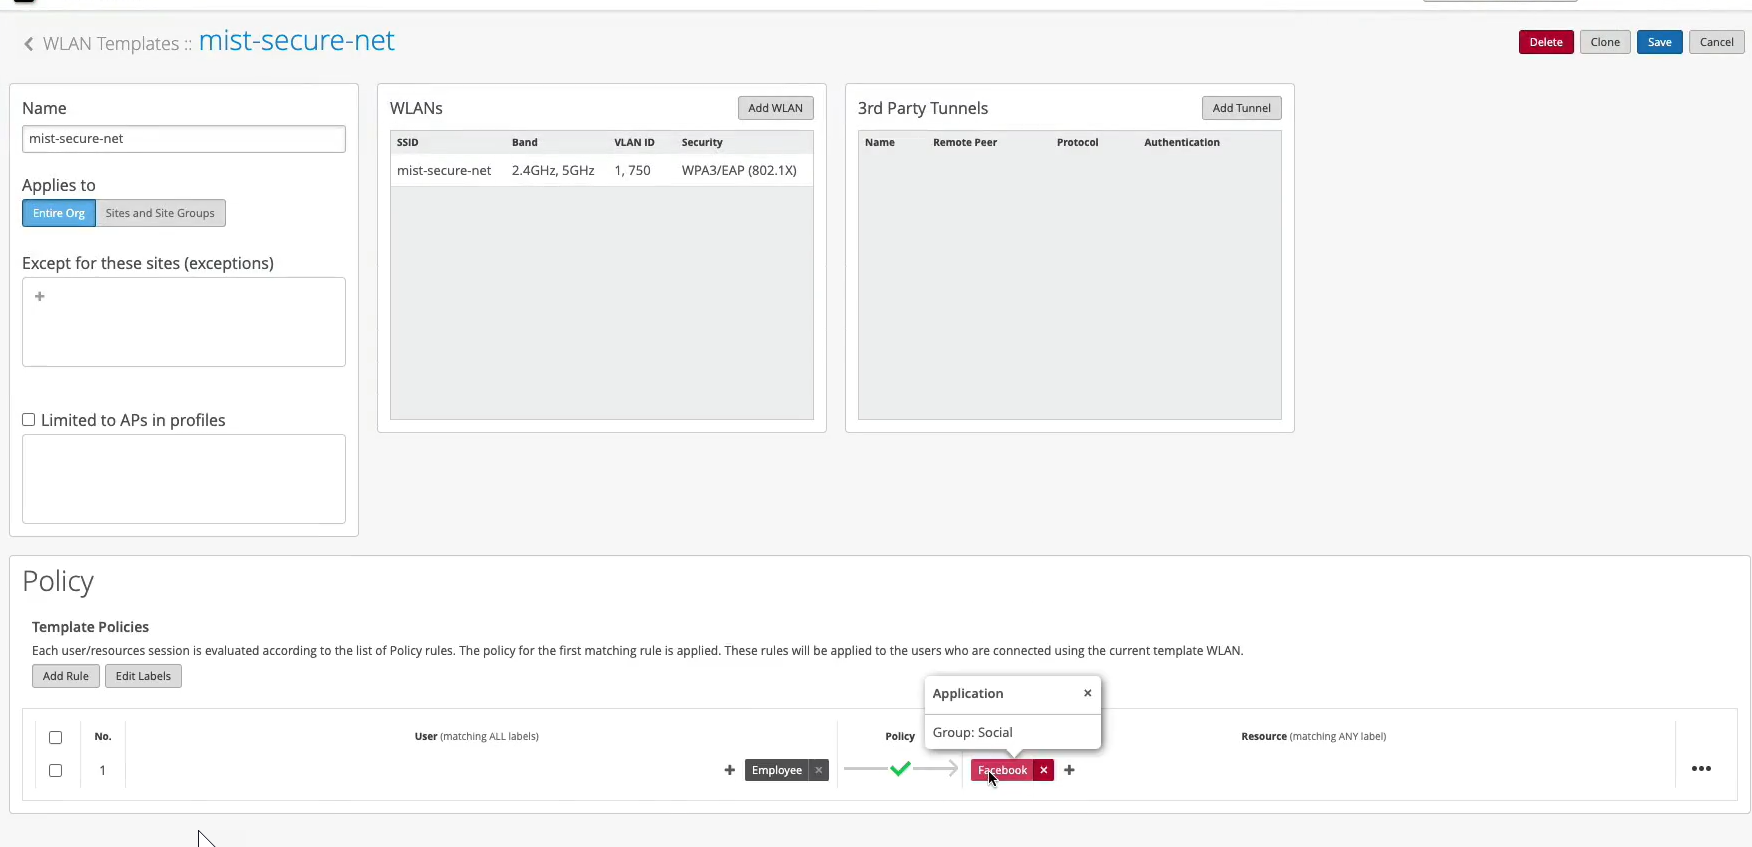
- ルールを適用するユーザー、ポリシー、およびリソースを選択します。
-
「 ユーザー 」セクションで、追加アイコン(+)をクリックします。次に、前に作成したユーザー ラベルの 1 つを選択します。
-
[ポリシー] セクションで、チェックマーク アイコン (✓) をクリックします。次に、適用するアクションを [許可] または [ブロック] から選択します。
-
「 リソース 」列で、追加アイコン (+) をクリックします。次に、前に作成したリソース ラベルの 1 つを選択します。
-
次のビデオでは、Azure AD と統合された証明書ベース (EAP-TLS) 認証を使用する場合に、WLAN テンプレートで認証ポリシーを構成する方法を示します。
Your rule configured, let's validate. Let's take a look at which policy is now being hit for this particular user. So we went in and did the client certificate check. Let's just refresh those events so we see them. All right, so we went in and client trusted the server cert. We trusted the client cert. We then did an IDP lookup, right? Same thing as your ID. We got the three IDP roles.
Now, let's look at this client access allowed. We got the VLAN 750. We got the user group or role called employee. And now we are actually hitting that different rule now. Because we have this additional context, additional visibility from the IDP, we can now do differentiated access policies for our clients.
Now, what you could do with this employee role - how can you use it on the wireless side? You could go to organization labels. You can create a label AAA attribute. Let's call it "Employee." You'll match on the user group. And what you'll do, you could go to your WLAN template. You can create a network policy now. You can say, OK, if the user is part of this employee role or employee group, we can now decide which resources it can or cannot access on the network. So we can say, OK, let's probably block Facebook for employees and hit Save. This is how you can extend the role that's being supplied by the NAC and then apply it on the AP to do some additional restrictions on which resources the user is able to access.