EAP-TTLS認証用のクライアントデバイスの設定
EAP-TTLS 認証によってネットワークを保護するには、クライアントデバイスで次の構成手順に従います。
ジュニパー Mist Access Assuranceは、内部方式として PAPのみを使用したEAP-TTLS認証 をサポートします。デフォルトでは、Apple iOS/macOSやWindowsなどのほとんどのクライアントデバイスは、ユーザーがSSIDログインプロンプトで資格情報を入力すると、PEAP-MSCHAPv2またはEAP-TTLS/MSCHAPv2を使用しようとします。これらの方法はパスワードハッシュ(MSCHAPv2など)に依存しており、最新のクラウドベースのIDプロバイダ(IdP)ではサポートされていません。オンボーディングを成功させるには、 PAPでEAP-TTLSを使用するようにクライアントデバイスを明示的に設定する必要があります。本番環境では、この構成は通常、モバイルデバイス管理(MDM)ソリューションを通じて適用されます。ただし、検証やラボテストの場合は、以下の手順に従って、デバイスを手動で設定することもできます
前提条件
- ジュニパー Mist Org CA 証明書をダウンロードします。
クライアントデバイスは、Mist Access Assuranceサーバーを信頼する必要があります。Mist組織のCA証明書は、設定する無線プロファイルに含まれている必要があります。
- ジュニパー Mistポータルで、[ 組織>アクセス>証明書]に移動します。認証局ページで、 Mist証明書を表示 をクリックして証明書の詳細を表示します。
図1:CA証明書
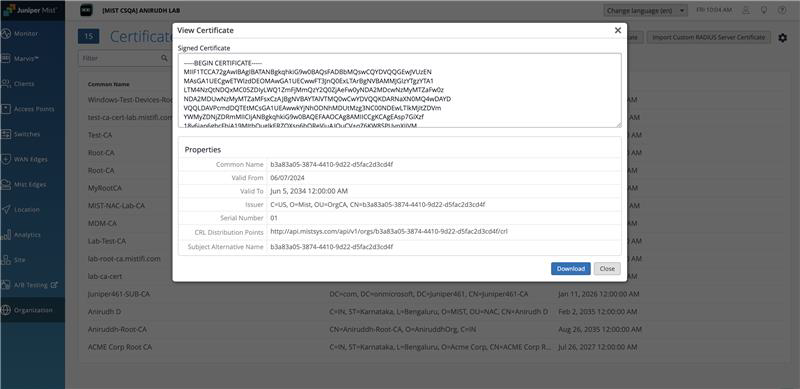 Mistジュニパーダウンロード
-
証明書のダウンロードをクリックして、クライアントデバイスに証明書をダウンロードします。
注:カスタムサーバー証明書を使用している場合は、Mist組織CAではなく、サーバー証明書のルートCAを使用します。
- ジュニパー Mistポータルで、[ 組織>アクセス>証明書]に移動します。認証局ページで、 Mist証明書を表示 をクリックして証明書の詳細を表示します。
- IDプロバイダ(IdP)を設定する:ジュニパー Mistダッシュボードで、 組織>アクセス>IDプロバイダに移動し>IDPを追加 し、必要なIdPの詳細を設定します。詳細については、「 ジュニパー Mist Access Assurance の ID プロバイダの追加」を参照してください。
図2:IDプロバイダー
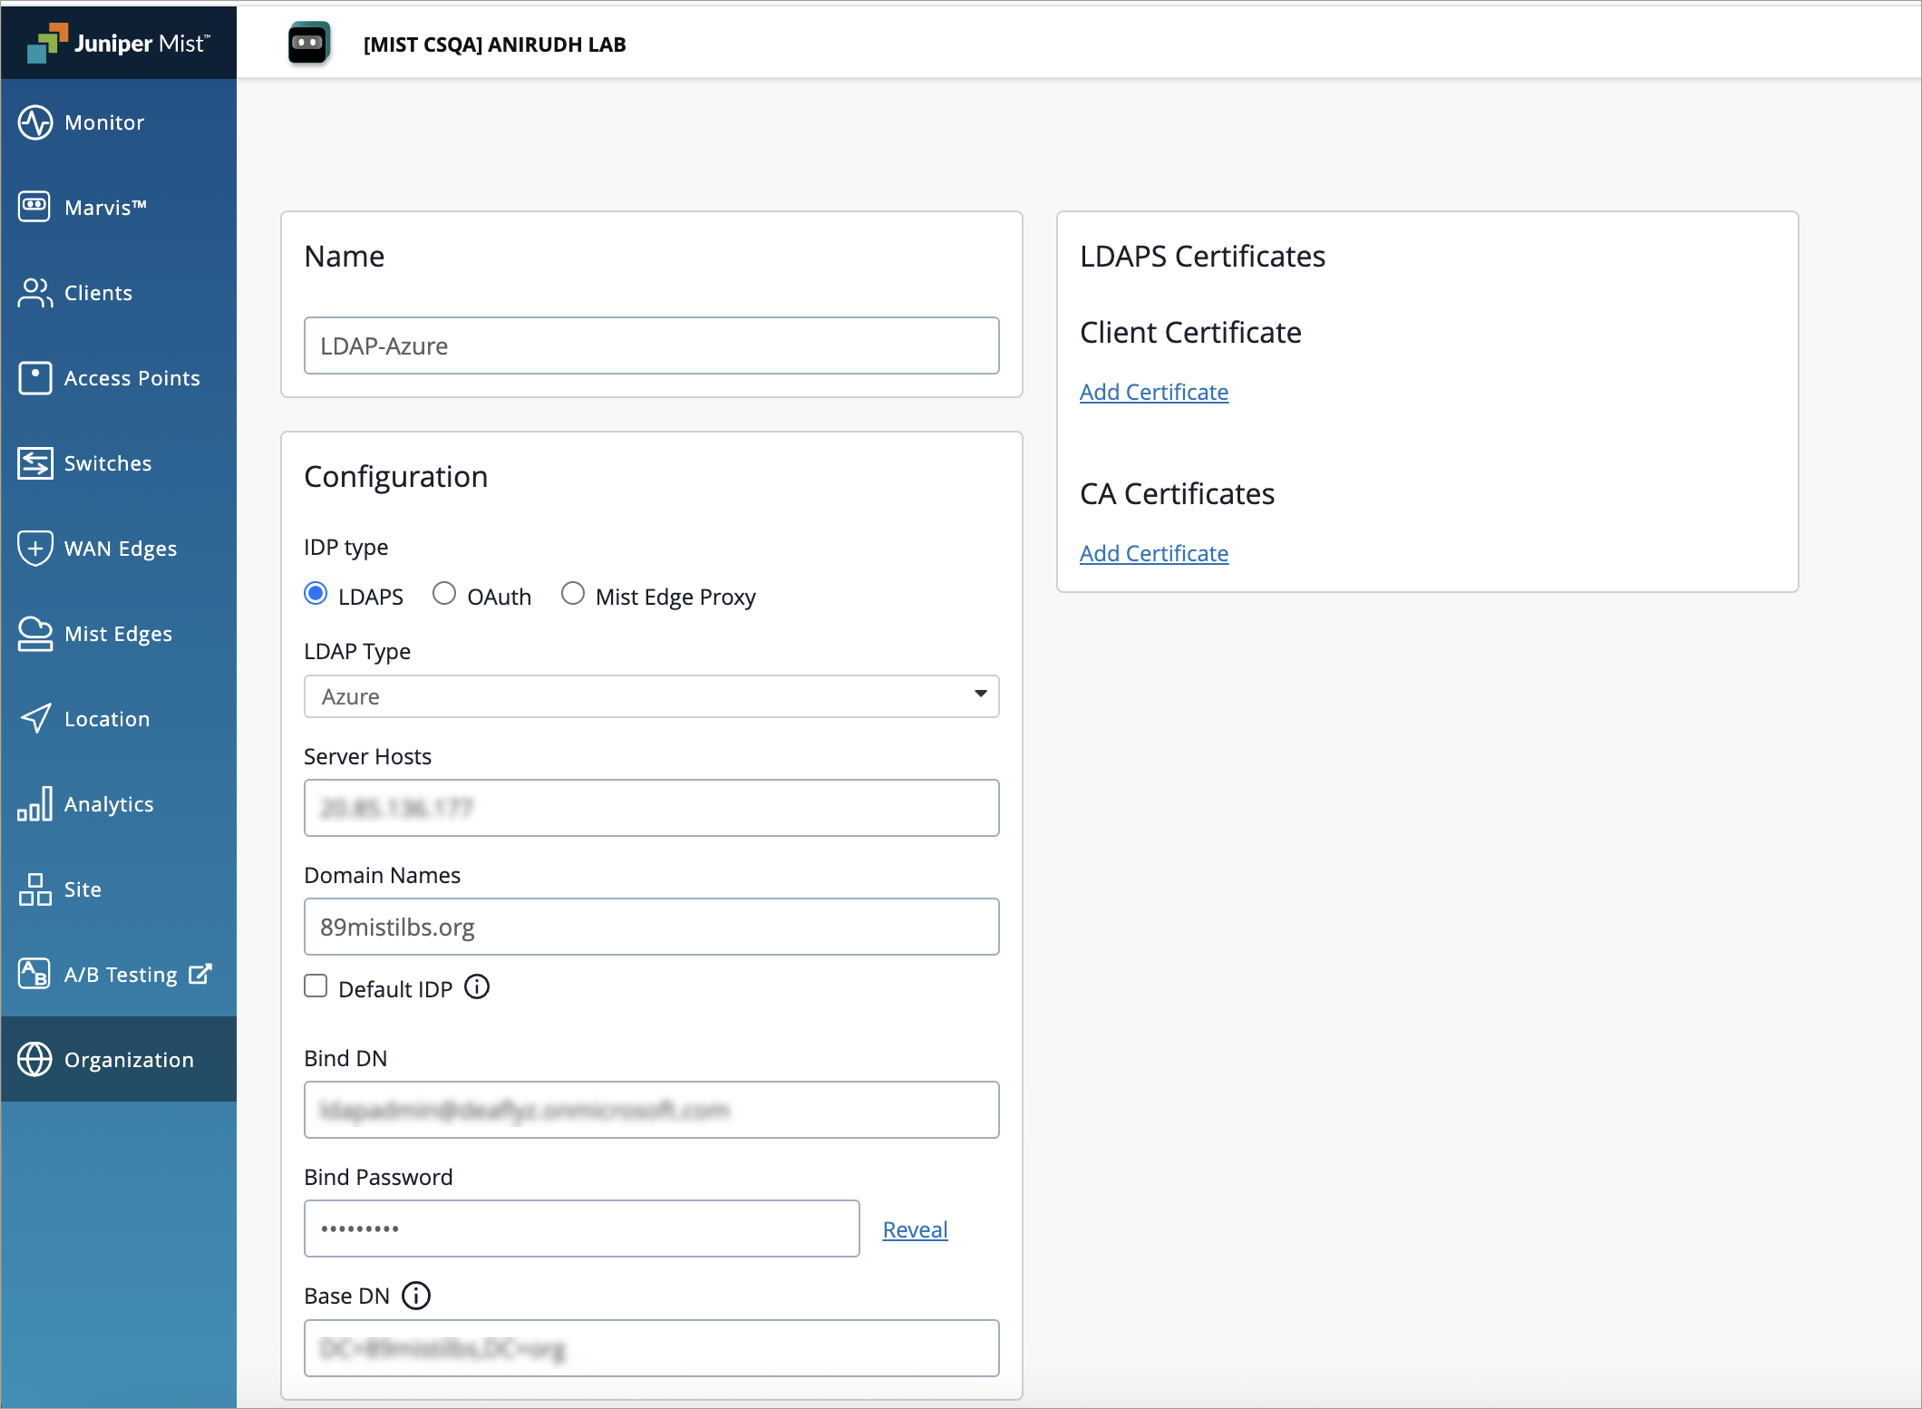 の設定
の設定
- 認証ポリシールールを作成する: 組織>アクセス>認証ポリシーで、EAP-TTLSクライアントデバイスがネットワークに接続できるようにする適切な認証ポリシールールを定義します。詳細については、「 認証ポリシーの設定」を参照してください。
図3:認証ポリシーの作成
![User interface for managing authentication policies in [MIST CSQA] ANIRUDH LAB, showing policy table with policy number, name, match criteria, actions, assigned policies, and hit count. Includes buttons for adding rules, creating labels, saving, and canceling changes. Dropdown menus for auth type and time filter are visible.](/documentation/us/en/software/mist/mist-access/images/access-eap-ttls-16.png)
EAP-TTLS認証用のAppleデバイスの設定
Apple macOSデバイスを使用した設定について説明しました。
このタスクでは、無料の Apple Configurator ツールを使用して EAP-TTLS ネットワーク プロファイルを作成します。
Appleクライアントデバイスでプロファイルを作成します。
- macOSクライアントで、Apple Configuratorツールを開き、「ファイル」>「新規プロファイル」をクリックします。
図4:Apple Client
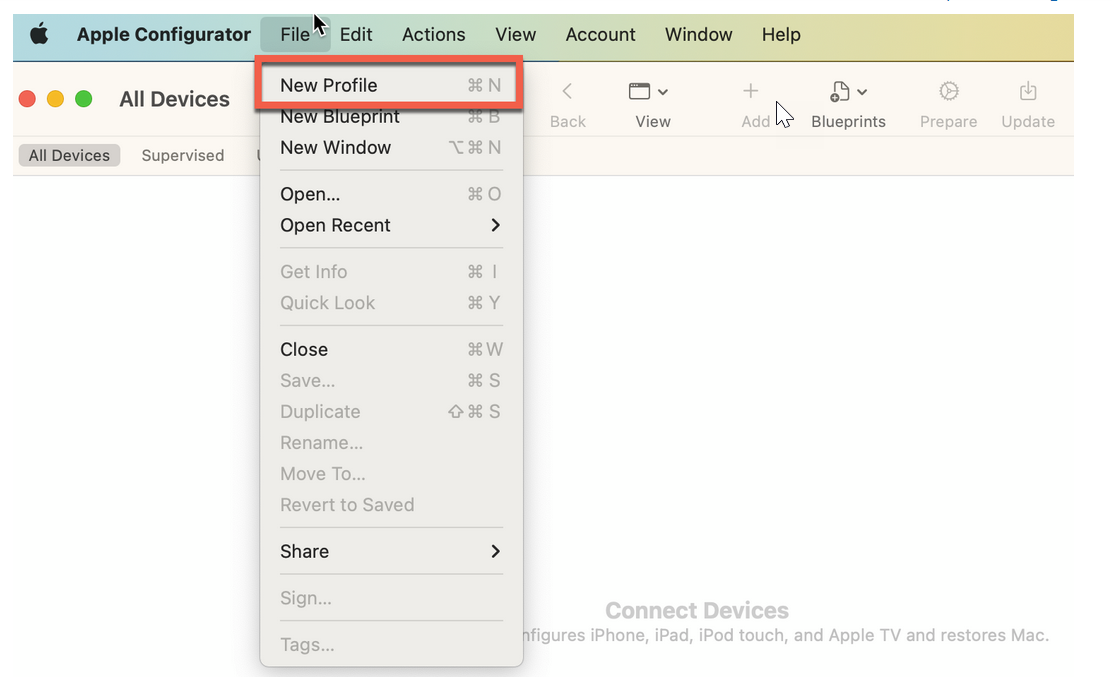 のWi-Fiプロファイル設定
新しい設定プロファイルドキュメントが開きます。
- Apple Configuratorページの左側のナビゲーションバーで、 証明書>設定をクリックします。ダウンロードしたMist証明書を選択してアップロードします( 「前提条件」に記載されているとおり)。クライアントデバイスがジュニパー Mist Access Assuranceサーバーを信頼するには、そのサーバーを無線プロファイルに含める必要があります。
図5:Wi-Fiプロファイル設定
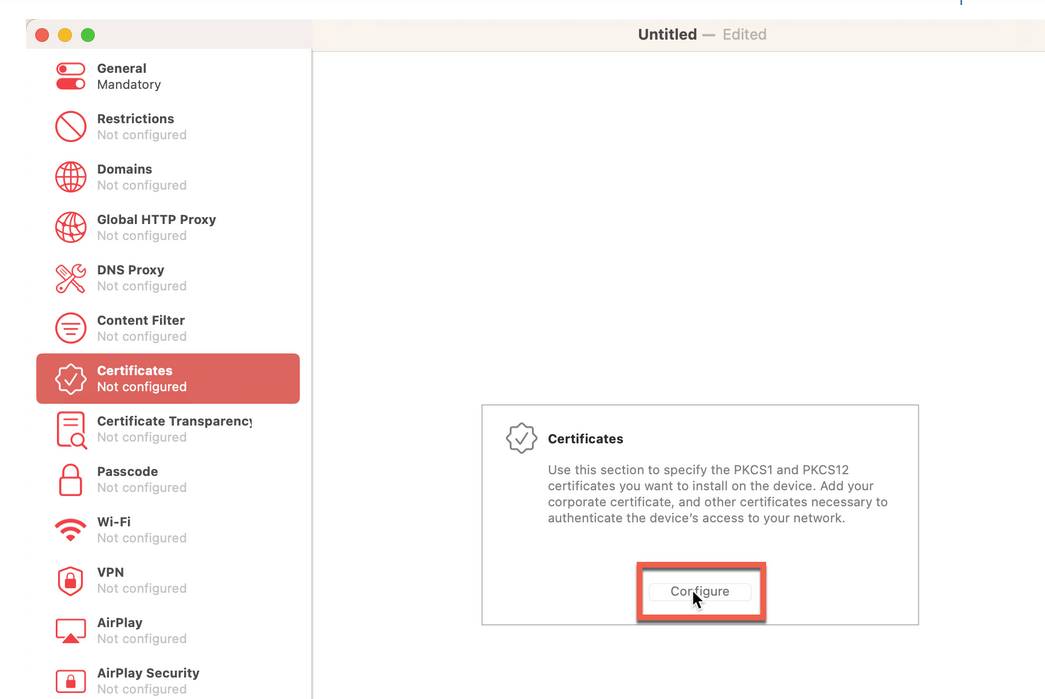 Mistジュニパー CA証明書をアップロードする
- Apple Configuratorツールの左側のナビゲーションバーから、 Wi-Fi を選択し、 設定をクリックします。
図6:Wi-Fiプロファイル構成
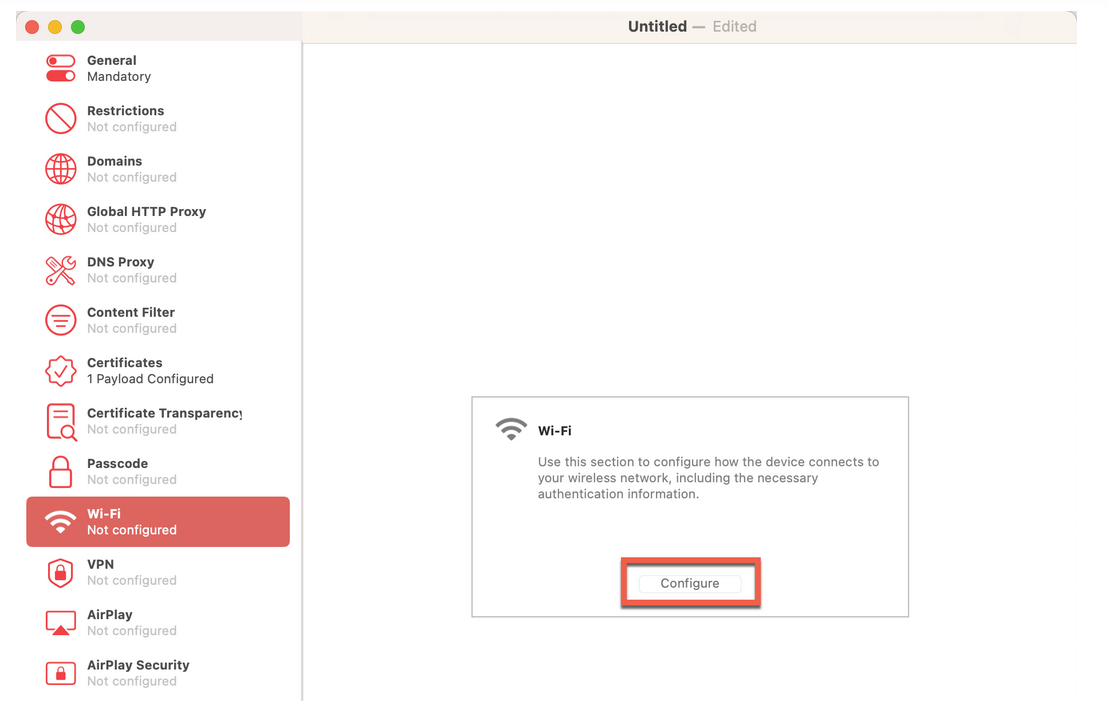
Wi-Fi設定に以下のオプションを入力します。
- SSID - ネットワークの SSID大文字を含む正しいSSIDを入力してください。
- セキュリティタイプ—WPA2/WPA 3エンタープライズ
- 受け入れられるEAPタイプ—TTLS を選択し、 接続ごとのパスワードを選択します。
- 内部認証—PAP
図7:Wi-Fiプロファイル構成設定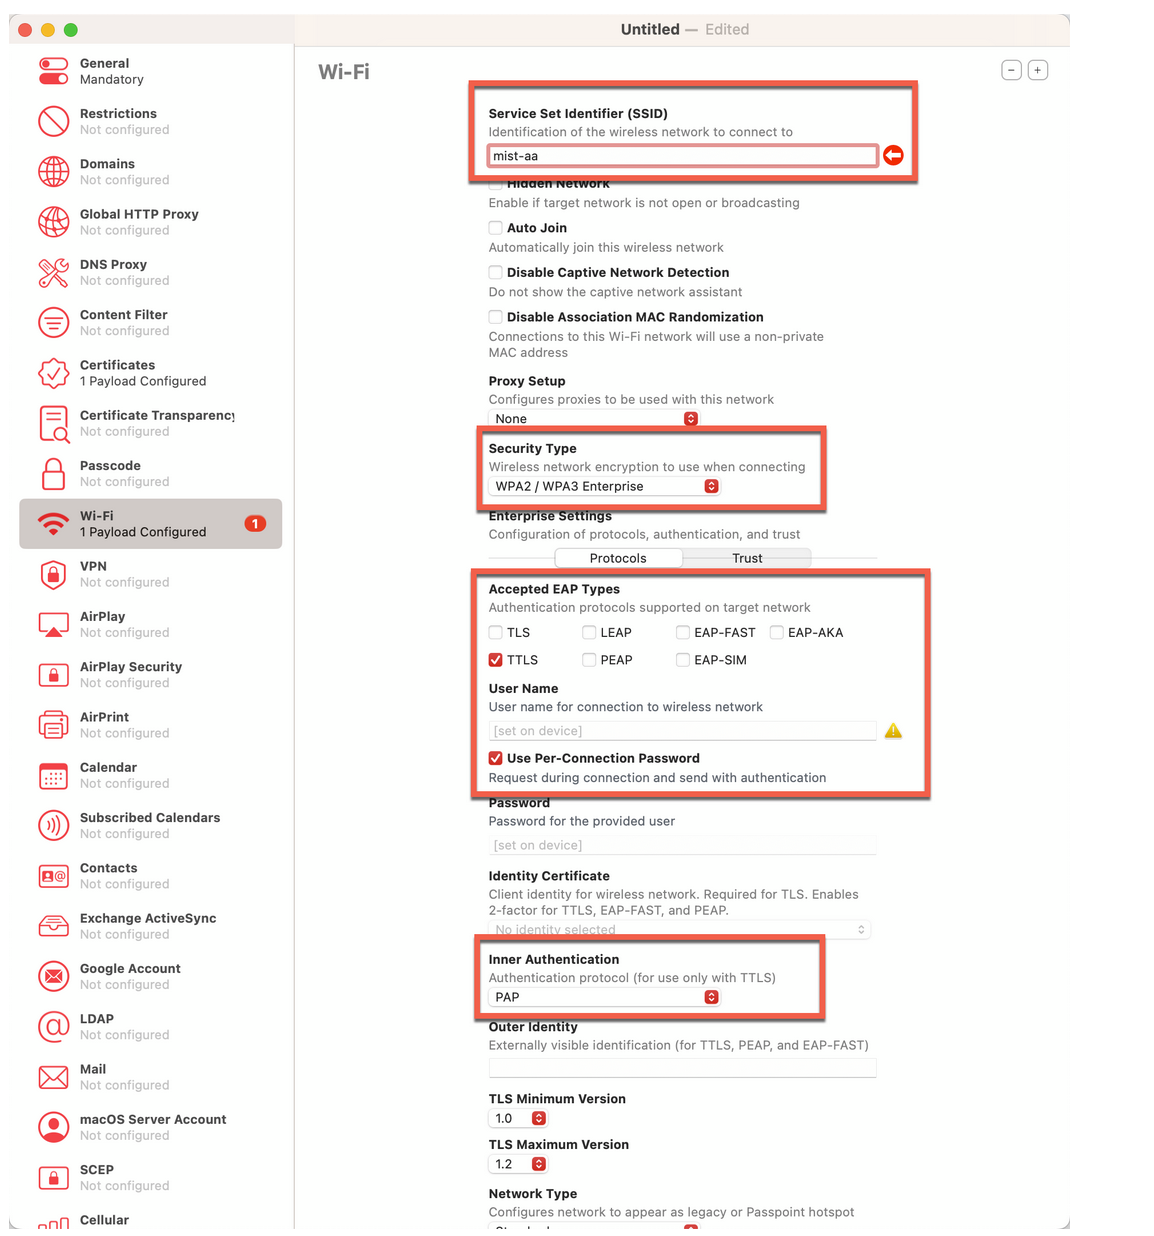
- 同じページのプロトコル横のエンタープライズ設定で、信頼をクリックします。このページには、アップロードされた証明書のリストが表示されます。
CA証明書Mistジュニパーを選択し、信頼できるサーバー証明書名に auth.mist.com を入力します。この手順により、クライアントデバイスがジュニパー Mist Access Assuranceサーバーを信頼できるようになります。
図8:Wi-Fiプロファイル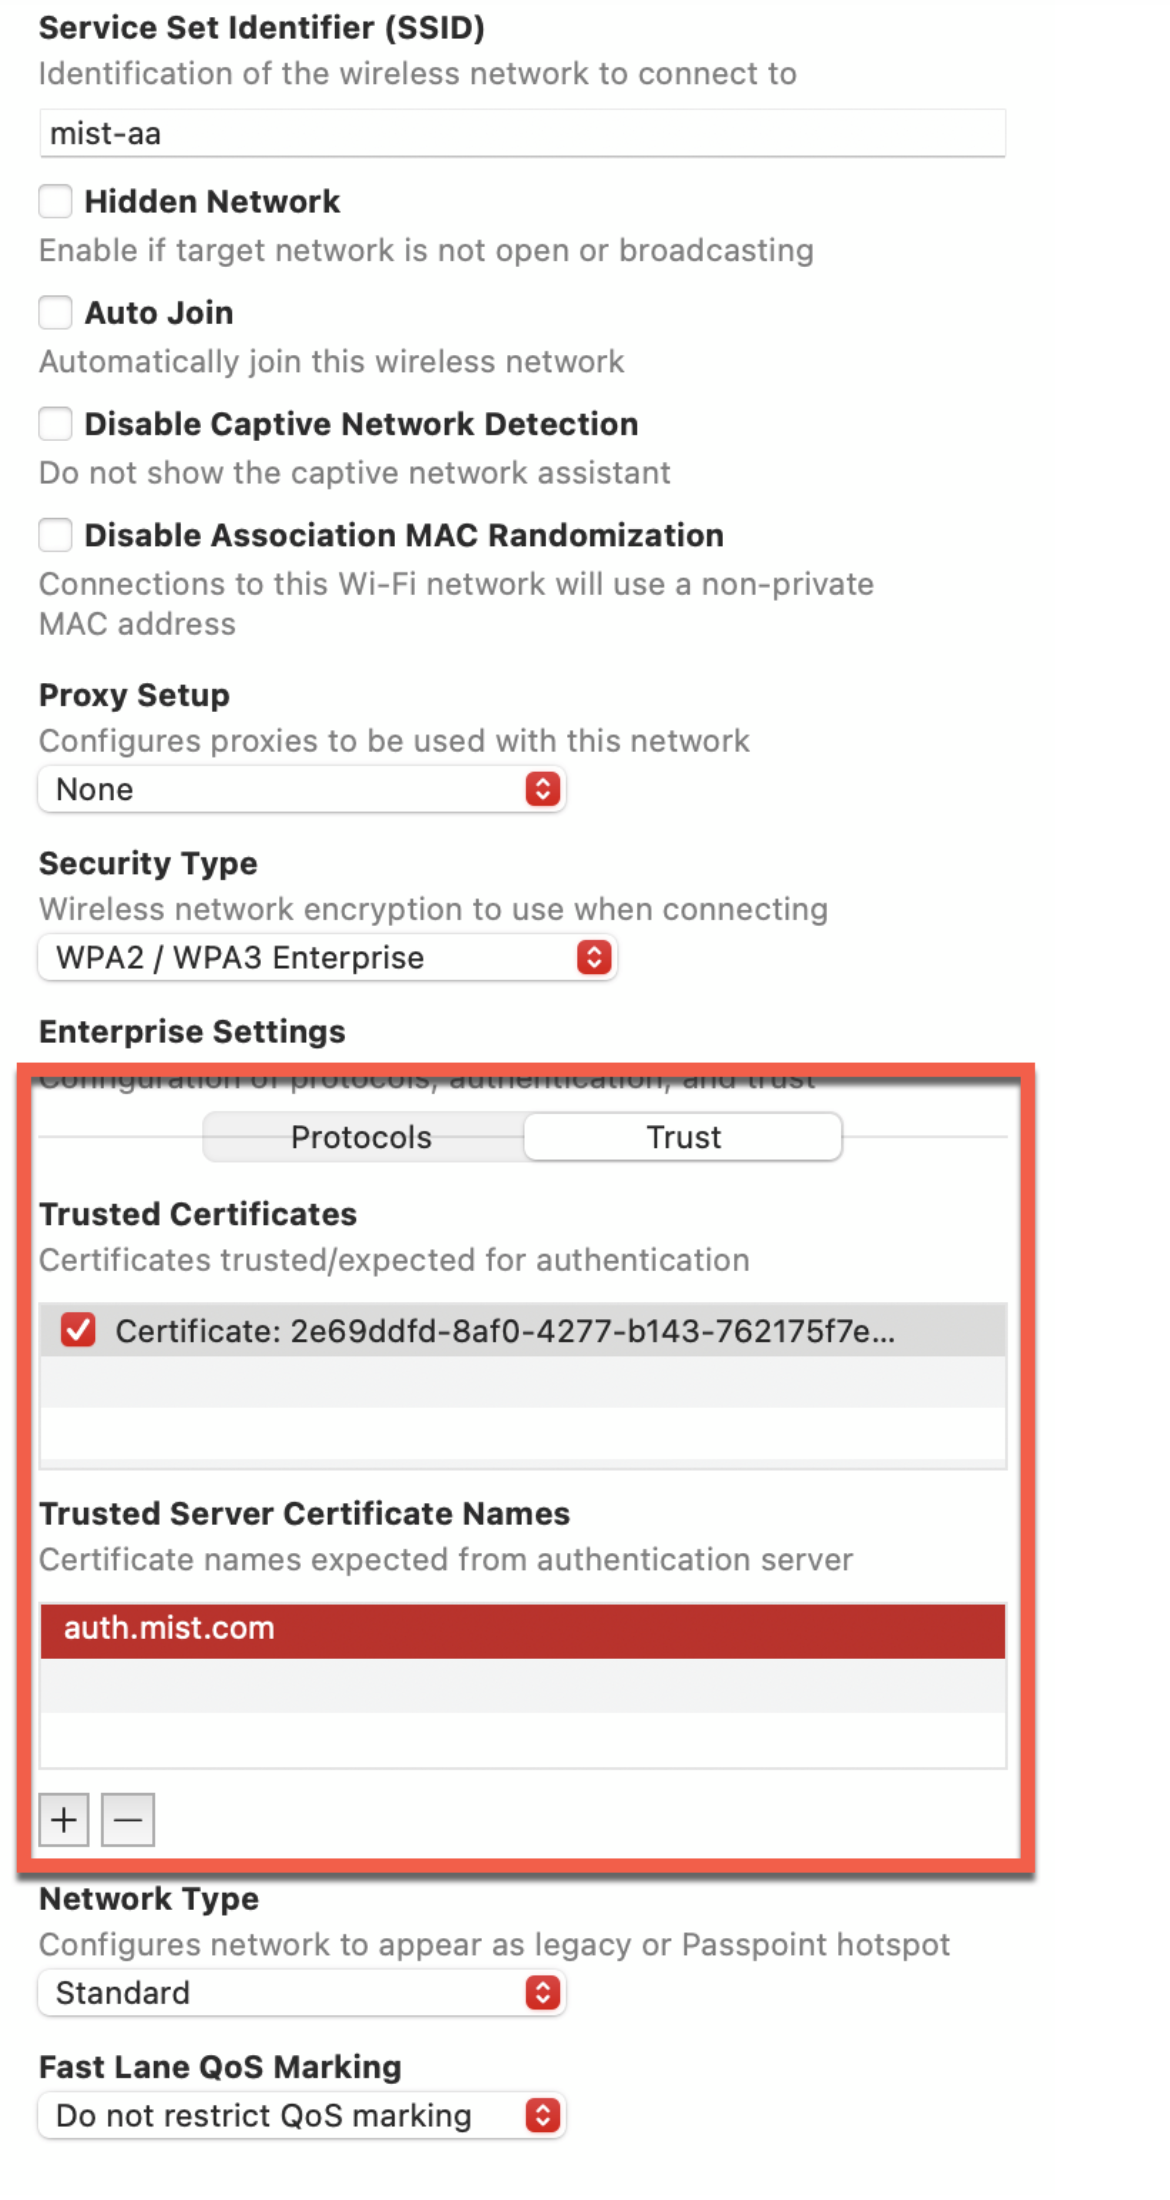 におけるMist CA証明書ジュニパー信頼
- プロファイル設定を保存します。
図9:Wi-Fiプロファイル設定の保存
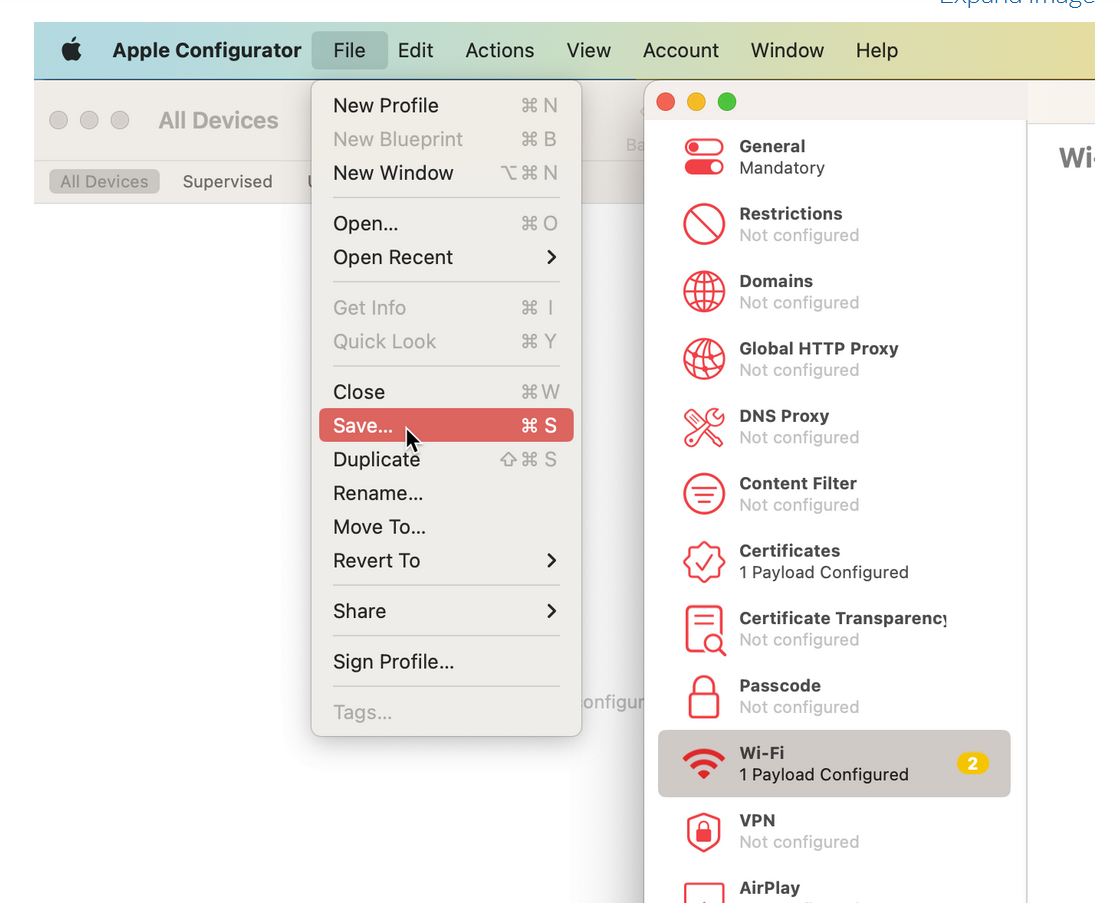
- プロファイルに署名するには、Appleが信頼する証明書が必要です。このステップは、実稼働環境で使用するために必要です。
これで、macOSデバイスにプロファイルをインストールし、EAP-TTLSを介してSSIDに接続できます。
iOSおよびiPadOSの場合
iPhone または iPad で EAP-TTLS をテストするには、設定された Wi-Fi プロファイルを macOS デバイスからエクスポートし、AirDrop 経由で共有します。受信したら、これらのプロファイルをiOSデバイスにインストールし、PAP認証を備えたEAP-TTLSを使用して接続します。
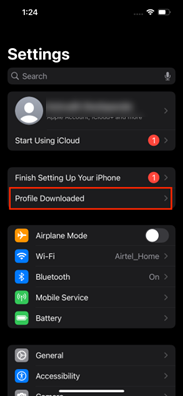
- iOS デバイスで設定アプリを開き、[ プロファイルのダウンロード済み] をタップします。
図10:プロファイル
 の検索
の検索
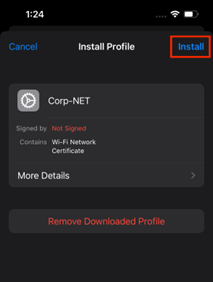
- 画面の右上隅にある [インストール] をタップします。
図11:インストールプロファイル
-
画面の指示に従ってインストール プロセスを完了します。
-
ユーザー名とパスワードを入力し、[無線 ネットワークに接続] をクリックします。
図12:ワイヤレスネットワーク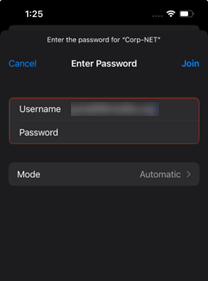 の接続
の接続
EAP-TTLS認証用のWindowsデバイスの設定
次の手順を使用して、EAP-TTLS認証用にWindowsデバイスを設定します。
- ジュニパー Mist Org CA 証明書をダウンロードし ( 「前提条件」を参照)、信頼できる ルート認証機関の「コンピューター証明書の管理」にある Windows デバイス> Mist Org CA 証明書をインポートします。
図13:Windowsデバイス
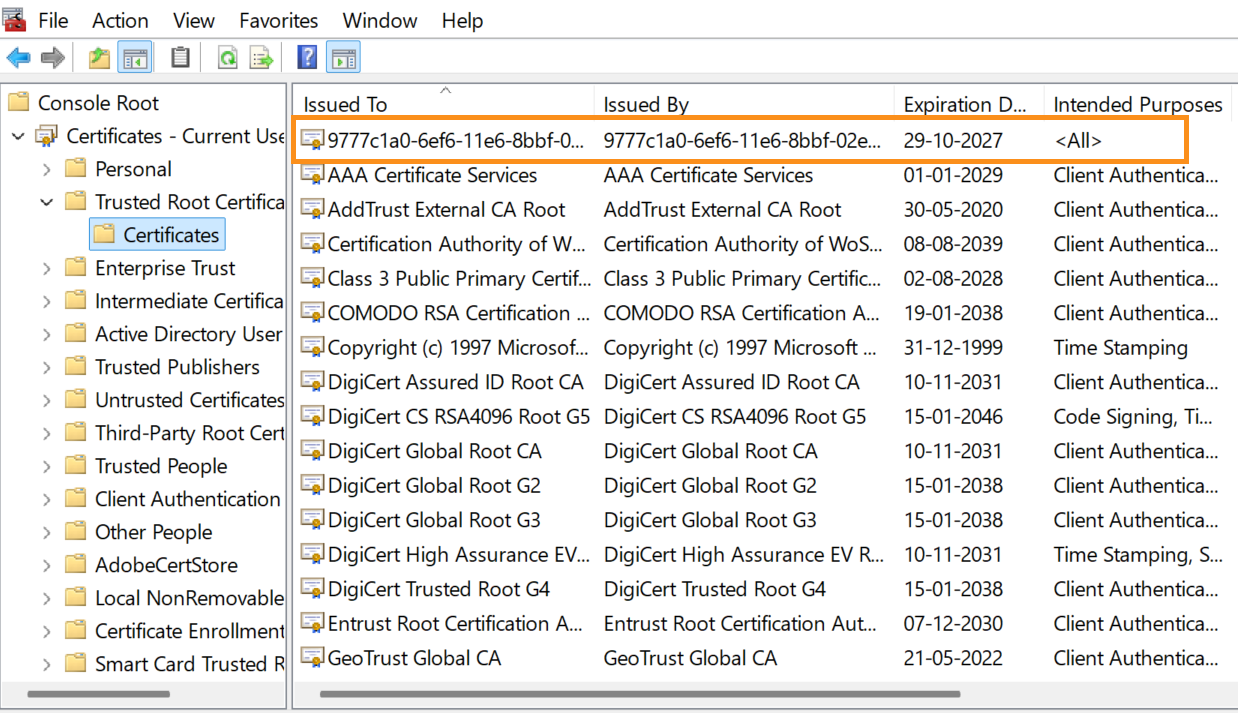 上の信頼できるルート証明書
- Windows デバイスで、[ コントロール パネル] > [ネットワークと共有センター] に移動し>新しい接続またはネットワークを設定し 、[ 無線 ネットワークに手動で接続する] を選択して、[ 次へ] をクリックします。
図14:新しい接続
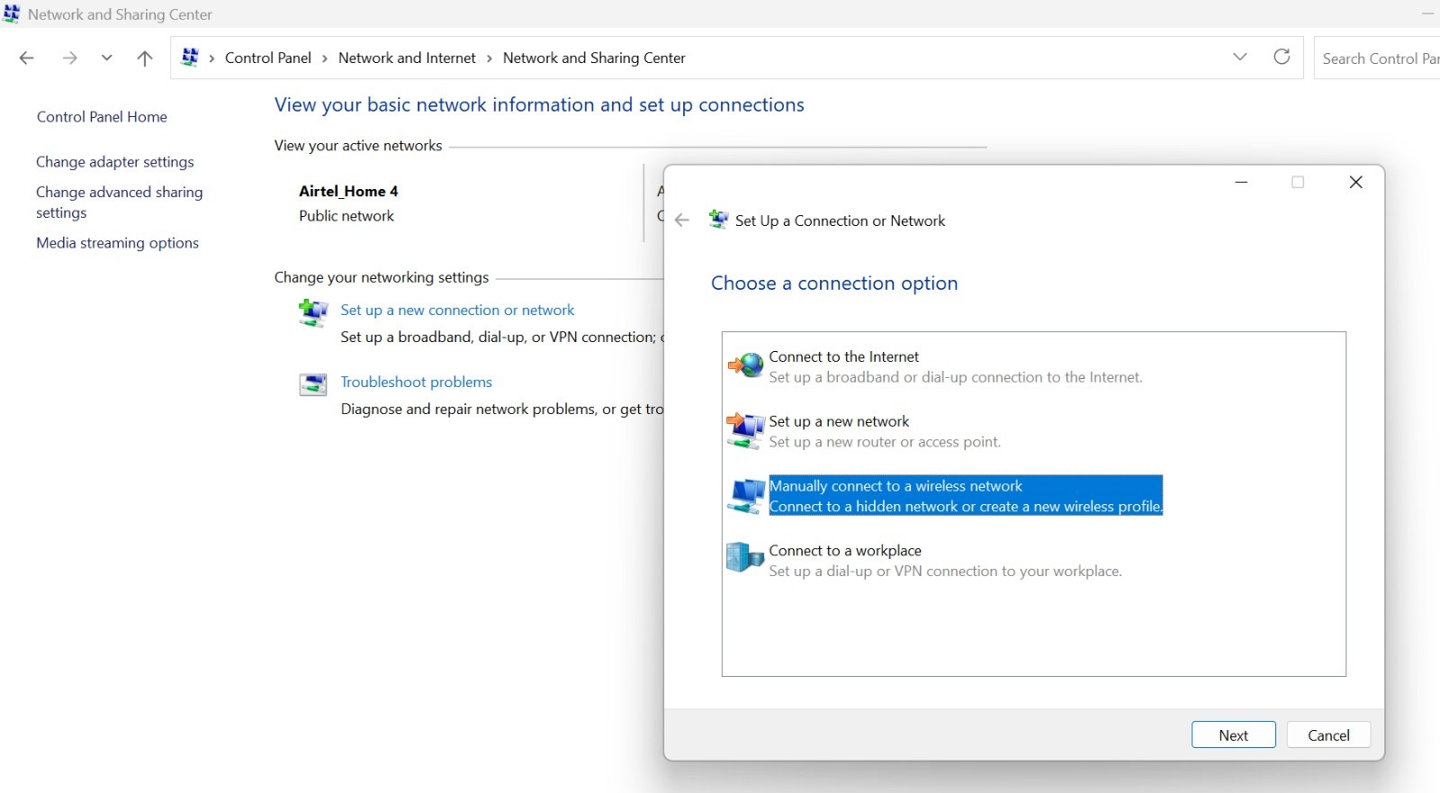 の設定
の設定
- [追加 する無線ネットワークの情報を入力]に、以下の詳細を入力します。
-
ネットワーク名—SSID名を指定します。
-
セキュリティタイプ—WPA2-エンタープライズまたはWPA3-エンタープライズオプションを選択します。
図15:無線ネットワーク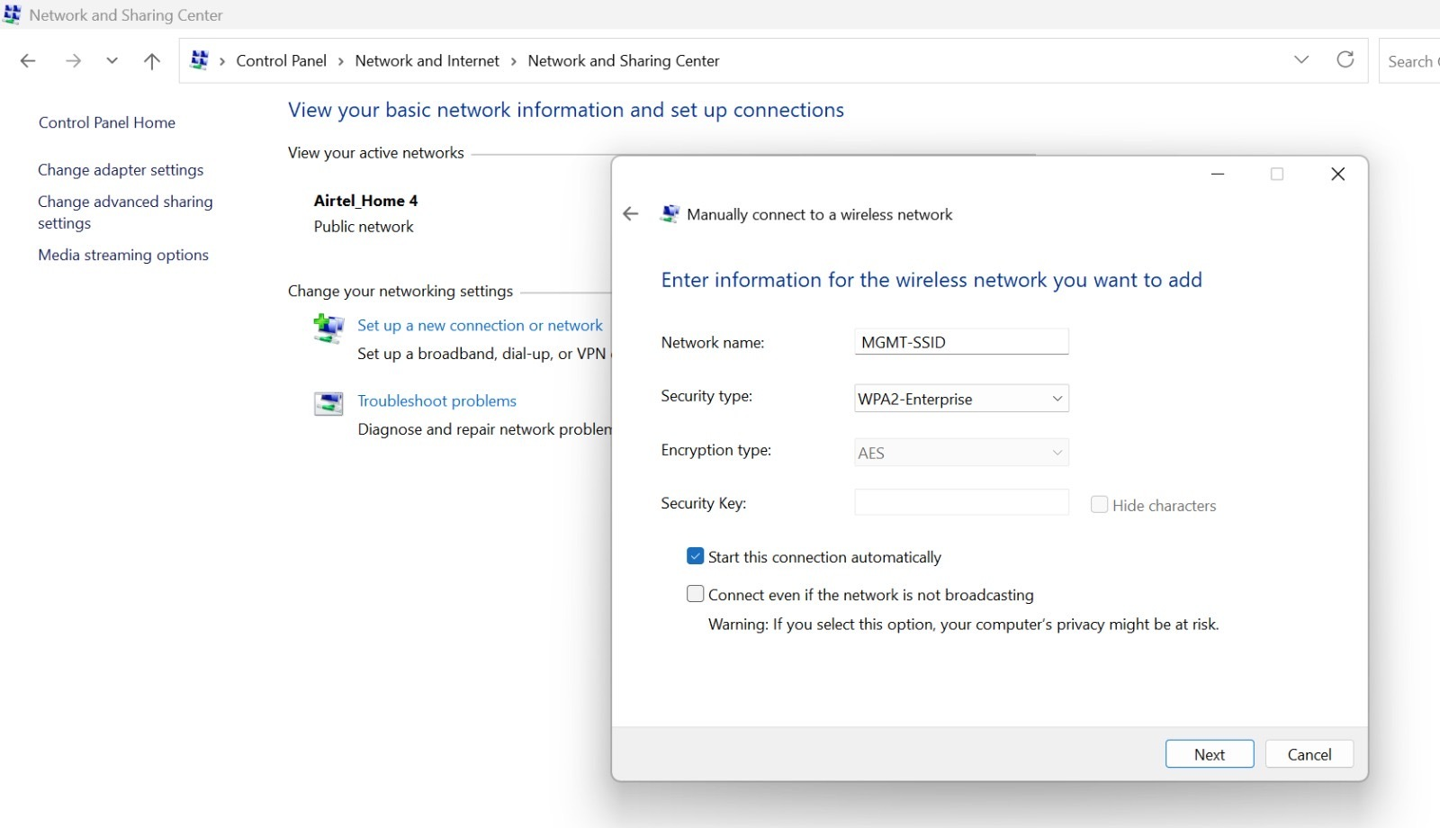 情報を入力します
次へをクリックすると、SSID が正常に追加されたことを示す確認メッセージが表示されます。
図16:ワイヤレスネットワークの設定:接続設定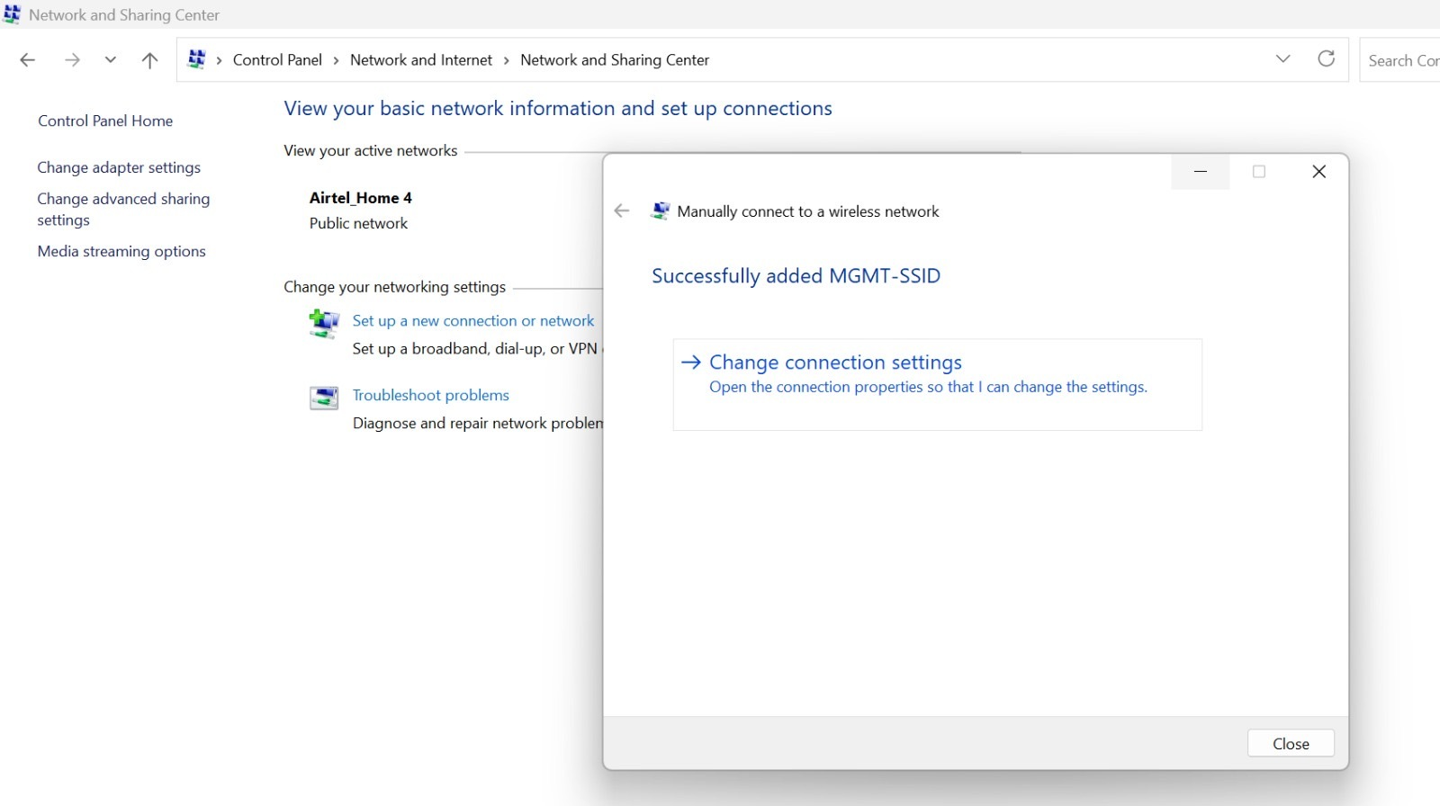
接続 設定の変更をクリックします。
-
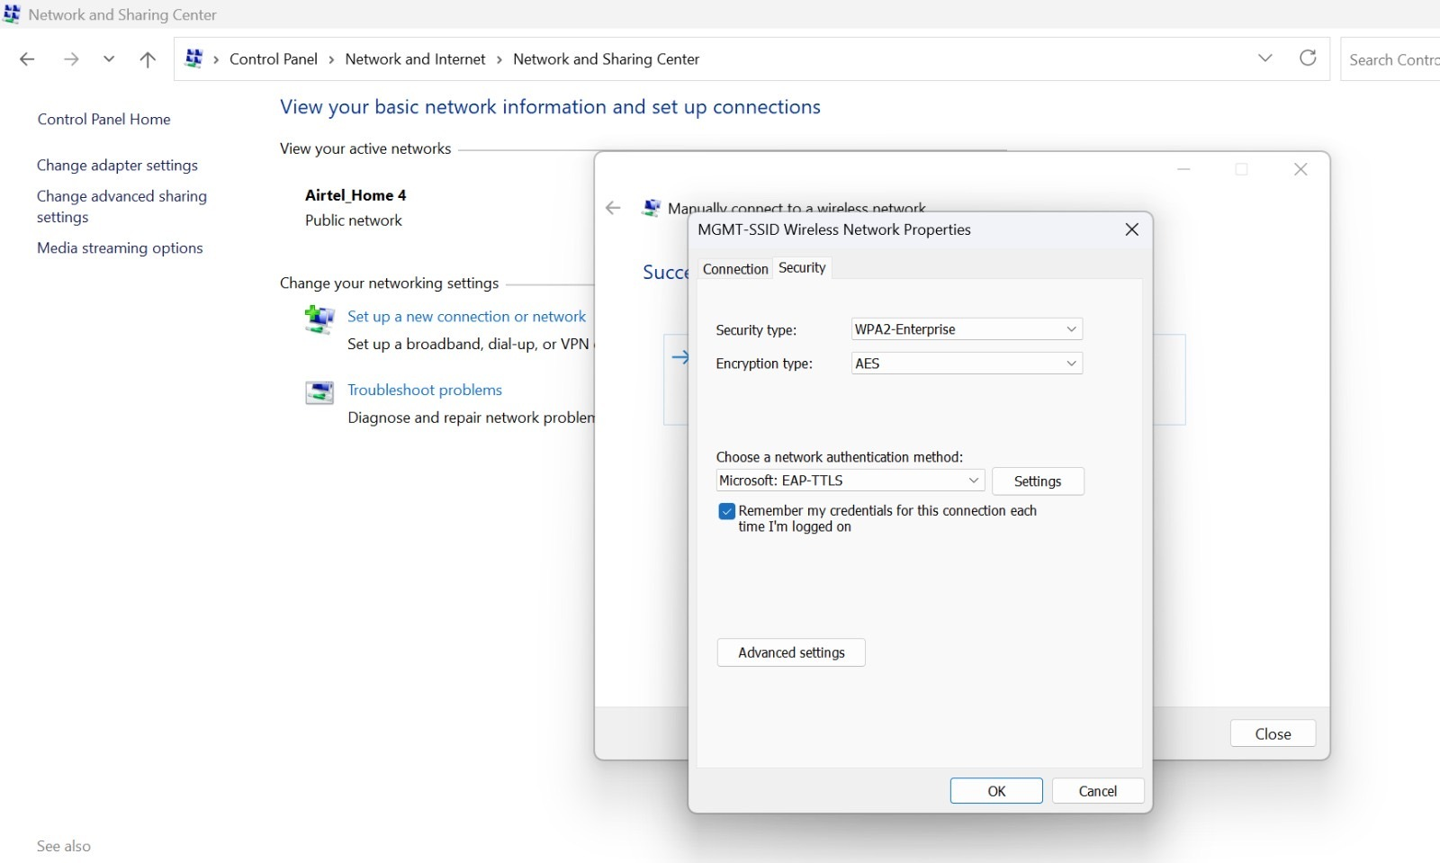
- [セキュリティ] タブに移動し、[ ネットワーク認証方法の選択] で [Microsoft: EAP-TTLS ] を選択し、[設定] をクリックします。
図17:無線ネットワークのプロパティを設定する
-
TTLSプロパティウィンドウで、以下のアクションを実行します。
-
ID プライバシーを有効にする オプションを無効にします。
-
[ Connect to these servers]に、
auth.mist.com -
信頼できるルート認証機関で、カスタムRADIUSサーバー証明書のMist組織CA証明書またはルートCAを選択します。
-
「 認証に非EAP方法を選択」で、「暗号化 されていないパスワード(PAP)」を選択します。
.
図18:無線ネットワークの設定:TTLSプロパティ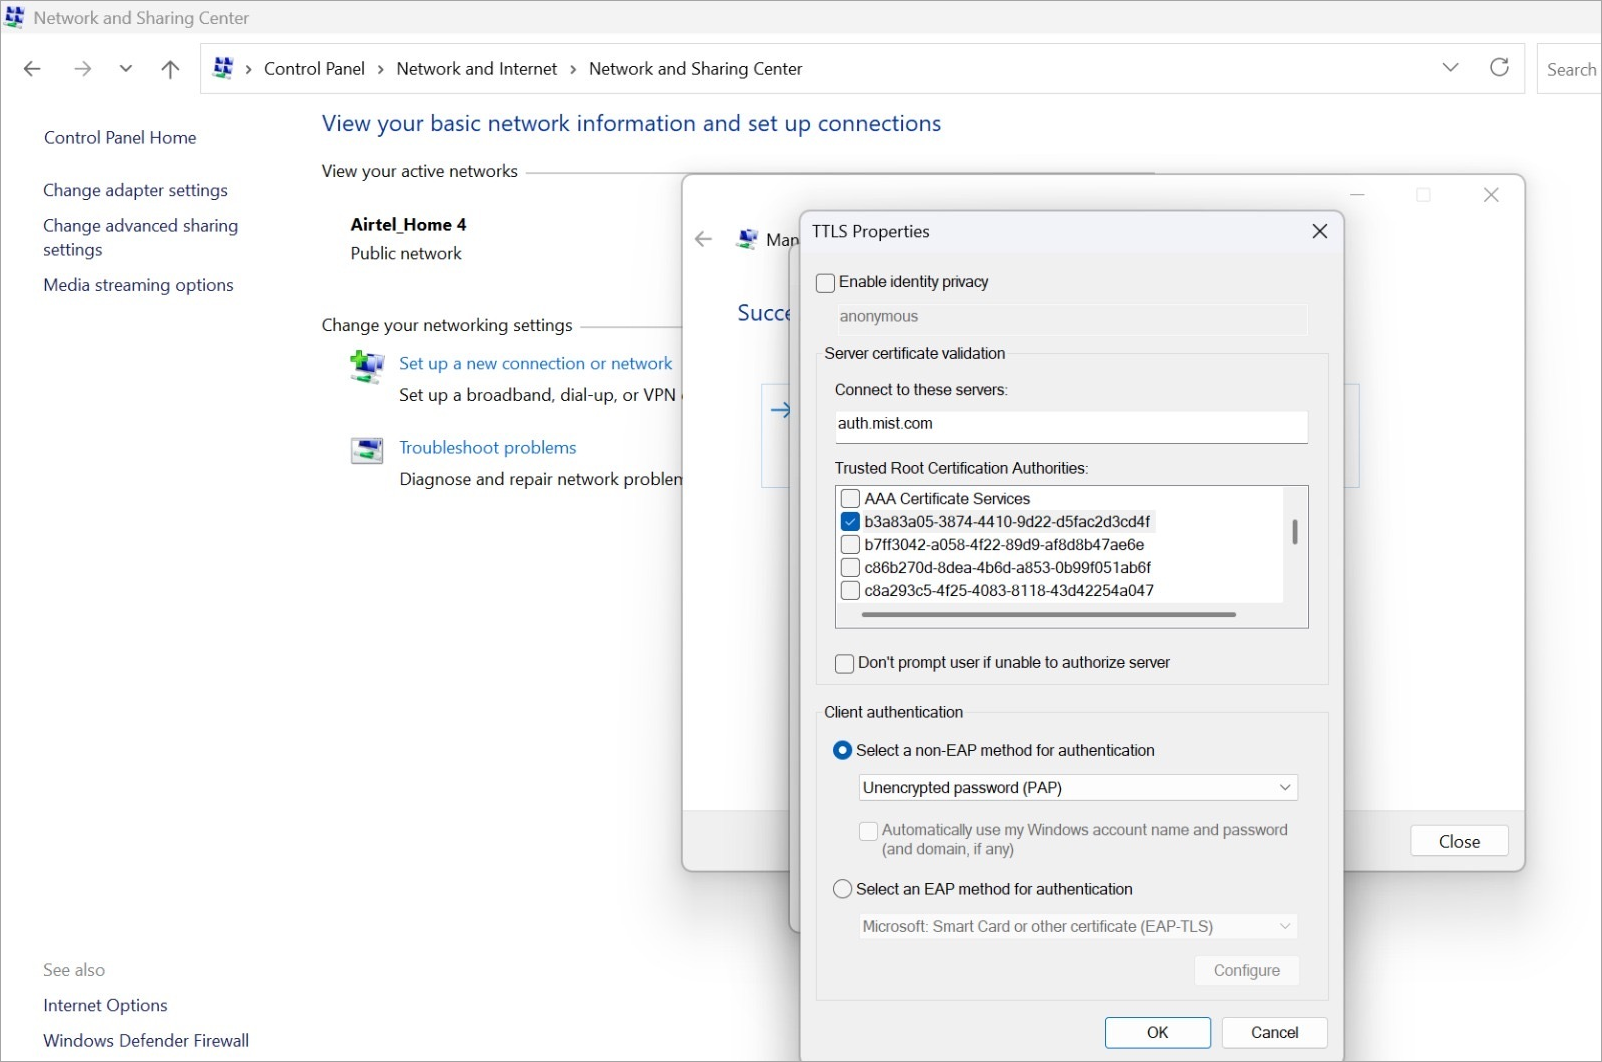
OKをクリックします。
-
-
セキュリティタブに戻り、 詳細設定をクリックします。
- 「認証モードを指定」にチェックを入れ、「ユーザー認証」オプションを選択します。
- OK、閉じるの順にクリックして設定を完了します。
図19:無線ネットワークの構成:詳細な設定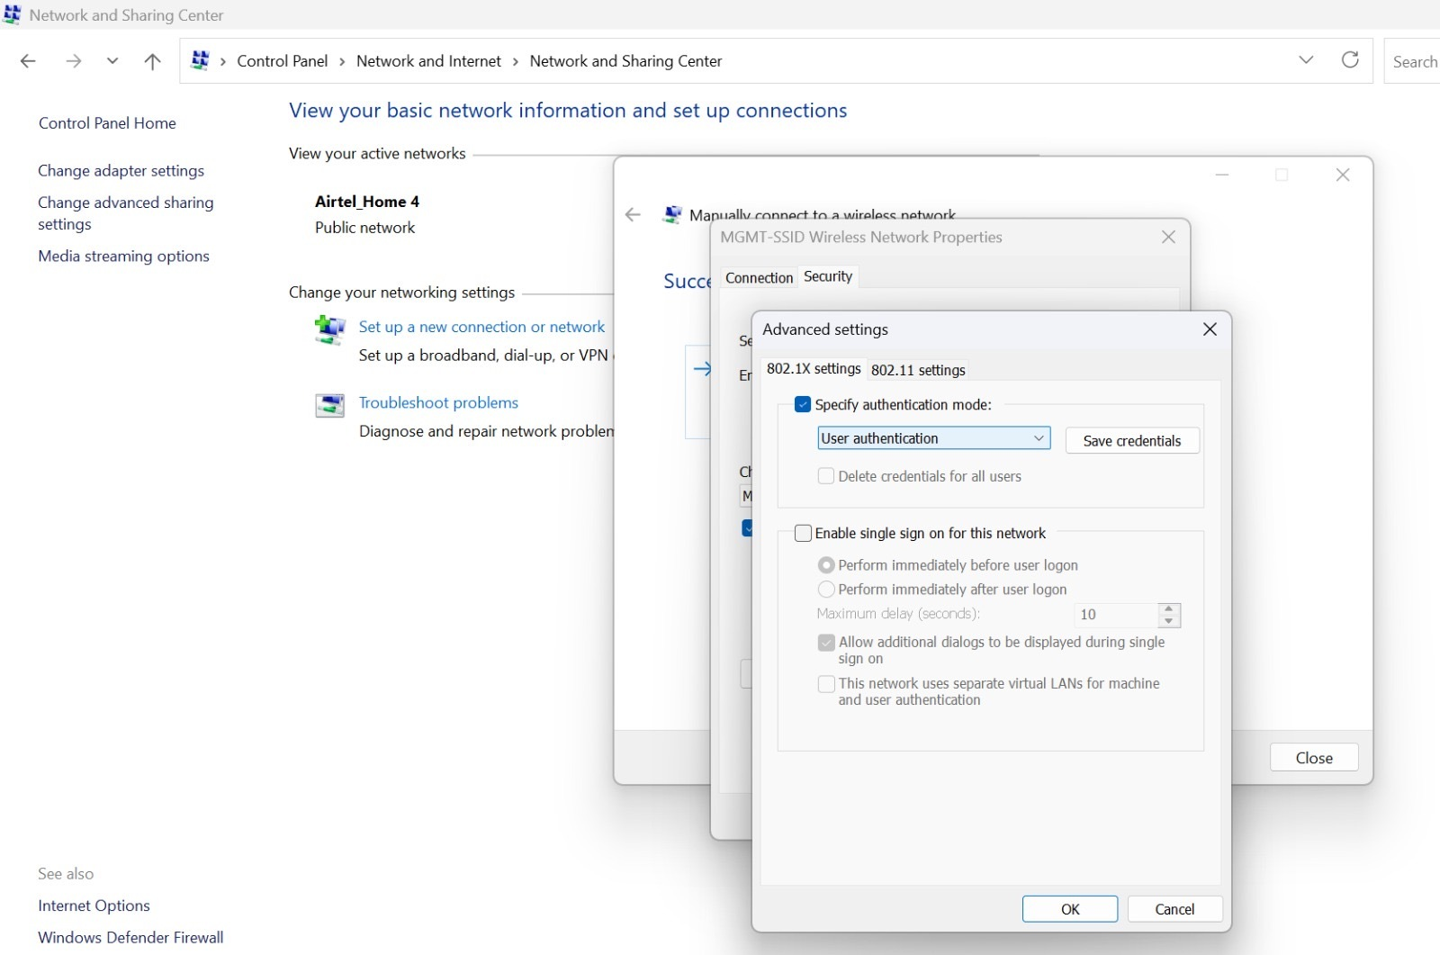
EAP-TTLS認証用のAndroidデバイスの設定
次の手順を使用して、EAP-TTLS認証用にAndroidデバイスを設定します。ナビゲーション手順は、デバイスモデルによって若干異なる場合があります。ここで提供される例は、Google Pixel 9に基づいています。
- Mist Org CA認定書をダウンロードし、デバイスのストレージに保存します。
- Android デバイスで 設定 アプリを開き、[ 設定] > [ネットワークとインターネット]> [インターネット] > [ネットワーク環境設定] に移動します。 証明書のインストールをクリックします。
図20:証明書
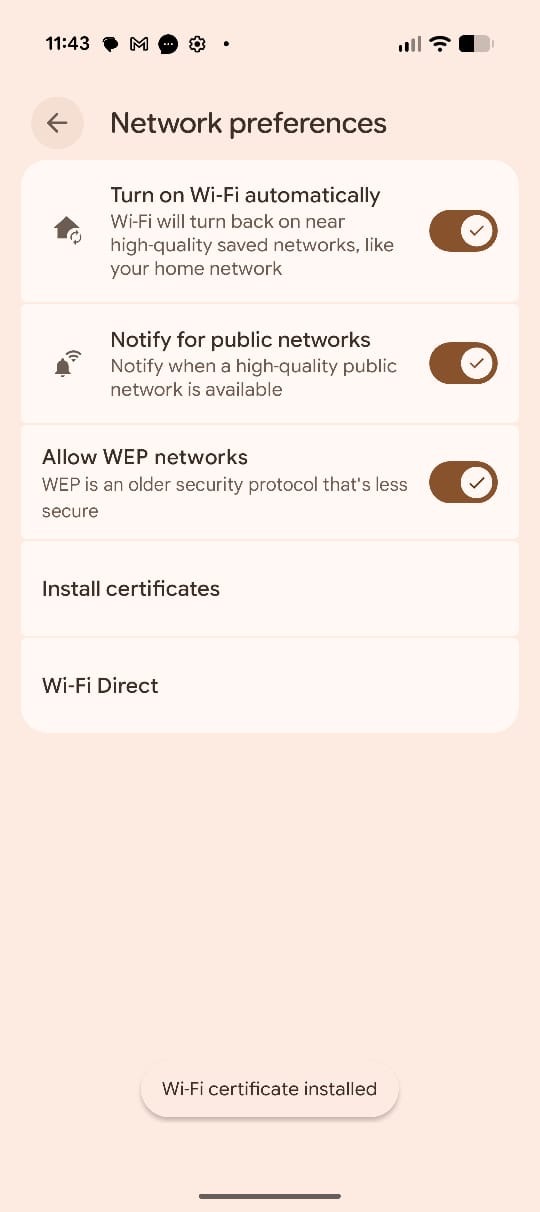 をインストールする
-
内部ストレージからMist組織のCA証明書をアップロードし、証明書の名前を入力します。カスタムRADIUSサーバー証明書を使用している場合は、Mist組織CAではなく、そのサーバーに対応するルートCAを選択します。
図21:証明書名の入力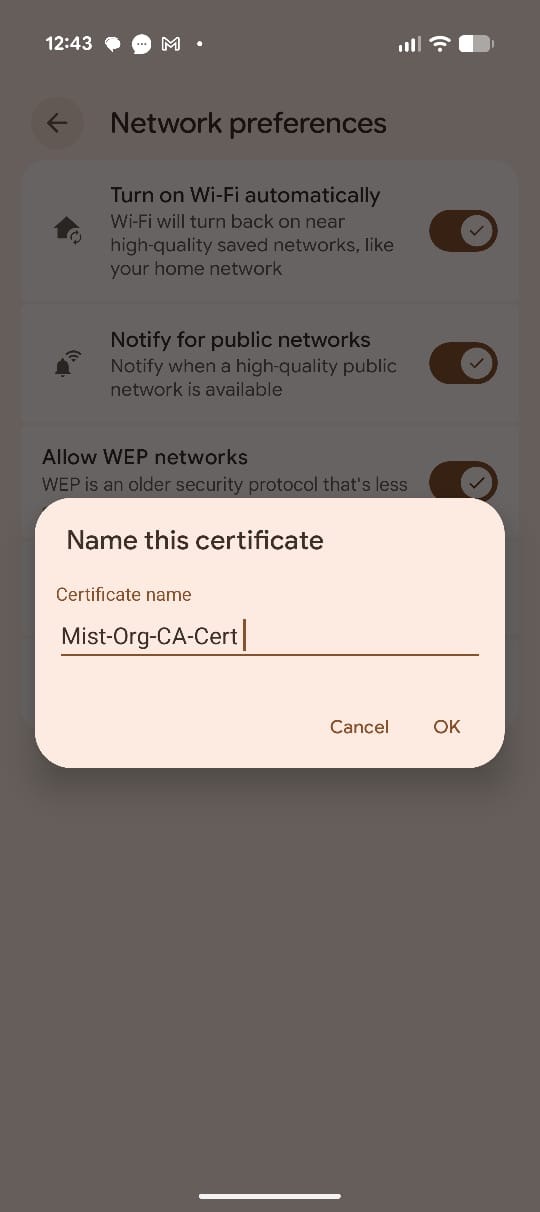
-
CA証明書をダウンロードしてインストールしたら、SSIDをクリックし、接続を次のように設定します。
- EAP方式:TTLS
- フェーズ 2 認証:PAP
- CA証明書:組織のCA証明書を選択します
- ドメイン:
auth.mist.comを入力します。 - 資格情報: ユーザー名 と パスワードを入力します。
図22:ワイヤレスネットワーク
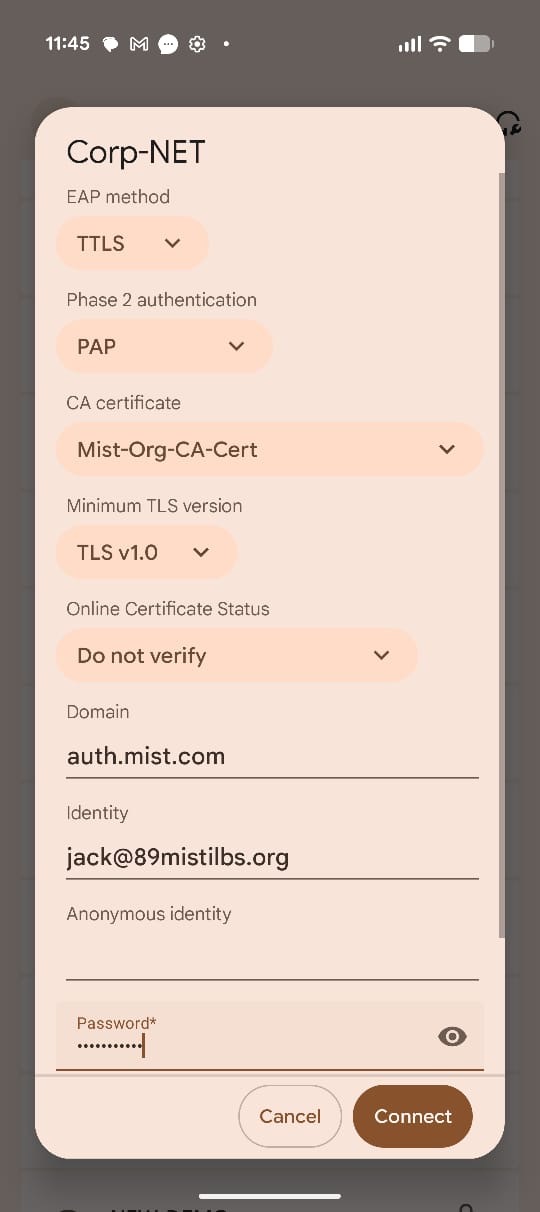 の設定
の設定
接続をクリックして設定を完了します。
EAP-TTLS認証用のLinuxデバイスの設定
Linux(Ubuntu)デバイスでEAP-TTLS認証を構成するには、以下の手順を使用します。
- ネットワーク設定を開き、接続するSSIDをクリックします。
図23:無線ネットワーク設定
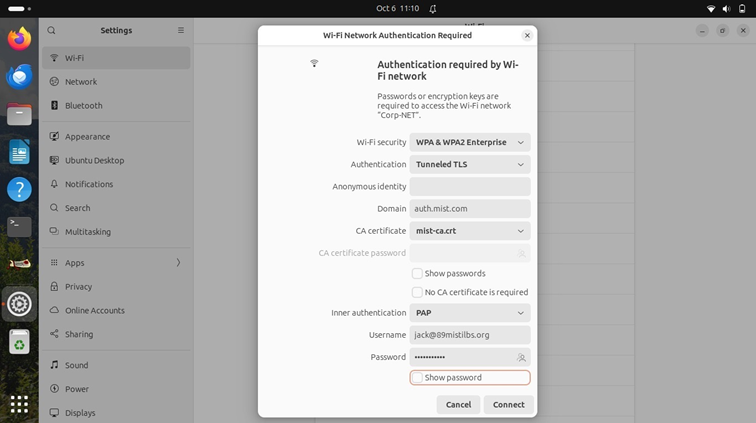
- Wi-Fiセキュリティで、WPAおよびWPA2エンタープライズを選択します。
- 認証で、トンネルTLS(EAP-TTLS)を選択します。
- ドメイン フィールド を次のように設定します。 auth.mist.com
- CA証明書については、以前にダウンロードしたMist組織のCA証明書を選択します。カスタムRADIUSサーバー証明書を使用している場合は、Mist組織CAではなく、そのサーバーに対応するルートCAを選択します。
- 内部認証(またはフェーズ2認証)をPAPに設定します。
- 認証用に提供された ユーザー名 と パスワード を入力します。
- 接続をクリックして設定を完了します。
クライアント接続と検証
- ユーザー名とパスワードを使用して、クライアントデバイスをネットワークに接続します。
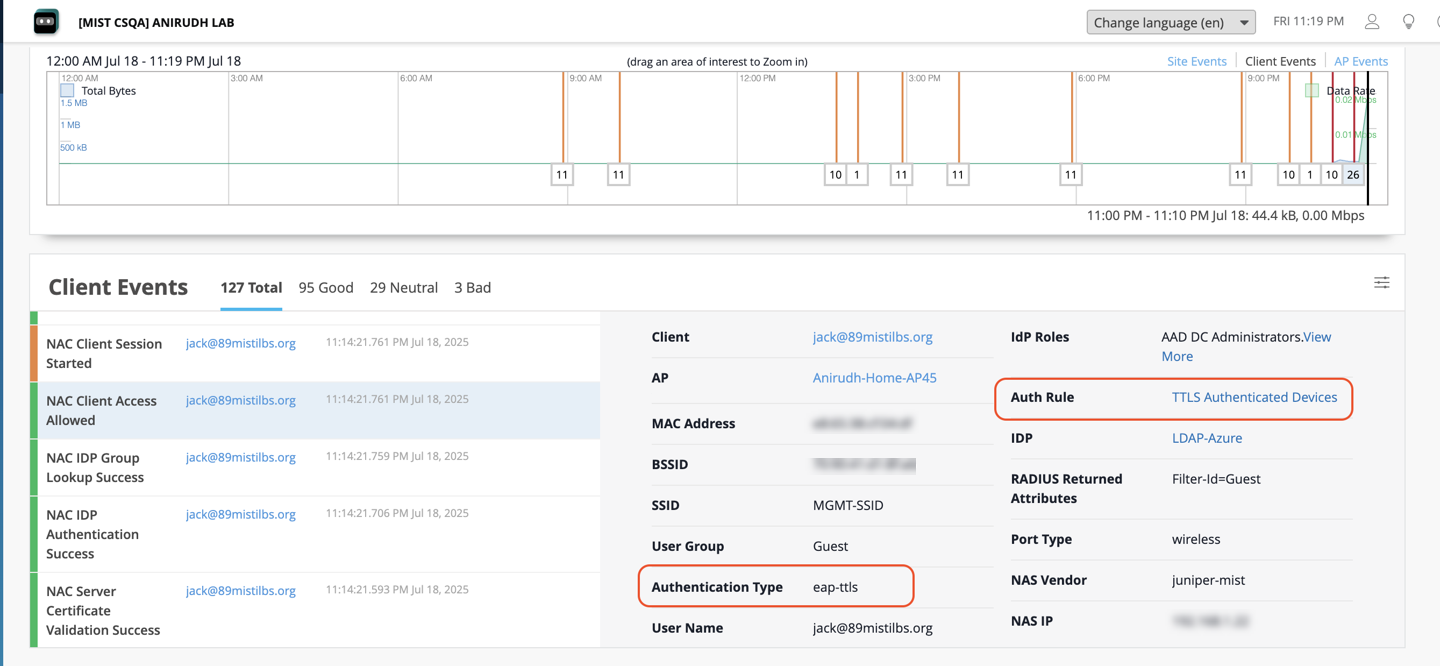
- ジュニパー Mistポータルで、[監視>サービスレベル>インサイト]に移動します。クライアントイベントセクションで、NACクライアント認証イベントを表示します。
図24:NACクライアント認証イベント