シャーシ クラスタ冗長イーサネット インターフェイス
Feature Explorerを使用して、特定の機能に対するプラットフォームとリリースのサポートを確認します。
プラットフォームに関連する注意事項については、 プラットフォーム固有の冗長イーサネットインターフェイスの動作 のセクションを確認してください。
詳細については、「 プラットフォームに関する追加情報」 セクションを参照してください。
reth(冗長イーサネット)インターフェイスは、クラスターの各ノードから少なくとも1つの物理インターフェイスを含む疑似インターフェイスです。アクティブノードのrethインターフェイスは、シャーシクラスタ設定でトラフィックを通過させる役割を担います。詳細については、次のトピックを参照してください。
シャーシ クラスタ冗長イーサネット インターフェイスについて
冗長イーサネットインターフェイスには、少なくとも、ファストイーサネットインターフェイスのペア、または冗長イーサネットインターフェイスの子インターフェイス(冗長親)と呼ばれるギガビットイーサネットインターフェイスのペアが含まれている必要があります。各ノードの2つ以上の子インターフェイスが冗長イーサネットインターフェイスに割り当てられている場合、冗長イーサネットインターフェイスリンクアグリゲーショングループを形成することができます。単一の冗長イーサネット インターフェイスには、ノード0およびノード1からの同じ速度またはタイプのイーサネット インターフェイス(ファスト イーサネットまたはギガビット イーサネット)が含まれている必要があります。SRXシリーズファイアウォールは、単一バンドルに混在するタイプのイーサネットインターフェイスをサポートしていません。
冗長イーサネットインターフェイスは、設定コマンドでは reth と呼ばれます。
冗長イーサネットインターフェイスの子インターフェイスは、子インターフェイス設定の一部として、冗長イーサネットインターフェイスに関連付けられます。冗長イーサネット インターフェイスの子インターフェイスは、親からほとんどの設定を継承します。
設定できる冗長イーサネットインターフェイスの最大数は、 プラットフォームに関する追加情報に示されているように、使用しているデバイスタイプによって異なります。設定された冗長イーサネットインターフェイスの数によって、SRXシリーズファイアウォールで設定できる冗長グループの数が決まります。
冗長イーサネットインターフェイスでプロミスキャスモードを有効にできます。レイヤー 3 イーサネット インターフェイスでプロミスキャス モードが有効になっている場合、インターフェイスで受信したすべてのパケットは、パケットの宛先 MAC アドレスに関係なく、中央ポイントまたは SPU(サービス処理ユニット)に送信されます。冗長イーサネットインターフェイスでプロミスキャスモードを有効にすると、すべての子物理インターフェイスでプロミスキャスモードが有効になります。
冗長イーサネットインターフェイスでプロミスキャスモードを有効にするには、[edit interfaces]階層でpromiscuous-modeステートメントを使用します。
冗長イーサネット インターフェイスは、それが属する冗長グループ x からフェイルオーバー プロパティを継承します。冗長イーサネットインターフェイスは、そのプライマリ子インターフェイスが使用可能またはアクティブである限り、アクティブなままです。例えば、reth0が冗長グループ1に関連付けられていて、冗長グループ1がノード0上でアクティブである場合、reth0のノード0の子が稼働している限り、reth0は稼働しています。
シャーシクラスターモードでSRXシリーズファイアウォールを使用する場合、冗長イーサネットインターフェイスとともにローカルインターフェイス(またはローカルインターフェイスの組み合わせ)を設定することは推奨されません。
例えば:
インターフェイスがローカルインターフェイスとして設定されている冗長イーサネットインターフェイスを備えたシャーシクラスタの以下の設定:
ge-2/0/2 {
    unit 0 {
        family inet {
            address 10.1.1.1/24;
        }
    }
}
インターフェイスが冗長イーサネットインターフェイスの一部として設定されるシャーシクラスタ冗長イーサネットインターフェイスの以下の設定がサポートされています。
interfaces {
    ge-2/0/2 {
        gigether-options {
            redundant-parent reth2;
        }
    }
    reth2 {
        redundant-ether-options {
            redundancy-group 1;
        }
        unit 0 {
            family inet {
                address 10.1.1.1/24;
            }
        }
    }
}
冗長イーサネットインターフェイスでプロミスキャスモードを有効にできます。レイヤー 3 イーサネット インターフェイスでプロミスキャス モードが有効になっている場合、インターフェイスで受信したすべてのパケットは、パケットの宛先 MAC アドレスに関係なく、中央ポイントまたは SPU(サービス処理ユニット)に送信されます。冗長イーサネットインターフェイスでプロミスキャスモードを有効にすると、すべての子物理インターフェイスでプロミスキャスモードが有効になります。
冗長イーサネットインターフェイスでプロミスキャスモードを有効にするには、[edit interfaces]階層でpromiscuous-modeステートメントを使用します。
IP-over-IP トンネリング
IP-over-IP トンネリングは、SRX シャーシ クラスター設定の reth インターフェイス上でサポートされています。トンネリングでは、ある IP パケットを別の IP パケット上にカプセル化できます。
トンネル設定は、プライマリデバイスとセカンダリデバイスの両方で作成されます。IP-IP トンネルを通過するトラフィックは、プライマリデバイスからセカンダリデバイスに同期されます。セカンダリ デバイスのトンネル設定はバックアップと見なされ、プライマリ デバイスに障害が発生した場合はアクティブになります。プライマリに障害が発生した場合、セカンダリデバイスでトラフィックが再開されます。
SRXシリーズファイアウォールでは、GRE(Generic Routing Encapsulation)とIP-IPトンネルは、それぞれ内部インターフェイスgr-0/0/0とip-0/0/0を使用します。Junos OS は、システムの起動時にこれらのインターフェイスを作成します。これらは物理インターフェイスに関連付けられていません。
参照
例:シャーシ クラスタ冗長イーサネット インターフェイスの設定
この例では、シャーシ クラスタ冗長イーサネット インターフェイスを設定する方法を説明します。冗長イーサネットインターフェイスは、2つ以上の物理インターフェイスを含む疑似インターフェイスで、クラスターの各ノードから少なくとも1つ含まれています。
必要条件
開始する前に、以下を実行します。
シャーシ クラスタ ノード ID とクラスタ ID の設定方法について説明します。 例:シャーシ クラスタ ノード ID とクラスタ ID の設定を参照してください。
冗長イーサネットインターフェイスの数を設定します。
シャーシ クラスタ ファブリックの設定方法について説明します。 例:シャーシ クラスタ ファブリック インターフェイスの設定を参照してください。
シャーシ クラスタ ノード冗長グループの設定方法について説明します。 例:シャーシ クラスタ冗長性グループの設定を参照してください。
概要
物理インターフェイスを冗長イーサネットインターフェイスに割り当てた後、冗長イーサネットインターフェイスのレベルでそれらに関連する設定を行うと、各子インターフェイスがその設定を継承します。
複数の子インターフェイスが存在する場合、すべての子インターフェイスの速度は同じである必要があります。
冗長イーサネットインターフェイスは、設定コマンドではrethと呼ばれます。
冗長イーサネットインターフェイスでプロミスキャスモードを有効にできます。レイヤー 3 イーサネット インターフェイスでプロミスキャス モードが有効になっている場合、インターフェイスで受信したすべてのパケットは、パケットの宛先 MAC アドレスに関係なく、中央ポイントまたはサービス処理ユニットに送信されます。冗長イーサネットインターフェイスでプロミスキャスモードを有効にすると、すべての子物理インターフェイスでプロミスキャスモードが有効になります。
冗長イーサネットインターフェイスで無作為検出モードを有効にするには、[editinterfaces]階層で無作為検出モードステートメントを使用します。
構成
IPv4アドレス用のシャーシクラスタ冗長イーサネットインターフェイスの設定
CLIクイック構成
この例を迅速に設定するには、以下のコマンドをコピーして、テキスト ファイルに貼り付け、改行を削除し、ネットワーク設定に一致させる必要がある詳細情報を変更し、コマンドを [edit] 階層レベルで CLI にコピー アンド ペーストして、設定モードから commit を入力します。
{primary:node0}[edit]
set interfaces ge-0/0/0 gigether-options redundant-parent reth1
set interfaces ge-7/0/0 gigether-options redundant-parent reth1
set interfaces fe-1/0/0 fast-ether-options redundant-parent reth2
set interfaces fe-8/0/0 fast-ether-options redundant-parent reth2
set interfaces reth1 redundant-ether-options redundancy-group 1
set interfaces reth1 unit 0 family inet mtu 1500
set interfaces reth1 unit 0 family inet address 10.1.1.3/24
set security zones security-zone Trust interfaces reth1.0
手順
IPv4 の冗長イーサネットインターフェイスを設定するには:
冗長な子物理インターフェイスを reth1 にバインドします。
{primary:node0}[edit]
user@host# set interfaces ge-0/0/0 gigether-options redundant-parent reth1
user@host# set interfaces ge-7/0/0 gigether-options redundant-parent reth1
冗長な子物理インターフェイスを reth2 にバインドします。
{primary:node0}[edit]
user@host# set interfaces fe-1/0/0 fast-ether-options redundant-parent reth2
user@host# set interfaces fe-8/0/0 fast-ether-options redundant-parent reth2
reth1 を冗長グループ 1 に追加します。
{primary:node0}[edit]
user@host# set interfaces reth1 redundant-ether-options redundancy-group 1
MTU サイズを設定します。
{primary:node0}[edit]
user@host# set interfaces reth1 unit 0 family inet mtu 1500
reth インターフェイスで設定されている最大送信単位(MTU)は、子インターフェイスの MTU と異なっていてもかまいません。
reth1 に IP アドレスを割り当てます。
{primary:node0}[edit]
user@host# set interfaces reth1 unit 0 family inet address 10.1.1.3/24
reth1.0 を trust セキュリティ ゾーンに関連付けます。
{primary:node0}[edit]
user@host# set security zones security-zone Trust interfaces reth1.0
IPv6アドレス用のシャーシクラスタ冗長イーサネットインターフェイスの設定
CLIクイック構成
この例を迅速に設定するには、以下のコマンドをコピーして、テキスト ファイルに貼り付け、改行を削除し、ネットワーク設定に一致させる必要がある詳細情報を変更し、コマンドを [edit] 階層レベルで CLI にコピー アンド ペーストして、設定モードから commit を入力します。
{primary:node0}[edit]
set interfaces ge-0/0/0 gigether-options redundant-parent reth1
set interfaces ge-7/0/0 gigether-options redundant-parent reth1
set interfaces fe-1/0/0 fast-ether-options redundant-parent reth2
set interfaces fe-8/0/0 fast-ether-options redundant-parent reth2
set interfaces reth2 redundant-ether-options redundancy-group 1
set interfaces reth2 unit 0 family inet6 mtu 1500
set interfaces reth2 unit 0 family inet6 address 2010:2010:201::2/64
set security zones security-zone Trust interfaces reth2.0
手順
IPv6 の冗長イーサネットインターフェイスを設定するには:
冗長な子物理インターフェイスを reth1 にバインドします。
{primary:node0}[edit]
user@host# set interfaces ge-0/0/0 gigether-options redundant-parent reth1
user@host# set interfaces ge-7/0/0 gigether-options redundant-parent reth1
冗長な子物理インターフェイスを reth2 にバインドします。
{primary:node0}[edit]
user@host# set interfaces fe-1/0/0 fast-ether-options redundant-parent reth2
user@host# set interfaces fe-8/0/0 fast-ether-options redundant-parent reth2
reth2 を冗長グループ 1 に追加します。
{primary:node0}[edit]
user@host# set interfaces reth2 redundant-ether-options redundancy-group 1
MTU サイズを設定します。
{primary:node0}[edit]
user@host# set interfaces reth2 unit 0 family inet6 mtu 1500
reth2 に IP アドレスを割り当てます。
{primary:node0}[edit]
user@host# set interfaces reth2 unit 0 family inet6 address 2010:2010:201::2/64
reth2.0 を trust セキュリティ ゾーンに関連付けます。
{primary:node0}[edit]
user@host# set security zones security-zone Trust interfaces reth2.0
手順
シャーシ クラスタの冗長イーサネット インターフェイスの数を設定するには、次の手順に従います。
冗長イーサネットインターフェイスの数を指定します。
{primary:node0}[edit]

user@host# set chassis cluster reth-count 2
業績
設定モードから、 show interfaces コマンドを入力して設定を確認します。出力結果に意図した設定内容が表示されない場合は、この例の設定手順を繰り返して設定を修正します。
簡潔にするために、この show コマンド出力には、この例に関連する設定のみ含まれています。システム上のその他の設定はすべて省略記号(...)で置き換えられています。
{primary:node0}[edit]
user@host# show interfaces
interfaces {
    ...
    fe-1/0/0 {
        fastether-options {
            redundant-parent reth2;
        }
    }
    fe-8/0/0 {
        fastether-options {
            redundant-parent reth2;
        }
    }
    ge-0/0/0 {
        gigether-options {
            redundant-parent reth1;
        }
    }
    ge-7/0/0 {
        gigether-options {
            redundant-parent reth1;
        }
    }
    reth1 {
        redundant-ether-options {
            redundancy-group 1;
        }
        unit 0 {
            family inet {
                mtu 1500;
                address 10.1.1.3/24;
            }
        }
    }
    reth2 {
        redundant-ether-options {
            redundancy-group 1;
        }
        unit 0 {
            family inet6 {
                mtu 1500;
                address 2010:2010:201::2/64;
            }
        }
    }
    ...
}
デバイスの設定が完了したら、設定モードから commit を入力します。
検証
設定が正常に機能していることを確認します。
シャーシ クラスタ冗長イーサネット インターフェイスの検証
目的
シャーシ クラスタ冗長イーサネット インターフェイスの設定を確認します。
アクション
動作モードから、 show interfaces terse | match reth1 コマンドを入力します。
{primary:node0}
user@host> show interfaces terse | match reth1

ge-0/0/0.0             up    up   aenet    --> reth1.0
ge-7/0/0.0             up    up   aenet    --> reth1.0
reth1                  up    up
reth1.0                up    up   inet     10.1.1.3/24
シャーシ クラスタ制御リンクの検証
目的
シャーシ クラスタ設定の制御インターフェイスに関する情報を検証します。
アクション
動作モードから、 show chassis cluster interfaces コマンドを入力します。
{primary:node0}
user@host> show chassis cluster interfaces
Control link status: Up

Control interfaces:
    Index   Interface   Monitored-Status   Internal-SA   Security
    0       em0         Up                 Disabled      Disabled
    1       em1         Up                 Disabled      Disabled

Fabric link status: Up

Fabric interfaces:
    Name    Child-interface    Status                    Security
                               (Physical/Monitored)
    fab0    xe-3/0/6           Up   / Up                 Enabled
    fab0
    fab1    xe-9/0/6           Up   / Up                 Enabled
    fab1

Redundant-ethernet Information:
    Name         Status      Redundancy-group
    reth0        Up          1
    reth1        Up          1
例:SRX4600でのシャーシ クラスタ冗長イーサネット インターフェイスの設定
この例では、シャーシクラスターモードでSRX4600デバイスに子リンクまたは物理リンクを設定する方法を示しています。
必要条件
開始する前に、以下を実行します。
シャーシ クラスタ ノード ID とクラスタ ID の設定方法について説明します。 例:シャーシ クラスタ ノード ID とクラスタ ID の設定を参照してください。
シャーシ クラスタ ノード冗長グループの設定方法について説明します。 例:シャーシ クラスタ冗長性グループの設定を参照してください。
概要
rethバンドルの子リンクは、シャーシごとに最大8個のSRX4600デバイスの子リンクを設定することができます。
構成
CLIクイック構成
この例を迅速に設定するには、以下のコマンドをコピーして、テキスト ファイルに貼り付け、改行を削除し、ネットワーク設定に一致させる必要がある詳細情報を変更し、コマンドを [edit] 階層レベルで CLI にコピー アンド ペーストして、設定モードから commit を入力します。
{primary:node0}[edit]
set interfaces xe-1/0/0:0 gigether-options redundant-parent reth0
set interfaces xe-1/0/0:1 gigether-options redundant-parent reth0
set interfaces xe-1/0/0:2 gigether-options redundant-parent reth0
set interfaces xe-1/0/0:3 gigether-options redundant-parent reth0
set interfaces xe-1/0/1:0 gigether-options redundant-parent reth0
set interfaces xe-1/0/1:1 gigether-options redundant-parent reth0
set interfaces xe-1/0/1:2 gigether-options redundant-parent reth0
set interfaces xe-1/0/1:3 gigether-options redundant-parent reth0
set interfaces xe-1/1/0 gigether-options redundant-parent reth1
set interfaces xe-1/1/1 gigether-options redundant-parent reth1
set interfaces reth0 redundant-ether-options redundancy-group 1
set interfaces reth0 unit 0 family inet address 192.0.2.1/24
set interfaces reth1 redundant-ether-options redundancy-group 1
set interfaces reth1 redundant-ether-options lacp active
set interfaces reth1 unit 0 family inet address 198.51.100.1/24
set security zones security-zone Trust-zone interfaces reth0.0
set security zones security-zone Untrust-zone interfaces reth1.0
set chassis cluster reth-count 10
冗長イーサネットインターフェイスの設定
手順
冗長イーサネットインターフェイスを設定するには:
8 つの冗長な子物理インターフェイスを reth0 にバインドします。
{primary:node0}[edit]
user@host# set interfaces xe-1/0/0:0 gigether-options redundant-parent reth0
user@host# set interfaces xe-1/0/0:1 gigether-options redundant-parent reth0
user@host# set interfaces xe-1/0/0:2 gigether-options redundant-parent reth0
user@host# set interfaces xe-1/0/0:3 gigether-options redundant-parent reth0
user@host# set interfaces xe-1/0/1:0 gigether-options redundant-parent reth0
user@host# set interfaces xe-1/0/1:1 gigether-options redundant-parent reth0
user@host# set interfaces xe-1/0/1:2 gigether-options redundant-parent reth0
user@host# set interfaces xe-1/0/1:3 gigether-options redundant-parent reth0
冗長な子物理インターフェイスを reth1 にバインドします。
{primary:node0}[edit]
user@host# set interfaces xe-1/1/0 gigether-options redundant-parent reth1
user@host# set interfaces xe-1/1/1 gigether-options redundant-parent reth1
冗長イーサネットインターフェイスの数を指定します。
{primary:node0}[edit]

user@host# set chassis cluster reth-count 10
reth0 を冗長グループ 1 に追加します。
{primary:node0}[edit]
user@host# set interfaces reth0 redundant-ether-options redundancy-group 1
reth0 に IP アドレスを割り当てます。
{primary:node0}[edit]
user@host# set interfaces reth0 unit 0 family inet address 192.0.2.1/24
reth1 を冗長グループ 1 に追加します。
{primary:node0}[edit]
user@host# set interfaces reth1 redundant-ether-options redundancy-group 1
user@host# set interfaces reth1 redundant-ether-options lacp active
reth1 に IP アドレスを割り当てます。
{primary:node0}[edit]
user@host# set interfaces reth1 unit 0 family inet address 198.51.100.1/24
reth0.0 を trust セキュリティ ゾーンに関連付けます。
{primary:node0}[edit]
user@host# set security zones security-zone Trust-zone interfaces reth0.0
reth1.0 を untrust セキュリティ ゾーンに関連付けます。
{primary:node0}[edit]
user@host# set security zones security-zone Untrust-zone interfaces reth1.0
業績
設定モードから、 show interfaces コマンドを入力して設定を確認します。出力結果に意図した設定内容が表示されない場合は、この例の設定手順を繰り返して設定を修正します。
簡潔にするために、この show コマンド出力には、この例に関連する設定のみ含まれています。システム上のその他の設定はすべて省略記号(...)で置き換えられています。
{primary:node0}[edit]
user@host# show interfaces
xe-1/0/0:0 {
    gigether-options {
        redundant-parent reth0;
    }
}
xe-1/0/0:1 {
    gigether-options {
        redundant-parent reth0;
    }
}
xe-1/0/0:2 {
    gigether-options {
        redundant-parent reth0;
    }
}
xe-1/0/0:3 {
    gigether-options {
        redundant-parent reth0;
    }
}
xe-1/0/1:0 {
    gigether-options {
        redundant-parent reth0;
    }
}
xe-1/0/1:1 {
    gigether-options {
        redundant-parent reth0;
    }
}
xe-1/0/1:2 {
    gigether-options {
        redundant-parent reth0;
    }
}
xe-1/0/1:3 {
    gigether-options {
        redundant-parent reth0;
    }
}
xe-1/1/0 {
    gigether-options {
        redundant-parent reth1;
    }
}
xe-1/1/1 {
    gigether-options {
        redundant-parent reth1;
    }
}
reth0 {
    redundant-ether-options {
        redundancy-group 1;
    }
    unit 0 {
        family inet {
            address 192.0.2.1/24;
        }
    }
}
reth1 {
    redundant-ether-options {
        redundancy-group 1;
        lacp {
            active;
        }
    }
    unit 0 {
        family inet {
            address 198.51.100.1/24;
        }
    }
}
デバイスの設定が完了したら、設定モードから commit を入力します。
検証
設定が正常に機能していることを確認します。
シャーシ クラスタ冗長イーサネット インターフェイスの確認
目的
デバイス上のシャーシ クラスタ冗長イーサネット インターフェイスの設定SRX4600検証します。
アクション
動作モードから、 show interfaces terse | match reth0 コマンドを入力します。
{primary:node0}
user@host> show interfaces terse | match reth0

xe-1/0/0:0.0            up    down aenet    --> reth0.0
xe-1/0/0:1.0            up    down aenet    --> reth0.0
xe-1/0/0:2.0            up    down aenet    --> reth0.0
xe-1/0/0:3.0            up    down aenet    --> reth0.0
xe-1/0/1:0.0            up    down aenet    --> reth0.0
xe-1/0/1:1.0            up    down aenet    --> reth0.0
xe-1/0/1:2.0            up    down aenet    --> reth0.0
xe-1/0/1:3.0            up    down aenet    --> reth0.0
reth0                   up    down
reth0.0                 up    down inet     192.0.2.1/24
意味
1つのシャーシで、rethバンドルの設定された子リンクインターフェイスの最大数を4から8まで表示できます。
シャーシ クラスタ制御リンクの検証
目的
シャーシ クラスタ設定の制御インターフェイスに関する情報を検証します。
アクション
動作モードから、 show chassis cluster interfaces コマンドを入力します。
{primary:node0}
user@host> show chassis cluster interfaces

Control link status: Down

Control interfaces:
    Index   Interface   Monitored-Status   Internal-SA   Security
    0       em0         Down               Disabled      Disabled
    1       em1         Down               Disabled      Disabled

Fabric link status: Down

Fabric interfaces:
    Name    Child-interface    Status                    Security
                               (Physical/Monitored)
    fab0    xe-0/0/2           Up   / Down               Disabled
    fab0

Redundant-ethernet Information:
    Name         Status      Redundancy-group
    reth0        Down        1
    reth1        Up          1
    reth2        Down        Not configured
    reth3        Down        Not configured
    reth4        Down        Not configured
    reth5        Down        Not configured
    reth6        Down        Not configured
    reth7        Down        Not configured
    reth8        Down        Not configured
    reth9        Down        Not configured

Redundant-pseudo-interface Information:
    Name         Status      Redundancy-group
    lo0          Up          0
例:SRXシリーズファイアウォールでIP-over-IPトンネルを設定する
この例では、トンネルを介してIPv4トラフィックを通過させ、プライマリデバイスからセカンダリデバイスに設定を同期させるために、転送ネクストホップを持つIP-IPトンネルを作成する方法を示しています。
必要条件
開始する前に、以下を実行します。
-
シャーシ クラスタ ノード ID とクラスタ ID の設定方法について説明します。 例:シャーシ クラスタ ノード ID とクラスタ ID の設定を参照してください。
この例では、以下のハードウェアとソフトウェアのコンポーネントを使用しています。
-
Junos OS リリース 23.1R1 以降のバージョン。
-
SRX345デバイス
概要
パケットは内部インターフェイスにルーティングされ、そこでIPパケットでカプセル化され、カプセル化パケットの宛先アドレスに転送されます。IP-IP インターフェイスは内部インターフェイスのみであり、物理インターフェイスには関連付けられていません。IPトンネリングを実行するには、インターフェイスを設定する必要があります。
位相幾何学
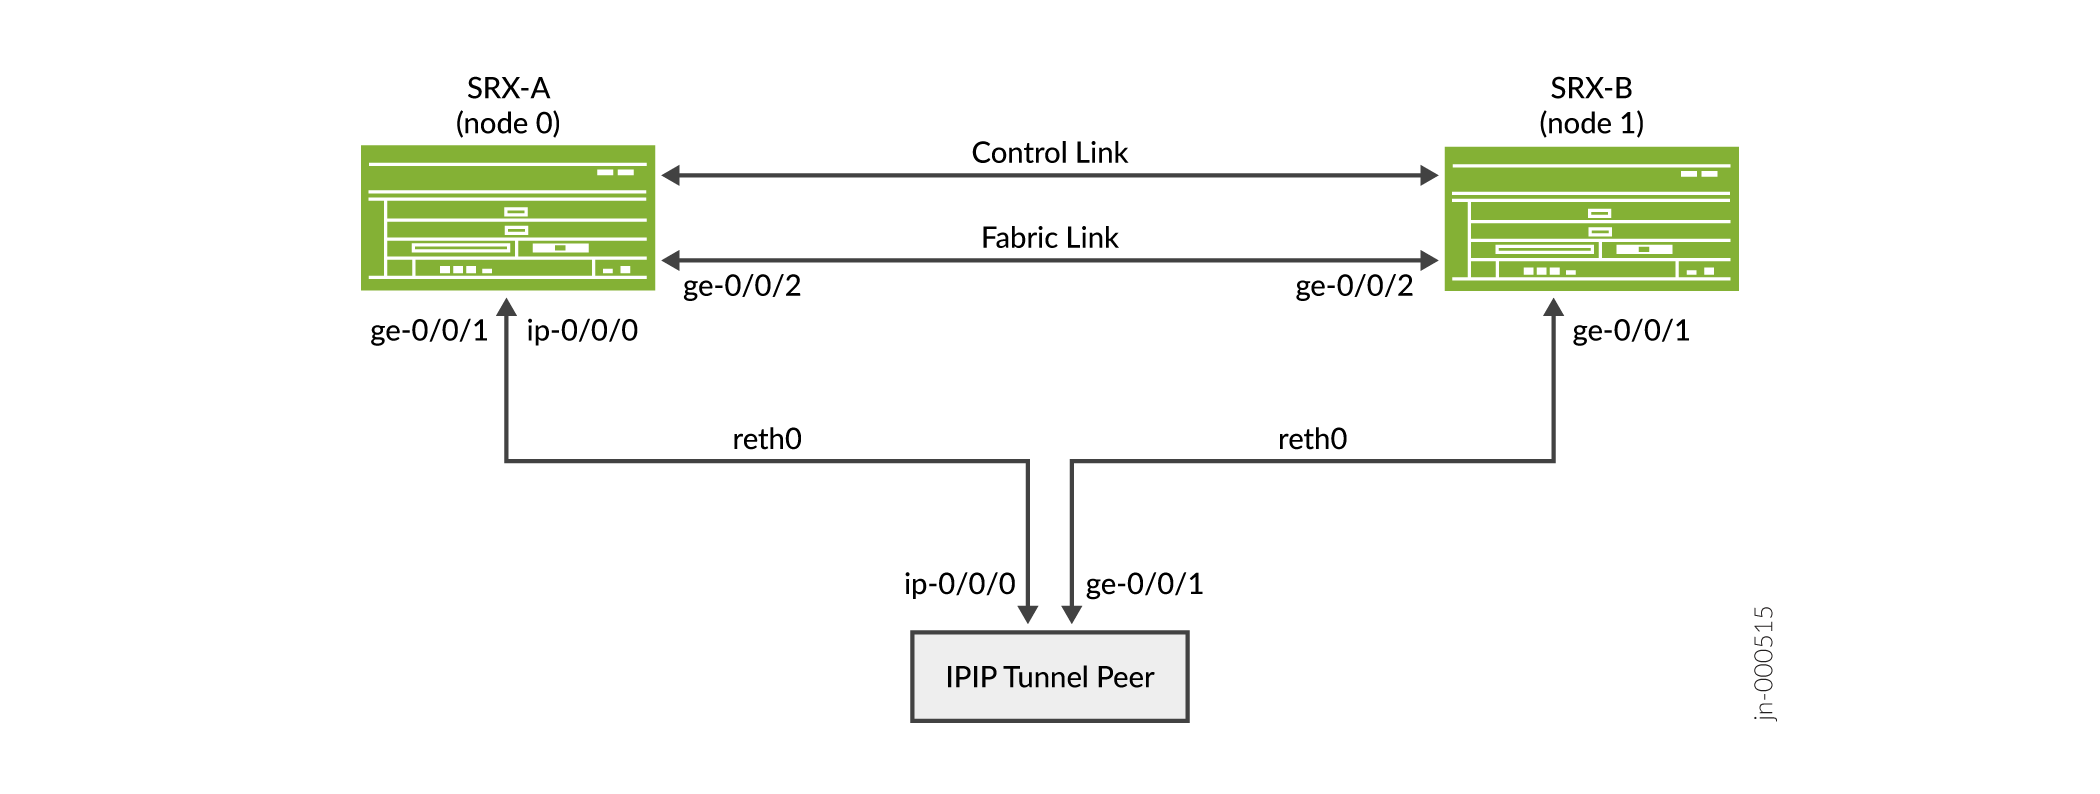
図 1:は、シャーシクラスターモードで動作するSRXシリーズファイアウォールでのIP-over-IPシナリオを示しています。
 を使用したSRXシリーズファイアウォールの設定
構成
シャーシクラスターを使用したIP-IPトンネルの設定 IPv4 アドレス用の冗長イーサネット インターフェイス
CLIクイック構成
この例を迅速に設定するには、以下のコマンドをコピーして、テキスト ファイルに貼り付け、改行を削除し、ネットワーク設定に一致させる必要がある詳細情報を変更し、コマンドを [edit] 階層レベルで CLI にコピー アンド ペーストして、設定モードから commit を入力します。
{primary:node0}[edit]
set chassis cluster reth-count 2


                     set chassis cluster redundancy-group 0 node 0 priority 100


                     set chassis cluster redundancy-group 0 node 1 priority 1


                     set chassis cluster redundancy-group 1 node 0 priority 100


                     set chassis cluster redundancy-group 1 node 1 priority 1


                     set interfaces reth0 redundant-ether-options redundancy-group 1


                     set interfaces reth1 redundant-ether-options redundancy-group 1


                     set interfaces reth0 unit 0 family inet address 22.0.0.254/24


                     set interfaces reth1 unit 0 family inet address 1.0.0.254/24


                     set interfaces ip-0/0/0 unit 0 tunnel source 22.0.0.254


                     set interfaces ip-0/0/0 unit 0 tunnel destination 22.0.0.200


                     set interfaces ip-0/0/0 unit 0 family inet address 33.0.0.254/24


                     set interfaces ge-0/0/1 gigether-options redundant-parent reth0


                     set interfaces ge-0/0/2 gigether-options redundant-parent reth1


                     set interfaces ge-7/0/1 gigether-options redundant-parent reth0


                     set interfaces ge-7/0/2 gigether-options redundant-parent reth1


                     set interfaces fab0 fabric-options member-interfaces ge-0/0/0


                     set interfaces fab1 fabric-options member-interfaces ge-7/0/0
{peer}
set interfaces ip-0/0/0 unit 0 tunnel source 22.0.0.200


                     set interfaces ip-0/0/0 unit 0 tunnel destination 22.0.0.254


                     set interfaces ip-0/0/0 unit 0 family inet address 33.0.0.200/24


                     set interfaces ge-0/0/1 unit 0 family inet address 22.0.0.200/24


                     set interfaces ge-0/0/2 unit 0 family inet address 2.0.0.200/24


                     set routing-options static route 1.0.0.0/24 next-hop ip-0/0/0.0
手順
IPv4 の冗長イーサネットインターフェイスを設定するには:
-
冗長イーサネット インターフェイスのフェイルオーバー プロパティを定義するには、ルーティングエンジン フェイルオーバー プロパティで冗長グループ0を設定し、冗長グループ1(この例ではすべてのインターフェイスが1つの冗長グループに含まれています)を設定します。
{primary:node0}[edit] user@host# set chassis cluster redundancy-group 0 node 0 priority 100 user@host# set chassis cluster redundancy-group 0 node 1 priority 1 user@host# set chassis cluster redundancy-group 1 node 0 priority 100 user@host# set chassis cluster redundancy-group 1 node 1 priority 1 -
reth(冗長イーサネット)インターフェイスを設定します。
{primary:node0}[edit] user@host# set chassis cluster reth-count 2 user@host# set interfaces ge-0/0/1 gigether-options redundant-parent reth0 user@host# set interfaces ge-0/0/2 gigether-options redundant-parent reth1 user@host# set interfaces ge-7/0/1 gigether-options redundant-parent reth0 user@host# set interfaces ge-7/0/2 gigether-options redundant-parent reth1 user@host# set interfaces reth0 redundant-ether-options redundancy-group 1 user@host# set interfaces reth0 unit 0 family inet address 22.0.0.254/24 user@host# set interfaces reth1 redundant-ether-options redundancy-group 1 user@host# set interfaces reth1 unit 0 family inet address 1.0.0.254/24 -
両方のノードで、冗長イーサネットインターフェイス上のトンネルを設定します。
{primary:node0}[edit] user@host# set interfaces ip-0/0/0 unit 0 tunnel source 22.0.0.254 user@host# set interfaces ip-0/0/0 unit 0 tunnel destination 22.0.0.200 user@host# set interfaces ip-0/0/0 unit 0 family inet address 33.0.0.254/24 -
ピアにトンネル セッションを設定します。
{peer} user@host# set interfaces ip-0/0/0 unit 0 tunnel source 22.0.0.200 user@host# set interfaces ip-0/0/0 unit 0 tunnel destination 22.0.0.254 user@host# set interfaces ip-0/0/0 unit 0 family inet address 33.0.0.200/24 user@host# set interfaces ge-0/0/1 unit 0 family inet address 22.0.0.200/24 user@host# set interfaces ge-0/0/2 unit 0 family inet address 2.0.0.200/24 user@host# set routing-options static route 1.0.0.0/24 next-hop ip-0/0/0.0 -
両方のノードでルーティングオプションを設定します。
{primary:node0} set routing-options static route 2.0.0.0/24 next-hop ip-0/0/0.0 -
両方のノードでファブリック インターフェイスを設定します。
{primary:node0}[edit]
user@host# set interfaces fab0 fabric-options member-interfaces ge-0/0/0
user@host# set interfaces fab1 fabric-options member-interfaces ge-7/0/0
業績
設定モードから、 show interfaces コマンドを入力して設定を確認します。出力結果に意図した設定内容が表示されない場合は、この例の設定手順を繰り返して設定を修正します。
簡潔にするために、この show コマンド出力には、この例に関連する設定のみ含まれています。システム上のその他の設定はすべて省略記号(...)で置き換えられています。
{primary:node0}[edit]
user@host# show interfaces
ip-0/0/0 {
    unit 0 {
        tunnel {
            source 22.0.0.254;
            destination 22.0.0.200;
        }
        family inet {
            address 33.0.0.254/24;
        }
    }
}
ge-0/0/1 {
    gigether-options {
        redundant-parent reth0;
    }
}
ge-0/0/2 {
    gigether-options {
        redundant-parent reth1;
    }
}
ge-7/0/1 {
    gigether-options {
        redundant-parent reth0;
    }
}
ge-7/0/2 {
    gigether-options {
        redundant-parent reth1;
    }
}
fab0 {
    fabric-options {
        member-interfaces {
            ge-0/0/0;
        }
    }
}
fab1 {
    fabric-options {
        member-interfaces {
            ge-7/0/0;
        }
    }
}
reth0 {
    redundant-ether-options {
        redundancy-group 1;
    }
    unit 0 {
        family inet {
            address 22.0.0.254/24;
        }
    }
}
reth1 {
    redundant-ether-options {
        redundancy-group 1;
    }
    unit 0 {
        family inet {
            address 1.0.0.254/24;
        }
    }
}
検証
目的
シャーシ クラスタ インターフェイスとステータスに関する情報を表示します。
アクション
動作モードから、 show chassis cluster interfaces、show chassis cluster status、および show security flow session コマンドを入力します。
{primary:node0}
user@host> show chassis cluster interfaces
Control link status: Up

Control interfaces:
    Index   Interface   Monitored-Status   Internal-SA   Security
    0       fxp1        Up                 Disabled      Disabled

Fabric link status: Down

Fabric interfaces:
    Name    Child-interface    Status                    Security
                               (Physical/Monitored)
    fab0    ge-0/0/0          Up   / Up                 Disabled
    fab0
    fab1    ge-0/0/7          Up   / Up                 Disabled
    fab1

Redundant-ethernet Information:
    Name         Status      Redundancy-group
    reth0        Up          1
    reth1        Up          1

Redundant-pseudo-interface Information:
    Name         Status      Redundancy-group
    lo0          Up          0
{primary:node0}
user@host> show chassis cluster status
Monitor Failure codes:
    CS  Cold Sync monitoring        FL  Fabric Connection monitoring
    GR  GRES monitoring             HW  Hardware monitoring
    IF  Interface monitoring        IP  IP monitoring
    LB  Loopback monitoring         MB  Mbuf monitoring
    NH  Nexthop monitoring          NP  NPC monitoring
    SP  SPU monitoring              SM  Schedule monitoring
    CF  Config Sync monitoring      RE  Relinquish monitoring
    IS  IRQ storm

Cluster ID: 1
Node   Priority Status               Preempt Manual   Monitor-failures

Redundancy group: 0 , Failover count: 1
node0  200      primary              no      no       None
node1  100      secondary            no      no       None

Redundancy group: 1 , Failover count: 1
node0  200      primary              no      no       None
node1  100      secondary            no      no       None
{primary:node0}
user@host> show security flow session
node0:
--------------------------------------------------------------------------

Session ID: 6323, Policy name: N/A, HA State: Active, Timeout: N/A, Session State: Valid
  In: 2012::2:2/1 --> 2012::2:1/1;ipip, Conn Tag: 0x0, If: reth1.0, Pkts: 0, Bytes: 0,

Session ID: 6324, Policy name: N/A, HA State: Active, Timeout: N/A, Session State: Valid
  In: 2012::2:2/1 --> 2012::2:1/1;ipv6, Conn Tag: 0x0, If: reth1.0, Pkts: 0, Bytes: 0,

Session ID: 6361, Policy name: self-traffic-policy/1, HA State: Active, Timeout: 56, Session State: Valid
  In: fe80::2:2/1 --> ff02::5/1;ospf, Conn Tag: 0x0, If: ip-0/0/0.1, Pkts: 153842, Bytes: 12371296,
  Out: ff02::5/1 --> fe80::2:2/1;ospf, Conn Tag: 0x0, If: .local..0, Pkts: 0, Bytes: 0,

Session ID: 6362, Policy name: self-traffic-policy/1, HA State: Active, Timeout: 52, Session State: Valid
  In: 100.0.2.2/1 --> 224.0.0.5/1;ospf, Conn Tag: 0x0, If: ip-0/0/0.1, Pkts: 152030, Bytes: 12178352,
  Out: 224.0.0.5/1 --> 100.0.2.2/1;ospf, Conn Tag: 0x0, If: .local..0, Pkts: 0, Bytes: 0,

Session ID: 6363, Policy name: self-traffic-policy/1, HA State: Active, Timeout: 60, Session State: Valid
  In: 100.0.2.2/49152 --> 100.0.2.1/3784;udp, Conn Tag: 0x0, If: ip-0/0/0.1, Pkts: 1509142, Bytes: 78475384,
  Out: 100.0.2.1/3784 --> 100.0.2.2/49152;udp, Conn Tag: 0x0, If: .local..0, Pkts: 0, Bytes: 0,

Session ID: 6364, Policy name: self-traffic-policy/1, HA State: Active, Timeout: 60, Session State: Valid
  In: fe80::2:2/49152 --> fe80::2:1/3784;udp, Conn Tag: 0x0, If: ip-0/0/0.1, Pkts: 1509355, Bytes: 108673560,
  Out: fe80::2:1/3784 --> fe80::2:2/49152;udp, Conn Tag: 0x0, If: .local..0, Pkts: 0, Bytes: 0,
Total sessions: 6

node1:
--------------------------------------------------------------------------

Session ID: 1304, Policy name: N/A, HA State: Backup, Timeout: N/A, Session State: Valid
  In: 2012::2:2/1 --> 2012::2:1/1;ipip, Conn Tag: 0x0, If: reth1.0, Pkts: 0, Bytes: 0,

Session ID: 1305, Policy name: N/A, HA State: Backup, Timeout: N/A, Session State: Valid
  In: 2012::2:2/1 --> 2012::2:1/1;ipv6, Conn Tag: 0x0, If: reth1.0, Pkts: 0, Bytes: 0,

Session ID: 1306, Policy name: self-traffic-policy/1, HA State: Backup, Timeout: 1482, Session State: Valid
  In: 100.0.2.2/49152 --> 100.0.2.1/3784;udp, Conn Tag: 0x0, If: ip-0/0/0.1, Pkts: 0, Bytes: 0,
  Out: 100.0.2.1/3784 --> 100.0.2.2/49152;udp, Conn Tag: 0x0, If: .local..0, Pkts: 0, Bytes: 0,

Session ID: 1307, Policy name: self-traffic-policy/1, HA State: Backup, Timeout: 1538, Session State: Valid
  In: fe80::2:2/49152 --> fe80::2:1/3784;udp, Conn Tag: 0x0, If: ip-0/0/0.1, Pkts: 0, Bytes: 0,
  Out: fe80::2:1/3784 --> fe80::2:2/49152;udp, Conn Tag: 0x0, If: .local..0, Pkts: 0, Bytes: 0,
Total sessions: 4
{primary:node0}
user@host> show security flow statistics
node0:
--------------------------------------------------------------------------
    Current sessions: 6
    Packets received: 12528819
    Packets transmitted: 12523469
    Packets forwarded/queued: 44
    Packets copied: 0
    Packets dropped: 5306
    Services-offload packets processed: 0
    Fragment packets: 0
    Pre fragments generated: 0
    Post fragments generated: 0

node1:
--------------------------------------------------------------------------
    Current sessions: 4
    Packets received: 1608551
    Packets transmitted: 1588679
    Packets forwarded/queued: 0
    Packets copied: 0
    Packets dropped: 19874
    Services-offload packets processed: 0
    Fragment packets: 0
    Pre fragments generated: 0
    Post fragments generated: 0
意味
シャーシクラスタ設定では、IP-over-IPトンネルを介してルートを交換するためのバインドインターフェイスとしてrethインターフェイスが表示されます。
プラットフォーム固有の 冗長イーサネットインターフェイス の動作
Feature Explorerを使用して、特定の機能に対するプラットフォームとリリースのサポートを確認します。
次の表を使用して、プラットフォームのプラットフォーム固有の動作を確認します。
| プラットホーム |
差 |
|---|---|
| SRX シリーズ |
|
プラットフォームの追加情報
Feature Explorerを使用して、特定の機能に対するプラットフォームとリリースのサポートを確認します。
追加のプラットフォームがサポートされる場合があります。
| プラットホーム |
reth(冗長イーサネット)インターフェイス |
|---|---|
| SRX4100とSRX4200 |
10 ギガビット イーサネット(xe) |
| SRX5600とSRX5800 |
10 ギガビット イーサネット(xe) 40ギガビットイーサネット 100ギガビットイーサネット |
| プラットホーム |
rethインターフェイス上の論理インターフェイス |
|---|---|
| SRX300シリーズ、SRX1500、SRX1600、SRX2300、SRX4120、SRX4100、SRX4200、SRX4300 |
1024 |
| SRX4600、SRX5000シリーズ |
4096 |
| プラットホーム |
rethインターフェイスの最大数 |
|---|---|
| SRX300シリーズ |
128 |
| SRX1500 |
128 |
| SRX1600 |
128 |
| SRX2300、SRX4120 |
128 |
| SRX4100、SRX4200、SRX4300 |
128 |
| SRX4600 |
128 |
| SRX5000シリーズ |
128 |
変更履歴
サポートされる機能は、使用しているプラットフォームとリリースによって決まります。特定の機能がお使いのプラットフォームでサポートされているかどうかを確認するには、 Feature Explorer を使用します。