将交换机载入 Mist 云
请按照以下步骤声明新交换机或将以前部署的交换机引入您的组织。如果您的交换机已上线到 Mist 云,请忽略这些步骤。
Wired Assurance 不支持 Junos Flex 映像。为确保兼容性,请验证您的交换机是否运行的是标准(非 Flex)Junos 映像。升级交换机时,我们建议通过 Mist 云进行升级,这样可以确保仅部署标准 Junos 映像。
要通过瞻博网络 Mist 云配置和管理交换机,您必须将交换机载入组织。
您可以将绿地或棕地交换机安装到 Mist:
-
绿地 - 新型云就绪交换机。云就绪设备的机箱上有一个二维码或声明码,您可以扫描这些二维码或声明码,在瞻博网络 Mist 门户中快速将设备载入。
-
棕地 — 尚未支持云的现有服务(棕地)交换机,但仍受 Mist 支持。这些交换机没有附加二维码。对于不具备云就绪但在 Mist 中仍受支持的设备,您必须在交换机本地输入一些 Junos CLI 命令才能载入(采用)设备。
瞻博网络交换机使用 SSH 连接(TCP 端口 2200) 向瞻博网络 Mist 云发送遥测更新。在瞻博网络 Mist 门户中,在采用棕地交换机时,以及从“公用事业”菜单打开交换机的远程 shell 时,也会使用 SSH。此外,如果在交换机配置页面的“其他 CLI 命令”部分中包含任何自定义 CLI 配置,则这些命令将通过 SSH 推送到交换机。
为了防止遭到拒绝服务攻击或其他可能的 SSH 攻击,可以在交换机上配置每个连接的连接数和/或会话数上限。对于瞻博网络 EX 和 QFX 系列交换机, ssh max-sessions-per-connection 的默认值为 10,您可以通过发出 Junos 命令进行更改,如下所示:
[edit system services ssh] set connection-limit <number>
交换机上线先决条件
在加入交换机之前:
-
确保您有 Wired Assurance 订阅以及瞻博网络 Mist 门户的登录凭证。要开始使用 Mist,请按照 快速入门:Mist 中的说明进行作。
-
确保已为您分配所需的交换机管理员角色。有关更多信息,请参阅 交换机管理员角色要求。
-
确保交换机受 Mist Wired Assurance 支持。要查看支持的交换机型号和软件版本,请参阅有 线网络的硬件和软件要求。
-
确保交换机连接到 DNS 服务器(也建议使用 NTP 服务器),并且能够通过互联网连接到瞻博网络 Mist 云架构。
-
如果云和交换机之间有防火墙,则允许从 TCP 端口 2200 出站访问交换机的管理端口。
绿地交换机入网
您可以使用计算机接入一个或多个绿地云就绪交换机,也可以使用手机接入单个交换机。将单个交换机接入 Mist 云的最简单方法是使用 Mist AI 移动应用。要同时接入多台云就绪交换机,请使用瞻博网络 Mist 门户并输入与采购订单关联的激活码。
要载入绿地交换机,请按照 快速入门:使用 Mist 使用云就绪 EX 和 QFX 交换机中的说明进行作。
如需快速演示,请观看以下视频:
Onboarding a Greenfield CloudReady EX switch is simple. In your inventory page, find the Switches tab. Click on Claim Switches.
Type in your switch's unique claim code, which can be found near the QR code at the front of the switch. Alternatively, you can also enter an activation code, which pulls all your newly purchased Juniper hardware from one order, rather than adding individual switch codes. Add and check for your desired settings, such as site assignment and configuration management.
Click Claim, and the switch has been added to the site. The EX3400 has been added. In the site view, you should see the switch appropriately assigned.
Notice that red indicates the switch is offline, but will turn green once it comes online. The switch is cloud-managed and accounted for as part of the health metrics above.
加入棕地交换机
使用 “采用交换机 ”选项来加载未支持云或没有二维码的棕地交换机。当您采用棕地交换机时,您可以让 Mist 对其进行管理(推荐),这意味着任何现有配置都将替换为 Mist 控制台中所做的设置。或者,您可以选择 不 让 Mist 管理交换机,在这种情况下,现有配置将保持不变,以及一些用于连接到云和遥测的新设置。非托管交换机将是独一无二的——在 Mist 控制台中进行的配置将不会被应用,也不会从使用模板或站点变量或托管设备可用的任何其他便利中受益。此外,Mist 不会“知道”在交换机上进行的后续配置,因此您可能需要在 CLI 中设置警告消息,以表明它是 Mist 环境的一部分,或限制谁可以进行配置更改,以免它们发生冲突。
如果 Mist 将管理交换机,即您在入网时选择使用 Mist 管理配置 选项,请务必在采用交换机之前备份现有 Junos OS 配置。为此,请连接到交换机,登录到 CLI,然后在 Junos 中运行 request system configuration rescue save 命令以保存当前活动配置和任何特定于安装的参数。
对于在硬件上使用 Mist 声明代码之前使用的虚拟设备(如 vJunos 交换机)或旧设备,您需要采用它们,而不是声明它们。请注意,如果以前在一个环境(例如 Global02)中声明了 VM,则可能无法从另一个环境或组织的清单或安装数据库中获得该 VM (这是因为 MAC 地址可能仍附加到原始环境。您需要从原始环境中释放设备,或重新创建虚拟设备,这将为其生成新的虚拟 MAC。
在以下过程中,您将对瞻博网络 Mist 门户以及使用 Junos OS CLI 的交换机进行配置更改。确保您可以登录到这两个环境。
非托管交换机仍会从 Mist 接收配置,以保持与 Mist 云的连接。其中包括用于高效统计信息收集的系统脚本和扩展、用于在设备上高效记录的系统系统日志设置以及用于云通信的名为“mist”的用户帐户。
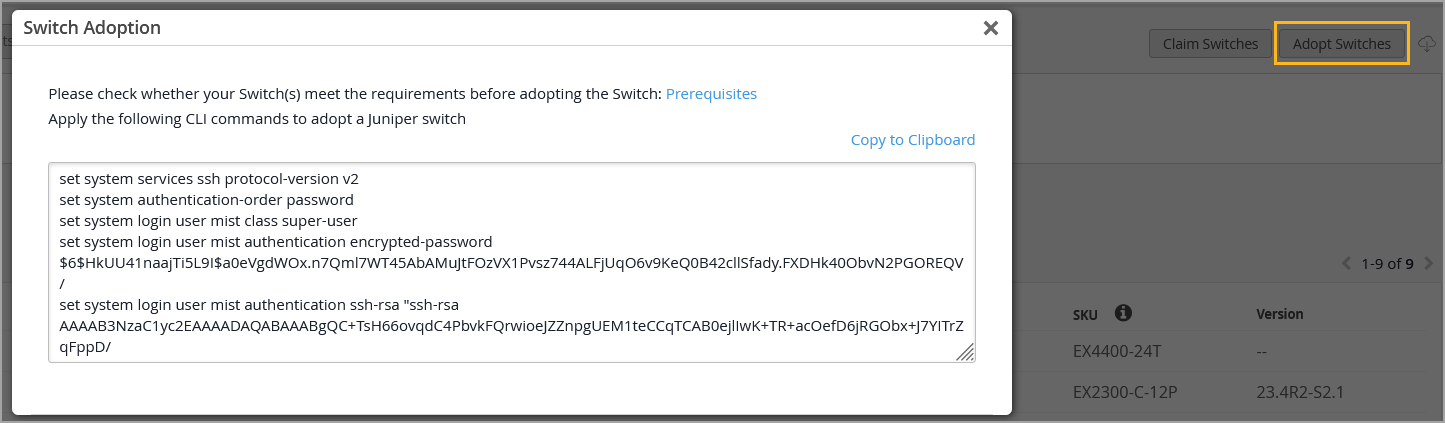
要将棕地交换机安装到 Mist 云:
- 选择出现的页面顶部的交换机,然后单击右上角的 Adopt Switch 按钮,以生成互作性所需的 Junos OS CLI 命令。这些命令将创建一个瞻博网络 Mist 用户帐户,并通过 TCP 端口 2200(交换机连接从管理接口启动,用于设置配置和发送遥测数据)建立到瞻博网络 Mist 云的 SSH 连接。
如需快速演示,请观看以下视频:
Adopting switches for brownfield environments only takes a few steps. In Organization, look for the Inventory tab and toggle to Switches. Click on Adopt Switches.
This brings up a clipboard of CLI commands to copy and paste into the console of a switch. Put in the config and commit it in the switch. Ensure that TCP port 2200 is open to the internet.
This allows for the switch to communicate with the Juniper Mist cloud. Check that it is connected properly by entering Show System Connection to see an established TCP session. Going back to the dashboard, you can see the EX switch online and fully cloud-managed.
Templates will also be inherited when you enable Configuration Management. Don't forget to save. Now you're good to go.
Adopting an EX switch to the Juniper Mist cloud from a brownfield environment is a straightforward process. Now you have the power and simplicity of a cloud-managed solution for your EX switches.