使用 Azure IdP 集成配置基于证书的 (EAP-TLS) 身份验证
按照以下步骤在 Entra ID 中注册您的Juniper Mist™组织Microsoft在Juniper Mist中添加您的身份提供商,并为您的用户组创建身份验证策略。
我们可以通过集成外部身份提供程序 (IdP) 来扩展可扩展身份验证协议 - 传输层安全 (EAP-TLS) 身份验证过程。通过这种集成,IdP 验证 EAP-TLS 身份验证交换,并确保只有受信任的用户才能访问网络。通过 IdP 与 EAP-TLS 身份验证集成引入额外的验证,您可以增强网络访问控制 (NAC) 的稳健性。
Juniper Mist™中,Microsoft可以使用 OAuth 将 Azure Active Directory (AD)(现在称为 Microsoft Entra ID)集成为标识提供者。通过这种集成,你可以将 Azure AD 作为标识提供者与 Mist Access Assurance 结合使用,并执行以下作:
- 通过 EAP-TTLS 对用户进行身份验证,通过 OAuth 执行委派身份验证,检查用户名和密码。
- 获取用户组成员身份,以便在身份验证策略中利用它们。
- 获取用户帐户状态信息(活动/暂停)。
- 通过 EAP-TLS 或 EAP-TTLS 授权用户。
Azure AD returns the following details that you can use to fine-tune your authentication policies in Juniper Mist Access Assurance:
-
组成员身份:有关用户所属组的信息提供有关用户角色和权限的见解。
-
帐户验证:帐户状态对于确保 Juniper Mist Access Assurance 仅向有效的活动用户授予网络访问权限至关重要。
-
其他用户上下文:收集有关用户的其他信息使我们能够更好地了解用户的个人资料。配置身份提供程序查找时,系统会向配置的身份提供程序发送 API 请求,以获取经过身份验证的用户的其他上下文。
概述
此任务演示如何在评估证书时在 Azure AD 中查找与特定域名关联的公用名 (CN)。Azure AD 查找的结果会获取有关用户的其他信息,你将使用这些信息来定义身份验证策略。此任务适用于无线网络。
作为此任务的先决条件,必须配置 EAP-TLS 身份验证。有关详细信息,请参阅 配置基于证书的 (EAP-TLS) 身份验证 。
在此示例中,您将:
- 在 Azure 门户上创建新应用程序,以将 Azure AD 用作 IdP。
- 将 Azure AD 集成为 IdP,并在 Microsoft Graph 中为已注册的应用程序授予 API 权限。
- 检索有关登录到 Juniper Mist 门户的用户的详细信息。
- 使用 IdP 获取的有关已登录用户的其他详细信息进一步完善身份验证策略。
要使用 Okta 作为 IdP 创建身份验证,请观看以下视频:
Create the authentication policies with Mist Access Assurance considering the same exact scenario with TLS users authenticating using certificates and TLS users authenticating using credentials. The first thing that we will do is we will import the root CA certificate so we can trust the certificates on our client signed by that CA. So we'll go to organization > access certificates and I'll click on add certificate authority.
I will go to my folder where I have all the pre-configured items ready. I'm going to copy my root CA cert, import it in here. It's the same cert we used with the other two vendors. It's now imported, it's decoded, we're good to go and good to proceed. We'll then go to organization authentication policies. Actually we go to identity providers first.
We need to configure an identity provider in here and unlike with ClearPass and ICE, we don't need to have a local AD on-prem. We would actually be able to talk to Okta as our identity provider to fetch the user group information to authenticate users and provide them with network access. So I will click on add IDP.
I will select this connector type as auth since we will use native API connector to talk to Okta. I will open my setup instructions since my Okta app has been pre-created. Same as AD for other providers so I'm going to take tenants. I'm going to select the auth type as Okta, paste the tenant ID. I'll take the client ID, paste it in here. I'll take the private key so we can authenticate ourselves to Okta.
Add it right there and finally I'll configure the ROPC API ID for TTLS authentication and it's secret. The last thing I will do is I will configure the domain name. So the domain name would actually tell us based on the user realm like when the user signs in as user at like in this case lab.mystify.com. We'll take that domain based on the domain. We'll talk to a respective IDP in our configuration so just give it a name called Okta. Click create. We have our IDP configured now.
The last step is to go to access authentication policies and create the two policies that we need based on our requirements. First, we will create a rule for certificate authentication. What we'll then do is in the match criteria on the left hand side we will use labels to match in certain conditions.
In our case, we need to match on wireless users that are using certificates or TTLS to authenticate and we also need it to match on the group employee that we will take from IDP. But as you can see by default we are not having any label associated with the group so what we can do is we can create a label right from that same place. We'll call it employee group.
We will select label type as directory attribute and the label value will be group and the actual value will be employee. Click create. We can now select this label on the left hand side. It shows up here as the directory attribute. Now we are matching on all these three conditions. Then on the right hand side we are deciding what we want to do with these types of users. By default we will allow access to the network but we also want to assign VLAN 750 and role corp. Again we need to create labels for that. So we'll go and create first corp VLAN label.
The label type will be AAA attribute and the value would be VLAN. I'll configure it as 750. I'll then create corp role attribute and I'll just configure it as corp. And then I'm going to create also labels for BYD VLAN and BYD role. So 751 and finally BYD role. Good to go.
So we can select corp VLAN and corp role. Now we'll create one more rule for our users that are doing TTLS based authentication. So we'll call it credential authentication and we'll match on wireless users that are doing TTLS and that they're also part of the same employee group.
And on the right hand side we'll assign them BYD VLAN and BYD role. At this point we can hit save and our authentication policy setup is done. The last thing is to create the actual WLAN template. So I'm going to go to WLAN templates. I'm going to create a new one. I'm going to call it MIST 802.1X. I'm going to click create.
Add a WLAN. Select security as 802.1X. And in this case we don't need to configure radio servers one by one. We don't need to add APs as radio clients. None of that is required. We'll just go and select MIST authentication as our authentication service. That's it. We'll then just go on and configure dynamic VLANs. It's the same two VLANs that we will be sending. So 750.751. Click create and just assign this template to the org.
Click save. At this point we should be able to test with our client devices. We have one laptop that's connected using a certificate. It got the role corp. We have a mobile device that connected using TTLS using username and password and got the role BYD. And now let's take a look deeper and look at the client insights.
What can we see with MIST access assurance here? So what you could see is in addition to the all the client events that are coming from the access point and that are showing the user experience, from the network perspective, you also see all the events coming from the NAC side of things as the client goes through the authentication and authorization process. So, first event is, okay, we're seeing the client certificate. We are grabbing all the metadata about the user certificate.
We see that the client trusted our server cert that's provided by the MIST authentication service. We'll then did a IDP lookup against Okta. And we got all the user group information from Okta. So we know now this user is part of all these user groups. And we see one of these groups is actually employee, which we needed to match on. And finally, when we look at the NAC client allowed access event, we're saying, okay, this client is good to go. It's allowed in the network. This is the VLAN that we are assigning from a NAC perspective. This is the user role that we are assigning from the NAC perspective.
And this is the authentication rule that hit during that process. So if we click on that link, it will actually go and highlight, this is the rule that this particular user hit during the auth process, right? Similarly, if we look at the mobile device, if we look at the client insights, we're now seeing that in this case, client trusted the service certificate, but instead of showing the client certificate, it actually did the IDP authentication using username and password credentials against Okta. Finally, we got the user role and group information from Okta.
And we've allowed client to access the network, assign a different VLAN 751 and different user group. But in this case, we are hitting a different authentication rule in our policy. So again, if we click on it, we're saying that particular user went through a different role.
为无线网络配置基于证书的 (EAP-TLS) 身份验证
- 在 Microsoft Azure 门户上,在 Azure AD 上设置 IdP 连接器。
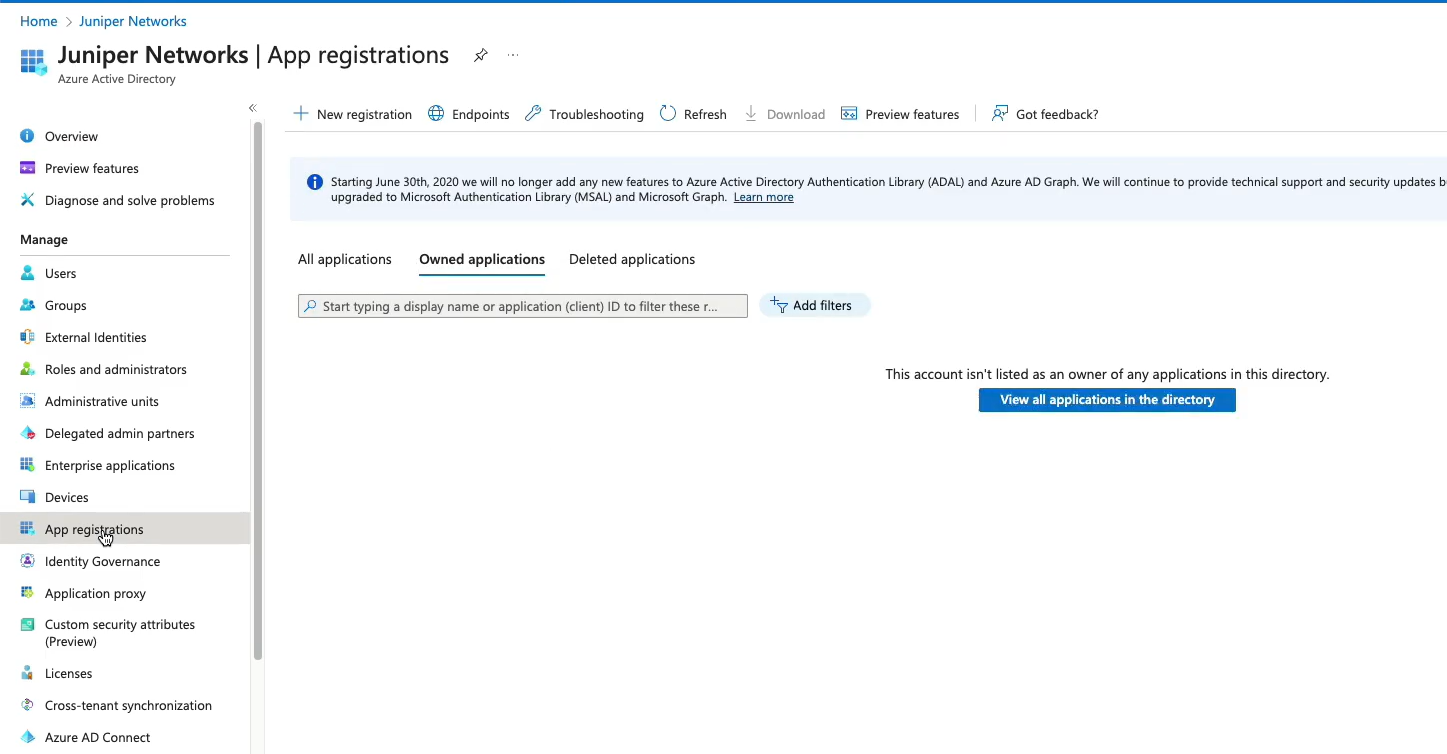
- 在左侧导航栏中,选择“应用注册”。
图 1:新应用注册如果已注册应用程序,请转到 “拥有的应用程序” 选项卡。单击应用程序名称可查看客户端 ID、租户 ID 和客户端密码等详细信息。
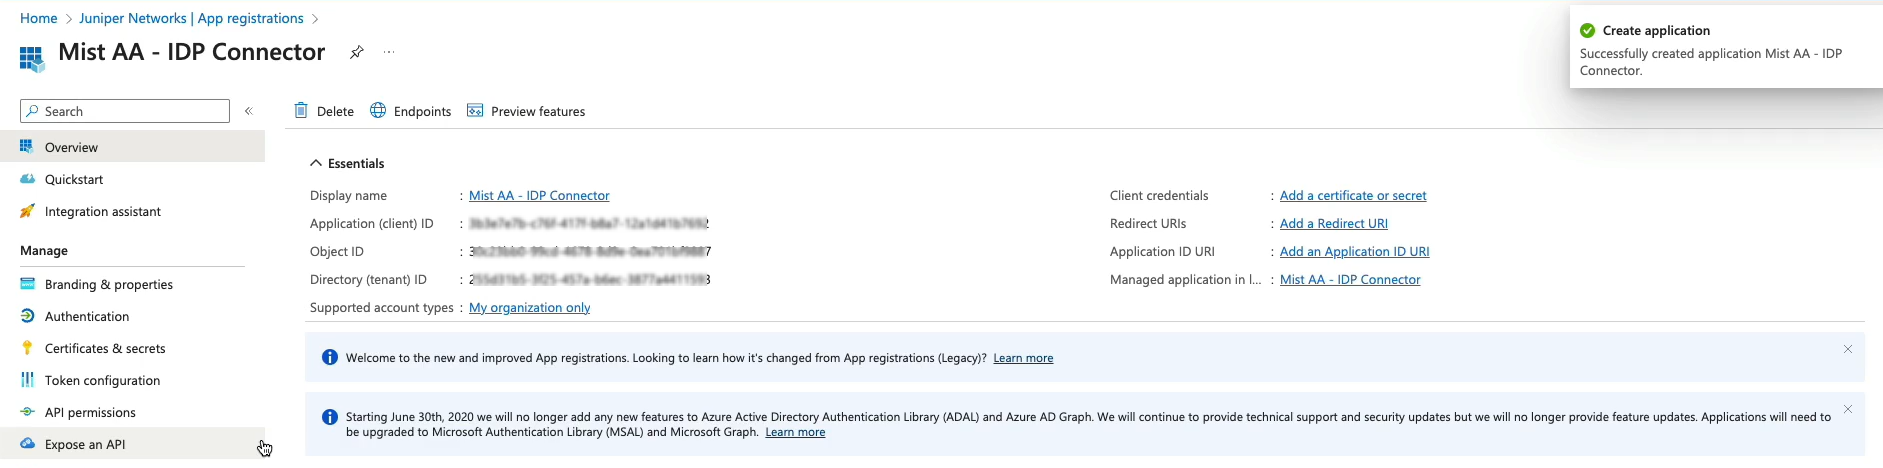
 如果要在 Azure 门户上注册新应用程序,请单击“ 新建注册 ”选项卡。在“新注册”页面中,在以下字段中输入所需信息。请注意,以下列表中的“名称”字段显示示例用户输入。
- 名称 - 输入 Mist AA IDP connector
- 支持的帐户类型 - 仅选择此组织目录中的帐户。
- 单击“注册”继续。
此时将显示一个页面,显示有关新创建的连接器的信息,如 图 2 所示。图 2:新应用程序详细信息
- 在左侧导航栏中,依次选择“证书和密码>新建客户端密码”。
输入以下详细信息,然后单击 “添加”。
- 名字
- 到期时间
图 3:客户端密钥详细信息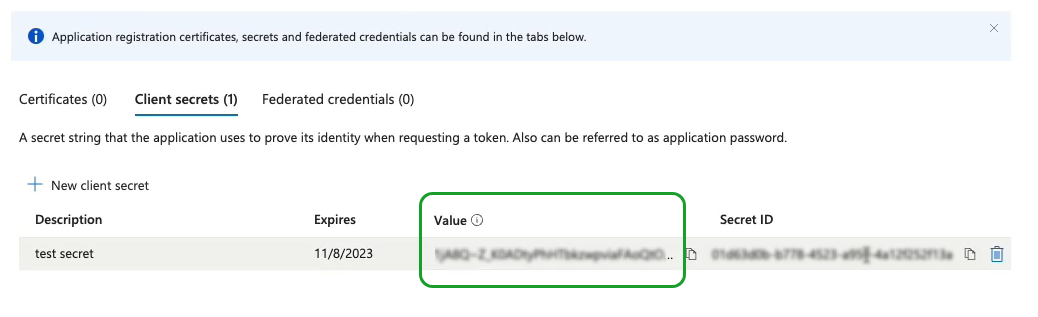
记下“值”字段中的信息。将 Azure AD 添加为 IdP 时,Juniper Mist门户中的“ OAuth 客户端凭据客户端机密 ”字段需要此信息。
- 在左侧导航栏中,选择“应用注册”。
- 向 Azure AD 应用程序授予委托权限和应用程序权限。使用这些权限,应用程序可以读取用户、组和目录信息。
- 在“添加权限”页上的“Microsoft Graph”下,在“委派的权限”和“应用程序权限”选项卡上添加以下权限。
-
- 目录.Read.All
- 组.Read.All
- 用户.read
- User.Read.All 用户
单击 授予 AD 的管理员同意 ,如 图 4 所示。
图 4:应用程序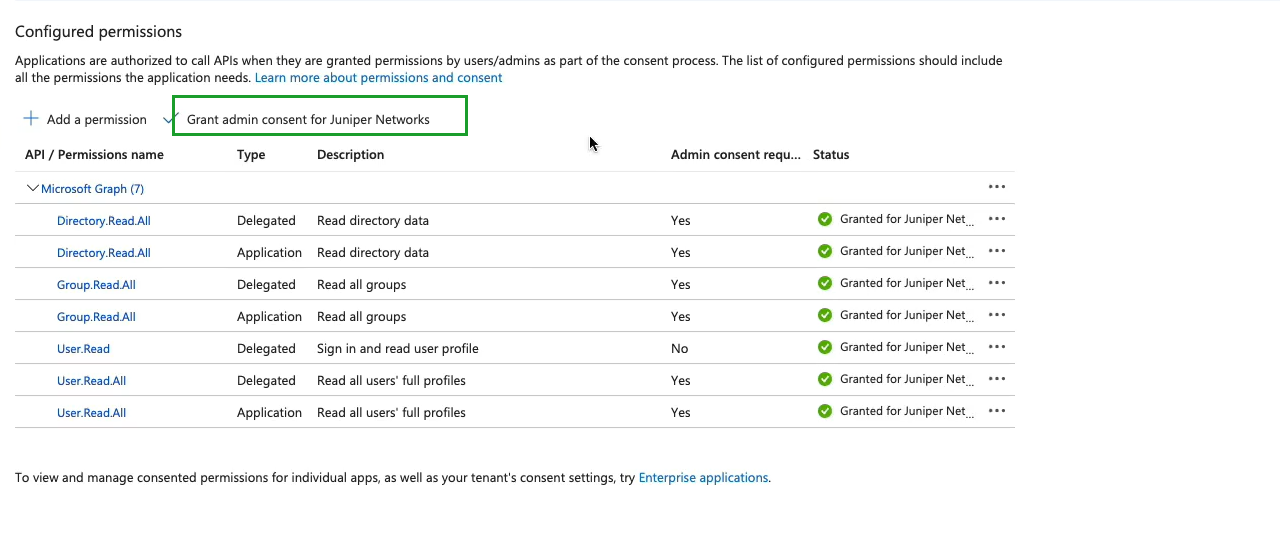 的 API 权限
应用程序需要应用程序权限才能在 Azure AD 中运行。当连接器使用用户名和密码进行身份验证时,委派权限是必不可少的。
-
- 在“添加权限”页上的“Microsoft Graph”下,在“委派的权限”和“应用程序权限”选项卡上添加以下权限。
- 在Juniper Mist门户上,将 Azure AD 添加为标识提供者。
- 在 New Identity Provider 页面上,输入所需信息,如图 5 所示。
图 5:将 Azure AD 添加为标识提供者Figure 5: Add Azure AD as Identity Provider
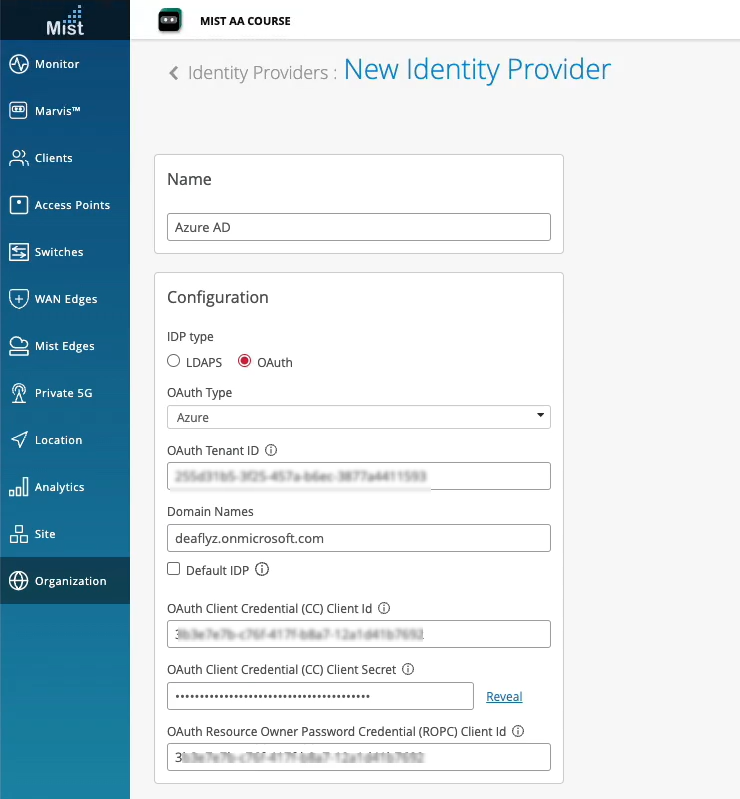
- 名称 - 输入 IdP 名称(在此示例中,使用 Azure AD)
- IDP 类型 - 选择 OAuth。
- OAuth 类型 - 从下拉列表中选择 Azure 。
- OAuth 租户 ID - 输入 Azure AD 租户 ID。
- 域名 - 输入域名,即用户的用户名(例如:username@domain.com)。域名字段检查传入的身份验证请求,识别相应的用户名和关联的域。为连接器设置域名后,连接器可以识别需要与之通信的 Azure 租户。
- OAuth 客户端凭据 (CC) 客户端 ID - 输入已注册的 Azure AD 应用程序的客户端 ID。
- OAuth 客户端凭据 (CC) 客户端密码 - Azure AD 应用程序密码。Azure AD 应用程序机密。输入 Azure 门户为 IdP 连接器生成的客户端密码的值组件。
- OAuth 资源所有者密码凭据 (ROPC) 客户端 ID - 输入 Azure AD 应用程序 ID。此 ID 与 OAuth 客户端凭据客户端 ID 相同。
- 在 New Identity Provider 页面上,输入所需信息,如图 5 所示。
使用 EAP-TLS 对用户进行身份验证时,Juniper Mist会将用户名与指定的域名进行匹配。Juniper Mist 向相应的 Azure AD 租户发送 API 请求,以获取该用户的详细信息。
图 7 和 图 6 显示了 Azure AD 和 Juniper Mist 门户中的用户详细信息。
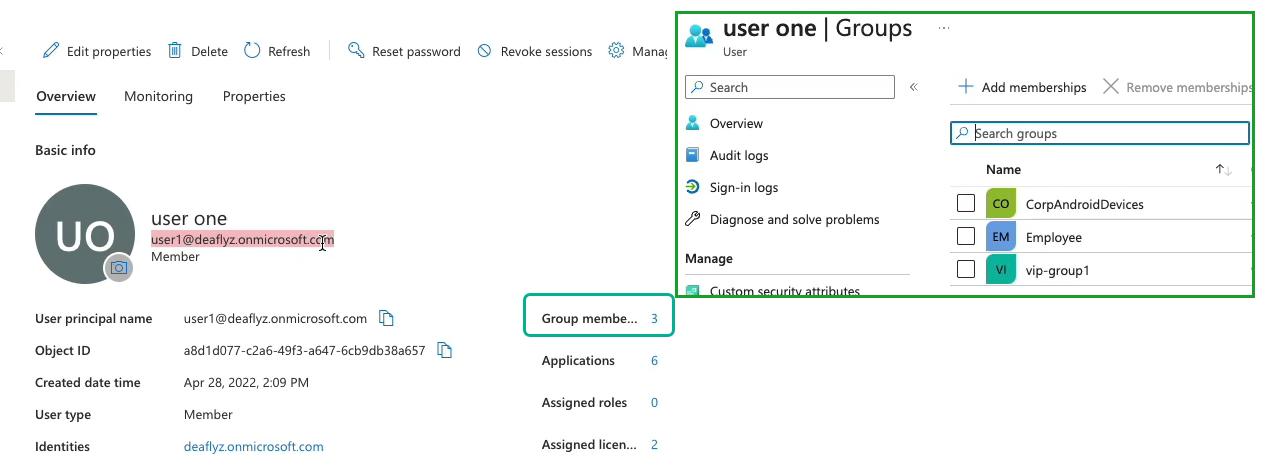
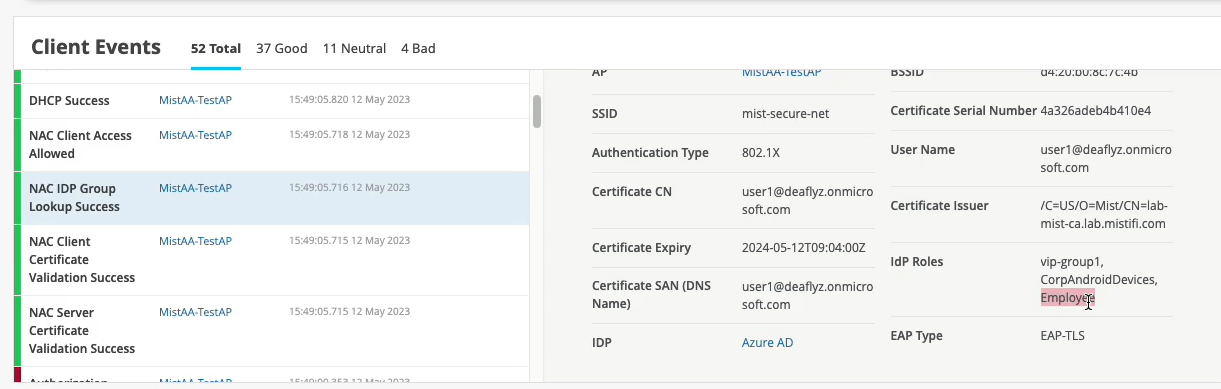
在Juniper Mist门户上,可以查看 Azure AD 返回的组成员身份信息。在Juniper Mist门户上,导航到 “监控 > 见解”>“客户端事件 ”以查看信息。
 上的用户详细信息
在 图 7 所示的示例中,用户属于组 Employee。
您可以根据组详细信息创建身份验证策略。
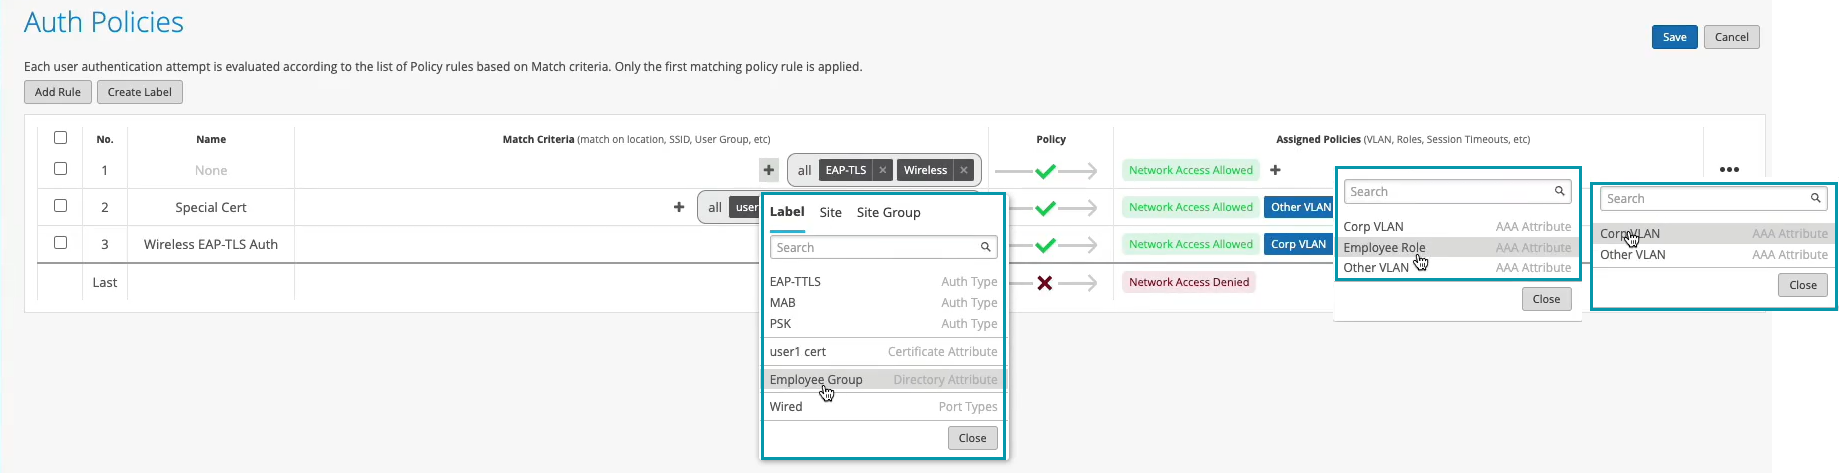
基于组详细信息创建身份验证策略
您可以根据 IdP 检索到的用户组成员身份,使用带有目录属性的标签创建身份验证策略。
要创建身份验证策略,请执行以下作:
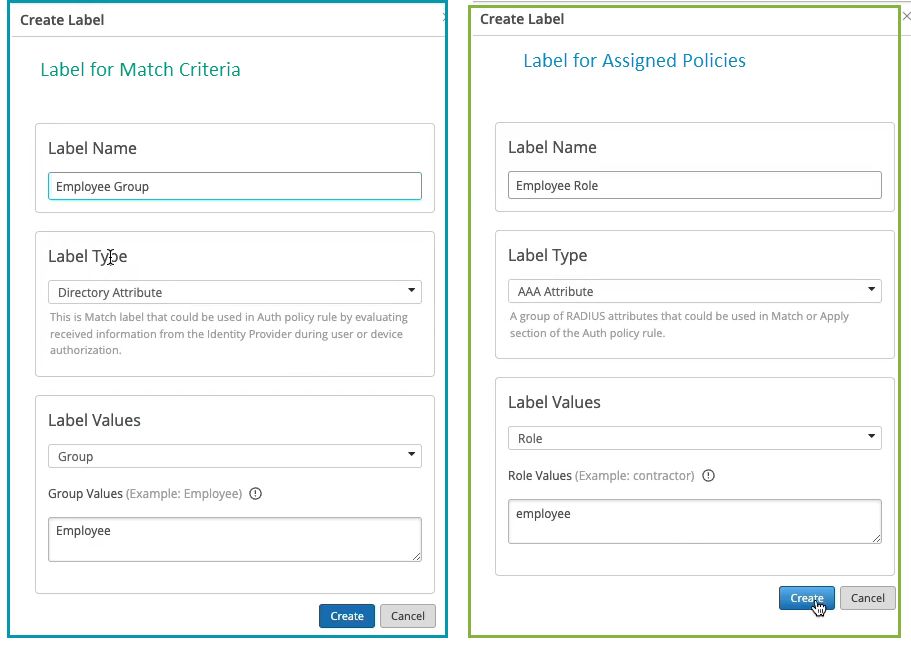
- 在“身份验证策略”页面上,单击“创建标签”并输入详细信息。
图 8:身份验证策略
 的标签
的标签
- 根据 IdP 检索到的用户组成员身份创建标签类型为目录属性的标签员工组。选择标签值为“组”,将组值选择为“员工”。使用此标签作为策略匹配标准。
- 创建标签类型为 AAA 属性的标签员工角色。选择“标签值”作为“角色”,选择“角色值”作为“员工”。使用此标签分配策略。
- 单击“添加规则”,创建身份验证策略。系统将插入一个新行,允许您添加新策略。
图 9:创建身份验证策略
 标签
标签
输入策略名称。
单击“匹配条件”列中的添加图标 (+),然后从显示的列表中选择一个用户标签。选择基于目录属性创建的标签(员工组)。
在“策略”列中,单击复选标记图标 (✓),然后选择要对接下来要标识的资源强制实施的作“允许”或“阻止”。
单击“分配的策略”列中的 (+),然后选择您根据已分配策略的 AAA 属性创建的标签(员工角色)。由于用户是员工组的一部分,因此您可以分配员工角色并将其移动到企业 VLAN
- 点击保存。
图 10 显示了已完成的身份验证策略。
图 10:身份验证策略
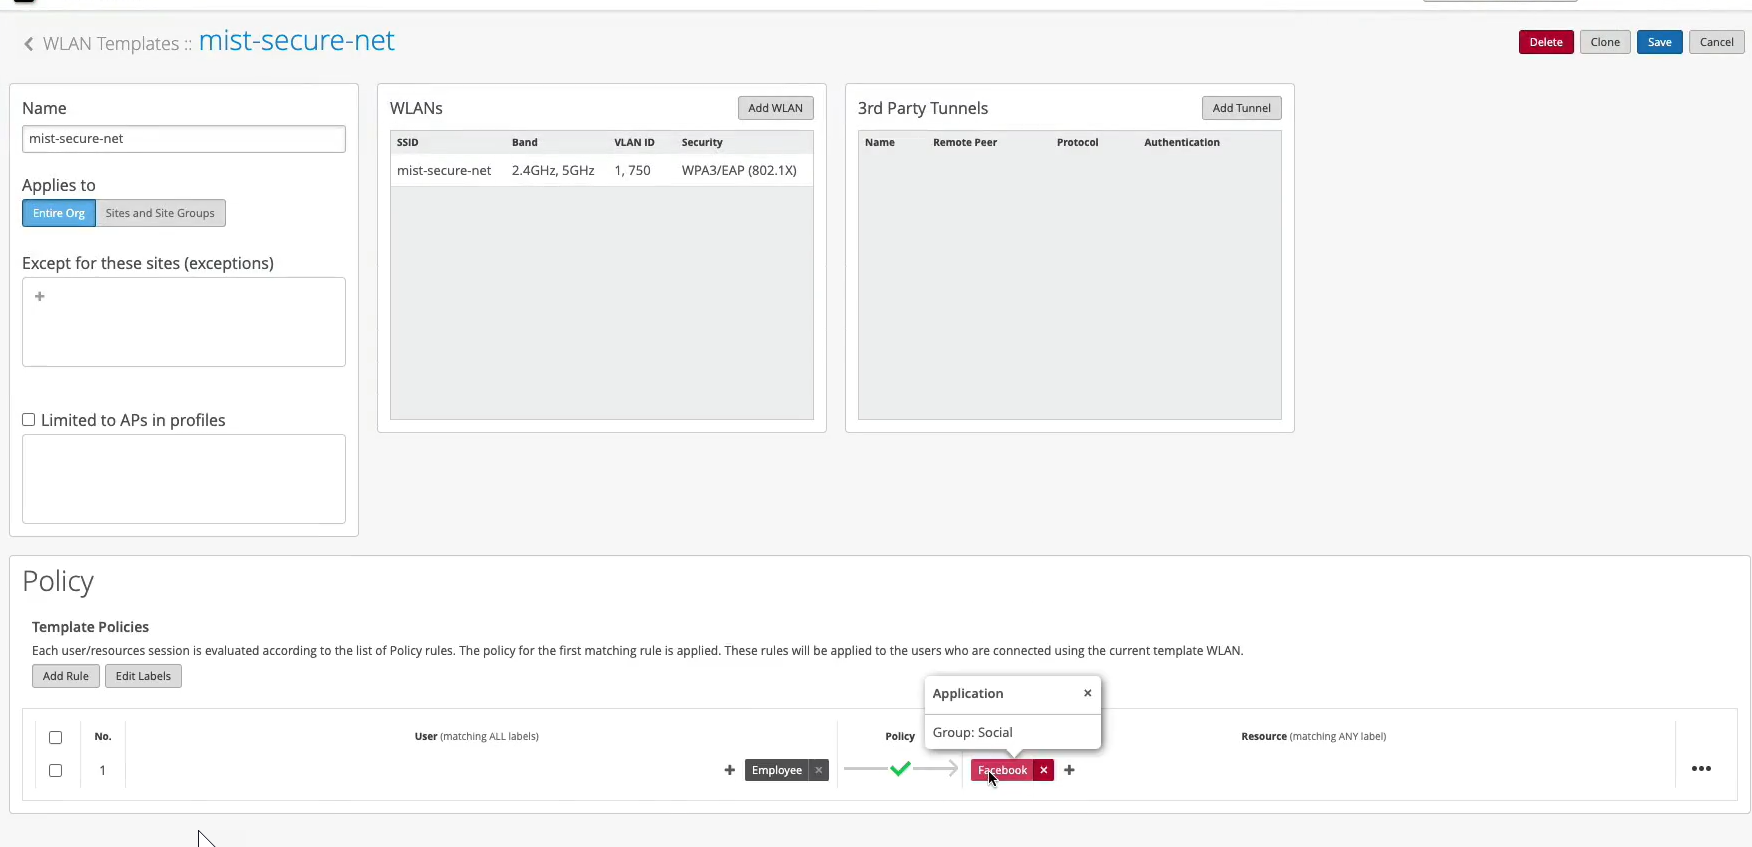
在WLAN模板中创建身份验证策略
在 WLAN 模板中添加身份验证策略时,它将应用于使用此模板的所有 WLAN。首先,您将创建需要在策略中引用的标签。然后,您将编辑模板以添加策略。
- 为用户创建标签,以便在 WxLAN 策略中使用这些标签。
- 为要识别的用户选择适当的“标签类型”和“标签值”。
用户的标签类型包括 AAA 属性、接入点、WiFi 客户端和 WLAN。值因所选类型而异。
在以下示例中,选择“AAA 属性类型”,标签值为“用户组”。通过创建与系统用户组对应的标签,您可以为不同的用户组创建不同的策略。图 11:创建新标签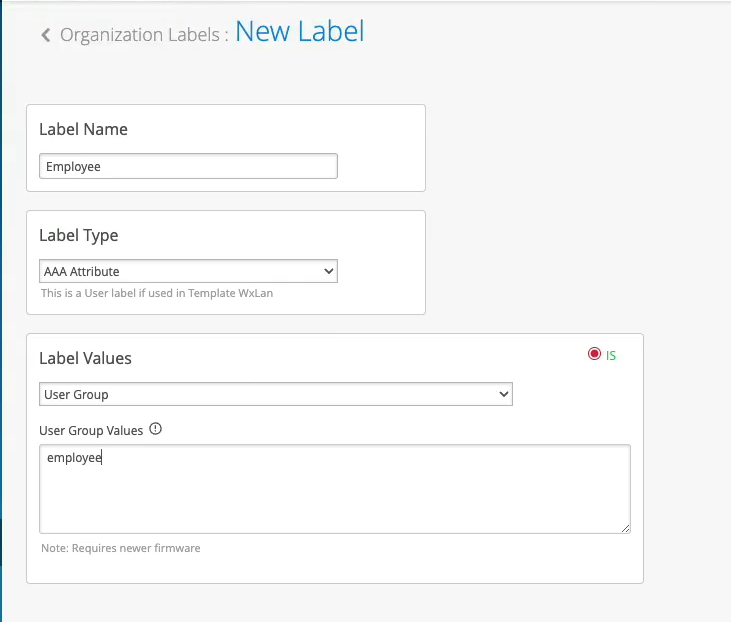
- 为要识别的用户选择适当的“标签类型”和“标签值”。
- 选择规则适用到的用户、策略和资源:
-
在 “用户 ”部分,单击添加图标 (+)。然后选择您之前创建的用户标签之一。
-
在 “策略 ”部分中,单击复选标记图标 (✓)。然后选择要强制执行的作:“ 允许 ”或 “阻止”。
-
在 “资源 ”列中,单击添加图标 (+)。然后选择之前创建的资源标签之一。
-
以下视频演示了使用与 Azure AD 集成的基于证书的 (EAP-TLS) 身份验证时如何在 WLAN 模板中配置身份验证策略。
Your rule configured, let's validate. Let's take a look at which policy is now being hit for this particular user. So we went in and did the client certificate check. Let's just refresh those events so we see them. All right, so we went in and client trusted the server cert. We trusted the client cert. We then did an IDP lookup, right? Same thing as your ID. We got the three IDP roles.
Now, let's look at this client access allowed. We got the VLAN 750. We got the user group or role called employee. And now we are actually hitting that different rule now. Because we have this additional context, additional visibility from the IDP, we can now do differentiated access policies for our clients.
Now, what you could do with this employee role - how can you use it on the wireless side? You could go to organization labels. You can create a label AAA attribute. Let's call it "Employee." You'll match on the user group. And what you'll do, you could go to your WLAN template. You can create a network policy now. You can say, OK, if the user is part of this employee role or employee group, we can now decide which resources it can or cannot access on the network. So we can say, OK, let's probably block Facebook for employees and hit Save. This is how you can extend the role that's being supplied by the NAC and then apply it on the AP to do some additional restrictions on which resources the user is able to access.