
安装适用于瞻博网络 Mist Mist 身份验证代理的瞻博网络 Mist Edge 虚拟机
按照以下步骤安装瞻博网络 Mist™ Edge 虚拟机 (VM),以实现瞻博网络 Mist 身份验证代理功能。
系统要求
支持瞻博网络 Mist 身份验证代理功能的瞻博网络 Mist Edge 虚拟机的最低硬件要求:
- 虚拟机管理程序:VMware ESXi(版本 – 6.7.0 和 7.0)
- CPU:2 个 vCPU
- 内存:16-GB RAM
- 硬盘:32 GB,厚配置
- 网络接口卡 (NIC):单个虚拟 NIC
您需要在创建 Mist Edge 虚拟机以进行初始启动的环境中提供对 debian 和 mistsys 存储库的无限制访问权限。此外,请确保防火墙已打开端口 80 和端口 443。
将瞻博网络 Mist Edge 虚拟机作为瞻博网络 Mist 身份验证代理
瞻博网络 Mist Edge 虚拟机 (VM) 需要带外管理 (OOBM) 接口才能充当瞻博网络 Mist 身份验证代理。
您可以指定客户端连接 RADIUS 服务器的端口。默认情况下,客户端使用端口 1812(如 RFC 2865 中指定)。您还可以指定用于发送计费数据包的计费端口。默认端口为 1813(如 RFC 2866 中指定)。
您必须配置 TCP 端口 2083 以允许发往 radsec.nac.mist.com 的出站连接。
此外,您必须在瞻博网络Mist云上提供瞻博网络Mist Edge虚拟机对 EP 终止器服务 [ep-terminator.mistsys.net (TCP 443)] 的访问权限。请参阅 防火墙配置:瞻博网络 Mist 端口和 IP 地址。
 流
流
安装瞻博网络 Mist Edge 虚拟机
- 在 VMware ESXi 门户中,将 ISO 上传到 VMware 存储。
- 单击 数据存储浏览器 ,然后选择要将文件上传到的数据存储。
图 2:选择要上传文件
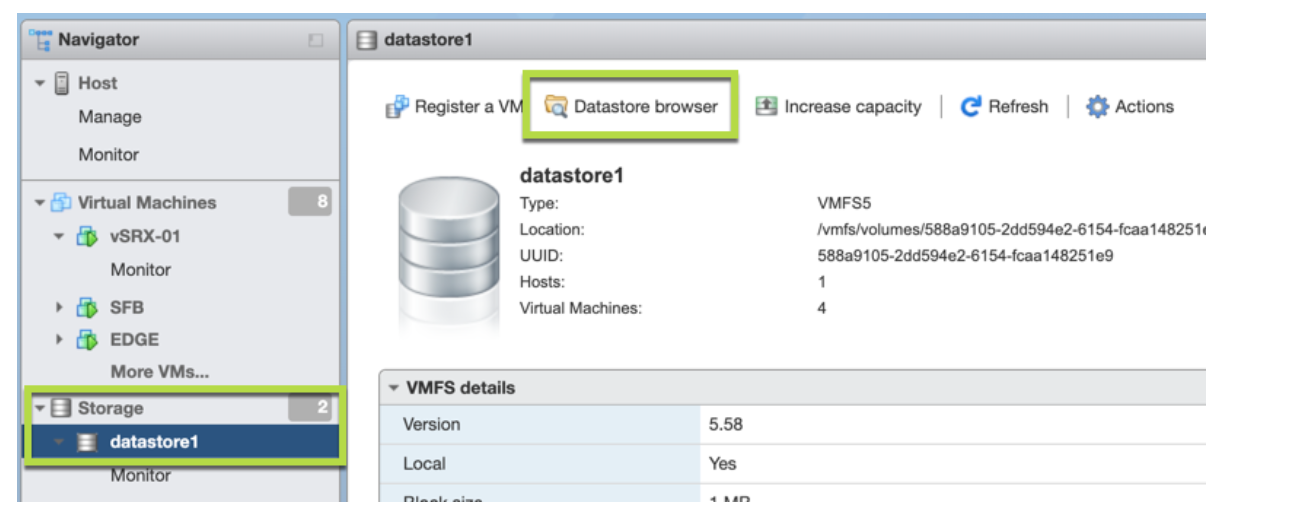 的数据存储
的数据存储
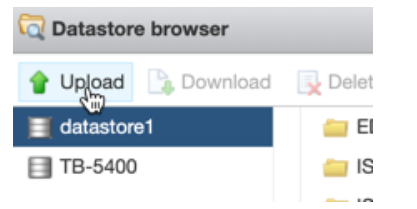
- 单击 “上传” ,然后选择您在上一步中下载的 ISO 文件。
图 3:上传 ISO 文件
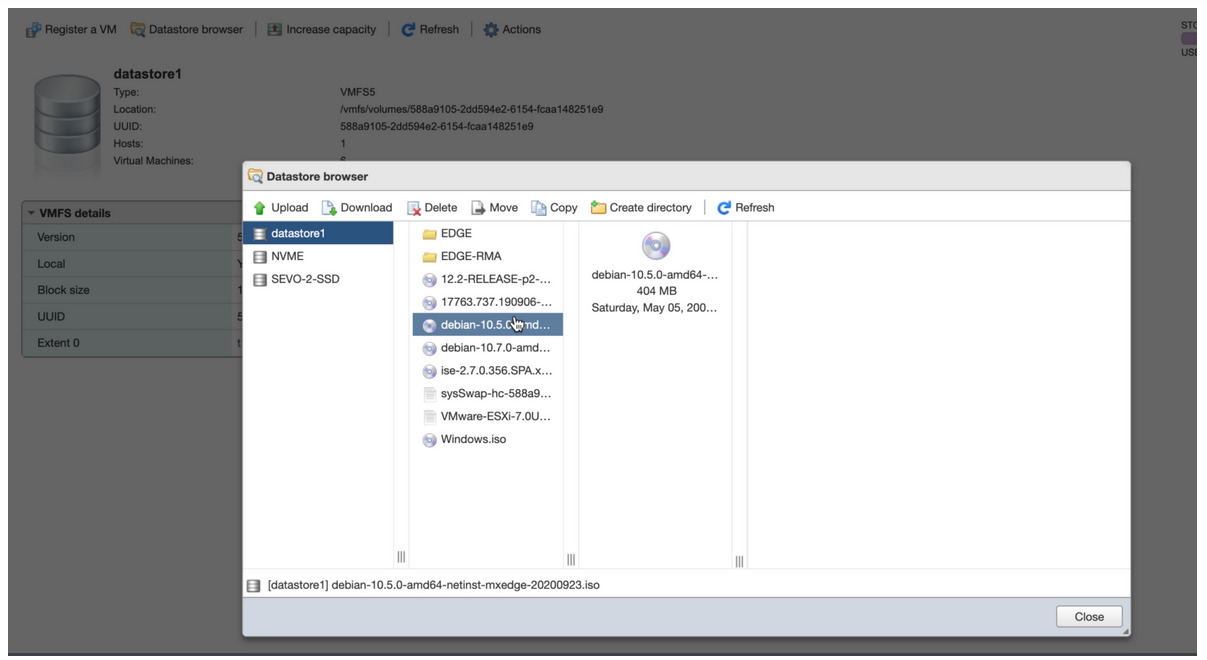
- 刷新数据存储浏览器以在列表中查看上传的文件。
图 4:刷新数据存储浏览器
- 单击 数据存储浏览器 ,然后选择要将文件上传到的数据存储。
- 使用以下配置创建 VM。
- 在“选择名称和来宾操作系统”页上,输入所需的详细信息。
图 5:输入瞻博网络 Mist Edge 虚拟机
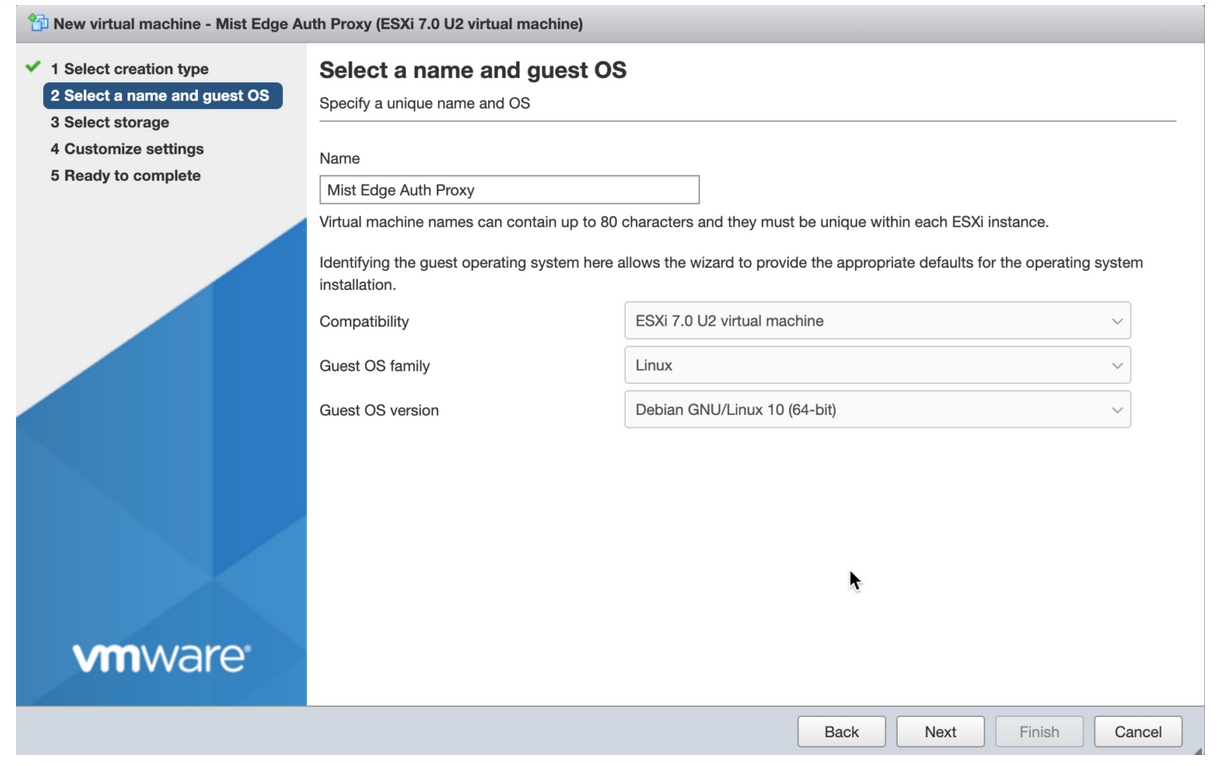 的详细信息
的详细信息
- 名称 - 输入虚拟机的名称。
- 兼容性 - 选择在 vSphere 上运行的 ESXi 版本。例如:ESXi 7.0 U2 虚拟机。
- 来宾操作系统家族 — 选择来宾操作系统家族。例如:Linux。
- 访客操作系统版本 - 选择访客操作系统版本。例如:Debian GNU/Linux 10 [64 位]。
- 在“自定义设置”页上,进行所需的更改。
图 6:自定义 VM请参阅 虚拟 Mist Edge ,了解详细说明。
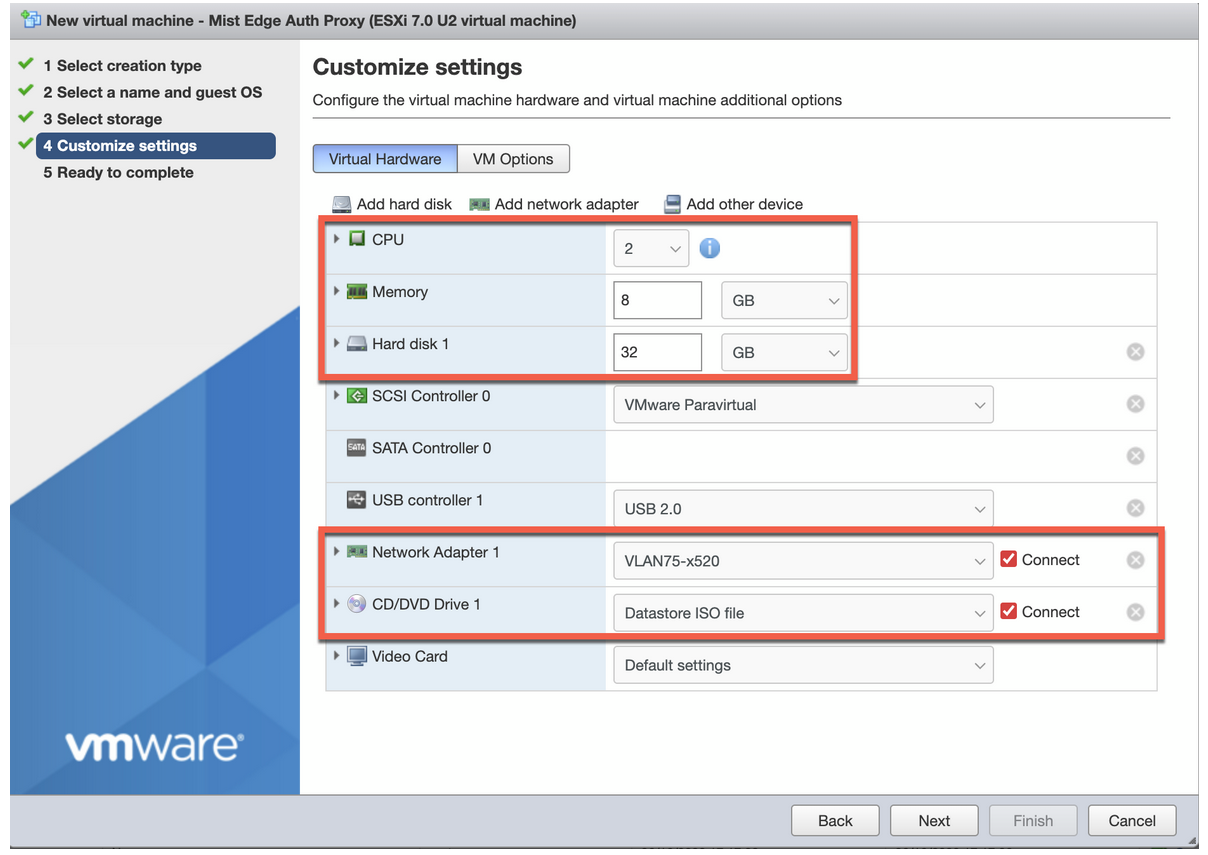 设置
设置
创建 VM 时打开电源。
- 在“选择名称和来宾操作系统”页上,输入所需的详细信息。
- 当瞻博网络 Mist Edge 虚拟机开机时,安装虚拟机。
在瞻博网络 Mist Edge 虚拟机安装页面上,选择 安装并 按 Enter。默认选择为 图形安装。
图 7:安装瞻博网络 Mist Edge 虚拟机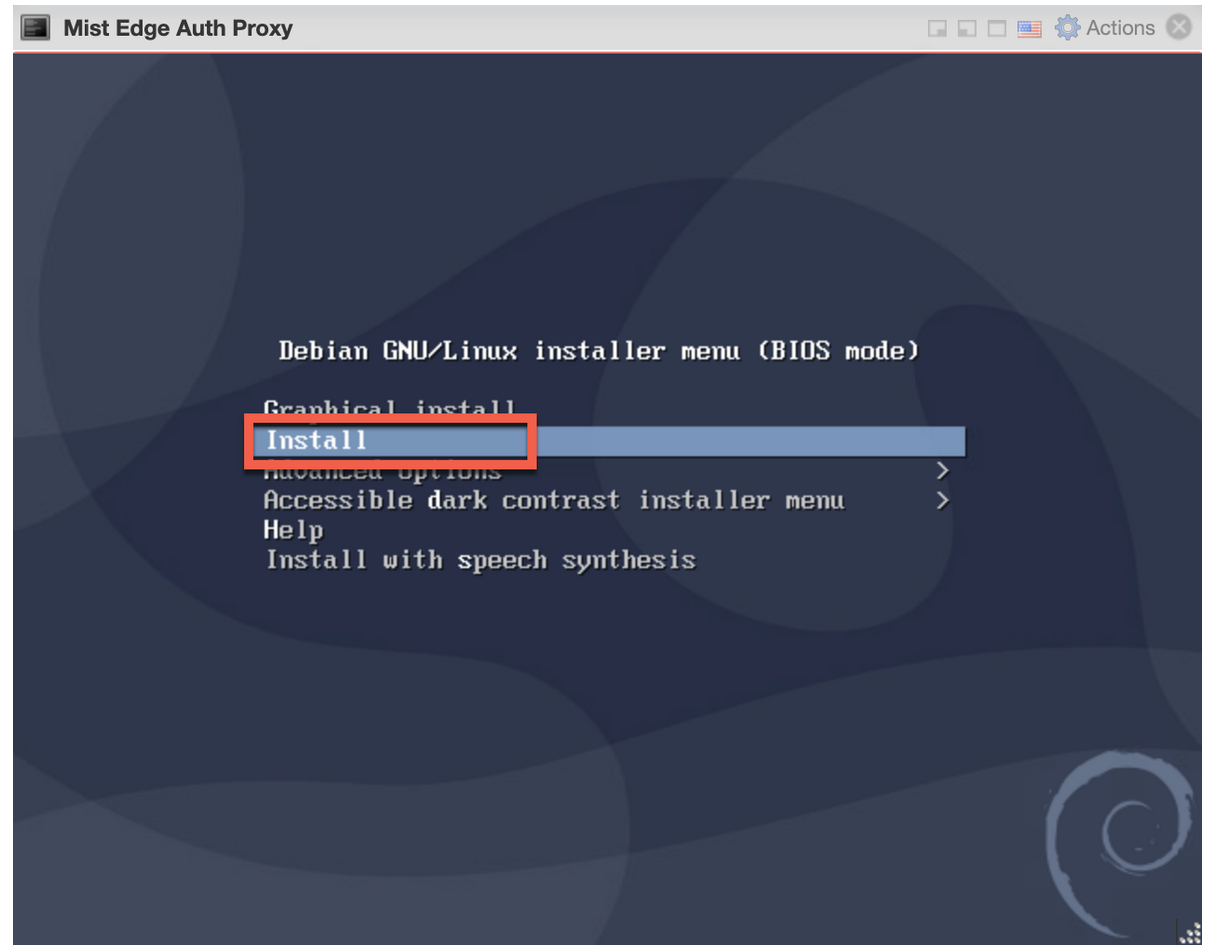
安装完成后,系统将显示
‘mxedge login:’。在安装页面上,您可以看到一段时间(30 秒到一分钟)的安装进度和等待请求。
选择 安装后,安装会自动进行,无需任何用户干预。
在瞻博网络Mist门户上创建瞻博网络Mist Edge虚拟机
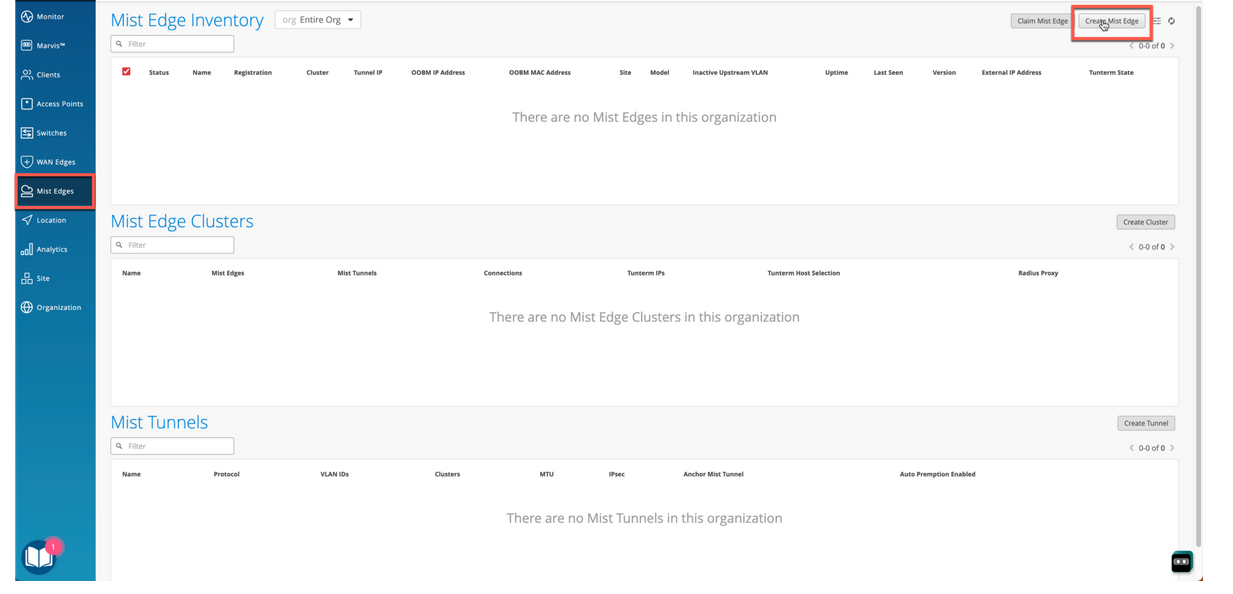
- 从瞻博网络 Mist 门户的左侧菜单中,选择 Mist Edge。然后,在页面右上角,单击创建 Mist Edge。
图 8:创建瞻博网络 Mist Edge 虚拟机
- 在创建 Mist Edge 页面上,输入瞻博网络 Mist Edge 设备的名称,然后选择虚拟机作为型号。
图 9:输入瞻博网络 Mist Edge 虚拟机
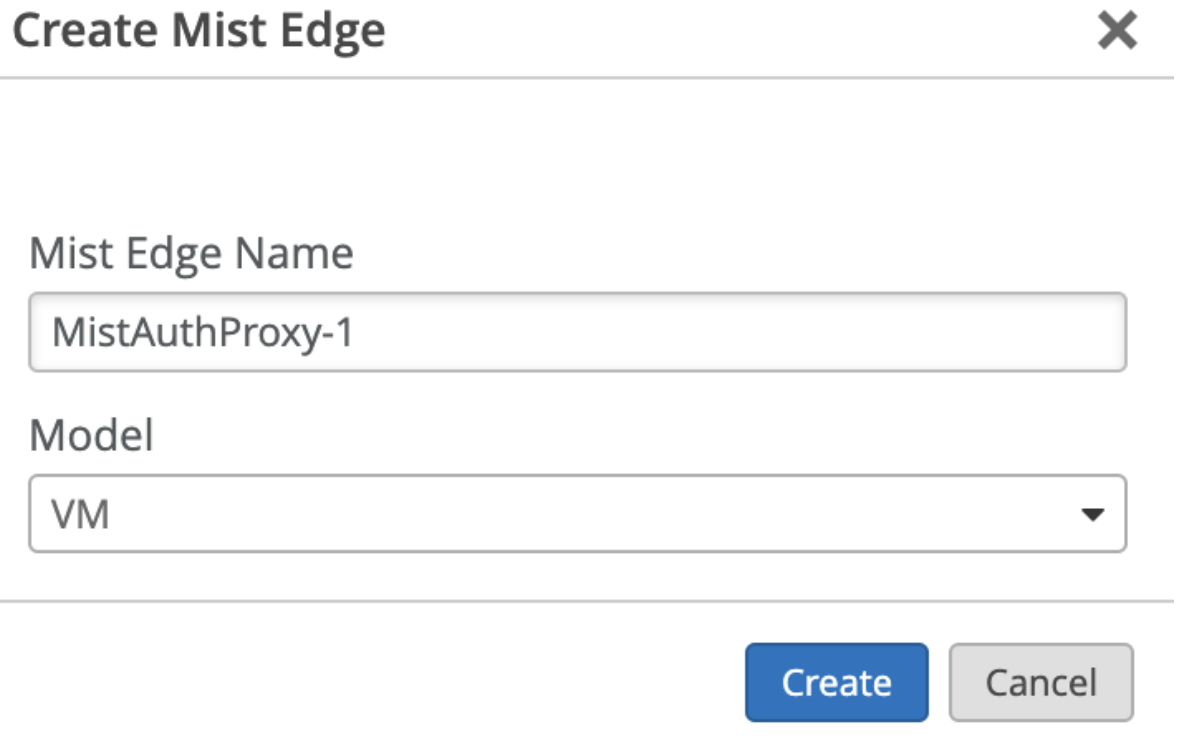 的详细信息
的详细信息
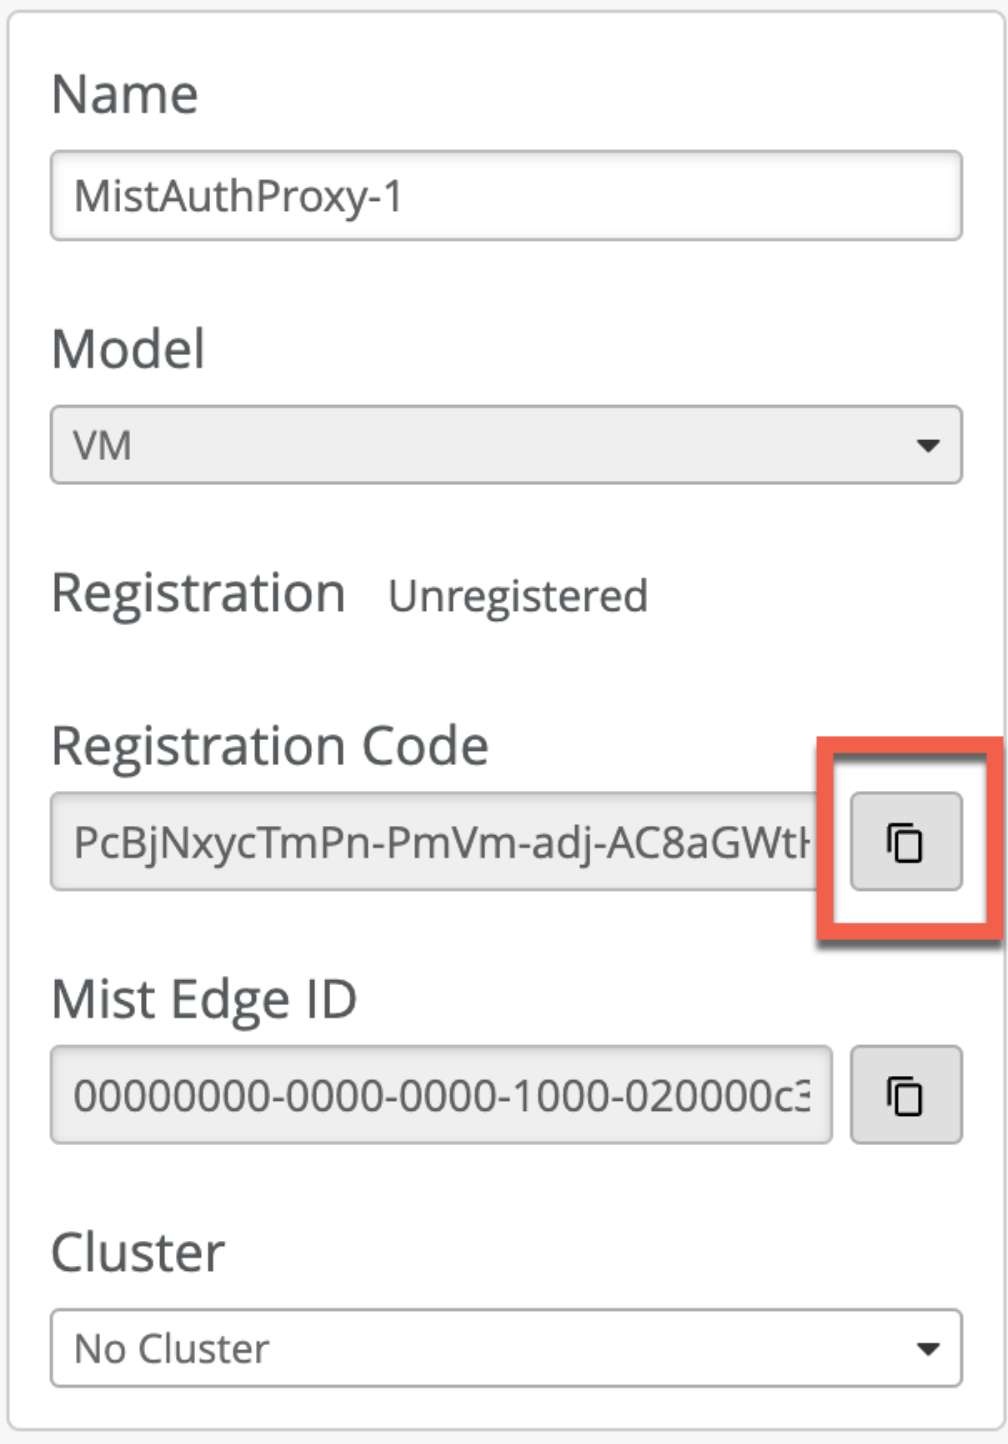
- 复制注册码并保存信息。
图 10:复制注册码
请注意,默认情况下,动态主机配置协议 (DHCP) 提供带外管理 (OOBM) IP 地址。在瞻博网络 Mist 门户上,您可以看到分配的静态 OOBM IP 地址,如下图所示。我们建议您为瞻博网络 Mist 身份验证代理用例使用静态带外管理 IP 地址。
图 11:瞻博网络 Mist Edge 虚拟机带外管理 IP 地址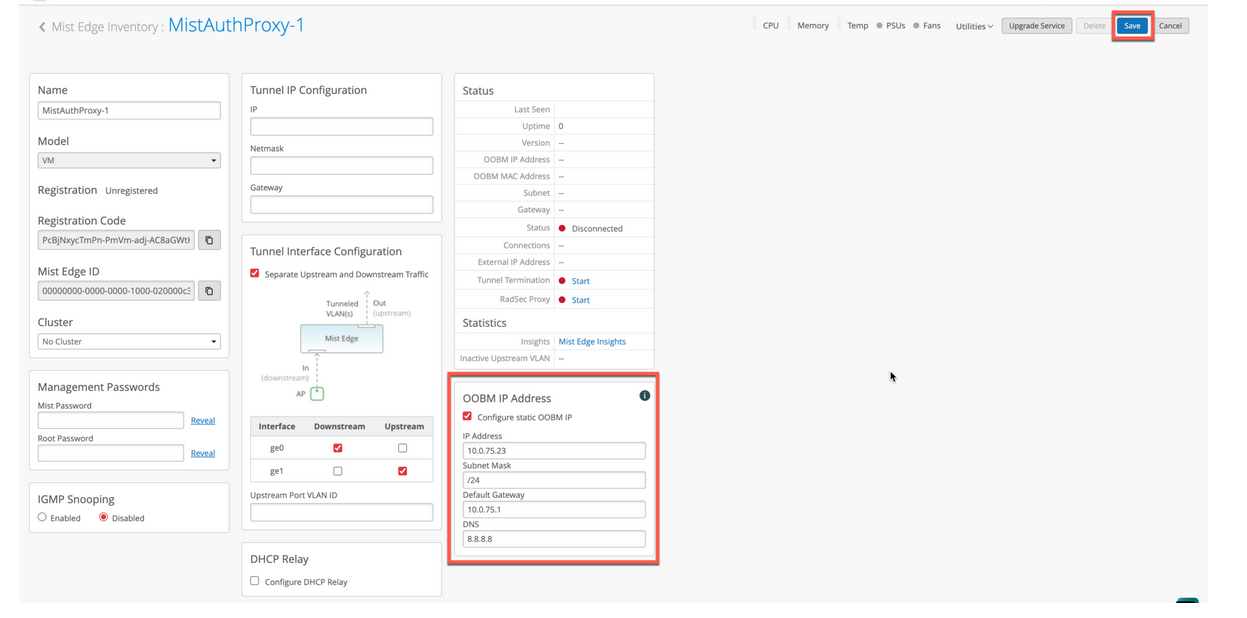
对于瞻博网络 Mist 身份验证代理用例,无需配置隧道接口 IP。
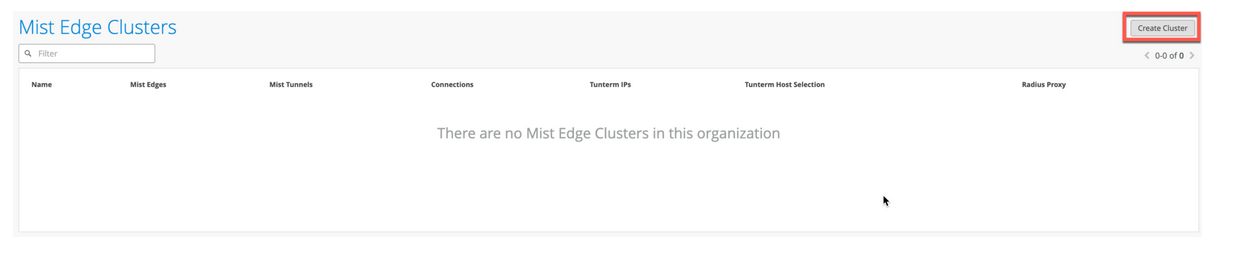
- 在 Mist Edge Inventory 页面上,向下滚动到 Mist Edge 群集窗格,然后单击创建 群集。
图 12:创建瞻博网络 Mist Edge 群集
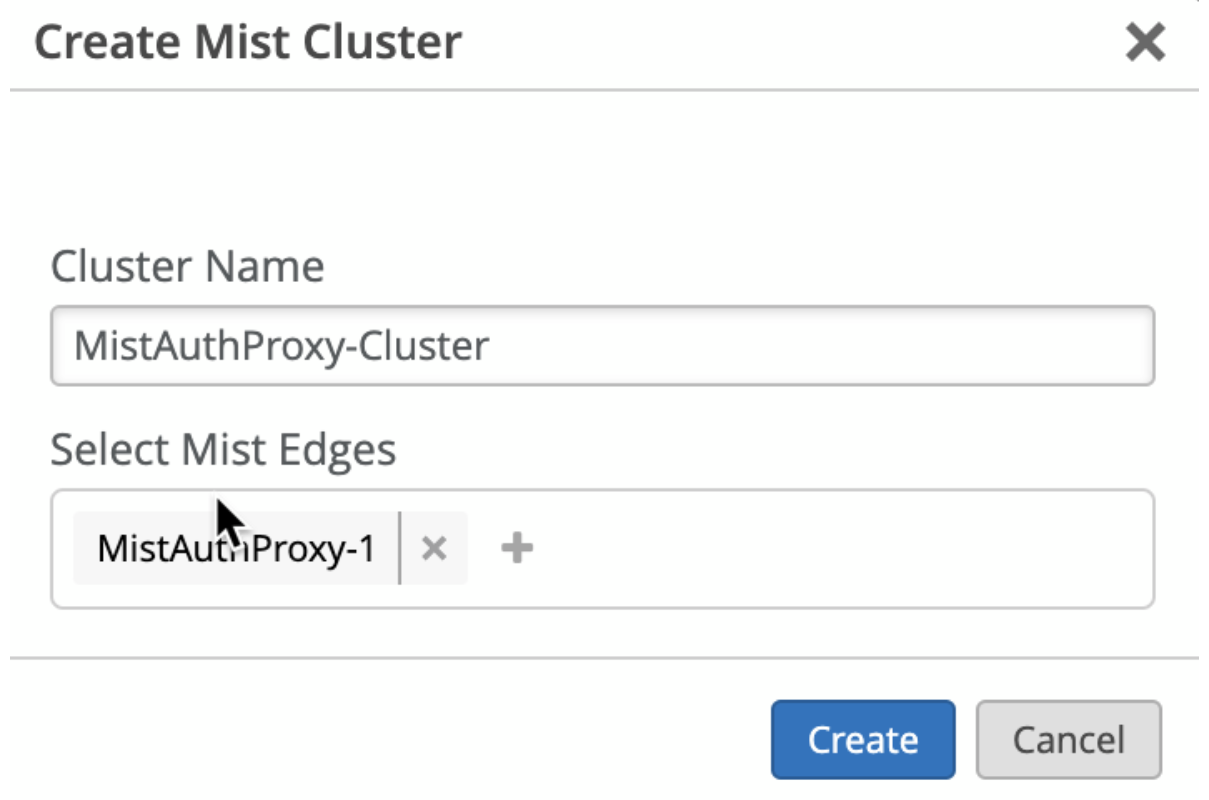
- 在创建 Mist 群集页面上,输入群集名称并选择已部署的瞻博网络 Mist Edge 虚拟机。
图 13:选择 Mist Edge 虚拟机作为群集
- 配置您的瞻博网络 Mist Edge 虚拟机。
在瞻博网络Mist门户上配置瞻博网络Mist Edge后,连接到控制台界面。
- 瞻博网络 Mist Edge 虚拟机首次启动时,请使用以下凭据登录到虚拟机:
- 用户名: mist
- 密码: Mist@1234
- Root (su -) 密码: mist
- 发出命令,
ip a从 DHCP 获取当前管理 IP 地址。在命令输出中,您可以看到 OOBM 接口为 ens192.。
图 14:配置瞻博网络 Mist Edge 虚拟机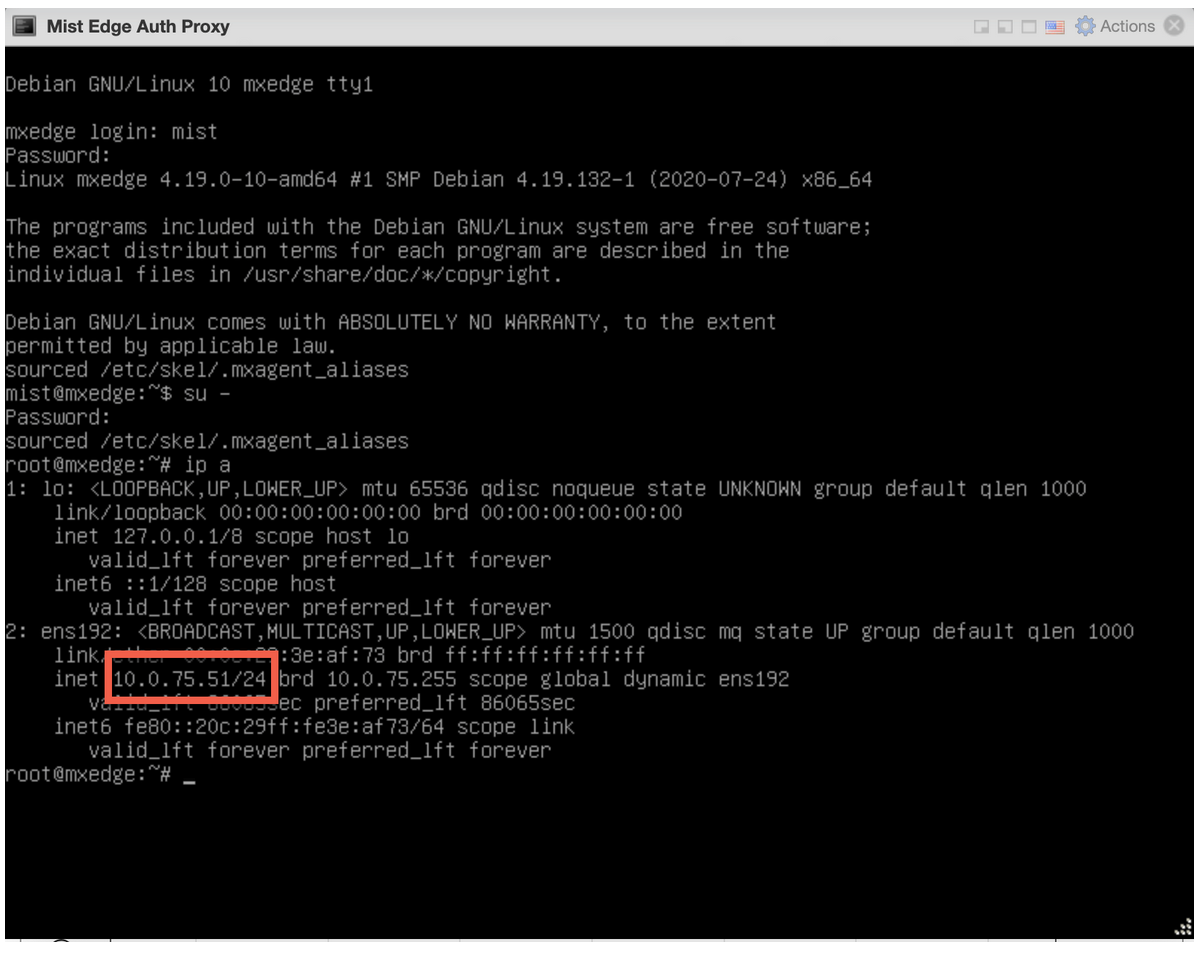 现在,您可以启动 SSH 会话并使用用户名
mist连接到瞻博网络 Mist Edge 虚拟机。示例:ssh mist@<OOBM-IP>, password is Mist@1234
切换到 root:
发出su –命令并用作 mist 密码。 - 瞻博网络 Mist Edge 虚拟机首次启动时,请使用以下凭据登录到虚拟机:
- 从瞻博网络 Mist Edge 虚拟机启动 SSH 并执行引导。
要在瞻博网络 Mist Edge 虚拟机上执行引导并将设备载入瞻博网络 Mist 门户,请使用以下 CLI 命令:
mist@mxedge:~$ su –
Password: abc1
root@mxedge:~# apt-get update
root@mxedge:~# mxagent register --registration-code <paste registration code from step 3>
该过程完成后,CLI 将显示以下消息:
registration finished successfully. (regfile at /var/lib/mxagent/mxagent.reg
成功注册后,瞻博网络 Mist Edge 虚拟机会自动重新启动,并从瞻博网络 Mist 云门户下载配置。
重新启动后,可以在瞻博网络Mist门户上看到 瞻博网络 Mist Edge VM 的更新状态。Mist Edge Inventory 页面上的 Status 字段显示 Connected 和 相应的橙色图标。
图 15:Mist Edge 清单 中的瞻博网络 Mist Edge 虚拟机