本页内容
Sophos 防病毒保护
Sophos 防病毒扫描程序使用本地内部缓存来维护来自外部列表服务器的查询响应,以提高查找性能。Sophos 防病毒扫描是作为基于文件的完整防病毒功能的 CPU 密集度较低的替代方案提供的。有关更多信息,请参阅以下主题:
Sophos 防病毒保护概述
Sophos 防病毒软件是一种云防病毒解决方案。病毒模式和恶意软件数据库位于由 Sophos (Sophos Extensible List) 服务器维护的外部服务器上,因此无需在瞻博网络设备上下载和维护大型模式数据库。在 Junos OS 23.1R1 版之前,Sophos 防病毒扫描程序还使用本地内部缓存来维护来自外部列表服务器的查询响应,以提高查找性能。
由于瞻博网络内容安全性处理的大量流量是基于 HTTP 的,因此使用统一资源标识符 (URI) 检查来有效防止恶意内容到达端点客户端或服务器。将对 HTTP 流量执行以下检查:URI 查找、真实文件类型检测和文件校验和查找。支持以下应用层协议:HTTP、FTP、SMTP、POP3 和 IMAP。
从 Junos OS 15.1X49-D10 版和 Junos OS 17.3R1 版及更高版本开始,不支持完整的基于文件的防病毒功能。在以前的版本中,Sophos 防病毒扫描是作为基于文件的完整防病毒功能的 CPU 密集度较低的替代方案提供的。Sophos 支持与完全防病毒相同的协议,并且以大致相同的方式运行;但是,它具有较小的内存占用,并且与内存较少的低端设备兼容。
从 Junos OS 15.1X49-D100 版开始,Sophos 防病毒、Web 过滤和内容安全性的安全功能支持 HTTP、HTTPS、FTP、SMTP、POP3、IMAP 协议的 IPv6 直通流量。
从 Junos OS 12.3X48-D35 版和 Junos OS 17.3R1 版开始,内容安全性 Sophos 防病毒 (SAV) 单会话吞吐量有所提高,以优化 TCP 代理转发。
从 Junos OS 19.4R1 版开始,防病毒功能支持隐式和显式 SMTPS、IMAPS 和 POP3S 协议,仅支持显式被动模式 FTPS。
隐式模式 — 使用安全通道连接到 SSL/TLS 加密端口。
显式模式 — 首先连接到不安全的信道,然后通过发出 STARTTLS 命令来保护通信。对于 POP3S,请使用 STLS 命令。
从 Junos OS 23.1R1 版开始,内容安全性支持新的防病毒 Sophos 实时保护 2.0 版。新版本的 Sophos 防病毒软件使用 HTTPS 连接进行设备到服务器的通信。对于 HTTPS 连接,您必须创建一个 SSL 初始配置文件,并将该配置文件添加到 Sophos 引擎的默认配置中。
从 Junos OS 24.4R1 版开始,我们引入了对内容安全性 Sophos 2.0 防病毒软件的 Web 代理支持。此外,我们还引入了基于文件信誉值的文件信誉组来控制流量并提供对安全性的更多控制。
也可以看看
Sophos Antivirus 功能
Sophos 防病毒软件具有以下主要功能:
Sophos antivirus expanded MIME decoding support—Sophos antivirus 提供对 HTTP、POP3、SMTP 和 IMAP 的解码支持。对于每种受支持的协议,MIME 解码支持包括以下内容:
多部分和嵌套标头解码
主题字段中的 Base64 解码、打印引号解码和编码单词解码
Sophos antivirus supports HTTPS traffic—从 Junos OS 12.3X48-D25 版和 Junos OS 17.3R1 版开始,基于 SSL 转发代理的 Sophos 防病毒软件支持 HTTPS 流量。Sophos antivirus over SSL 转发代理通过拦截通过 SRX 系列防火墙的 HTTPS 流量来实现此目的。来自 SRX 系列防火墙的安全通道划分为客户端和 SRX 系列防火墙之间的一个 SSL 通道,以及 SRX 系列防火墙和 HTTPS 服务器之间的另一个 SSL 通道。SSL 转发代理充当两个通道的终端,并将明文流量转发到内容安全性。内容安全性从明文流量中提取 URL 和文件校验和信息。Sophos 防病毒扫描程序确定是阻止还是允许请求。
SSL 转发代理不支持客户端身份验证。如果服务器需要客户端身份验证,内容安全性会绕过流量。在以下情况下,内容安全性会绕过 HTTPS 流量:
如果 SSL 代理未解析来自客户端的第一个握手数据包,则 SSL 转发代理将绕过流量。
如果由于兼容性问题而导致与客户端和服务器的 SSL 代理握手不完整,则连接将中断。
如果系统资源不足,SSL 转发代理将无法处理新连接,并且 Sophos 防病毒软件会绕过流量。
如果 HTTPS 流量达到 SSL 转发代理的允许列表,则 SSL 转发代理和 Sophos 防病毒软件会绕过该流量。
Sophos antivirus scan result handling— 使用 Sophos 防病毒软件 TCP,当发现病毒并且数据内容被丢弃时,流量会正常关闭。
支持以下故障模式选项:content-size、default、engine-not-ready、out-of-resource、timeout 和 too-many-requests。您可以设置以下作:阻止、记录并允许和允许。使用 Sophos 对支持的选项进行失败模式处理与使用完全防病毒软件大致相同。
Sophos Uniform Resource Identifier checking— Sophos 提供统一资源标识符 (URI) 检查,类似于反垃圾邮件实时空路由列表 (RBL) 查找。URI 检查是一种针对 Sophos 数据库分析 HTTP 流量中的 URI 内容以识别恶意软件或恶意内容的方法。由于恶意软件主要是静态的,因此使用校验和机制来识别恶意软件以提高性能。能够使用校验和的文件包括 .exe、.zip、.rar、.swf、.pdf 和 .ole2(doc 和 xls)。
如果您的瞻博网络设备正在保护没有 HTTP 流量的内部网络,或者其外部世界无法访问的 Web 服务器,则可能需要关闭 URI 检查。如果外部世界无法访问 Web 服务器,则它们不太可能包含 Sophos URI 数据库中的 URI 信息。默认情况下,URI 检查处于打开状态。
从 Junos OS 18.4R1 版开始,默认情况下,URI 检查处于关闭状态。
也可以看看
了解 Sophos Antivirus 数据文件更新
Sophos 防病毒软件使用一小部分需要定期更新的数据文件。这些数据文件仅包含有关引导扫描逻辑的信息,不包含完整的模式数据库。主模式数据库包括针对关键病毒、URI 检查、恶意软件、蠕虫、特洛伊木马和间谍软件的保护,位于 Sophos 维护的远程 Sophos 可扩展列表服务器上。
Sophos 数据文件通过 HTTP 或 HTTPS 进行更新,可以手动更新或计划自动更新。使用 Sophos 防病毒软件:
默认情况下,签名数据库自动更新间隔为每天一次。此间隔可以更改。
数据文件更新期间,病毒扫描功能不会中断。如果更新失败,将继续使用现有数据文件。
默认情况下,Sophos 防病毒数据文件更新的 URL 为 http://update.juniper-updates.net/SAV/。
Sophos 防病毒扫描功能是一项单独许可的订阅服务。当您的防病毒许可证密钥过期时,功能将不再起作用,因为模式查找数据库位于远程 Sophos 服务器上。您有 30 天的宽限期来更新您的许可证。
也可以看看
Sophos Antivirus 与 Kaspersky Antivirus 的比较
从 Junos OS 15.1x49-D10 版和 Junos OS 17.3R1 版及更高版本开始,卡巴斯基和 Express 防病毒功能不受支持。对于以前的版本,Sophos Antivirus 与瞻博网络 Express Antivirus 非常相似,并且与 Full Antivirus 功能也有相似之处:
与瞻博网络 Express 和 Full Antivirus 解决方案不同,Sophos 的防病毒和恶意软件数据库存储在一组远程 Sophos 可扩展列表服务器上。使用 DNS 协议执行查询。Sophos 维护这些服务器,因此无需在瞻博网络设备上下载和维护大型模式数据库。因为数据库位于远程位置,而且对新病毒爆发的响应速度更快。防病毒数据库没有大小限制,但扫描文件大小有限制。
注意:Sophos 防病毒软件使用一组需要定期更新的数据文件。这些不是典型的病毒模式文件;它们是一组小文件,有助于指导病毒扫描逻辑。您可以手动下载数据文件或设置自动下载。
Sophos 不提供与 Kaspersky Antivirus 相同的预筛选检测。Sophos 确实提供了类似的解决方案,它是 Sophos 引擎的一部分,无法打开和关闭。
Sophos 防病毒扫描功能是一项单独许可的订阅服务。此外,模式查找数据库位于 Sophos 维护的远程服务器上,因此当您的防病毒许可证密钥过期时,功能将不再有效。您有 30 天的宽限期来更新您的许可证。
也可以看看
Sophos Antivirus 配置概述
Sophos 防病毒软件是内容安全性功能集的一部分,因此您首先配置内容安全性选项(自定义对象),配置 Sophos 功能,然后创建内容安全性策略和安全策略。安全策略控制设备转发的所有流量,内容安全性策略指定用于扫描流量的参数。内容安全性策略还用于将一组协议绑定到一个或多个内容安全性功能配置文件,在本例中包括 Sophos 防病毒软件。
您必须完成以下任务才能配置 Sophos 防病毒软件:
- 配置内容安全性自定义对象和 MIME 列表。请参阅 示例:配置 Sophos Antivirus 自定义对象,
- 配置 Sophos 防病毒功能配置文件。请参阅 示例:配置 Sophos Antivirus 功能配置文件。
- 配置内容安全性策略。请参阅 示例:配置 Sophos Antivirus 内容安全性策略
- 配置安全策略。请参阅 示例:配置 Sophos Antivirus Firewall 安全性策略。
要配置 Sophos Antivirus Live Protection 版本 2.0 ,请参阅示例:配置 Sophos Antivirus Live Protection 版本 2.0。
要在执行不中断服务的软件升级 (ISSU) 时使用 Sophos 防病毒软件,请删除以下配置选项。此警告仅适用于 ISSU 升级,不适用于独立升级。完成 ISSU 后,您可以重新启用配置。当两台设备启动时,Sophos 防病毒功能照常运行。
-
edit security utm default-configuration anti-virus forwarding-mode holdset -
edit security utm default-configuration anti-virus forwarding-mode inline-tap
要配置 Sophos antivirus over SSL 转发代理以支持 HTTPS 流量,请参阅 配置具有内容安全性的 SSL 代理。
示例:配置 Sophos Antivirus 自定义对象
此示例说明如何创建内容安全性全局自定义对象以与 Sophos 防病毒软件一起使用。
要求
在开始之前,请阅读有关内容安全性自定义对象的信息。请参阅 内容安全性概述。
概述
配置 MIME 列表。这包括创建用于防病毒扫描的 MIME 允许列表和 MIME 例外列表。在此示例中,您可以绕过 QuickTime 视频的扫描,除非它们包含 MIME 类型 quicktime-inappropriate。
配置
过程
GUI 快速配置
分步程序
要配置 MIME 列表:
单击任务栏中的 “配置” 选项卡,然后选择 “安全性>UTM>自定义对象”。
单击“ MIME 模式列表” 选项卡,然后单击 “添加”。
在“MIME 模式名称”框中,键入 avmime2。
在“MIME 模式值”框中,键入“ video/quicktime”,然后单击 “添加”。
在“MIME 模式值”框中,键入 image/x-portable-anympa,然后单击 “添加”。
在“MIME 模式值”框中,键入 x-world/x-vrml,然后单击 “添加”。
分步程序
要配置 MIME 例外列表:
单击任务栏中的 “配置” 选项卡,然后选择 “安全性>UTM>自定义对象”。
单击“ MIME 模式列表” 选项卡,然后选择 “添加”。
在“MIME 模式名称”框中,键入 exception-avmime2。
在“MIME 模式值”框中,键入 video/quicktime-inappropriate ,然后单击 “添加”。
分步程序
配置防病毒扫描将绕过的 URL 或地址的 URL 模式列表(允许列表)。创建 URL 模式列表后,您将创建一个自定义 URL 类别列表并将模式列表添加到其中。
由于您使用 URL 模式列表创建自定义 URL 类别列表,因此必须先配置 URL 模式列表自定义对象,然后再配置自定义 URL 类别列表。
要配置 URL 模式允许列表:
单击任务栏中的 “配置” 选项卡,然后选择 “安全性>UTM>自定义对象”。
单击“ URL 模式列表” 选项卡,然后单击 “添加”。
在“URL 模式名称”框中,输入 urlist2。
在 URL 模式值框中,输入 http://example.net。(您也可以使用服务器的 IP 地址而不是 URL。
分步程序
保存配置:
单击确定以检查您的配置并将其保存为候选配置。
如果完成设备配置,请单击 作>提交。
URL 模式通配符支持 — 通配符规则如下: \*\.[]\?* 并且必须在所有通配符 URL 前面加上 http://。仅当“*”位于 URL 的开头并且后跟“.”时,您才能使用“*”。您只能在 URL 末尾使用“?”。
支持以下通配符语法: http://*。example.net、 http://www.example.ne?、 http://www.example.n??。不支持以下通配符语法:*.example.net、www.example.ne?、http://*example.net、http://*。
分步程序
要使用 CLI 配置防病毒保护,您必须按以下顺序创建自定义对象:
-
创建 MIME 允许列表。
[edit security utm]
user@host# set custom-objects mime-pattern avmime2 value [video/quicktime image/x-portable-anymap x-world/x-vrml]
创建 MIME 例外列表。
[edit security utm]
user@host# set custom-objects mime-pattern exception-avmime2 value [video/quicktime-inappropriate]
配置要绕过的 URL 或地址的 URL 模式列表(允许列表)。创建 URL 模式列表后,您可以创建一个自定义 URL 类别列表并将模式列表添加到其中。通过创建列表名称并向其添加值来配置 URL 模式列表自定义对象,如下所示。使用 URL 模式列表创建自定义 URL 类别列表时,必须先配置 URL 模式列表自定义对象,然后再配置自定义 URL 类别列表。
[edit security utm]
user@host# set custom-objects url-pattern urllist2 value [http://www. example.net 192.168.1.5]
注意:URL 模式通配符支持 — 通配符规则如下: \*\.[]\?* 并且必须在所有通配符 URL 前面加上 http://。只有当“*”位于 URL 的开头并且后跟“.”时,您才能使用它。您只能在 URL 末尾使用“?”。
支持以下通配符语法: http://*。example.net、 http://www.example.ne?、 http://www.example.n??。不支持以下通配符语法:*.example.net、www.example.ne?、http://*example.net、http://*。
使用之前创建的 URL 模式列表 urllist2 配置自定义 URL 类别列表自定义对象:
[edit security utm]
user@host# set custom-objects custom-url-category custurl2 value urllist2
示例:配置 Sophos Antivirus 功能配置文件
此示例说明如何配置 Sophos 防病毒配置文件,该配置文件定义将用于病毒扫描的参数。
要求
开始之前:
安装 Sophos 防病毒许可证。请参阅 安装和升级指南。
为内容安全性配置自定义对象。请参阅 示例:配置 Sophos Antivirus 自定义对象。
概述
以下配置将 Sophos 定义为防病毒引擎并设置参数,例如数据文件更新间隔、管理员通知选项、回退选项和文件大小限制。
[edit security utm feature-profile]该层级在 Junos OS 18.2R1 版中已被弃用。有关详细信息,请参阅内容安全性概述。
配置
过程
GUI 快速配置
分步程序
以下示例说明如何创建自定义 Sophos 配置文件。如果要使用瞻博网络预配置的配置文件,请在内容安全性策略中使用名为 junos-sophos-av-defaults 的配置文件。请参阅 示例:配置 Sophos Antivirus 内容安全性策略。
选择并配置引擎类型。因为您正在配置 Sophos antivirus,所以要配置 sophos-engine:
分步程序
单击任务栏中的 “配置” 选项卡,然后选择 “安全性>UTM>防病毒”。
单击 “全局选项” 选项卡,然后单击“ Sophos”。
单击 确定 并提交更改。
像在步骤 1 中所做的那样返回防病毒全局选项屏幕,并设置以下参数:
分步程序
在 MIME 允许列表列表中,选择 exception-avmime2。
在 URL 允许列表列表中,选择 custurl2。
在“模式更新间隔(秒)”框中,键入 2880。
在框中,键入将接收 SophosAdmin 电子邮件数据文件更新通知的电子邮件地址。例如 - admin@ example.net。
在自定义邮件主题框中,键入 Sophos Data File Updated。
单击确定以检查您的配置并将其保存为候选配置。
为 sophos-engine 配置配置文件并设置参数。
分步程序
单击任务栏中的 “配置” 选项卡,然后选择 安全性>UTM>防病毒。单击 添加。
在“添加配置文件”框中,单击 “主” 选项卡。
在“配置文件名称”框中,键入 sophos-prof1。
在“涓流超时”框中,键入 180。
启用涓流选项时,请务必了解涓流可能会在防病毒扫描期间将部分文件发送到客户端。客户端可能会接收到某些内容,并且客户端可能会在完全扫描文件之前被感染。
默认情况下,URI 检查处于打开状态。若要将其关闭,请清除 URI 复选框中的“ 是 ”。
在“内容大小限制”框中,键入 20000。
在“扫描引擎超时”框中,键入 1800。
通过单击“ 回退设置” 选项卡来配置回退设置。在此示例中,所有回退选项都设置为 log 和 allow。单击 Log and allow for following items: 默认作、内容大小、引擎未就绪、超时、资源不足、请求过多。
通过单击通知选项选项卡来配置通知 选项 。您可以为回退阻止和回退非阻止作以及病毒检测配置通知。
分步程序
要为回退设置配置通知:
对于通知类型,单击协议。
对于通知邮件发件人,单击 是。
在“自定义消息”框中,键入 “发生回退阻止作”。
在“自定义邮件主题”框中,键入“ 防病毒回退警报***”。
要配置病毒检测的通知选项,请单击 “通知选项续... ”选项卡。
分步程序
对于“通知类型”选项按钮,选择 “协议”。
对于“通知邮件发件人”选项按钮,选择 “是”。
在“自定义消息”框中,键入“ 已检测到病毒”。
在“自定义邮件主题”框中,键入“ 检测到病毒***”。
单击确定以检查您的配置并将其保存为候选配置。
完成设备配置后,单击 作>提交。
分步程序
要使用 CLI 配置 Sophos 防病毒功能配置文件:
以下示例说明如何创建自定义 Sophos 配置文件。如果要使用瞻博网络预配置的配置文件,请在内容安全性策略中使用名为 junos-sophos-av-defaults 的配置文件。请参阅 示例:配置 Sophos Antivirus 内容安全性策略。
选择并配置引擎类型。因为您正在配置 Sophos antivirus,所以要配置 sophos-engine。
[edit]
user@host# set security utm default-configuration anti-virus type sophos-engine
提交配置。
选择更新数据文件的时间间隔。默认防病毒模式更新间隔为 1440 分钟(每 24 小时一次)。您可以选择保留此默认值,也可以更改它。如果需要,您还可以强制手册更新。要将默认值从每 24 小时更改为每 48 小时:
[edit security utm default-configuration anti-virus]
user@host# set sophos-engine pattern-update interval 2880
使用代理服务器详细信息配置网络设备,以便从远程服务器下载模式更新:
[edit security utm default-configuration anti-virus]
user@host# set sophos-engine pattern-update proxy
(可选)启用 Sophos 引擎通过代理安全地连接到外部服务器。此外,您还可以在代理配置文件中配置代理身份验证。通过设置用户名和密码,您可以实现对外部源和服务的安全访问。
[edit]
user@host# set services proxy profile proxy-profile protocol http host x.x.x.x port xxxx
user@host# set services proxy profile proxy-profile protocol http username <username>
user@host# set services proxy profile proxy-profile protocol http password <password>
user@host# set security utm default-configuration anti-virus sophos-engine server proxy-profile proxy-profile
在大多数情况下,无需更改 URL 即可更新模式数据库。如果确实需要更改此选项,请使用以下命令:
[edit security utm default-configuration anti-virus]
user@host# set sophos-engine pattern-update url http://www.example.net/test-download
您可以将设备配置为在数据文件更新时通知指定的管理员。这是带有自定义邮件和自定义主题行的电子邮件通知。
[edit security utm default-configuration anti-virus]
user@host# set sophos-engine pattern-update email-notify admin-email admin@example.net custom-message “Sophos antivirus data file was updated” custom-message-subject “AV data file updated”
将回退选项列表配置为阻止、日志和允许或允许。默认设置为 log-and-permit。您可以使用默认设置,也可以更改它们。
配置内容大小作。在此示例中,如果超过内容大小,则采取的作为阻止。
首先创建名为 sophos-prof1 的配置文件。
[edit security utm feature-profile anti-virus]
user@host# set profile sophos-prof1
将内容大小回退选项配置为阻止。
[edit security utm feature-profile anti-virus profile sophos-prof1]
user@host# set fallback-options content-size block
将默认回退选项配置为 log-and-allow。
[edit security utm feature-profile anti-virus profile sophos-prof1]
user@host# set fallback-options default log-and-permit
如果防病毒引擎尚未准备就绪,请配置日志记录和许可。
[edit security utm feature-profile anti-virus profile sophos-prof1]
user@host# set fallback-options engine-not-ready log-and-permit
如果设备资源不足,则配置日志记录和许可。
[edit security utm feature-profile anti-virus profile sophos-prof1]
user@host# set fallback-options out-of-resources log-and-permit
如果发生病毒扫描超时,配置日志记录和许可。
[edit security utm feature-profile anti-virus profile sophos-prof1]
user@host# set fallback-options timeout log-and-permit
如果病毒引擎无法处理的请求过多,请配置日志记录和许可。
[edit security utm feature-profile anti-virus profile sophos-prof1]
user@host# set fallback-options too-many-requests log-and-permit
配置通知选项。您可以配置回退阻止、回退非阻止作和病毒检测的通知。
在此步骤中,为回退阻止作配置自定义消息,并向管理员和发件人发送仅协议作的通知。
[edit security utm feature-profile anti-virus profile sophos-prof1]
user@host# set notification-options fallback-block custom-message ***Fallback block action occurred*** custom-message-subject Antivirus Fallback Alert notify-mail-sender type protocol-only allow email administrator-email admin@example.net
配置仅协议病毒检测的通知,并发送通知。
[edit security utm feature-profile anti-virus profile sophos-prof1]
user@host#set notification-options virus-detection type protocol-only notify-mail-sender custom-message-subject ***Virus detected*** custom-message Virus has been detected
配置内容大小参数。
配置 content-size 值时,请记住,在某些情况下,协议标头中提供了 content size,因此在发送扫描请求之前应用 max-content-size 回退。但是,在许多情况下,协议标头中未提供内容大小。在这些情况下,TCP 有效负载将发送到防病毒扫描程序并累积到有效负载结束。如果累积有效负载超过最大内容大小值,则应用 max-content-size 回退。默认回退作是 log 和 permit,因此您可能需要将此选项更改为阻止,在这种情况下,此类数据包将被丢弃,并向客户端发送阻止消息。
在此示例中,如果内容大小超过 20 MB,则丢弃数据包。
[edit security utm default-configuration anti-virus]
user@host# set scan-options content-size-limit 20000
默认情况下,URI 检查处于打开状态。要关闭 URI 检查,请执行以下作:
[edit security utm default-configuration anti-virus]
user@host# set scan-options no-uri-check
将扫描作的超时设置为 1800 秒。
[edit security utm default-configuration anti-virus]
user@host# set scan-options timeout 1800
Sophos 可扩展列表服务器包含用于扫描作的病毒和恶意软件数据库。将这些服务器的响应超时设置为 3 秒(默认值为 2 秒)。
[edit security utm default-configuration anti-virus]
user@host# set scan-options sxl-timeout 3
将 Sophos 可扩展列表服务器重试选项配置为 2 次重试(默认为 1 次)。
[edit security utm default-configuration anti-virus]
user@host# set scan-options sxl-retry 2
将涓流设置配置为 180 秒。如果使用涓流,还可以设置超时参数。涓涓细流仅适用于 HTTP。HTTP 涓流是一种机制,用于防止 HTTP 客户端或服务器在文件传输或防病毒扫描期间超时。
启用涓流选项时,请记住涓流可能会在防病毒扫描期间将部分文件发送到客户端。因此,在完全扫描文件之前,客户端可能会收到某些内容。
[edit security utm default-configuration anti-virus]
user@host# set trickling timeout 180
将防病毒模块配置为使用 MIME 旁路列表和例外列表。您可以使用自己的自定义对象列表,也可以使用设备附带的名为 junos-default-bypass-mime 的默认列表。在此示例中,您将使用之前设置的列表。
[edit security utm default-configuration anti-virus]
user@host# set mime-whitelist list avmime2
[edit security utm feature-profile anti-virus]
user@host# set mime-whitelist list exception-avmime2
将防病毒模块配置为使用 URL 绕过列表。如果您使用的是 URL 允许列表,则这是您之前配置为自定义对象的自定义 URL 类别。URL 允许列表仅对 HTTP 流量有效。在此示例中,您将使用之前设置的列表。
[edit security utm default-configuration anti-virus]
user@host# set url-whitelist custurl2
验证
获取有关当前防病毒状态的信息
目的
行动
在作模式下,输入命令 show security utm anti-virus status 以查看防病毒状态。
user@host>show security utm anti-virus status
意义
防病毒密钥到期日期 — 许可证密钥到期日期。
更新服务器 - 数据文件更新服务器的 URL。
间隔 — 设备从更新服务器更新数据文件的时间段(以分钟为单位)。
阵列更新状态 (Pattern update status) - 下次更新数据文件的时间,以分钟为单位显示。
上次结果 - 上次更新的结果。如果您已经拥有最新版本,这将显示
already have latest database。
防病毒签名版本 — 当前数据文件的版本。
扫描引擎类型 - 当前正在运行的防病毒引擎类型。
扫描引擎信息 - 使用当前扫描引擎执行的最后一个作的结果。
示例:配置 Sophos Antivirus 内容安全性策略
此示例说明如何为 Sophos 防病毒软件创建内容安全性策略。
要求
在创建内容安全性策略之前,请创建自定义对象和 Sophos 功能配置文件。
-
配置内容安全性自定义对象和 MIME 列表。请参阅 示例:配置 Sophos Antivirus 自定义对象。
配置 Sophos 防病毒功能配置文件。请参阅 示例:配置 Sophos Antivirus 功能配置文件。
概述
创建防病毒功能配置文件后,为防病毒扫描协议配置内容安全性策略,并将此策略附加到功能配置文件。在此示例中,将扫描 HTTP 中的病毒,如语句所示 http-profile 。您也可以通过创建不同的配置文件或向配置文件添加其他协议来扫描其他协议,例如:imap-profile、pop3-profile 和 smtp-profile。
配置
过程
GUI 快速配置
分步程序
要为 Sophos 防病毒软件配置内容安全性策略:
单击任务栏中的 “配置” 选项卡,然后选择“ 安全性>策略>UTM策略”。然后单击 “添加”。
单击 “主” 选项卡。在“策略名称”框中,键入 utmp3。
单击 “防病毒配置文件 ”选项卡。在 HTTP 配置文件列表中,选择 sophos-prof1。
单击确定以检查您的配置并将其保存为候选配置。
如果完成设备配置,请选择 作>提交。
分步程序
要为 Sophos 防病毒软件配置内容安全性策略:
-
转到编辑安全内容安全性层次结构。
[edit]
user@host# edit security utm
-
创建内容安全性策略 utmp3 并将其附加到 http-profile sophos-prof1。您可以通过将上述语句中的 sophos-prof1 替换为 junos-sophos-av-defaults,来使用默认的 Sophos 功能配置文件设置。
[edit security utm]
user@host# set utm-policy utmp3 anti-virus http-profile sophos-prof1
示例:配置 Sophos Antivirus Firewall 安全性策略
此示例说明如何为 Sophos 防病毒软件创建安全策略。
要求
在创建安全策略之前,请创建自定义对象、Sophos 功能配置文件和内容安全性策略。
-
配置内容安全性自定义对象和 MIME 列表。请参阅 示例:配置 Sophos Antivirus 自定义对象。
配置 Sophos 防病毒功能配置文件。请参阅 示例:配置 Sophos Antivirus 功能配置文件。
-
配置内容安全性策略。请参阅 示例:配置 Sophos Antivirus 内容安全性策略。
概述
创建一个防火墙安全策略,该策略将导致 Sophos antivirus 使用 示例:配置 Sophos Antivirus 功能配置文件中定义的功能配置文件设置扫描从不信任区域到信任区域的流量。由于匹配应用程序配置设置为 any,因此将扫描所有应用程序类型。
配置
过程
GUI 快速配置
分步程序
要为 Sophos 防病毒软件配置安全策略:
将不信任到信任策略配置为匹配任何源地址或目标地址,然后选择要扫描到
any的应用程序。分步程序
单击任务栏中的 “配置” 选项卡,然后选择 “安全性>策略>FW 策略”。然后选择 “添加”。
在“策略名称”框中,键入 p3。
在“策略作”框中,选择 “允许”。
在“从区域”列表中,选择 “不信任”。
在“至区域”列表中,选择 “信任”。
在“源地址”和“目标地址”框中,确保将“匹配”设置为“ 任何”。
在“应用程序”框中,从“应用程序/集”列表中选择 任何一个 ,然后将其移动到“匹配”列表中。
-
将名为 utmp3 的内容安全性策略附加到防火墙安全策略。这将导致 Sophos 防病毒功能扫描匹配的流量。
分步程序
-
从“编辑策略”框中,单击 “应用程序服务 ”选项卡。
-
在“内容安全性策略”列表中,选择 utmp3。
-
单击确定以检查您的配置并将其保存为候选配置。
如果完成设备配置,请选择 作>提交。
分步程序
要为 Sophos 防病毒软件配置安全策略:
将不信任信任策略配置为匹配任何源地址。
[edit security]
user@host# set policies from-zone untrust to-zone trust policy p3 match source-address any
将不信任到信任策略配置为匹配任何目标地址。
[edit security]
user@host# set policies from-zone untrust to-zone trust policy p3 match destination-address any
将不信任到信任策略配置为匹配任何应用类型。
[edit security]
user@host# set policies from-zone untrust to-zone trust policy p3 match application any
-
将名为 utmp3 的内容安全性策略附加到防火墙安全策略。这将导致 Sophos 防病毒功能扫描匹配的流量。
[edit security]
user@host# set policies from-zone untrust to-zone trust policy p3 then permit application-services utm-policy utmp3
示例:配置 Sophos Antivirus Live Protection 版本 2.0
使用此配置示例在设备上配置和验证 Sophos 防病毒实时保护 2.0 版。Sophos antivirus 是一种云防病毒解决方案。Sophos (Sophos Extensible List) 服务器维护的外部服务器上的病毒模式和恶意软件数据库可以隔离并保护您的设备。从 Junos OS 23.1R1 版开始,内容安全性支持 Sophos 防病毒实时保护 2.0 版。新的防病毒版本使用 HTTPS 协议在 SRX 系列防火墙和 Sophos 服务器之间进行通信。
| 可读性分数 |
|
| 阅读时间 |
不到 15 分钟。 |
| 配置时间 |
不到一个小时。 |
先决条件示例
| 硬件要求 | SRX 系列防火墙和 vSRX 虚拟防火墙 |
| 软件要求 | Junos OS 23.1R1 或更高版本 |
| 许可要求 | Sophos antivirus live protection 2.0 版许可证 使用该 |
开始之前
| 优势 |
Sophos (Sophos Extensible List) 服务器维护的外部服务器上的病毒模式和恶意软件数据库可以隔离并保护您的设备。 在 SRX 系列防火墙和 Sophos 服务器之间提供基于 HTTPS 的安全连接。 |
| 实用资源: |
|
| 了解更多 |
|
| 实践经验 |
|
| 了解更多信息 |
|
功能概述
表 2 简要总结了此示例中部署的配置组件。
| 配置文件 |
|
| 启动配置文件 | SRX 系列防火墙上的 Sophos 服务器配置包括 SSL 初始配置文件 ( 初始配置文件是必需的,使 SRX 系列防火墙能够启动与 Sophos 服务器的 HTTPS 会话以检查数据包。SSL 初始配置文件还对进出 Sophos 服务器的数据包进行加密和解密。 |
| 代理配置文件 | SSL 代理配置文件 |
| 功能配置文件 |
功能配置文件 您可以为不同的内容安全策略拥有多个功能配置文件。 |
| 政策 |
|
| 内容安全策略 |
内容安全策略 content_security_p1定义防病毒协议(HTTP、FTP、SMTP、POP3 和 IMAP),并将此策略附加到安全功能配置文件 , |
| 安全性策略 |
两个安全策略( 我们将内容安全策略和 |
| 安全性区域 |
|
|
|
主机(客户端)区域中的网络分段。 |
|
|
目标服务器(Web 服务)区域中的网络分段。 |
|
|
SRX 系列防火墙通过它与 Sophos 服务器交互的网段。 |
| 协议 |
|
| HTTPS |
HTTPS 会话在客户端和 Web 服务器以及 SRX 系列防火墙和 Sophos 服务器之间建立。 |
| 主要验证任务 |
|
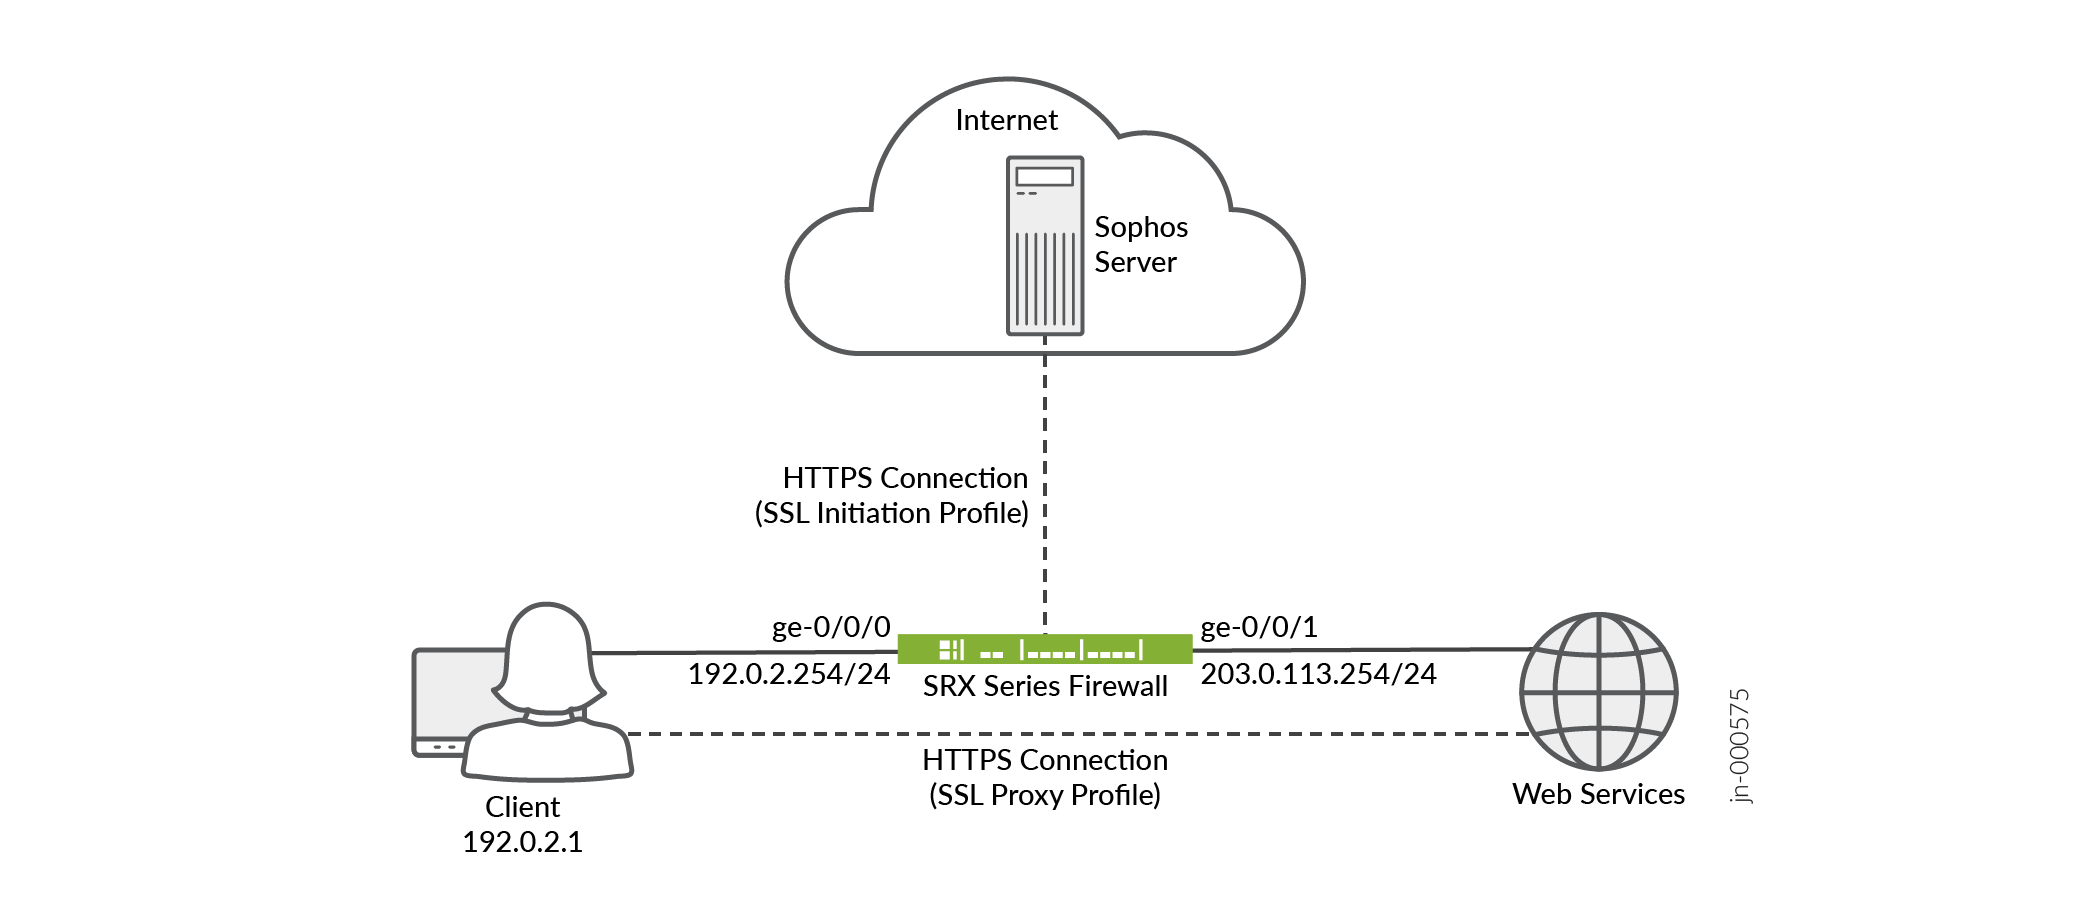
拓扑概述
在此示例中,客户端通过 SRX 系列防火墙发起对 Web 服务的请求。当 SRX 系列防火墙收到请求时,它会联系 Sophos 服务器以检查 Web 服务的真实性。Sophos 防病毒软件版本 2.0 使用 HTTPS 连接进行 SRX 系列防火墙与 Sophos 服务器的通信。根据从 Sophos 服务器收到的响应,SRX 系列防火墙允许或阻止内容安全策略中定义的流量。
| 拓扑组件 | 角色 | 函数 |
|---|---|---|
| 客户端 | 请求 Web 服务 | 通过 SRX 系列防火墙发起与 Web 服务器的 HTTPS 会话。 |
| SRX 系列防火墙 | 瞻博网络防火墙 | 启动与 Sophos 防病毒服务器的 HTTPS 会话。它还会为客户端的数据包进行加密和解密。 |
| Sophos 服务器 | 防病毒服务器 | 对从 SRX 系列防火墙接收的内容进行身份验证。 |
| Web 服务器 | Web 服务提供商 | 响应客户端的请求。 |
拓扑图示
在被测设备 (DUT) 上进行分步配置
-
配置设备接口。
[edit interfaces] user@host# set ge-0/0/0 unit 0 family inet address 192.0.2.254/24 user@host# set ge-0/0/1 unit 0 family inet address 203.0.113.254/24 -
在设备上启用 Sophos 防病毒软件。配置 Sophos 防病毒软件应检查的转发模式和流量类型。
[edit security] user@host# set utm default-configuration anti-virus type sophos-engine user@host# set utm default-configuration anti-virus forwarding-mode inline-tap user@host# set utm default-configuration anti-virus scan-options no-uri-check -
定义用于添加到 SRX 系列防火墙上的 Sophos 服务器配置的 SSL 初始配置文件。
[edit services] user@host# set ssl initiation profile ssl_init_prof client-certificate content_security_cert user@host# set ssl initiation profile ssl_init_prof actions ignore-server-auth-failure -
将 SSL 初始配置文件包含在 Sophos 服务器配置中。若要使 SRX 系列防火墙能够启动与 Sophos 服务器的 HTTPS 会话以检查数据包,必须使用此配置。初始配置文件还对进出 Sophos 服务器的数据包进行加密和解密。
[edit security] user@host# set utm default-configuration anti-virus sophos-engine server ssl-profile ssl_init_prof -
定义要应用于安全策略的 SSL 代理配置文件。SLL 代理配置文件使 SRX 系列防火墙能够解密数据包以进行进一步的应用处理。
[edit services] user@host# set ssl proxy profile ssl_pr1 root-ca content_security_cert user@host# set ssl proxy profile ssl_pr1 actions ignore-server-auth-failure -
定义功能配置文件,以指示 Sophos 防病毒软件应通过将配置文件附加到内容安全策略来检查的流量类型。您可以为不同的内容安全策略定义多个功能配置文件。
[edit security] user@host# set utm feature-profile anti-virus profile content_security_sav_fp -
定义安全区域。
[edit security zones] user@host# set security-zone untrust description untrust user@host# set security-zone untrust host-inbound-traffic system-services all user@host# set security-zone untrust host-inbound-traffic protocols all user@host# set security-zone untrust interfaces ge-0/0/1.0 user@host# set security-zone trust description trust user@host# set security-zone trust host-inbound-traffic system-services all user@host# set security-zone trust host-inbound-traffic protocols all user@host# set security-zone trust interfaces ge-0/0/0.0 user@host# set security-zone internet description internet -
定义内容安全策略并向其附加功能配置文件以指示 Sophos 服务器应检查的流量类型。
[edit security utm] user@host# set utm-policy content_security_p1 anti-virus http-profile content_security_sav_fp user@host# set utm-policy content_security_p1 anti-virus ftp upload-profile content_security_sav_fp user@host# set utm-policy content_security_p1 anti-virus ftp download-profile content_security_sav_fp user@host# set utm-policy content_security_p1 anti-virus smtp-profile content_security_sav_fp user@host# set utm-policy content_security_p1 anti-virus pop3-profile content_security_sav_fp user@host# set utm-policy content_security_p1 anti-virus imap-profile content_security_sav_fp -
定义安全策略并配置匹配标准以应用于不同安全区域之间的流量。
[edit security policies]
user@host# set from-zone trust to-zone untrust policy p1 match source-address any
user@host# set from-zone trust to-zone trust policy p1 match destination-address any
user@host# set from-zone trust to-zone trust policy p1 match application any
user@host# set from-zone trust to-zone trust policy p1 then permit application-services ssl-proxy profile-name ssl_pr1


user@host# set from-zone trust to-zone trust policy p1 then permit application-services utm-policy content_security_p1


user@host# set from-zone trust to-zone trust policy trust_to_internet match source-address any
user@host# set from-zone trust to-zone trust policy trust_to_internet match destination-address any
user@host# set from-zone trust to-zone trust policy trust_to_internet match application any
user@host# set from-zone trust to-zone trust policy trust_to_internet then permit
user@host# set default-policy permit-all
验证
在此示例中提供用于验证功能的 show 命令列表。
| 命令 | 验证任务 |
|---|---|
| 显示安全 UTM 防病毒状态 | 显示设备上安装的防病毒软件的类型和状态。 |
| 显示安全 UTM 防病毒统计信息 | 显示设备上防病毒软件的性能统计信息。 |
防病毒扫描引擎类型验证
目的
验证设备上安装的防病毒扫描引擎类型。
行动
在作模式下,输入 show security utm anti-virus status 以查看已安装防病毒软件的状态。
user@host> show security utm anti-virus status
UTM anti-virus status:

    Anti-virus key expire date: 2024-02-23 16:00:00
    Forwarding-mode: continuous delivery
    Scan engine type: sophos-engine
    Scan engine information: running
意义
示例输出确认您的设备上提供了 Sophos 防病毒软件。
防病毒扫描引擎性能验证
目的
验证设备上的防病毒扫描引擎性能。
行动
在作模式下,输入 show security utm anti-virus statistics 以查看设备上防病毒软件的性能统计信息。
user@host> show security utm anti-virus statistics
UTM Anti Virus statistics:

Intelligent-prescreening passed:    0
MIME-whitelist passed:              0
URL-whitelist passed:               0
Session abort:                      0
Scan Request:

Total           Clean         Threat-found    Fallback
2                 1                1             0

Fallback:
                            Log-and-Permit    Block             Permit
Engine not ready:                0              0                 0
Out of resources:                0              0                 0
Timeout:                         0              0                 0
Maximum content size:            0              0                 0
Too many requests:               0              0                 0
Decompress error:                0              0                 0
Others:                          0              0                 0
意义
示例输出 Threat-found 值显示防病毒软件检测到 1 个威胁。其他统计信息值是安全的。
附录 1:在所有设备上设置命令
在所有设备上设置命令输出。
set security utm default-configuration anti-virus type sophos-engine
set security utm default-configuration anti-virus forwarding-mode inline-tap
set security utm default-configuration anti-virus scan-options no-uri-check
set security utm default-configuration anti-virus sophos-engine server ssl-profile ssl_init_prof
set security utm feature-profile anti-virus profile content_security_sav_fp
set security utm utm-policy content_security_p1 anti-virus http-profile content_security_sav_fp
set security utm utm-policy content_security_p1 anti-virus ftp upload-profile content_security_sav_fp
set security utm utm-policy content_security_p1 anti-virus ftp download-profile content_security_sav_fp
set security utm utm-policy content_security_p1 anti-virus smtp-profile content_security_sav_fp
set security utm utm-policy content_security_p1 anti-virus pop3-profile content_security_sav_fp
set security utm utm-policy content_security_p1 anti-virus imap-profile content_security_sav_fp
set security zones security-zone untrust description untrust
set security zones security-zone untrust host-inbound-traffic system-services all
set security zones security-zone untrust host-inbound-traffic protocols all
set security zones security-zone untrust interfaces ge-0/0/1.0
set security zones security-zone trust description trust
set security zones security-zone trust host-inbound-traffic system-services all
set security zones security-zone trust host-inbound-traffic protocols all
set security zones security-zone trust interfaces ge-0/0/0.0
set security zones security-zone internet description internet
set security policies from-zone trust to-zone untrust policy p1 match source-address any
set security policies from-zone trust to-zone untrust policy p1 match destination-address any
set security policies from-zone trust to-zone untrust policy p1 match application any
set security policies from-zone trust to-zone untrust policy p1 then permit application-services ssl-proxy profile-name ssl_pr1
set security policies from-zone trust to-zone untrust policy p1 then permit application-services utm-policy content_security_p1
set security policies from-zone trust to-zone internet policy trust_to_internet match source-address any
set security policies from-zone trust to-zone internet policy trust_to_internet match destination-address any
set security policies from-zone trust to-zone internet policy trust_to_internet match application any
set security policies from-zone trust to-zone internet policy trust_to_internet then permit
set security policies default-policy permit-all
set services ssl initiation profile ssl_init_prof client-certificate content_security-cert
set services ssl initiation profile ssl_init_prof actions ignore-server-auth-failure
set services ssl proxy profile ssl_pr1 root-ca content_security-cert
set services ssl proxy profile ssl_pr1 actions ignore-server-auth-failure
附录 2:在 DUT 上显示配置输出
显示 DUT 上的命令输出。
在配置模式下,输入 show security utm、 show interfaces、 show security policiesshow security zones和show services ssl命令以确认您的配置。如果输出未显示预期的配置,请重复此示例中的配置说明进行更正。
user@host# show security utm
default-configuration {
    anti-virus {
        type sophos-engine;
        forwarding-mode {
            inline-tap;
        }
        scan-options {
            no-uri-check;
        }
        sophos-engine {
            server {
                ssl-profile ssl_init_prof;
            }
        }
    }
}
utm-policy P1 {
    anti-virus {
        http-profile junos-sophos-av-defaults;
    }
}
utm-policy content_security_p1 {
    anti-virus {
        http-profile content_security_sav_fp;
        ftp {
            upload-profile content_security_sav_fp;
            download-profile content_security_sav_fp;
        }
        smtp-profile content_security_sav_fp;
        pop3-profile content_security_sav_fp;
        imap-profile content_security_sav_fp;
    }
}
user@host# show show interfaces
ge-0/0/0 {
    unit 0 {
        family inet {
            address 192.0.2.254/24;
        }
    }
}
ge-0/0/1 {
    unit 0 {
        family inet {
            address 203.0.113.254/24;
        }
    }
}
user@host# show security zones
security-zone untrust {
    description untrust;
    host-inbound-traffic {
        system-services {
            all;
        }
        protocols {
            all;
        }
    }
    interfaces {
        ge-0/0/1.0;
    }
}
security-zone trust {
    description trust;
    host-inbound-traffic {
        system-services {
            all;
        }
        protocols {
            all;
        }
    }
    interfaces {
        ge-0/0/0.0;
    }
}
security-zone internet {
    description internet;
}
user@host# show security policies
from-zone trust to-zone untrust {
    policy p1 {
        match {
            source-address any;
            destination-address any;
            application any;
        }
        then {
            permit {
                application-services {
                    ssl-proxy {
                        profile-name ssl_pr1;
                    }
                    utm-policy content_security_p1;
                }
            }
        }
    }
}
from-zone trust to-zone internet {
    policy trust_to_internet {
        match {
            source-address any;
            destination-address any;
            application any;
        }
        then {
            permit;
        }
    }
}
default-policy {
    permit-all;
}
user@host# show services ssl
initiation {
    profile ssl_init_prof {
        client-certificate content_security-cert;
        actions {
            ignore-server-auth-failure;
        }
    }
}
proxy {
    profile ssl_pr1 {
        root-ca content_security-cert;
        actions {
            ignore-server-auth-failure;
        }
    }
}
配置 Sophos Antivirus 文件信誉组
Sophos 防病毒软件将传入流量分类为四个文件信誉组,使您能够控制流量并更好地控制安全性。 表 3 列出了四个文件信誉组。
| 文件信誉组 |
文件信誉值 |
文件信誉作 |
|---|---|---|
| 恶意软件 |
≤19 |
块 |
| 潜在有害应用 |
20 到 29 |
您可以根据需要配置为允许、记录和允许或阻止流量。 |
| 未知 |
30 至 69 |
您可以根据需要配置为允许、记录和允许或阻止流量。 |
| 已知良好/清洁 |
≥70 |
允许 |
要配置文件信誉作,请使用以下命令:
-
为潜在有害应用流量配置文件信誉作:
[edit]
user@host# set security utm default-configuration anti-virus sophos-engine file-reputation-action potentially-unwanted-applications (block | log-and-permit | permit)
-
为未知流量配置文件信誉作:
[edit]
user@host# set security utm default-configuration anti-virus sophos-engine file-reputation-action unknown (block | log-and-permit | permit)
您可以使用 show security utm anti-virus statistics 命令查看文件信誉作的状态。
也可以看看
使用 Web 代理配置 Sophos Antivirus Live Protection 2.0 版
您可以使用代理服务器在安全设备和 Sophos 服务器之间建立安全连接。配置代理服务器时,您的设备将与代理服务器建立连接,然后代理服务器会启动与 Sophos 服务器的新连接。
要配置代理服务器,请执行以下作:
-
创建 SSL 初始配置文件,请参阅配置文件(SSL 初始化)。
-
将 SSL 初始化配置文件连接到 Sophos 默认配置:
[edit]
user@host# set security utm default-configuration anti-virus sophos-engine server ssl-profile ssl-profile-name
-
配置代理配置文件:
[edit]
user@host# set services proxy profile proxy-profile-name protocol http host host-name
user@host# set services proxy profile proxy-profile-name protocol http port port-number
-
将 Web 代理配置文件连接到 Sophos 默认配置:
[edit]
user@host# set security utm default-configuration anti-virus sophos-engine server proxy-profile proxy-profile-name
您可以使用 show security utm anti-virus status 命令查看代理服务器的状态。
也可以看看
管理 Sophos Antivirus 数据文件
开始之前:
安装 Sophos 防病毒许可证。请参阅 Installation and Upgrade Guide.
将 Sophos 配置为设备的防病毒功能。请参阅 示例:配置 Sophos Antivirus 功能配置文件。要设置防病毒引擎类型,请运行该
set security utm feature-profile anti-virus type sophos-engine语句。
在此示例中,您将安全设备配置为每 4320 分钟(每 3 天)自动更新一次数据文件。默认数据文件更新间隔为 1440 分钟(每 24 小时一次)。
要自动更新 Sophos 数据文件:
[edit security utm feature-profile anti-virus]
user@host# set sophos-engine pattern-update interval 4320
在 CLI作模式下执行以下命令。
要手动更新数据文件:
user@host> request security utm anti-virus sophos-engine pattern-update
要手动重新加载数据文件:
user@host> request security utm anti-virus sophos-engine pattern-reload
要手动删除数据文件:
user@host> request security utm anti-virus sophos-engine pattern-delete
要检查防病毒软件的状态,其中还显示数据文件版本:
user@host> show security utm anti-virus status
要检查代理服务器的状态:
user@host> show security utm anti-virus status
变更历史表
是否支持某项功能取决于您使用的平台和版本。使用 功能资源管理器 确定您的平台是否支持某个功能。