使用逻辑隧道接口连接逻辑系统
配置逻辑隧道接口
逻辑隧道 (lt-) 接口根据主机路由器提供完全不同的服务:
-
在 M 系列、MX 系列和 T 系列路由器上,逻辑隧道接口允许您连接逻辑系统、虚拟路由器或 VPN 实例。M 系列和 T 系列路由器必须配备隧道服务 PIC 或自适应服务模块(仅适用于 M7i 路由器)。MX 系列路由器必须配备 Trio MPC/MIC 模块。有关连接这些应用程序的详细信息,请参阅 适用于路由设备的 Junos OS VPN 库。
-
在 SRX 系列防火墙上,逻辑隧道接口用于互连逻辑系统。有关在 SRX 系列上使用逻辑隧道接口的信息,请参阅 《安全设备的逻辑系统和租户系统用户指南 》。
连接逻辑系统
要连接两个逻辑系统,请在两个逻辑系统上配置一个逻辑隧道接口。然后,在逻辑隧道接口之间配置对等关系,从而创建点对点连接。
要在两个逻辑系统之间配置点对点连接,请通过包含 lt-fpc/pic/port 以下语句来配置逻辑隧道接口:
lt-fpc/pic/port {
    unit logical-unit-number {
        encapsulation encapsulation;
        peer-unit unit-number;   # peering logical system unit number
        dlci dlci-number;
        family (inet | inet6 | iso | mpls);
    }
}
您可以在以下层次结构级别包含此语句:
-
[edit interfaces] -
[edit logical-systems logical-system-name interfaces]
配置逻辑隧道接口时,请注意以下事项:
-
您可以使用以下封装类型之一配置每个逻辑隧道接口:以太网、以太网电路交叉连接 (CCC)、以太网 VPLS、帧中继、帧中继 CCC、VLAN、VLAN CCC 或 VLAN VPLS。
-
您可以配置 IP、IPv6、国际标准化组织 (ISO) 或 MPLS 协议家族。
-
除非首先停用所有使用该伪线订阅者接口的宽带用户,否则请勿重新配置作为锚点的逻辑隧道接口,该接口上方堆叠有伪线设备。
-
对等逻辑接口必须属于从隧道服务 PIC 或自适应服务模块派生的同一逻辑隧道接口。
-
您只能为每个逻辑接口配置一个对等单元。例如,单元 0 不能同时与单元 1 和单元 2 对等。
-
要启用逻辑隧道接口,必须至少配置一个物理接口语句。
-
自适应服务、多服务或链路服务 PIC 不支持逻辑隧道(但如上所述,M7i 路由器上的自适应服务模块支持逻辑隧道)。
-
在 M40e 路由器以外的 M 系列路由器上,逻辑隧道接口需要增强型灵活 PIC 集中器 (FPC)。
-
在 MX 系列路由器上,逻辑隧道接口需要 Trio MPC/MIC 模块。它们不需要在同一系统中使用隧道服务 PIC。
参见
在 MX 系列路由器上配置逻辑隧道的准则
在将其中一个对等方配置为第 2 层模式的 MX 系列路由器上配置逻辑隧道时,请确保对等方第 2 层逻辑隧道是桥接域或 VPLS 实例的一部分,以实现双向流量。
要使用网桥封装配置逻辑隧道,必须先将逻辑隧道配置为网桥域的一部分。以下示例配置允许您配置具有网桥封装的逻辑隧道 lt-2/1/0.3。
user@host# edit bridge-domains {
             bd1 {
                    domain-type bridge;
                    vlan-id 1
                   }
                            }


user@host# edit chassis
lt-2/1/0 {
    unit 3 {
        description "MPLS port mirroring Bridge ingress interface";
        encapsulation ethernet-bridge;
                   mtu 4500;
            peer-unit 4;
            family bridge {
                interface-mode access;
                vlan-id 1;
                          }
            }

    unit 4 {
            description "MPLS Port mirroring L2/CCC egress interface";
            encapsulation ethernet-ccc;
            mtu 4500;
            peer-unit 3;
            family ccc {
                filter {
                    input HighPriority;
                }
            }
          }
    }
在 ACX 系列路由器上配置逻辑隧道的准则
在 ACX 系列路由器上配置逻辑隧道 (lt-) 接口时,请遵循以下准则:
您可以使用逻辑隧道接口仅连接桥接域和伪线。
逻辑隧道接口无法互连以下链路:
Pesudowire 和路由实例(在 VRF 上终止的伪线)
两个路由实例
VPLS 实例和路由实例
两个 VPLS 实例
两个桥接域
桥接域和 VPLS 实例
在 ACX 路由器上,每种带宽类型(1 Gbps 或 10 Gbps)只能配置一个逻辑隧道(物理接口)。但是,您最多可以在 ACX 路由上指定两个逻辑隧道接口(一个带宽为 1 Gb,另一个带宽为 10 Gb)。
逻辑隧道的保证带宽为 1 Gbps,某些平台最多支持 10 Gbps 的额外带宽。使用逻辑隧道接口配置的所有服务共享此带宽。
在逻辑隧道接口上配置的带宽在该接口上的上游和下游流量之间共享。服务可用的有效带宽是配置带宽的一半。
多个逻辑隧道接口,允许在每个逻辑接口上配置单独的服务,从而为每个单独的接口获取更高的带宽,或者不支持捆绑单个逻辑隧道接口。
您可以将以太网 VLAN、以太网 CCC、以太网接口上的 VLAN 网桥和电路交叉连接 (CCC) 上的 VLAN 配置为逻辑隧道接口上的封装类型。不支持其他封装类型,如以太网、VLAN、以太网 VPLS 或 VLAN VPLS。
当逻辑接口单元上配置的封装是受支持的类型之一(如以太网 VLAN 或 VLAN 网桥)时,您只能在逻辑隧道接口上启用桥接域或 CCC 协议。不支持其他地址族或协议,如 IPv4、IPv6、MPLS 或 OSPF。
逻辑隧道接口支持分类器、重写器和入口监管器配置。物理接口级别的 lt- 接口支持固定、基于 BA 和多域分类器。
支持基于 802.1p、802.1ad、TOS 和 DSCP 的 BA 分类器。可以在 LT 接口上的端口级别配置重新标记规则。数据包中的 802.1p、802.1ad、TOS 和 DSCP 字段可以在 LT 接口中重写。支持入口监管器。
支持简单的单速率三色标记 (srTCM)、双速率三色标记 (trTCM) 监管器。不支持出口监管器。
在非以太网 PIC 上配置 lt- 接口时,默认分类器无法正常工作。
支持端口级排队;每个 LT- 接口最多支持 8 个队列。这八个队列在遍历 lt- 接口的上游和下游流量之间共享。如果 lt- 接口上配置的带宽不足以满足接口上配置的服务的上游和下游流量,则流量传播将发生故障,因为不支持多个 lt- 接口。
八个转发类 (0-7) 根据全局系统配置映射到八个队列。调度程序配置的其余部分、缓冲区大小、传输速率、整形速率、优先级和 WRED 或删除配置文件映射可以在 lt- 接口队列上配置。
lt- 接口支持以下防火墙过滤器类型:
逻辑接口级过滤器
桥接族过滤器
CCC 系列过滤器
支持所有防火墙配置。此类过滤器的扩展限制与现有防火墙过滤器限制相同。
LT- 接口不支持 OAM。
与其他物理接口类似,逻辑隧道物理接口上可支持的逻辑接口数量为 30。
当桥接域配置 VLAN ID 时(桥接域具有规范化的 VLAN),MX 和 ACX 系列路由器之间的区别在于,MX 路由器与输出过滤器中的用户 VLAN ID 不匹配,而 ACX 路由器与输出过滤器中指定的用户 VLAN ID 匹配。
如果逻辑隧道接口是使用非以太网 PIC 创建的,则默认分类器不会绑定到该接口。
要创建逻辑隧道接口和带宽(以每秒千兆位为单位)为隧道服务保留,请在层次结构级别包含 tunnel-services bandwidth (1g | 10g) 以下语句 [edit chassis fpc slot-number pfe pfe-number core core-number channel channel-number] :
[edit interfaces]
    lt-fpc/pic/port {
        unit logical-unit-number {
            encapsulation encapsulation;
            peer-unit unit-number;   # peering logical system unit number
            dlci dlci-number;
            family (inet | inet6 | iso | mpls);
        }
    }
ACX5048 和 ACX5096 路由器支持 ethernet-vpls 和 vlan-vpls 封装。这些封装仅在逻辑隧道接口上受支持,并且是配置分层 VPLS 所必需的。
您可以使用 ACX5048 和 ACX5096 路由器上任何未使用的物理端口来创建逻辑隧道接口,如下所示:
user@host# edit chassis
fpc 0 {
    pic 0 {
        tunnel-services {
            port port-number;
        }
    }
}
以下示例配置允许您封装 vlan-ccc 为 vlan-vpls 在 ACX5048 和 ACX5096 路由器中使用 LT 接口:
user@host# edit interfaces
lt-0/0/1 {
    unit 0 {
        encapsulation vlan-ccc;
        vlan-id 1;
        peer-unit 1;
    }
    unit 1 {
        encapsulation vlan-vpls;
        vlan-id 1;
        peer-unit 0;
    }
}
在 ACX7K 系列路由器上配置逻辑隧道物理接口和逻辑隧道接口
从 Junos Evolved OS 版本 24.2R1 开始,ACX7K 系列路由器支持第 2 层服务 (BD) 的逻辑隧道物理接口 (IFD) 配置。
-
支持逻辑隧道物理接口,其中包括:
-
逻辑隧道接口物理接口级别配置
-
通过逻辑隧道接口支持两个不相交业务的拼接
-
在逻辑隧道接口上支持 SNMP
-
-
支持逻辑隧道接口 (LT ifl) 和桥接域,其中包括:
-
创建逻辑隧道接口时,每个单元的逻辑隧道接口都有一个
peer-unit配置作为强制参数。如果单元 X 将单元 Y 配置为对等单元,则单元 Y 必须将单元 X 配置为peer-unit。 -
支持在逻辑隧道接口上封装 VLAN 网桥
-
支持在逻辑隧道接口上封装以太网网桥
-
支持逻辑隧道接口上的接收方和发射机统计信息。逻辑隧道接口的接收方和发送方统计信息必须与其他逻辑接口统计信息相同。
-
支持逻辑隧道接口上的第 2 层泛洪
-
支持 MAC 学习。此支持包括在逻辑隧道接口上添加静态 MAC、在逻辑隧道接口上添加动态 MAC 学习以及所有 MAC 事件和通知处理。
-
在 ACX7K 系列路由器上配置逻辑隧道物理接口
要创建逻辑隧道接口和为隧道服务保留的带宽(以 Gbps 为单位),请在层次结构级别包含 tunnel-services bandwidth value 该语句 [edit chassis fpc slot-number | feb slot slot-number pfe pfe-number core core-number channel channel-number] 。
以下示例配置允许您在基于 FPC 的系统上配置逻辑隧道:
user@host# edit chassis
fpc 0 {
    pfe 0 {
      core 0 {
      channel 0 {
     tunnel-services {
                  bandwidth 10g;
                     }
                }
            }
        }
    }
以下示例配置允许您在基于 FEB 的系统上配置逻辑隧道:
user@host# edit chassis
feb slot 0 {
    pfe 0 {
      core 0 {
      channel 0 {
     tunnel-services {
                  bandwidth 10g;
                     }
                }
            }
        }
    }
例如,要创建带宽为 10 Gbps 的 lt-0/0/0:3,您可以使用以下示例配置:
创建逻辑隧道接口并封装逻辑接口,以实现服务提供商样式的桥接配置。
set chassis fpc 0 pfe 0 core 0 channel 3 tunnel-services bandwidth 10G
set interfaces lt-0/0/0:3 flexible-vlan-tagging
set interfaces lt-0/0/0:3 unit 0 peer-unit 1 encapsulation vlan-bridge vlan-id 100
set interfaces lt-0/0/0:3 unit 1 peer-unit 0 encapsulation vlan-bridge vlan-id 100
配置逻辑隧道物理接口上的网桥域
在 ACX7K 系列路由器上,您可以配置逻辑隧道物理接口 (IFD) 以在两个桥接域 (BD) 之间进行通信。对于此逻辑隧道物理接口,您可以创建逻辑隧道接口并将逻辑隧道接口映射到每个服务或网桥域。现在,可以使用这些逻辑隧道接口将流量从一个服务转发到另一个服务。您还可以为每个逻辑隧道接口配置带宽。
封装服务提供商样式桥接配置的逻辑接口。
[edit]
user@host# set interfaces et-0/0/2 flexible-vlan-tagging
user@host# set interfaces et-0/0/2 encapsulation flexible-ethernet-services
user@host# set interfaces et-0/0/3 flexible-vlan-tagging
user@host# set interfaces et-0/0/3 encapsulation flexible-ethernet-services
user@host# set interfaces et-0/0/2 unit 0 encapsulation ethernet-bridge vlan-id 100
user@host# set interfaces et-0/0/3 unit 0 encapsulation ethernet-bridge vlan-id 100
创建 BD1 并关联逻辑隧道接口。
[edit]
user@host# set vlans bd1 interface et-0/0/3.0
user@host# set vlans bd1 interface et-0/0/2.0
user@host# set vlans bd1 interface lt-0/0/0:3.0
封装服务提供商样式桥接配置的逻辑接口。
[edit]
user@host# set interfaces et-0/0/6 flexible-vlan-tagging
user@host# set interfaces et-0/0/6 encapsulation flexible-ethernet-services
user@host# set interfaces et-0/0/7 flexible-vlan-tagging
user@host# set interfaces et-0/0/7 encapsulation flexible-ethernet-services
user@host# set interfaces et-0/0/6 unit 0 encapsulation ethernet-bridge vlan-id 100
user@host# set interfaces et-0/0/7 unit 0 encapsulation ethernet-bridge vlan-id 100
创建 BD2 并关联逻辑隧道接口。
[edit]
user@host# set vlans bd2 vlan-id 100
user@host# set vlans bd2 interface et-0/0/7.0
user@host# set vlans bd2 interface et-0/0/6.0
user@host# set vlans bd2 interface lt-0/0/0:3.1
为逻辑隧道物理接口配置回收带宽
ACX7K 系列路由器上的逻辑隧道接口使用内部回收接口在两个互连服务之间再循环流量。
回收机制有两种操作模式:
-
默认回收带宽模式
-
可配置的循环带宽模式
有关 ACX7K 系列平台中的回收基础架构的信息,请参阅 回收带宽管理。
默认情况下,逻辑隧道接口在默认模式下运行。要为逻辑隧道接口启用配置模式,请使用以下示例配置回收应用程序:
配置逻辑隧道应用程序的日历带宽百分比。
[edit]
  user@host# set system packet-forwarding-options recycle-bandwidth-profiles prof1 tunnel-services 80
在此示例中,您将为逻辑隧道应用程序保留 80% 的日历带宽。在这种情况下,800Gbps 的 80%(即 640Gbps)保留用于逻辑隧道应用。
将配置的带宽应用于逻辑隧道应用程序。
[edit]
  user@host# set system packet-forwarding-options recycle-bandwidth profile prof1
在默认模式下,逻辑隧道带宽以尽力模式与其他回收应用程序共享。在配置模式下,所有逻辑隧道接口带宽的总和受逻辑隧道回收应用程序总带宽的限制。如果所有逻辑隧道接口的已配置带宽总和大于逻辑隧道回收应用程序派生的带宽,则逻辑隧道接口的带宽总和将限制为逻辑隧道回收应用程序值。
例如,为逻辑调整 10Gbps 配置带宽,为逻辑隧道 2 配置 100Gbps 带宽。逻辑隧道应用百分比等于 100 Gbps。逻辑 tunnle1 和逻辑 tunnle2 的带宽总和将为 100 Gbps,而不是 110 Gbps。在这种情况下,逻辑隧道回收应用程序带宽按各个逻辑隧道接口带宽的比率进行分配。在本例中,1:10 的比率为 100 Gbps。
通过逻辑隧道接口支持 3 层 VPN
从 Junos OS 演化版 24.1R1 开始,我们支持 ACX7K 系列路由器上通过逻辑隧道接口的第 3 层 VPN 服务。该功能包括:
-
通过逻辑隧道接口的 VRF
-
通过逻辑隧道接口拼接第 3 层 VPN 和第 2 层服务
以下示例配置允许您通过逻辑隧道接口配置第 3 层 VPN:
user@host# edit chassis {
lt-0/0/1:0 {
    unit 0 {
        vlan-id 10;
        encapsulation vlan-bridge;
        peer-unit 1;
    }
    unit 1 {
        vlan-id 10;
        family inet {
            address 100.1.1.100/24;
        }
        family inet6 {
            address 2001::1/128;
          }
        peer-unit 0;
    }


        routing-instances {
            vpn100 {
                instance-type vrf;
                interface lt-0/0/1:0.1;
                route-distinguisher <...>;
                vrf-import vpn100-imp;
                vrf-export vpn100-exp;
                vrf-table-label;
}

policy-options {
            policy-statement vpn100-exp {
                term 1 {
                    from {
                        <...>;
                    }
                    then {
                        community add vpn100;
                        accept;
                    }
                }
            }
            policy-statement vpn100-imp {
                term 1 {
                    from {
                        <...>;
                        community vpn100;
                    }
                    then {
                        accept;
                    }
                }
            }
            community vpn100 members <...>;
        }
示例:配置逻辑隧道
配置三个逻辑隧道:
[edit interfaces]
lt-4/2/0 {
    description “Logical tunnel interface connects three logical systems”;
}
[edit logical-systems]
lr1 {
    interfaces lt-4/2/0 {
        unit 12 {
            peer-unit 21; #Peering with lr2
            encapsulation frame-relay;
            dlci 612;
            family inet;
        }
        unit 13 {
            peer-unit 31; #Peering with lr3
            encapsulation frame-relay-ccc;
            dlci 613;
        }
    }
}
lr2 {
    interfaces lt-4/2/0 {
        unit 21 {
            peer-unit 12; #Peering with lr1
            encapsulation frame-relay-ccc;
            dlci 612;
        }
        unit 23 {
            peer-unit 32; #Peering with lr3
            encapsulation frame-relay;
            dlci 623;
        }
    }
}
lr3 {
    interfaces lt-4/2/0 {
        unit 31 {
            peer-unit 13; #Peering with lr1
            encapsulation frame-relay;
            dlci 613;
            family inet;
        }
        unit 32 {
            peer-unit 23; #Peering with lr2
            encapsulation frame-relay-ccc;
            dlci 623;
        }
    }
}
参见
配置 VRF 域中的接口以接收组播流量
您可以将 ACX 系列路由器配置为在 VRF 域中接收组播流量。在 IPTV 解决方案中,IPTV 源和接收器可以分布在 VRF 域中网络的不同端点上。要在接收方接收组播流量,必须通过网络通过隧道传输组播流量,以到达终端接收设备或订阅者。此隧道通常使用组播虚拟专用网络 (MVPN) 技术完成。
ACX 系列路由器不支持 MVPN 技术。在 ACX 系列路由器的 VRF 域中接收组播流量的另一种方法是将全局逻辑接口关联到 VRF 域中的逻辑接口。全局逻辑接口充当代理,用于接收 VRF 域中逻辑接口上的组播流量。要将全局逻辑接口关联到 VRF 域中的逻辑接口,您需要在全局域中配置 IRB 接口,以充当 VRF 域中逻辑接口的代理。
在全局域中配置代理逻辑接口
要在全局域中配置代理逻辑接口,您需要创建逻辑隧道 (lt-) 接口和 IRB 接口,然后将 IRB 接口关联到桥接域。以下是在全局域中配置代理逻辑接口的示例:
创建逻辑隧道 (lt-) 接口。
[edit]
user@host# set chassis aggregated-devices ethernet device-count 1
user@host# set chassis fpc 0 pic 0 tunnel-services bandwidth 1g
user@host# set interfaces lt-0/0/10 unit 0 encapsulation vlan-bridge
user@host# set interfaces lt-0/0/10 unit 0 vlan-id 101
user@host# set interfaces lt-0/0/10 unit 0 peer-unit 1
user@host# set interfaces lt-0/0/10 unit 1 encapsulation vlan-ccc
user@host# set interfaces lt-0/0/10 unit 1 vlan-id 101
user@host# set interfaces lt-0/0/10 unit 1 peer-unit 0
创建 IRB 接口。
[edit]
user@host# set interfaces irb unit 0 family inet address 192.168.1.2/24
将 IRB 接口关联到桥接域。
[edit]
user@host# set bridge-domains b1 vlan-id 101
user@host# set bridge-domains b1 interface lt-0/0/10.0
user@host# set bridge-domains b1 routing-interface irb.0
将代理逻辑接口关联到 VRF 域中的逻辑接口
要将代理逻辑接口关联到 VRF 域中的逻辑接口,您需要运行以下 PFE 命令:
test pfe acx vrf-mc-leak enable- 启用代理关联。test pfe acx entry add VRF-logical-interface-name logical-tunnel-logical-interface-name IRB-logical-interface-name IRB-IP-address + 1— 在代理逻辑接口与 VRF 域中的逻辑接口之间创建关联。test pfe acx vrf-mc-leak disable- 禁用代理关联。test pfe acx entry del VRF-logical-interface-name logical-tunnel-logical-interface-name IRB-logical-interface-name IRB-IP-address + 1— 删除代理逻辑接口与 VRF 域中逻辑接口之间的关联。show pfe vrf-mc-leak— 显示代理逻辑接口与 VRF 域中的逻辑接口之间的关联条目。
重新启动路由器或 PFE 时,逻辑接口的代理关联将被删除,您需要再次创建逻辑接口的代理关联。
局限性
在 VRF 域中接收组播流量时,需要考虑以下限制:
最多可以配置 5 个逻辑接口的代理关联。
不支持 VRF IPv6 组播。
不支持将 AE 接口作为 VRF 接口(请求组播流量)。
如果第一跳路由器是 ACX 路由器,则无法从 VRF 域中的逻辑接口转发组播流量。
冗余逻辑隧道概述
您可以通过逻辑隧道连接两台设备,例如面向访问的设备以及面向核心的设备。要为隧道提供冗余,您可以创建和配置多个物理逻辑隧道,并将其添加到虚拟冗余逻辑隧道中。
冗余逻辑隧道仅在带有 MPC 的 MX 系列路由器上受支持。从 Junos OS 版本 18.4R3 开始,MX 系列虚拟机箱支持冗余逻辑隧道。
例如,在 MPLS 接入网络中,您可以在接入节点和带有 MPC 的 MX 系列路由器之间配置多条伪线,并将它们添加到冗余逻辑隧道中。然后,您可以向冗余逻辑隧道添加多个逻辑隧道。 图 1 显示了接入节点与 MX 系列路由器之间的冗余逻辑隧道。
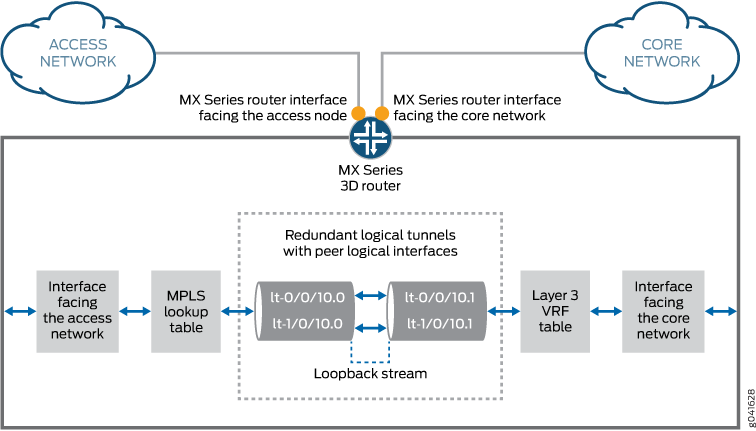
冗余逻辑隧道的每一端都有对等逻辑接口 rlt0.0 和 rlt0.1。您可以在这些接口上为冗余逻辑隧道及其成员配置路由器功能。
每个成员逻辑隧道都有对等逻辑接口。在 图 1 中,lt-0/0/10.0 和 lt-0/0/10.1 是对等方。
MX 系列路由器在逻辑隧道中分组的伪线终止的路由器上的第 3 层 VPN 路由和转发 (VRF) 表中执行 IP 查找。
冗余逻辑隧道配置
在 Junos OS 14.1R1 及更早版本中,您最多可以创建 16 个冗余逻辑隧道,具体取决于数据包转发引擎的数量以及设备上每个数据包转发引擎上的环路接口数量。从 Junos OS 14.2 版开始,对于 13.3R3 和 14.1R2,设备计数的有效范围为 1 到 255。
您最多可以添加 32 个逻辑隧道作为冗余逻辑隧道的成员。
向冗余逻辑隧道添加两个以上成员时,它们将处于活动模式。默认情况量在所有隧道成员上进行负载平衡。还可以将 RLT 配置为单链路目标,并为 RLT 指定最小活动链路数。
如果仅向冗余逻辑隧道添加两个成员,则可以通过以下方式之一配置这些成员:
-
两个成员都处于活动模式
-
一个成员处于主动模式,另一个成员处于备份模式
单链路定位
可以将 RLT 定位点配置为使用单链路目标。在此模式经伪线或 PWHT 接口的所有流量将仅通过 rlt 束中的一个链路进行定向。如果目标链路断开,RLT 上的所有订阅者都将终止。
最小活动链路数
在此模式下,您可以指定 RLT 接口保持正常运行必须处于活动状态的最小链路数。如果 RLT 上的活动链路数降至最小值以下,则 RLT 将下降。RLT 上堆叠的任何伪线和 PWHT 接口也将关闭,所有用户都将终止。
冗余逻辑隧道故障检测和故障切换
逻辑隧道发生故障并从冗余逻辑隧道组中移除,并且备份逻辑隧道由于以下事件之一而变为活动状态:
-
MPC 模块上发生硬件故障。
-
由于微内核崩溃而发生 MPC 故障。
-
MPC 模块以管理方式关闭并从冗余逻辑隧道中移除。
-
MPC 模块发生电源故障。
您可以减少故障检测和故障转移所需的时间。 enhanced-ip 在 [edit chassis network-services] 层次结构级别配置语句以启用数据包转发引擎实时检测。
参见
配置冗余逻辑隧道
使用冗余逻辑隧道为两台设备(如面向访问的设备和面向核心的设备)之间的逻辑隧道提供冗余。
配置冗余逻辑隧道接口时,请注意以下事项:
从 Junos OS 13.3 版开始,只能在带有 MPC 的 MX 系列路由器上配置冗余逻辑隧道。
在 Junos OS 14.1R1 及更早版本中,您最多可以创建 16 个冗余逻辑隧道,具体取决于数据包转发引擎的数量以及设备上每个数据包转发引擎上的环路接口数量。从 Junos OS 14.2 版开始,对于 13.3R3 和 14.1R2,设备计数的有效范围为 1 到 255。命令如下所示。
set chassis redundancy-group interface-type redundant-logical-tunnel device-count [number];您最多可以添加 32 个逻辑隧道作为成员。
当具有现有配置的逻辑隧道加入冗余逻辑隧道时,您必须使用现有配置中的设置配置冗余逻辑隧道。
您可以将成员逻辑隧道添加到父逻辑隧道以实现冗余。
向冗余逻辑隧道添加两个以上的逻辑隧道时,成员默认处于活动模式。
如果仅添加两个成员,则可以通过以下方式之一配置成员:
两个成员都处于活动模式
一个成员处于主动模式,另一个成员处于备份模式
要在两台设备之间配置冗余逻辑隧道,请执行以下操作:
为冗余逻辑隧道配置单链路目标
使用单一链路定位将冗余逻辑隧道上的所有流量定向到一个特定的逻辑隧道接口。
targeted-options配置要使用的single-targeted-link接口,并指定目标的逻辑隧道链路。
[edit interfaces interface-name] user@host# set targeted-options single-targeted-link interface-name
为冗余逻辑隧道配置最小活动链路
您可以使用最小活动链路来指定冗余逻辑隧道保持正常运行必须处于活动状态的隧道链路数。
配置最小活动链路后,如果活动链路数低于配置的数量,冗余逻辑隧道 (RLT) 将关闭。当 RLT 出现故障时,堆叠在 RLT 之上的所有用户流量都将终止,包括伪线和 PWHT 流量。
minimum-links选项配置冗余逻辑隧道接口。此选项位于层次结构下redundancy-group。
[edit interfaces rlt-interface] user@host# set redundancy-group minimum-links number-of-links
示例:配置冗余逻辑隧道
此示例说明如何在 MPLS 接入网络中配置冗余逻辑隧道。
要求
在 Junos OS 13.3 或更高版本中,只能在带有 MPC 的 MX 系列路由器上配置冗余逻辑隧道。
概述
当具有现有配置的逻辑隧道加入冗余逻辑隧道时,您必须使用现有配置中的设置配置冗余逻辑隧道。
您可以将成员逻辑隧道添加到父逻辑隧道以实现冗余。
在带有 MPC 的 MX 系列路由器上,您可以按如下方式配置冗余逻辑隧道:
在 Junos OS 14.1R1 及更早版本中,您最多可以创建 16 个冗余逻辑隧道,具体取决于数据包转发引擎的数量以及设备上每个数据包转发引擎上的环路接口数量。从 Junos OS 14.2 版开始,对于 13.3R3 和 14.1R2,设备计数的有效范围为 1 到 255。命令如下所示。
set chassis redundancy-group interface-type redundant-logical-tunnel device-count [number];您最多可以添加 32 个逻辑隧道作为成员。
向冗余逻辑隧道添加两个以上的逻辑隧道时,成员默认处于活动模式。
如果仅添加两个成员,则可以通过以下方式之一配置成员:
两个成员都处于活动模式
一个成员处于主动模式,另一个成员处于备份模式
配置
CLI 快速配置
要快速配置此示例,请复制以下命令,将其粘贴到文本文件中,删除所有换行符,更改与您的网络配置匹配所需的任何详细信息,然后将命令复制并粘贴到层次结构级别的 CLI [edit] 中。
set chassis redundancy-group interface-type redundant-logical-tunnel device-count 4 set chassis fpc 1 pic 0 tunnel-services bandwidth 1g set chassis fpc 2 pic 2 tunnel-services bandwidth 1g set interfaces rlt0 redundancy-group member-interface lt-1/0/10 set interfaces rlt0 redundancy-group member-interface lt-2/0/10 set interfaces rlt0 unit 0 description "Towards Layer 2 Circuit" set interfaces rlt0 unit 0 encapsulation vlan-ccc set interfaces rlt0 unit 0 vlan-id 600 set interfaces rlt0 unit 0 peer-unit 1 set interfaces rlt0 unit 0 family ccc set interfaces rlt0 unit 1 description "Towards Layer 3 VRF" set interfaces rlt0 unit 1 encapsulation vlan set interfaces rlt0 unit 1 vlan-id 600 set interfaces rlt0 unit 1 peer-unit 0 set interfaces rlt0 unit 1 family inet address 10.10.10.2/24 set protocols l2circuit neighbor 192.0.2.2 interface rlt0.0 virtual-circuit-id 100 set protocols l2circuit neighbor 192.0.2.2 interface rlt0.0 no-control-word set routing-instances pe-vrf instance-type vrf set routing-instances pe-vrf interface rlt0.1 set routing-instances pe-vrf route-distinguisher 65056:1 set routing-instances pe-vrf vrf-import VPN-A-Import set routing-instances pe-vrf vrf-export VPN-A-Export set routing-instances pe-vrf vrf-table-label set routing-instances pe-vrf protocols ospf export VPN-A-Import set routing-instances pe-vrf protocols ospf area 0.0.0.0 interface rlt0.1 set protocols mpls no-cspf set protocols mpls interface all set protocols ldp interface all set protocols bgp export local-routes set protocols bgp group internal type internal set protocols bgp group internal local-address 198.51.100.3 set protocols bgp group internal family inet any set protocols bgp group internal family inet-vpn unicast set protocols bgp group internal neighbor 203.0.113.4 set protocols ospf area 0.0.0.0 interface ge-5/3/8.0 set protocols ospf area 0.0.0.0 interface ge-5/2/5.0 set protocols ospf area 0.0.0.0 interface lo0.3 passive set policy-options policy-statement VPN-A-Export term a then community add VPN-A set policy-options policy-statement VPN-A-Export term a then accept set policy-options policy-statement VPN-A-Export term b then reject set policy-options policy-statement VPN-A-Import term a from protocol bgp set policy-options policy-statement VPN-A-Import term a from community VPN-A set policy-options policy-statement VPN-A-Import term a then accept set policy-options policy-statement VPN-A-Import term b then reject set policy-options policy-statement local-routes then accept set policy-options community VPN-A members target:100:100 set routing-options router-id 198.51.100.3 set routing-options autonomous-system 65056
程序
分步过程
在此示例中,所有逻辑隧道都处于活动模式。
创建逻辑隧道和冗余逻辑隧道接口。
[edit chassis] user@host# set redundancy-group interface-type redundant-logical-tunnel device-count 4 user@host# set fpc 1 pic 0 tunnel-services bandwidth 1g user@host# set fpc 2 pic 2 tunnel-services bandwidth 1g
将成员逻辑隧道绑定到冗余逻辑隧道。
[edit interfaces] user@host# set rlt0 redundancy-group member-interface lt-1/0/10 user@host# set rlt0 redundancy-group member-interface lt-2/0/10
配置冗余逻辑隧道接口。
[edit interfaces] user@host# set rlt0 unit 0 description "Towards Layer 2 Circuit" user@host# set rlt0 unit 0 encapsulation vlan-ccc user@host# set rlt0 unit 0 vlan-id 600 user@host# set rlt0 unit 0 peer-unit 1 user@host# set rlt0 unit 0 family ccc user@host# set rlt0 unit 1 description "Towards Layer 3 VRF" user@host# set rlt0 unit 1 encapsulation vlan user@host# set rlt0 unit 1 vlan-id 600 user@host# set rlt0 unit 1 peer-unit 0 user@host# set rlt0 unit 1 family inet address 10.10.10.2/24
将 rlt0.0 连接到第 2 层电路。
[edit protocols] user@host# set l2circuit neighbor 192.0.2.2 interface rlt0.0 virtual-circuit-id 100 user@host# set l2circuit neighbor 192.0.2.2 interface rlt0.0 no-control-word
将 rlt0.1 添加到第 3 层 VRF 实例。
[edit routing-instances] user@host# set pe-vrf instance-type vrf user@host# set pe-vrf interface rlt0.1 user@host# set pe-vrf route-distinguisher 65056:1 user@host# set pe-vrf vrf-import VPN-A-Import user@host# set pe-vrf vrf-export VPN-A-Export user@host# set pe-vrf vrf-table-label user@host# set pe-vrf protocols ospf export VPN-A-Import user@host# set pe-vrf protocols ospf area 0.0.0.0 interface rlt0.1
在伪线和第 3 层 VPN 中配置 MPLS 和 LDP。
[edit protocols]
user@host# set mpls no-cspf
user@host# set mpls interface all
user@host# set ldp interface all
在第 3 层 VPN 中配置 BGP。
[edit protocols]
user@host# set bgp export local-routes
user@host# set bgp group internal type internal
user@host# set bgp group internal local-address 198.51.100.3
user@host# set bgp group internal family inet any
user@host# set bgp group internal family inet-vpn unicast
user@host# set bgp group internal neighbor 203.0.113.4
在面向核心的接口和路由器本地环路接口上配置 OSPF。
[edit protocols]
user@host# set ospf area 0.0.0.0 interface ge-5/3/8.0
user@host# set ospf area 0.0.0.0 interface ge-5/2/5.0
user@host# set ospf area 0.0.0.0 interface lo0.3 passive
设置 BGP 的策略选项。
[edit policy-options]
user@host# set policy-statement VPN-A-Export term a then community add VPN-A
user@host# set policy-statement VPN-A-Export term a then accept
user@host# set policy-statement VPN-A-Export term b then reject
user@host# set policy-statement VPN-A-Import term a from protocol bgp
user@host# set policy-statement VPN-A-Import term a from community VPN-A
user@host# set policy-statement VPN-A-Import term a then accept
user@host# set policy-statement VPN-A-Import term b then reject
user@host# set policy-statement local-routes then accept
user@host# set community VPN-A members target:100:100
设置路由器 ID 和自治系统 (AS) 编号。
[edit routing-options]
user@host# set router-id 198.51.100.3
user@host# set autonomous-system 65056
结果
在配置模式下,输入以下命令确认您的配置:
show chassisshow interfacesshow policy-optionsshow protocolsshow routing-instancesshow routing-options
如果输出未显示预期的配置,请重复此示例中的说明以更正配置。
user@host# show chassis
redundancy-group {
    interface-type {
        redundant-logical-tunnel {
            device-count 4;
        }
    }
}
fpc 1 {
    pic 0 {
        tunnel-services {
            bandwidth 1g;
        }
    }
}
fpc 1 {
    pic 2 {
        tunnel-services {
            bandwidth 1g;
        }
    }
}
user@host# show interfaces rlt0
redundancy-group {
    member-interface lt-1/0/10;
    member-interface lt-2/0/10;
}
unit 0 {
    description "Towards Layer 2 Circuit";
    encapsulation vlan-ccc;
    vlan-id 600;
    peer-unit 1;
    family ccc;
}
unit 1 {
    description "Towards Layer 3 VRF";
    encapsulation vlan;
    vlan-id 600;
    peer-unit 0;
    family inet {
        address 10.10.10.2/24;
    }
}
user@host# show protocols l2circuit
neighbor 192.0.2.2 {
    interface rlt0.0 {
        virtual-circuit-id 100;
        no-control-word;
    }
}
user@host# show protocols
mpls {
    no-cspf;
    interface all;
}
bgp {
    export local-routes;
    group internal {
        type internal;
        local-address 198.51.100.3;
        family inet {
            any;
        }
        family inet-vpn {
            unicast;
        }
        neighbor 203.0.113.4;
    }
}
ospf {
    area 0.0.0.0 {
        interface ge-5/3/8.0;
        interface ge-5/2/5.0;
        interface lo0.3 {
            passive;
        }
    }
}
ldp {
    interface all;
}
l2circuit {
    neighbor 192.0.2.2 {
        interface rlt0.0 {
            virtual-circuit-id 100;
            no-control-word;
        }
    }
}
user@host# routing-instances
pe-vrf {
     instance-type vrf;
    interface rlt0.1;
     route-distinguisher 65056:1;
    vrf-import VPN-A-Import;
    vrf-export VPN-A-Export;
    vrf-table-label;
    protocols {
        ospf {
            export VPN-A-Import;
            area 0.0.0.0 {
                interface rlt0.1;
            }
        }
    }
}
user@host# policy-options
policy-statement VPN-A-Export {
    term a {
        then {
            community add VPN-A;
            accept;
        }
    }
    term b {
        then reject;
    }
}
policy-statement VPN-A-Import {
    term a {
        from {
            protocol bgp;
            community VPN-A;
            }
         then accept;
    }
    term b {
        then reject;
    }
}
policy-statement local-routes {
    then accept;
}
community VPN-A members target:100:100;
user@host# routing-options
router-id 198.51.100.3;
autonomous-system 65056;
验证
确认配置工作正常。
验证冗余逻辑隧道配置
目的
验证是否使用正确的封装创建了具有子逻辑隧道接口的冗余逻辑隧道。
行动
user@host# run show interfaces terse | match rlt0
lt-1/0/10.0             up    up   container--> rlt0.0
lt-1/0/10.1             up    up   container--> rlt0.1
lt-2/0/10.0             up    up   container--> rlt0.0
lt-2/0/10.1             up    up   container--> rlt0.1
rlt0                    up    up
rlt0.0                  up    up   ccc
rlt0.1                  up    up   inet     10.10.10.2/24
验证第 2 层电路
目的
验证第 2 层电路是否已启动。
行动
user@host# run show l2circuit connections
Layer-2 Circuit Connections:

Legend for connection status (St)
EI -- encapsulation invalid      NP -- interface h/w not present
MM -- mtu mismatch               Dn -- down
EM -- encapsulation mismatch     VC-Dn -- Virtual circuit Down
CM -- control-word mismatch      Up -- operational
VM -- vlan id mismatch           CF -- Call admission control failure
OL -- no outgoing label          IB -- TDM incompatible bitrate
NC -- intf encaps not CCC/TCC    TM -- TDM misconfiguration
BK -- Backup Connection          ST -- Standby Connection
CB -- rcvd cell-bundle size bad  SP -- Static Pseudowire
LD -- local site signaled down   RS -- remote site standby
RD -- remote site signaled down  HS -- Hot-standby Connection
XX -- unknown

Legend for interface status
Up -- operational
Dn -- down
Neighbor: 192.0.2.2
    Interface                 Type  St     Time last up          # Up trans
    rlt0.0(vc 100)            rmt   Up     Aug  8 00:28:04 2013           1
      Remote PE: 192.0.2.2, Negotiated control-word: No
      Incoming label: 299776, Outgoing label: 299776
      Negotiated PW status TLV: No
      Local interface: rlt0.0, Status: Up, Encapsulation: VLAN
验证 OSPF 邻居
目的
验证路由器是否相邻且能够交换 OSPF 数据。
行动
user@host# run show ospf neighbor
Address          Interface              State     ID               Pri  Dead
198.168.30.2       ge-5/2/5.0             Full      203.0.113.4          128    38
198.168.20.1       ge-5/3/8.0             Full      192.0.2.2          128    38
验证 BGP 组
目的
验证是否已创建 BGP 组。
行动
user@host# run show bgp group internal
Group Type: Internal    AS: 65056                  Local AS: 65056
    Name: internal        Index: 0                   Flags: <Export Eval>
    Export: [ local-routes ]
    Holdtime: 0
    Total peers: 1        Established: 1
    203.0.113.4+179
    inet.0: 1/6/3/0
    inet.2: 0/0/0/0
    bgp.l3vpn.0: 2/2/2/0
    pe-vrf.inet.0: 2/2/2/0
验证路由表中的 BGP 路由
目的
验证 BGP 路由是否在 pe-vrf.inet.0 路由表中。
行动
user@host# run show route protocol bgp table pe-vrf.inet.0
pe-vrf.inet.0: 5 destinations, 5 routes (5 active, 0 holddown, 0 hidden)
+ = Active Route, - = Last Active, * = Both

198.168.50.0/24      *[BGP/170] 01:18:14, localpref 100, from 203.0.113.4
                      AS path: I, validation-state: unverified
                    > to 198.168.30.2 via ge-5/2/5.0, Push 16
198.168.51.0/24      *[BGP/170] 01:18:14, MED 2, localpref 100, from 203.0.113.4
                      AS path: I, validation-state: unverified
                    > to 198.168.30.2 via ge-5/2/5.0, Push 16
更改历史记录表
功能支持由您使用的平台和版本决定。使用 功能资源管理器 确定您的平台是否支持某个功能。