Examples: Configuring Reverse Path Forwarding
Understanding Multicast Reverse Path Forwarding
Unicast forwarding decisions are typically based on the destination address of the packet arriving at a router. The unicast routing table is organized by destination subnet and mainly set up to forward the packet toward the destination.
In multicast, the router forwards the packet away from the source to make progress along the distribution tree and prevent routing loops. The router's multicast forwarding state runs more logically by organizing tables based on the reverse path, from the receiver back to the root of the distribution tree. This process is known as reverse path forwarding (RPF).
The router adds a branch to a distribution tree depending on whether the request for traffic from a multicast group passes the reverse-path-forwarding check (RPF check). Every multicast packet received must pass an RPF check before it is eligible to be replicated or forwarded on any interface.
The RPF check is essential for every router's multicast implementation. When a multicast packet is received on an interface, the router interprets the source address in the multicast IP packet as the destination address for a unicast IP packet. The source multicast address is found in the unicast routing table, and the outgoing interface is determined. If the outgoing interface found in the unicast routing table is the same as the interface that the multicast packet was received on, the packet passes the RPF check. Multicast packets that fail the RPF check are dropped because the incoming interface is not on the shortest path back to the source.
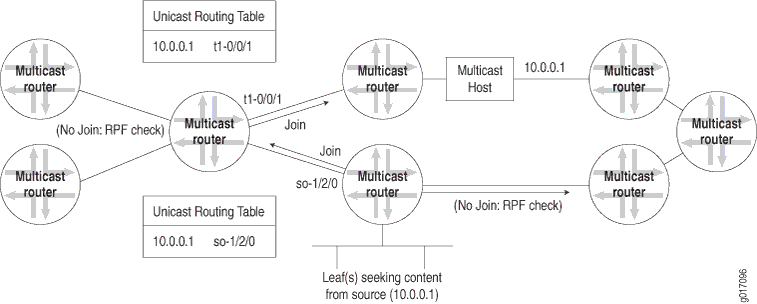
Figure 1 shows how multicast routers can use the unicast routing table to perform an RPF check and how the results obtained at each router determine where join messages are sent.
Routers can build and maintain separate tables for RPF purposes. The router must have some way to determine its RPF interface for the group, which is the interface topologically closest to the root. For greatest efficiency, the distribution tree follows the shortest-path tree topology. The RPF check helps to construct this tree.
RPF Table
The RPF table plays the key role in the multicast router. The RPF table is consulted for every RPF check, which is performed at intervals on multicast packets entering the multicast router. Distribution trees of all types rely on the RPF table to form properly, and the multicast forwarding state also depends on the RPF table.
RPF checks are performed only on unicast addresses to find the upstream interface for the multicast source or RP.
The routing table used for RPF checks can be the same routing table used to forward unicast IP packets, or it can be a separate routing table used only for multicast RPF checks. In either case, the RPF table contains only unicast routes, because the RPF check is performed on the source address of the multicast packet, not the multicast group destination address, and a multicast address is forbidden from appearing in the source address field of an IP packet header. The unicast address can be used for RPF checks because there is only one source host for a particular stream of IP multicast content for a multicast group address, although the same content could be available from multiple sources.
If the same routing table used to forward unicast packets is also used for the RPF checks, the routing table is populated and maintained by the traditional unicast routing protocols such as BGP, IS-IS, OSPF, and the Routing Information Protocol (RIP). If a dedicated multicast RPF table is used, this table must be populated by some other method. Some multicast routing protocols (such as the Distance Vector Multicast Routing Protocol [DVMRP]) essentially duplicate the operation of a unicast routing protocol and populate a dedicated RPF table. Others, such as PIM, do not duplicate routing protocol functions and must rely on some other routing protocol to set up this table, which is why PIM is protocol independent. .
Some traditional routing protocols such as BGP and IS-IS now have extensions to differentiate between different sets of routing information sent between routers for unicast and multicast. For example, there is multiprotocol BGP (MBGP) and multitopology routing in IS-IS (M-IS-IS). IS-IS routes can be added to the RPF table even when special features such as traffic engineering and “shortcuts” are turned on. Multicast Open Shortest Path First (MOSPF) also extends OSPF for multicast use, but goes further than MBGP or M-IS-IS and makes MOSPF into a complete multicast routing protocol on its own. When these routing protocols are used, routes can be tagged as multicast RPF routers and used by the receiving router differently than the unicast routing information.
Using the main unicast routing table for RPF checks provides simplicity. A dedicated routing table for RPF checks allows a network administrator to set up separate paths and routing policies for unicast and multicast traffic, allowing the multicast network to function more independently of the unicast network.
Multicast RPF Configuration Guidelines
You use multicast RPF checks to prevent multicast routing loops. Routing loops are particularly debilitating in multicast applications because packets are replicated with each pass around the routing loop.
In general, a router is to forward a multicast packet only if it arrives on the interface closest (as defined by a unicast routing protocol) to the origin of the packet, whether source host or rendezvous point (RP). In other words, if a unicast packet would be sent to the “destination” (the reverse path) on the interface that the multicast packet arrived on, the packet passes the RPF check and is processed. Multicast (or unicast) packets that fail the RPF check are not forwarded (this is the default behavior). For an overview of how a Juniper Networks router implements RPF checks with tables, see Understanding Multicast Reverse Path Forwarding.
However, there are network router configurations where multicast packets that fail the RPF check need to be forwarded. For example, when point-to-multipoint label-switched paths (LSPs) are used for distributing multicast traffic to PIM “islands” downstream from the egress router, the interface on which the multicast traffic arrives is not always the RPF interface. This is because LSPs do not follow the normal next-hop rules of independent packet routing.
In cases such as these, you can configure policies on the PE router to decide which multicast groups and sources are exempt from the default RPF check.
See Also
Example: Configuring a Dedicated PIM RPF Routing Table
This example explains how to configure a dedicated Protocol Independent Multicast (PIM) reverse path forwarding (RPF) routing table.
Requirements
Before you begin:
Configure the router interfaces. See the Interfaces User Guide for Security Devices.
Enable PIM. See PIM Overview.
This example uses the following software components:
Junos OS Release 7.4 or later
Overview
By default, PIM uses the inet.0 routing table as its RPF routing table. PIM uses an RPF routing table to resolve its RPF neighbor for a particular multicast source address and to resolve the RPF neighbor for the rendezvous point (RP) address. PIM can optionally use inet.2 as its RPF routing table. The inet.2 routing table is dedicated to this purpose.
PIM uses a single routing table for its RPF check, this ensures that the route with the longest matching prefix is chosen as the RPF route.
If multicast routes are exchanged by Multiprotocol Border Gateway Protocol MP-BGP or multitopology IS-IS, they are placed in inet.2 by default.
Using inet.2 as the RPF routing table enables you to have a control plane for multicast, which is independent of the normal unicast routing table. You might want to use inet.2 as the RPF routing table for any of the following reasons:
If you use traffic engineering or have an interior gateway protocol (IGP) configured for shortcuts, the router has label-switched paths (LSPs) installed as the next hops in inet.2. By applying policy, you can have the router install the routes with non-MPLS next-hops in the inet.2 routing table.
If you have an MPLS network that does not support multicast traffic over LSP tunnels, you need to configure the router to use a routing table other than inet.0. You can have the inet.2 routing table populated with native IGP, BGP, and interface routes that can be used for RPF.
To populate the PIM RPF table, you use rib groups. A rib group is defined with the rib-groups statement at the [edit routing-options] hierarchy level. The
rib group is applied to the PIM protocol by including the rib-group statement at
the [edit pim] hierarchy level. A rib group is most frequently used to place routes
in multiple routing tables.
When you configure rib groups for PIM, keep the following in mind:
The
import-ribstatement copies routes from the protocol to the routing table.The
export-ribstatement has no effect on PIM. However the same rib-group can be applied to BGP, which uses the export-rib table to source routes to advertise to peers in the case of inter-domain networking.Only the first rib routing table specified in the
import-ribstatement is used by PIM for RPF checks.
You can also configure IS-IS or OSPF to populate inet.2 with routes that have regular IP next hops. This allows RPF to work properly even when MPLS is configured for traffic engineering, or when IS-IS or OSPF are configured to use “shortcuts” for local traffic.
You can also configure the PIM protocol to use a rib group for RPF checks under a virtual
private network (VPN) routing instance. In this case the rib group is still defined at the [edit routing-options] hierarchy level.
Configuration
Configuring a PIM RPF Routing Table Group Using Interface Routes
CLI Quick Configuration
To quickly configure this example, copy the following commands, paste
them into a text file, remove any line breaks, change any details necessary to match your
network configuration, copy and paste the commands into the CLI at the [edit] hierarchy
level, and then enter commit from configuration mode.
set routing-options rib-groups mcast-rpf-rib import-rib inet.2
set protocols pim rib-group mcast-rpf-rib
set routing-options interface-routes rib-group inet if-rib
set routing-options rib-groups if-rib import-rib [ inet.0 inet.2 ]
Step-by-Step Procedure
In this example, the network administrator has decided to use the inet.2 routing table for RPF checks. In this process, local routes are copied into this table by using an interface rib group.
To define an interface routing table group and use it to populate inet.2 for RPF checks:
Use the
show multicast rpfcommand to verify that the multicast RPF table is not populated with routes.user@host> show multicast rpf instance is not running
Create a multicast routing table group named mcast-rpf-rib.
Each routing table group must contain one or more routing tables that Junos OS uses when importing routes (specified in the
import-ribstatement).Include the
import-ribstatement and specify the inet.2 routing table at the[edit routing-options rib-groups]hierarchy level.[edit routing-options rib-groups] user@host# set mcast-rpf-rib import-rib inet.2
Configure PIM to use the mcast-rpf-rib rib group.
The rib group for PIM can be applied globally or in a routing instance. In this example, the global configuration is shown.
Include the
rib-groupstatement and specify the mcast-rpf-rib rib group at the[edit protocols pim]hierarchy level.[edit protocols pim] user@host# set rib-group mcast-rpf-rib
Create an interface rib group named if-rib.
Include the
rib-groupstatement and specify the inet address family at the[edit routing-options interface-routes]hierarchy level.[edit routing-options interface-routes] user@host# set rib-group inet if-rib
Configure the if-rib rib group to import routes from the inet.0 and inet.2 routing tables.
Include the
import-ribstatement and specify the inet.0 and inet.2 routing tables at the[edit routing-options rib-groups]hierarchy level.[edit routing-options rib-groups] user@host# set if-rib import-rib [ inet.0 inet.2 ]
Commit the configuration.
user@host# commit
Verifying Multicast RPF Table
Purpose
Verify that the multicast RPF table is now populated with routes.
Action
Use the show multicast rpf command.
user@host> show multicast rpf
Multicast RPF table: inet.2 , 10 entries
10.0.24.12/30
Protocol: Direct
Interface: fe-0/1/2.0
10.0.24.13/32
Protocol: Local
10.0.27.12/30
Protocol: Direct
Interface: fe-0/1/3.0
10.0.27.13/32
Protocol: Local
10.0.224.8/30
Protocol: Direct
Interface: ge-1/3/3.0
10.0.224.9/32
Protocol: Local
127.0.0.1/32
Inactive
192.168.2.1/32
Protocol: Direct
Interface: lo0.0
192.168.187.0/25
Protocol: Direct
Interface: fxp0.0
192.168.187.12/32
Protocol: Local
Meaning
The first line of the sample output shows that the inet.2 table is being used and that there are 10 routes in the table. The remainder of the sample output lists the routes that populate the inet.2 routing table.
Example: Configuring a PIM RPF Routing Table
This example shows how to configure and apply a PIM RPF routing table.
Requirements
Before you begin:
Determine whether the router is directly attached to any multicast sources. Receivers must be able to locate these sources.
Determine whether the router is directly attached to any multicast group receivers. If receivers are present, IGMP is needed.
Determine whether to configure multicast to use sparse, dense, or sparse-dense mode. Each mode has different configuration considerations.
Determine the address of the RP if sparse or sparse-dense mode is used.
Determine whether to locate the RP with the static configuration, BSR, or auto-RP method.
Determine whether to configure multicast to use its RPF routing table when configuring PIM in sparse, dense, or sparse-dense mode.
Configure the SAP and SDP protocols to listen for multicast session announcements. See Configuring the Session Announcement Protocol.
Configure IGMP. See Configuring IGMP.
Configure the PIM static RP. See Configuring Static RP.
Filter PIM register messages from unauthorized groups and sources. See Example: Rejecting Incoming PIM Register Messages on RP Routers and Example: Stopping Outgoing PIM Register Messages on a Designated Router.
Overview
In this example, you name the new RPF routing table group multicast-rfp-rib and use inet.2 for its export as well as its import routing table. Then you create a routing table group for the interface routes and name the RPF if-rib. Finally, you use inet.2 and inet.0 for its import routing tables, and add the new interface routing table group to the interface routes.
Configuration
Procedure
CLI Quick Configuration
To quickly configure this example, copy the
following commands, paste them into a text file, remove any line breaks,
change any details necessary to match your network configuration,
and then copy and paste the commands into the CLI at the [edit] hierarchy level.
set routing-options rib-groups multicast-rpf-rib export-rib inet.2 set routing-options rib-groups multicast-rpf-rib import-rib inet.2 set protocols pim rib-group multicast-rpf-rib set routing-options rib-groups if-rib import-rib inet.2 set routing-options rib-groups if-rib import-rib inet.0 set routing-options interface-routes rib-group inet if-rib
Step-by-Step Procedure
The following example requires you to navigate various levels in the configuration hierarchy. For instructions on how to do that, see Using the CLI Editor in Configuration Mode in the Junos OS CLI User Guide.
To configure the PIM RPF routing table:
Configure a routing option and a group.
[edit] user@host# edit routing-options rib-groups
Configure a name.
[edit routing-options rib-groups] user@host# set multicast-rpf-rib export-rib inet.2
Create a new group for the RPF routing table.
[edit routing-options rib-groups] user@host# set multicast-rpf-rib import-rib inet.2
Apply the new RPF routing table.
[edit protocols pim] user@host# set rib-group multicast-rpf-rib
Create a routing table group for the interface routes.
[edit] user@host# edit routing-options rib-groups
Configure a name for import routing table.
[edit routing-options rib-groups] user@host# set if-rib import-rib inet.2 user@host# set if-rib import-rib inet.0
Set group to interface routes.
[edit routing-options interface-routes]
user@host# set rib-group inet if-rib
Results
From configuration mode, confirm your configuration
by entering the show protocols and show routing-options commands. If the output does not display the intended configuration,
repeat the configuration instructions in this example to correct it.
[edit]
    user@host# show protocols
    pim {
    rib-group inet multicast-rpf-rib;
}
[edit]
    user@host# show routing-options
    interface-routes {
    rib-group inet if-rib;
    }
    static {
    route 0.0.0.0/0 next-hop 10.100.37.1;
    }
    rib-groups {
    multicast-rpf-rib {
    export-rib inet.2;
    import-rib inet.2;
    }
    if-rib {
    import-rib [ inet.2 inet.0 ];
    }
}
If you are done configuring the device, enter commit from configuration mode.
Verification
To confirm that the configuration is working properly, perform these tasks:
- Verifying SAP and SDP Addresses and Ports
- Verifying the IGMP Version
- Verifying the PIM Mode and Interface Configuration
- Verifying the PIM RP Configuration
- Verifying the RPF Routing Table Configuration
Verifying SAP and SDP Addresses and Ports
Purpose
Verify that SAP and SDP are configured to listen on the correct group addresses and ports.
Action
From operational mode, enter the show sap listen command.
Verifying the IGMP Version
Purpose
Verify that IGMP version 2 is configured on all applicable interfaces.
Action
From operational mode, enter the show igmp interface command.
user@host> show igmp interface
Interface: ge–0/0/0.0
    Querier: 192.168.4.36
    State:         Up Timeout:     197 Version:  2 Groups:      0

Configured Parameters:
IGMP Query Interval: 125.0
IGMP Query Response Interval: 10.0
IGMP Last Member Query Interval: 1.0
IGMP Robustness Count: 2

Derived Parameters:
IGMP Membership Timeout: 260.0
IGMP Other Querier Present Timeout: 255.0
Verifying the PIM Mode and Interface Configuration
Purpose
Verify that PIM sparse mode is configured on all applicable interfaces.
Action
From operational mode, enter the show pim interfaces command.
Verifying the PIM RP Configuration
Purpose
Verify that the PIM RP is statically configured with the correct IP address.
Action
From operational mode, enter the show pim rps command.
Example: Configuring RPF Policies
A multicast RPF policy disables RPF checks for a particular multicast (S,G) pair. You usually disable RPF checks on egress routing devices of a point-to-multipoint label-switched path (LSP), because the interface receiving the multicast traffic on a point-to-multipoint LSP egress router might not always be the RPF interface.
This example shows how to configure an RPF check policy named disable-RPF-on-PE. The disable-RPF-on-PE policy disables RPF checks on packets arriving for group 228.0.0.0/8 or from source address 196.168.25.6.
Requirements
Before you begin:
Configure the router interfaces.
Configure an interior gateway protocol or static routing. See the Junos OS Routing Protocols Library for Routing Devices.
Overview
An RPF policy behaves like an import policy. If no policy term matches the input packet, the default action is to accept (that is, to perform the RPF check). The route-filter statement filters group addresses, and the source-address-filter statement filters source addresses.
This example shows how to configure each condition as a separate policy and references both policies in the rpf-check-policy statement. This allows you to associate groups in one policy and sources in the other.
Be careful when disabling RPF checks on multicast traffic. If you disable RPF checks in some configurations, multicast loops can result.
Changes to an RPF check policy take effect immediately:
If no policy was previously configured, the policy takes effect immediately.
If the policy name is changed, the new policy takes effect immediately and any packets no longer filtered are subjected to the RPF check.
If the policy is deleted, all packets formerly filtered are subjected to the RPF check.
If the underlying policy is changed, but retains the same name, the new conditions take effect immediately and any packets no longer filtered are subjected to the RPF check.
Configuration
Procedure
CLI Quick Configuration
To quickly configure this example, copy the
following commands, paste them into a text file, remove any line breaks,
change any details necessary to match your network configuration,
copy and paste the commands into the CLI at the [edit] hierarchy
level, and then enter commit from configuration mode.
set policy-options policy-statement disable-RPF-from-group term first from route-filter 228.0.0.0/8 orlonger
set policy-options policy-statement disable-RPF-from-group term first then reject
set policy-options policy-statement disable-RPF-from-source term first from source-address-filter 192.168.25.6/32 exact
set policy-options policy-statement disable-RPF-from-source term first then reject
set routing-options multicast rpf-check-policy [ disable-RPF-from-group disable-RPF-from-source ]
Step-by-Step Procedure
The following example requires you to navigate various levels in the configuration hierarchy. For information about navigating the CLI, see Using the CLI Editor in Configuration Mode in the Junos OS CLI User Guide.
To configure an RPF policy:
Configure a policy for group addresses.
[edit policy-options]
user@host# set policy-statement disable-RPF-for-group term first from route-filter 228.0.0.0/8 orlonger
user@host# set policy-statement disable-RPF-for-group term first then reject
Configure a policy for a source address.
[edit policy-options]
user@host# set policy-statement  disable-RPF-for-source term first from source-address-filter 192.168.25.6/32 exact
user@host# set policy-statement  disable-RPF-for-source term first then reject
Apply the policies.
[edit routing-options]
user@host# set multicast rpf-check-policy [ disable-RPF-for-group disable-RPF-for-source ]
If you are done configuring the device, commit the configuration.
user@host# commit
Results
Confirm your configuration by entering the show policy-options and show routing-options commands.
user@host# show policy-options
policy-statement disable-RPF-from-group {
    term first {
        from {
            route-filter 228.0.0.0/8 orlonger;
        }
        then reject;
    }
}
policy-statement disable-RPF-from-source {
    term first {
        from {
            source-address-filter 192.168.25.6/32 exact;
        }
        then reject;
    }
}
user@host# show routing-options
multicast {
    rpf-check-policy [ disable-RPF-from-group disable-RPF-from-source ];
}
Verification
To verify the configuration, run the show multicast rpf command.
Example: Configuring PIM RPF Selection
This example shows how to configure and verify the multicast PIM RPF next-hop neighbor selection for a group or (S,G) pair.
Requirements
Before you begin:
Configure the router interfaces.
Configure an interior gateway protocol or static routing. See the Junos OS Routing Protocols Library for Routing Devices.
Make sure that the RPF next-hop neighbor you want to specify is operating.
Overview
Multicast PIM RPF neighbor selection allows you to specify the RPF neighbor (next hop) and source address for a single group or multiple groups using a prefix list. RPF neighbor selection can only be configured for VPN routing and forwarding (VRF) instances.
If you have multiple service VRFs through which a receiver VRF can learn the same source or rendezvous point (RP) address, PIM RPF checks typically choose the best path determined by the unicast protocol for all multicast flows. However, if RPF neighbor selection is configured, RPF checks are based on your configuration instead of the unicast routing protocols.
You can use this static RPF selection as a building block for particular applications. For example, an extranet. Suppose you want to split the multicast flows among parallel PIM links or assign one multicast flow to a specific PIM link. With static RPF selection configured, the router sends join and prune messages based on the configuration.
You can use wildcards to designate the source address. Whether or not you use wildcards affects how the PIM joins work:
If you configure only a source prefix for a group, all (*,G) joins are sent to the next-hop neighbor selected by the unicast protocol, while (S,G) joins are sent to the next-hop neighbor specified for the source.
If you configure only a wildcard source for a group, all (*,G) and (S,G) joins are sent to the upstream interface pointing to the wildcard source next-hop neighbor.
If you configure both a source prefix and a wildcard source for a group, all (S,G) joins are sent to the next-hop neighbor defined for the source prefix, while (*,G) joins are sent to the next-hop neighbor specified for the wildcard source.
Topology
Figure 2 shows the topology used in this example.
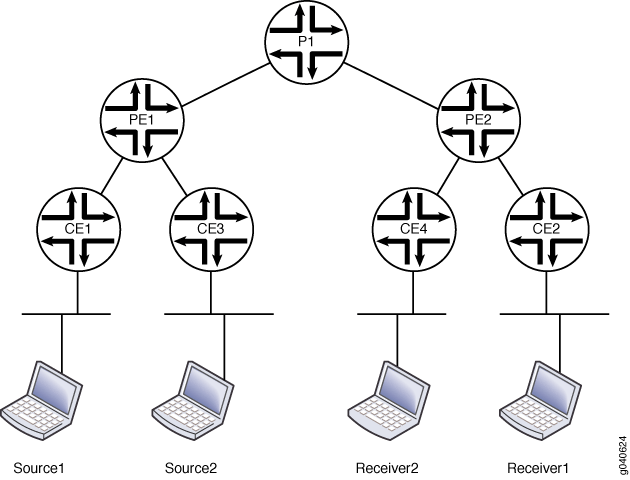
In this example, the RPF selection is configured on the receiver provider edge router (PE2).
Configuration
Procedure
CLI Quick Configuration
To quickly configure this example, copy the following commands, paste
them into a text file, remove any line breaks, change any details necessary to match your
network configuration, copy and paste the commands into the CLI at the [edit] hierarchy
level, and then enter commit from configuration mode.
set routing-instance vpn-a protocols pim rpf-selection group 225.5.0.0/16 wildcard-source next-hop 10.12.5.2
set routing-instance vpn-a protocols pim rpf-selection prefix-list group12 wildcard-source next-hop 10.12.31.2
set routing-instance vpn-a protocols pim rpf-selection prefix-list group34 source 22.1.12.0/24 next-hop 10.12.32.2
set policy-options prefix-list group12 225.1.1.0/24
set policy-options prefix-list group12 225.2.0.0/16
set policy-options prefix-list group34 225.3.3.3/32
set policy-options prefix-list group34 225.4.4.0/24
Step-by-Step Procedure
The following example requires you to navigate various levels in the configuration hierarchy. For information about navigating the CLI, see Using the CLI Editor in Configuration Mode in the Junos OS CLI User Guide.
To configure PIM RPF selection:
On PE2, configure RFP selection in a routing instance.
[edit routing-instance vpn-a protocols pim]
user@host# set rpf-selection group 225.5.0.0/16 wildcard-source next-hop 10.12.5.2
user@host# set rpf-selection prefix-list group12 wildcard-source next-hop 10.12.31.2
user@host# set rpf-selection prefix-list group34 source 22.1.12.0/24 next-hop 10.12.32.2
user@host# exit
On PE2, configure the policy.
[edit policy-options]
set prefix-list group12 225.1.1.0/24
set prefix-list group12 225.2.0.0/16
set prefix-list group34 225.3.3.3/32
set prefix-list group34 225.4.4.0/24
If you are done configuring the device, commit the configuration.
user@host# commit
Results
From configuration mode, confirm your configuration by entering the show policy-options and show routing-instances commands. If the output does not display the intended configuration, repeat the instructions in this example to correct the configuration.
user@host# show policy-options
prefix-list group12 {
    225.1.1.0/24;
    225.2.0.0/16;
}
prefix-list group34 {
    225.3.3.3/32;
    225.4.4.0/24;
}
user@host# show routing-instances
vpn-a{
    protocols {
        pim {
            rpf-selection {
                group 225.5.0.0/16 {
                    wildcard-source {
                        next-hop 10.12.5.2;
                    }
                }
                prefix-list group12 {
                    wildcard-source {
                        next-hop 10.12.31.2;
                    }
                }
                prefix-list group34 {
                    source 22.1.12.0/24 {
                        next-hop 10.12.32.2;
                    }
                }
            }
        }
    }
}
Verification
To verify the configuration, run the following commands, checking the upstream interface and the upstream neighbor:
show pim join extensive
show multicast route
Hash-based PIM RPF Selection
You can configure hash-based PIM RPF selection to ensure that multicast traffic for a specific source and group (S,G) is routed consistently through the same upstream node.
In multicast-enabled networks where multiple scattered receivers are interested in receiving the same traffic, the same specific source and group (S,G) traffic may be pulled via multiple nodes. This results in a widespread multicast tree with redundant multicast flowing through multiple upstream nodes.

Hash-Based PIM RPF (Reverse Path Forwarding) selection optimizes multicast traffic routing by
utilizing a deterministic hash-based algorithm within Protocol Independent Multicast (PIM).
This algorithm uses PIM neighbor attributes such as router-id,
cluster-id, and interface-id to perform multi-level
hashing. The hashing process ensures that multicast traffic for a specific source and group
(S,G) is routed consistently through the same upstream node. By enabling this hashing feature,
data centers reduce redundant multicast traffic flows and as a result, optimize network
performance and resource utilization.
Let’s take an example of a data center where multiple nodes (leaf nodes) pick the same upstream node (spine node) to pull multicast traffic from it, and as a result minimizing redundant traffic. All devices are PIM-enabled Layer 3 devices.

The pod and spine devices are segregated into color-based clusters, red and green.
Red – cluster 10
Green – cluster 20
This color or cluster-id can be configured by using the statement below:
set protocols pim cluster-id private-tlv <cluster-id>
This cluster-id needs to be configured on all nodes – spine, leaf and
pod.
cluster-id must be configured on leaf devices for
them to accept cluster-id from other neighbour nodes. If cluster-id is not
configured or not received from its PIM neighbors, then hashing will be performed with a
cluster-id value of zero (0).Hashing is performed on three levels:
1. S, G, cluster-id
2. S, G, router-id
3. S, G, interface-id
The first level of hashing is based on (S, G, cluster-id). If multiple winners come out as a result of the first level of hashing, then a 2nd level of hashing is performed using (S, G, router-id). If multiple winners come out as a result of the second level of hashing, then a 3rd level of hashing is performed based on (S, G, interface-id).
With the hashing operation above, a single PIM neighbour is chosen as the upstream node and the PIM join message is sent to that specific neighbor.
To enable hash-based PIM RPF selection use the hash-based-rpf-selection
configuration statement under the edit protocols pim hierarchy.
On enabling this feature, the (S,G) pair’s RPF is updated with the output of the hashing algorithm. This update of the RPF happens in Make-before-break (MBB) fashion and therefore, enabling or disabling this configuration does not result in a loss of traffic.
Use the show pim join command to view the winner RPF upstream neighbor for
the given (S, G) pair.
join-load-balance, and PIM RPF selection rpf-selection. They are mutually exclusive.