Secure Data with vSRX Virtual Firewall 3.0 Using GCP KMS (HSM)
This topic describes the integration of vSRX Virtual Firewall 3.0 with GCP (Google Cloud Platform) Key management Service (KMS) for securing confidential information such as private keys that must be stored within a FIPS boundary. GCP provides support for KMS that is used by applications such as vSRX Virtual Firewall 3.0 to safeguard and to manage cryptographic keys.
Overview
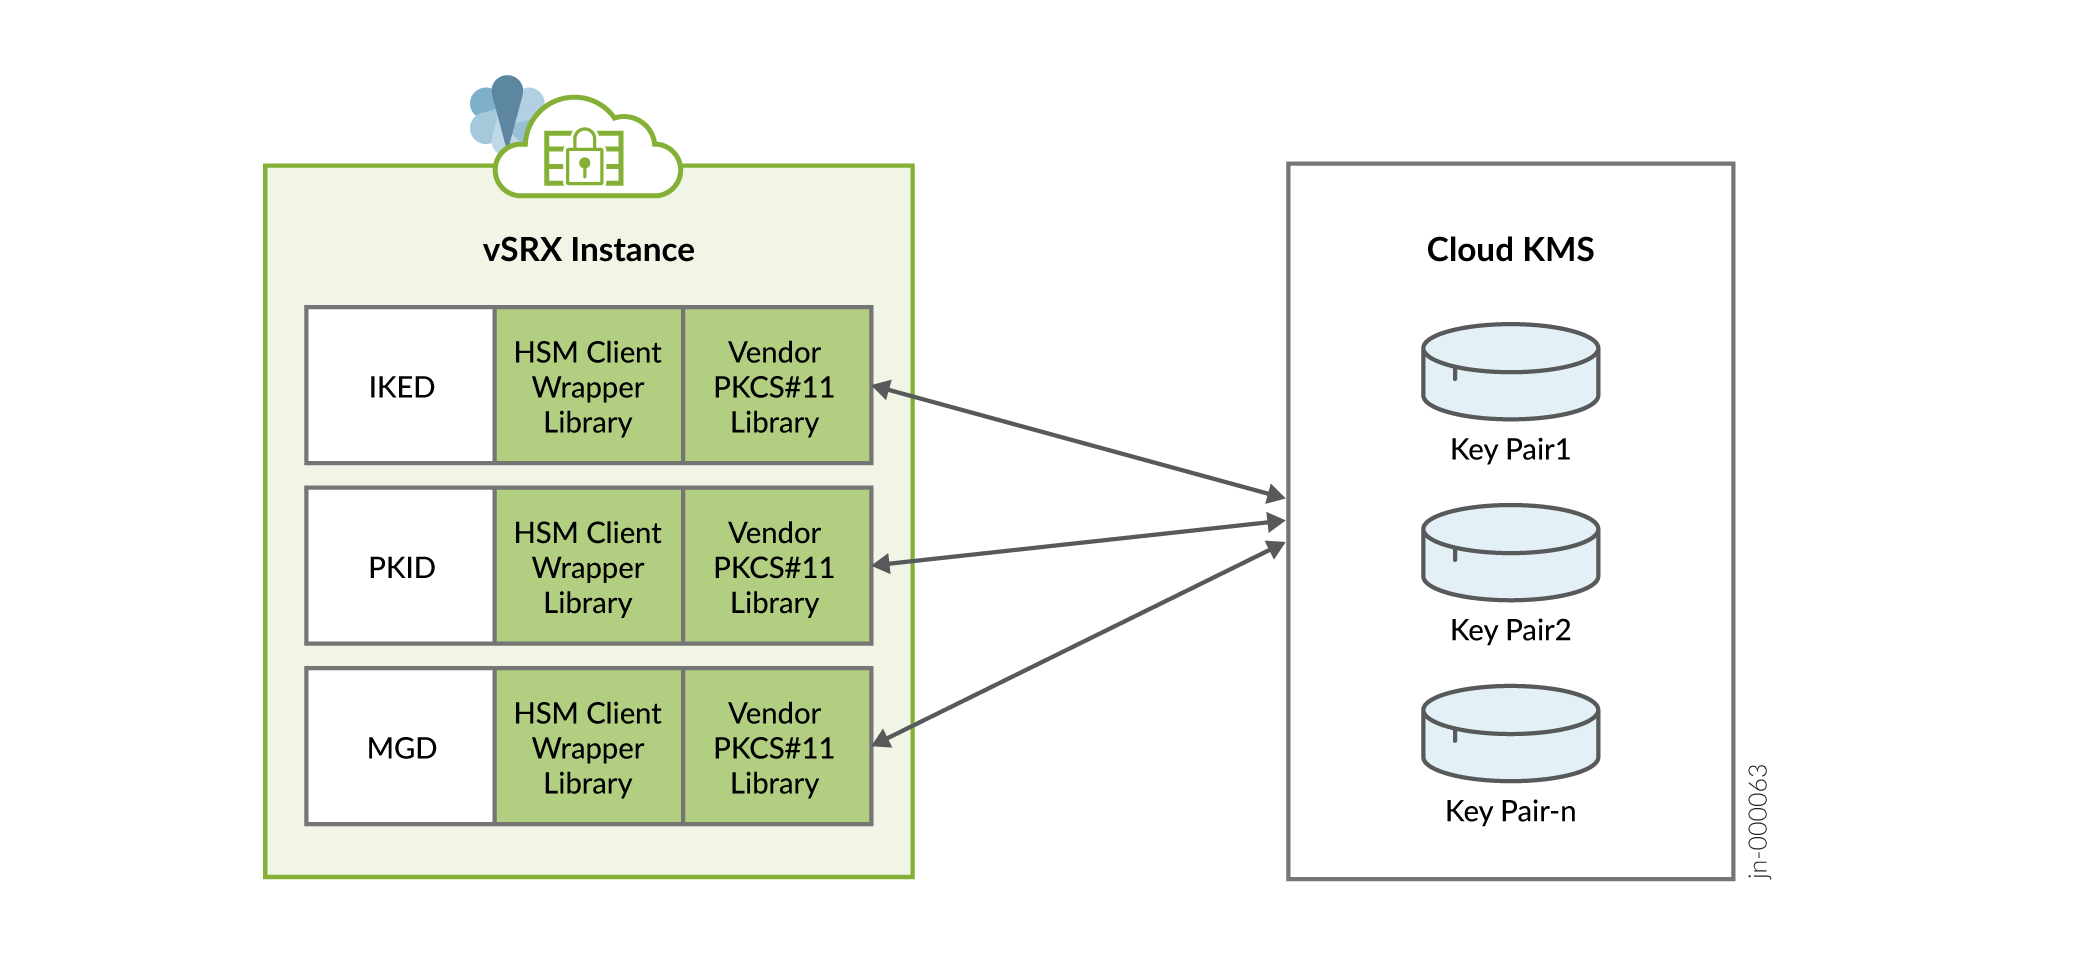
A wrapper library is available in Junos to enable VPN and other applications (such as mgd) to integrate and communicate with cloud-based KMS. This wrapper library provides interface to Key Management Service (KMS) using PKCS#11 APIs. Junos applications use this wrapper library with updated support for GCP to communicate with KMS. To support PKCS#11 APIs, GCP team provides Juniper a library which acts as an intermediary between Junos applications and Cloud KMS service. This library is added as part of vSRX Virtual Firewall 3.0 Junos package. There is no action needed from you to enable the libraries.
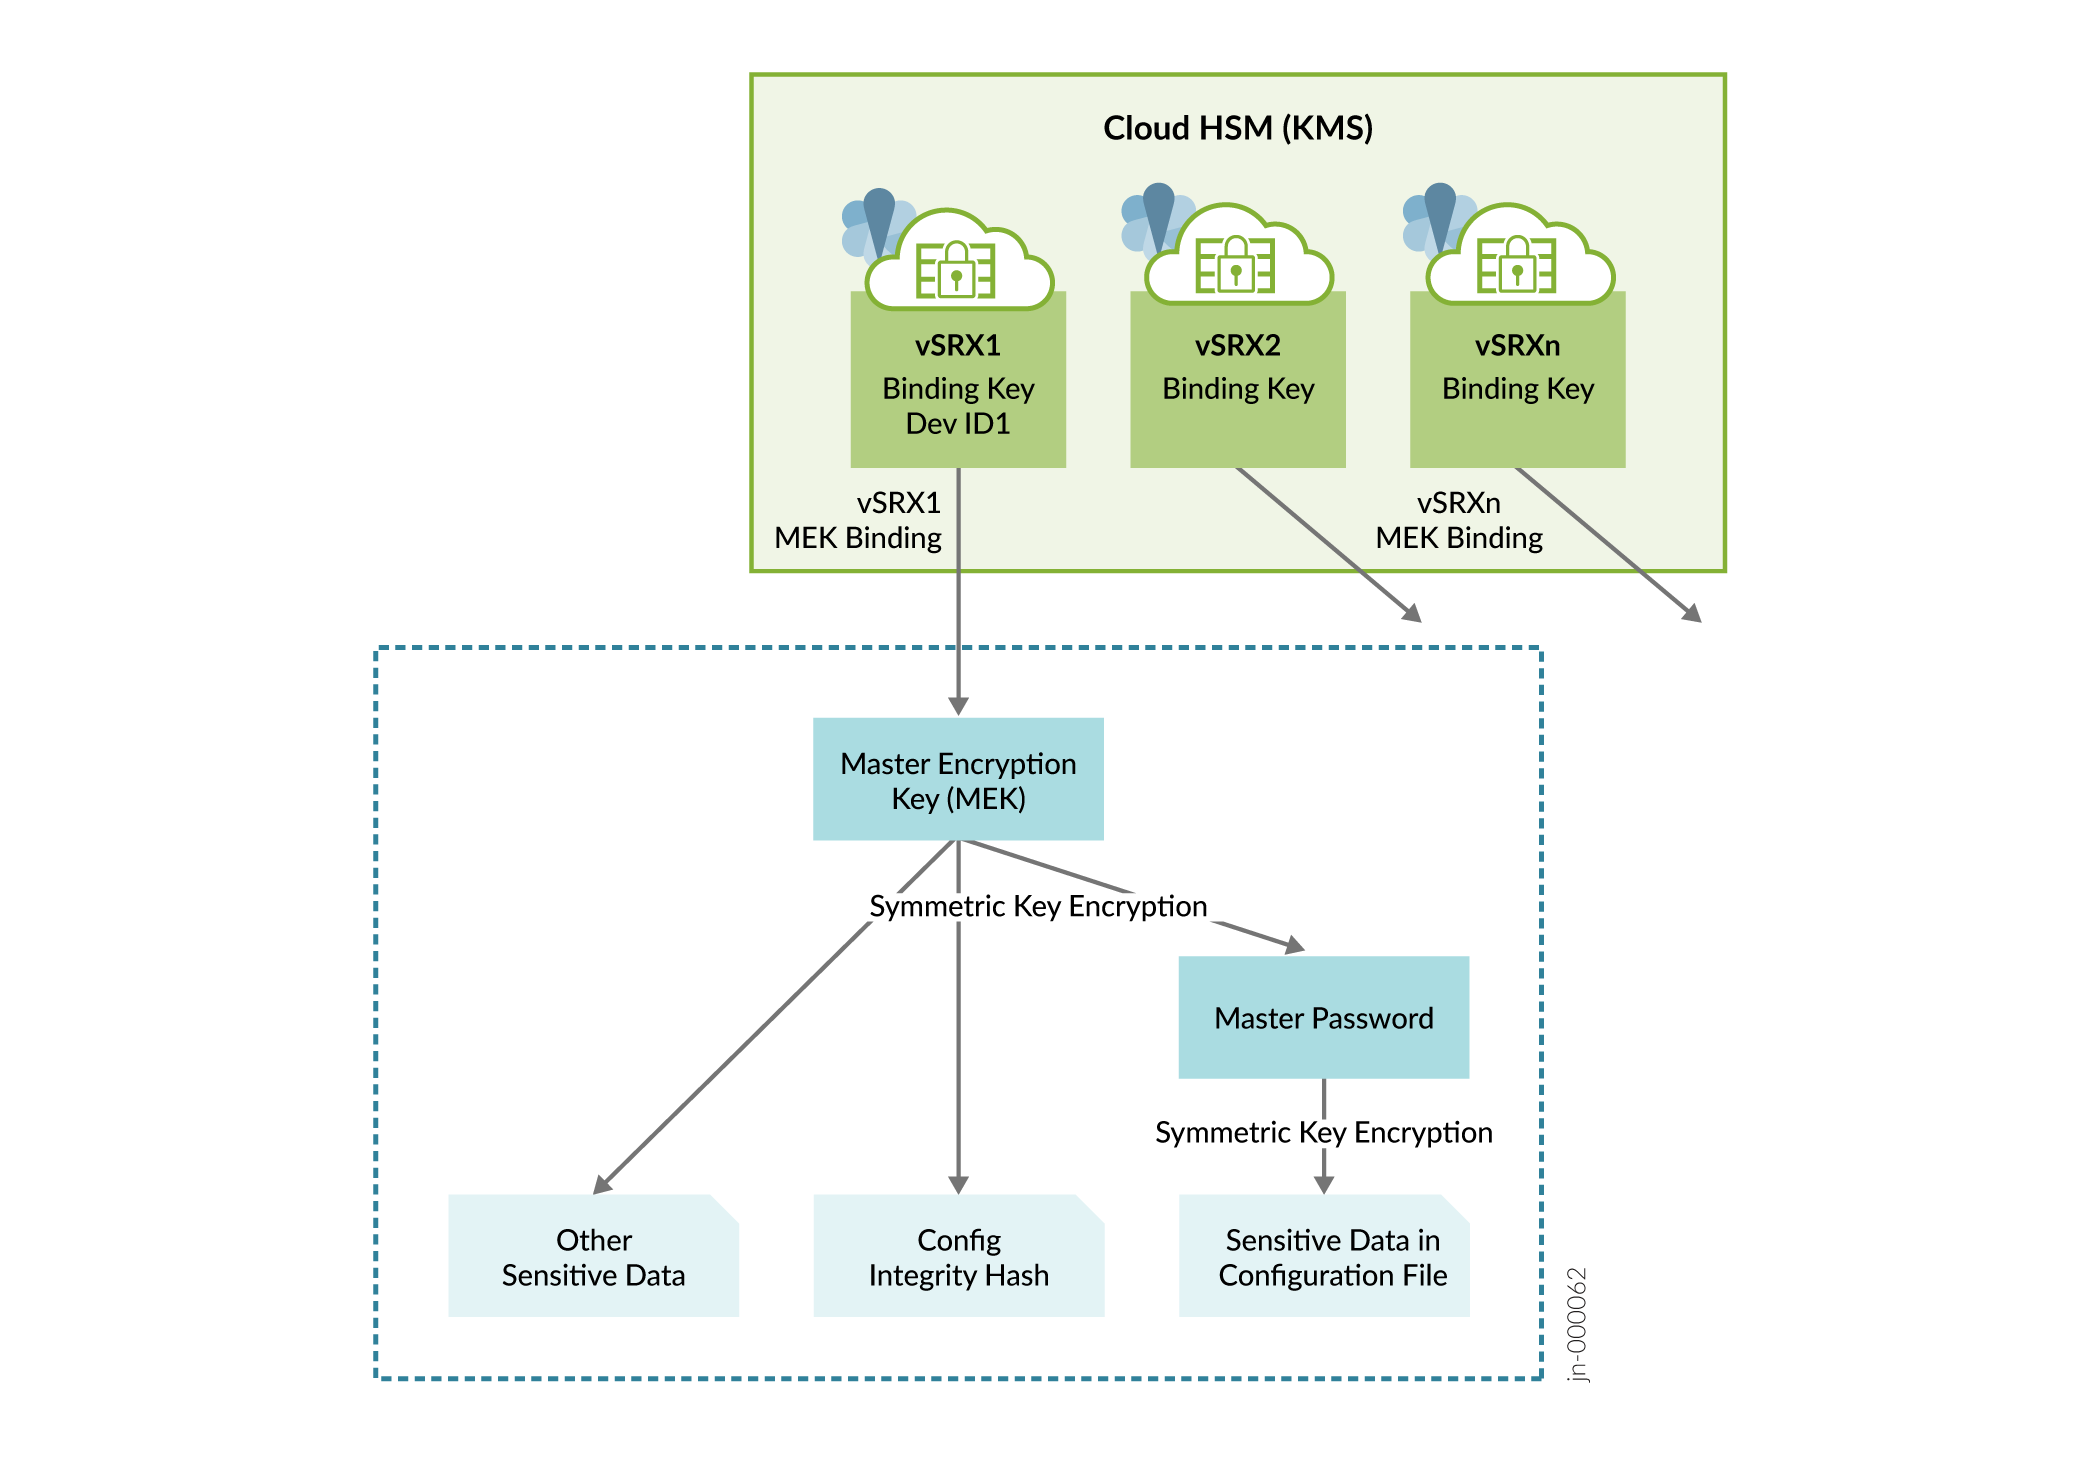
After enabling the KMS service, you need to specify the Master Encryption Key (MEK)
using the request security hsm master-encryption-password set
plain-text-password command. vSRX Virtual Firewall 3.0 then creates RSA
2048 key pair Master binding Key (MBK) in KMS and encrypts MEK using MBK in KMS. MEK
is then used as a key for encrypting data at rest such as hash of configuration,
private key pair files and master-password file.
vSRX Virtual Firewall with GCP KMS has the following limitations:
-
vSRX Virtual Firewall uses management interface to access KMS service. If management interface is not enabled or configured, KMS service cannot be used from vSRX Virtual Firewall.
-
SSL Proxy, Sky-ATP, IDP Signature download or any other module using certificate-based connections will not work when HSM is enabled.
-
RSA Key Pair with a Key ID can be generated only once. It cannot be used for another Key Pair to generate or create request, for a deleted Key ID, or for another new Key request.
Figure 1 illustrates the inventory of keys in vSRX Virtual Firewall 3.0.
Support for generating Public Key Infrastructure (PKI) key-pairs in GCP cloud KMS is enabled and any request such as RSA SIGN, which needs private key of the generated key-pair is be sent to GCP cloud KMS. Specifically, the following operations have been offloaded to the KMS:
-
Private key signing during Certificate Signing Request (CSR) creation in PKI Daemon (PKID) running on the device.
-
Private key signing during verification of the certificate received from the CA server in PKID.
-
Private key signing during IKE negotiations at Key Management Daemon (KMD) which is the IKE Daemon running on the device.
All the VPN applications (PKID and KMD) will use wrapper library to communicate with the KMS service to create, manage and execute crypto operations on the RSA keys.
Figure 2 illustrates how VPN applications accessing KMS service.
You can secure data at rest and achieve configuration integrity with vSRX Virtual Firewall 3.0 using GCP KMS. Perform the steps given in this topic to setup GCP Cloud KMS service and Key Ring for vSRX Virtual Firewall 3.0.
Key Ring is a component in KMS service where keys created by Junos applications are going to reside. A key ring organizes keys in a specific Google Cloud location and allows you to manage access control on groups of keys. A key ring's name does not need to be unique across a Google Cloud project, but must be unique within a given location. After creation, a key ring cannot be deleted. Key rings do not incur storage costs.
Integrate GCP KMS with vSRX Virtual Firewall 3.0
To enable and setup vSRX Virtual Firewall 3.0 to access KMS on GCP.
-
Launch vSRX Virtual Firewall 3.0 instance in GCP. See Deploying vSRX Virtual Firewalls on Google Cloud Platform and Deploy vSRX in Google Cloud Platform.
-
Setup GCP KMS for vSRX Virtual Firewall 3.0.
Before you can enable vSRX Virtual Firewall 3.0 to communicate with the KMS service, you need to ensure vSRX Virtual Firewall 3.0 instance is authenticated and authorized to access GCP Cloud KMS service. To setup GCP environment or account do the following:
-
Create a service account.
A service account is a special type of Google account intended to represent a non-human user such as virtual machines(VMs), that needs to authenticate and be authorized to access data in Google APIs.
vSRX Virtual Firewall 3.0 uses the PKCS#11 library provided by GCP to access Cloud KMS service. The library uses service accounts to authenticate using service account credentials.
-
To create a new service account to use with vSRX Virtual Firewall 3.0 to access Cloud KMS, see
Getting Started with Authentication. If you already have a service account then, see Authenticating as a service account.
-
Create IAM role for the service account to enable access for vSRX Virtual Firewall 3.0 instance.
Once you have service account setup, grant the account a role or roles with the following IAM permissions:
-
cloudkms.cryptoKeys.list on all configured KeyRings.
-
cloudkms.cryptoKeyVersions.list on all CryptoKeys in each configured KeyRing.
-
cloudkms.cryptoKeyVersions.viewPublicKey for all asymmetric keys contained within all configured KeyRings.
-
cloudkms.cryptoKeyVersions.use to Decrypt or cloudkms.cryptoKeyVersions.use to sign for any keys to be used for decryption or signing.
-
cloudkms.cryptoKeys.create if you intend to create keys.
-
cloudkms.cryptoKeyVersions.destroy if you intend to destroy keys.
You can also use pre-defined groups of IAM roles as listed below to grant service account the needed permissions. For more information about roles associated for each of the above groups, see Permissions and Roles.
-
-
Attach IAM role to vSRX Virtual Firewall 3.0 instance either from GUI or using GCP CLI.
After you have service account created and granted needed IAM roles as mentioned above, you can either create a new vSRX Virtual Firewall 3.0 instance using this service account or set an existing vSRX Virtual Firewall 3.0 instance to use the service account.
For more information, see Creating and enabling service accounts for instances.
Create Key Ring
After granting required access for vSRX Virtual Firewall 3.0 instance to communicate with KMS, you need to create Key Ring, which is a component in KMS service where keys created by vSRX Virtual Firewall 3.0 will reside.
Key Ring can be created using gcloud or from console. For more information, see Create a Key Ring
.Additionally, GCP KMS does not allow creation of a key with an ID which was already used and created earlier. GCP KMS also does not allow deletion of existing key and creating another key with same name.
Note:Key ring can be created in one specific region, dual-regional or multi-regional locations. Location refers to the datacenter in which your keys are going to be saved. If you use one specific region key is located in that location only. In case of dual regions, keys are replicated to other regions and same implies for multi-regional locations. For more information, see Cloud KMS locations.
After you create Key Ring, please note down the resource ID for the key ring as it is needed for input into vSRX Virtual Firewall 3.0 using CLI. GCP PKCS#11 KMS library on vSRX Virtual Firewall 3.0 will use this resource ID to communicate with KMS. Name of Key created in Key ring can contain letters, numbers, underscores (_), and hyphens (-).
-
-
-
Provide GCP Key Ring resource information using the
request security hsm set gcp project <name_of_project> location <location_of_key_ring> key-ring <name_of_key_ring>command. For more information, see Getting a Cloud KMS resource ID -
After enabling the KMS service, you need to specify the Master Encryption Key (MEK) using the
request security hsm master-encryption-password set plain-text-passwordcommand on vSRX Virtual Firewall 3.0.Once you specify the MEK, vSRX Virtual Firewall 3.0 creates the RSA 2048 key pair (MBK) in KMS and encrypts MEK using Master binding Key (MBK) in KMS. MEK is then used as a key for encrypting data at rest such as hash of configuration, private key pair files and master-password file.
-
Change the Master Encryption Password.
If you want to change the master encryption password then you can run the
request security hsm master-encryption-password set
                            plain-text-password
command from operational mode:Note:It is recommended that no configuration changes are made while you are changing the master encryption password.
The system checks if the master encryption password is already configured. If master encryption password is configured, then you are prompted to enter the current master encryption password.
The entered master encryption password is validated against the current master encryption password to make sure these master encryption passwords match. If the validation succeeds, you will be prompted to enter the new master encryption password as plain text. You will be asked to enter the key twice to validate the password.
The system then proceeds to re-encrypt the sensitive data with the new master encryption password. You must wait for this process of re-encryption to complete before attempting to change the master encryption password again.
If the encrypted master encryption password file is lost or corrupted, the system will not be able to decrypt the sensitive data. The system can only be recovered by re-importing the sensitive data in clear text, and re-encrypting them.
-
Check HSM status using the
show security hsm statuscommand to check if KMS is enabled and reachable, also displays the Resource ID of Key Ring being used, Master binding Key (MBK), and Master Encryption Key (MEK) status.
Verify the Status of the HSM
Purpose
To check connectivity with HSM.
Action
You can use the show security hsm status command to verify the
status of the HSM. The following information is displayed:
-
If HSM is enabled and reachable or disabled
-
Is Master Binding Key (RSA Key pair) created in HSM
-
Is Master Encryption Key configured - master encryption password status (set or not set)
-
Cloud vendor Information
show security hsm status
Syntax
show security hsm status
Release Information
Command introduced in Junos OS Release 19.4R1.
Description
Display the current status of the Hardware Security Module (HSM). You can use
this show security hsm status command to check the status of
HSM, master binding key, master encryption password, and cloud vendor
details.
Options
This command has no options.
Required Privilege Level
security
Output Fields
Table 1 lists the output fields for the show security hsm
status command.
|
Field Name |
Field Description |
|---|---|
|
|
Specifies whether HSM is enabled or disabled. |
|
|
Displays the HSM’s Master Binding Key status whether it is created or not created in HSM. HSM generates cryptographic keys and encrypts them so that those can only be decrypted by the HSM. This process is know as binding. Each HSM has a master binding key, which is also know as storage root key. |
|
|
Displays Master Encryption configuration status whether it is set or not set. The encrypted data and the hash of the configuration is protected by vSRX Virtual Firewall using Microsoft Key Vault (HSM) service. |
|
|
Displays the details specific to the cloud vendor. |
Sample Output
- show security hsm status (HSM status command output when vSRX Virtual Firewall initially boots up but GCP KMS feature is not enabled)
- show security hsm status (HSM status command output after successful integration with GCP KMS)
show security hsm status (HSM status command output when vSRX Virtual Firewall initially boots up but GCP KMS feature is not enabled)
user@host> show security hsm status
HSM Status: Accessible: no Master Binding Key: not-created Master Encryption Key: not-configured
show security hsm status (HSM status command output after successful integration with GCP KMS)
user@host> show security hsm status
HSM Status: Accessible: yes Master Binding Key: not-created Master Encryption Key: not-configured GCP Key Ring: projects/example-project-98765/locations/us-central1/keyRings/example-ring
request security hsm master-encryption-password
Syntax
request security hsm master-encryption-password set
                            plain-text-password
Release Information
Command introduced in Junos OS Release 19.4R1.
Description
Use this command to set or replace the password (in plain text).
Options
| plain-text-password | Set or replace the password (in plain text). |
Required Privilege Level
maintenance
Output Fields
When you enter this command, you are provided feedback on the status of your request.
Sample Output
request security hsm master-encryption-password set plain-text-password
user@host> request security hsm master-encryption-password set plain-text-password
   Enter new master encryption password:
   Repeat new master encryption password:
   Binding password with HSM
   Master encryption password is bound to HSM
   Encoding master password ..
   Successfully encoded master password
   Deleting all previous local certificates, keypairs and certificate requests