Deploy vMX from Azure CLI
The deployment script and sample configuration file in this section simplifies the deployment of vMX in the Microsoft Azure virtual network. The configuration file includes parameters that enable you to customize your vMX VM deployment, such as login username and network interfaces (NICs).
We recommend that you deploy your vMX VMs using the Azure CLI method described in this section, instead of using the Azure Portal to deploy the vMX manually.
What's Next
Before You Deploy vMX Using the Azure CLI
Before you begin deploying vMX from the Azure CLI:
Obtain an account for and a subscription to Microsoft Azure. See Microsoft Azure.
Use your Microsoft account username and password to log into the Microsoft Azure portal. The Azure Portal will be used later in this section to verify the deployment of the vMX using the Azure CLI method.
Install the latest version of Azure command line interface (Azure CLI).
Purchase a vMX license or request an evaluation license. Licenses can be procured from the Juniper Networks License Management System (LMS).
For information about the evaluation license for vMX, see https://www.juniper.net/us/en/dm/free-vmx-trial/.
Note:In Microsoft Azure, you can host servers and services on the cloud as a pay-as-you-go (PAYG) or bring-your-own-license (BYOL) service. PAYG images do not require Juniper Networks licenses.
You must first run the following Azure CLI command to accept the End User License Agreement (EULA) terms for the specific BYOL or PAYG vMX image that you want to deploy. Otherwise, you will encounter a MarketplacePurchaseEligibilityFailed error in the VM creation stage of the deployment script discussed later in this section.
You only have to run the following CLI command once for the PAYG or BYOL image type you want to deploy.
az vm image terms accept --urn juniper-networks:vmx-services-gateway-byol:vmx-services-gateway-byol:18.3.2
The vMX for Azure deployment scripts are written in shell and in the latest version of Azure CLI commands. Pre-2.x versions of Azure CLI is not supported.
Deployment of vMX to Microsoft Azure does not support the use of the Azure CLI from Microsoft Windows because the shell scripts that are used as part of the deployment procedure can be run only from the Linux or Mac OS CLI.
Deploying vMX from the Azure CLI
Use the following procedure to deploy and configure vMX in a Microsoft Azure virtual network from the Azure CLI.
- Using the Microsoft Azure CLI
- Using the vMX Deployment Tools
- Modifying vMX Configuration Parameters for Deployment
- Deploying the vMX Using the Shell Script
- Verifying Deployment of vMX to Microsoft Azure
- Logging In to a vMX Instance
- Initial Configuration for vMX
Using the Microsoft Azure CLI
To run the Azure CLI script provided, you can install Azure CLI on your server.
Perform one of the following tasks for your chosen method:
Installing the Azure CLI
To install and log in to the Azure CLI :
Using the vMX Deployment Tools
Juniper Networks provides a set of script and configuration files. These tools are intended to help simplify the deployment of vMX to Azure when using the Azure CLI.
azure.config configuration file
azure_vmx_deploy.sh shell script
azure_vmx_deploy.sh automates the deployment of the vMX virtual machine (VM) and virtual networks respectively, using the parameters in the azure.config configuration file. The azure_vmx_deploy.sh shell script creates network interfaces, virtual networks, virtual subnets, and the VM.
To copy the azure_vmx_deploy.sh and azure.config files:
After you have saved the files, you can modify the azure.config file for your configuration and run the azure_vmx_deploy.sh script.
azure.config file
#
# Sample VMX deployment settings for Microsoft Azure
#

# Account config

account="12345bf4b32bf-1234-5678-aaaa-4b348978e06a"
grpname="vmxcloudv2"
location="westus"

# VM config
vmname="vmx183-x3"
admin="azuser"
vmximagename="juniper-networks:vmx-services-gateway-byol:vmx-services-gateway-byol:18.3.2"

# Network Config
number_of_nics=4
addressprefix="30.0.0.0/16"
PrivateIpAddress="30.0.0.10"
PrivateIpAddress2="30.0.1.10"
subnet_prefixes=( 30.0.0.0/24 30.0.1.0/24 30.0.2.0/24 30.0.3.0/24 )
azure_vmx_deploy.sh file
#!/bin/sh
# Copyright (c) 2020, Juniper Networks, Inc.
# All rights reserved.
#
#
# Sample deployment script for vMX on Microsoft Azure
#

source ./azure.config

stor="stor"
cont="cont"
vm="_image"

vnet=$grpname-vnet1
base_subnet=$vnet-vsubnet
base_nic=$vmname-wan-nic
mdisk="_Managed_Disk"
storageacc=$grpname$stor
STORAGE_CONT=$grpname$cont

az account set -s $account
echo "Creating resource group"
az group create -n $grpname -l $location -o table
echo "Created group $grpname"

echo "Creating storage account"
# Create storage account
az storage account create --sku Standard_LRS --location $location --kind Storage --resource-group $grpname --name $storageacc --output table
echo "Created storage account $storageacc"

# Get connection string for the storage account
KEY1=`az storage account keys list --account-name $storageacc --resource-group $grpname  | grep -m 1 \"value\": | awk '{print $2}'`

# Create storage container
az storage container create --account-name $storageacc --name $STORAGE_CONT --account-key $KEY1 --output table
echo "Created container $STORAGE_CONT"

count=$(( $number_of_nics - 1 ))
while [ $count -ge 0 ]
do
    subnet_names[$count]=$base_subnet"$count"
    nic_names[$count]=$base_nic"$count"
    count=$(( $count - 1 ))
done

skip=1
az network vnet show -g $grpname  --name  $vnet > /dev/null 2>&1
if [ $? -eq 0 ]; then
        skip=2
        echo "Vnet \"$vnet\" already exists, skipping vnet and subnet creation"
fi

if [ $skip -eq 1 ]; then
    # Create VNET
    echo "Creating Azure virtual network $vnet...."
    az network vnet create \
        --resource-group $grpname \
        --name $vnet \
        --address-prefix $addressprefix \
        --location $location \
        --output table

    echo "Done creating Azure virtual network $vnet"

    # Create as many subnets as there are NICs
    i=0
    for prefix in "${subnet_prefixes[@]}"
    do
        echo "Creating virtual subnet ${subnet_names[$i]} $prefix.."
        az network vnet subnet create \
            --address-prefix $prefix \
            --name ${subnet_names[$i]} \
            --resource-group $grpname \
            --vnet-name $vnet \
            --output table
        echo "Done creating subnet ${subnet_names[$i]} with prefix $prefix"
        let i++
    done
fi

#
# Creating routing tables for vMX WAN ports (add tables as needed for more than 2 wan ports)
#
echo "Creating routing tables..."

az network route-table create --name $grpname-rt-to-subnet2 --resource-group $grpname --location $location --output table
az network route-table create --name $grpname-rt-to-subnet3 --resource-group $grpname --location $location --output table

az network vnet subnet update --resource-group $grpname --vnet-name $vnet --name $vnet-vsubnet2 --route-table $grpname-rt-to-subnet3 --output table
az network vnet subnet update --resource-group $grpname --vnet-name $vnet --name $vnet-vsubnet3 --route-table $grpname-rt-to-subnet2  --output table
#
# Create all NICs
#

echo "Creating public IP addresses and NICs..."

i=0
for nic in "${nic_names[@]}"
do
    if [ $i -eq 0 ]; then
        # Create Public IP for first NIC:
        ip=$vmname-vfp-public-ip
        az network public-ip create \
            --name $ip \
            --allocation-method Static \
            --resource-group $grpname \
            --location $location \
            --output table

        # Create 1st NIC
	nic=$vmname-vfp-nic
        allnics="$allnics ""$nic"
        az network nic create \
            --resource-group $grpname \
            --location $location \
            --name $nic \
            --vnet-name $vnet \
            --subnet ${subnet_names[$i]} \
            --public-ip-address $ip \
            --private-ip-address $PrivateIpAddress \
            --output table
        echo "Created NIC $nic with public IP..."

    elif [ $i -eq 1 ]; then
        # Create Public IP for first NIC:
        ip2=$vmname-vcp-public-ip
        az network public-ip create \
            --name $ip2 \
            --allocation-method Static \
            --resource-group $grpname \
            --location $location \
            --output table

        # Create 2nd NIC
	nic=$vmname-vcp-nic
        allnics="$allnics ""$nic"
        az network nic create \
            --resource-group $grpname \
            --location $location \
            --name $nic \
            --vnet-name $vnet \
            --subnet ${subnet_names[$i]} \
            --public-ip-address $ip2 \
            --private-ip-address $PrivateIpAddress2 \
            --output table
        echo "Created NIC $nic with public IP..."
      else
        allnics="$allnics ""$nic"
        az network nic create \
            --resource-group $grpname \
            --location $location \
	    --accelerated-networking true \
            --name $nic \
            --vnet-name $vnet \
            --subnet ${subnet_names[$i]} \
            --output table
        echo "Created NIC $nic..."
    fi
    let i++
done

#
# Add routes to route tables
#
echo "Adding routes to routing tables"

ip=`az network nic show -g $grpname --name $base_nic"2"|grep privateIpAddress\"|awk '{print $2}'|sed -e  s/\"//g -e s/\,//`
az network route-table route create -g $grpname --route-table-name $grpname-rt-to-subnet3 --next-hop-type VirtualAppliance --name ToSubnet3 --next-hop-ip-address $ip --address-prefix ${subnet_prefixes[3]} --output table
ip=`az network nic show -g $grpname --name $base_nic"3"|grep privateIpAddress\"|awk '{print $2}'|sed -e  s/\"//g -e s/\,//`
az network route-table route create -g $grpname --route-table-name $grpname-rt-to-subnet2 --next-hop-type VirtualAppliance --name ToSubnet2 --next-hop-ip-address $ip --address-prefix ${subnet_prefixes[2]}  --output table

#
# Create vMX VM
#
echo "Creating vMX VM..."

az vm create \
    --name $vmname \
    --size Standard_F8  \
    --image $vmximagename \
    --nics $allnics \
    --resource-group $grpname \
    --location $location \
    --authentication-type ssh \
    --admin-username $admin \
    --generate-ssh-keys \
    --storage-sku Standard_LRS  \
    --boot-diagnostics-storage ${grpname}stor \
    --output table
echo "vMX deployment complete"
Modifying vMX Configuration Parameters for Deployment
To deploy vMX, you might need to modify the configuration parameters by performing these tasks:
Changing the Azure Configuration Parameters
In the azure.config file, set these parameters:
account=”account subscription
id”
—This is the Microsoft Azure account subscription ID.grpname="group-name"—Resource group name. Enter your existing resource group. A resource group name can include alphanumeric characters, periods (.), underscores (_), hyphens (-), and parenthesis (), but the name cannot end with a period.location="region"—Resource group location. Select the location of the Microsoft Azure data center from which you intend to deploy the VM. Specify a location where the majority of your resources will reside. Typically, select the location that is closest to your physical location.vmname="vm-name"—vMX VM name. The VM name cannot contain non-ASCII or special characters.admin="admin-username"—Name of user logging into the VM using SSH. The username cannot contain uppercase characters or special characters, and cannot start with a dollar sign ($) or hyphen (-).vmximagename="image-name"—Name of the vMX image.number_of_nics=number-of-interfaces—Number of interfaces, including VFP (eth0), VCP (fxp0) and any WAN ports (WAN ports appear as ge-x/x/x on the vMX). This number must be between 3 and 8.addressprefix="address-prefix"—Address space. Enter the virtual network’s address range in CIDR notation. By default, the address range is 30.0.0.0/16.Note:Ensure that the address space does not overlap with an existing network
PrivateIpAddress="ip-address"—Private IP address for VFP (eth0) management port. It must be contained by the address space of the virtual network, as defined in theaddressprefixparameter.PrivateIpAddress2="ip-address"—Private IP address for VCP (fxp0) management port. It must be contained by the address space of the virtual network, as defined in theaddressprefixparameter.subnet_prefixes=(subnet-prefix0 subnet-prefix1 subnet-prefix2 subnet-prefix3 )—Array of subnet address ranges for each subnet under the virtual network. Enter each network subnet address range in CIDR notation. It must be contained by the address space of the virtual network, as defined in theaddressprefixparameter. Subnet address ranges cannot overlap one another.The subnet is a range of IP addresses in your virtual network to isolate VMs. Public subnets have access to the Internet gateway, but private subnets do not.
Enter as many subnets in the array as the number of interfaces. Each NIC will have a corresponding subnet defined in this array. For example, if
number_of_nicsis 4, there will be four entries in thesubnet_prefixesarray.A vMX VM requires two public subnets and one or more public or private subnets for each individual instance group. The management interfaces for the VFP (eth0) and VCP (fxp0) use a public subnet and the revenue (data) interfaces can use either public or private subnets. The private subnets, connected to the other vMX interfaces, ensure that all traffic between applications on the private subnets and the Internet must pass through the vMX instance.
For example, a virtual network with four subnets for the four NICs that will be created has this setting:
subnet_prefixes=(
30.0.0.0/24 30.0.1.0/24 30.0.2.0/24 30.0.3.0/24)
.
For example, the azure.config file might resemble the following:
grpname="vmxcloudv2"
location="westus"

# VM config
vmname="vmxv2"
admin="azuser"
vmximagename="juniper-networks:vmx-services-gateway-byol:vmx-services-gateway-byol:18.3.2"
number_of_nics=4

# Network Config
addressprefix="30.0.0.0/16"
PrivateIpAddress="30.0.0.1"
PrivateIpAddress2=”30.0.1.10”
subnet_prefixes=( 30.0.0.0/24 30.0.1.0/24 30.0.2.0/24 30.0.3.0/24 )
You can get the vMX image details by using the following command:
az vm image list --all --publisher juniper-networks
Adding NICs to the Configuration
The Standard_F8 CPU type supports a total of 8 ports. Each vMX requires two management ports on Azure leaving a maximum of 6 WAN ports.
The vMX instance contains two separate virtual machines (VMs), one for the virtual forwarding plane VMX FPC (VFP) and one for the virtual control plane (VCP)
VFP has a dedicated management port (eth0) mapped to the <vm-name>-vfp-nic of the vMX.
VCP has a dedicated management port (fxp0) mapped to the <vm-name>-vcp-nic of the vMX.
The public IP address configured in Resource groups > vMX resource group > vmname-vcp-nic. vMX name is the IP address to use for connecting to the VMX RE (VCP) FPC using SSH.
To change the number of network interfaces (NICs):
Deploying the vMX Using the Shell Script
The azure_vmx_deploy.sh shell script deploys the vMX virtual machine (VM) in a resource group that is based on your Azure Cloud geographic location.
To deploy vMX to the Azure virtual network, run the azure_vmx_deploy.sh script to create the virtual network subnets, NICs, and VM. The parameters defined in the azure.config configuration file are used to deploy the vMX.
For example, if the azure.config file contains the following parameters:
grpname="vmxcloudv2"
location="westus"

# VM config
vmname="vmxv2"
admin="user"
vmximagename="juniper-networks:vmx-services-gateway-byol:vmx-services-gateway-byol:18.3.2"
number_of_nics=4

# Network Config
addressprefix="30.0.0.0/16"
PrivateIpAddress="30.0.0.10"
subnet_prefixes=( 30.0.0.0/24 30.0.1.0/24 30.0.2.0/24 30.0.3.0/24 )
Running the azure_vmx_deploy.sh script generates the following output.
$ ./azure_vmx_deploy.sh
Creating resource group
Location    Name
----------  -----------
westus      vmxcloudv2
Created group vmxcloudv2
Creating storage account
CreationTime                      EnableHttpsTrafficOnly    Kind     Location    Name             PrimaryLocation    ProvisioningState    ResourceGroup    StatusOfPrimary
--------------------------------  ------------------------  -------  ----------  ---------------  -----------------  -------------------  ---------------  -----------------
2020-03-11T00:12:55.943835+00:00  True                      Storage  westus      vmxcloudv2stor  westus             Succeeded            vmxcloudv2      available
Created storage account vmxcloudv2stor
Created
---------
False
Created container vmxcloudv2cont
Creating Azure virtual network vmxcloudv2-vnet1....

Done creating Azure virtual network vmxcloudv2-vnet1
Creating virtual subnet vmxcloudv2-vnet1-vsubnet0 30.0.0.0/24..
AddressPrefix    Name                        PrivateEndpointNetworkPolicies    PrivateLinkServiceNetworkPolicies    ProvisioningState    ResourceGroup
---------------  --------------------------  --------------------------------  -----------------------------------  -------------------  ---------------
30.0.0.0/24      vmxcloudv2-vnet1-vsubnet0  Enabled                           Enabled                              Succeeded            vmxcloudv2
Done creating subnet vmxcloudv2-vnet1-vsubnet0 with prefix 30.0.0.0/24
Creating virtual subnet vmxcloudv2-vnet1-vsubnet1 30.0.1.0/24..
AddressPrefix    Name                        PrivateEndpointNetworkPolicies    PrivateLinkServiceNetworkPolicies    ProvisioningState    ResourceGroup
---------------  --------------------------  --------------------------------  -----------------------------------  -------------------  ---------------
30.0.1.0/24      vmxcloudv2-vnet1-vsubnet1  Enabled                           Enabled                              Succeeded            vmxcloudv2
Done creating subnet vmxcloudv2-vnet1-vsubnet1 with prefix 30.0.1.0/24
Creating virtual subnet vmxcloudv2-vnet1-vsubnet2 30.0.2.0/24..
AddressPrefix    Name                        PrivateEndpointNetworkPolicies    PrivateLinkServiceNetworkPolicies    ProvisioningState    ResourceGroup
---------------  --------------------------  --------------------------------  -----------------------------------  -------------------  ---------------
30.0.2.0/24      vmxcloudv2-vnet1-vsubnet2  Enabled                           Enabled                              Succeeded            vmxcloudv2
Done creating subnet vmxcloudv2-vnet1-vsubnet2 with prefix 30.0.2.0/24
Creating virtual subnet vmxcloudv2-vnet1-vsubnet3 30.0.3.0/24..
AddressPrefix    Name                        PrivateEndpointNetworkPolicies    PrivateLinkServiceNetworkPolicies    ProvisioningState    ResourceGroup
---------------  --------------------------  --------------------------------  -----------------------------------  -------------------  ---------------
30.0.3.0/24      vmxcloudv2-vnet1-vsubnet3  Enabled                           Enabled                              Succeeded            vmxcloudv2
Done creating subnet vmxcloudv2-vnet1-vsubnet3 with prefix 30.0.3.0/24
Creating routing tables...
DisableBgpRoutePropagation    Location    Name                       ProvisioningState    ResourceGroup
----------------------------  ----------  -------------------------  -------------------  ---------------
False                         westus      vmxcloudv2-rt-to-subnet2  Succeeded            vmxcloudv2
DisableBgpRoutePropagation    Location    Name                       ProvisioningState    ResourceGroup
----------------------------  ----------  -------------------------  -------------------  ---------------
False                         westus      vmxcloudv2-rt-to-subnet3  Succeeded            vmxcloudv2
AddressPrefix    Name                        PrivateEndpointNetworkPolicies    PrivateLinkServiceNetworkPolicies    ProvisioningState    ResourceGroup
---------------  --------------------------  --------------------------------  -----------------------------------  -------------------  ---------------
30.0.2.0/24      vmxcloudv2-vnet1-vsubnet2  Enabled                           Enabled                              Succeeded            vmxcloudv2
AddressPrefix    Name                        PrivateEndpointNetworkPolicies    PrivateLinkServiceNetworkPolicies    ProvisioningState    ResourceGroup
---------------  --------------------------  --------------------------------  -----------------------------------  -------------------  ---------------
30.0.3.0/24      vmxcloudv2-vnet1-vsubnet3  Enabled                           Enabled                              Succeeded            vmxcloudv2
Creating public IP addresses and NICs...


Created NIC vmx183-x3-vfp-nic with public IP...


Created NIC vmx183-x3-vcp-nic with public IP...

Created NIC vmx183-x3-wan-nic2...

Created NIC vmx183-x3-wan-nic3...
Adding routes to routing tables
AddressPrefix    Name       NextHopIpAddress    NextHopType       ProvisioningState    ResourceGroup
---------------  ---------  ------------------  ----------------  -------------------  ---------------
30.0.3.0/24      ToSubnet3  30.0.2.4            VirtualAppliance  Succeeded            vmxcloudv2
AddressPrefix    Name       NextHopIpAddress    NextHopType       ProvisioningState    ResourceGroup
---------------  ---------  ------------------  ----------------  -------------------  ---------------
30.0.2.0/24      ToSubnet2  30.0.3.4            VirtualAppliance  Succeeded            vmxcloudv2
Creating vMX VM...
ResourceGroup    PowerState    PublicIpAddress           Fqdns    PrivateIpAddress                       MacAddress                                                               Location    Zones
---------------  ------------  ------------------------  -------  -------------------------------------  -----------------------------------------------------------------------  ----------  -------
vmxcloudv2      VM running    52.160.86.48,40.83.167.5           30.0.0.10,30.0.1.10,30.0.2.4,30.0.3.4  00-0D-3A-5C-0B-1D,00-0D-3A-5C-08-9C,00-0D-3A-5C-09-83,00-0D-3A-5C-0E-D8  westus
vMX deployment complete
Verifying Deployment of vMX to Microsoft Azure
To verify the deployment of the vMX instance to Microsoft Azure:
- To view the vMX resource group and its resources after
deployment is completed, from the right- hand menu, click Resource
groups to access the Resource Groups page as shown in Figure 1.Figure 1: Resource Groups Page

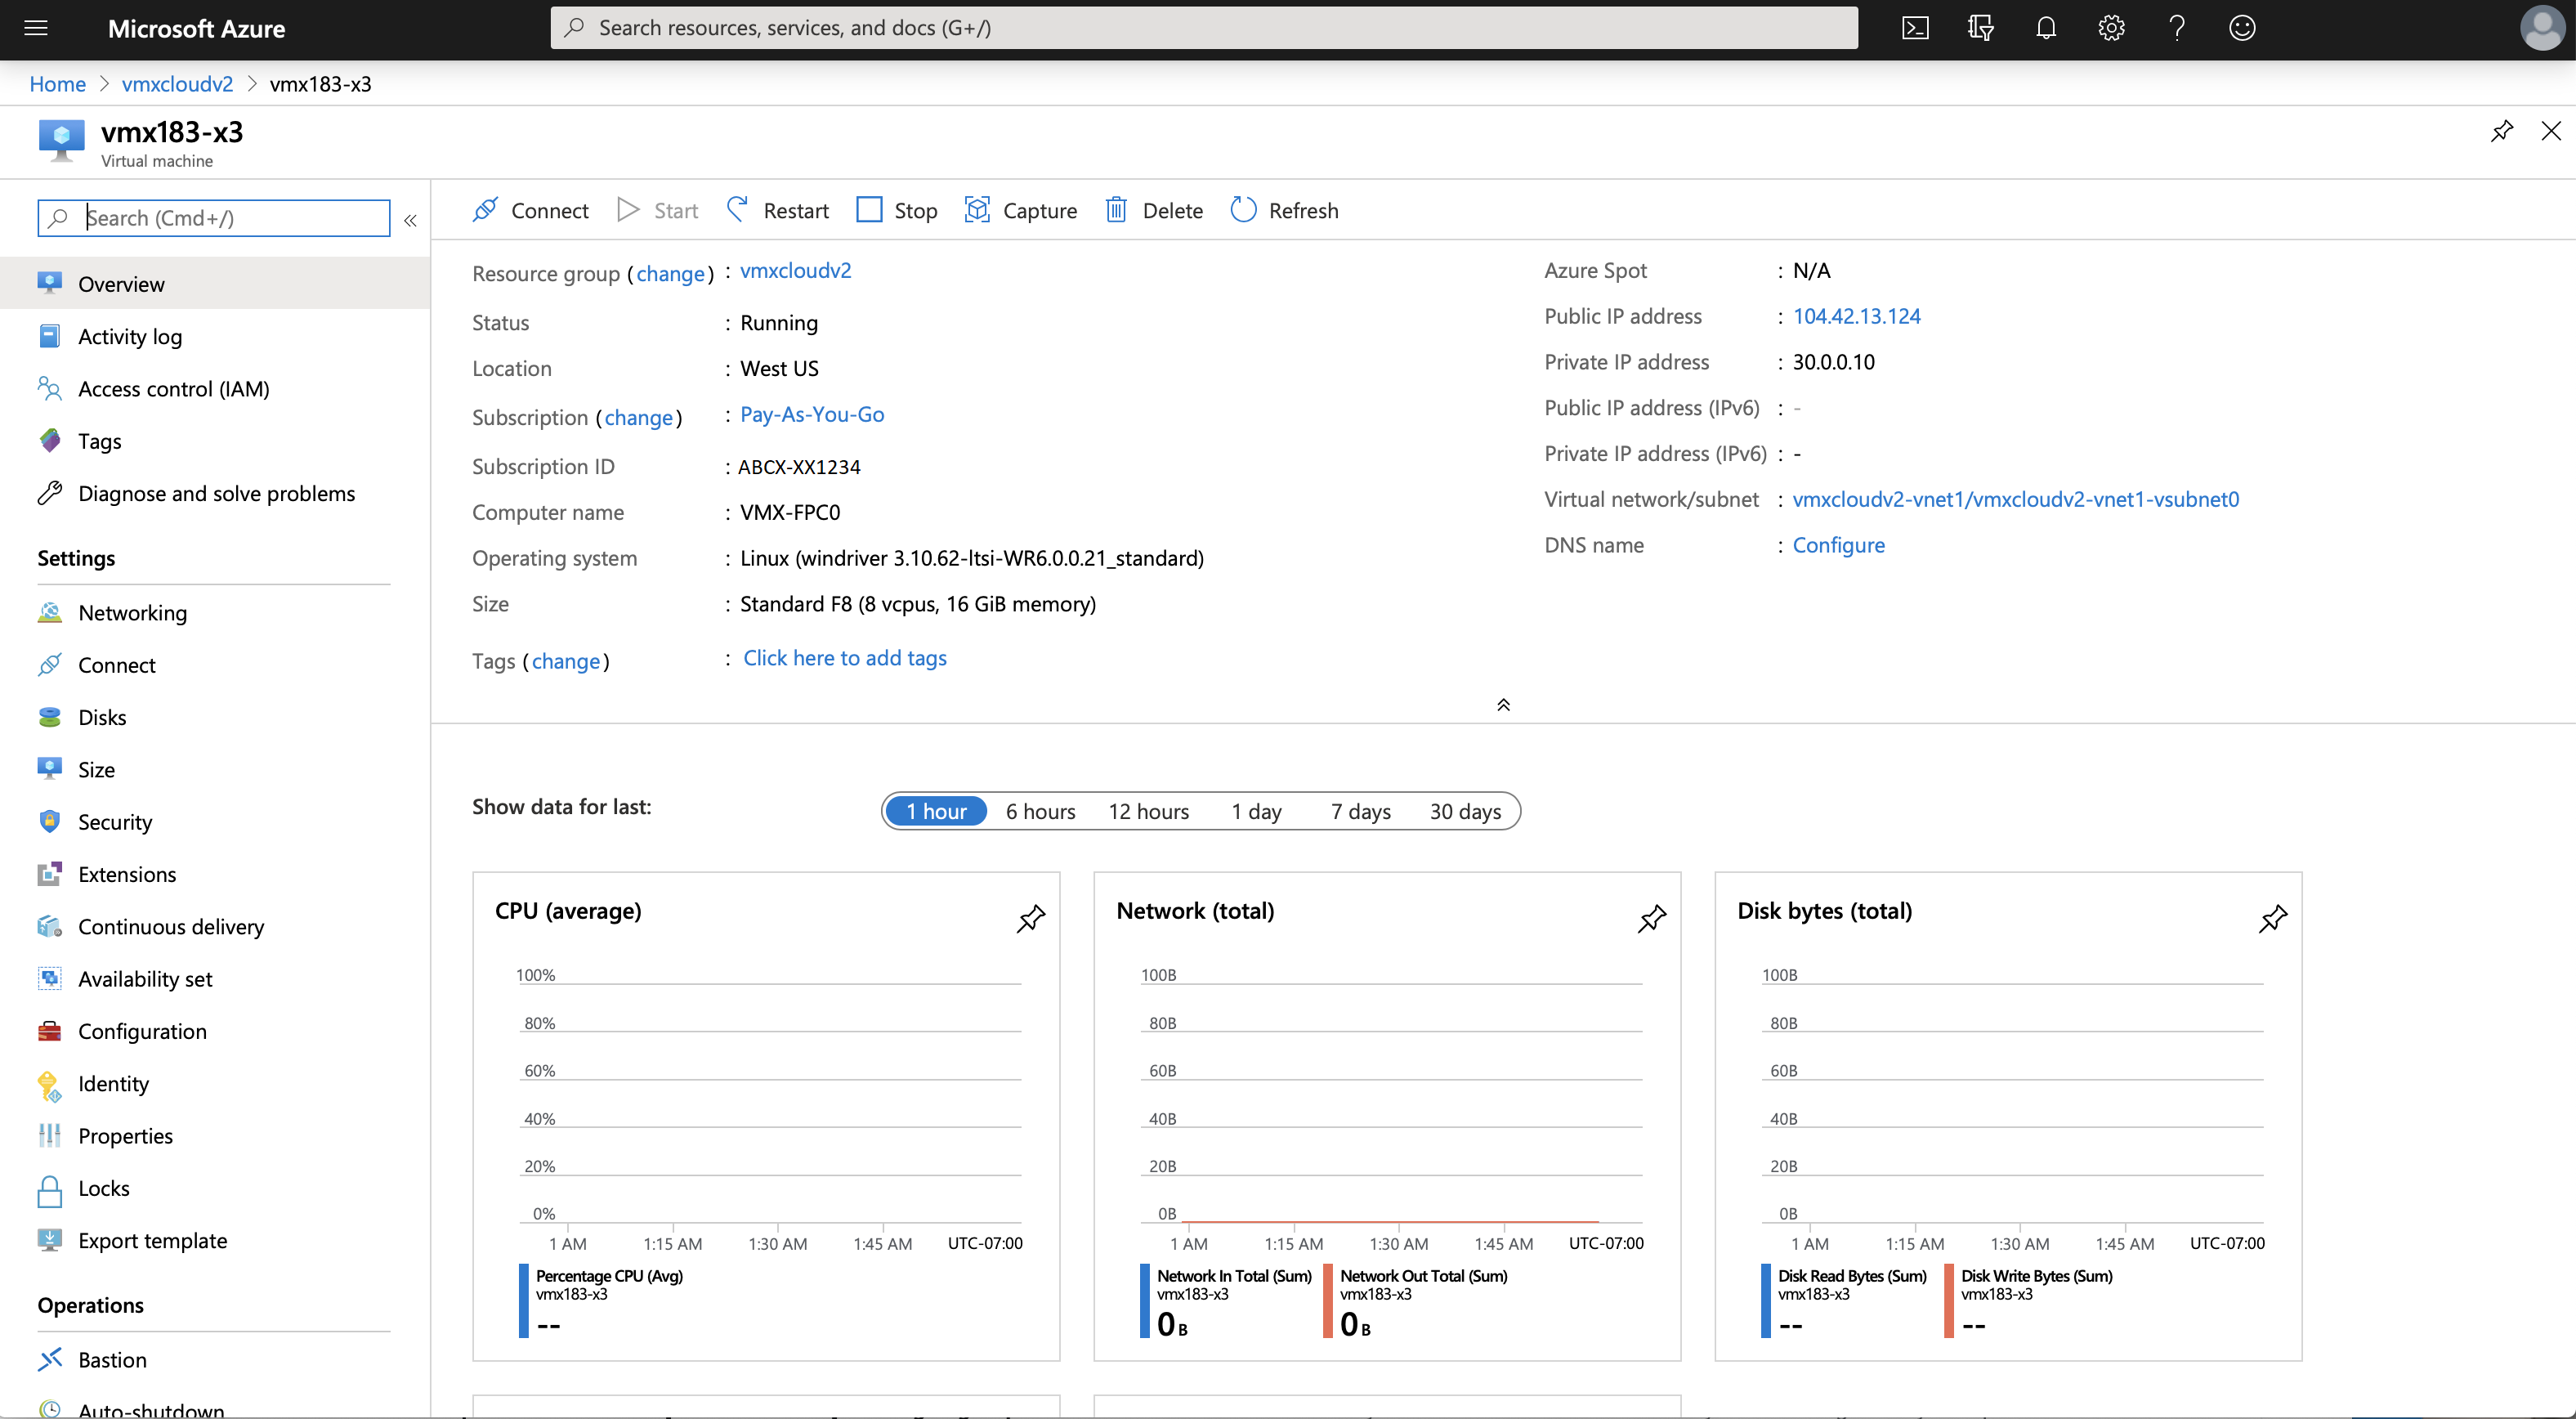
- To view details of the vMX VM associated with the resource
group, click the name of the vMX. Details are displayed as shown in Figure 2.Figure 2: vMX VM Details
Logging In to a vMX Instance
After vMX deployment is completed, the vMX instance is automatically powered on and launched. At this point, you can use an SSH client to log in to the vMX instance.
It can take 15 minutes or more for the vMX to finish deploying and be ready for login via SSH.
To log in to the vMX VM:
Initial Configuration for vMX
At a minimum, you must perform these initial Junos OS configuration tasks after logging in to vMX: