Example: Configuring LDAP Authentication for Juniper Secure Connect (CLI Procedure)
Overview
LDAP helps in authentication of users. You can define one or more LDAP groups and use a specific local IP pool for address assignment based on group membership when you use LDAP as an authentication option. If you don't specify the local IP pool per group, Junos OS assigns an IP address from the local IP pool configured in the access profile.
To configure user groups, include the allowed-groups statement at
the [edit access ldap-options] hierarchy level. These group names
match the names in your LDAP directory.
Consider the following LDAP groups such as group1, group2, and group3. You can assign group1 to address pool Juniper_Secure_Connect_Addr-Pool. You can assign group2 to address pool poolB. You can assign group3 to address pool poolC.
-
User1 belongs to group1. User1's group matches one of the configured groups, User1 is authenticated. Based on the group membership, the system assigns IP address to User1 from following address pool Juniper_Secure_Connect_Addr-Pool.
-
User2 belongs to group2. User2's group matches one of the configured groups, User2 is authenticated. Based on the group membership, the system assigns IP address to User2 from following address pool poolB.
-
User3 belongs to group3. User3's group matches one of the configured groups, User3 is authenticated. Based on the group membership, the system assigns IP address to User3 from following address pool poolC.
-
User4's group doesn't match either of the configured groups.
Table-1 describes LDAP server response when the ldap-options is
configured at the global access level and within the access profile. The priority of
profile configuration is higher than global configuration.
| Username | Configured Matched group | LDAP server returned groups | Address pool | Action |
|---|---|---|---|---|
| User1 | group1 | group1, group2, group3 | Juniper_Secure_Connect_Addr-Pool | Accept (Matching configured groups) |
| User2 | group2 | group1, group2, group3 | poolB | Accept (Matching configured groups) |
| User3 | group3 | group1, group2, group3 | poolC | Accept (Matching configured groups) |
| User4 | group4 | groupX, groupY, groupZ | poolD | Reject (Not matching configured matched groups) |
This example uses LDAP as the authentication option where the user belongs to a single group.
Requirements
This example uses the following hardware and software components:
-
Any SRX Series Firewall
-
Junos OS Release 23.1R1
Before you begin:
-
ldap options, see ladp-options
-
Enable LDAP authentication with TLS/SSL for secure connections, see Enabling LDAP Authentication with TLS/SSL for Secure Connections.
For information about prerequisites, see System Requirements for Juniper Secure Connect.
You must ensure that the SRX Series Firewall uses either a signed certificate or a self-signed certificate instead of the default system-generated certificate. Before you start configuring Juniper Secure Connect, you must bind the certificate to the SRX Series Firewall by executing the following command:
user@host# set system services web-management https pki-local-certificate <cert_name>
For example:
user@host# set system services web-management https pki-local-certificate SRX_Certificate
Where SRX_Certificate is the certificate obtained from CA or self-signed certificate.
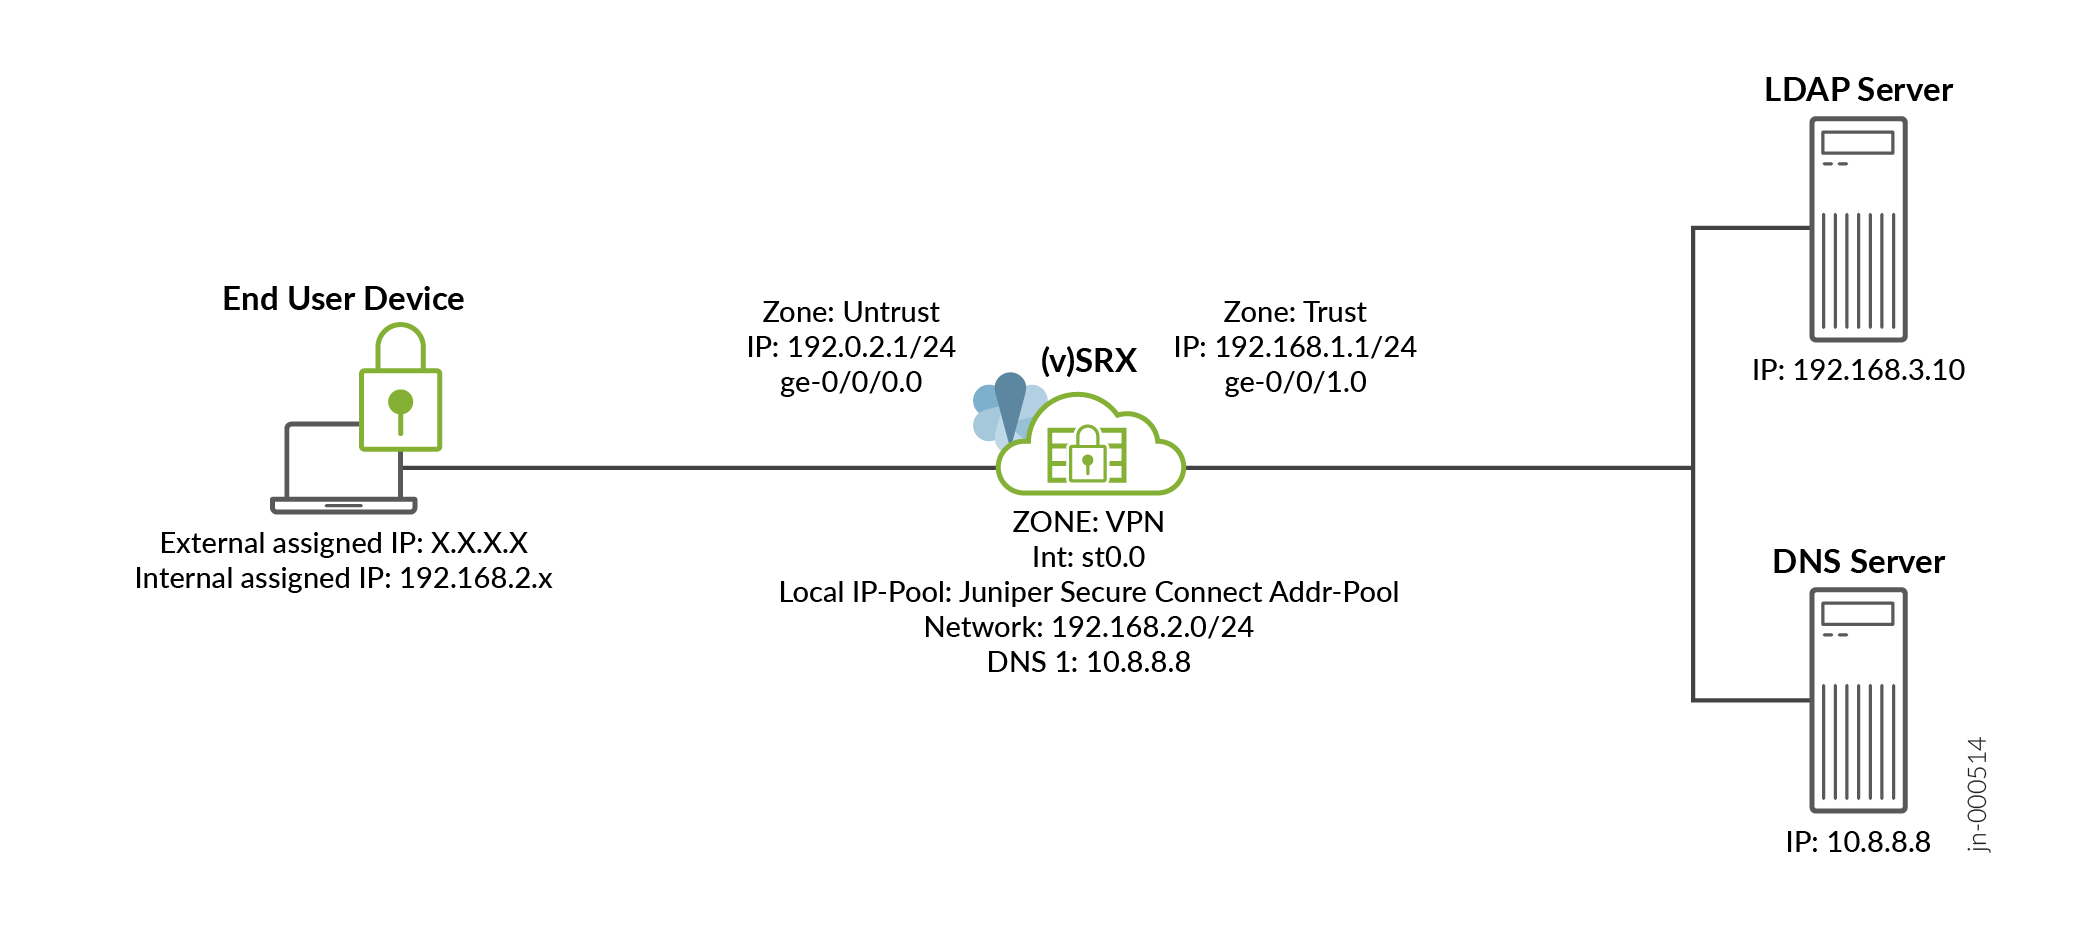
Topology
The below figure shows the topology in this example.
Figure 1: Configuring LDAP authentication for Juniper Secure Connect
Configuration
In this example, we use LDAP as the authentication option where the user belongs to a single group.
CLI Quick Configuration
To quickly configure this example, copy the following commands, paste them into a text file, remove any line breaks, change any details necessary to match your network configuration, and then copy and paste the commands into the CLI at the [edit] hierarchy level.
set security ike proposal JUNIPER_SECURE_CONNECT authentication-method pre-shared-keys
set security ike proposal JUNIPER_SECURE_CONNECT dh-group group19
set security ike proposal JUNIPER_SECURE_CONNECT authentication-algorithm sha-384
set security ike proposal JUNIPER_SECURE_CONNECT encryption-algorithm aes-256-cbc
set security ike proposal JUNIPER_SECURE_CONNECT lifetime-seconds 28800

set security ike policy JUNIPER_SECURE_CONNECT mode aggressive
set security ike policy JUNIPER_SECURE_CONNECT proposals JUNIPER_SECURE_CONNECT
set security ike policy JUNIPER_SECURE_CONNECT pre-shared-key ascii-text "$9$vWL8xd24Zk.5bs.5QFAtM8X7bsgoJDHq4o"

set security ike gateway JUNIPER_SECURE_CONNECT dynamic hostname ra.example.com
set security ike gateway JUNIPER_SECURE_CONNECT dynamic ike-user-type shared-ike-id
set security ike gateway JUNIPER_SECURE_CONNECT ike-policy JUNIPER_SECURE_CONNECT
set security ike gateway JUNIPER_SECURE_CONNECT dead-peer-detection optimized
set security ike gateway JUNIPER_SECURE_CONNECT dead-peer-detection interval 10
set security ike gateway JUNIPER_SECURE_CONNECT dead-peer-detection threshold 5
set security ike gateway JUNIPER_SECURE_CONNECT version v1-only
set security ike gateway JUNIPER_SECURE_CONNECT aaa access-profile JUNIPER_SECURE_CONNECT
set security ike gateway JUNIPER_SECURE_CONNECT tcp-encap-profile SSL-VPN
set security ike gateway JUNIPER_SECURE_CONNECT external-interface ge-0/0/0

set security ipsec proposal JUNIPER_SECURE_CONNECT authentication-algorithm hmac-sha-256-128
set security ipsec proposal JUNIPER_SECURE_CONNECT encryption-algorithm aes-256-cbc
set security ipsec proposal JUNIPER_SECURE_CONNECT lifetime-seconds 3600

set security ipsec policy JUNIPER_SECURE_CONNECT perfect-forward-secrecy keys group19
set security ipsec policy JUNIPER_SECURE_CONNECT proposals JUNIPER_SECURE_CONNECT

set security ipsec vpn JUNIPER_SECURE_CONNECT bind-interface st0.0
set security ipsec vpn JUNIPER_SECURE_CONNECT ike gateway JUNIPER_SECURE_CONNECT
set security ipsec vpn JUNIPER_SECURE_CONNECT ike ipsec-policy JUNIPER_SECURE_CONNECT
set security ipsec vpn JUNIPER_SECURE_CONNECT traffic-selector ts1 local-ip 0.0.0.0/0
set security ipsec vpn JUNIPER_SECURE_CONNECT traffic-selector ts1 remote-ip 0.0.0.0/0

set security remote-access profile ra.example.com ipsec-vpn JUNIPER_SECURE_CONNECT
set security remote-access profile ra.example.com access-profile JUNIPER_SECURE_CONNECT
set security remote-access profile ra.example.com client-config JUNIPER_SECURE_CONNECT
set security remote-access client-config JUNIPER_SECURE_CONNECT connection-mode manual
set security remote-access client-config JUNIPER_SECURE_CONNECT dead-peer-detection interval 10
set security remote-access client-config JUNIPER_SECURE_CONNECT dead-peer-detection threshold 5

set access address-assignment pool Juniper_Secure_Connect_Addr-Pool family inet network 192.168.2.0/24
set access address-assignment pool Juniper_Secure_Connect_Addr-Pool family inet xauth-attributes primary-dns 10.8.8.8/32
set access address-assignment pool Juniper_Secure_Connect_Addr-Pool family inet xauth-attributes primary-wins 192.168.3.10/32

set access profile JUNIPER_SECURE_CONNECT authentication-order ldap
set access profile JUNIPER_SECURE_CONNECT  ldap-options base-distinguished-name CN=Users,DC=juniper,DC=net
set access profile JUNIPER_SECURE_CONNECT  ldap-options search search-filter CN=
set access profile JUNIPER_SECURE_CONNECT ldap-options search admin-search distinguished-name CN=Administrator,CN=Users,DC=juniper,DC=net
set access profile JUNIPER_SECURE_CONNECT ldap-options search admin-search password "$9$Bmf1hreK8x7Vrl24ZGiHkqmPQ36/t0OR"
set access profile JUNIPER_SECURE_CONNECT ldap-options allowed-groups group1 address-assignment pool Juniper_Secure_Connect_Addr-Pool
set access profile JUNIPER_SECURE_CONNECT ldap-server 192.168.3.10
set access firewall-authentication web-authentication default-profile JUNIPER_SECURE_CONNECT

set services ssl termination profile Juniper_SCC-SSL-Term-Profile server-certificate JUNIPER_SECURE_CONNECT(RSA)
set security tcp-encap profile SSL-VPN ssl-profile Juniper_SCC-SSL-Term-Profile
set security policies from-zone trust to-zone VPN policy JUNIPER_SECURE_CONNECT-1 match source-address any
set security policies from-zone trust to-zone VPN policy JUNIPER_SECURE_CONNECT-1 match destination-address any
set security policies from-zone trust to-zone VPN policy JUNIPER_SECURE_CONNECT-1 match application any
set security policies from-zone trust to-zone VPN policy JUNIPER_SECURE_CONNECT-1 then permit
set security policies from-zone trust to-zone VPN policy JUNIPER_SECURE_CONNECT-1 then log session-close
set security policies from-zone VPN to-zone trust policy JUNIPER_SECURE_CONNECT-2 match source-address any
set security policies from-zone VPN to-zone trust policy JUNIPER_SECURE_CONNECT-2 match destination-address any
set security policies from-zone VPN to-zone trust policy JUNIPER_SECURE_CONNECT-2 match application any
set security policies from-zone VPN to-zone trust policy JUNIPER_SECURE_CONNECT-2 then permit
set security policies from-zone VPN to-zone trust policy JUNIPER_SECURE_CONNECT-2 then log session-close

set interfaces ge-0/0/0 description untrust
set interfaces ge-0/0/0 unit 0 family inet address 192.0.2.1/24
set interfaces ge-0/0/1 description trust
set interfaces ge-0/0/1 unit 0 family inet address 192.168.1.1/24
set interfaces st0 unit 0 family inet

set security zones security-zone untrust host-inbound-traffic system-services ike
set security zones security-zone untrust host-inbound-traffic system-services https
set security zones security-zone untrust host-inbound-traffic system-services tcp-encap
set security zones security-zone untrust interfaces ge-0/0/0.0
set security zones security-zone trust interfaces ge-0/0/1.0
set security zones security-zone vpn interface st0.0
Step-by-Step Procedure
The following example requires you to navigate various levels in the configuration hierarchy.
- Configure one or more Internet Key Exchange (IKE) proposals; then you
associate these proposals with an IKE policy. Configure IKE gateway
options.
user@host# set security ike proposal JUNIPER_SECURE_CONNECT authentication-method pre-shared-keys
user@host# set security ike proposal JUNIPER_SECURE_CONNECT dh-group group19
user@host# set security ike proposal JUNIPER_SECURE_CONNECT authentication-algorithm sha-384
user@host# set security ike proposal JUNIPER_SECURE_CONNECT encryption-algorithm aes-256-cbc
user@host# set security ike proposal JUNIPER_SECURE_CONNECT lifetime-seconds 28800

user@host# set security ike policy JUNIPER_SECURE_CONNECT mode aggressive
user@host# set security ike policy JUNIPER_SECURE_CONNECT proposals JUNIPER_SECURE_CONNECT
user@host# set security ike policy JUNIPER_SECURE_CONNECT pre-shared-key ascii-text "$9$vWL8xd24Zk.5bs.5QFAtM8X7bsgoJDHq4o"

user@host# set security ike gateway JUNIPER_SECURE_CONNECT dynamic hostname ra.example.com
user@host# set security ike gateway JUNIPER_SECURE_CONNECT dynamic ike-user-type shared-ike-id
user@host# set security ike gateway JUNIPER_SECURE_CONNECT ike-policy JUNIPER_SECURE_CONNECT
user@host# set security ike gateway JUNIPER_SECURE_CONNECT dead-peer-detection optimized
user@host# set security ike gateway JUNIPER_SECURE_CONNECT dead-peer-detection interval 10
user@host# set security ike gateway JUNIPER_SECURE_CONNECT dead-peer-detection threshold 5
user@host# set security ike gateway JUNIPER_SECURE_CONNECT version v1-only
user@host# set security ike gateway JUNIPER_SECURE_CONNECT aaa access-profile JUNIPER_SECURE_CONNECT
user@host# set security ike gateway JUNIPER_SECURE_CONNECT tcp-encap-profile SSL-VPN
user@host# set security ike gateway JUNIPER_SECURE_CONNECT external-interface ge-0/0/0
- Configure one or more IPsec proposals; then you associate these proposals
with an IPsec policy. Configure IPsec VPN parameters and traffic
selectors.
user@host# set security ipsec proposal JUNIPER_SECURE_CONNECT authentication-algorithm hmac-sha-256-128
user@host# set security ipsec proposal JUNIPER_SECURE_CONNECT encryption-algorithm aes-256-cbc
user@host# set security ipsec proposal JUNIPER_SECURE_CONNECT lifetime-seconds 3600

user@host# set security ipsec policy JUNIPER_SECURE_CONNECT perfect-forward-secrecy keys group19
user@host# set security ipsec policy JUNIPER_SECURE_CONNECT proposals JUNIPER_SECURE_CONNECT

user@host# set security ipsec vpn JUNIPER_SECURE_CONNECT bind-interface st0.0
user@host# set security ipsec vpn JUNIPER_SECURE_CONNECT ike gateway JUNIPER_SECURE_CONNECT
user@host# set security ipsec vpn JUNIPER_SECURE_CONNECT ike ipsec-policy JUNIPER_SECURE_CONNECT
user@host# set security ipsec vpn JUNIPER_SECURE_CONNECT traffic-selector ts1 local-ip 0.0.0.0/0
user@host# set security ipsec vpn JUNIPER_SECURE_CONNECT traffic-selector ts1 remote-ip 0.0.0.0/0
- Configure a remote access profile and client
configuration.
user@host# set security remote-access profile ra.example.com ipsec-vpn JUNIPER_SECURE_CONNECT
user@host# set security remote-access profile ra.example.com access-profile JUNIPER_SECURE_CONNECT
user@host# set security remote-access profile ra.example.com client-config JUNIPER_SECURE_CONNECT
user@host# set security remote-access client-config JUNIPER_SECURE_CONNECT connection-mode manual
user@host# set security remote-access client-config JUNIPER_SECURE_CONNECT dead-peer-detection interval 10
user@host# set security remote-access client-config JUNIPER_SECURE_CONNECT dead-peer-detection threshold 5
- Specify the LDAP server for external authentication
order.
user@host# set access address-assignment pool Juniper_Secure_Connect_Addr-Pool family inet network 192.168.2.0/24
user@host# set access address-assignment pool Juniper_Secure_Connect_Addr-Pool family inet xauth-attributes primary-dns 10.8.8.8/32
user@host# set access address-assignment pool Juniper_Secure_Connect_Addr-Pool family inet xauth-attributes primary-wins 192.168.3.10/32

user@host# set access profile JUNIPER_SECURE_CONNECT authentication-order ldap
user@host# set access profile JUNIPER_SECURE_CONNECT  ldap-options base-distinguished-name CN=Users,DC=juniper,DC=net
user@host# set access profile JUNIPER_SECURE_CONNECT  ldap-options search search-filter CN=
user@host# set access profile JUNIPER_SECURE_CONNECT ldap-options search admin-search distinguished-name CN=Administrator,CN=Users,DC=juniper,DC=net
user@host# set access profile JUNIPER_SECURE_CONNECT ldap-options search admin-search password "$9$Bmf1hreK8x7Vrl24ZGiHkqmPQ36/t0OR"
user@host# set access profile JUNIPER_SECURE_CONNECT ldap-options allowed-groups group1 address-assignment pool Juniper_Secure_Connect_Addr-Pool
user@host# set access profile JUNIPER_SECURE_CONNECT ldap-server 192.168.3.10
user@host# set access firewall-authentication web-authentication default-profile JUNIPER_SECURE_CONNECT
-
Create SSL termination profile. SSL termination is a process where the SRX Series Firewalls acts as an SSL proxy server, and terminates the SSL session from the client. Enter the name for the SSL termination profile and select the server certificate that you use for the SSL termination on the SRX Series Firewalls. The server certificate is a local certificate identifier. Server certificates are used to authenticate the identity of a server.
user@host# set services ssl termination profile Juniper_SCC-SSL-Term-Profile server-certificate JUNIPER_SECURE_CONNECT(RSA)
Create SSL VPN profile. See tcp-encap.
user@host# set security tcp-encap profile SSL-VPN ssl-profile Juniper_SCC-SSL-Term-Profile
-
Create firewall policies.
Create the security policy to permit traffic from the trust zone to the VPN zone.
user@host# set security policies from-zone trust to-zone VPN policy JUNIPER_SECURE_CONNECT-1 match source-address any
user@host# set security policies from-zone trust to-zone VPN policy JUNIPER_SECURE_CONNECT-1 match destination-address anyuser@host# set security policies from-zone trust to-zone VPN policy JUNIPER_SECURE_CONNECT-1 match application any
user@host# set security policies from-zone trust to-zone VPN policy JUNIPER_SECURE_CONNECT-1 then permit
user@host# set security policies from-zone trust to-zone VPN policy JUNIPER_SECURE_CONNECT-1 then log session-close
Create the security policy to permit traffic from the VPN zone to the trust zone.
user@host# set security policies from-zone VPN to-zone trust policy JUNIPER_SECURE_CONNECT-2 match source-address any
user@host# set security policies from-zone VPN to-zone trust policy JUNIPER_SECURE_CONNECT-2 match destination-address any
user@host# set security policies from-zone VPN to-zone trust policy JUNIPER_SECURE_CONNECT-2 match application any
user@host# set security policies from-zone VPN to-zone trust policy JUNIPER_SECURE_CONNECT-2 then permit
user@host# set security policies from-zone VPN to-zone trust policy JUNIPER_SECURE_CONNECT-2 then log session-close
-
Configure Ethernet interface information.
user@host# set interfaces ge-0/0/0 description untrust
user@host# set interfaces ge-0/0/0 unit 0 family inet address 192.0.2.1/24
user@host# set interfaces ge-0/0/1 description trust
user@host# set interfaces ge-0/0/1 unit 0 family inet address 192.168.1.1/24
Configure st0 interface with the family set as inet.
user@host# set interfaces st0 unit 0 family inet
-
Configure security zones.
user@host# set security zones security-zone untrust host-inbound-traffic system-services ike
user@host# set security zones security-zone untrust host-inbound-traffic system-services https
user@host# set security zones security-zone untrust host-inbound-traffic system-services tcp-encap
user@host# set security zones security-zone untrust interfaces ge-0/0/0.0
user@host# set security zones security-zone trust interfaces ge-0/0/1.0
user@host# set security zones security-zone vpn interface st0.0
Results
Check the results of the configuration:
[edit security ike]
proposal JUNIPER_SECURE_CONNECT {
    authentication-method pre-shared-keys;
    dh-group group19;
    authentication-algorithm sha-384;
    encryption-algorithm aes-256-cbc;
    lifetime-seconds 28800;
}
policy JUNIPER_SECURE_CONNECT {
    mode aggressive;
    proposals JUNIPER_SECURE_CONNECT;
    pre-shared-key ascii-text “$9$vWL8xd24Zk.5bs.5QFAtM8X7bsgoJDHq4o"; ## SECRET-DATA
}
gateway JUNIPER_SECURE_CONNECT {
    dynamic {
        hostname ra.example.com;
        ike-user-type shared-ike-id;
    }
    ike-policy JUNIPER_SECURE_CONNECT;
    dead-peer-detection {
        optimized;
        interval 10;
        threshold 5;
    }
    version v1-only;
    aaa {
        access-profile JUNIPER_SECURE_CONNECT;
    }
    tcp-encap-profile SSL-VPN;
    external-interface ge-0/0/0;
}[edit security ipsec]
proposal JUNIPER_SECURE_CONNECT {
authentication-algorithm hmac-sha-256-128;
encryption-algorithm aes-256-cbc;
lifetime-seconds 3600;
}
policy JUNIPER_SECURE_CONNECT {
perfect-forward-secrecy {
keys group19;
}
proposals JUNIPER_SECURE_CONNECT;
}
vpn JUNIPER_SECURE_CONNECT {
bind-interface st0.0;
ike {
gateway JUNIPER_SECURE_CONNECT;
ipsec-policy JUNIPER_SECURE_CONNECT;
}
traffic-selector ts1 {
local-ip 0.0.0.0/0;
remote-ip 0.0.0.0/0;
}
}[edit security remote-access]
profile ra.example.com {
ipsec-vpn JUNIPER_SECURE_CONNECT;
access-profile JUNIPER_SECURE_CONNECT;
client-config JUNIPER_SECURE_CONNECT;
}
client-config JUNIPER_SECURE_CONNECT {
connection-mode manual;
dead-peer-detection {
interval 10;
threshold 5;
}
}[edit access]
address-assignment {
pool Juniper_Secure_Connect_Addr-Pool {
family inet {
network 192.168.2.0/24;
xauth-attributes {
primary-dns 10.8.8.8/32;
primary-wins 192.168.3.10/32;
}
}
}
}
profile JUNIPER_SECURE_CONNECT {
authentication-order ldap;
ldap-options {
base-distinguished-name DC=juniper,DC=net;
search {
search-filter CN=
admin-search {
distinguished-name CN=Administrator,CN=Users,DC=juniper,DC=net;
password "$9$Bmf1hreK8x7Vrl24ZGiHkqmPQ36/t0OR"; ## SECRET-DATA
}
}
allowed-groups {
group1 {
address-assignment {
pool Juniper_Secure_Connect_Addr-Pool;
}
}
}
}
ldap-server 192.168.3.10;
}
firewall-authentication {
web-authentication {
default-profile JUNIPER_SECURE_CONNECT;
}
}[edit services]
ssl {
termination {
profile Juniper_SCC-SSL-Term-Profile {
server-certificate JUNIPER_SECURE_CONNECT(RSA);
}
}
}Make sure that you already have a server certificate to attach with the SSL termination profile.
[edit security]
tcp-encap {
    profile SSL-VPN {
        ssl-profile Juniper_SCC-SSL-Term-Profile;
    }
}
policies {
    from-zone trust to-zone VPN {
        policy JUNIPER_SECURE_CONNECT-1 {
            match {
                source-address any;
                destination-address any;
                application any;
            }
            then {
                permit;
                log {
                    session-close;
                }
            }
        }
    }
    from-zone VPN to-zone trust {
        policy JUNIPER_SECURE_CONNECT-2 {
            match {
                source-address any;
                destination-address any;
                application any;
            }
            then {
                permit;
                log {
                    session-close;
                }
            }
        }
   }
}[edit interfaces]
ge-0/0/0 {
description untrust;
unit 0 {
family inet {
address 192.0.2.1/24;
}
}
}
ge-0/0/1 {
description trust;
unit 0 {
family inet {
address 192.168.1.1/24;
}
}
}
st0 {
unit 0 {
family inet;
}
}[edit security zones]
security-zone untrust {
host-inbound-traffic {
system-services (ike | https | tcp-encap);
}
interfaces {
ge-0/0/0.0;
}
}
security-zone trust {
interfaces {
ge-0/0/1.0;
}
}
security-zone vpn {
interfaces {
st0.0;
}
}Verification
To confirm that the configuration is working properly, enter the following show commands.
Verify IPsec, IKE, and Group Information
Purpose
Display the possible outcomes list based on the LDAP server response when you
use JUNIPER_SECURE_CONNECT access profile and configure
ldap-options within the profile.
Action
From operational mode, enter these commands:
user@host> show network-access address-assignment pool Juniper_Secure_Connect_Addr-Pool
IP address/prefix       Hardware address     Host/User      Type
192.168.2.3              FF:FF:C0:A8:02:03    user1          xauth
user@host> show security ike security-associations detail
IKE peer 192.0.2.100, Index 6771534, Gateway Name: JUNIPER_SECURE_CONNECT
  Role: Responder, State: UP
  Initiator cookie: f174398039244783, Responder cookie: ffb63035b9f3f098
  Exchange type: Aggressive, Authentication method: Pre-shared-keys
  Local: 192.0.2.1:500, Remote: 192.0.2.100:10952
  Lifetime: Expires in 28746 seconds
  Reauth Lifetime: Disabled
  IKE Fragmentation: Disabled, Size: 0
  Remote Access Client Info: Juniper Secure Connect
  Peer ike-id: ra.example.com
  AAA assigned IP: 192.168.2.3
  Algorithms:
   Authentication        : hmac-sha384-192
   Encryption            : aes256-cbc
   Pseudo random function: hmac-sha384
   Diffie-Hellman group  : DH-group-19
  Traffic statistics:
   Input  bytes  :                 2058
   Output bytes  :                 1680
   Input  packets:                   12
   Output packets:                   10
   Input  fragmentated packets:       0
   Output fragmentated packets:       0
  IPSec security associations: 1 created, 0 deleted
  Phase 2 negotiations in progress: 1

    Negotiation type: Quick mode, Role: Responder, Message ID: 0
    Local: 192.0.2.1:500, Remote: 192.0.2.100:10952
    Local identity: 192.0.2.1
    Remote identity: ra.example.com
    Flags: IKE SA is created
user@host> show security ike active-peer detail
Peer address: 192.0.2.100, Port: 10952,
Peer IKE-ID : ra.example.com
AAA username: user1
Assigned network attributes:
IP Address      : 192.168.2.3 ,   netmask         : 255.255.255.0
DNS Address     : 10.8.8.8 ,   DNS2 Address    : 0.0.0.0
WINS Address    : 192.168.3.10 ,   WINS2 Address   : 0.0.0.0

Previous Peer address   : 0.0.0.0, Port               : 0
Active IKE SA indexes   : 6771534
IKE SA negotiated       : 1
IPSec tunnels active    : 1, IPSec Tunnel IDs   : 67108869

DPD Config Mode    : optimized
DPD Config Interval: 10
DPD Config Treshold: 5
DPD Config P1SA IDX: 6771534
DPD Flags          : REMOTE_ACCESS

DPD Stats Req sent: 0, DPD Stats Resp rcvd: 0
DPD Statistics          : DPD TTL                  :5    DPD seq-no               :515423892
DPD Statistics          : DPD triggerd p1SA        :0    DPD Reserved             :0
user@host> show security ipsec security-associations detail
ID: 67108869 Virtual-system: root, VPN Name: JUNIPER_SECURE_CONNECT
  Local Gateway: 192.0.2.1, Remote Gateway: 192.0.2.100
  Traffic Selector Name: ts1
  Local Identity: ipv4(0.0.0.0-255.255.255.255)
  Remote Identity: ipv4(192.168.2.3)
  Version: IKEv1
  DF-bit: clear, Copy-Outer-DSCP Disabled, Bind-interface: st0.0
  Port: 500, Nego#: 4, Fail#: 0, Def-Del#: 0 Flag: 0x24608f29
  Multi-sa, Configured SAs# 1, Negotiated SAs#: 1
  Tunnel events:
    Tue Mar 28 2023 11:34:36: IPSec SA negotiation successfully completed (1 times)
    Tue Mar 28 2023 11:34:36: Tunnel is ready. Waiting for trigger event or peer to trigger negotiation (1 times)
    Tue Mar 28 2023 11:34:35: IKE SA negotiation successfully completed (1 times)
  Direction: inbound, SPI: f74fcaad, AUX-SPI: 0
                              , VPN Monitoring: -
    Hard lifetime: Expires in 3435 seconds
    Lifesize Remaining:  Unlimited
    Soft lifetime: Expires in 2838 seconds
    Mode: Tunnel(0 0), Type: dynamic, State: installed
    Protocol: ESP, Authentication: hmac-sha256-128, Encryption: aes-cbc (256 bits)
    Anti-replay service: counter-based enabled, Replay window size: 64
  Direction: outbound, SPI: 8605b13f, AUX-SPI: 0
                              , VPN Monitoring: -
    Hard lifetime: Expires in 3435 seconds
    Lifesize Remaining:  Unlimited
    Soft lifetime: Expires in 2838 seconds
    Mode: Tunnel(0 0), Type: dynamic, State: installed
    Protocol: ESP, Authentication: hmac-sha256-128, Encryption: aes-cbc (256 bits)
    Anti-replay service: counter-based enabled, Replay window size: 64
Meaning
Command output provides details of matched group.