Create and Manage CSDS Groups
Follow this procedure to create and manage Connected Security Distributed Services (CSDS) groups, and to add devices to the groups.
You can create and manage the CSDS groups to monitor the health status and performance statistics of the SRX Series Firewalls. You can add MX Series routers and SRX Series Firewalls to your groups based on your CSDS architecture. Juniper Security Director supports the following topologies for your CSDS groups:
-
Single MX Series router and standalone SRX Series Firewalls—Add an MX Series router and one or more standalone SRX Series Firewalls to the group.
-
Single MX Series router and SRX Series Firewalls in Multinode High Availability (MNHA) pairs—Add an MX Series router and one or more SRX Series Firewalls in MNHA pairs.
-
Dual MX Series routers and standalone SRX Series Firewalls—Add two MX Series routers and one or more standalone SRX Series Firewalls.
-
Dual MX Series routers and SRX Series Firewalls in MNHA pairs—Add two MX Series routers and one or more SRX Series Firewalls in MNHA pairs.
All the MX Series routers and SRX Series Firewalls are either directly connected or connected through a switch.
Before You Begin
-
Deploy CSDS solution outside of Juniper Security Director. For more information, see Connected Security Distributed Services Architecture Deployment Guide.
-
Onboard your SRX Series Firewalls to Juniper Security Director. For more information, see Onboard SRX Series Firewalls to Juniper Security Director.
Create CSDS Groups
-
Select CSDS Groups.
The CSDS Groups page is displayed.
-
Click Create a CSDS Group on your first visit or the plus icon (
 )
if you want to create additional CSDS groups.
)
if you want to create additional CSDS groups.The Create a CSDS Group page is displayed.
Figure 1: Create CSDS Groups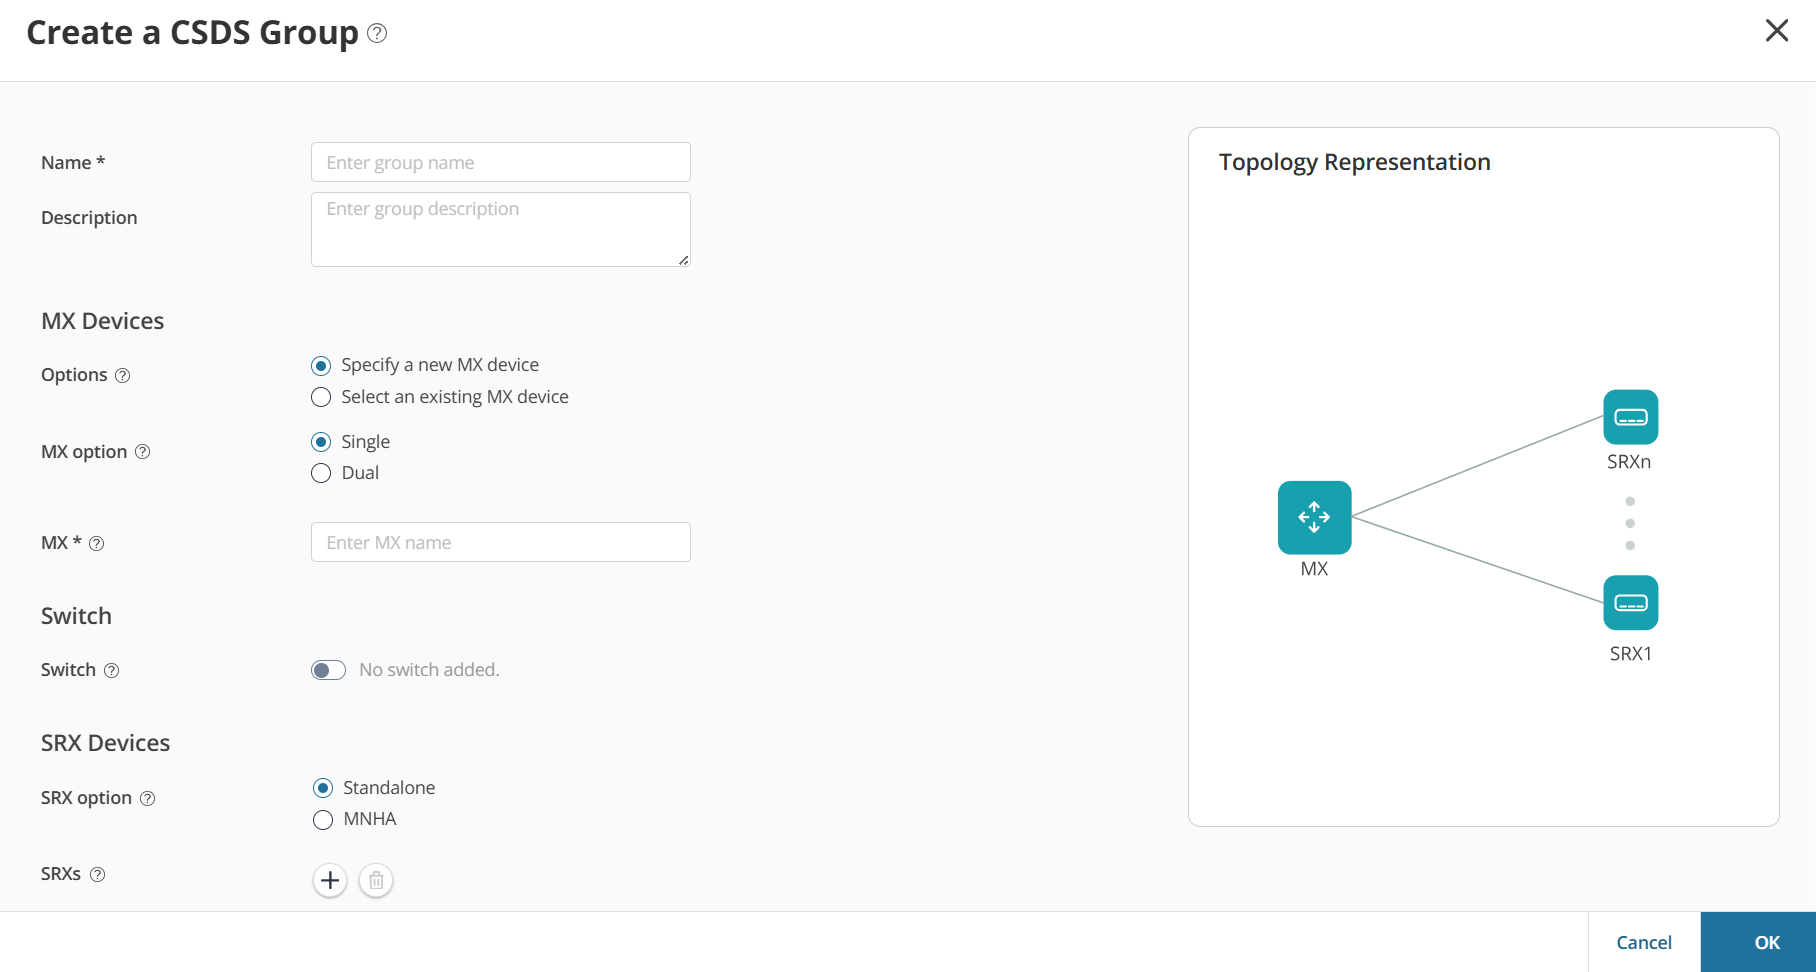
-
Complete the configuration according to the guidelines provided below:
Table 1: Create CSDS Group Settings Field Description Name Enter a unique name for the CSDS group.
The name should be a string of maximum 62 characters. The string can contain alphanumeric characters, spaces, and special characters such as colons, hyphens, periods, underscores, forward slashes, and backslashes.
Description Enter a description of maximum 255 characters for the CSDS group. MX Devices Options Select one of the following options: - Specify a new MX device to add an MX Series router for the first time
-
Specify an existing MX device to select
an MX Series router that was already added to another CSDS
group.
You can create multiple CSDS groups using an MX Series router.
MX Option Select one of the following options: - Single to add an MX Series router
- Dual to add two MX Series routers for load balancing
MX Device Enter the name of the MX Series router. The name should be a string of maximum 125 characters. The string can contain alphanumeric characters and special characters such as hyphens, periods, and underscores.
Switch Switch Enable the toggle button if the SRX Series Firewalls are connected to the MX Series router through a Switch. SRX Devices SRX Option Select one of the following options: - Standalone to add a standalone SRX Series Firewall
- MNHA to add SRX Series Firewalls in an MNHA pair
You cannot add the same SRX Series Firewall to multiple CSDS groups.
SRXs Select the hostname of the SRX Series Firewall and the interface connected to the switch or MX Series router from the drop-down lists. Click the plus icon (
) to add more SRX Series Firewalls.Select the SRX Series Firewall and click the trash can icon (
 ) to delete the SRX Series Firewall.
MNHA SRXs Select the hostnames of the SRX Series Firewalls in the MNHA pair and their interfaces connected to the switch or MX Series router from the drop-down lists. Click the plus icon (
) to add more MNHA pairs.Select the MNHA pair and click the trash can icon (
).When you select the MX Option and SRX Option fields, you can view the topology on the right side of the page as shown in Figure 1. The Topology Representation view is refreshed when you change the field selections.
-
Click OK.
You will see a confirmation message indicating that the CSDS group has been created.
Manage CSDS Groups
-
Edit—Select the CSDS group, and then click the pencil icon (
 ).
). -
Delete—Select the CSDS group, and then click the trash can icon (
).