
Configure a Security Policy Rule
To configure a security policy rule:
-
Select a security policy rule and click the pencil icon (
 ).
).
-
Configure the security policy rule according to Fields on the
Security Policy Name Page.
- Click the plus icon (+) in Sources to display the Sources page. Configure the source endpoint from the list of zones, addresses, including the identity of such source end point.
- Click the plus icon (+) in Destinations to display the Destinations page. Configure the destination end point from the list of zones and addresses.
- Click the plus icon (+) in Applications/Services to display the Applications & Services page. Add applications and services.
- Select the action from the Action dropdown list for the traffic between the source and destination.
- Select the security subscriptions to apply.
- Select the options to apply.
Table 1: Fields on the Security Policy Page Field Action General Information Name
Enter a name containing maximum 63 alphanumeric characters without spaces. The name can contain dashes (-) and underscores (_).
If you do not enter a name, the rule is saved with a default name assigned by Juniper Security Director Cloud.
Description
Enter a description for the policy rule containing maximum 900 characters.
The description cannot contain special characters such as ampersand (&), angular brackets (<, >) or a new line.
Sources
Select a source endpoint.
Click the plus icon (+) to select an endpoint from the list of zone, addresses, and users to apply the security policy rule.
-
Zone—Select a source zone, either a standard or variable zone, for SRX Series Firewalls to define the context for the policy. Zone policies are applied on traffic entering from a source zone to a destination zone.
Ensure that the variable zone is not same for both source and destination zones. If you select the same variable zone for both zones, an error message is displayed when you deploy the security policy.
-
Addresses—Enter the IPv4 or IPv6 addresses or address groups to include in the security policy rule. Select Any to add any address, Specific to select the addresses.
You can copy and paste addresses to a rule using Copy-Paste Objects. Here is an example:
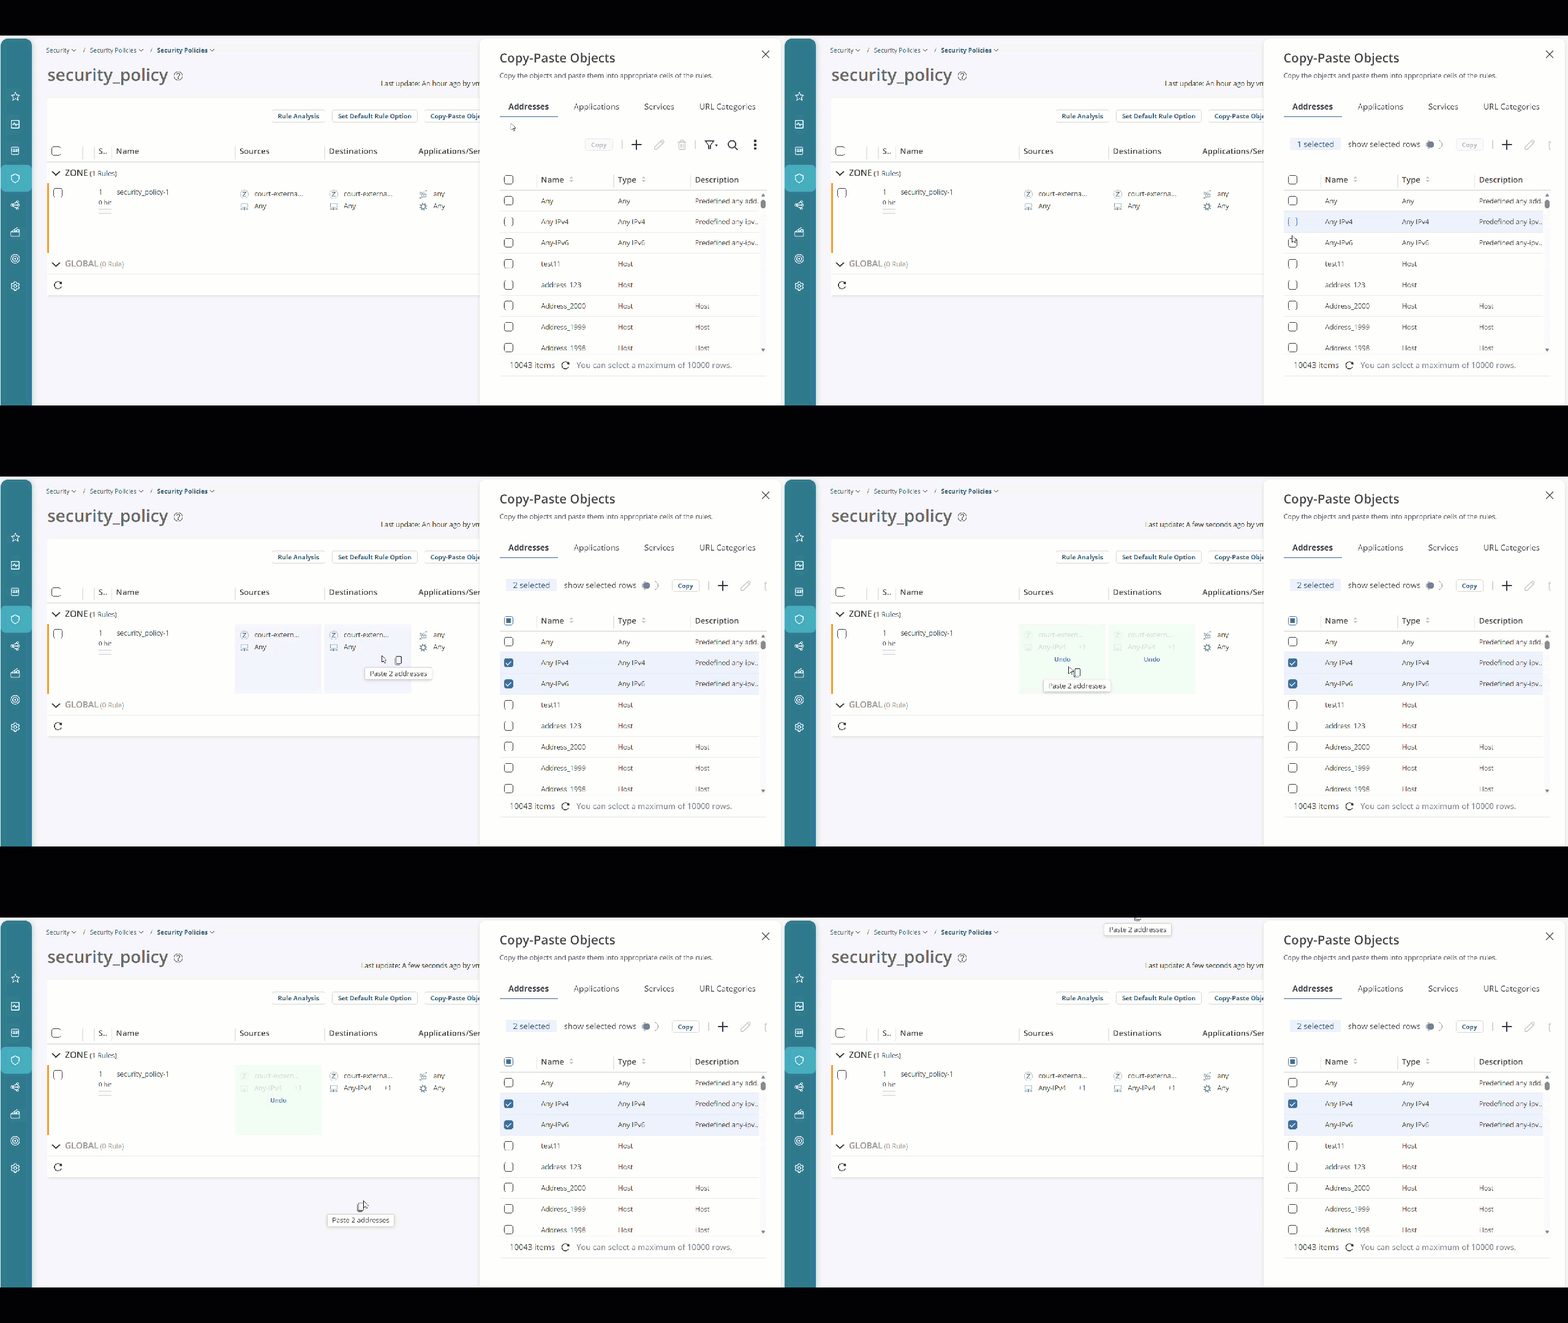
For more details, see Copy Paste an Object to a Security Policy Rule in Add and Manage Security Policy Rules.
-
Exclude addresses—Select the IPv4 addresses to exclude from the security policy rule. This setting is available only when you select Specific in Addresses.
-
Identity—Select the source identity to use as the match criteria for the policy. You can have different policy rules based on user roles and user groups.
Destinations
Select a destination endpoint.
Click the plus icon (+) to select the endpoint from the list of zones, addresses, and URL categories to apply the security policy rule.
-
Zone—Select a destination zone, either a standard or variable zone, for SRX Series Firewalls to define the context for the policy. Zone policies are applied on traffic entering from a source zone to a destination zone.
Ensure that the variable zone is not same for both source and destination zones. If you select the same variable zone for both zones, an error message is displayed when you deploy the security policy.
-
Addresses—Enter the IPv4 or IPv6 addresses or address groups to include in the security policy rule. Select Any to add any address, Specific to select the addresses.
-
Exclude addresses—Select the IPv4 addresses to exclude from the security policy rule. This setting is available only when you select Specific in Addresses.
-
URL categories—Select Any to add any URL in the security policy rule, Specific to select the URLs, or None.
You can copy and paste addresses to source and destination and URL categories to a destination column of rules using Copy-Paste Objects. For more details, see Copy Paste an Object to a Security Policy Rule in Add and Manage Security Policy Rules.
Applications/Services
Select the applications and services.
Click the plus icon (+) to select the application and service options.
-
Applications—Select Any to add any application, Specific to select the applications, or None. Use the search field to find a specific application.
-
Services—Select Any to add any services, Specific to select the services, or Default to add Junos-default services. Select the check box for the services, click the arrow (>) to transfer them to the Selected column. Use the search fields at the top of each column to find specific services.
You can copy and paste applications and services to a rule using Copy-Paste Objects. For more details, see Copy Paste an Object to a Security Policy Rule in Add and Manage Security Policy Rules.
The secure Web proxy feature does not support unified policies. If you want to associate a secure Web proxy profile with the rule, you must disable Applications. You can select the required applications when you configure the secure Web proxy profile.
Action
Select the action for the traffic between the source and destination from the drop-down list.
- Permit—Devices permit the traffic.
- Deny—Devices silently drop all packets for the session and do not send any active control messages such as TCP reset or ICMP unreachable.
-
Reject—Devices drop the packets and
send the following message based on the traffic type:
- TCP traffic: Devices send the TCP reset message to the source host.
- UDP traffic: Devices send the destination unreachable, port unreachable ICMP message.
- For all other traffic: Devices drop the packets without notifying the source host.
-
Redirect—Define a response in the unified policy to notify the connected client when a policy blocks HTTP or HTTPS traffic with a reject action.
-
Message—Select the message from the drop-down list, or click Create redirect message and enter the message.
-
URL—Select the redirect URL from the drop-down list, or click Add redirect URL and enter the redirect URL.
-
-
Tunnel—Devices permit traffic using the type of VPN tunneling options applied to the policy.
Security Subscriptions Select the security subscriptions to apply to the security policy rule.
-
IPS—When you select the Permit action, you can specify an IPS profile by selecting a profile from the list to monitor and prevent intrusions.
-
Content Security—When you select the Permit action, you can specify a content security profile for protection against multiple threat types including spam and malware, and control access to unapproved websites and content. To select a Content Security profile:
Enable Content Security and click Customize.
The Security Subscription window opens.
Select the Content Security profile from the list or click Create New to create a new content security profile inline.
If you select Content Security profile with Juniper NextGen web filtering profile, you must have Junos OS version 23.4R1 or later installed.
-
Decrypt—When you select the Permit, Reject, or Redirect action, you can configure a decrypt profile to perform SSL encryption and decryption between the client and the server and obtain granular application information which enables you to apply advanced security subscriptions protection and detect threats.
-
Flow-based AV—When you set the action to Permit, you can assign a flow-based antivirus profile to the security policy to scan packets in the payload content for threats in real-time and block the content if a threat is detected.
-
Anti-malware—When you set the action to Permit, you can assign the anti-malware profile to the security policy to define the files to send to the ATP cloud for inspection and the action to be taken when malware is detected.
-
SecIntel—When you set the action to Permit, you can assign the SecIntel profile group to the security policy to add SecIntel profiles, such as C&C, DNS, and infected hosts.
- Secure Web Proxy—When you set the action to Permit, you can enable the toggle switch to assign the secure Web proxy profile to enable applications to bypass a proxy server and connect to a web server directly. See Secure Web Proxy Overview for more information about secure Web proxy profile.
-
ICAP Redirect—When you select the Permit or Reject action, you can assign the ICAP redirect profile to decrypt HTTP or HTTPS traffic and redirect HTTP messages to a third-party, on-premise DLP server.
Click Customize to configure the security subscription profiles. If there is no default profile configured, you can configure it using the customize option or set the default profile using Global Options. See Configure Global Options for Security Policies.
This setting is available only if you select the Permit or the Reject action.
Options
Schedule
Select a pre-saved schedule. The schedule options are populated with the selected schedule data.
Policy schedules enable you to define when a policy is active and are an implicit match criterion. You can define the day of the week and the time of the day when the policy is active. For example, you can define a security policy that opens or closes access based on business hours.
Session initiate logs
Select this option to enable logging of events when sessions are created.
Session close logs
Select this option to enable logging of events when sessions are closed.
When logging is enabled, the system logs at session close time by default.
Rule options
Create an object to specify the redirect options, the authentication, the TCP-options, and the action for destination-address translated or untranslated packets.