Example: Configure Application Identification in Juniper Security Director Cloud to Manage Web Applications
As an administrator, you can control user access to external websites and web applications to ensure full control and visibility. Within the applications, you can further restrict user activities to prevent any uploading actions that could consume excessive bandwidth or violate compliance regulations. Use this configuration example to configure application identification (AppID) in Juniper Security Director Cloud.
Juniper Networks® AppSecure is a suite of application-aware security services for Juniper Networks® SRX Series Firewalls. These services deliver security measures to provide visibility and control over the types of applications in a network. AppSecure uses a classification engine to accurately identify applications regardless of port or protocol, including nested applications that reside within trusted network services.
Application identification, a service of AppSecure, recognizes traffic at different network layers using characteristics other than port number. The service uses protocol bundles containing application signatures and information parsed from packets to identify applications.
Benefits of Application Identification
- Wide monitoring coverage—Provides granular control over applications, including video streaming, peer-to-peer communication, social networking, and messaging. AppID also identifies services, port usage, underlying technology, and behavioral characteristics of applications. With this visibility, you can block evasive applications inline at the SRX Series Firewall.
- Control over network traffic—Identifies applications and allows, blocks, or limits applications regardless of port or protocol, including applications known for using evasive techniques to avoid identification. This identification helps organizations control the types of traffic allowed to enter and exit the network.
Application Identification Mapping Overview
Application signature mapping is a method used to accurately identify applications generating network traffic by analyzing the content at the application layer (Layer 7). This approach enables more precise security enforcement and traffic management. Applications are identified by using a downloadable protocol bundle.
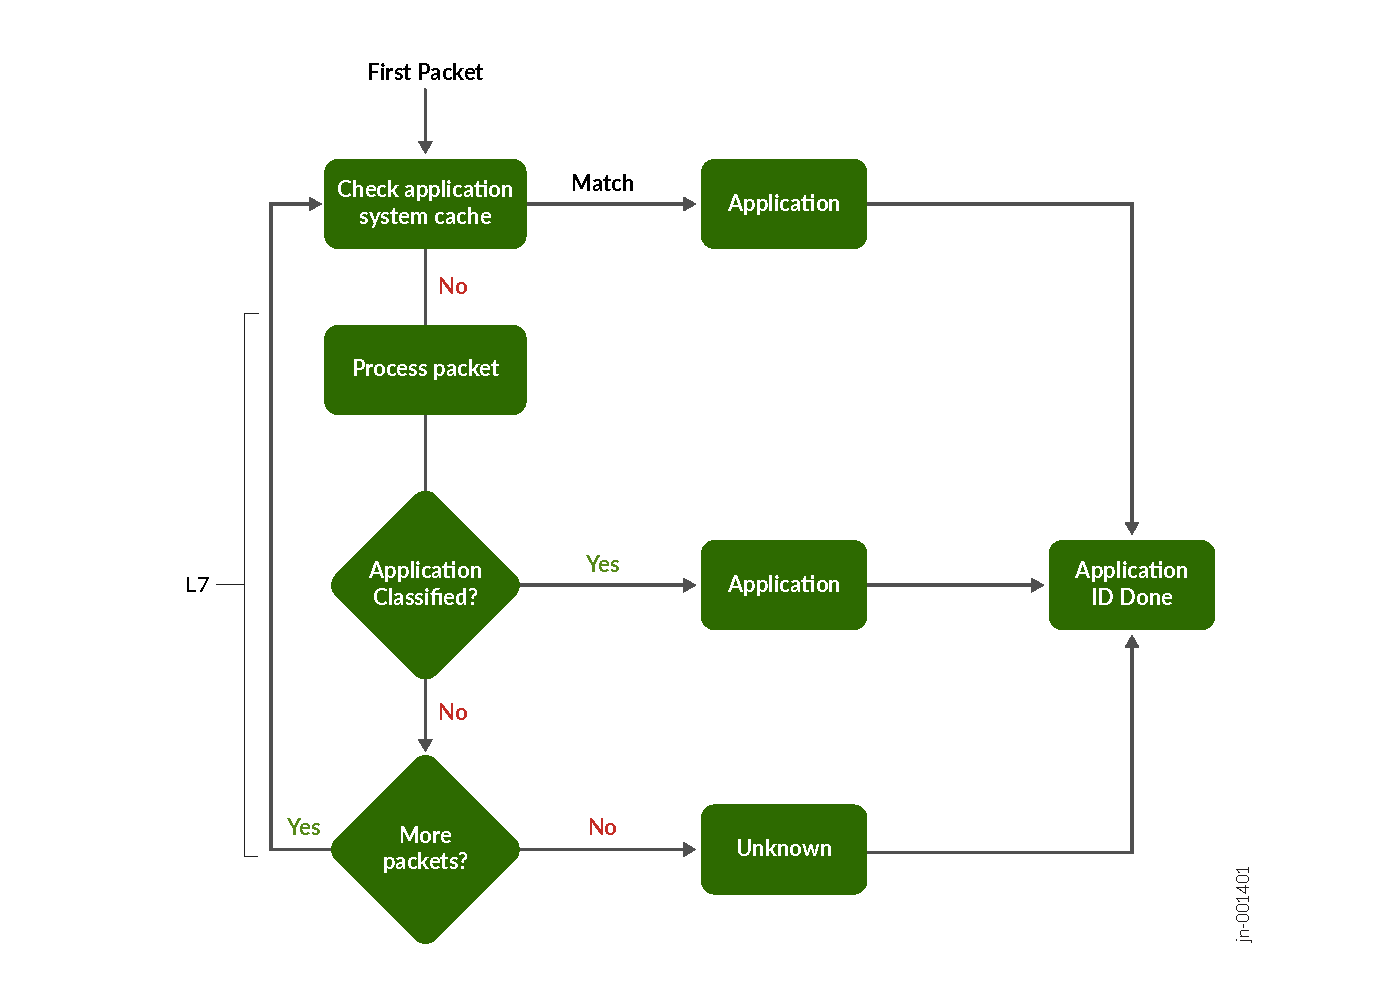
Every packet in the flow passes through the AppID engine until the application is identified. Application bindings are saved in the application system cache (ASC) to expedite future identification. AppID uses signatures to identify applications based on protocol grammar analysis of the first few packets of a session. If the AppID engine can't identify the application, the engine waits for more packets to analyze.
-
Traffic Detection—When a new traffic flow begins, the AppID engine monitors and captures the initial packets exchanged between the source and destination.
-
Checking Application System Cache (ASC)—The AppID engine first checks the ASC to determine if there is an existing application binding for the flow. If a match is found, the application is immediately identified and mapped to that flow.
-
Signature Analysis—If no match is found in the ASC, the system uses a protocol bundle containing known application signatures. It compares details from the initial packets’ payloads against this database to look for a match.
-
Grammar and Protocol Inspection—The AppID engine analyzes the protocol grammar and additional packet contents, seeking more granular indicators of the application’s identity.
-
Signature Matching—If a signature in the protocol bundle matches the captured packet data, the application is successfully identified and the mapping is recorded in the cache for future efficiency.
-
Ongoing Packet Analysis (if no match)—If no signature match is found, the engine continues to inspect additional packets in the session, repeating the process for each until a match is determined or the flow is classified as unknown.
-
Classification as Unknown—If, after processing several packets, the application cannot be identified, it is categorized as an unknown application and processes according to the security policy.
By following this sequence, application signature mapping provides an organized and systematic approach to identifying and managing application traffic with high accuracy and speed.
Application Identification in Juniper Security Director Cloud
Juniper® Security Director Cloud provides tools for managing application identification within enterprise networks. Juniper Security Director Cloud allows users to create, modify, clone, and delete application signatures and signature groups.
You can also add custom application signatures that are not included in Juniper Networks' predefined database. You can create these custom signatures based on parameters such as Internet Control Message Protocol (ICMP), IP protocol, IP address, and Layer 7 context values. This functionality helps you identify patterns in application traffic more precisely.
Topology for Configuring Application Identification in Juniper Security Director Cloud
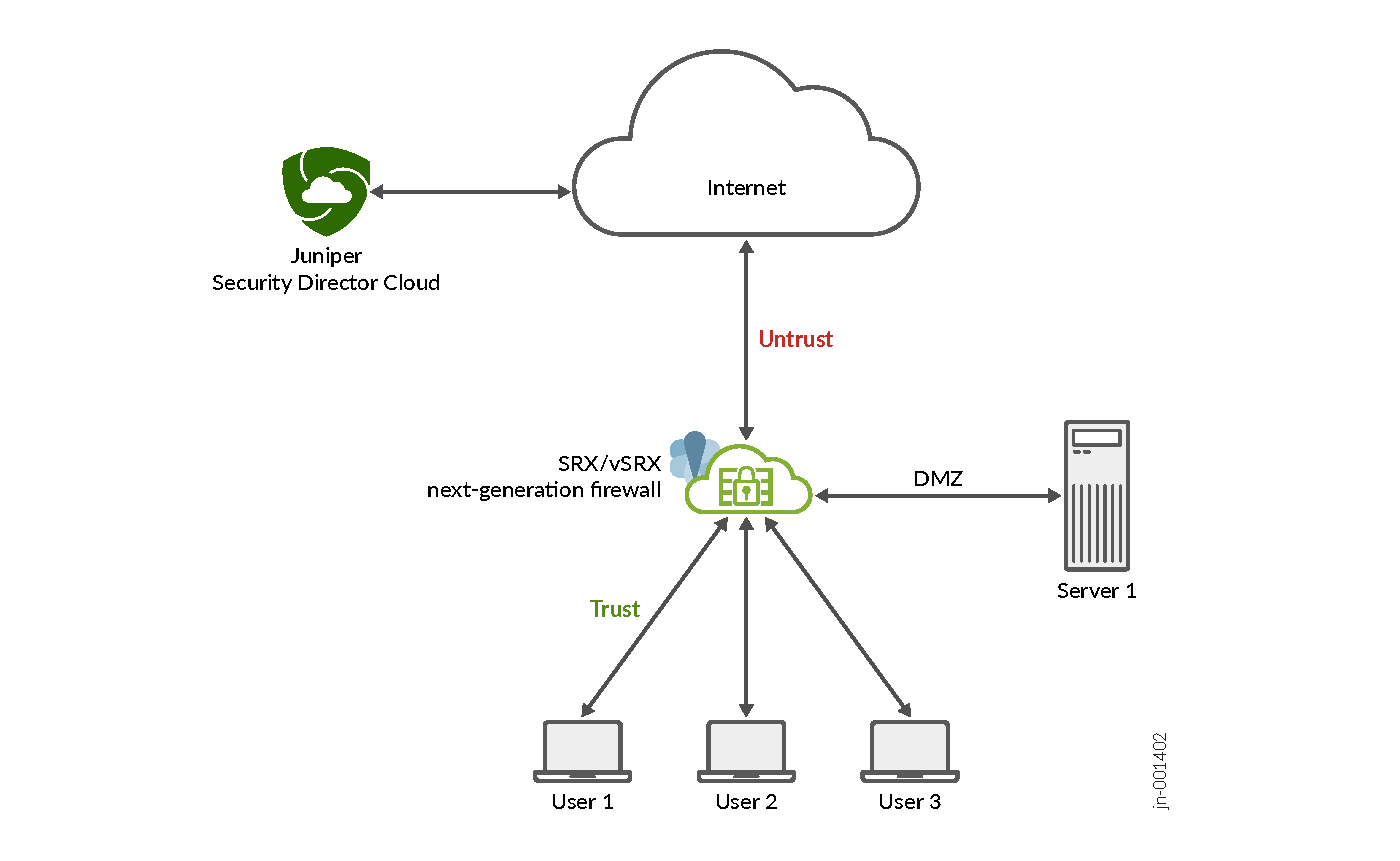
This topology centralizes web application traffic management, enhancing network security. The figure shows how Juniper Security Director Cloud manages SRX Series Firewalls through the Internet. You can configure AppID profiles and security policies in Juniper Security Director Cloud which are then applied to the SRX Series Firewalls.
SRX Series Firewalls perform various tasks from Juniper Security Director Cloud. The firewalls inspect device traffic, identify Web applications, and enforce security policies such as allow, monitor, or block applications, and manage bandwidth.
Juniper Security Director Cloud also provides tools to monitor traffic, track policy enforcement, and adjust configurations based on activity and compliance needs.
Before You Begin
The following list describes the prerequisites to configuring AppID:
-
Create your Juniper Security Director Cloud organization account. See Create Your Juniper Security Director Cloud Organization Account.
-
Add your purchased device subscriptions to Juniper Security Director Cloud. See Add and Manage Subscriptions.
-
Add your devices to Juniper Security Director Cloud. See Add Devices.
-
Associate the devices with your purchased device subscriptions. See Device Subscriptions.
-
Install the application signature security package. See Install Security Package.
-
Enable automatic update of the application signature security package. See Enable Automatic Update of Security Package.
Application Identification Configuration
This configuration example describes the workflow for creating a security policy to allow access to all websites, updating the policy to restrict access to Facebook and YouTube, then configure packet capture of unknown application traffic packets to detect applications that do not match the application signature.
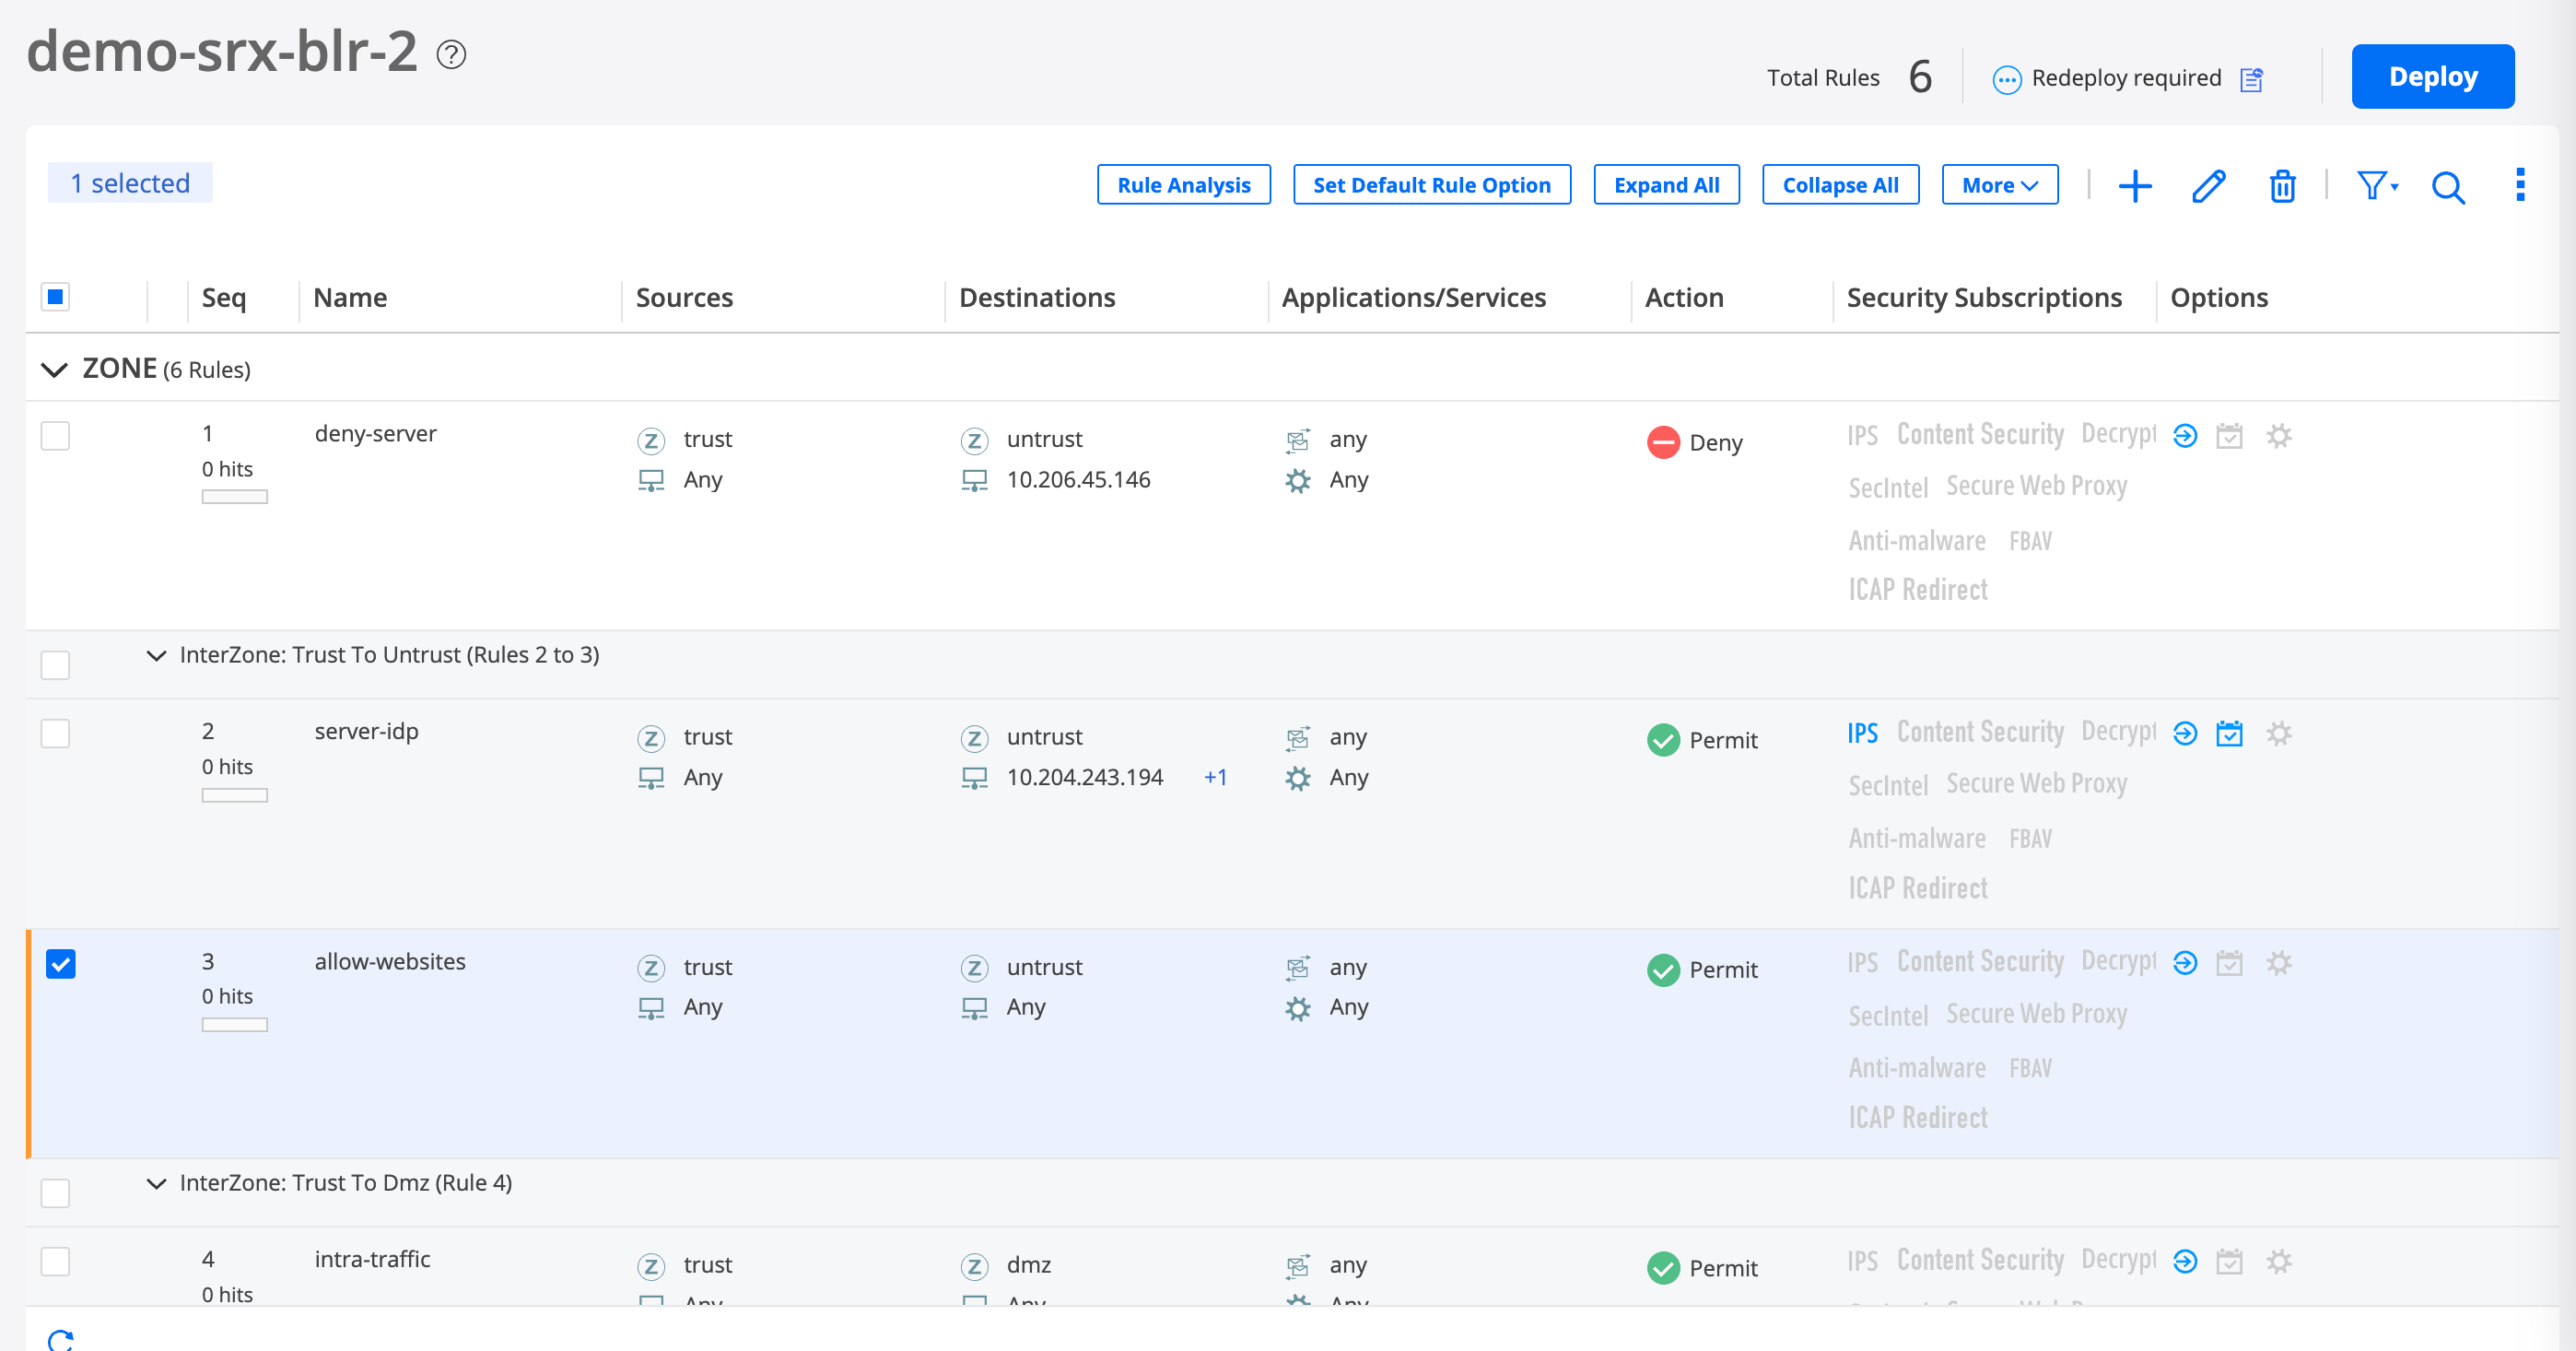
- Step 1: Create a Security Policy to Allow Access to All Websites
- Step 2: Add a Security Policy Rule to Restrict Access to Facebook
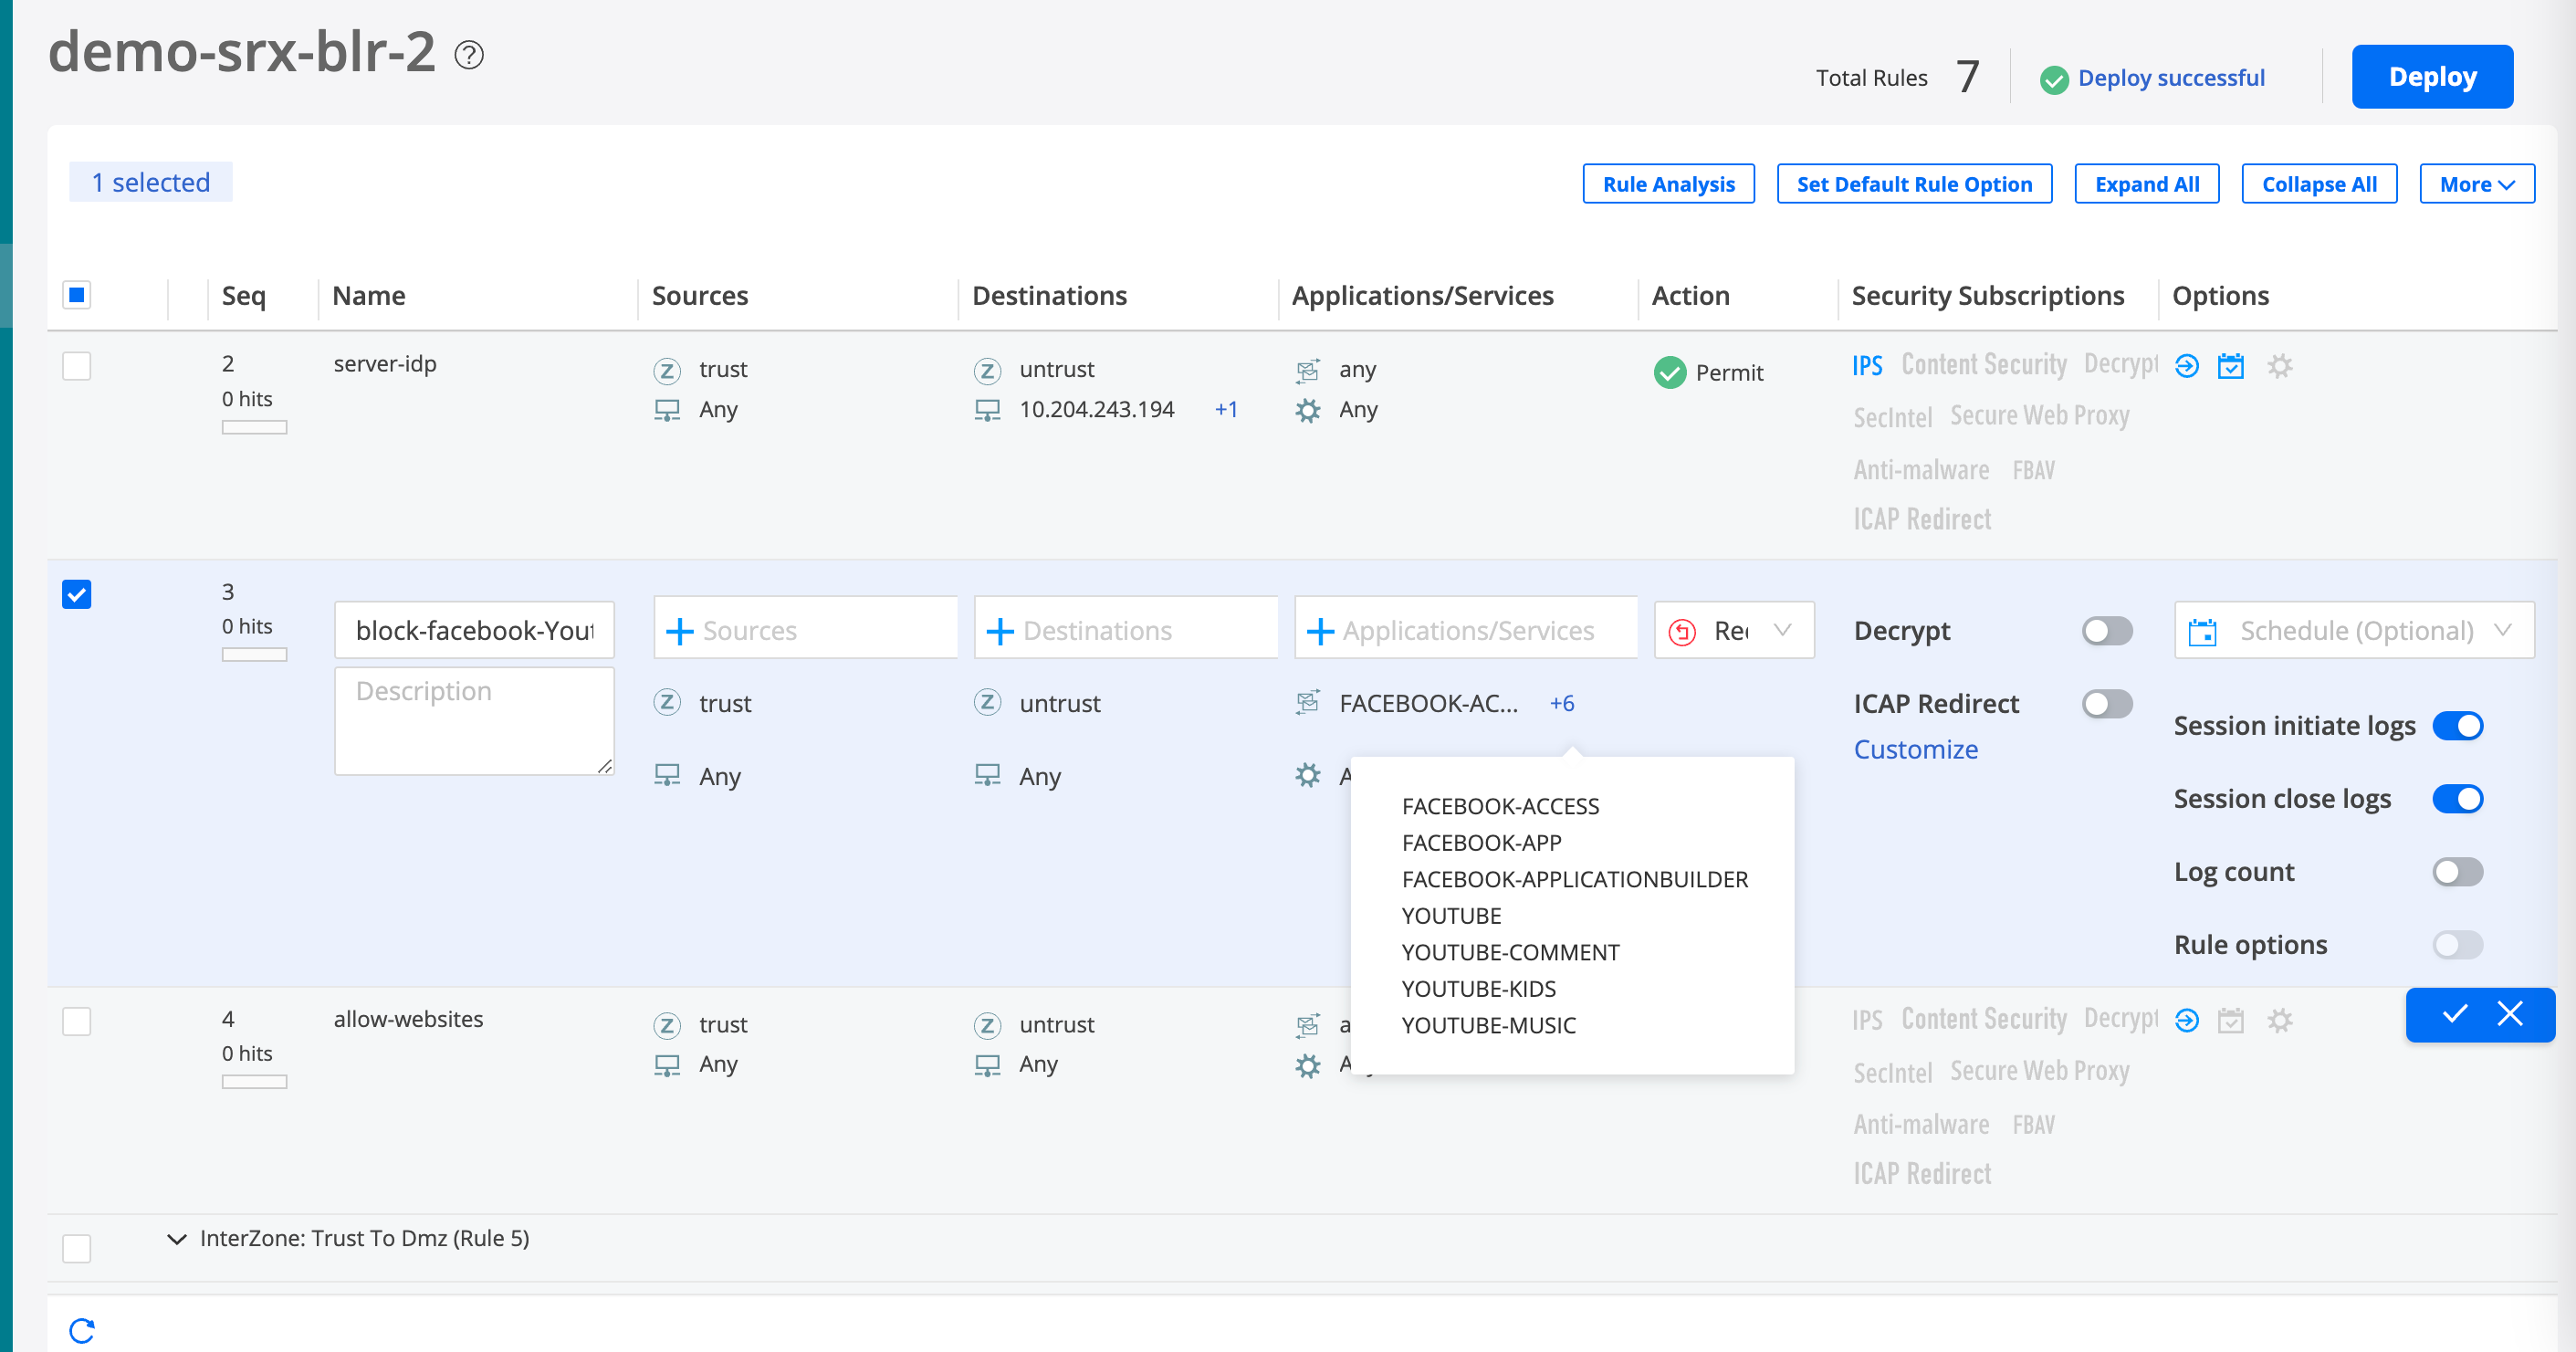
- Step 3: Update the Security Policy Rule to Restrict Access to YouTube
- Step 4: Verify Access is Blocked to Facebook and YouTube
- Step 5: Configure Packet Capture for Unknown Application Traffic
Step 1: Create a Security Policy to Allow Access to All Websites
-
Click the plus icon (
 ). The Add Security
Policy page is displayed.
). The Add Security
Policy page is displayed.
-
Under Deployment Time options, select Run Now to
deploy the policy immediately and click OK.
A job is created. Click the job ID to go to the Jobs page and see the deployment status.
-
Verify user access to all websites.
-
See the event logs and verify whether access to websites, such
as Facebook and YouTube, is allowed.
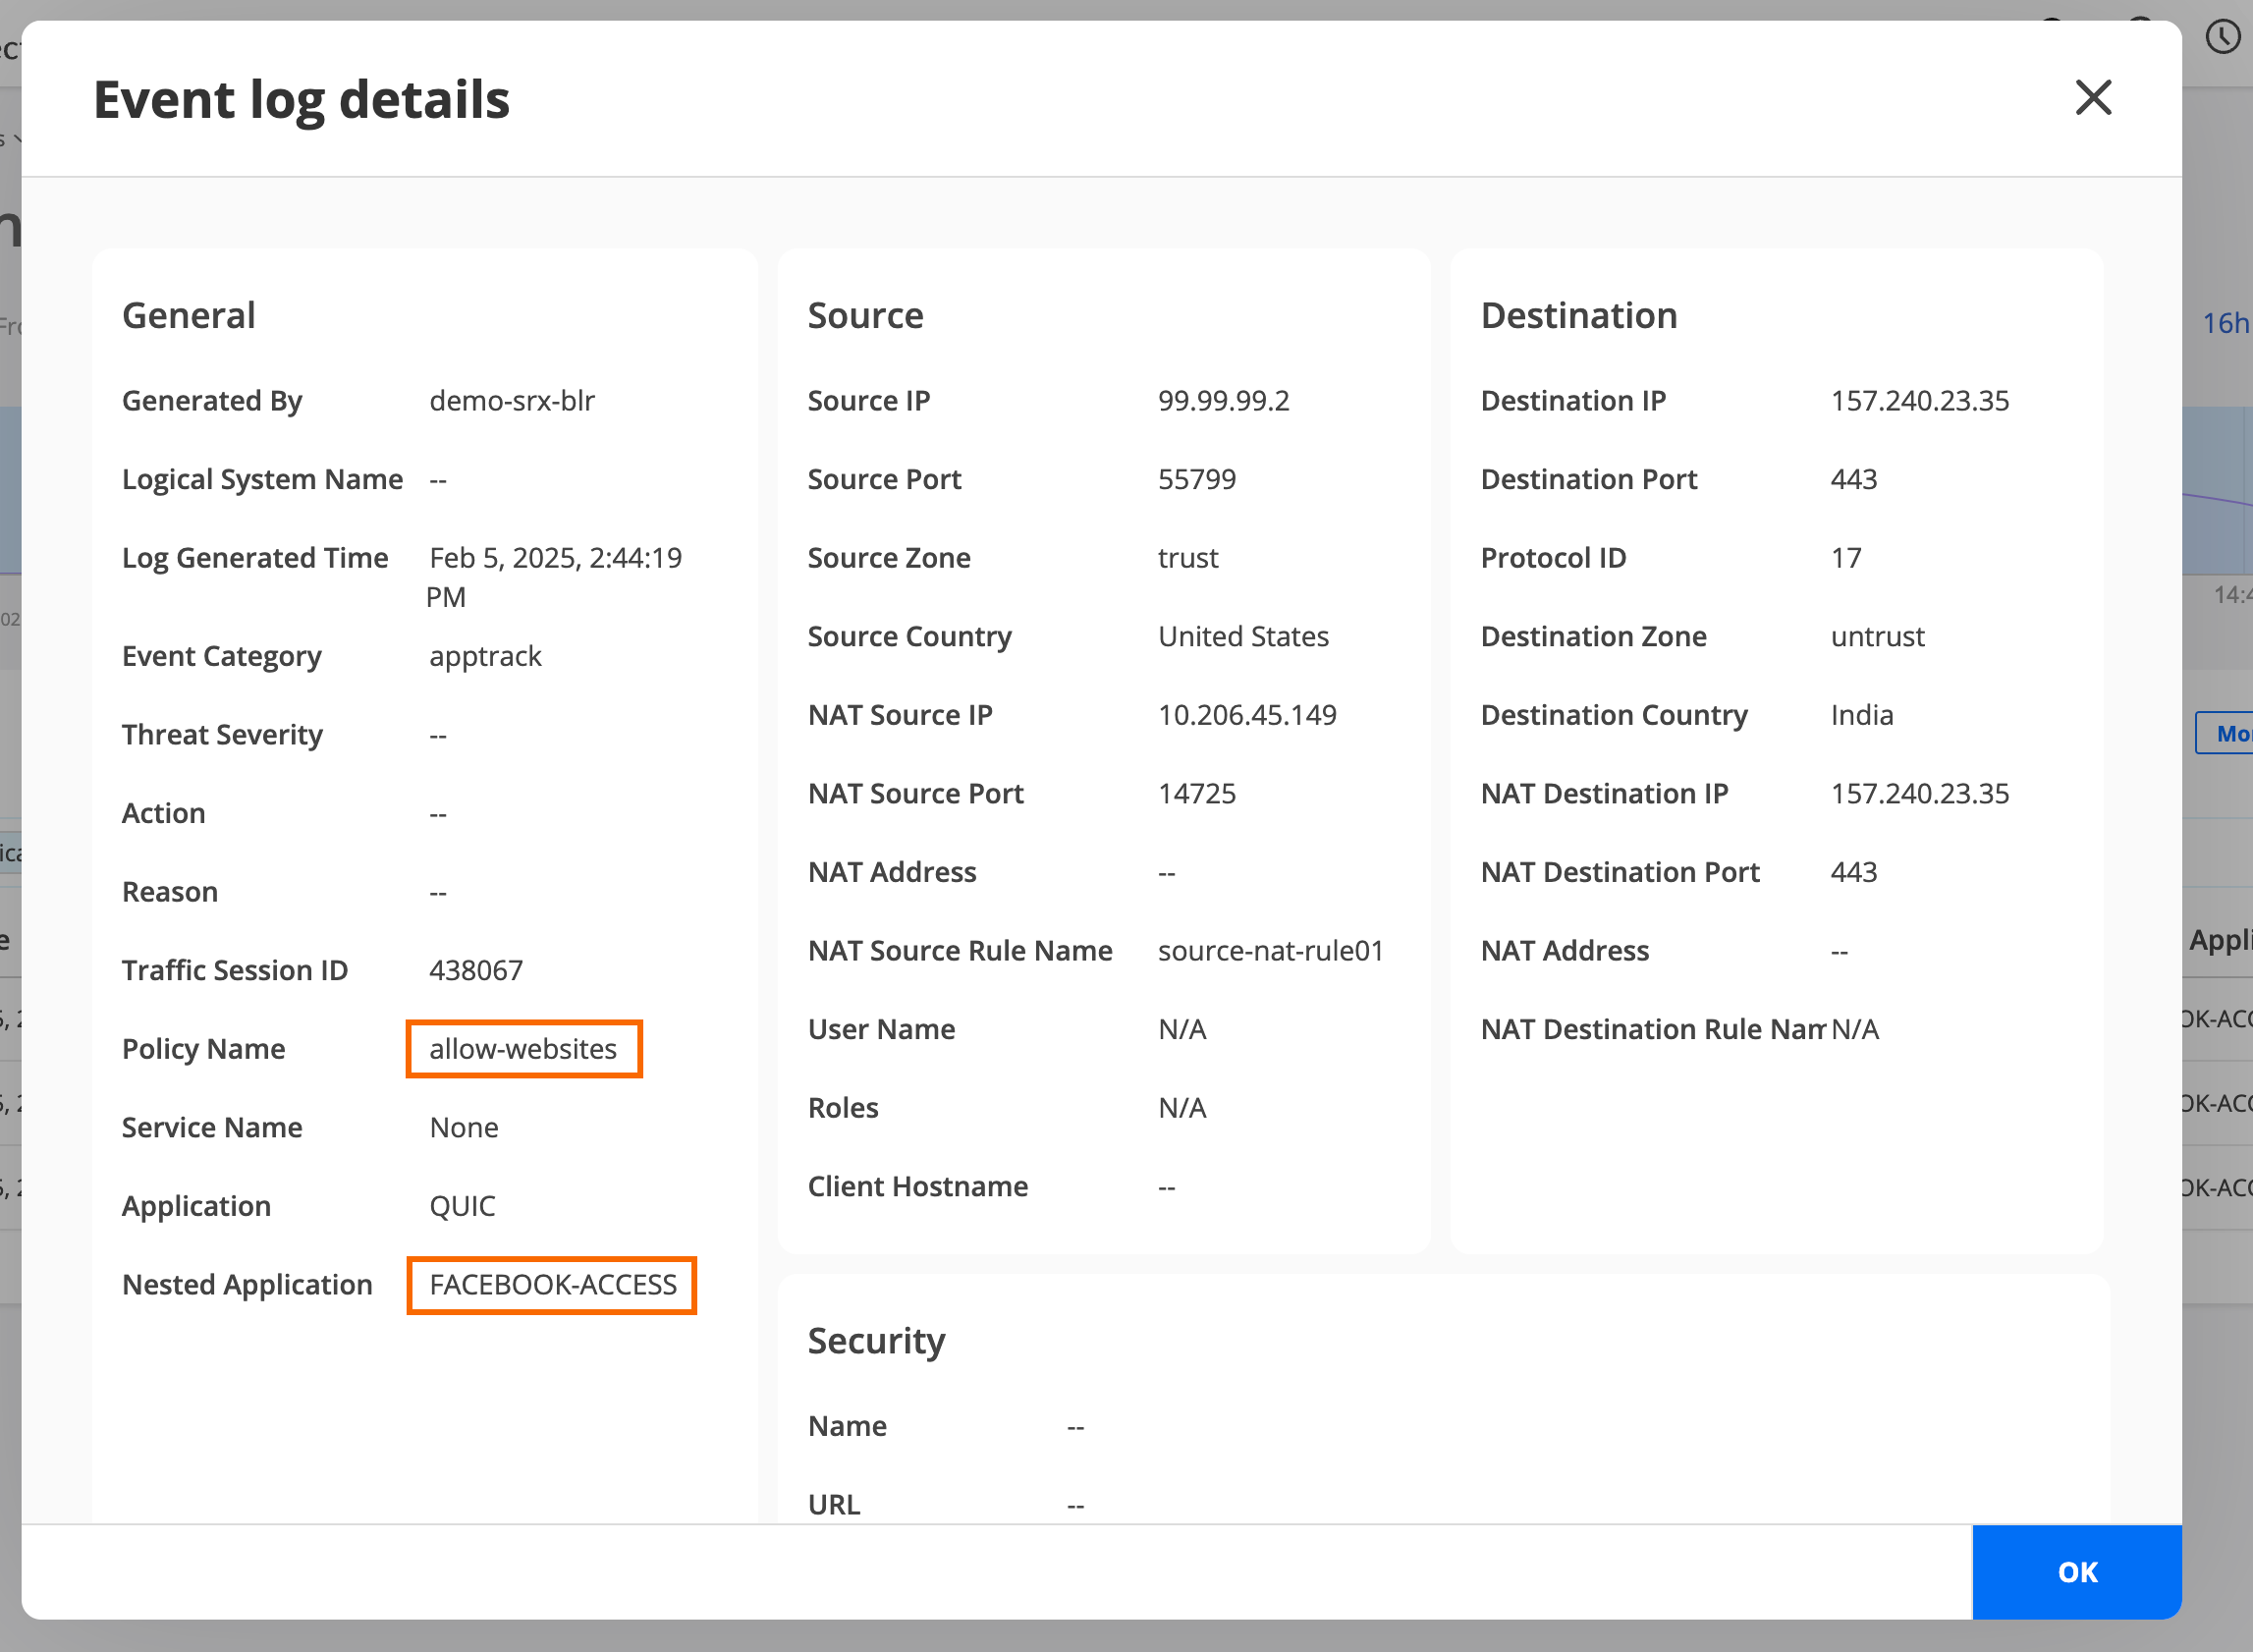
Select an event log generated by the demo-srx-blr security policy and click More > Details to see the event log details. This overlay provides the details of the event allowing a device user’s access to Facebook or YouTube.
-
See the event logs and verify whether access to websites, such
as Facebook and YouTube, is allowed.
Step 2: Add a Security Policy Rule to Restrict Access to Facebook
-
Click the plus icon (). The Add Security
Policy page is displayed.
-
Under Deployment Time options, select Run Now to
deploy the policy immediately and click OK.
A job is created. Click the job ID to go to the Jobs page and see the deployment status.
-
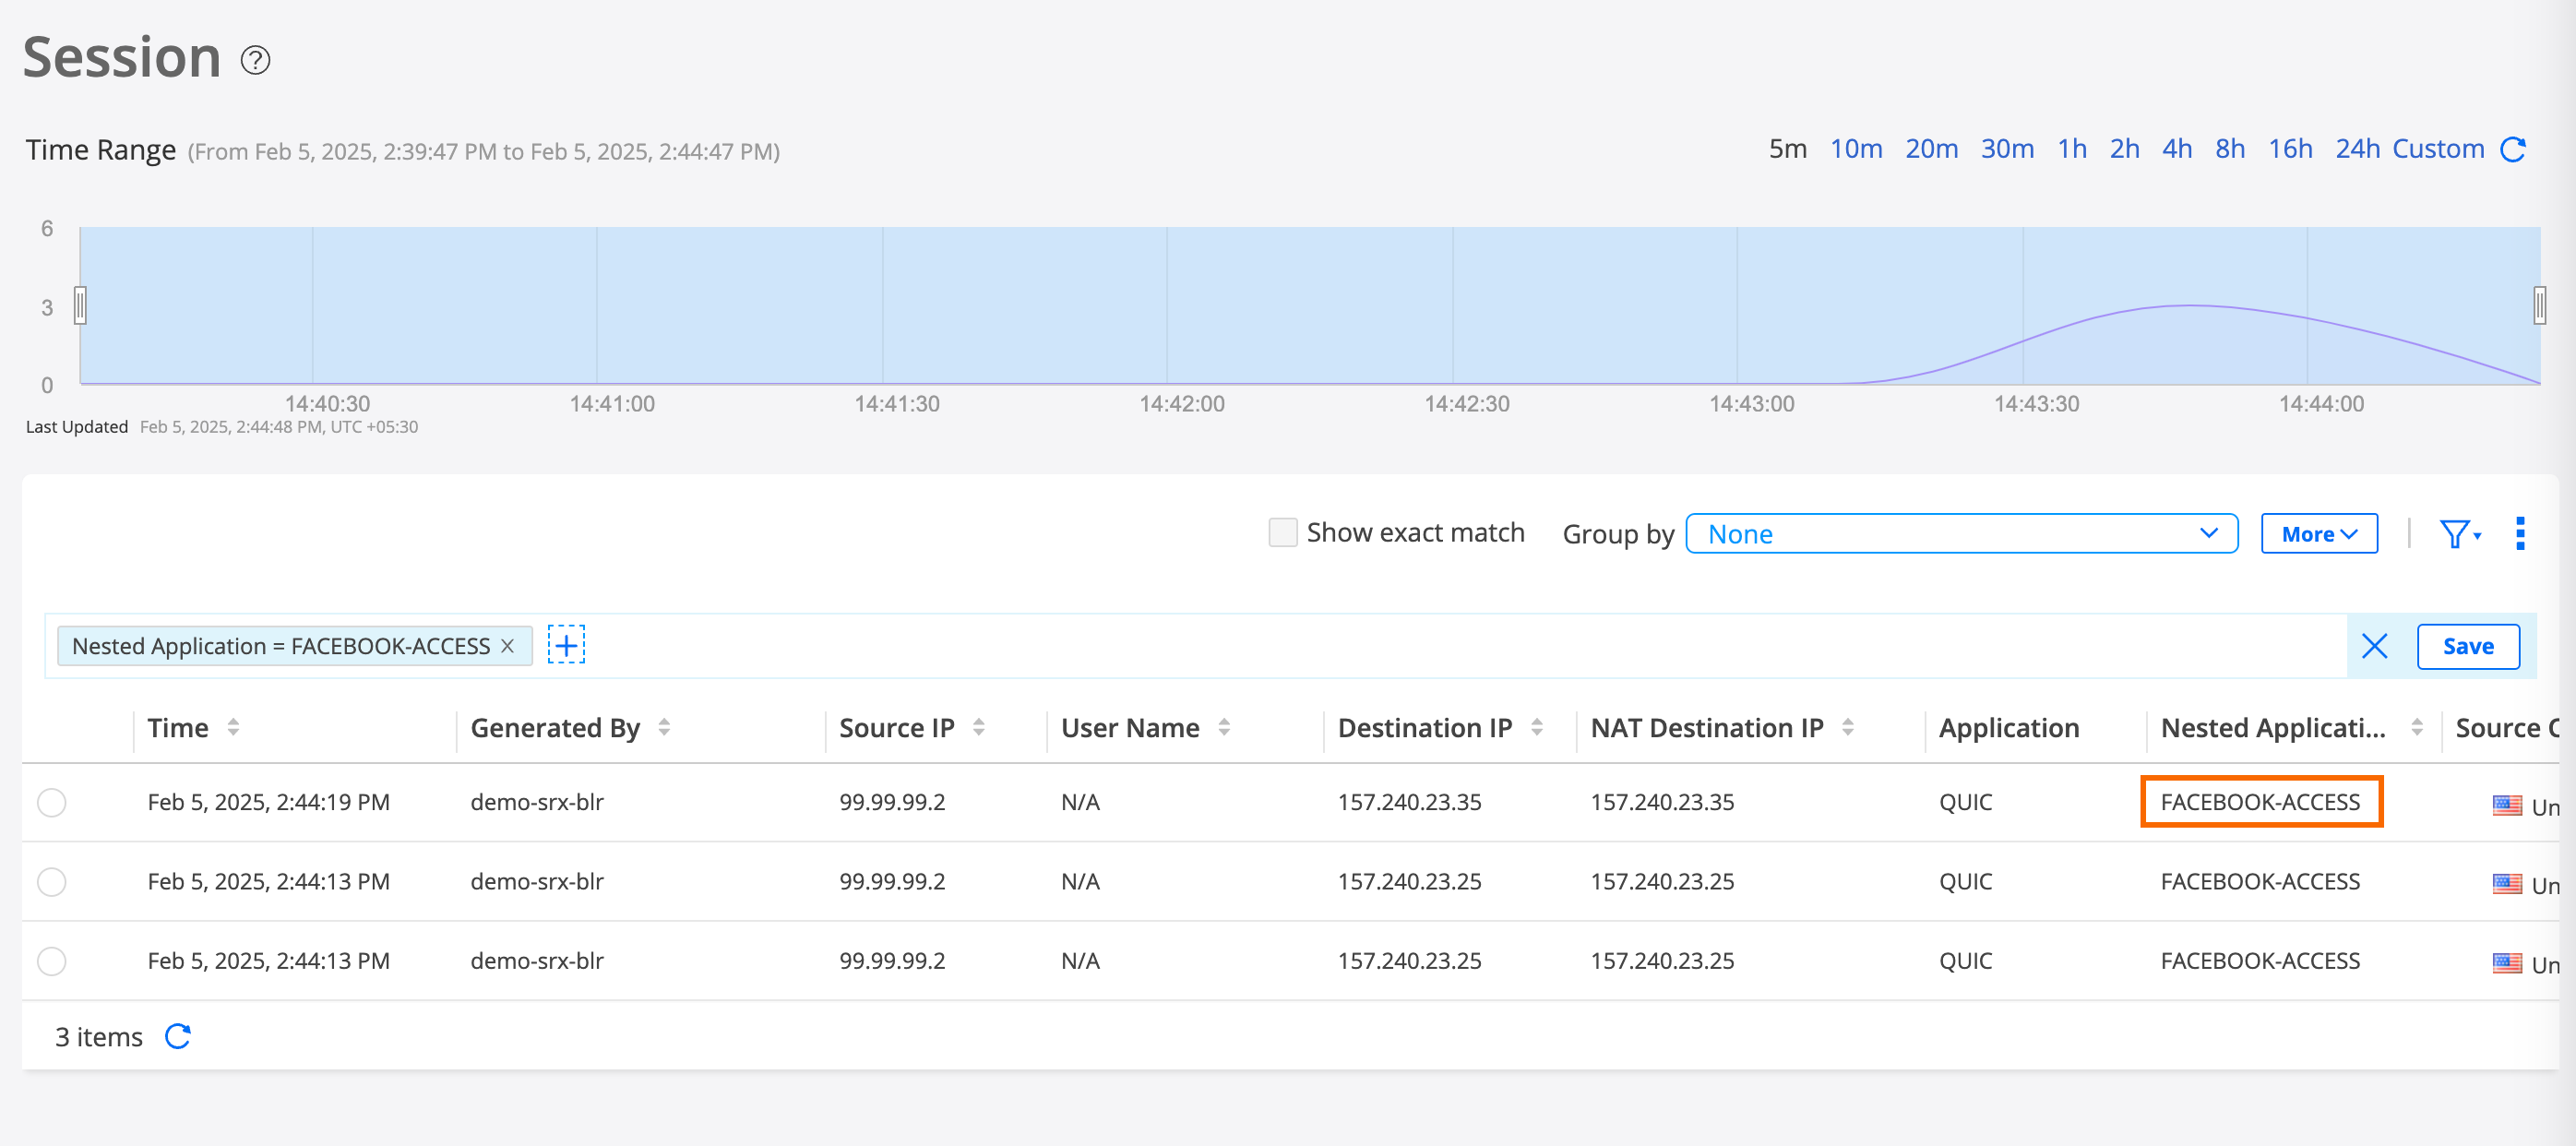
Verify that access to Facebook is blocked .
-
See the event logs and verify whether access to Facebook is
blocked.
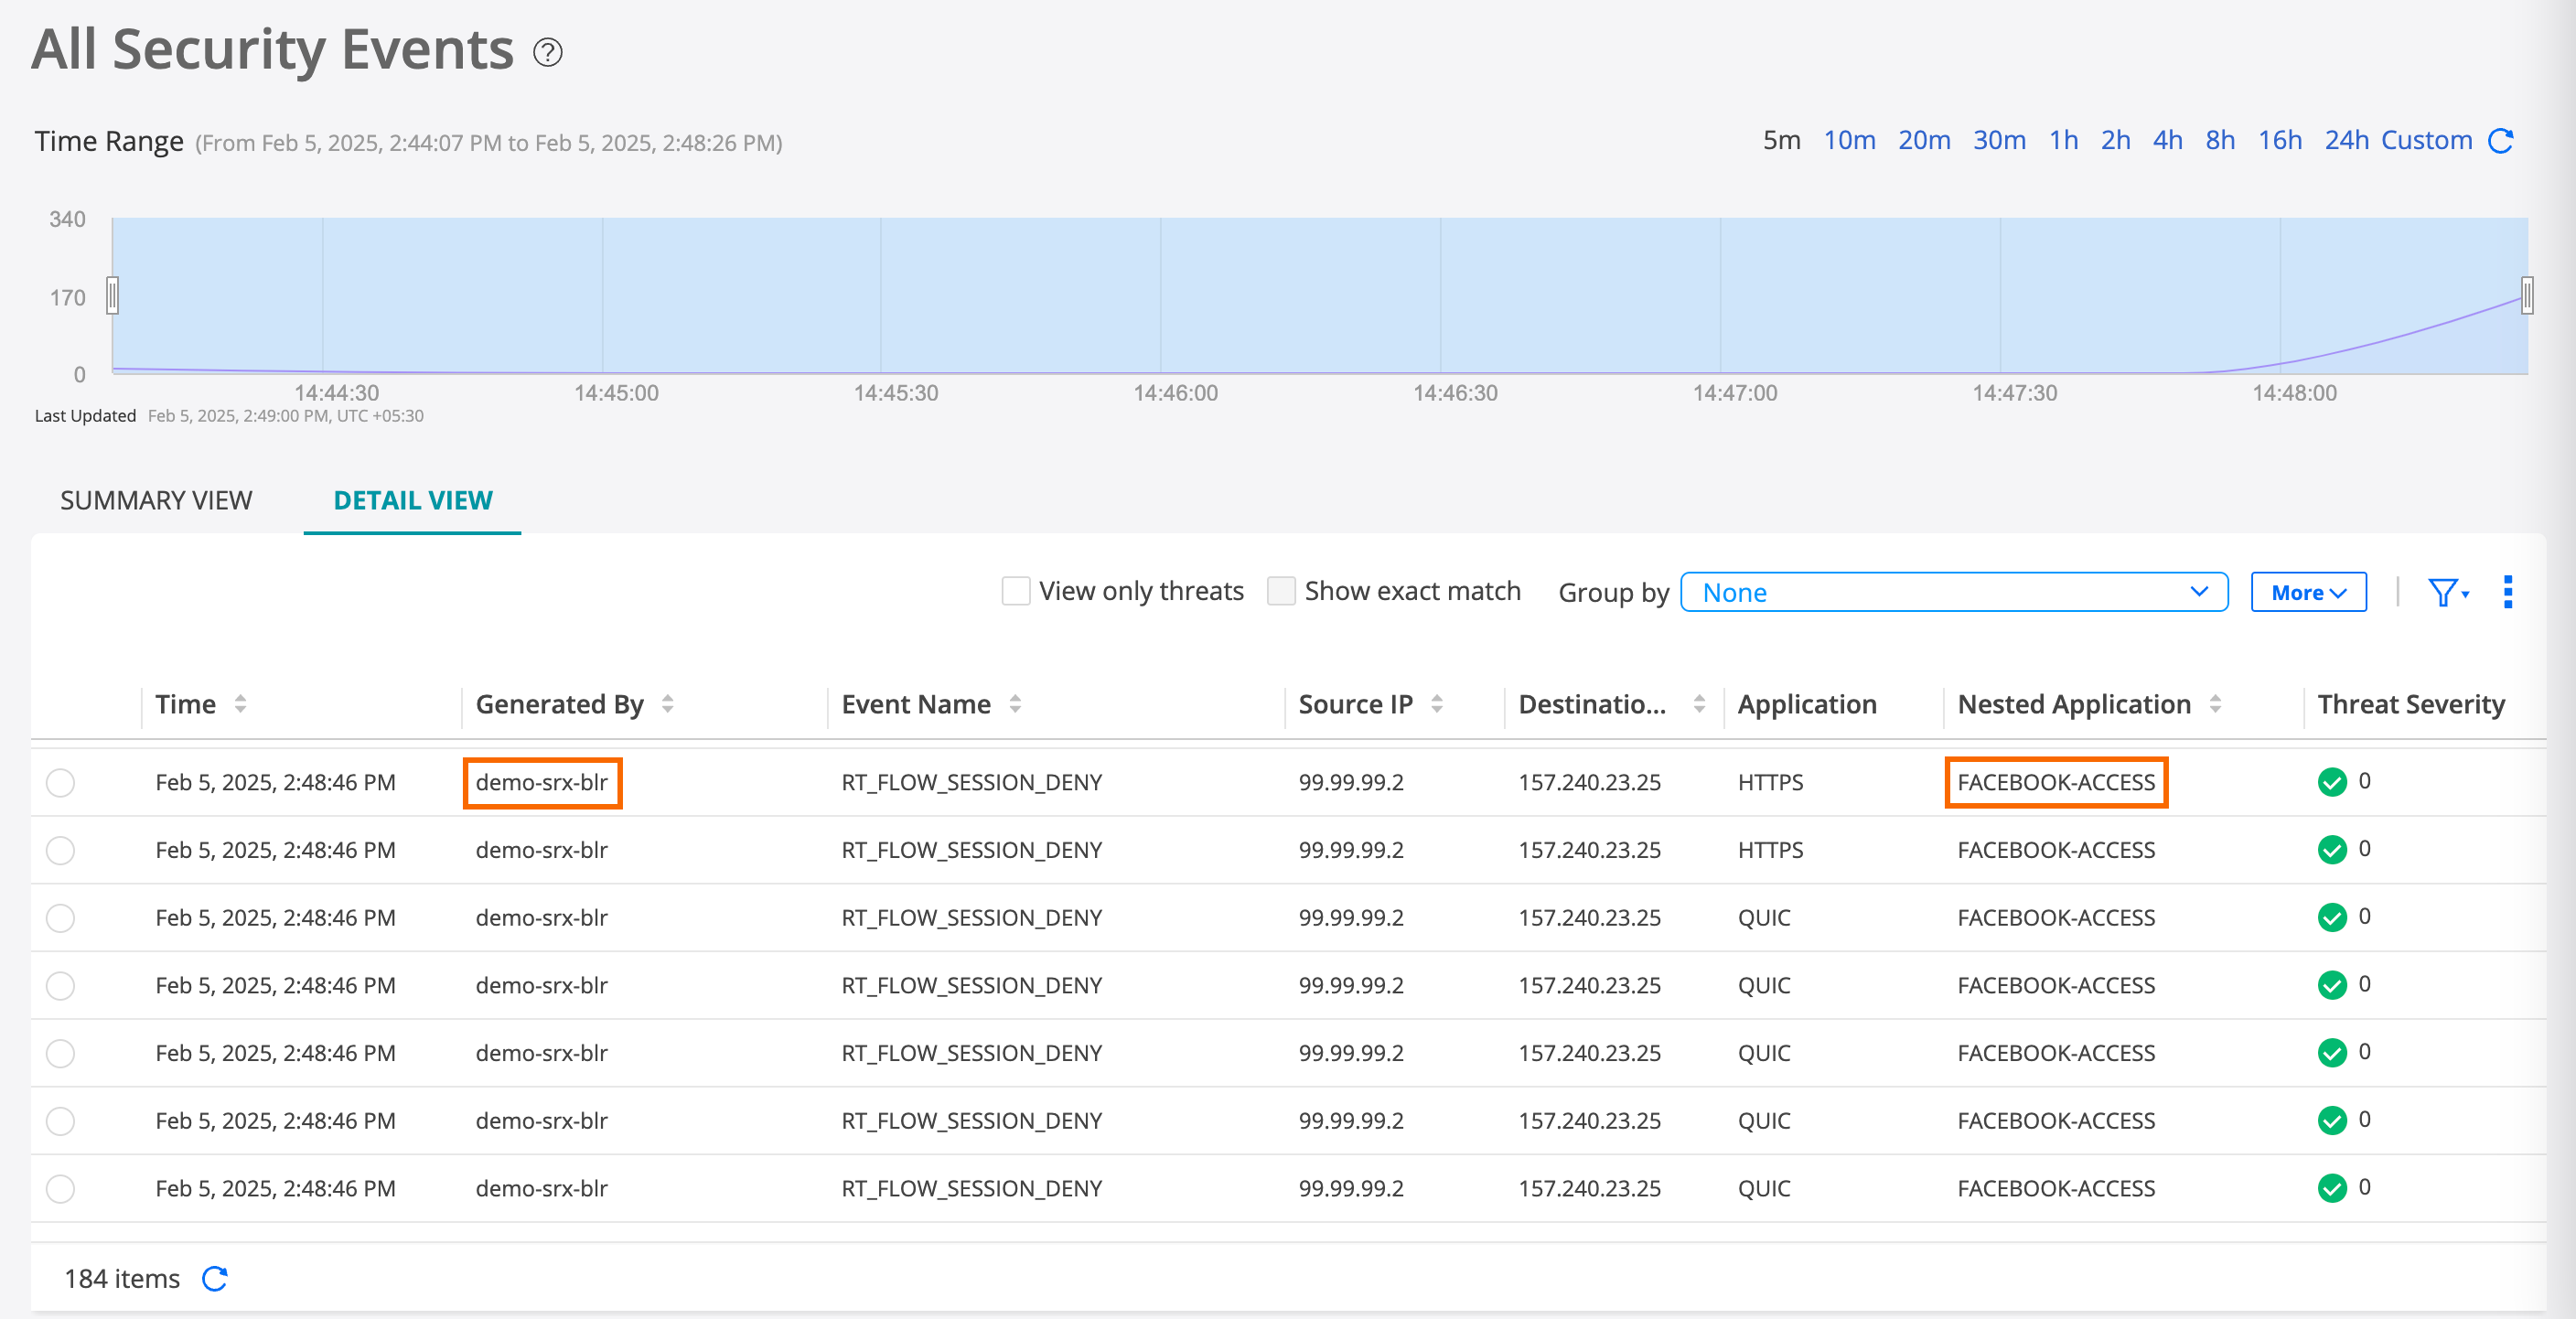
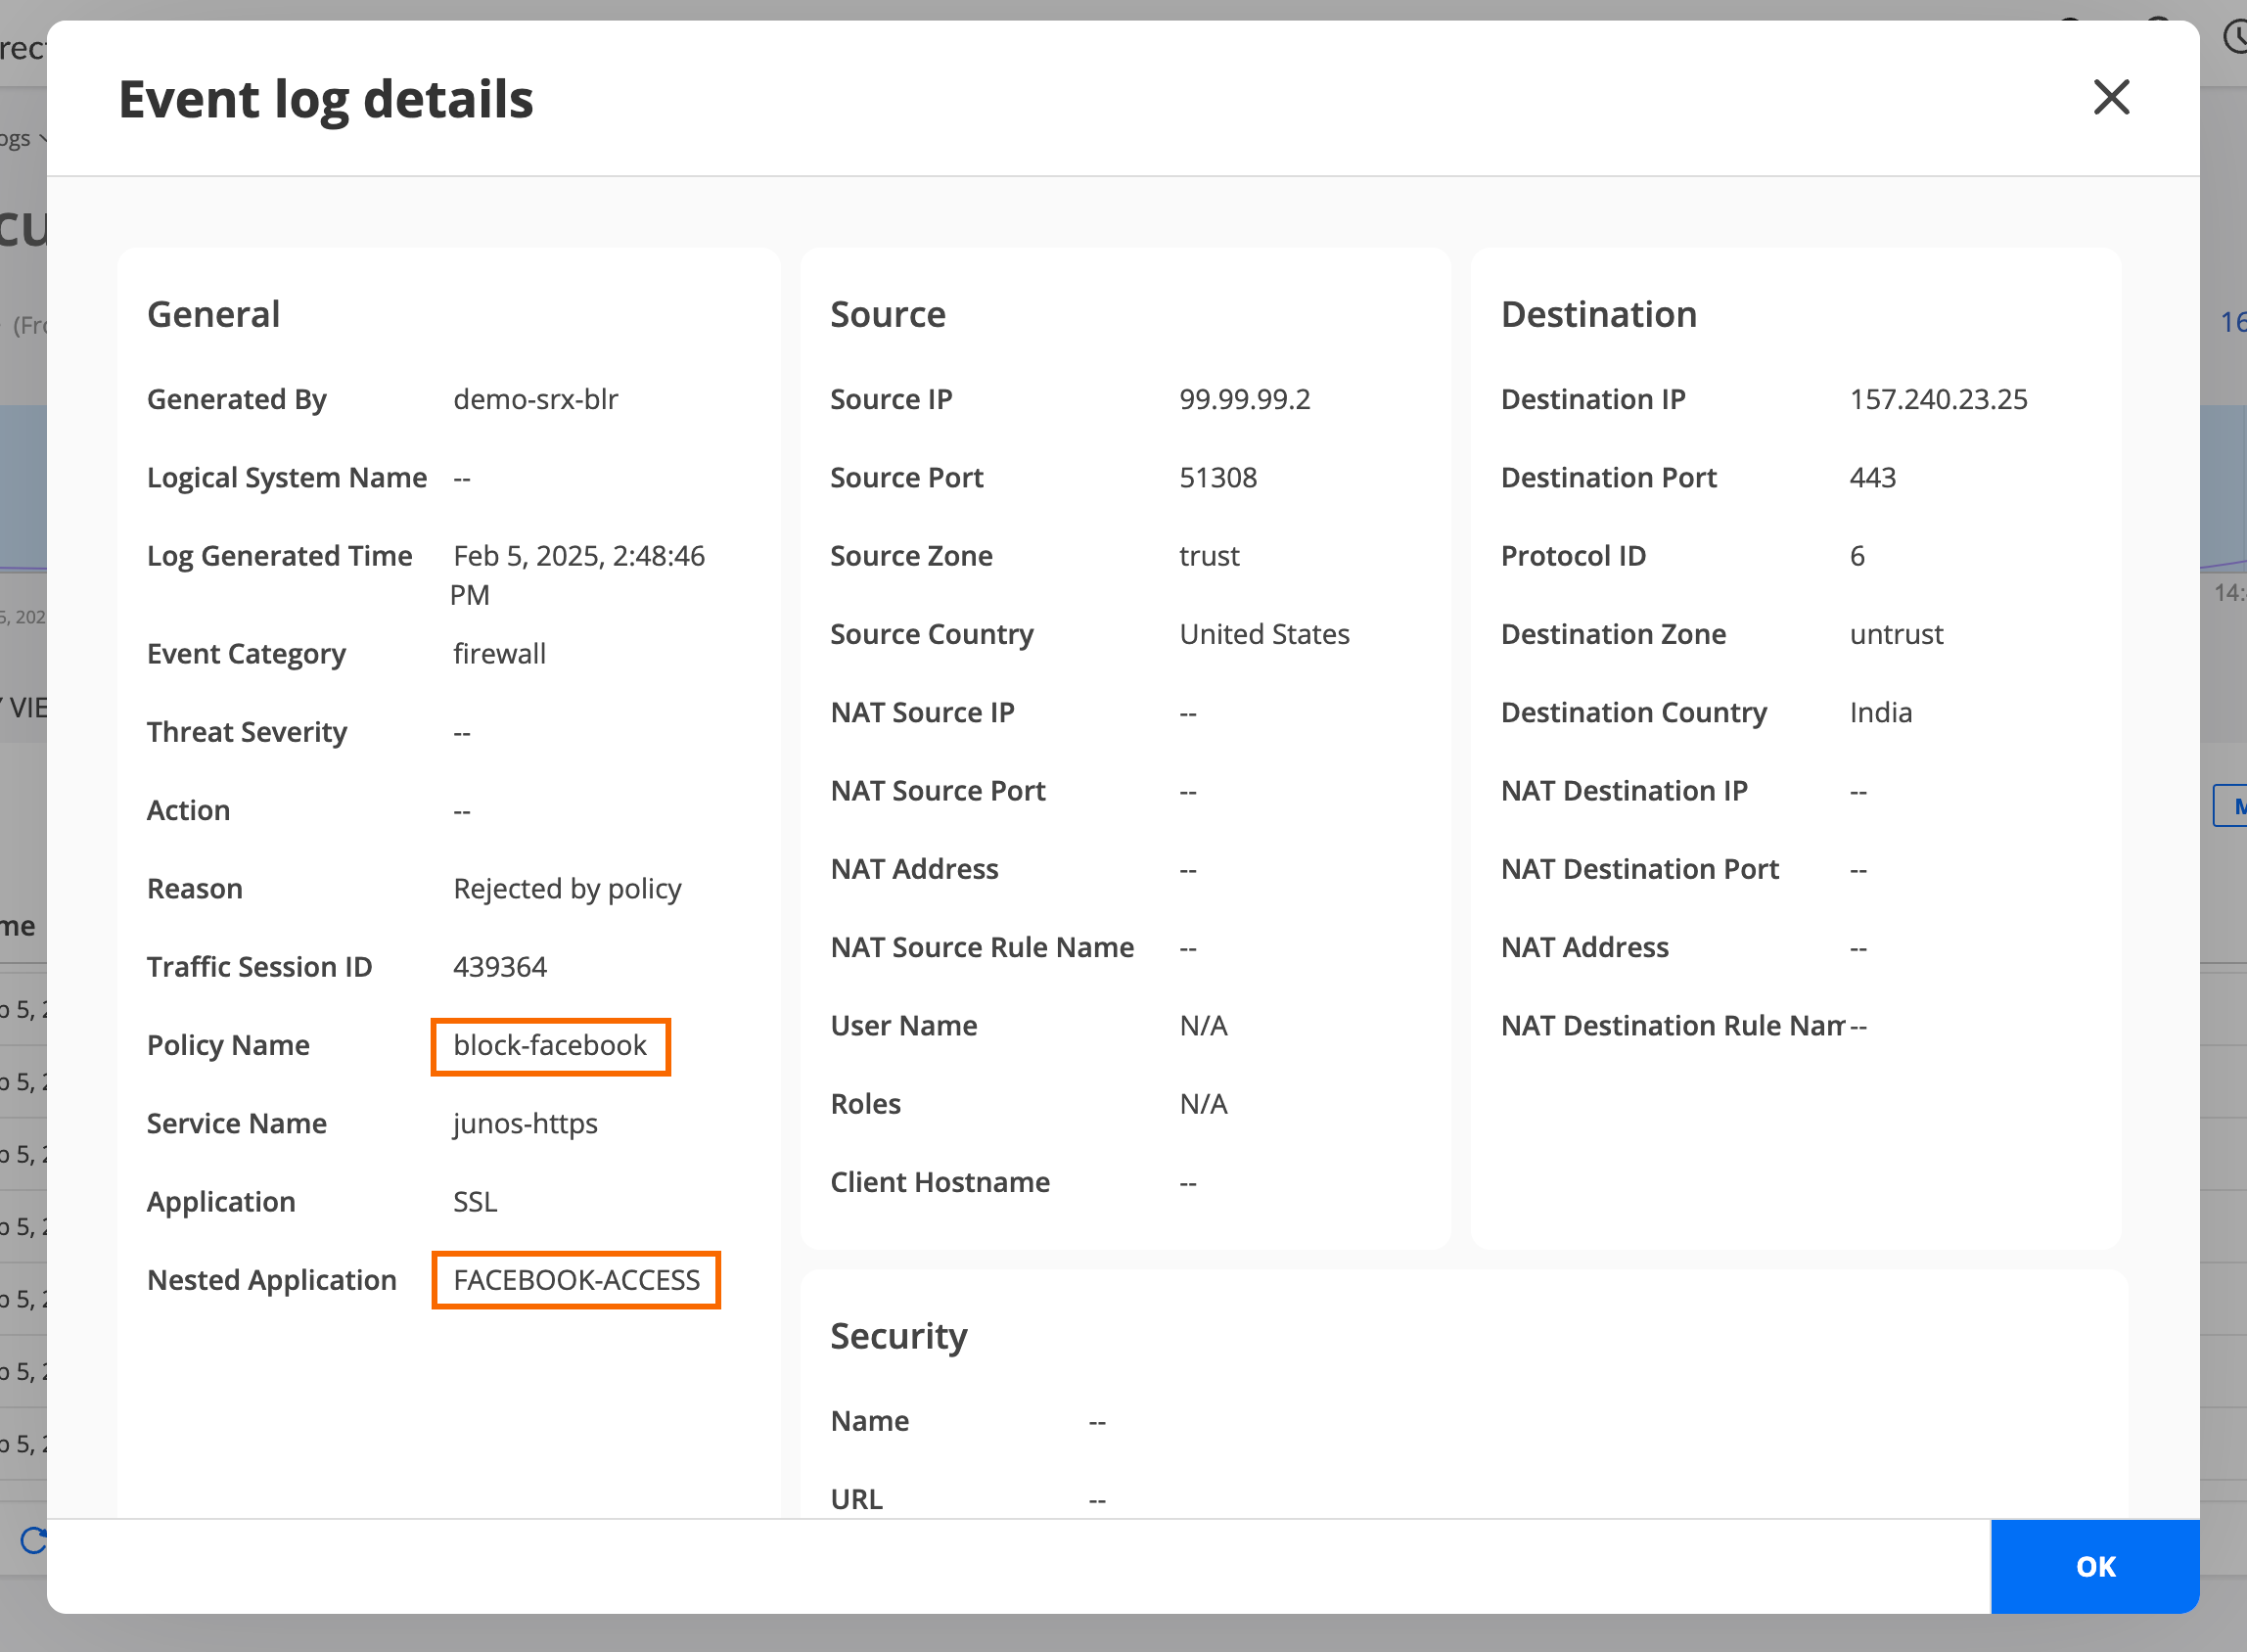
Select an event log generated by the demo-srx-blr security policy, and click More > Details to see the event log details. This overlay displays details of the event blocking a device user’s access to Facebook.
-
See the event logs and verify whether access to Facebook is
blocked.
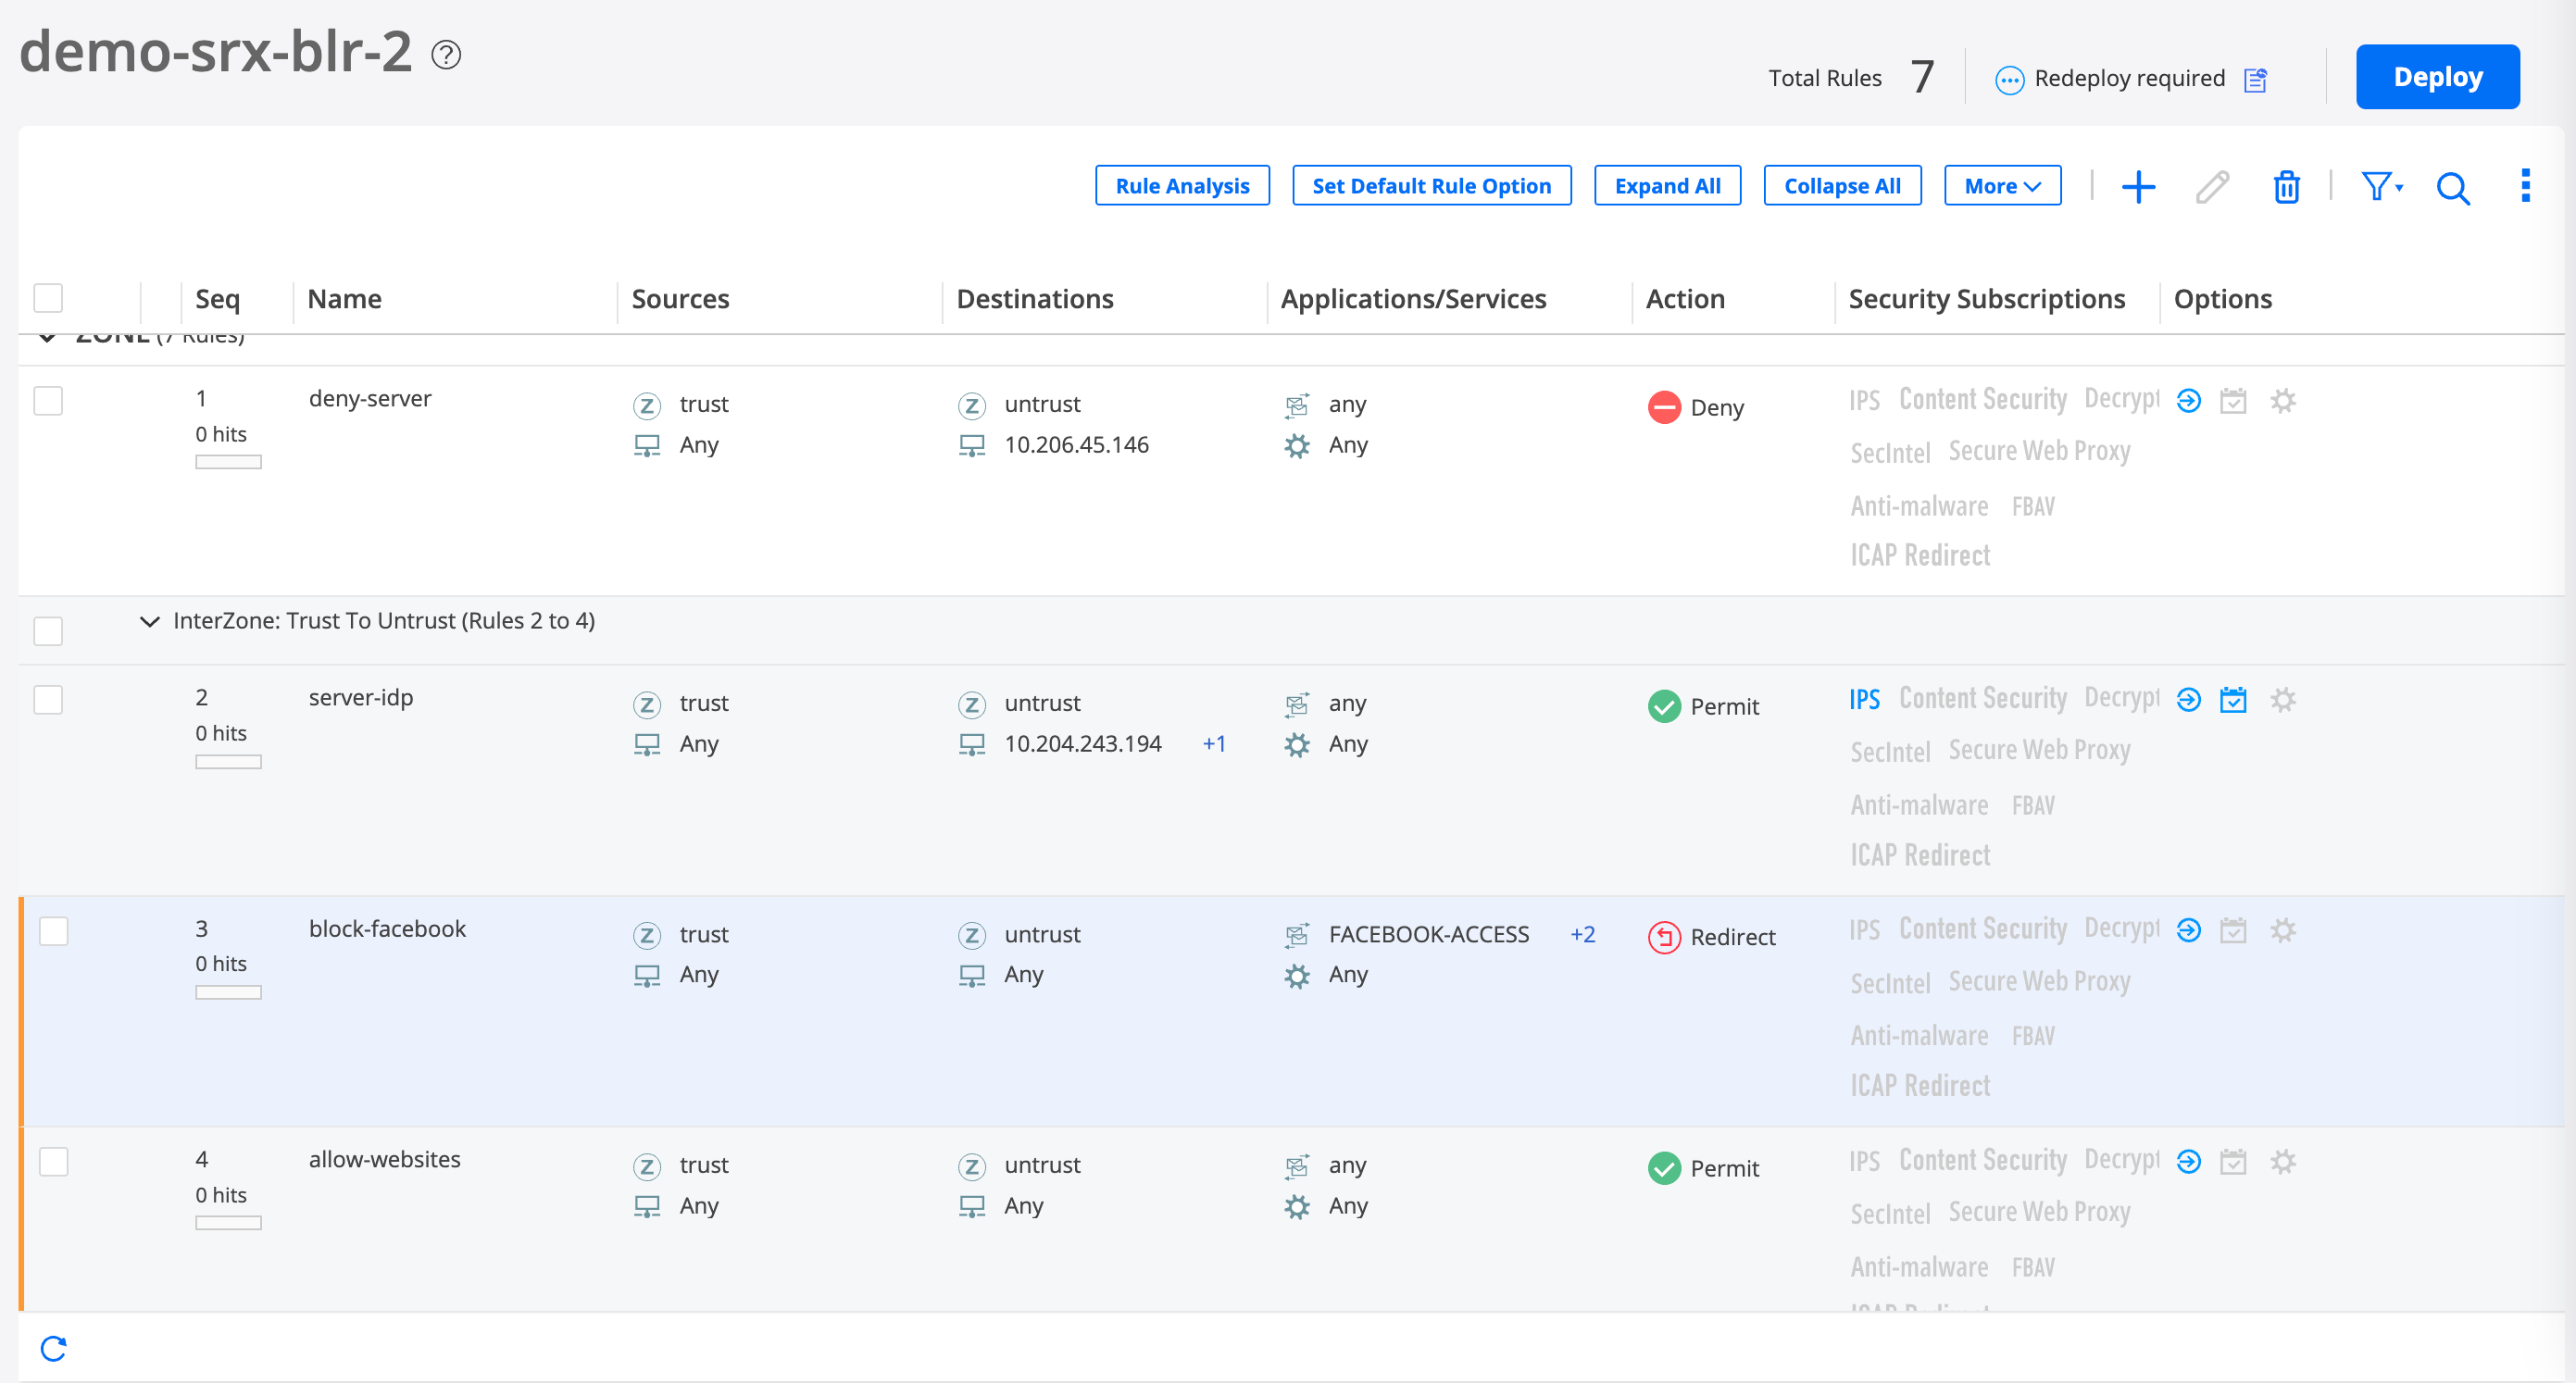
You have now created and deployed a security policy rule that blocks user access to Facebook. When you add the Facebook security policy rule above the allow-all security policy rule sequence, the Facebook security policy rule is implemented first.
Step 3: Update the Security Policy Rule to Restrict Access to YouTube
-
Select the block-facebook security policy rule
and click the edit icon (
 ). The Edit Security Policy page is
displayed.
). The Edit Security Policy page is
displayed.
-
Under Deployment Time options, select Run Now to
deploy the policy immediately and click OK.
A job is created. Click the job ID to go to the Jobs page and see the deployment status.
-
Verify that user access to YouTube is blocked.
-
See the event logs and verify whether access to YouTube is
blocked.
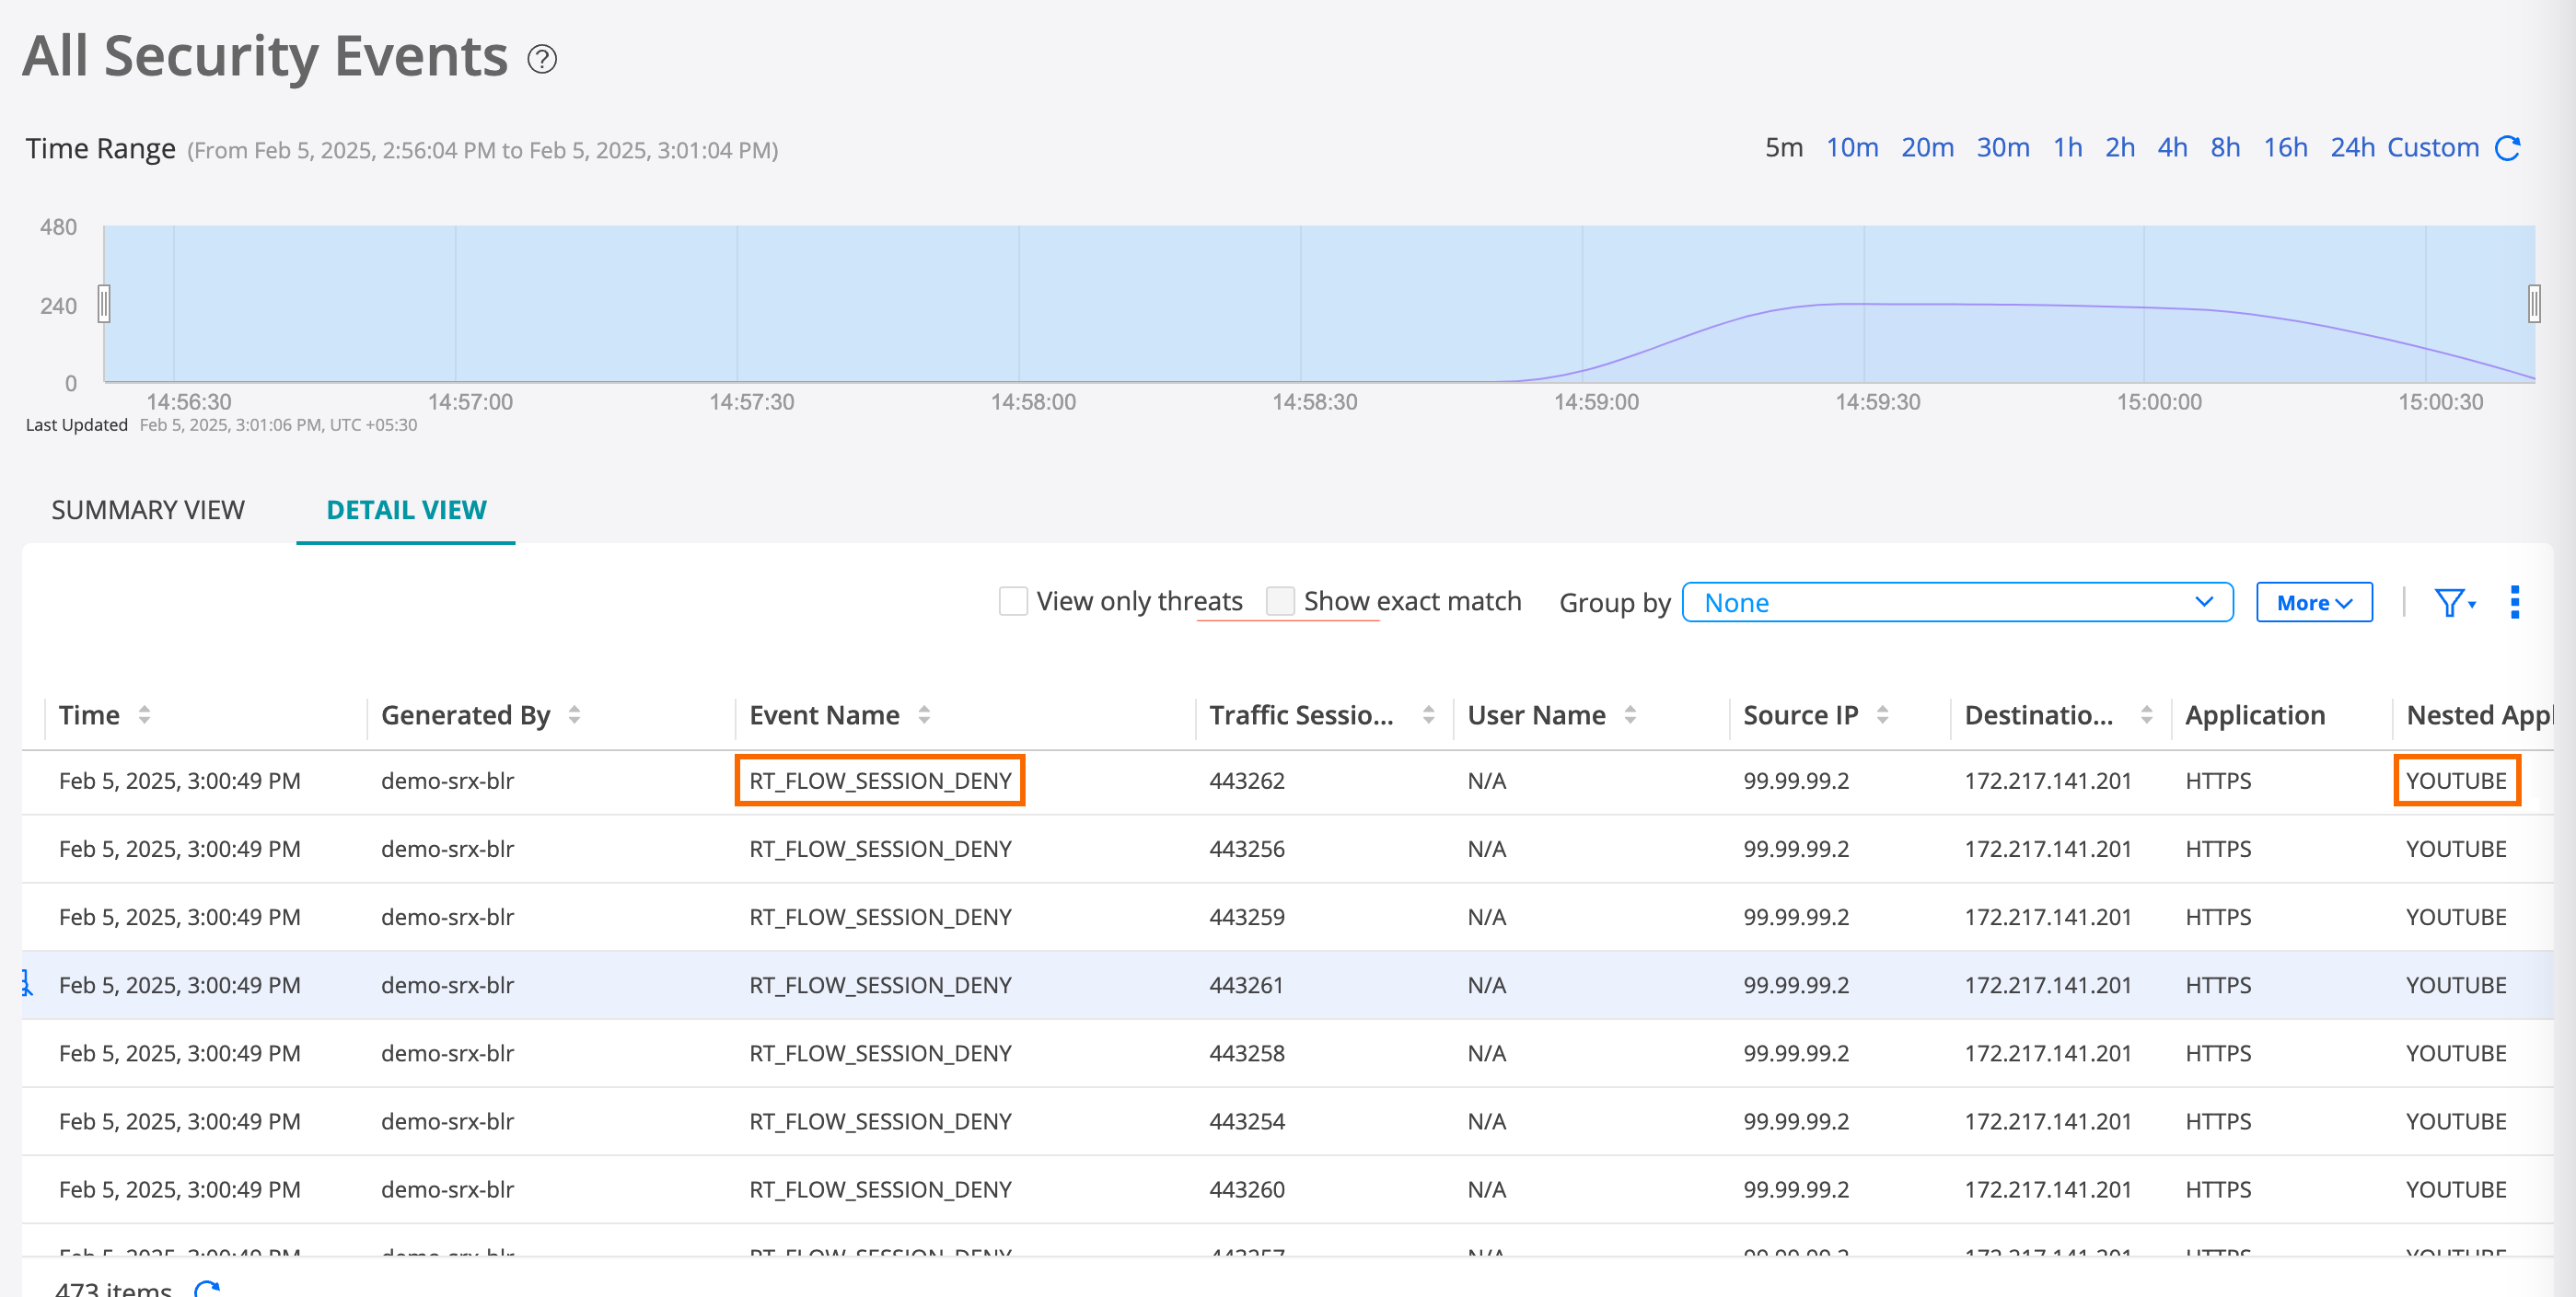
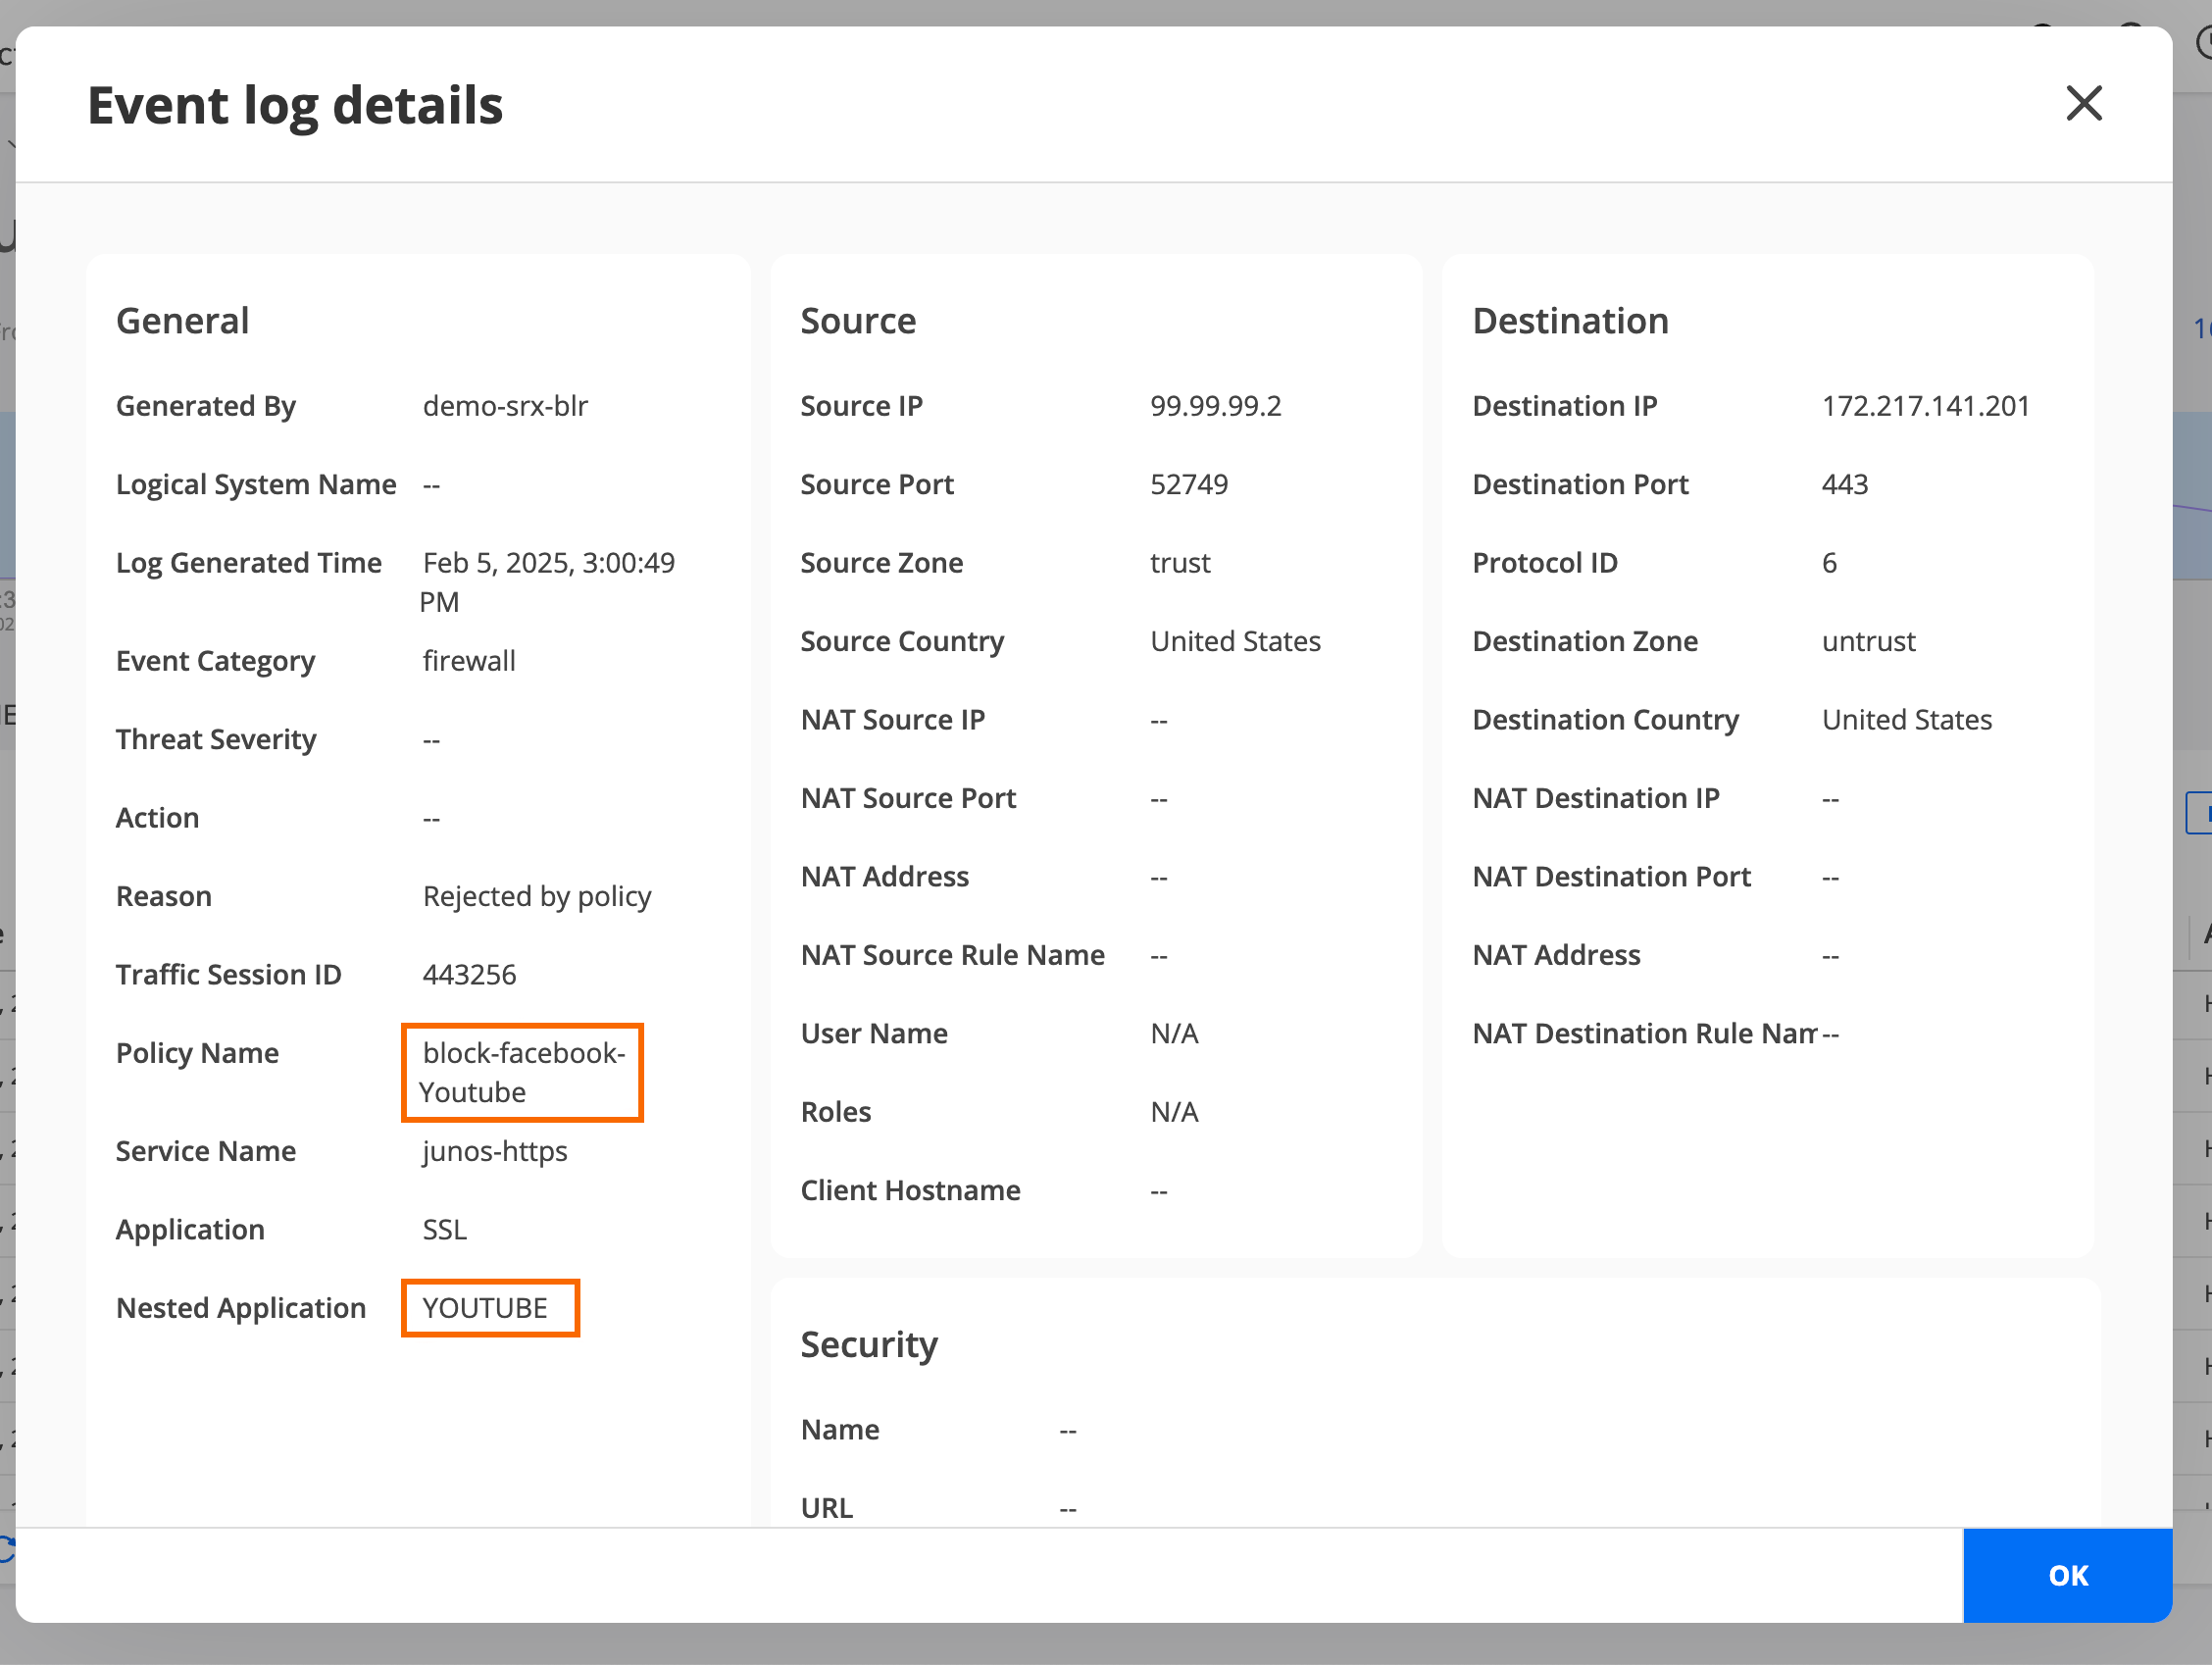
Select an event log generated by the demo-srx-blr security policy, and click More > Details to see the event log details. This overlay displays the event blocking the device user’s access to YouTube.
-
See the event logs and verify whether access to YouTube is
blocked.
You have now updated the Facebook security policy to block user access to YouTube.
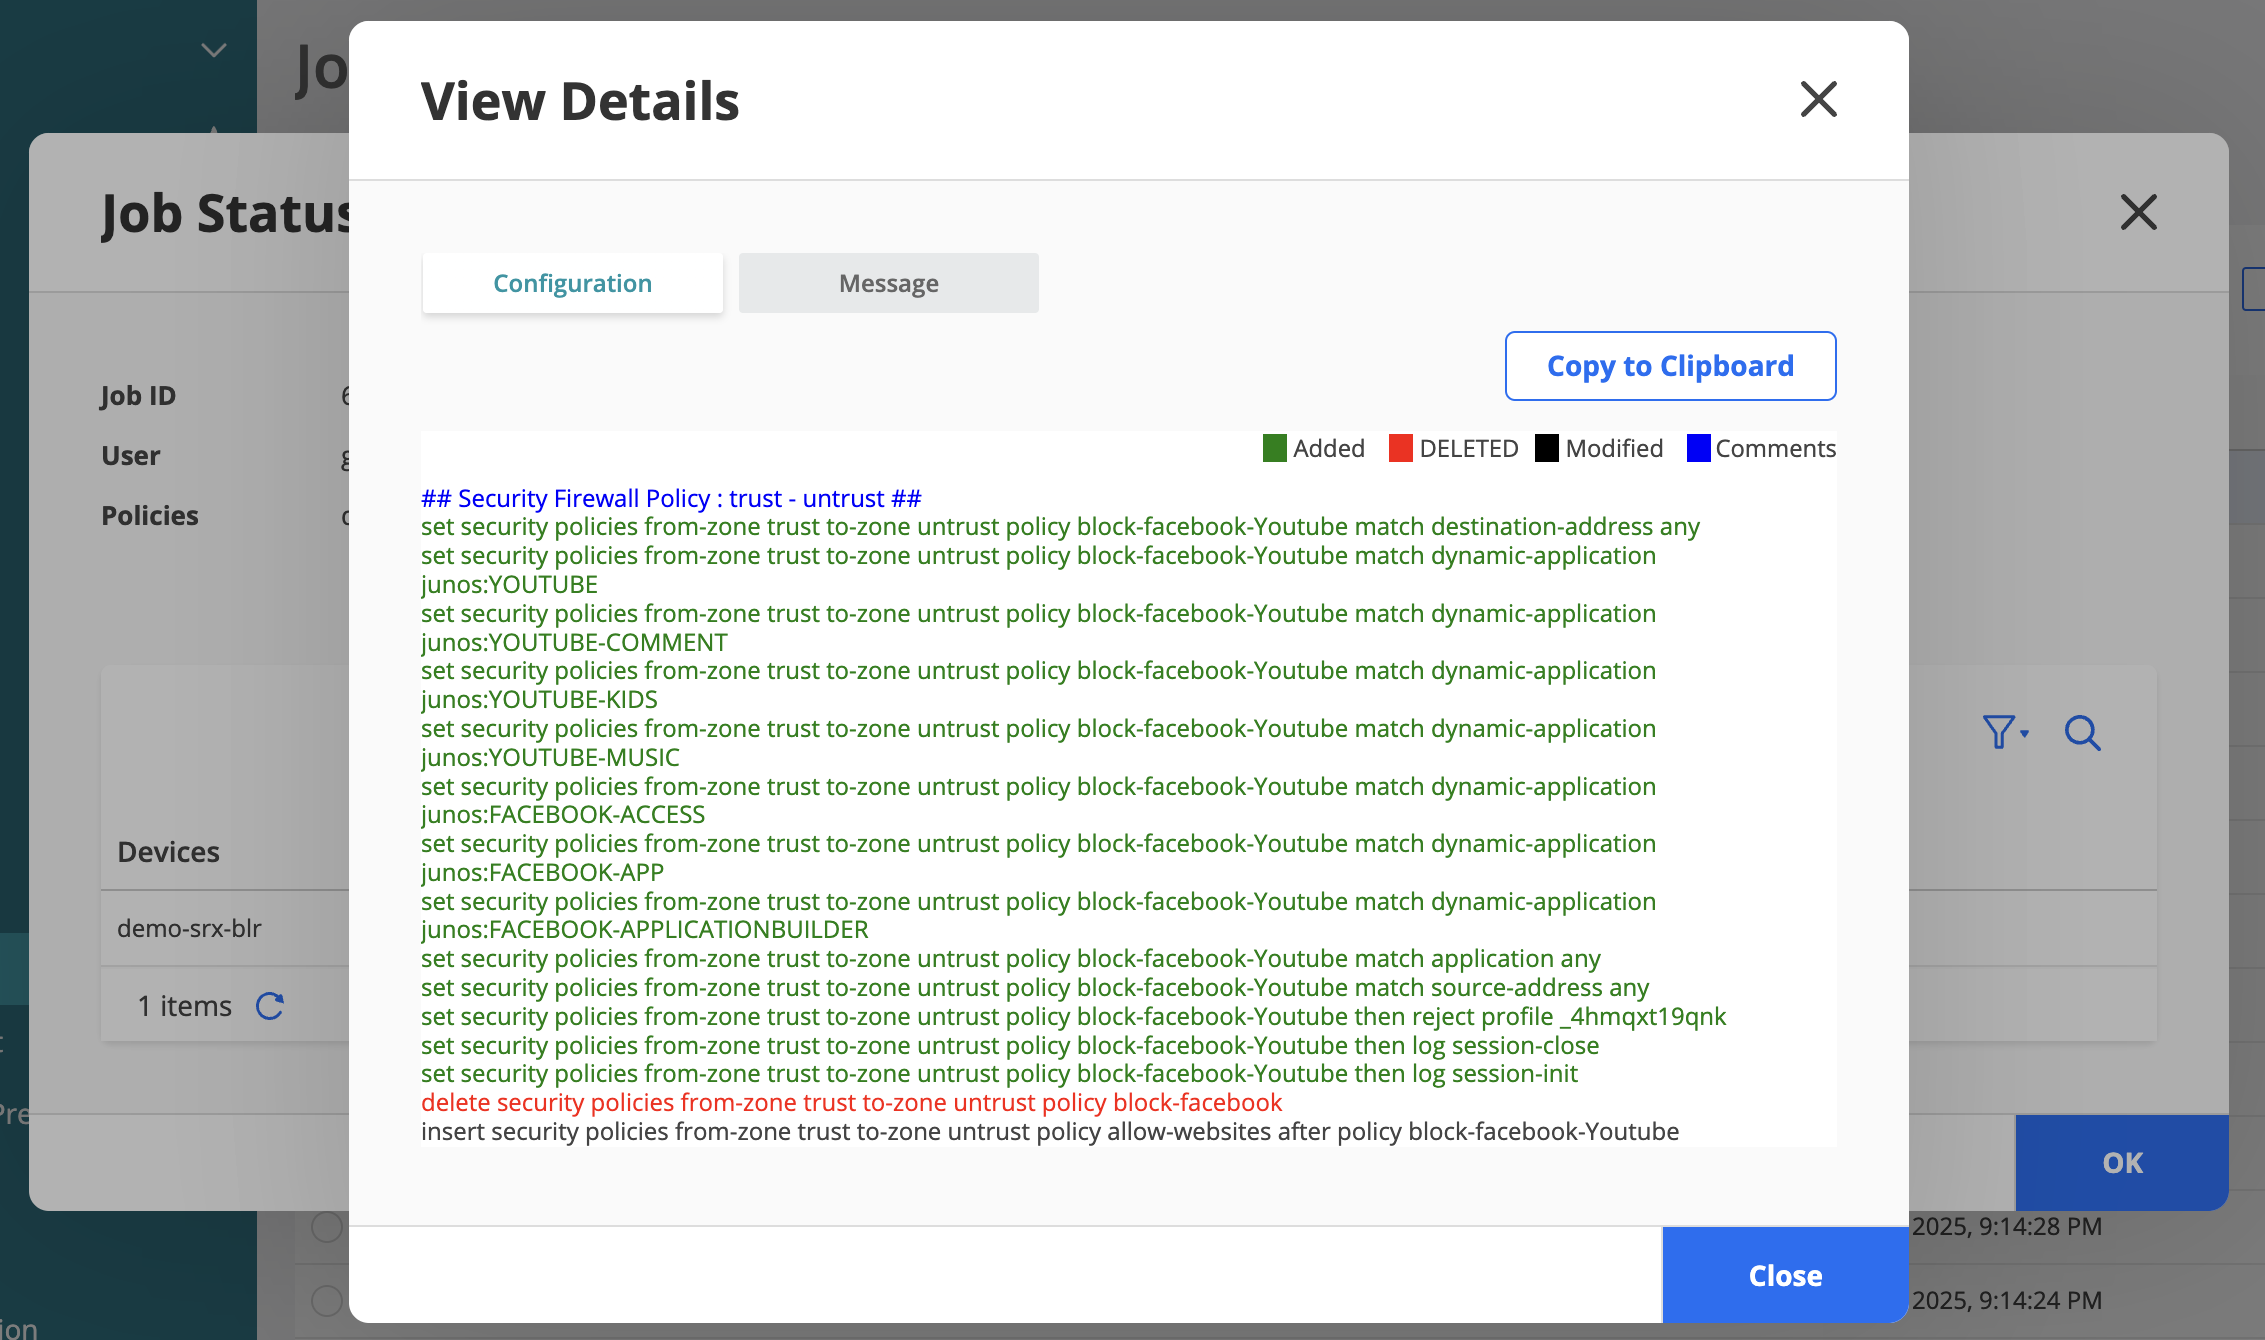
Step 4: Verify Access is Blocked to Facebook and YouTube
-
Click View Details to see the CLI configuration
that blocks Facebook and YouTube.
Step 5: Configure Packet Capture for Unknown Application Traffic
You can use the packet capture of unknown applications feature to gather more details about an unknown application on your security device. Unknown application traffic is the traffic that does not match an application signature.
Use this feature to capture and analyse data packets of applications whose signatures cannot be identified and are marked as unknown applications in your enterprise network.
-
Use the packet capture of an unknown application to define a new custom application signature. You can use this custom application signature in a security policy to manage the application traffic more efficiently.
-
Send the .pcap file to Juniper Networks for analysis in cases where the traffic is incorrectly classified, or to submit a request to create an application signature.
Troubleshooting
Issues with detection of applications or applications blocked by the SRX Series Firewall
The applications might not be detected or blocked by the SRX Series Firewall because of various reasons.
To ensure that the device successfully detects applications and does not block required applications, check whether the following requirements are met and perform the suggested steps:
-
The correct application signature package is installed on the device.
-
A dynamic application is configured in the security policy rule.
-
No conflicting unified and standard security policies.
-
Verify the security flow session by using the command
show security flow session -
Check whether the device is dropping packets by using the command
show security packet-drop records. -
Capture packets with specific source and destination points for better troubleshooting.
-
Check whether the security policy is being implemented by using the command
show security policies hit-count. -
Check whether pre-ID default policy logging has been enabled.
-
Generate logs that track specific events for troubleshooting by using the following commands:
set system syslog file securitylogs any any
set system syslog file securitylogs match "(RT_FLOW)|(WEBFILTER_)|(SSL_PROXY_)"