Enable WPA2/WPA3 Enterprise (802.1X) Security on a WLAN
Enable WPA2/WPA3 Enterprise on your WLAN for advanced authentication using a RADIUS server.
These topics guide you through the basic steps of enabling 802.1x security and adding your RADIUS server, with additional information about various options.
Set the WLAN Security Type and Add Your RADIUS Server
Wi-Fi 7 (802.11be), as well as use of the 6 GHz radio spectrum, require either WPA3 or Enhanced Open (based on OWE) security types. For Wi-Fi 7, you must also enable the Wi-Fi 7 Security option. Although supported, WPA2 and Open security types are not available by default. To use them, you need to deselect both Wi-Fi 6 and Wi-Fi 7 under Wi-Fi Protocols, and deselect 6 GHz under Radio Band on the WLAN template or configuration page,
Juniper Mist Wi-Fi 7 and Wi-Fi 6E APs running firmware version 0.15.34098 or later support Wi-Fi 7 security.
To set the WLAN security type and add your RADIUS server:
-
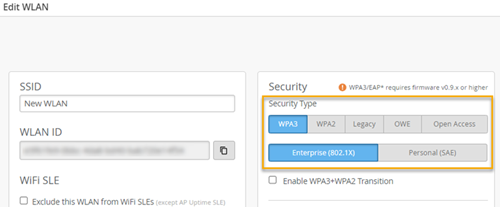
In the Security section of the Edit WLAN
window:
- Click WPA3 or WPA2.
- Click Enterprise (802.1X).
RADIUS authentication is available only when you've selected WPA2/WPA3 and Enterprise (802.1X) in the Security section.
-
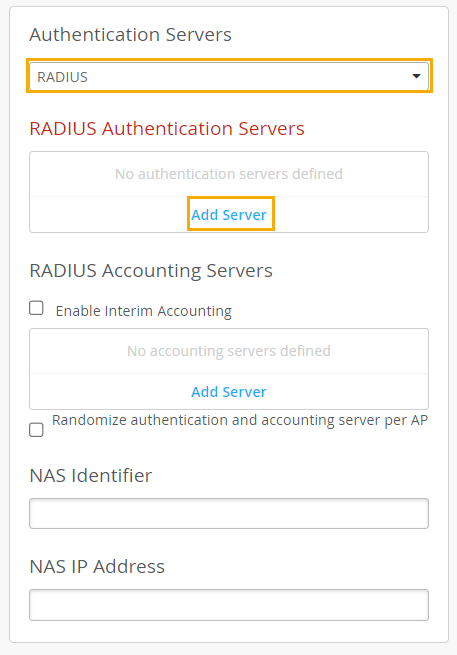
In the Authentication Servers section, add your
server.
-
Click Add Server.
-
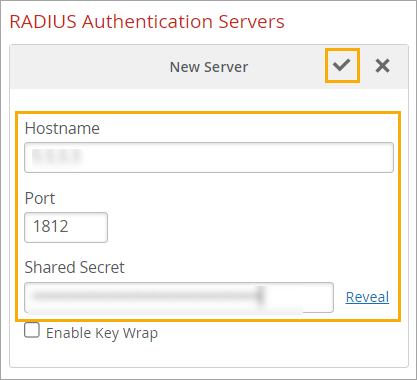
Click the check mark button.
-
Click Add Server.
(Optional) Use Site Variables to Add a Server
By using site variables to identify your RADIUS server, you can easily apply the same WLAN configuration to APs at different sites even though certain attributes are different. In this scenario, imagine that Site A and Site B use different RADIUS servers. You'll use variables to add the RADIUS server in the WLAN configuration. Then you'll define the variables differently in the two site configurations.
To use site variables to add a server:
-
Define the site variables in the site configuration for the first
site:
-
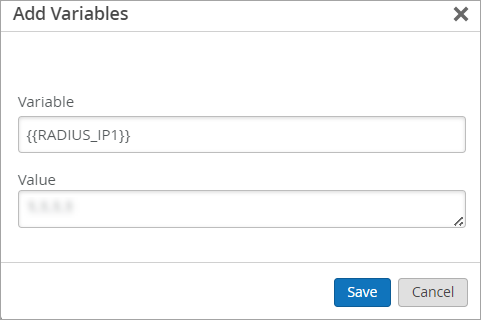
Enter a variable name and value for the IP address of the RADIUS
server, and then click Save.
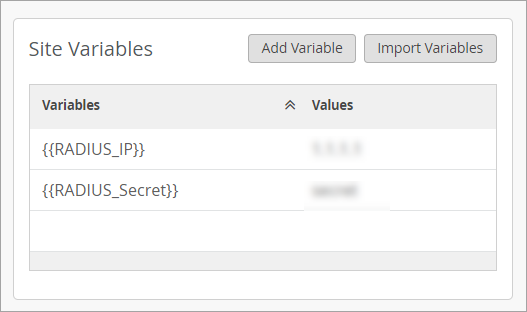
As shown below, enter {{RADIUS_IP}} for Variable. Enter the actual IP address for Value.
-
Add a variable for the Shared Secret, such as {{RADIUS_Secret}},
and enter the actual Shared Secret for this server as the
Value.
After you add the two variables, they appear in the Site Variables section of the Site Configuration page.
-
Enter a variable name and value for the IP address of the RADIUS
server, and then click Save.
-
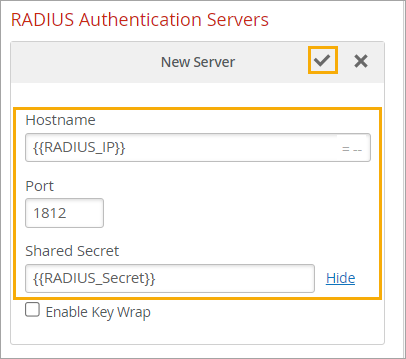
Set the WLAN Security Type and Add Your RADIUS Server, and enter variables for the
server details.
For example, use variables when adding a RADIUS server or a CoA/DM server.
In this example, the Hostname is {{RADIUS_IP}} and Shared Secret is {{RADIUS_Secret}}.
(Optional) Add a NAS Identifier and NAS IP Address
When you're enabling 802.1X security on a WLAN, you can add a NAS Identifier or NAS IP Address to customize the information that is passed to your RADIUS server.
For example, you could enter the site ID (in a site-level WLAN) or a site name variable (in a WLAN template) as the NAS Identifier. With this approach, you can associate all activity with a site to facilitate your auditing/accounting processes or to create different RADIUS rules for different sites. Another example is to enter the word Mist as the NAS Identifier. This way, you can create a different RADIUS rule or guest portal experience for traffic coming from Mist.
If you leave the NAS Identifier field blank, the WLAN ID is used as the NAS ID.
You can enter plain text and variables. The following variables are valid in this field:
-
Device Name—{{DEVICE_NAME}}
-
Model—{{DEVICE_MODEL}}
-
MAC Address—{{DEVICE_MAC}}
-
Site Name—{{SITE_NAME}}
This example shows how you can use both text and variables in the ID.
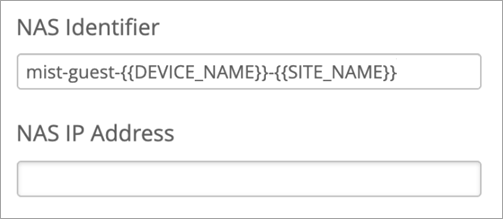
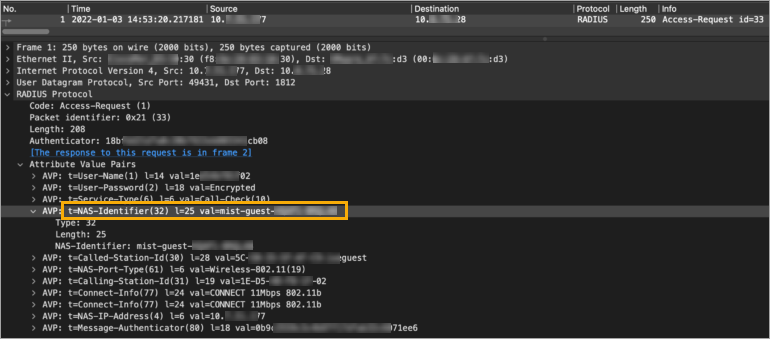
As shown below, when an AP on this WLAN sends an Access-Request, the variables are transformed to identify the AP.
Alternatively, specify a NAS IP Address. Normally, Mist passes through the actual IP address of the AP. But you might want to specify an IP address to be used for all activity, so that you can reference it in your RADIUS policies.
You can add the NAS Identifier or NAS IP Address in the Edit/Create WLAN window.
(Optional) Add a CoA/DM Server
When you're enabling 802.1X security on a WLAN, you also can add a CoA/DM server.
Change of Authorization (CoA) allows you to modify authorized RADIUS sessions after initial authentication to meet changing access requirements. For example, enable use cases such as administrator-initiated session resets.
For more information, see Change of Authorization (CoA).
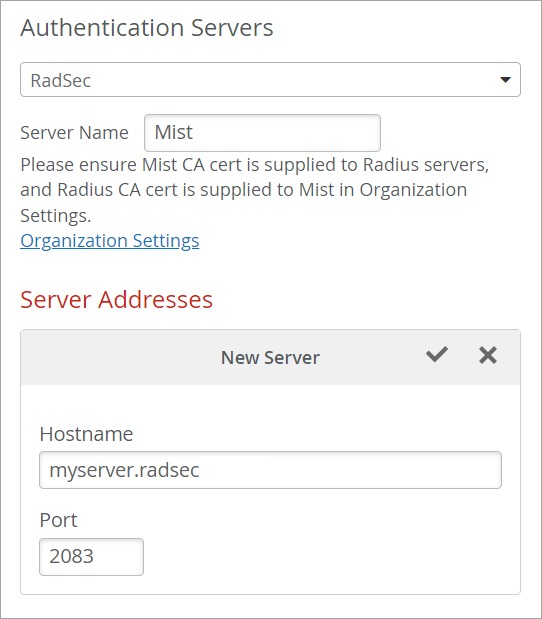
(Optional) Enable RadSec
-
After you Set the WLAN Security Type and Add Your RADIUS Server, add your RadSec
server:
-
Click Add Server, and enter the
Hostname.
-
Click Add Server, and enter the
Hostname.
-
Get your Mist certificate from your organization settings:
- Select Organization > Settings from the left menu of the Juniper Mist portal.
- Under Mist Certificate, click View Certificate. Copy the certificate. You'll need it for the next step.
-
Go to your RadSec server and complete these tasks:
- Load the copied Mist certificate.
- Copy your RadSec certificate from your RadSec server. You'll need it for the next step.
-
Return to the Organization Settings page in Juniper Mist portal and add
your RadSec certificate:
- Under RadSec Certificates, click Add a RadSec certificate.
- Paste the contents of the certificate from your RadSec server.
- Click Add.
- (Optional) If you want to use your own AP RadSec certificates (rather than the unique certificate that Mist generates for each AP), click Add AP RadSec certificate, and then enter the private key and the signed certificate for the CA certificate.
- Click Save at the top-right corner of the Organization Settings page.